Like anyone with an iPad and bills to pay, I've considered trying to land a passive income stream by setting up a dropshipping store to sell simple designs, stickers, and low-content books. I've even gone so far as setting up storefronts on a few different platforms to test out the different features and interfaces.
It's thanks to eCommerce websites like Shopify that people like me can adopt this dabbler's attitude toward the idea of starting a small business. With almost no overhead, the financial barrier to entry on eCommerce selling is low. And thanks to the simplicity of these platforms, the learning curve isn't too steep, either.
If you're setting up a digital storefront and are ready to get things up and running, here's how to sell on Shopify:
1. Create your product listings
A store without products isn't a store at all, which is why the first step Shopify will prompt you to take after opening your account is to add your first products. You can add your products directly to your Shopify store, or you can browse the Shopify App Store to find the service you use to create or host your product listings and integrate it directly into your shop.
For example, I create my designs on Printify, so I can connect my two accounts and migrate my product images and descriptions instead of adding them manually.

Sellers can also add products to their Shopify store manually by navigating to the Products tab and opening a new product listing.
Whether you start by migrating products from other sites or you start from scratch, you'll need to add the following information to each listing.
Add basic details for each product
You can be as thorough or as sparse as you like with your product information, but at a minimum, each product listing will need a title, description, at least one product image, and a price. If you want to show the customer that a product is listed for a higher price on a different site, you can add a "compare at price" as well.
If a product has variants—for example, if it comes in multiple sizes or colors—you'll need to add all of this information for each product variant.

Incorporate meta information
Once you have a good number of products listed on your site, you'll want to make sure everything is well organized and easily searchable. The way to do this is by adding meta information, like product type, tags, and (if you're selling branded goods) original vendor brand.
Upload physical product information
If you're selling physical products, you'll need to add your products' weight so Shopify can calculate shipping prices. If you're selling branded goods or already have your products in a store, they'll have a barcode (a UPC or, if you're selling books, an ISBN). You should also add a stock keeping unit, or SKU, to help keep track of your internal product stock and inventory. Finally, if you sell internationally, you'll need a harmonized system code, which will be required in order for your product to make it through customs.

Additional options will also appear as you're working if they apply to your product. If you add product variants, Shopify will add sub-listings for each, so you can add basic info for each variant.
2. Organize your products into collections
Adding this detailed information to each product will make organizing your listings into easy-to-navigate collections easier. Shopify uses collections to let you group your products, feature them on your homepage, and make it easier for customers to find items that go together.
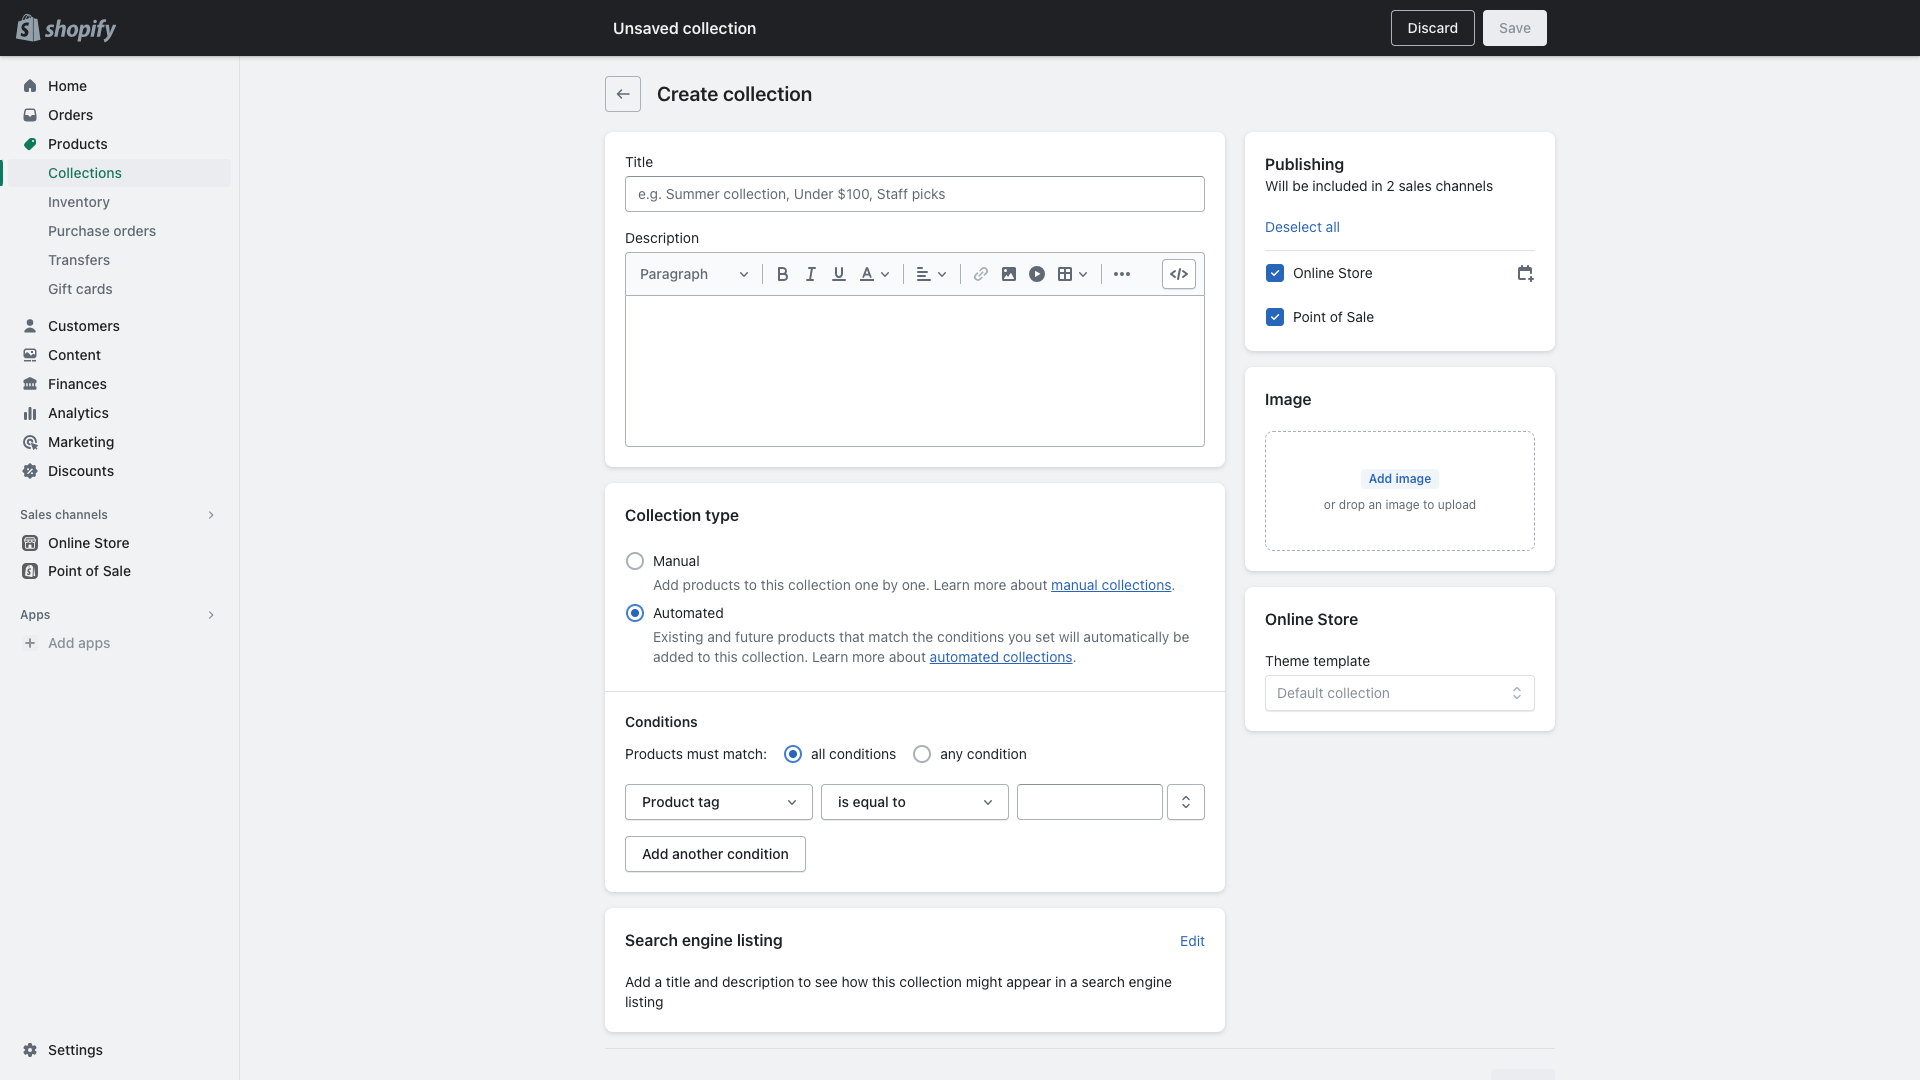
Each collection will need a title and description at a minimum. Then, you can choose between adding new products to each collection manually or setting up automated product sorting so that Shopify adds new products to collections right away. If you choose the automated option, you'll need to add conditions for Shopify to sort your collections (like price range, product type, and tags).
3. Choose a domain name
The default URL for your store will be your-name.myshopify.com, so you'll need to choose a domain name—the address customers will use to visit your store—that's simple and easy to remember.
You can either purchase a domain name via a third party like GoDaddy or Bluehost, or you can buy a domain directly through Shopify. In either case, a custom domain will likely run you $10-$20. Follow Shopify's step-by-step instructions to set up your new URL.
4. Customize your Shopify storefront
Now for the fun part: with all your product listings set up, you can customize your store's look by editing your shop theme (under Online Store on your homepage menu). Shopify includes 12 default free themes, along with a Theme Store, where you can choose from over 100 paid themes from designers around the world.
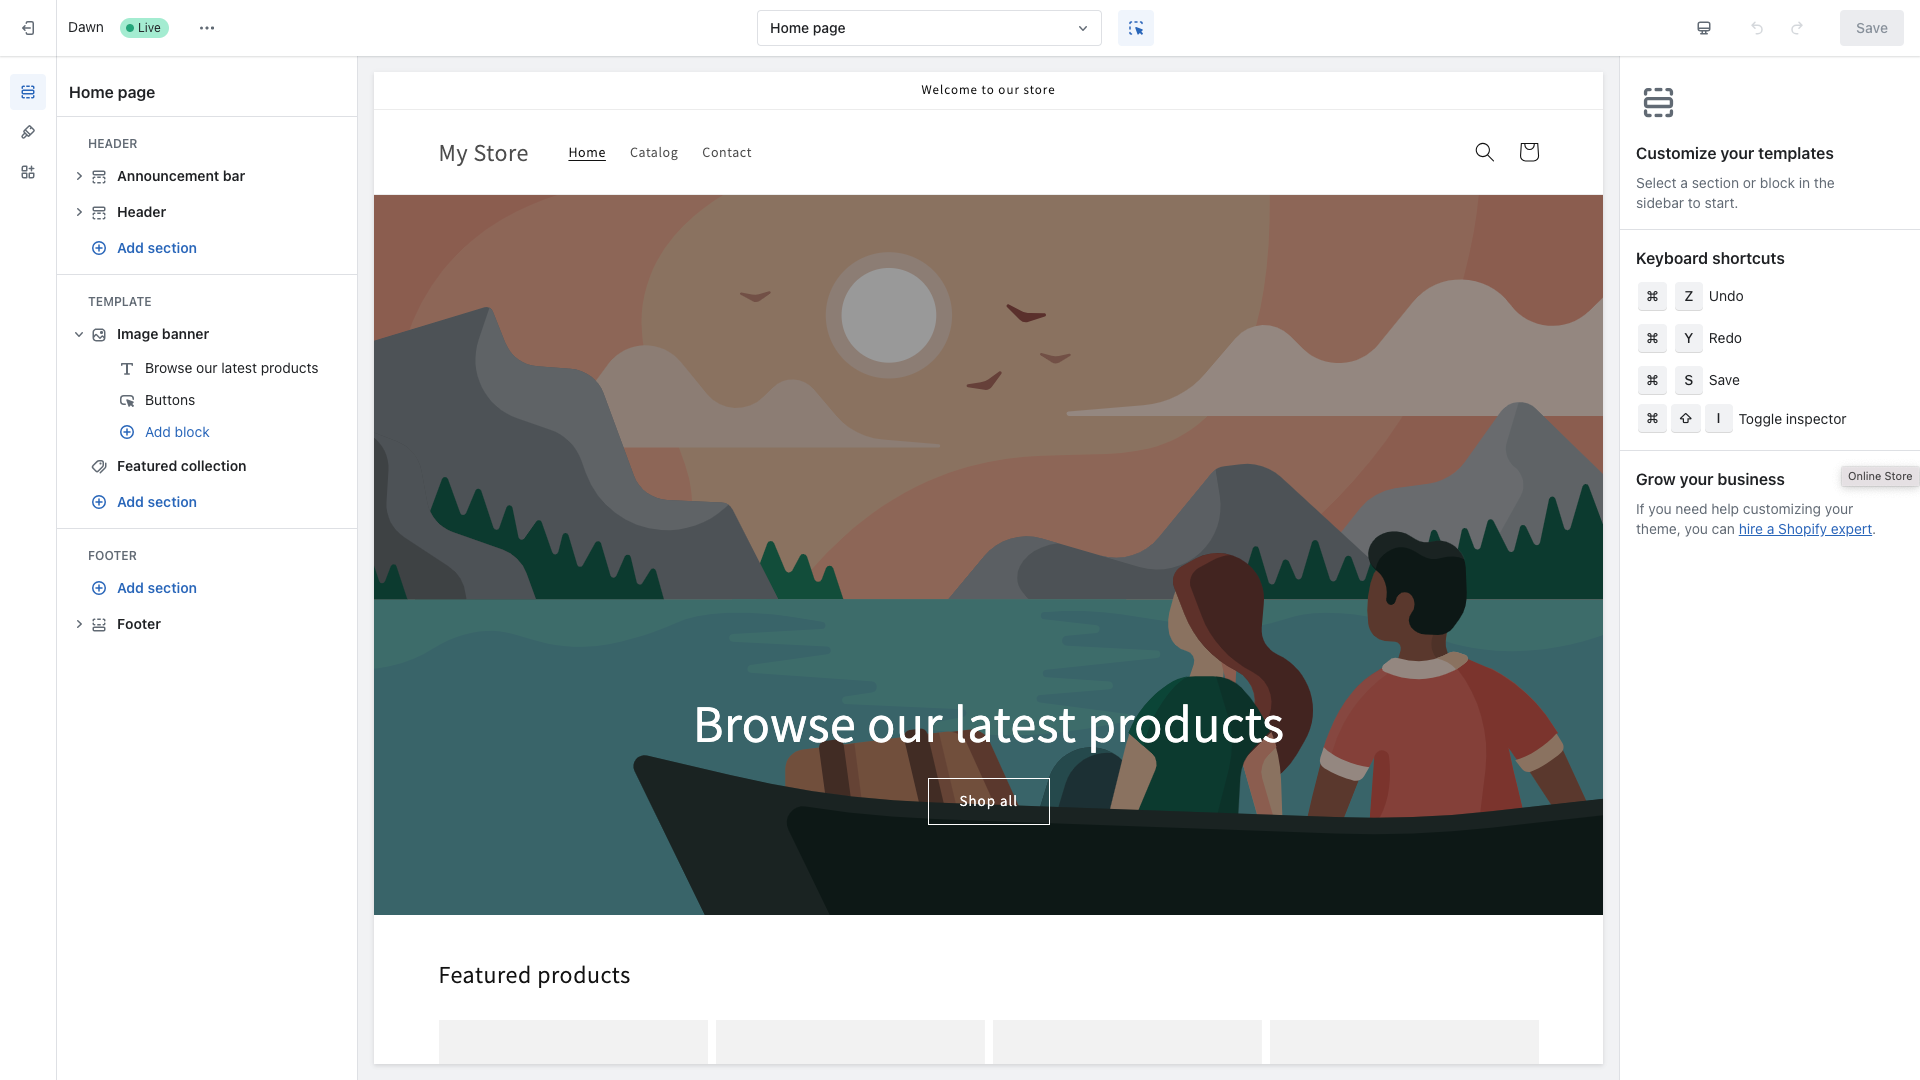
Shopify's theme editor is similar to most website hosting platforms. It starts with a basic site structure that store owners can customize as much or as little as they like.
The default site has blocks like an image banner, site title, button, featured collection, and footer. You can select each one and add your own information, delete or move blocks around, and add new blocks by clicking the plus signs that appear between blocks.
At the bottom of the right-hand menu column, select Theme Settings to open a new menu, where you can edit things like colors, fonts, currency format, buttons, and other site features.
5. Add key information for SEO
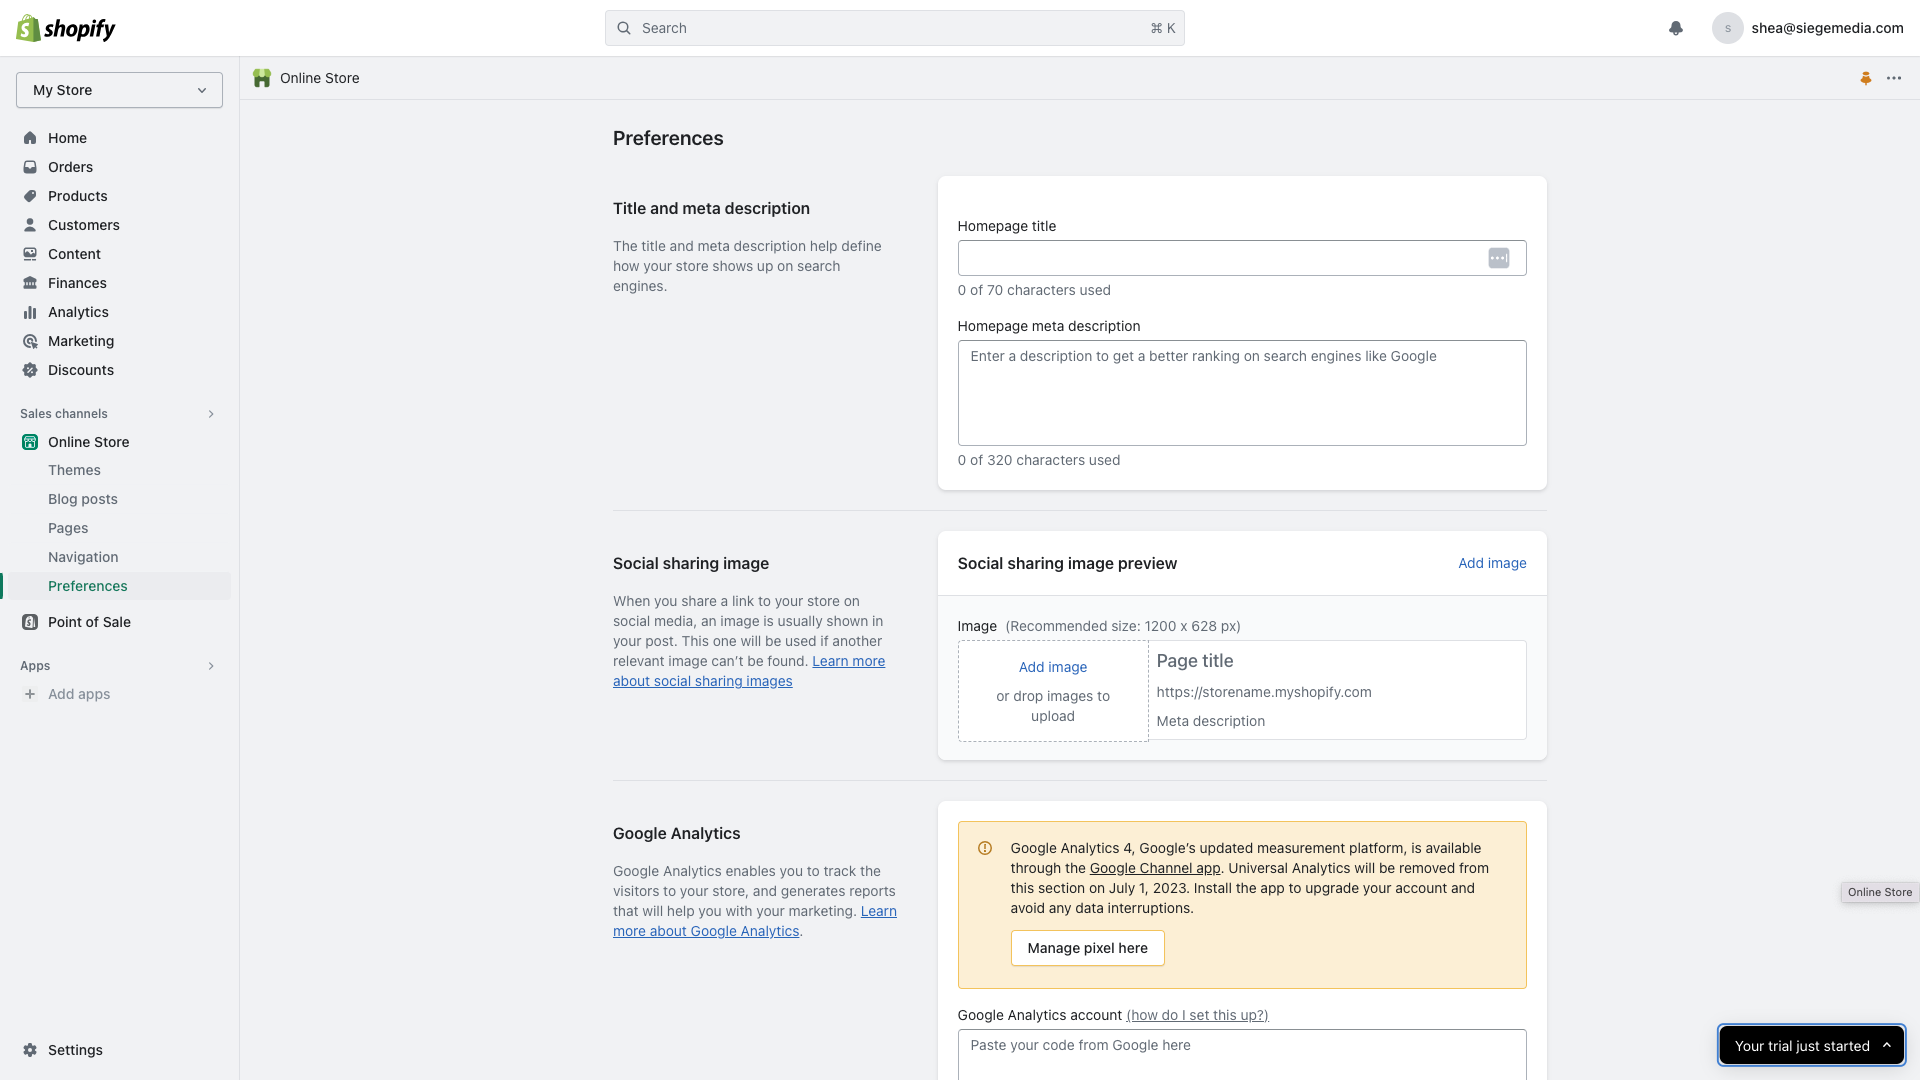
In the same way that you should add meta information to each product listing so shoppers can easily search your site, you should also add meta information and tags to your shop as a whole so that it will show up in search engines.
From your dashboard, select Online Store and scroll down to Preferences. This will bring you to a page where you can add the title, meta description, and image you want to appear on search engines and social media. If you have Google Analytics or if you sell via Facebook, you can link those accounts here as well to track site and customer data.
How to manage your Shopify store
Your basic store is plenty to get started, with product listings, a customized theme, featured collections of products, and your domain name. Shopify will email you whenever you get a new order, and you can ship the order to the address in that email.
To run an efficient, well-maintained store, though, you'll want to put a bit more work into Shopify. Here are the tools you need to keep track of your sales, add more info and features, and let your store take care of itself with automation.
Manage your orders
By now, you should have the Shopify menu down pat: to see your orders, select Order, and you'll jump right to the Orders sub-page. You can open any order and see which ones are paid and which still need to be shipped.
Open your first order to ship and look through the page. You'll see the products ordered, order total, customer's shipping address, and even a risk analysis where Shopify tries to detect if an order is fraudulent. You can add a comment or note on the order—perhaps to list something the customer said or to note which specific product you sent them—and add tags to categorize that order. Then, click Continue to print a shipping label with pre-paid shipping from your postal service, or you can make a shipping label and mark the order as shipped.
Add extra pages
Your store will include a few pages by default: your store's front page, a catalog of your products along with individual product pages, and perhaps an About page with details about your store. To create a more fulfilling shopping experience, you'll need to flesh out your site with additional pages. (You can find these options on the left homepage menu under Online Store.)
Blog posts are perfect for sharing news or updates. If you're looking to garner organic search traffic, this is where you'll write SEO-driven content as well. Blog posts display in reverse chronological order, with the newest post on top.
Pages, on the other hand, appear permanently in the top menu of your store. If you want to add contact forms, store hours and info, directions, and any other reference information, you should use Pages.
Sell in more places
Your online store is a great place to sell products and put all your marketing efforts into one place. The only problem is you'll have to attract potential customers to your store. That's tough—and sometimes it's easier to put your products where customers already are.
That's what makes selling products on marketplaces so appealing—and Shopify can help you do that while still managing everything through your main store site. Go to Settings, and click on Apps and sales channels in the menu. There you can add integrations for marketplaces, including eBay and Amazon, along with social networks like Twitter, Facebook, and Pinterest. You can even add Shopify to Messenger to chat with customers and close sales inside Facebook Messenger chat.
Add features with apps and integrations
Shopify includes everything you need to get a basic store up and running within its setup guide and homepage menu, but there are a lot of other things you can do with your store by adding app integrations from the Shopify App Store.
Here are a few apps you might want to install as your store gains momentum:
SEO tools like Yoast SEO, Schema Plus, or Swift
Automatic language and currency translators like Transcy, T Lab, or LangShop
Additional site features like product reviews, email opt-in pop-ups, and "customers also bought" recommendations
Invoicing and accounting platforms like FreshBooks or Xero
Report generators for sales, inventory, and customer data
Email marketing platforms like Mailchimp or Brevo
Shopify offers thousands of different integrations, but there are some notable exceptions like Discord, Keap, Google Workspace, Asana, and Trello. For some apps, like Slack, you can find third-party integrations designed to integrate the two platforms, but they can be hit or miss. If you use a platform that isn't natively supported by Shopify, you can always use Zapier's Shopify integrations to connect it to thousands of other apps.
With Zapier and Shopify, you can streamline everything from promoting new products and contacting customers to following up on abandoned carts. That way, you can focus on the more important aspects of running your Shopify small business.
Send Gmail emails with new abandoned carts in Shopify
How to sell on Shopify: FAQ
How much does Shopify cost?
Shopify offers different pricing plans based on the number of features you need. Shopify Starter costs $5 per month, Shopify Basic costs $39 per month, Shopify costs $105 per month, Advanced Shopify costs $399 per month, and Shopify Plus costs $2,000 per month and up.
How long is the Shopify free trial?
Shopify offers a three-day free trial. You'll need to select a plan to see your orders, but you won't be charged until after your free trial ends.
What can you sell on Shopify?
You can sell a variety of things on Shopify, including tangible goods, digital products, services, classes, live streams, and more.
Can you sell on Shopify through social media platforms?
Yes, you can promote your product page on social media platforms like Facebook, Instagram, TikTok, and Pinterest.
How does Shopify pay you?
Shopify offers several ways to receive payouts, including Shopify Payments, PayPal, and Amazon Pay.
Does Shopify have an AI chatbot?
Shopify has an AI assistant called Sidekick, which can answer a variety of questions related to business.
Related reading:


