When I learned that I could build apps without writing a single line of code, I thought it meant creating simple apps without a lot of depth. I figured I'd be able to do basic stuff, but then the project would get challenging, and I'd have to learn to code to get it to work.
The truth is, despite my lack of technical skills—and my skepticism—I've built some pretty cool apps, and it only took a matter of weeks to reach a functional result.
But how? No-code tools simplify advanced programming concepts, making them easier to understand and use. Instead of having to write code or manually type in commands, you get to use visual interfaces, drag-and-drop elements, and wizards to configure everything just the way you want it.
In this guide, I'll walk you step-by-step through building a simple app with a no-code tool called Bubble. Once you're done, you'll understand the basics of no-code app building, and you'll be well on your way to building exciting new things without code.
An introduction to my to-do list app
Things To Do is the model app we'll be recreating today. It's a to-do list app where you can:
View the tasks you need to do today
Add and delete new tasks from the list
Mark tasks as done
View a list of completed tasks
Here's an example design:
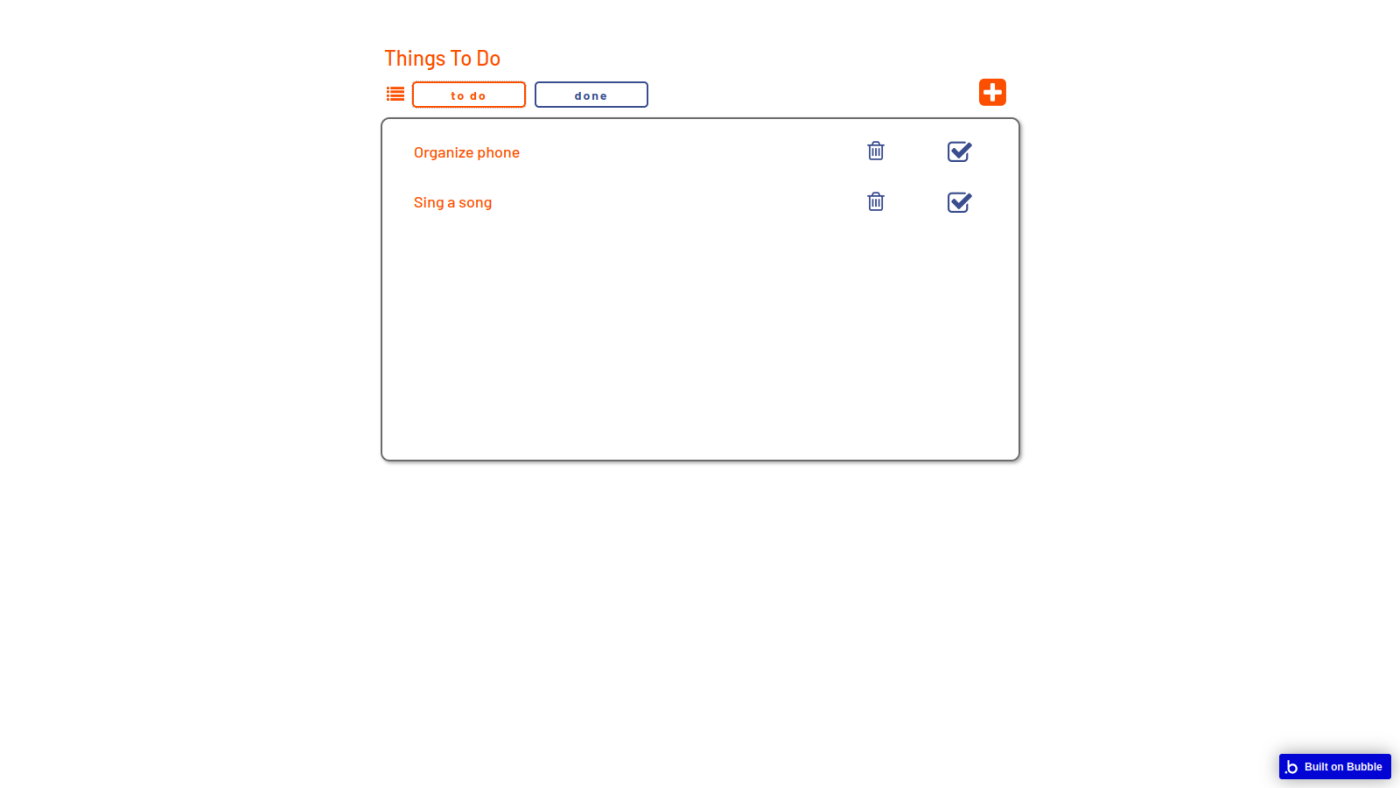
You can explore the functionality by visiting the app's site. Log in with the test credentials provided on the page, and give it a try. Beware, though—other people may be testing it at the same time, so you might see a lot of tasks going back and forth.
Following this guide to the end will take around two hours.
Before we begin
Before we begin building our own version of Things To Do, you'll need to create a free account in Bubble.
If you'd like, you can also take the crash course—a set of 10 lessons explaining core concepts in a series of step-by-step instructions. But you can skip that part for now since I'll be explaining what we're doing as we go.
Once you create an account, click the New app button, fill in the information in the dialog box, and choose Start with a blank page.
Part 1: Setting up the database
Most modern apps rely on a database to work. A database allows you to store, maintain, and access data, while making it possible to create relationships between different data elements.
Let's access the part of Bubble that deals with data. Click the Data tab on the left-hand navigation bar on your screen.
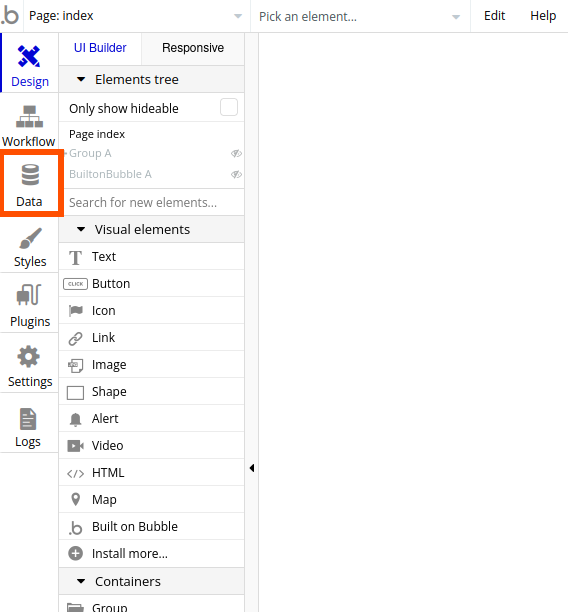
When we're creating an app, we'll be storing data from our users in our database. Depending on what we need to power the app's features, you'll need different data types.
Right now, there's only the User data type. It's set up by default, and it keeps track of the app's users, their email addresses, passwords, the date it was created or modified, who created the user, and the slug.
Since we're building a to-do list, we'll need a way to store the tasks that each user will create to fill their list. On the New type input field, type in "Task" and click Create.
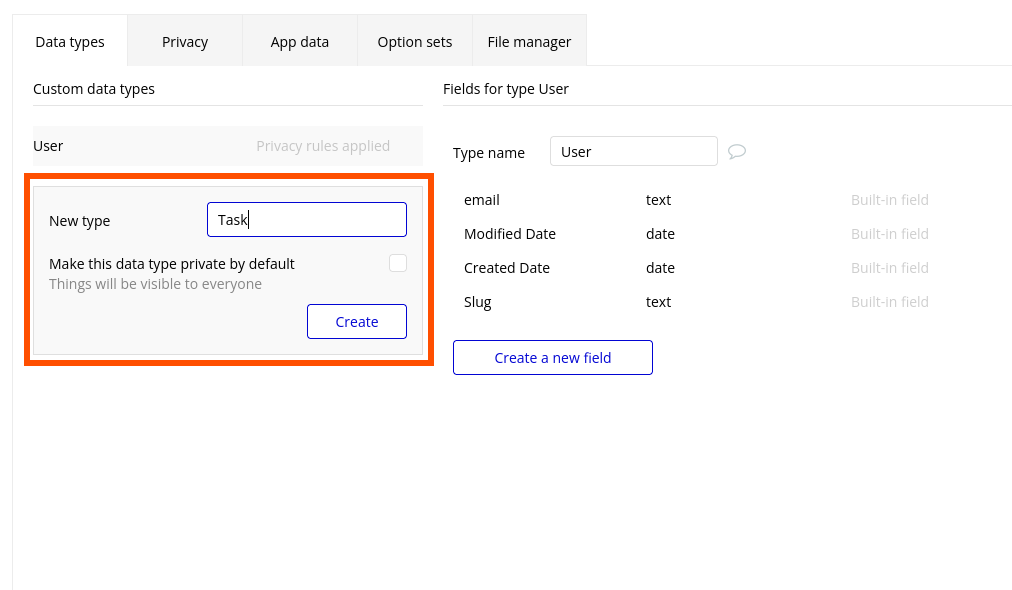
Now that we have a data type for tasks, we need to store some more information about each task. We need to have a task description, so users can record that they need to walk the dog or make their bed; we also need a way to store the status of the task, whether it still needs to be done or is already complete.
Let's create these fields now. Click Create a new field.
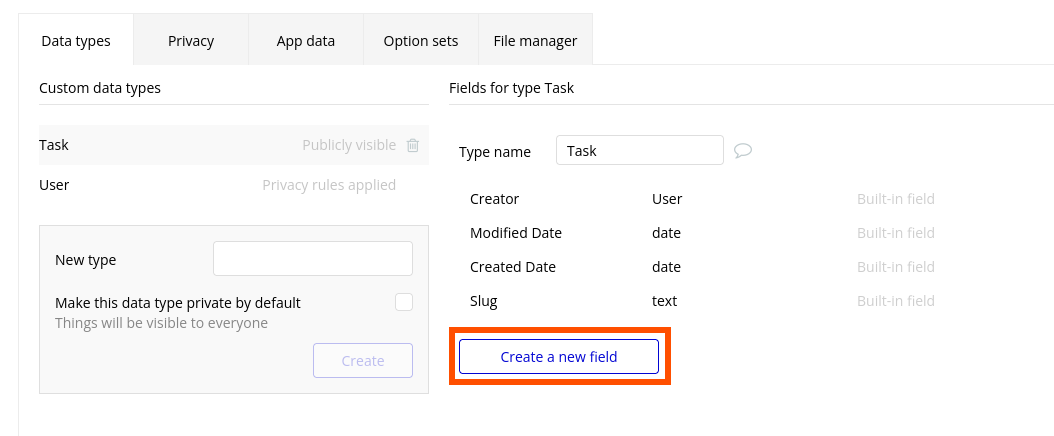
In the Field name dialog box that appears, type "description." Data fields also need a type. Click the Field type dropdown, and choose text. Once you're done, click Create.
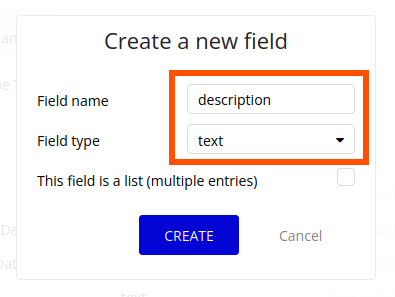
Let's repeat the process for the task's status. Click Create a new field, type "status" for Field name, and set the Field type to number.
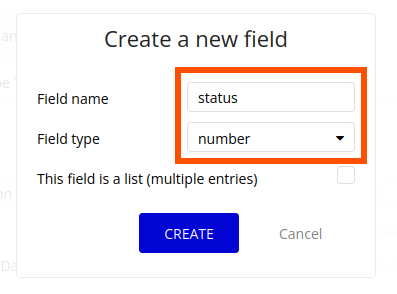
Why the number type? We'll use a numeric system to keep track of the status of our task. Tasks that have the number 0 will be treated as not done, and tasks with the number 5 will be considered complete. The reason we chose 0 and 5 (and not 0 and 1, for instance), is to allow some breathing room to create additional task statuses in the future. After all, from the backlog to the completed list, we could also add a "scheduled" or "in progress" status.
Now we have the basic information we need for the Tasks data type to be useful. There's just a slight problem: when we get our first 10 users on the app, and all these users start creating their tasks, we'll have a hard time assigning each task to its rightful owner. This could make things hectic in the long run, so we'll add an additional data field to register who owns each task.
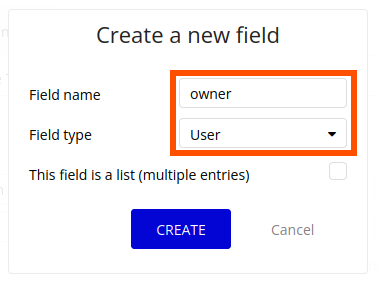
Click Create a new field. In the dialog box, set the Field name as owner. For Field type, open the dropdown, and choose User at the bottom. Finally, click Create.
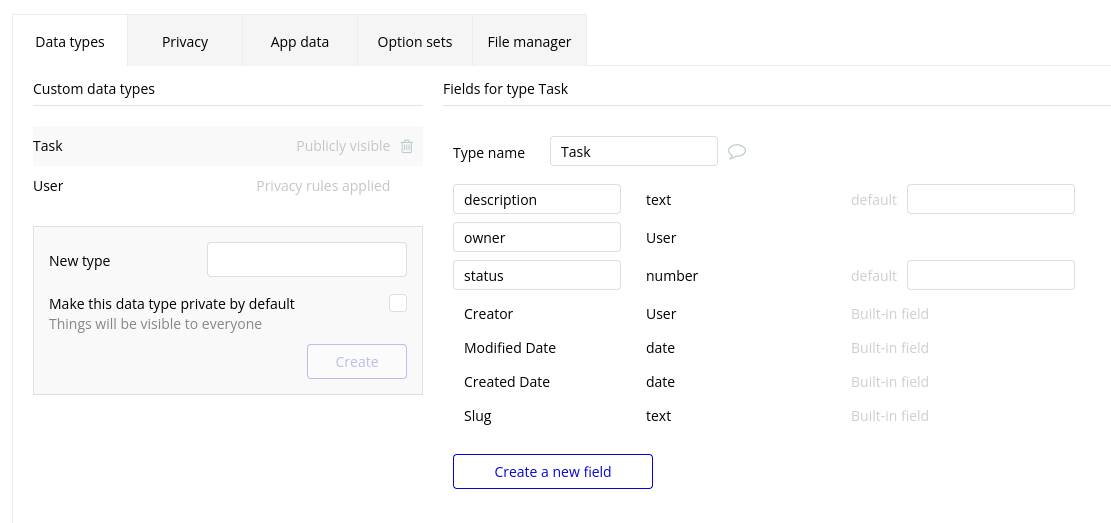
The data fields for the Task data type are all set. Your screen should look like this:
When building the app later on, it'll be useful to pin every task to each user on the database as well. Let's set that up now. Click the User data type.
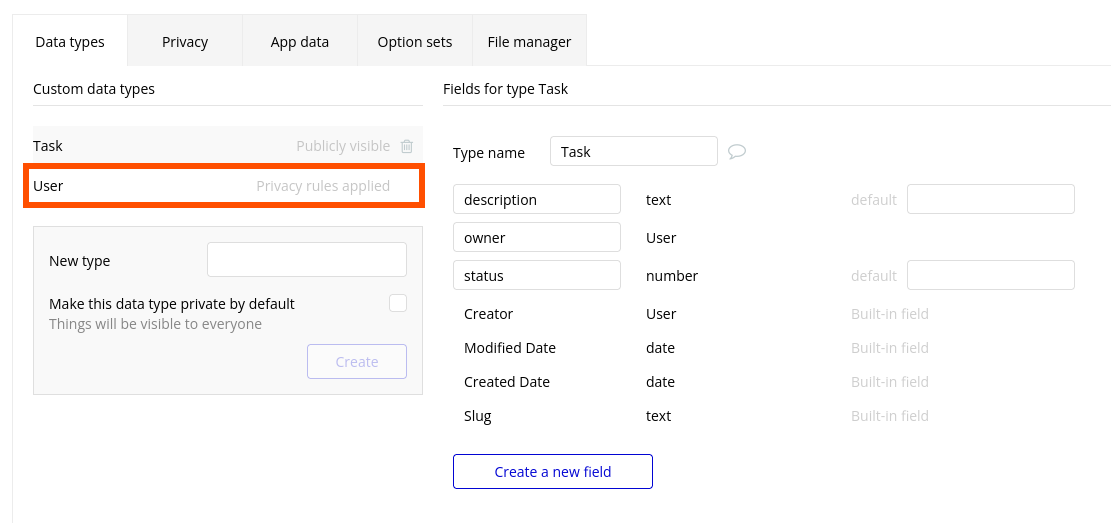
Click Create a new field. Name it "tasks," set the Field type to Task, and, before clicking Create, remember to tick This field is a list (multiple entries). This ensures that each user can add as many tasks as needed in this field.
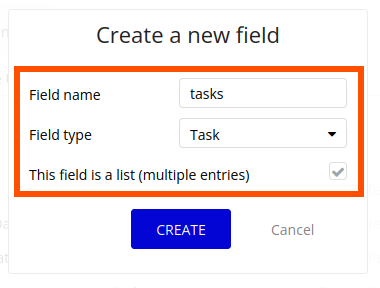
Now we're ready to move forward. (Note: if you want to add more features to your app, you'll have to revisit the data tab in the future.)
Let's say you'd like to add a way for each user to track projects. That'd mean you'd have to create a Projects data type and provide all the relevant fields to identify the project owner, participants, and tasks. The same would apply if you wanted to let the users form teams.
Just remember that any time you need to hold more types of data inside your app, you'll have to expand your database. For now, let's move on to creating the user interface.
Part 2: Creating the user interface
The user interface (UI) is what your users interact with to write and retrieve information from the database as well as performing the logic operations that make your app useful—in this case, the to-do list app.

First, we need to add a new page. An app page functions much like a website page: you can use it to separate different activities or dashboards. Click the dropdown displaying the current page on the top-left edge of your screen.
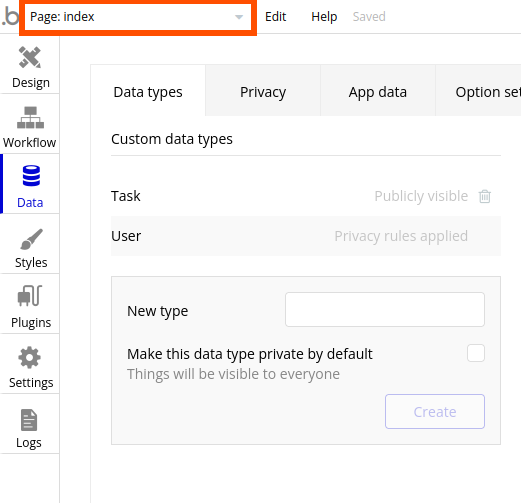
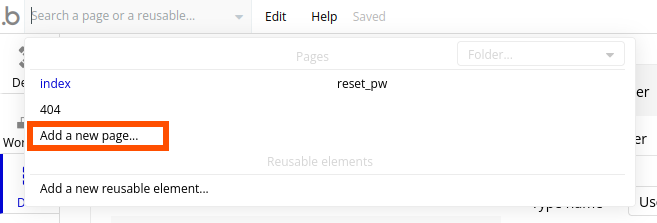
Click Add a new page.
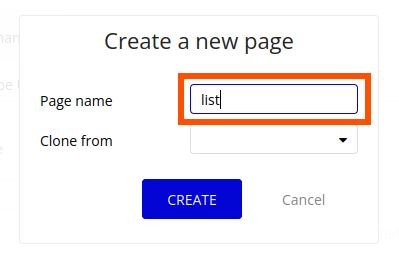
Set the Page name to list and leave the dropdown blank. Click Create.
It's time to start designing. Notice the UI builder on the left part of the screen:
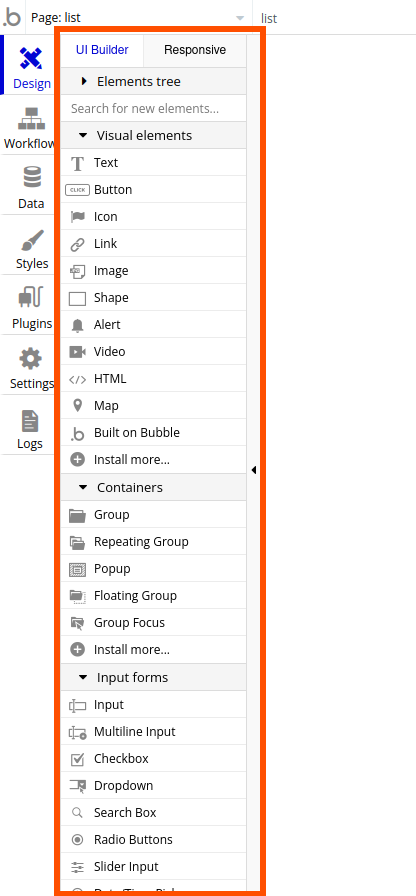
The Elements tree will display a list of all the elements you added to the page so far. Everything below this section are the elements you can add to the page, which are divided into categories.
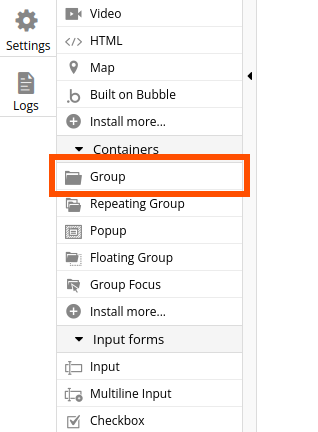
Let's add a group that'll hold our to-do list. Under the Containers section, click Group.
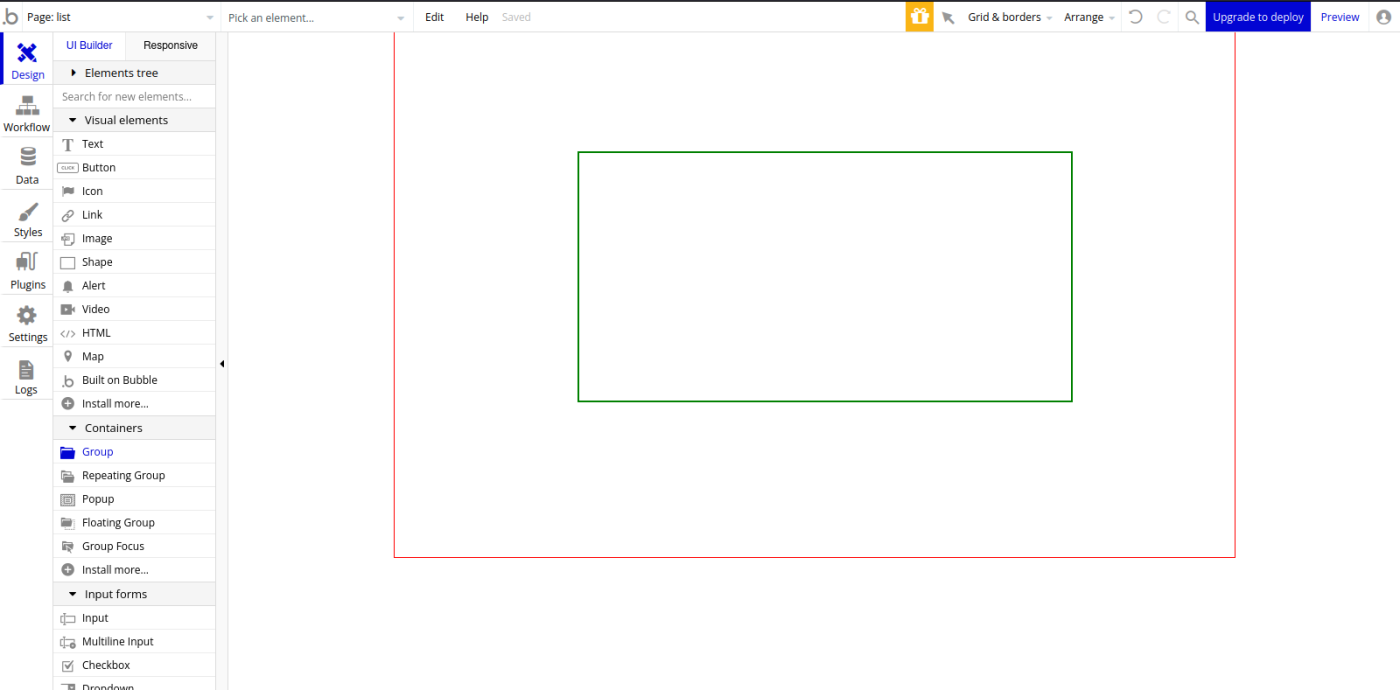
Now, draw a wide rectangle on the canvas.
Once you're finished, the edit dialog box will appear. This kind of dialog will let you edit the details of each element you add to the page. Let's start by changing the name of the element to keep things organized. Click the header of this dialog and rename it "Group Lists."
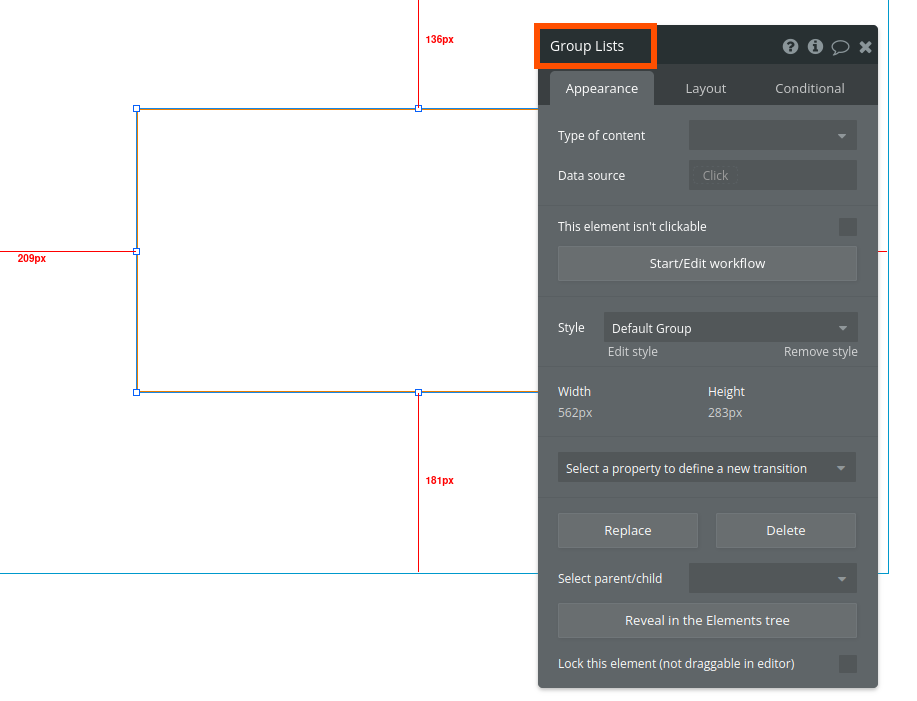
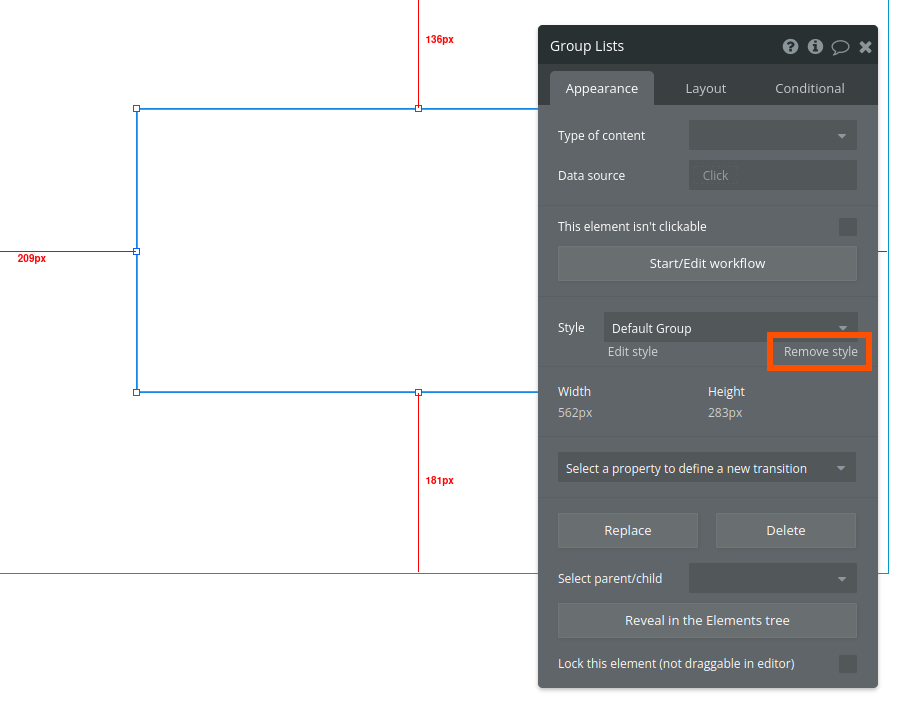
Let's give it a border. Click Remove style to unlock individual style editing for this group.
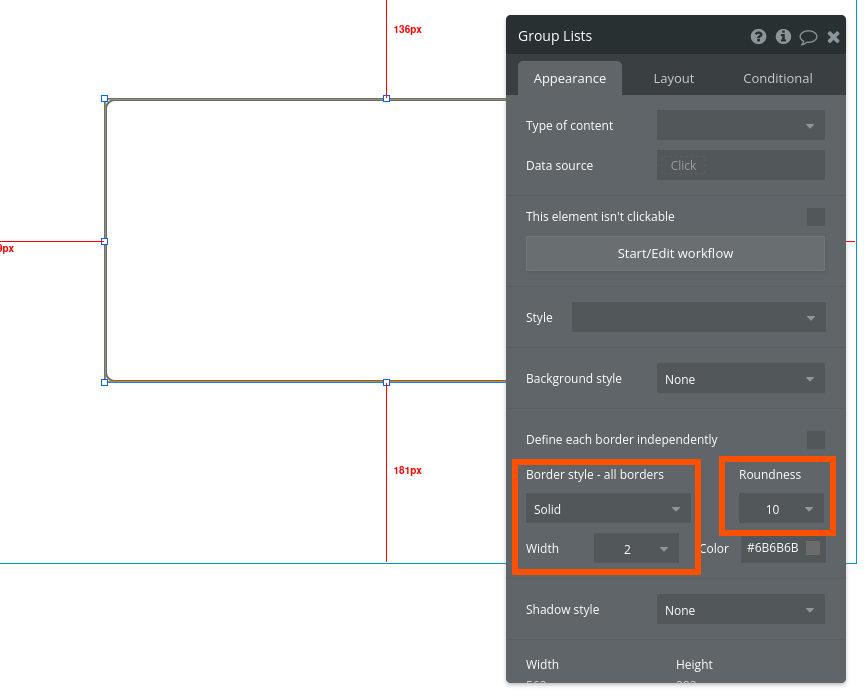
Now, set the Border style - all borders to Solid, Roundness to 10, and Width to 2.
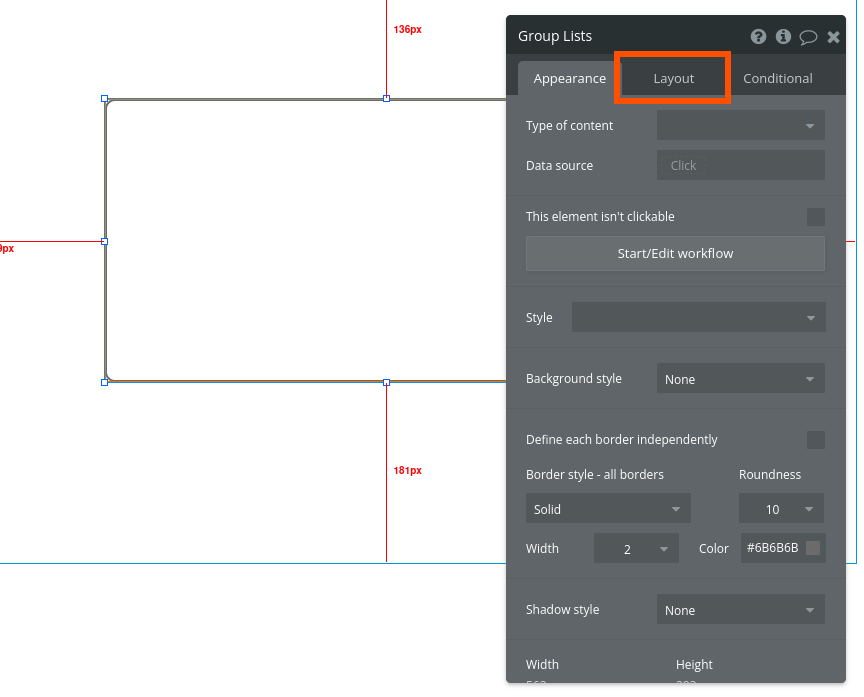
Let's adjust the size and position of this group to make sure it can hold everything we need. Click the Layout tab within the edit window.
Fill in the width (W), height (H), X position (X), and Y position (Y) with the following values:
W 731
H 393
X 114
Y 134
This group will serve just as a visual element, so we won't tinker with it anymore.
It's time to add a repeating group to show the list of tasks to do. A repeating group is a special kind of group that displays data in a series of rows and columns, allowing you to visualize lots of data in a simple way.
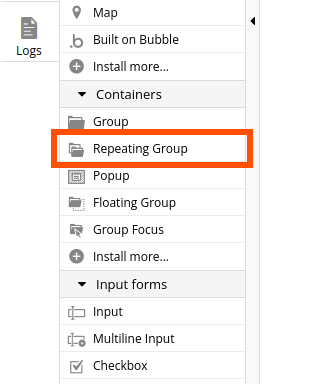
On the left UI Builder menu, under Containers, click Repeating Group.
Draw the repeating group inside the Group Lists we just configured. Make sure it covers most of its inner area.
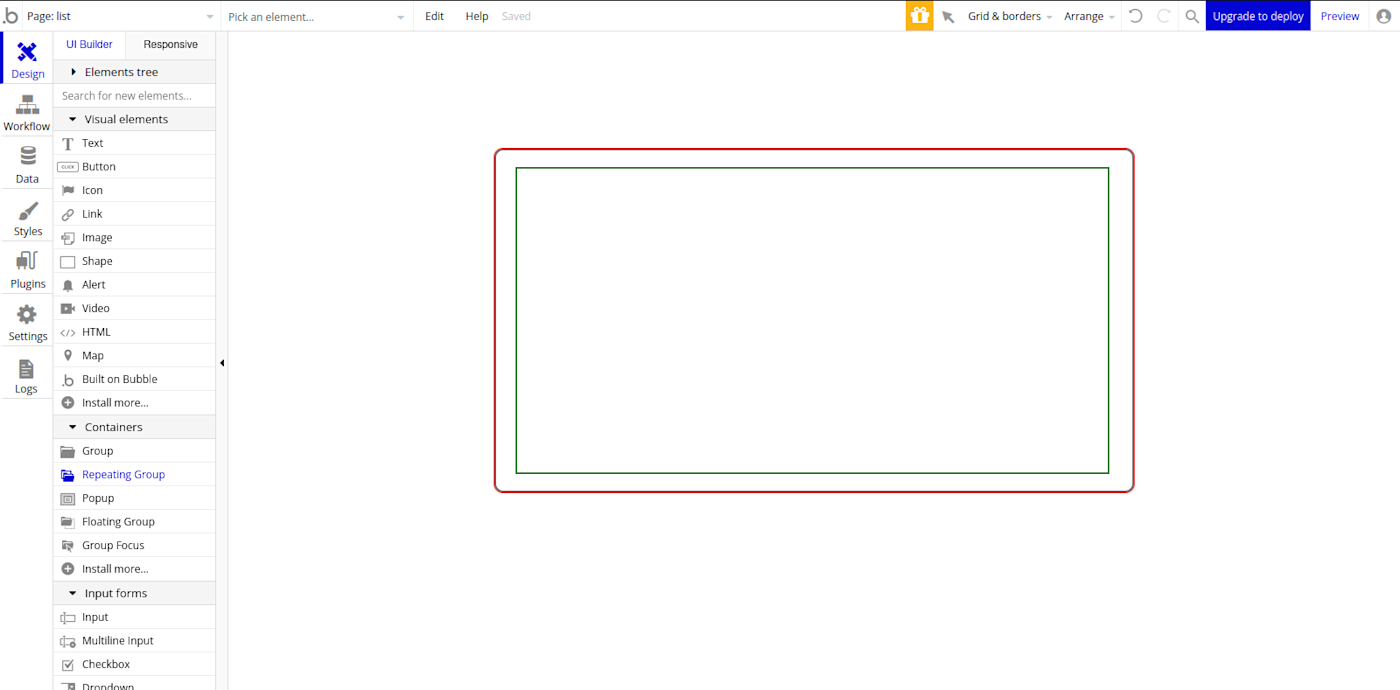
When the repeating group's edit dialog box appears, you'll notice we're on the Layout tab. Enter the following width, height, X, and Y values:
W 671
H 346
X 28
Y 16
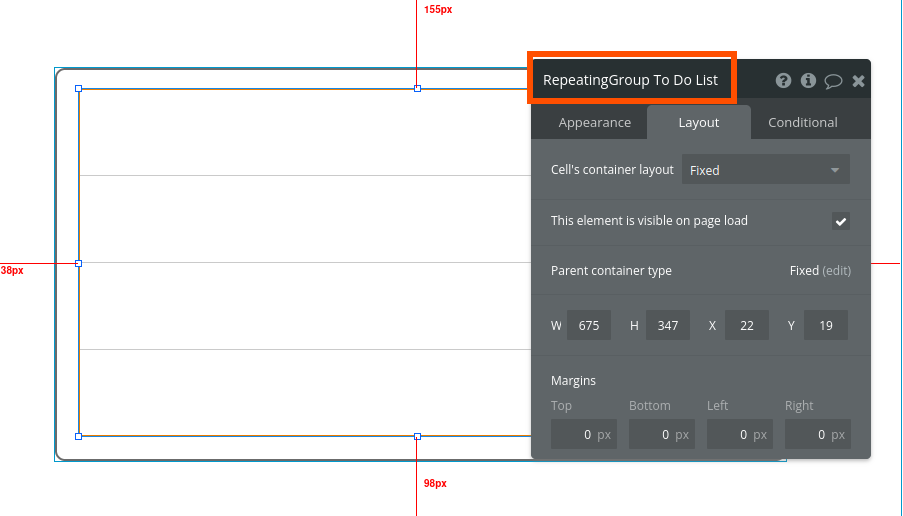
Let's keep things organized. Rename this repeating group to "RepeatingGroup To Do List" by clicking on the header of the edit dialog.
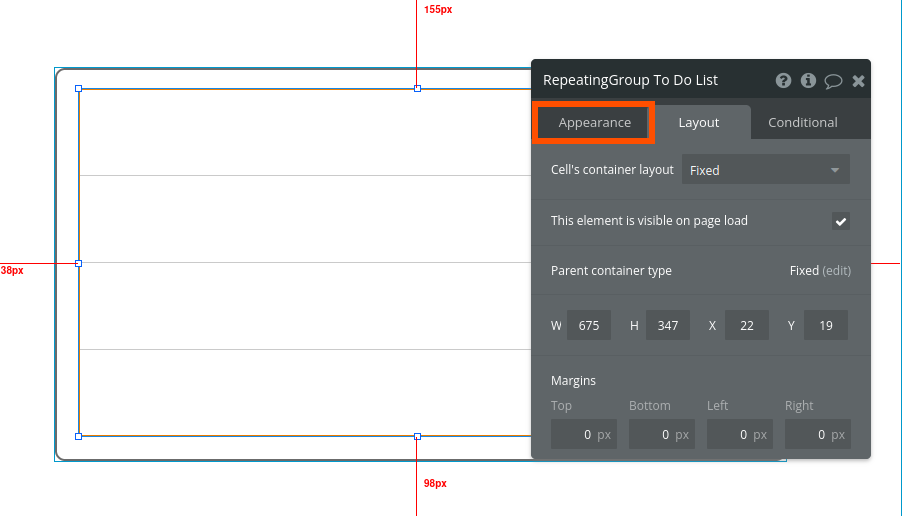
Let's edit the appearance of this group a little more. Click the Appearance tab.
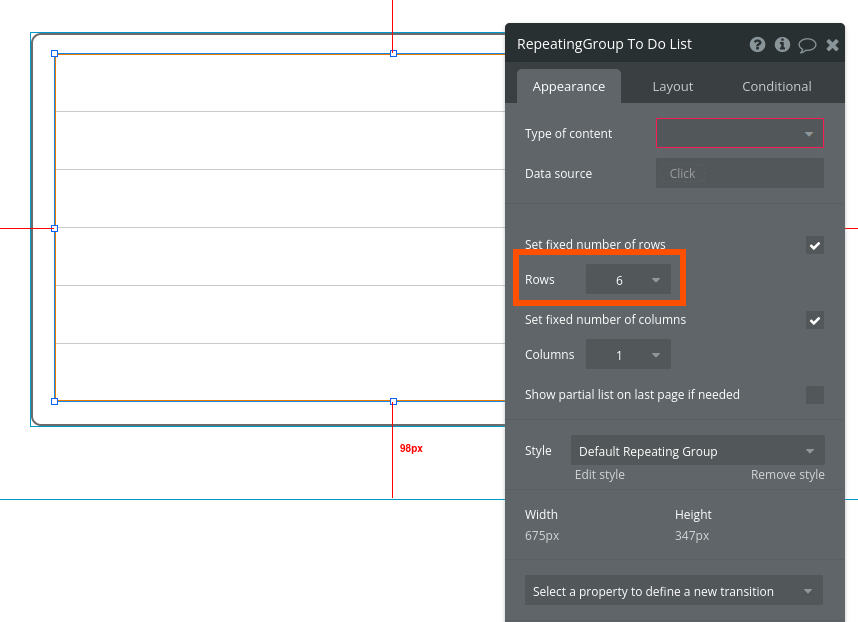
Set the number of rows to 6.
Let's also get rid of the line separator. Click Remove style like before to edit this element's style independently. On the new settings that appear, click the dropdown in front of Separator and set it to None.
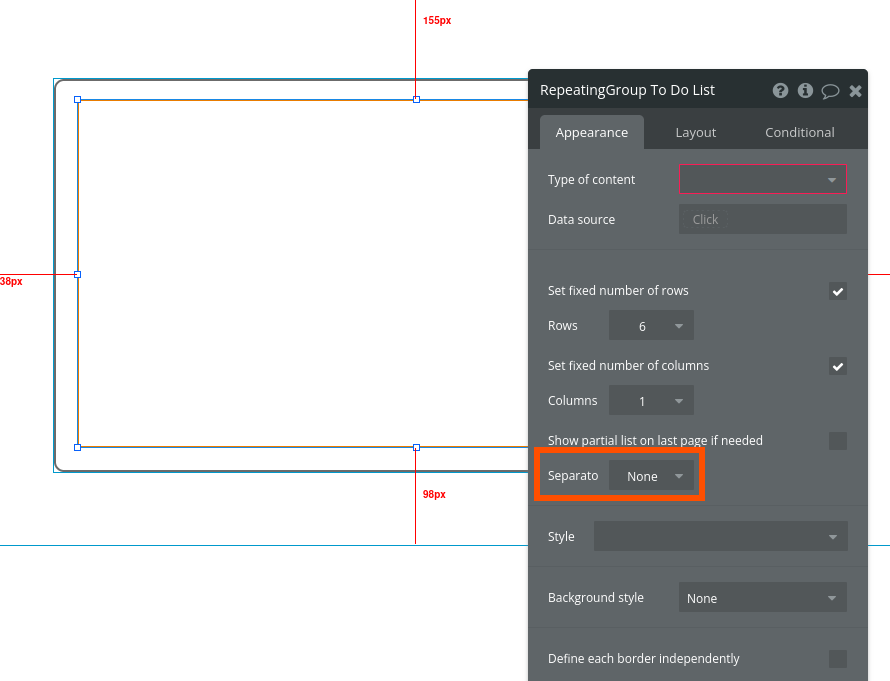
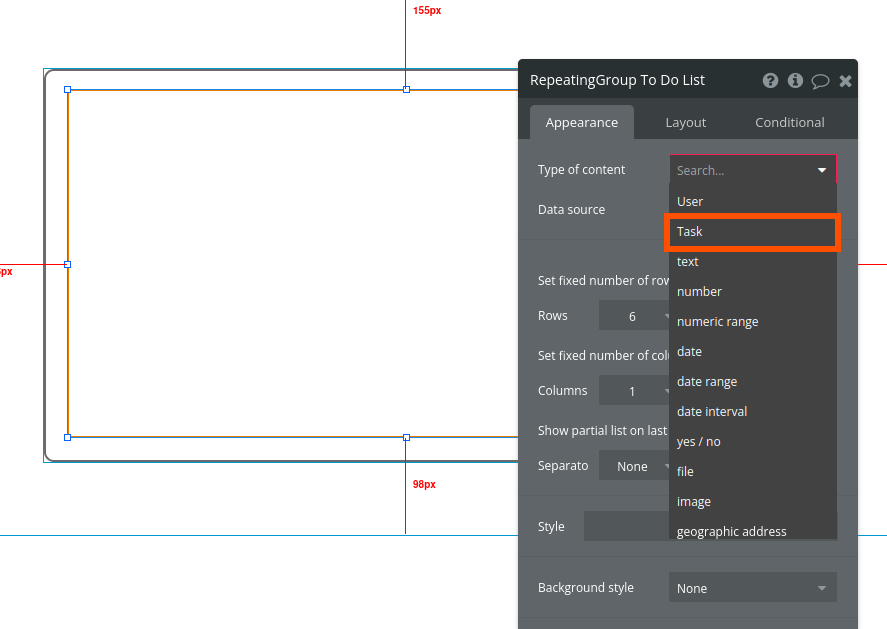
Time to set up some functionality. We need to let Bubble know that this repeating group will be showing our to-do tasks. Click the Type of content dropdown and choose Task.
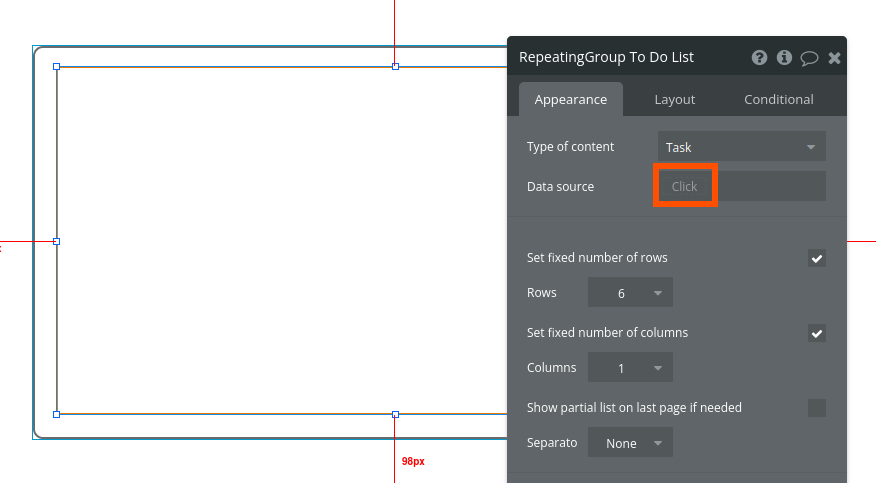
But this isn't enough to display the tasks—we also need to say where to get the tasks we want to display. On the Data source input, you'll notice a small rectangle inviting you to "Click." Click there to trigger a dropdown.
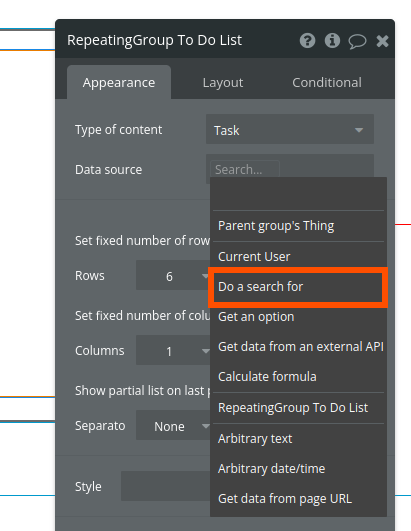
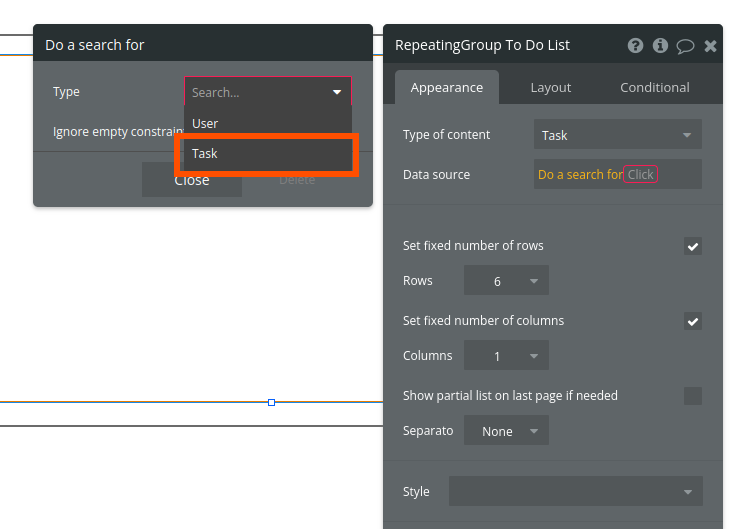
On the dropdown, choose Do a search for.
In the new dialog box on the left, under the Type dropdown, click Task.
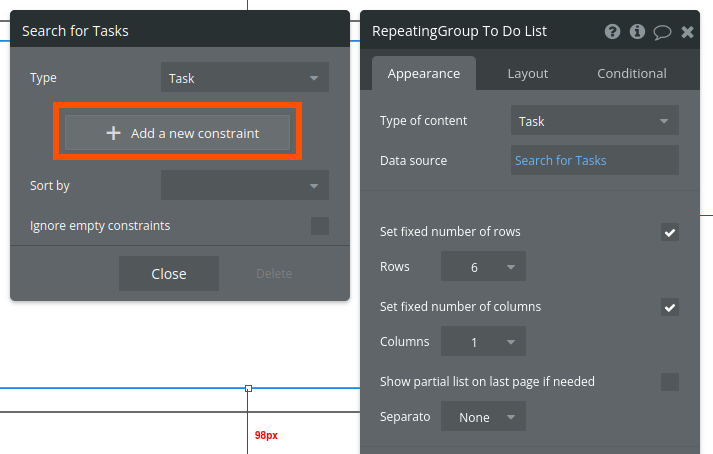
But we don't want to display all the tasks, right? We just want to display the tasks that are still incomplete, and the tasks that belong to the current user. Click Add a new constraint.
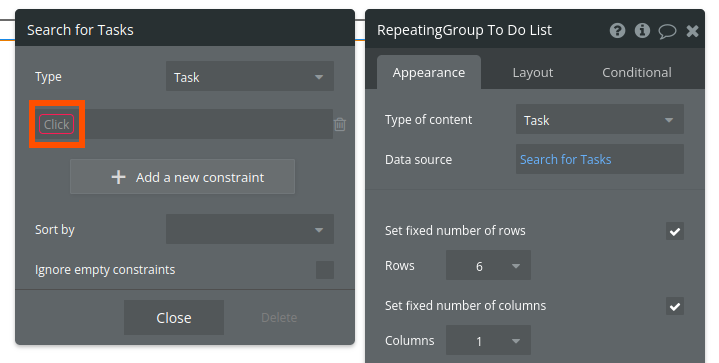
Click the small rectangle inside the input field that appears.
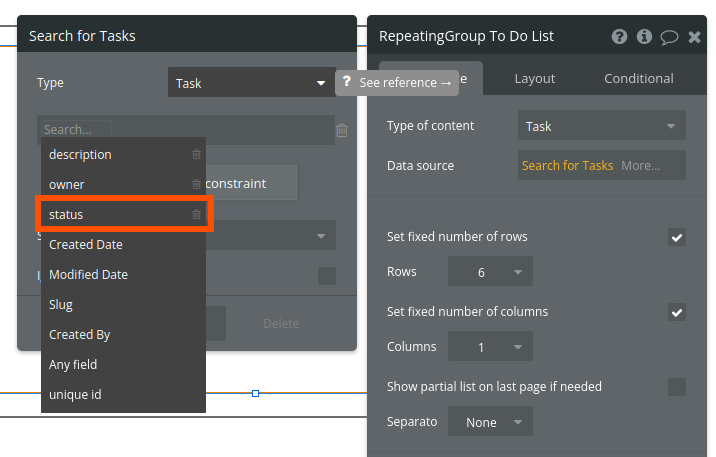
On the dropdown, click status.
Click again, and choose =.
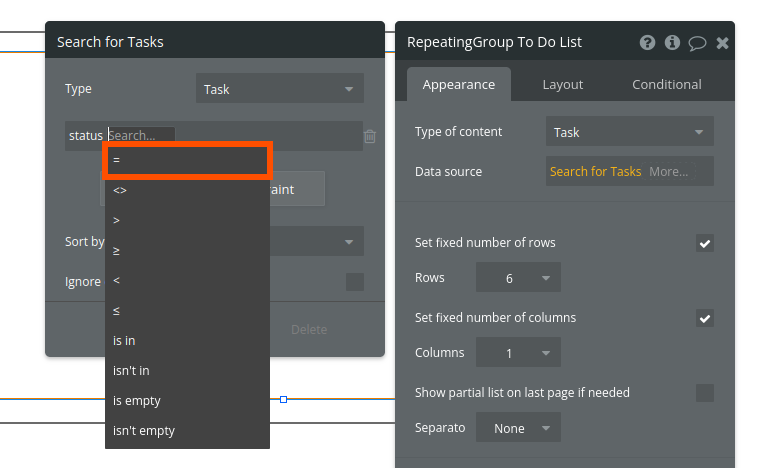
Finally, click again, type 0 (zero) and press enter. This constraint will filter the results, only bringing up the tasks with a status of 0 (not complete).
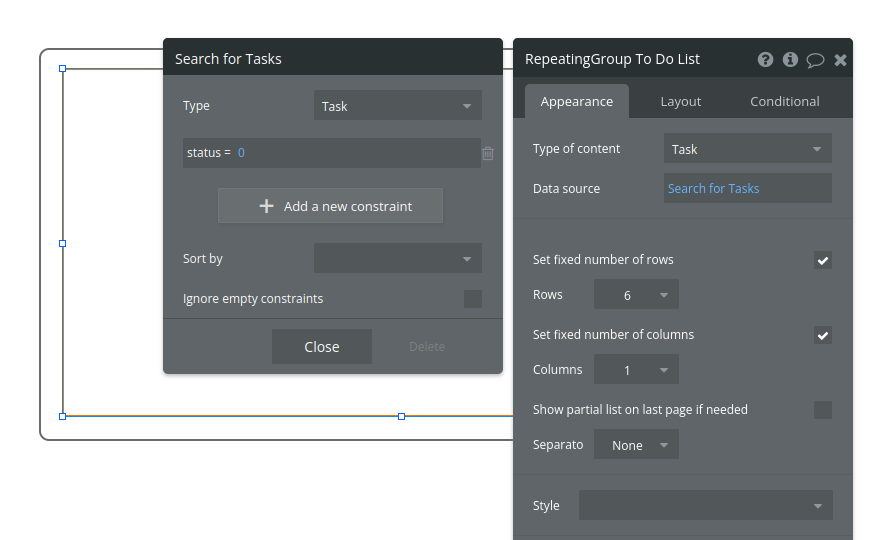
Click below to add another constraint. Then:
click the input field
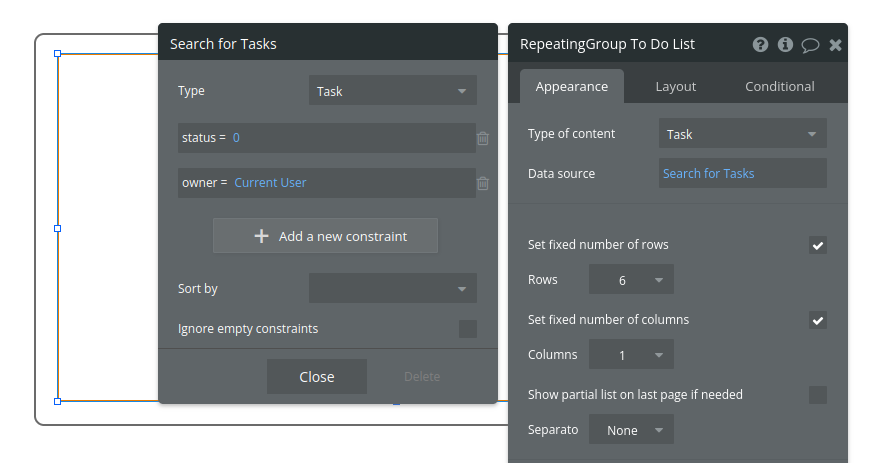
choose owner
click again to select =
and click one last time to choose Current user
This expression ensures that the results will only contain tasks the current user created, not tasks that belong to other users in the app. The end result should look like this:
Our RepeatingGroup To Do List is pulling information correctly from the database, but there's no way our users can see it. You can close the edit dialog by pressing the X icon on the top right.
Now, we need to add text elements inside the repeating group and then set them up to show the right data.
Before we begin, remember how the repeating group has multiple rows? A great thing about this element is that, when you configure the first row, all the other rows will have the same design and functionality. This allows you to create features like a social media feed, a list of products in an online store or—you guessed it—tasks on a to-do list.
From the UI Builder menu on the left, drag a Text element from the Visual elements, and drop it inside the first row of the repeating group. If you see a red line appearing under your cursor, you're doing it right.
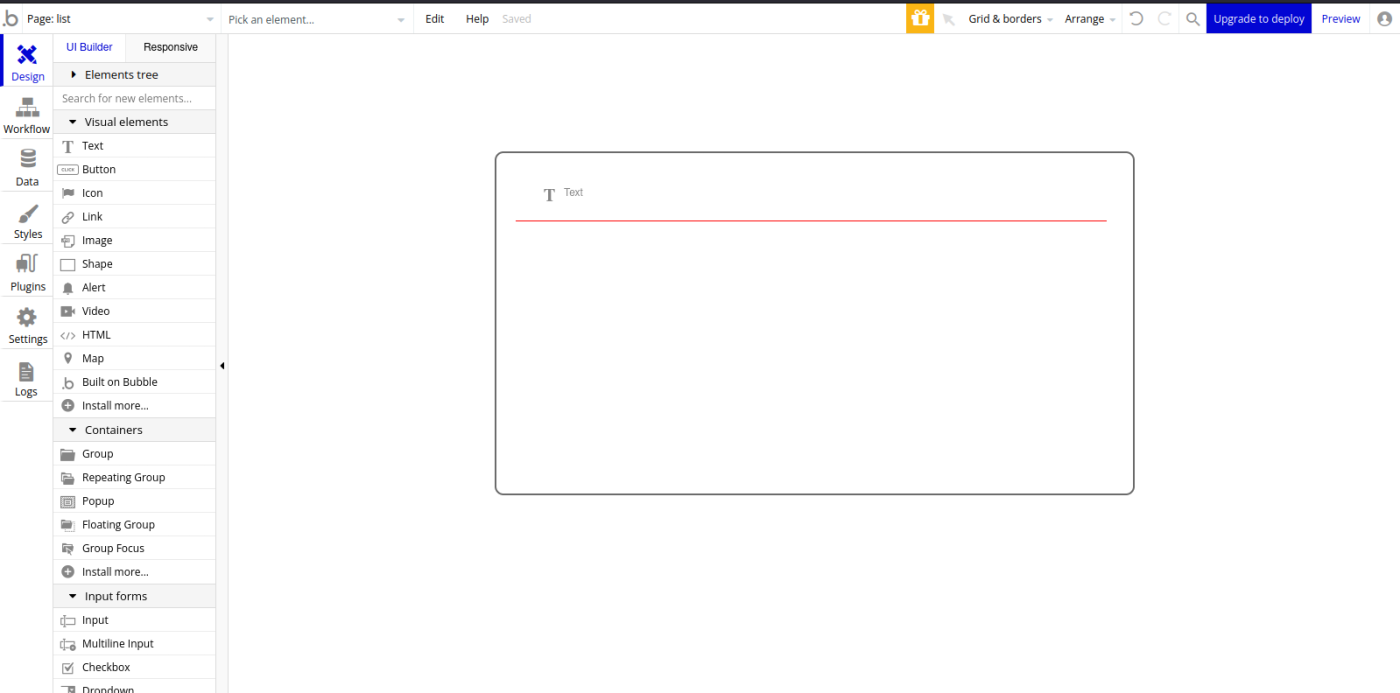
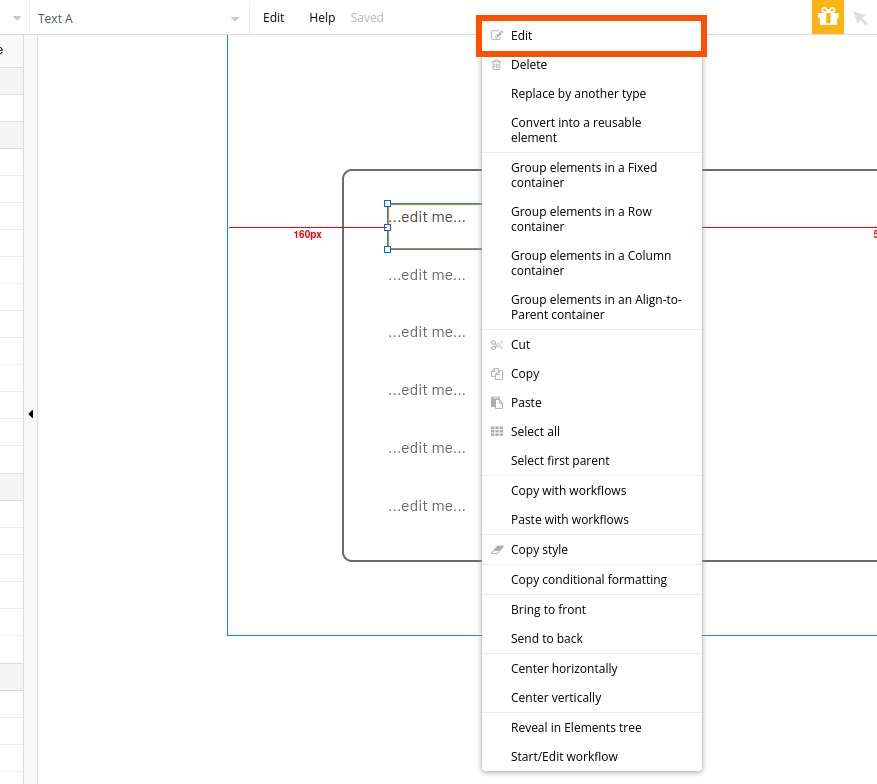
See how it's replicating to the other rows? This is a preview of how it's going to look in the end. Right-click the text element and click Edit.
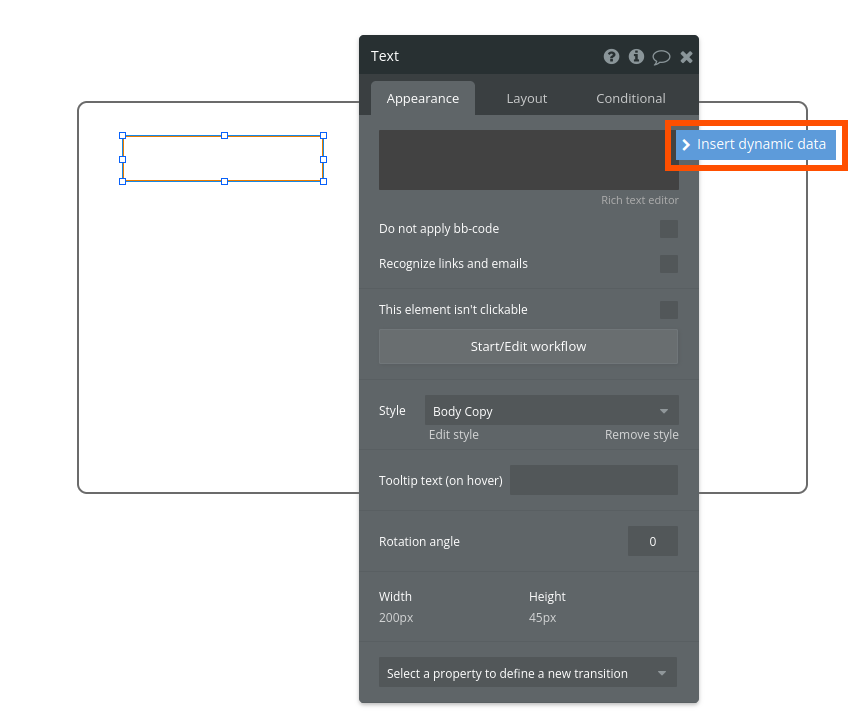
In the top input field, erase "…edit me…" and click the blue button Insert dynamic data.
From the dropdown menu, select Current cell's Task's description.
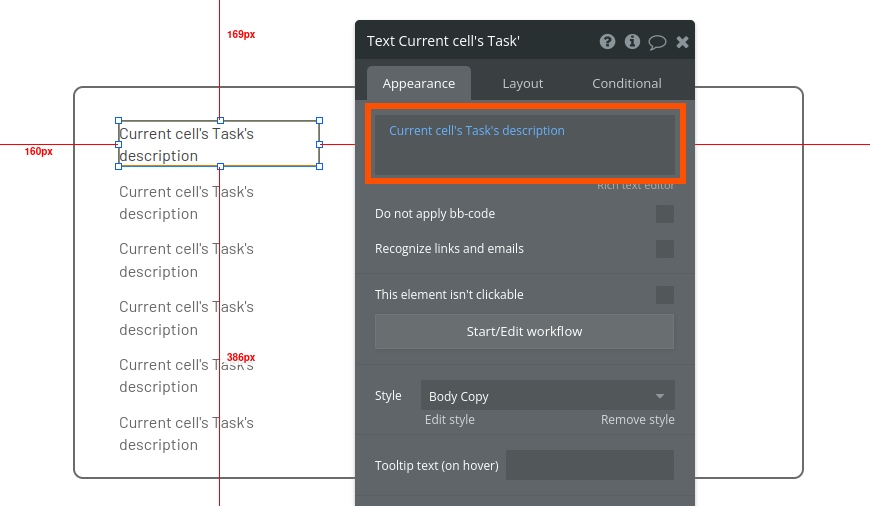
Each of these text elements will pull the corresponding cell's task and show its description. We could repeat the process for other data fields—for example, to show the task's status or the date created—but it won't be necessary for now.
A to-do list also needs a method to mark tasks as done. Drag an Icon element from the Visual elements menu, and drop it inside the first row of the repeating group on the right side.
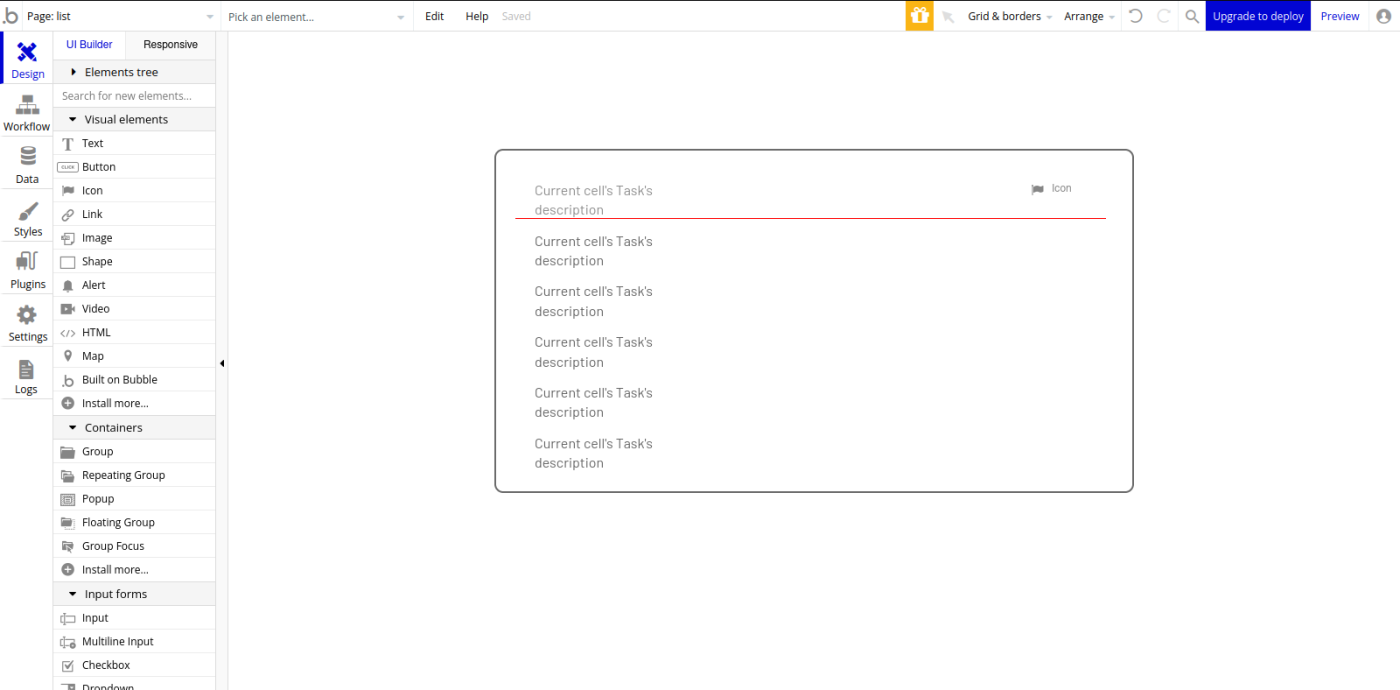
The default icon is a flag. Choose an icon that's appropriate for the action we want to illustrate. We also need to make it smaller. Drag the icon's limit handles to resize it, or click the Layout tab and enter the following values:
W 30
H 30
X 609
Y 14
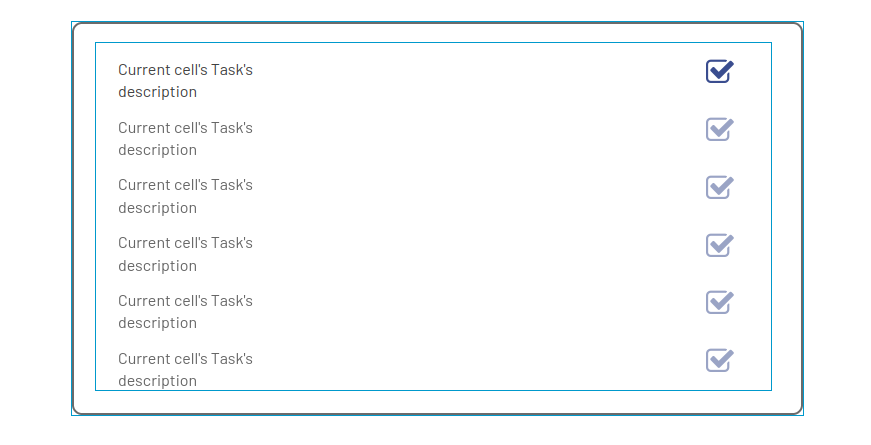
Let's continue to keep things organized. Change the name of the icon to "Icon Mark Done."
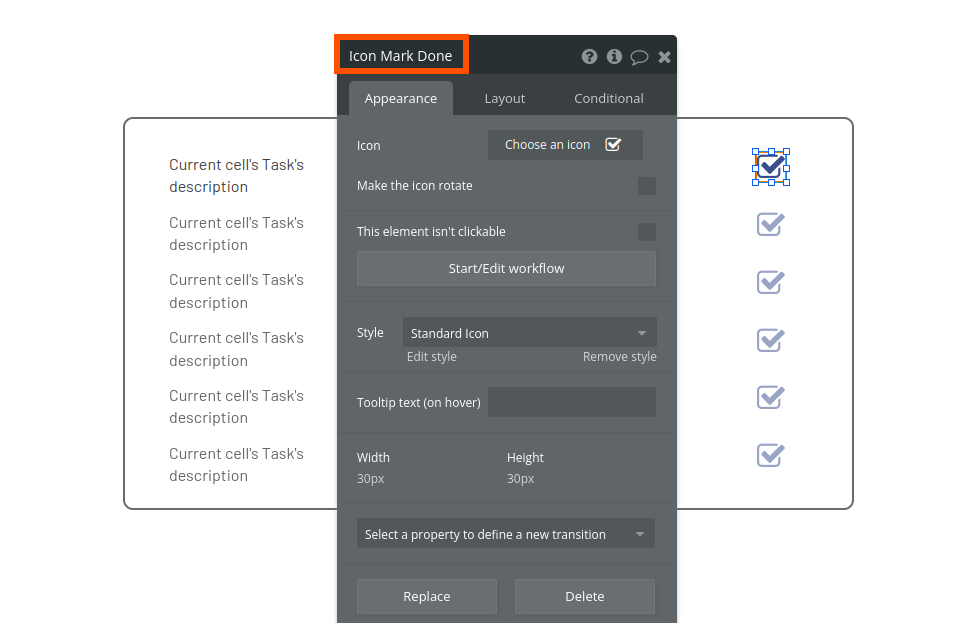
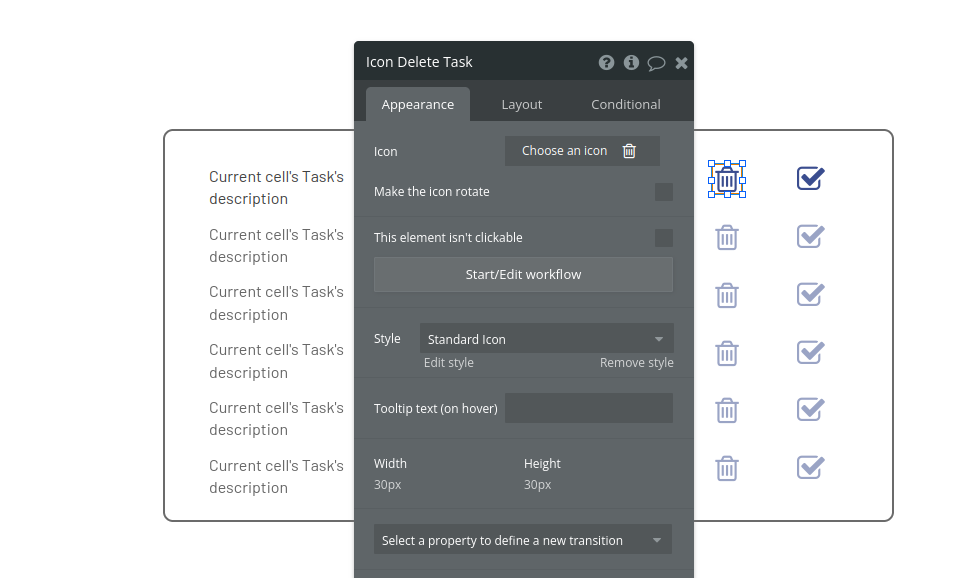
If the users make a mistake in adding tasks, it'd be helpful to have a button to delete the task. Repeat the process to add an icon to delete a task. Use the same method to resize the icon, and don't forget to name it "Icon Delete Task."
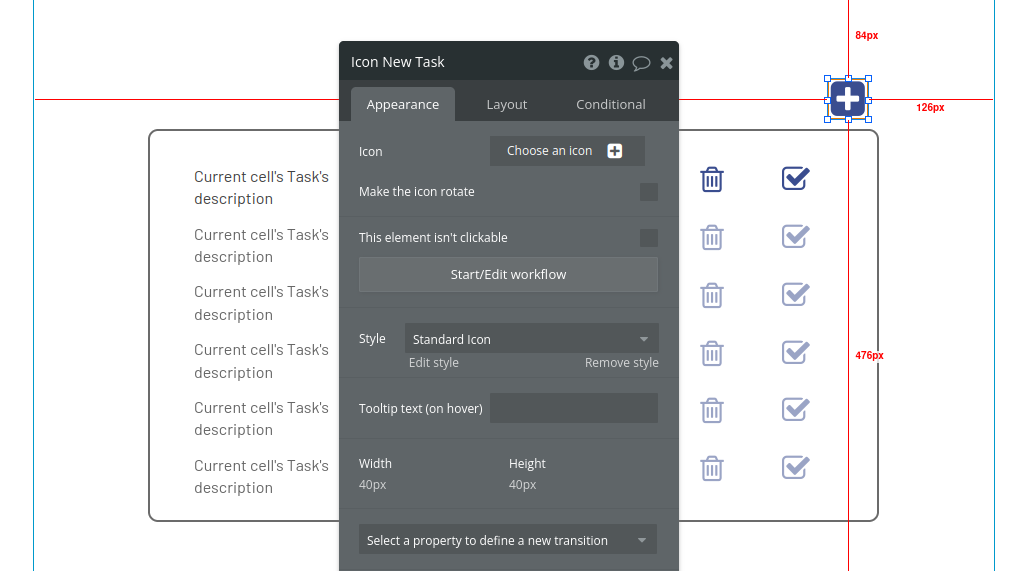
It's time to add a button to add tasks to our list. We'll also use an icon to that effect. Place it on the top right of the to-do list, and name it "Icon New Task."
To add new tasks, we'll bring up a pop-up with an input field and a button. In the UI Builder menu on the left, under Containers, click Popup, and then click in the middle of the canvas to place it.
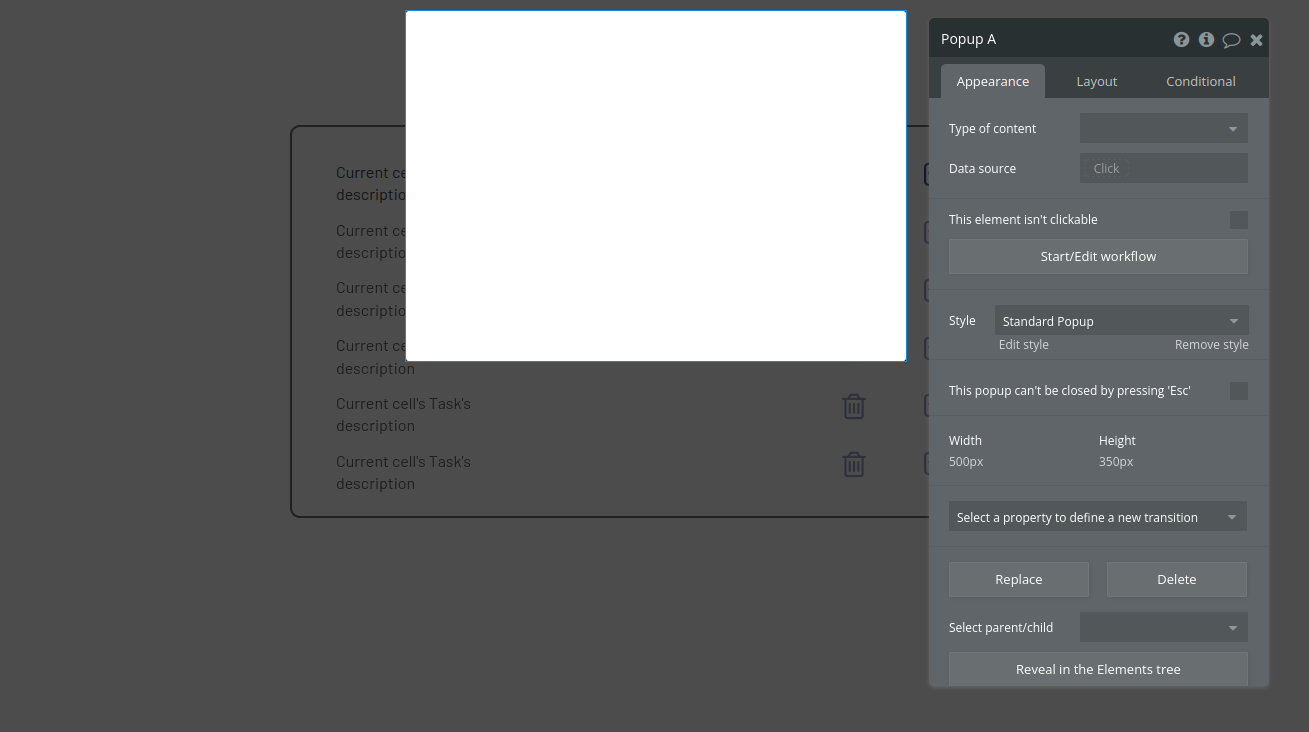
Rename the pop-up in the edit window to "Popup New Task." Next, add a text element to the pop-up, and write "Create new task" in it.
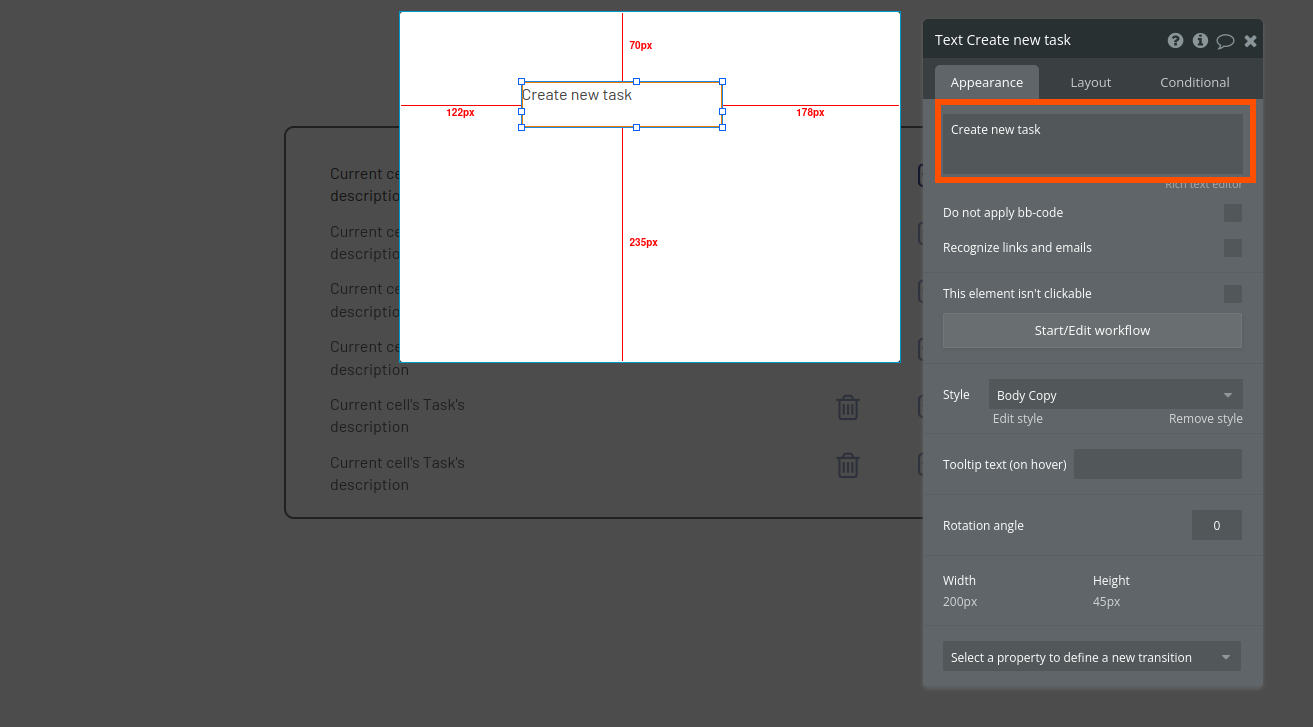
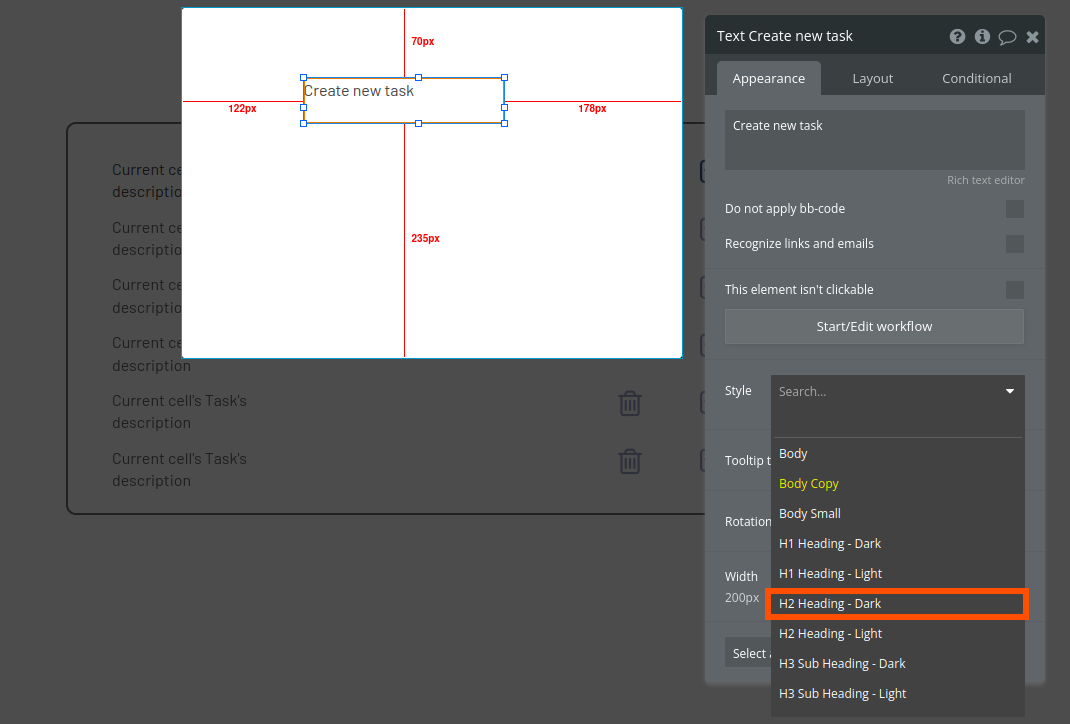
Let's change the style of this text to something more impactful. Click the Style dropdown, and choose H2 Heading - Dark.
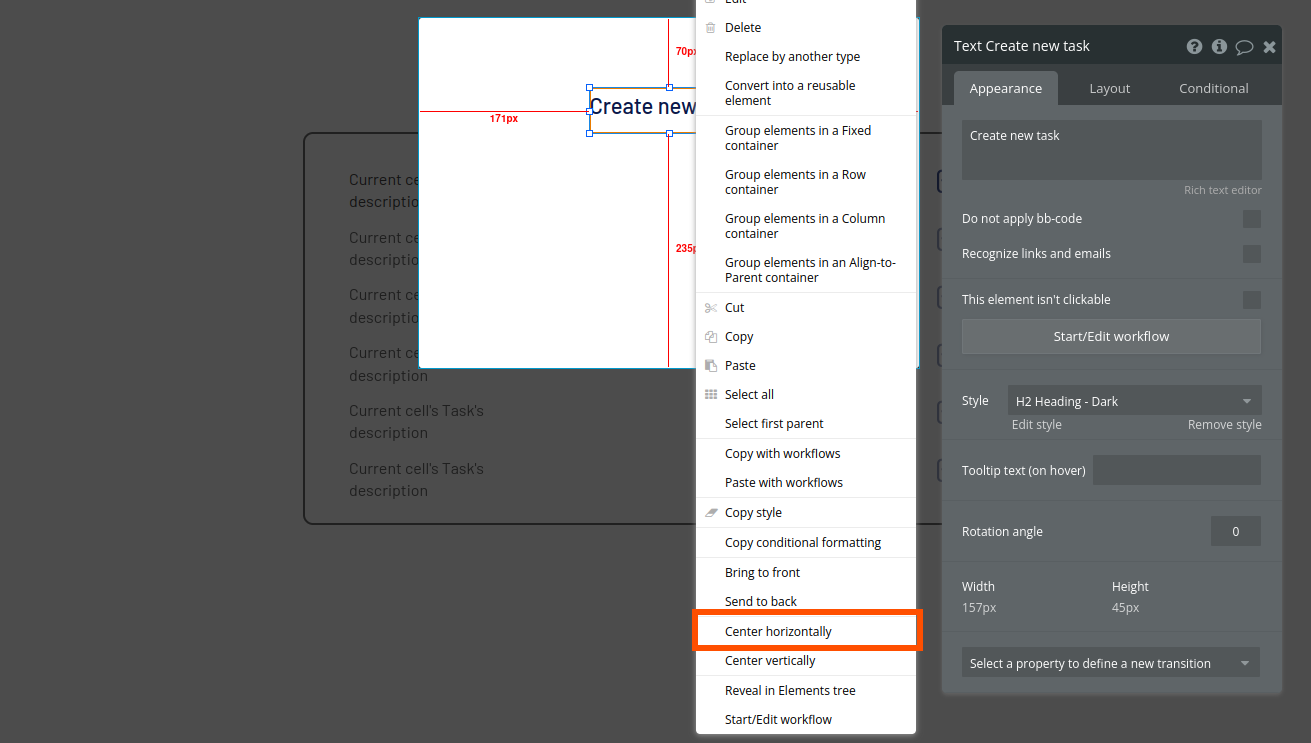
Use the element's handles to resize and position it on the pop-up. To center, right-click it and hit Center horizontally. You can also use the arrow keys on your keyboard to move the element around.
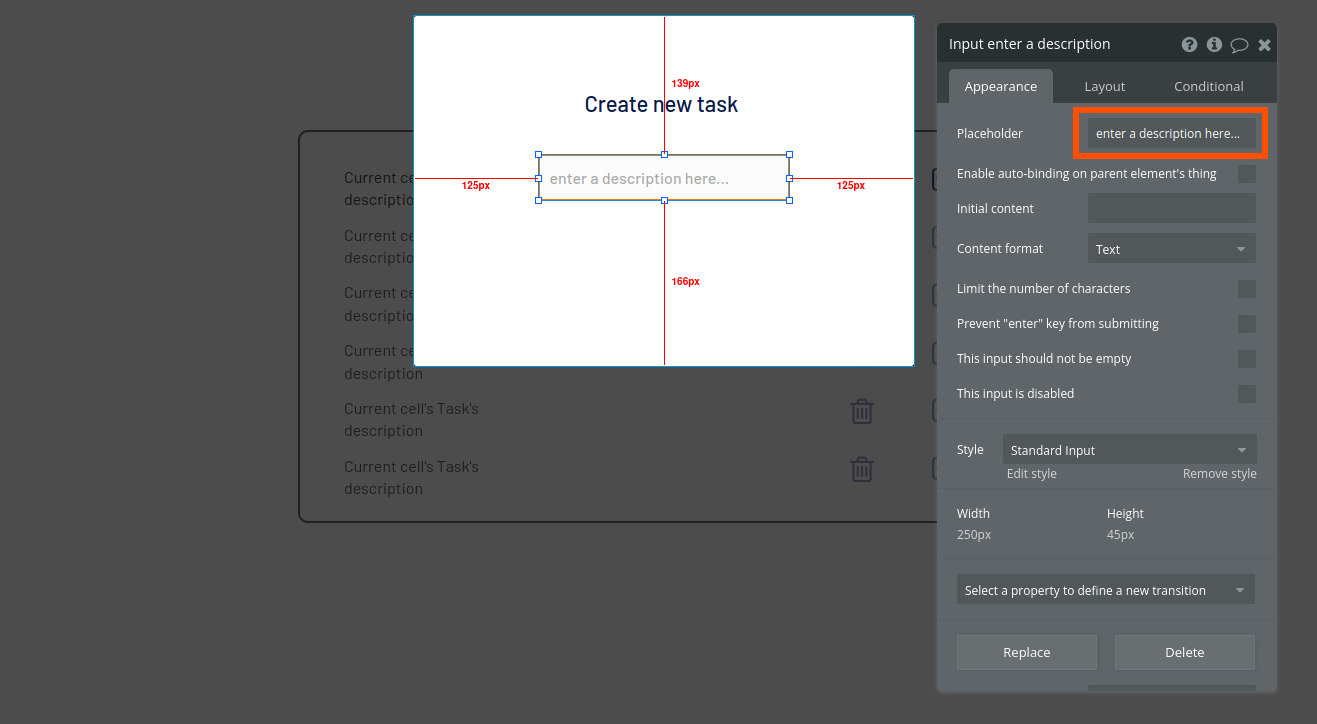
Add an input field under the text element (you'll find it in the UI Builder menu, under the Input forms section). Edit the placeholder value to be "enter a description here…"
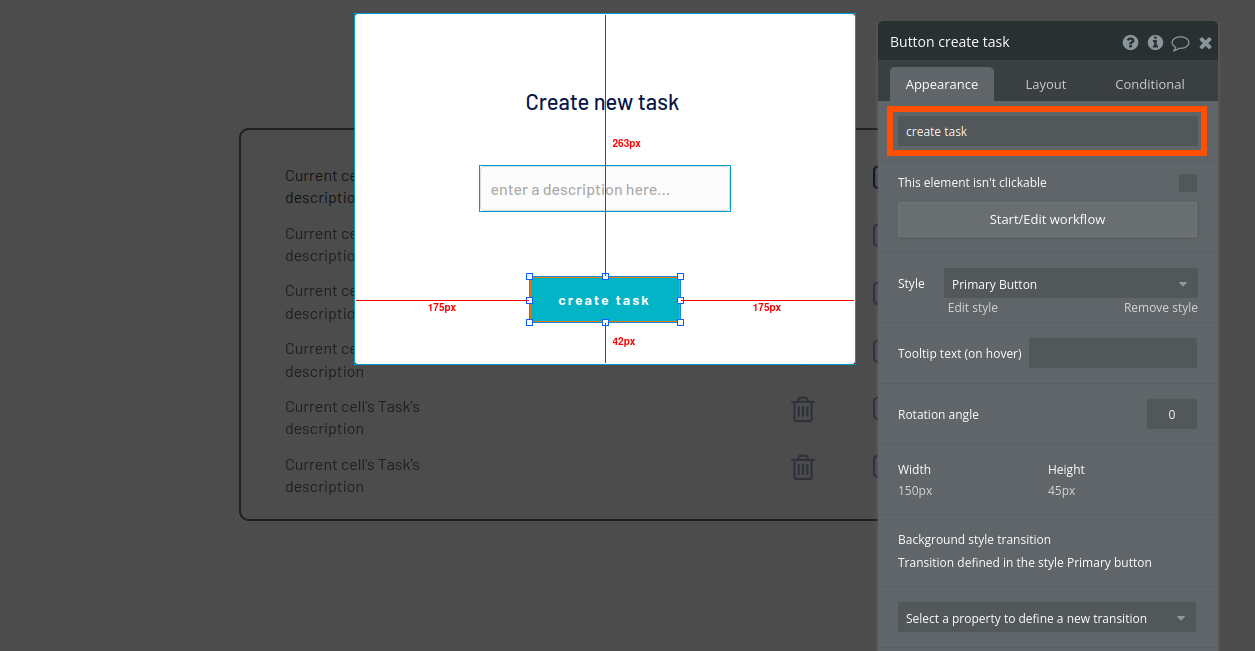
Lastly, add a button (you'll find it under Visual elements on the left menu) underneath both these elements, and label it "create task."
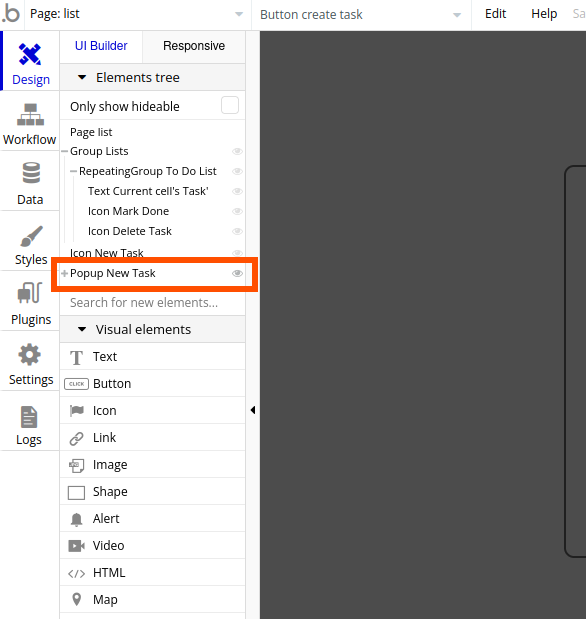
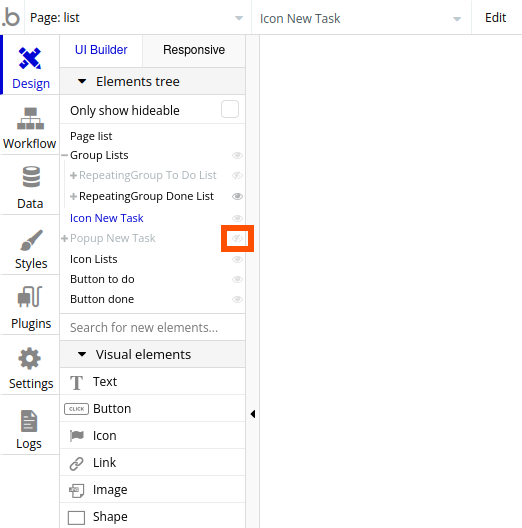
The pop-up is obstructing the rest of our app. Click outside it to hide it. If you want to see it again later, you can toggle its visibility on the left menu, under Elements tree. Look for the pop-up there, and click the little eye icon to show or hide it.
Our app's interface is almost complete. Let's add a list to let our users see completed tasks. We'll use another repeating group that'll filter tasks based on status and owner, very much like the first one we created.
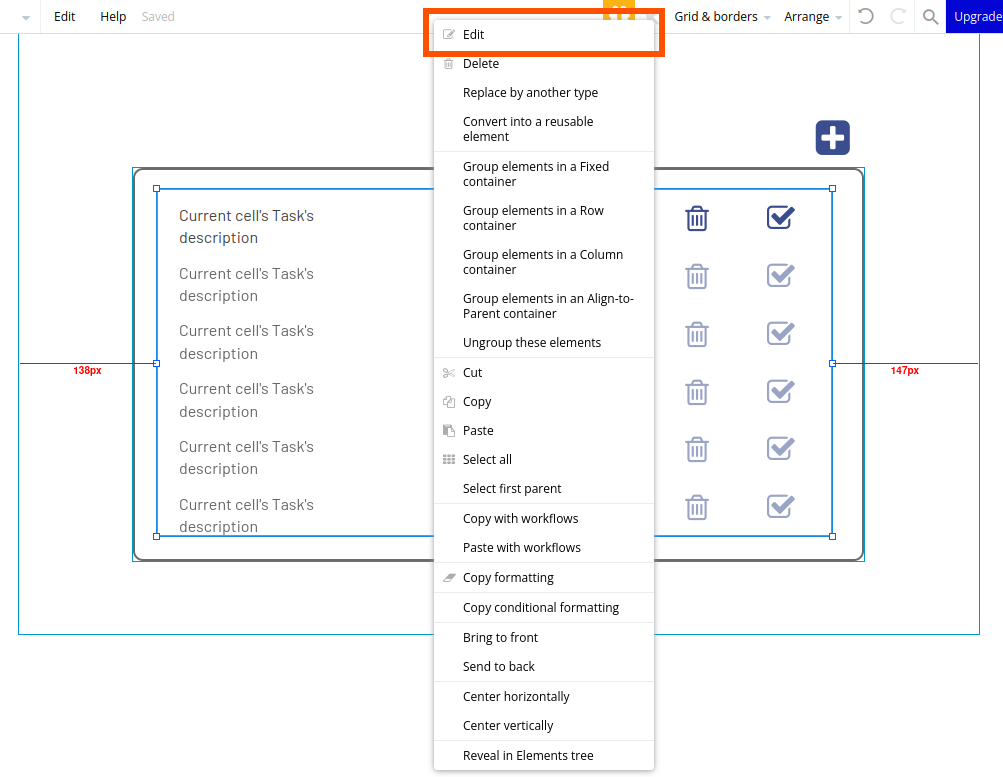
Right-click the RepeatingGroup To Do List and click Edit.
Click the Layout tab.
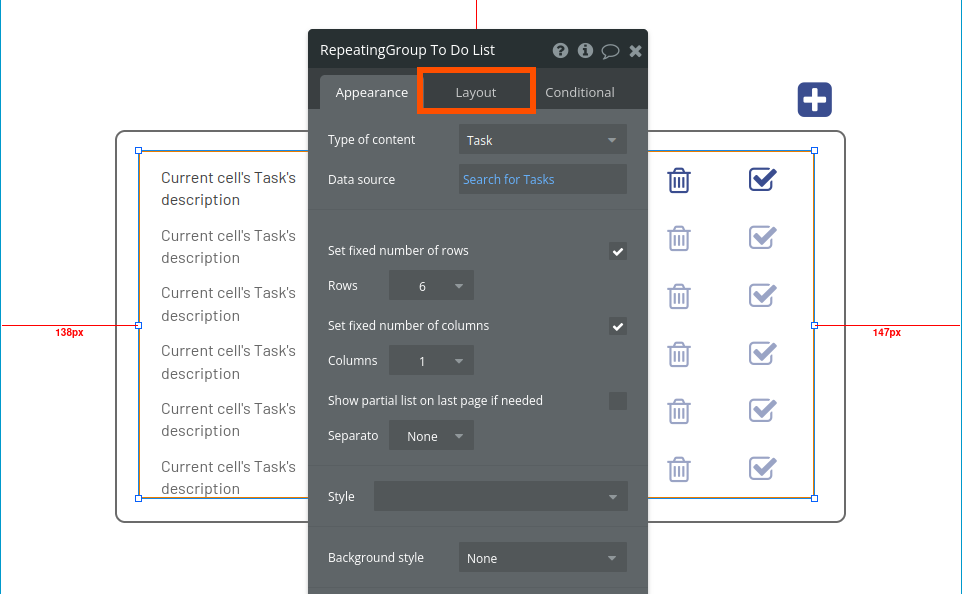
Untick This element is visible on page load. We'll use this property to create a menu later that'll either display the tasks to do or the completed tasks.
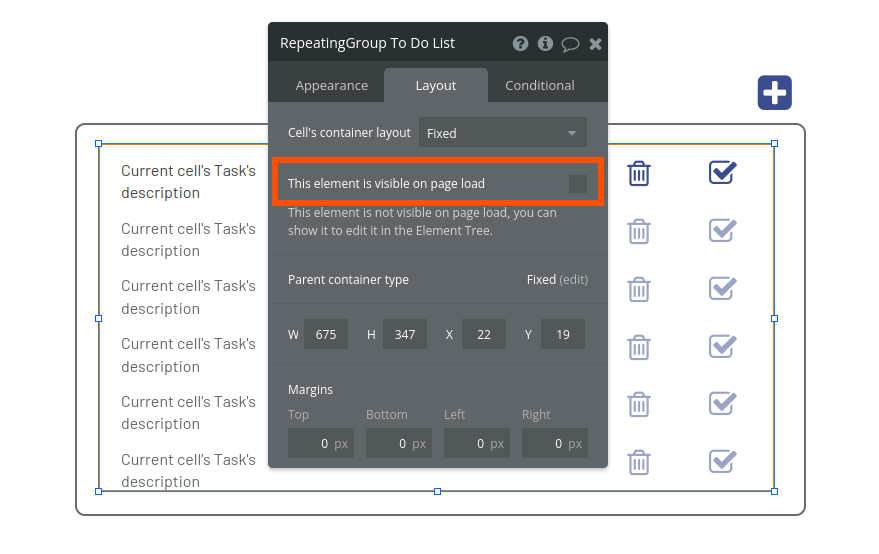
Note the width (W), height (H), X position (X), and Y position (Y) of this element. In this case, it's W 675, H 347, X 22, Y 19.

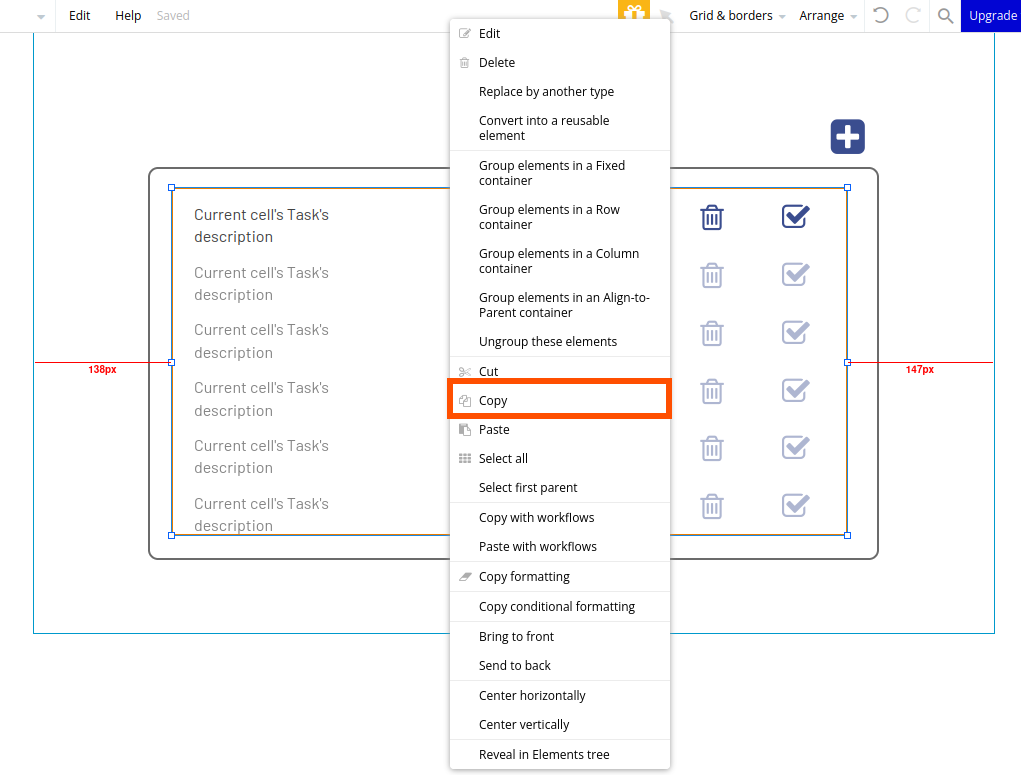
Now, close the dialog box. Right-click the RepeatingGroup To Do List and click Copy.
Right-click inside the top-left region of the Group Lists and select Paste.
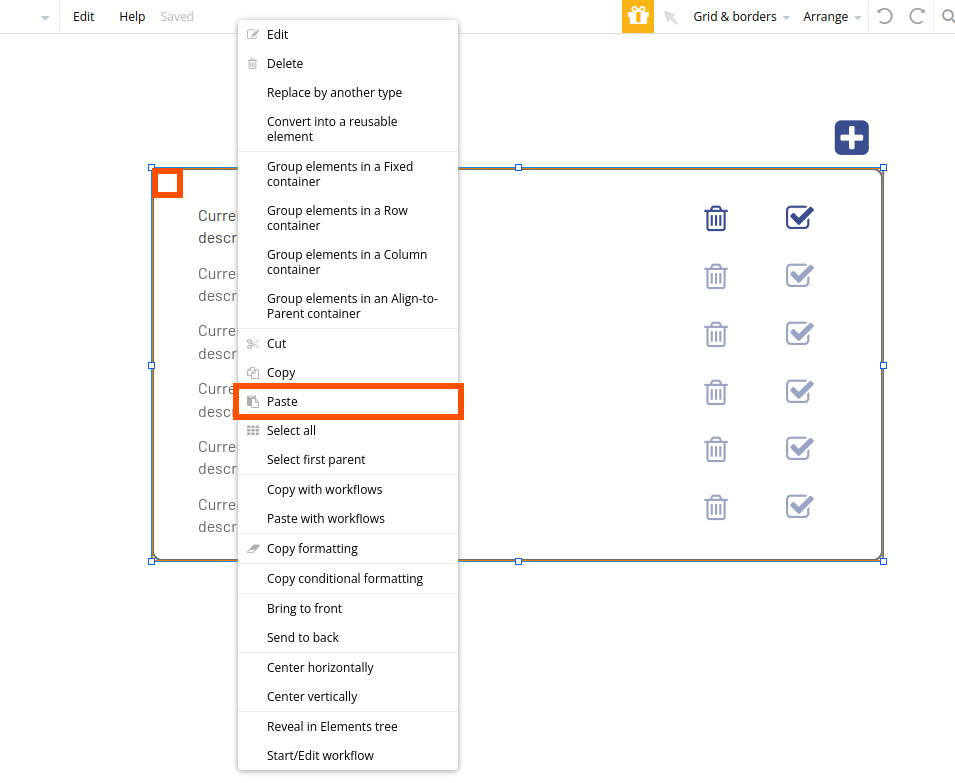
A copy of the repeating group was pasted slightly off the original one. You'll also notice that a new element appeared inside the Element tree on the menu on the left. Click the little eye to hide the RepeatingGroup To Do List.
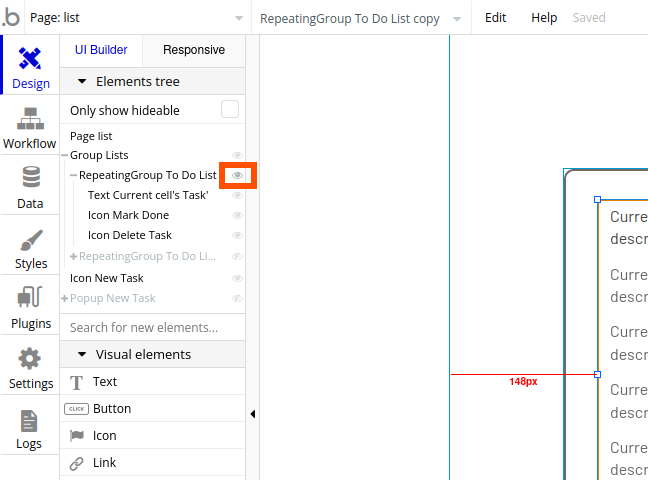
Now, click the RepeatingGroup To Do List copy to open the edit dialog.
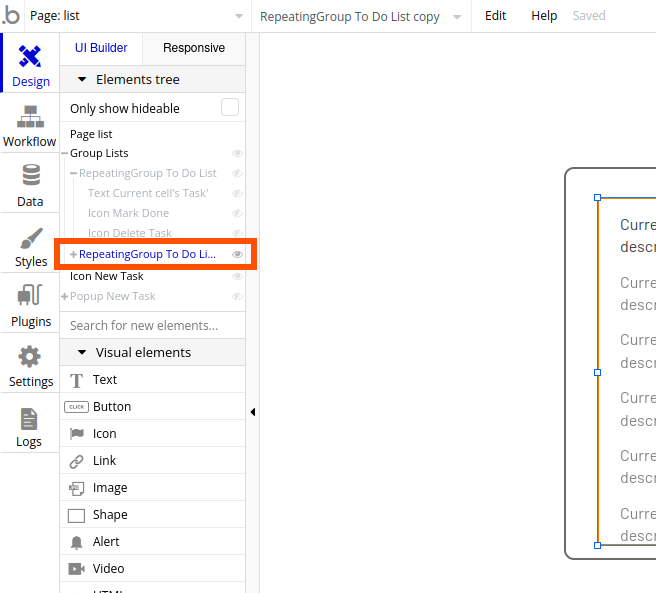
To keep everything organized, change the name of this group to RepeatingGroup Done List (to do this, click the name on the header of the edit dialog).
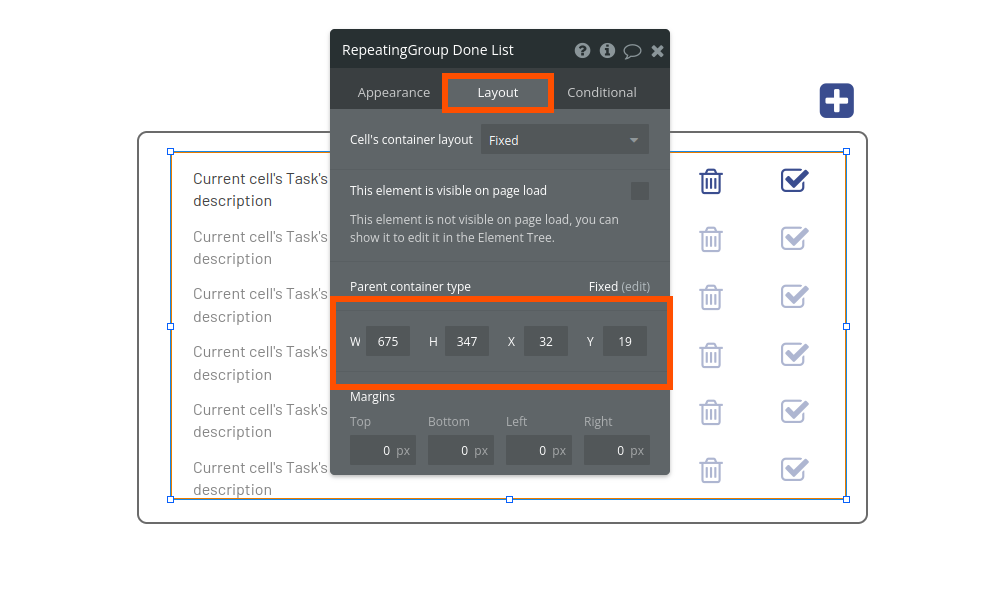
Click the Layout tab, and enter the W, H, X, Y values you copied earlier (W 675, H 347, X 22, Y 19). This will ensure that both lists will have the same dimensions and position on the page.
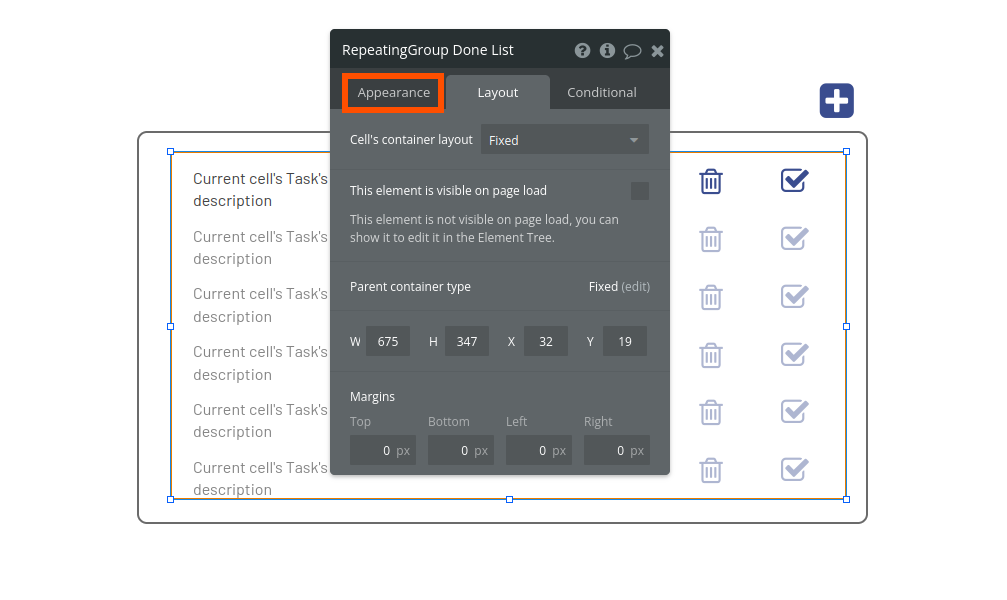
It's time to change the type of tasks we'll show on this list. Click the Appearance tab.
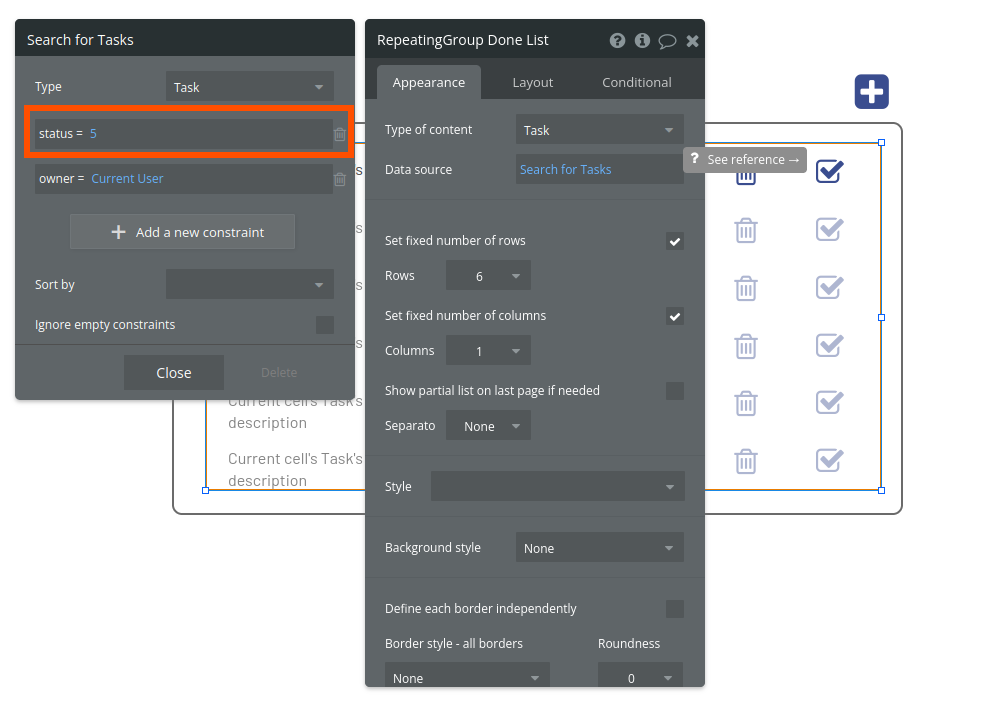
On the Data source field, click the expression Search for Tasks. A new dialog will appear. On the status constraint, change the "0" to a "5" (it's the number that we decided would mark a task as done). Leave all other fields as they are.
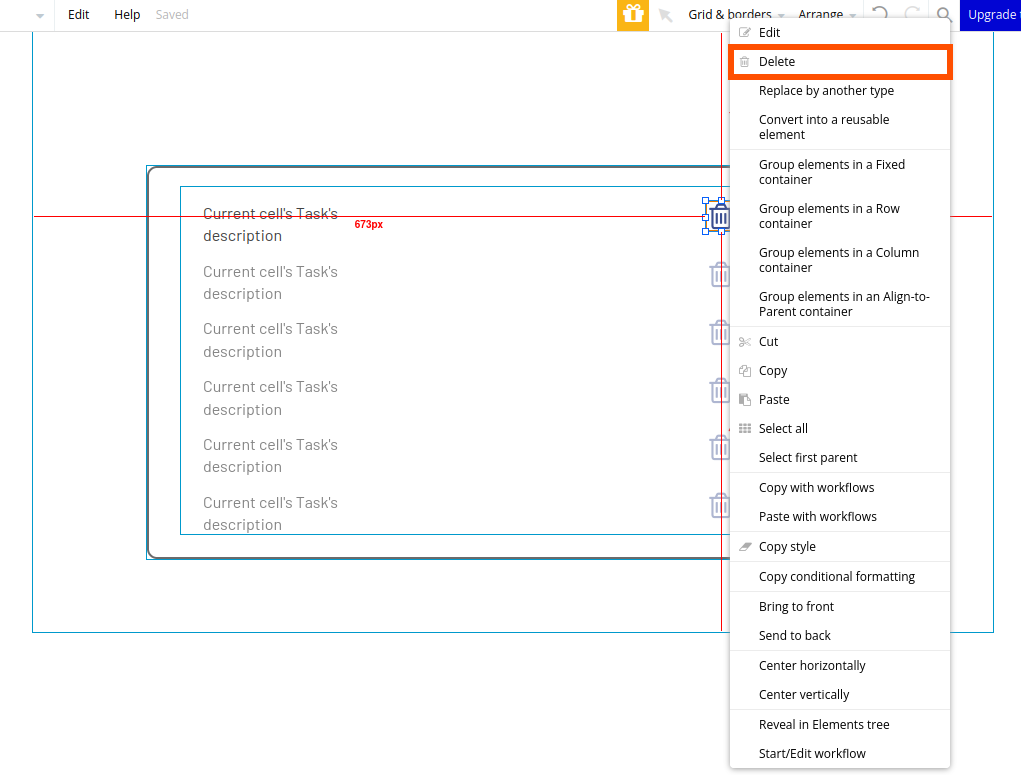
We won't need a delete icon for completed tasks inside the "done" list. You can right-click and delete it.
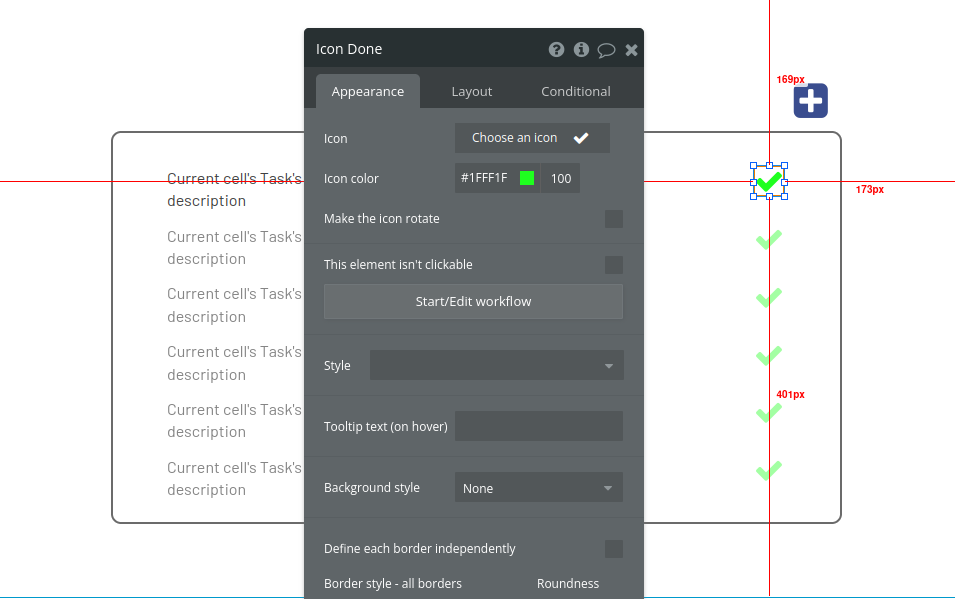
The icon to display that the task is complete should be different from the one we have to mark the task as done. Choose a more appropriate icon. Once you find the right one:
Change its color to green (right-click the icon, click Edit; under Style click Remove style, and you'll see a color picker above).
Change its name to "Icon Done."
Now we have two repeating groups—one is showing the tasks to do and the other is a list of completed tasks. We need a way to toggle between them. Let's add a simple menu on top of the list to do just that.
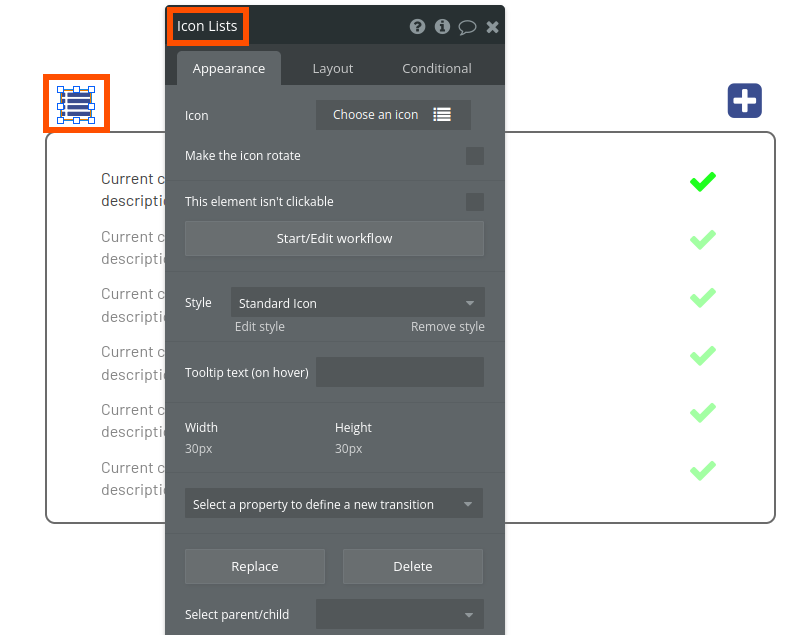
Add an icon suggesting the functionality of the menu on the top left. Name it "Icon Lists."
Add a button labeled "to do," followed by another labeled "done."
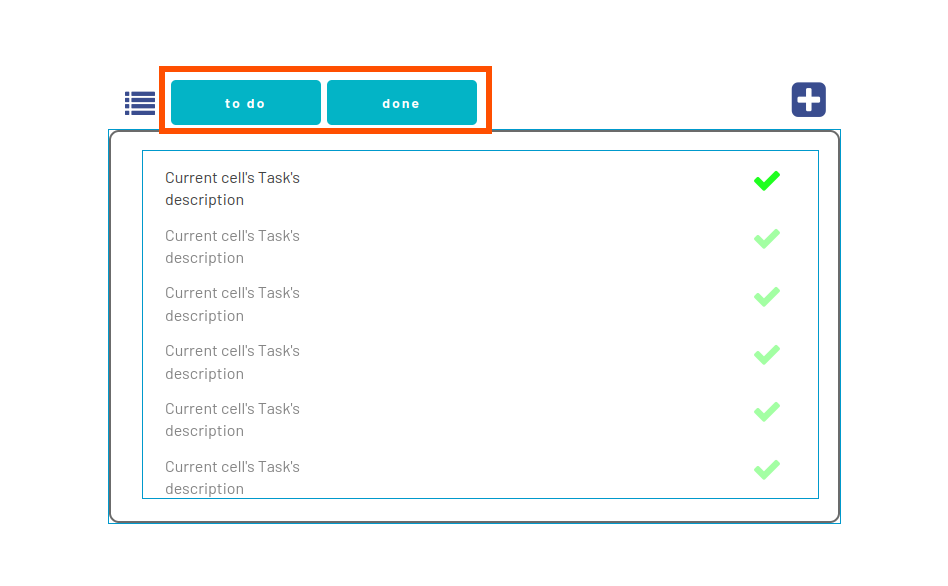
We'll use something called "custom element states" to toggle the visibility of each list. Custom element states are an agile way to control many aspects of the user interface in Bubble.
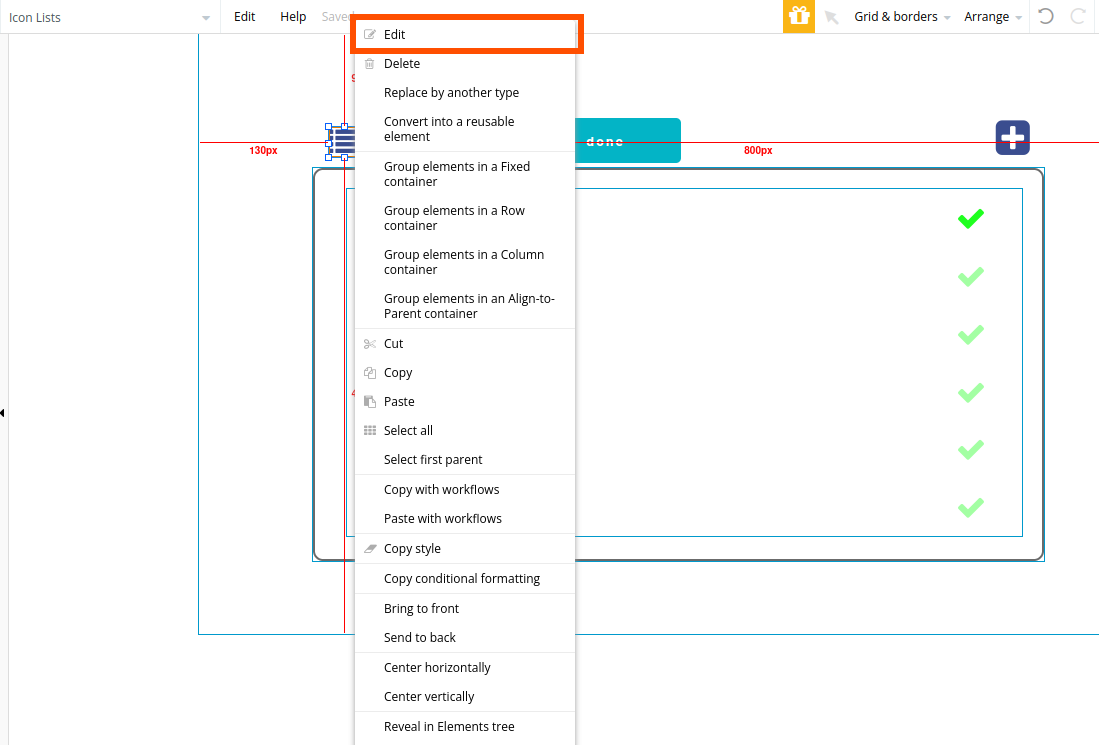
Right-click the Icon Lists we placed, and click Edit.
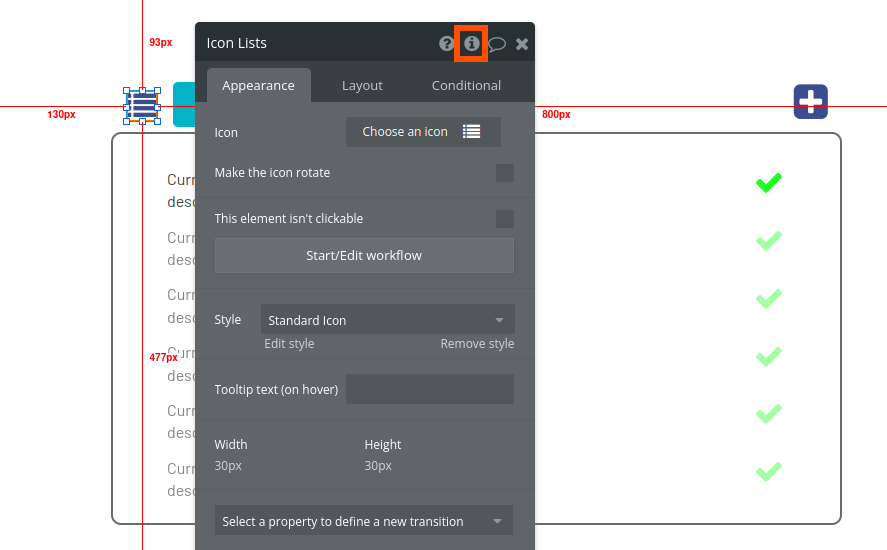
Click the small i button on the edit dialog's header (Element inspector).
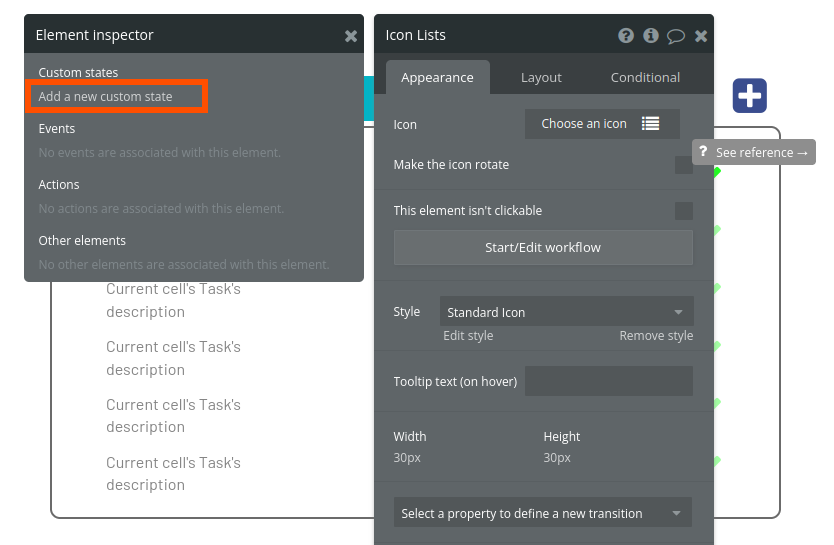
Under Custom states, click Add a new custom state.
Set the State name to "active-list" and the State type to "number." Finish by clicking Create.
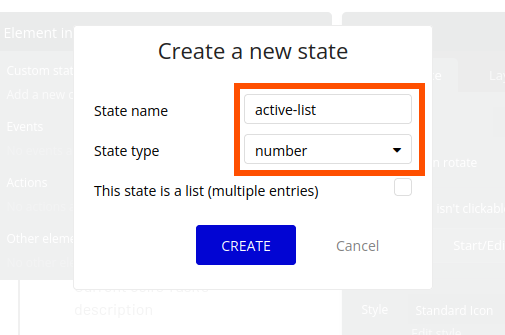
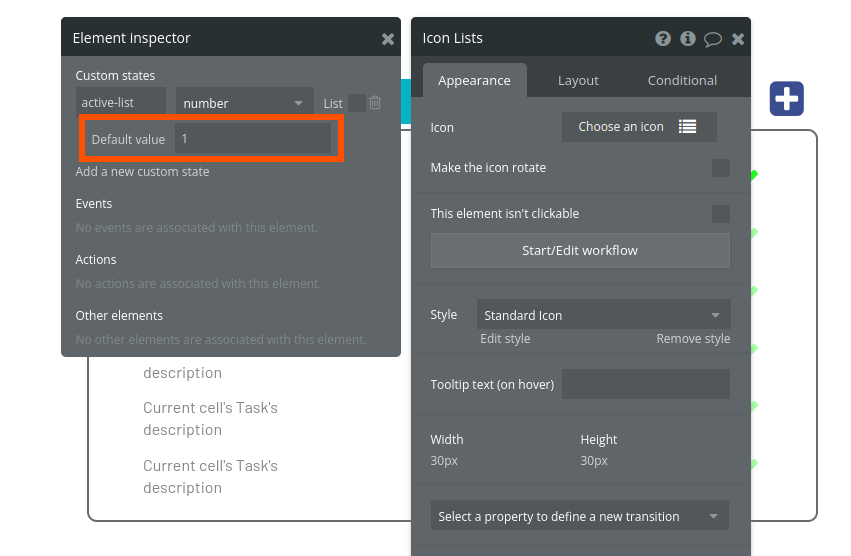
We'll use this state in the following way: whenever the state is set to 1, the RepeatingGroup To Do List is visible; when the state is set to 2, the RepeatingGroup Done List is visible. Since we want our users to see the to-do list every time they open the page for the first time, we can set the default value to 1.
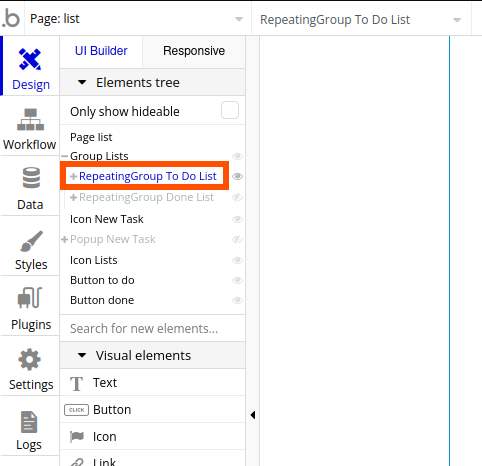
Now that we have this custom state, we'll need to let our repeating groups know when they should appear and disappear. On the Elements tree, click the RepeatingGroup To Do list.
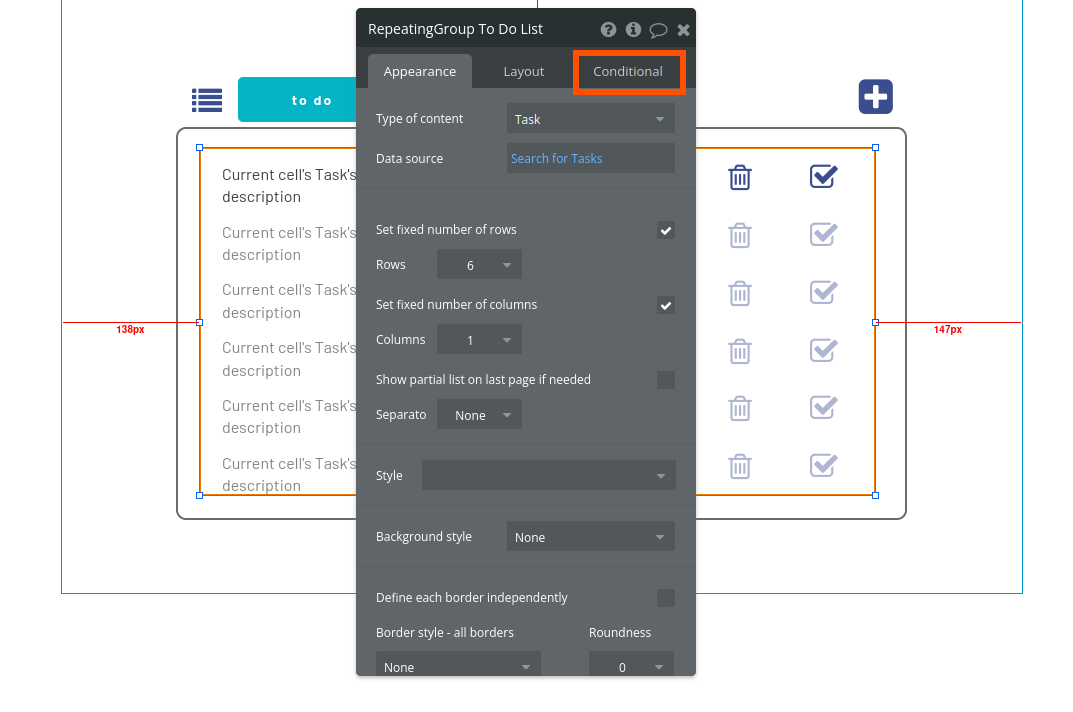
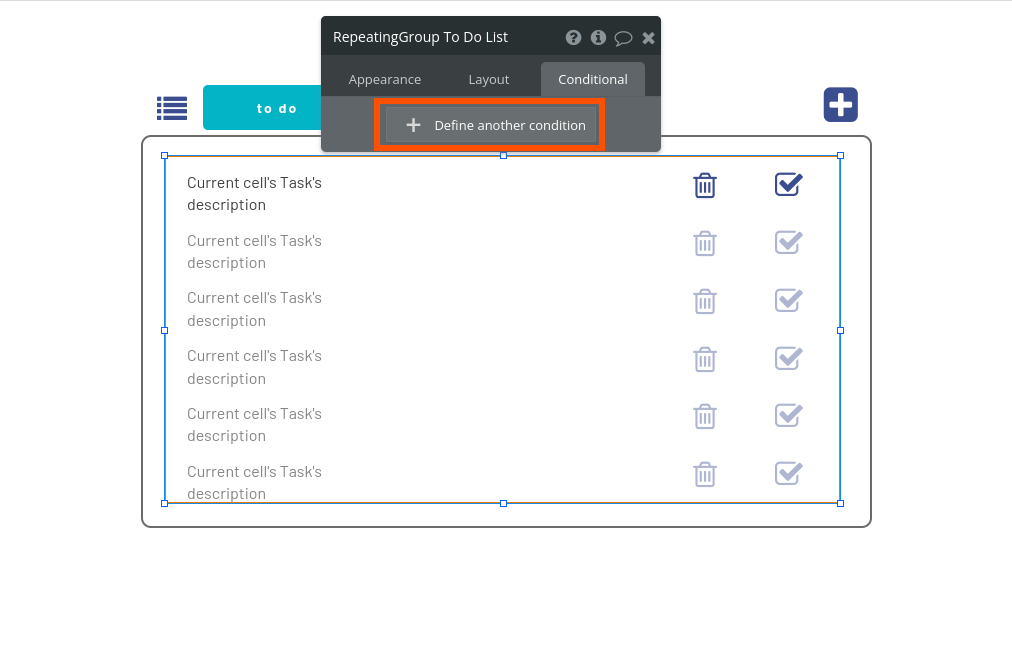
On the editing dialog that appears, click the Conditional tab.
This tab lets you change the characteristics of this element when certain conditions are true. Let's add a new condition. Click Define another condition.
Click the input field in front of When. On the dropdown that appears:
Scroll down to find the Icon Lists, and click it.
Continue the expression by selecting 's active-list.
Then, select is.
Type in the number 1, and press enter on your keyboard
The result should look like this:
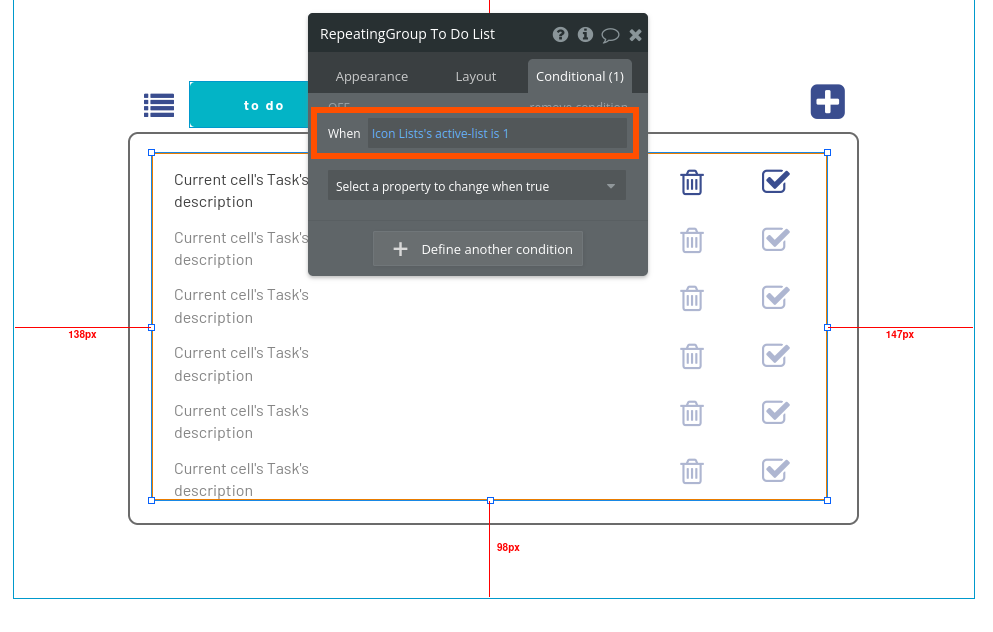
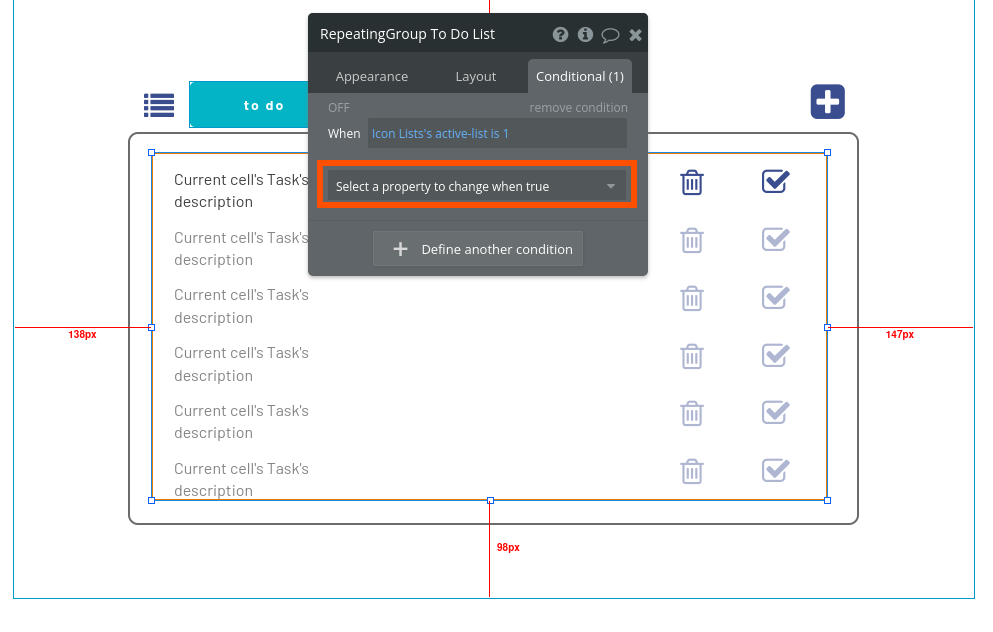
Click the dropdown labeled Select a property to change when true.
Select This element is visible.
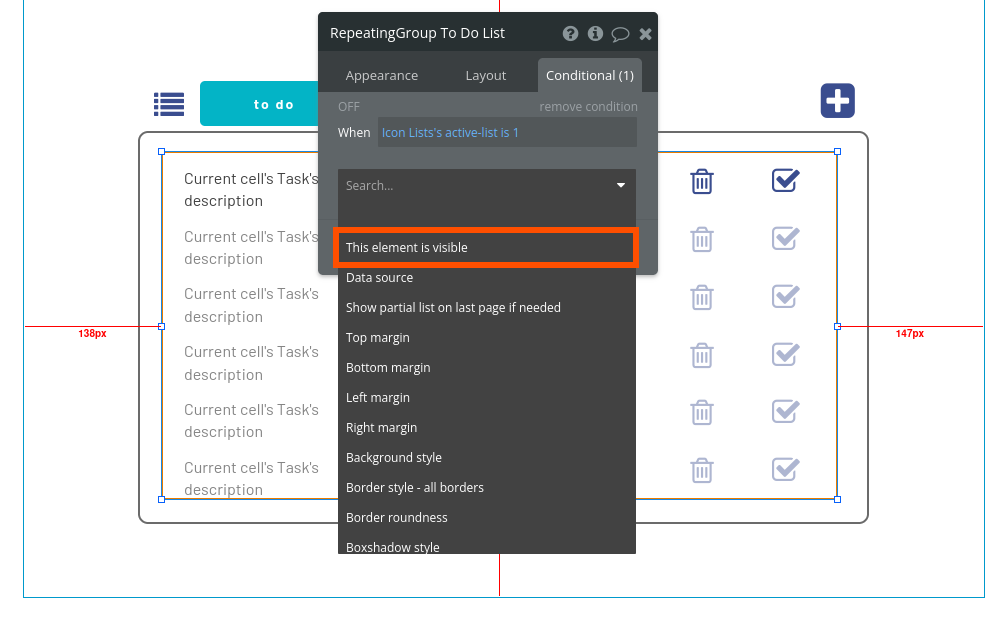
Don't forget to tick the box.
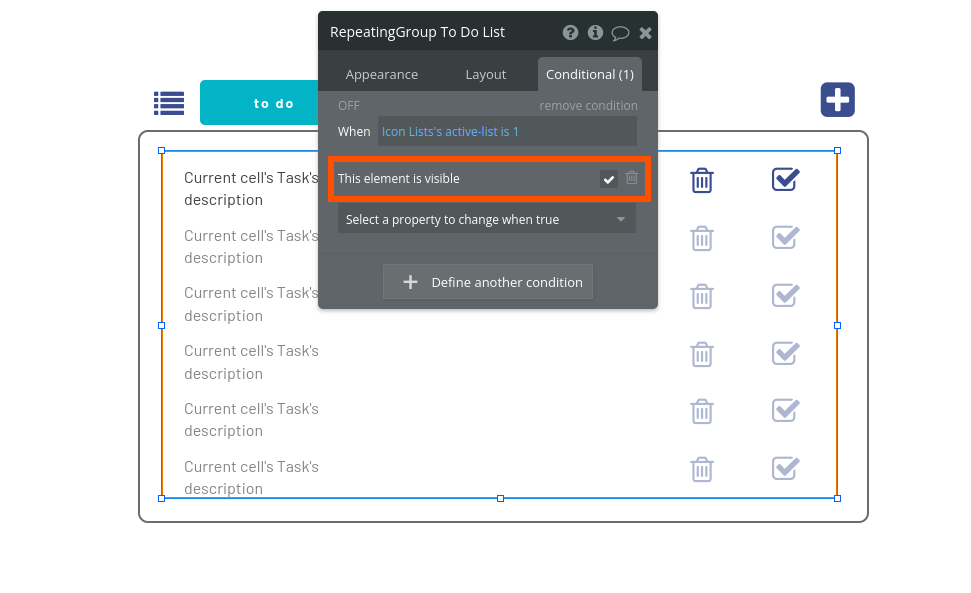
Here's what's happening: whenever the Icon list's custom state is 1, this repeating group will show. Let's repeat a similar process to display the done list. On the left menu, inside the Elements tree, click the RepeatingGroup done list.
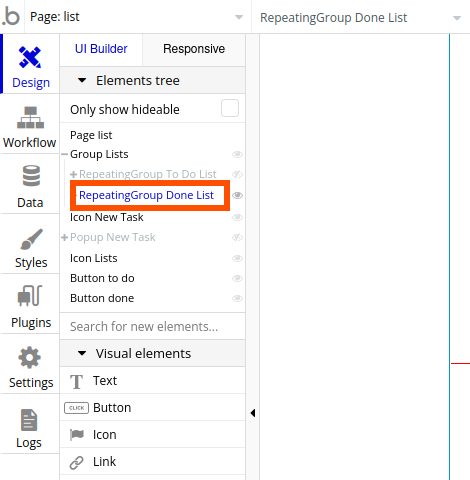
The edit dialog should already be on the Conditionals tab. Click to set the expression as before:
Choose Icon lists > 's active-list > is.
This time, type the number 2, and press enter.
Click the dropdown Select a property to change when true, pick This element is visible, and tick the box.
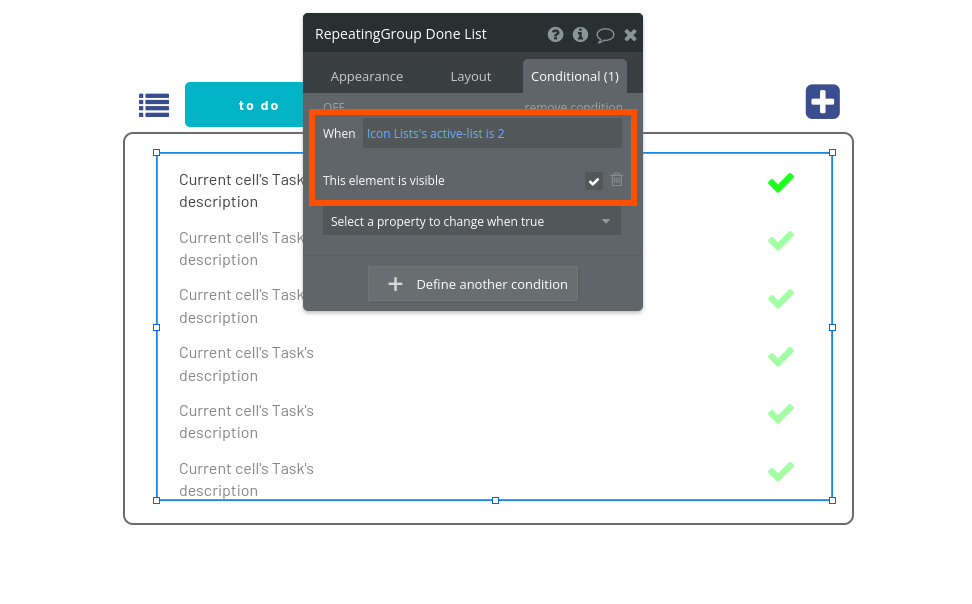
Now, whenever the Icon list's custom state is set to 2, this repeating group will show. We'll configure the means to change these states (and change the visibility of these elements) in the following section.
The user interface is ready to go. We have all the elements pulling information from the database and displaying information the way we want them to, and we also have all the buttons and states we need for the functionality. It's time to tie everything together with workflows.
Part 3: Logic and workflows
Now comes the exciting part. This is when the app will actually do what we want it to do. Now, we'll be configuring all the buttons and icons to carry out the right actions.
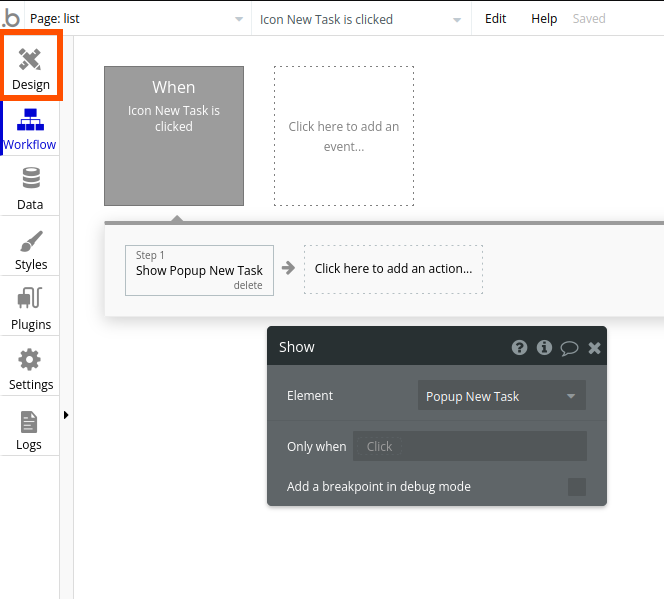
Right-click the icon to add a new task, and click Start/Edit workflow.
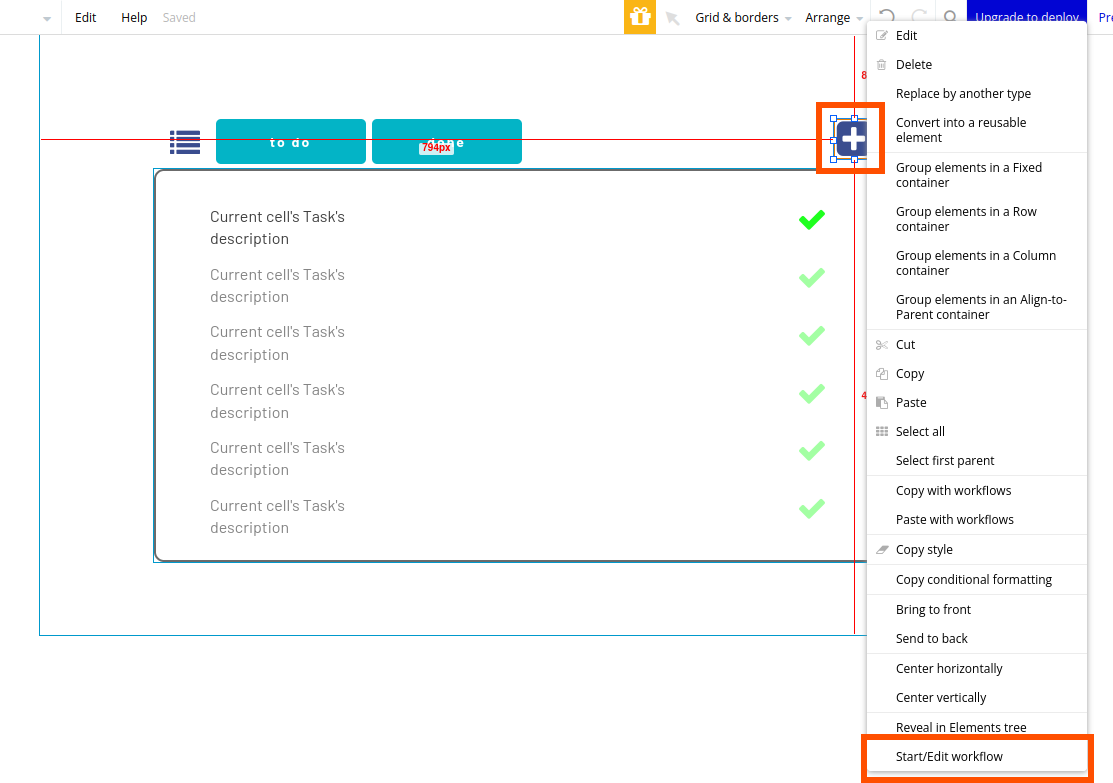
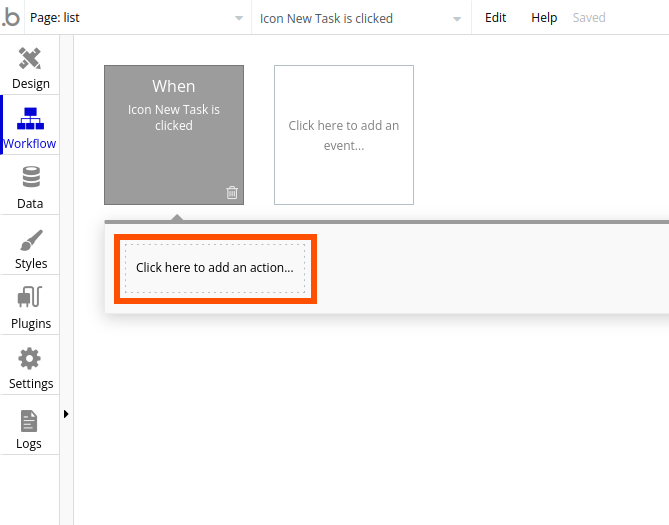
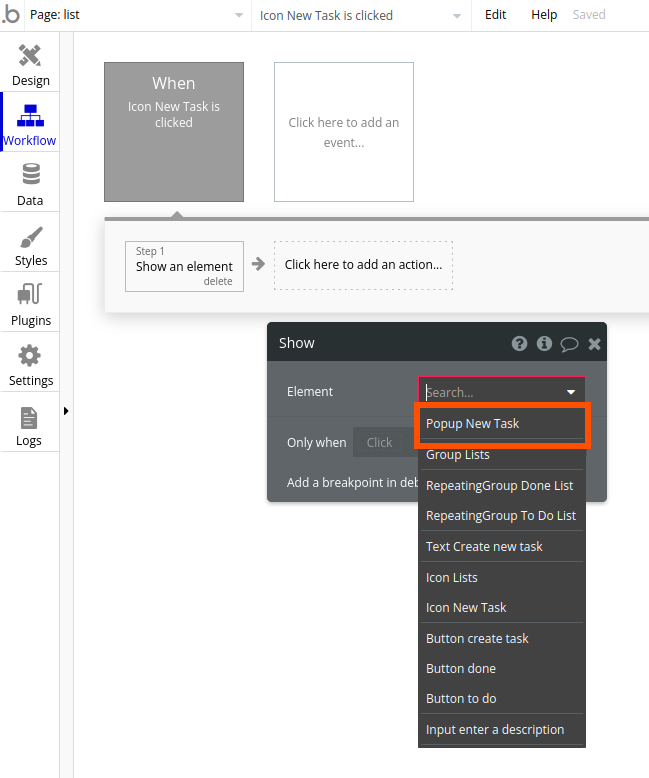
We'll be using this button to display a pop-up. Click Click here to add a new action…
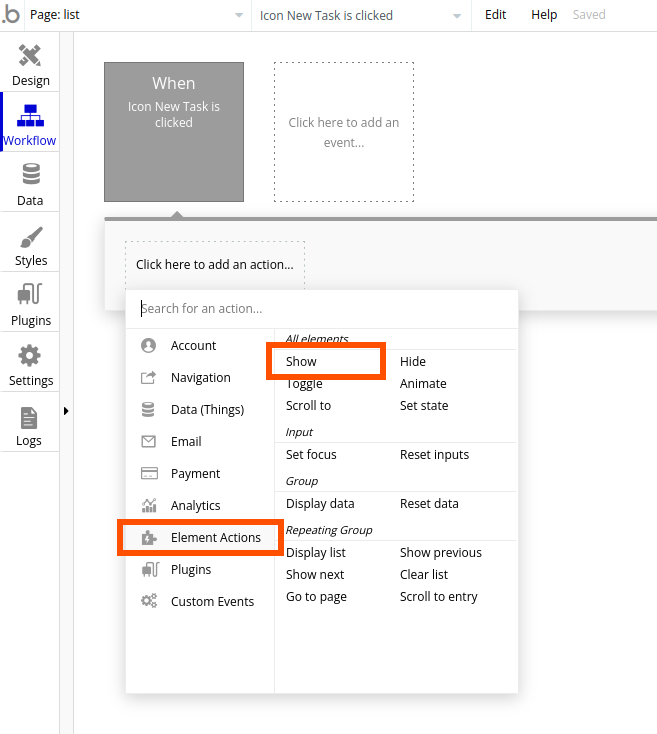
Hover over Element Actions and click Show.
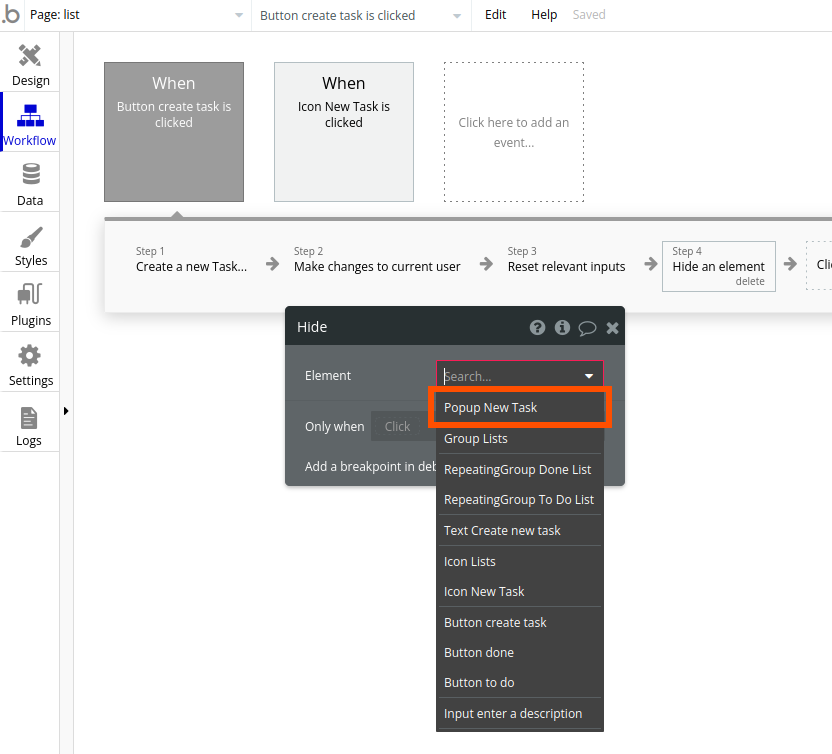
A new dialog appears. Click the Element dropdown, and select Popup New Task.
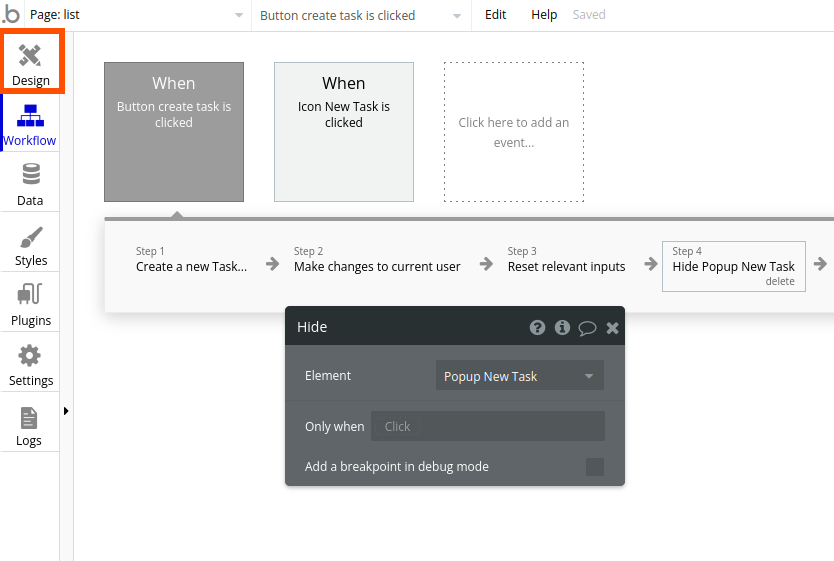
Now, whenever the user clicks that button, it'll show the Popup New Task. Let's go back to the Design tab to find the next element we'll configure.
Let's set up the button to create tasks we put inside the pop-up. Make the pop-up visible by clicking the little eye icon in the Elements tree menu on the left side of your screen.
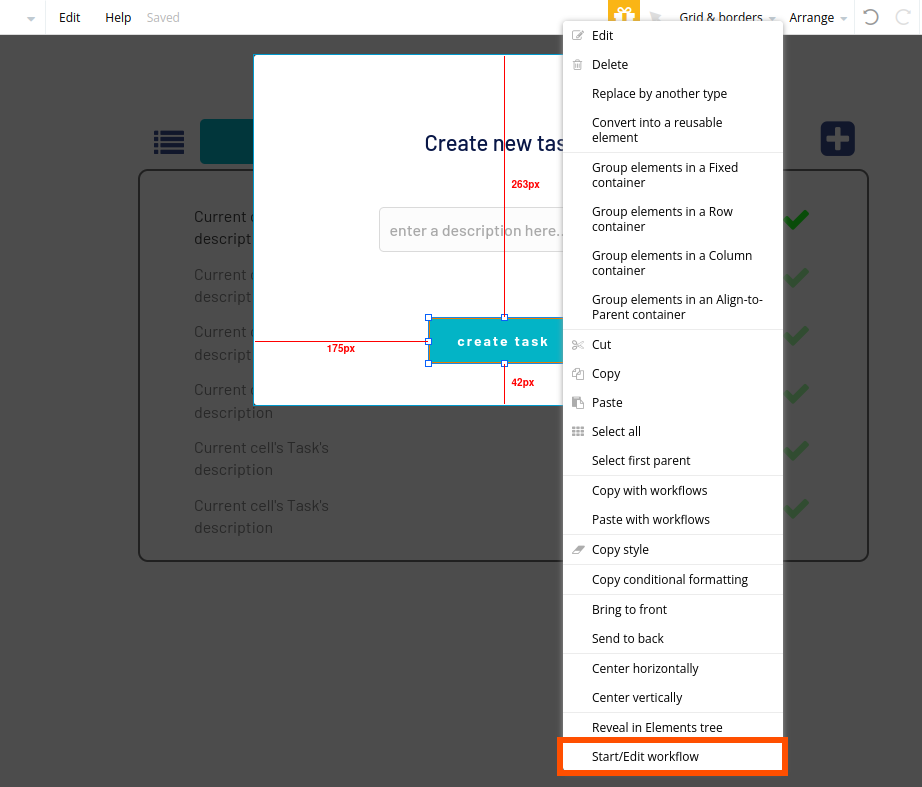
Right-click the button labeled create task, and click Start/Edit workflow.
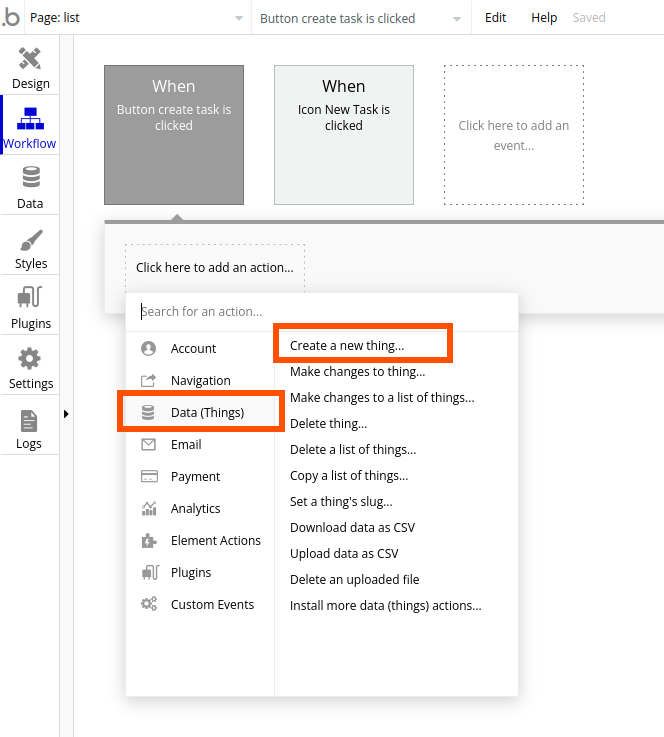
This workflow will be longer. Click to add a new action. Hover over Data (Things) and click Create a new thing.
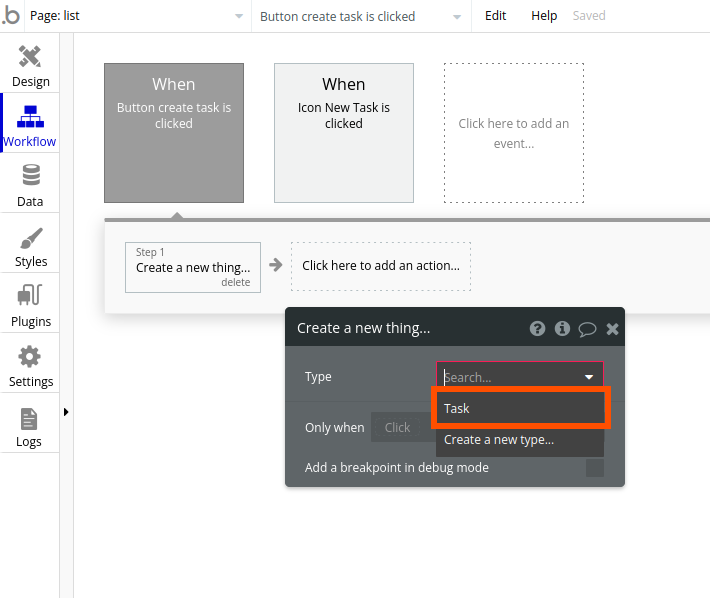
The type of thing we want to create is Task. Select it from the dropdown menu.
We want to fill some of the task's data fields. Click Set another field.
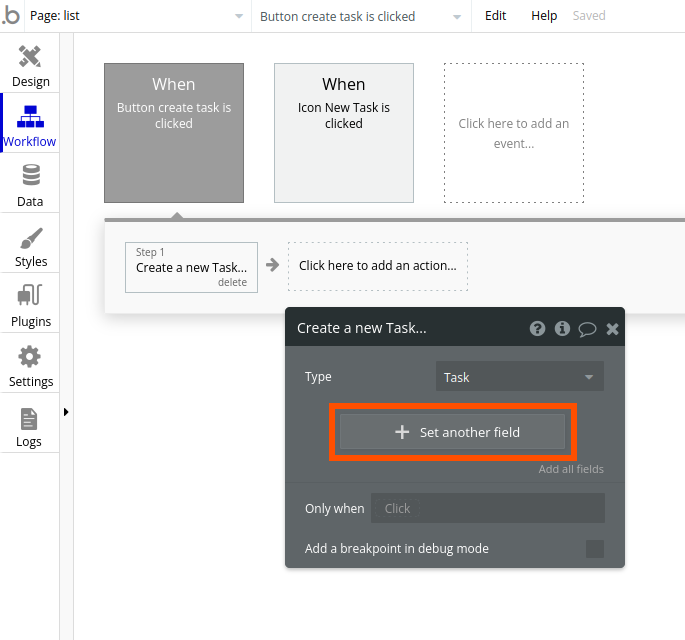
Click the input field, and select description from the dropdown menu.
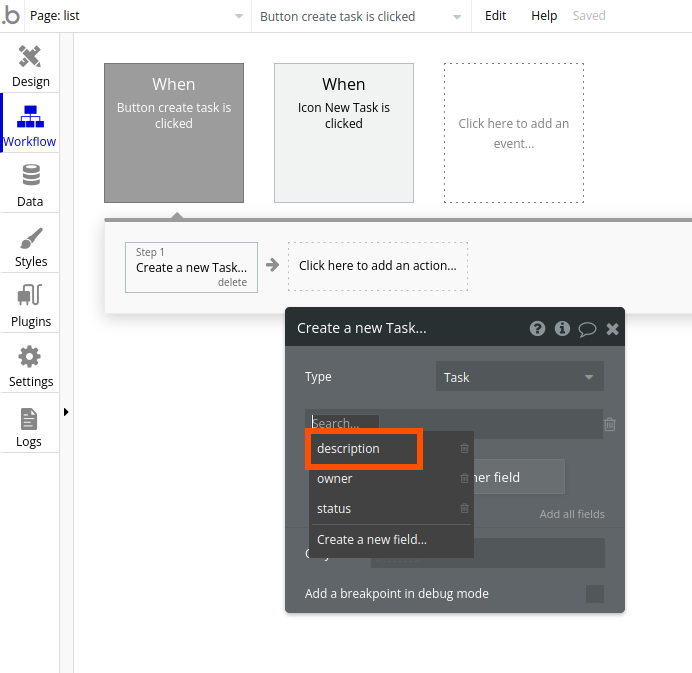
Click the area in front of the = sign. In the dropdown menu that appears, click Input enter a description.
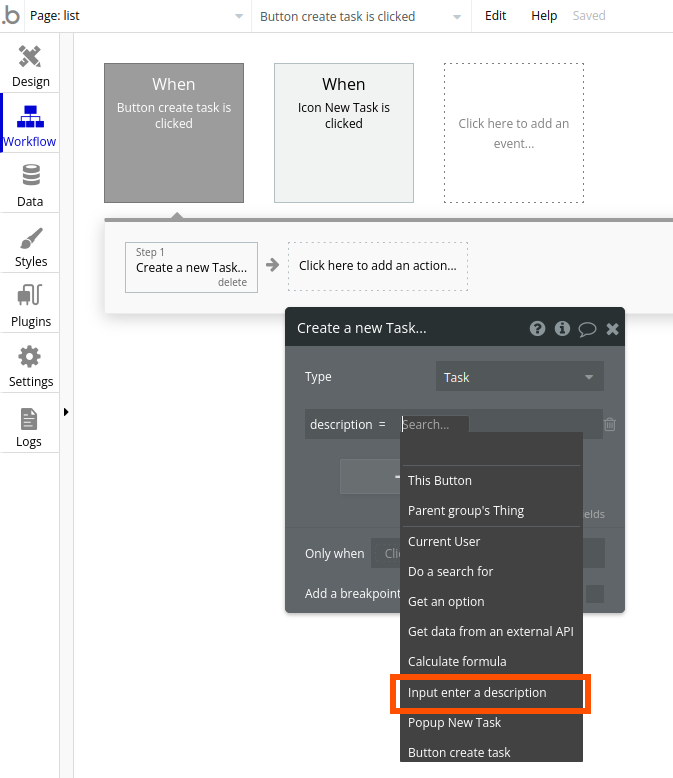
This will let Bubble know that it should fill the "description" data field with whatever is inside the input field we placed inside the pop-up element earlier. Finish the expression by selecting 's value.
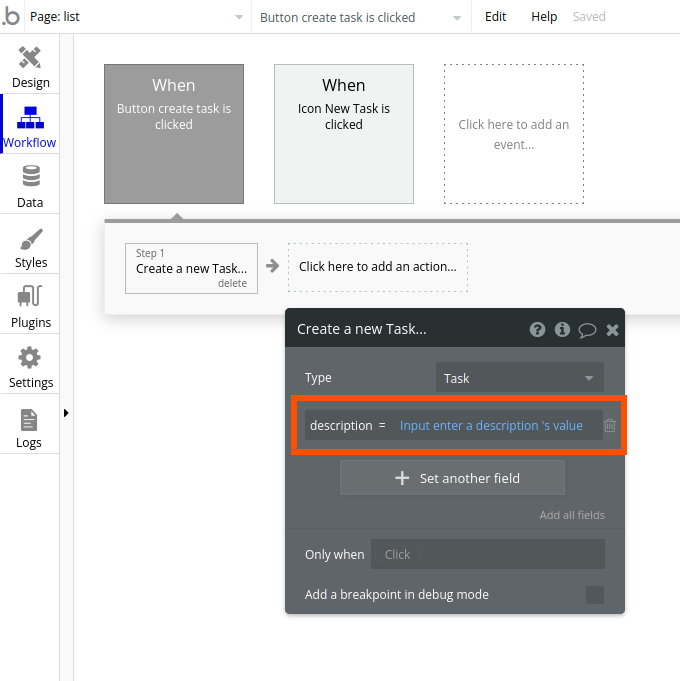
When a task is created, it's likely it's not complete. Click to set another field. Choose status from the dropdown menu.
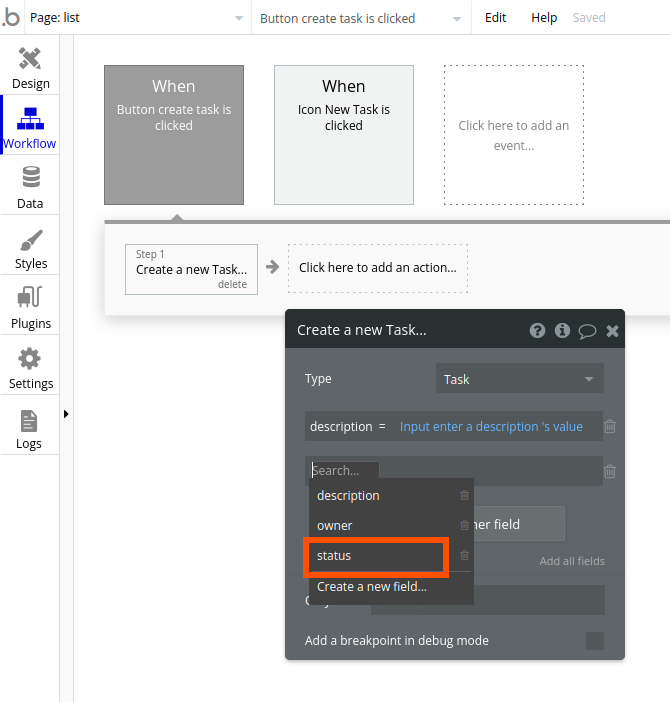
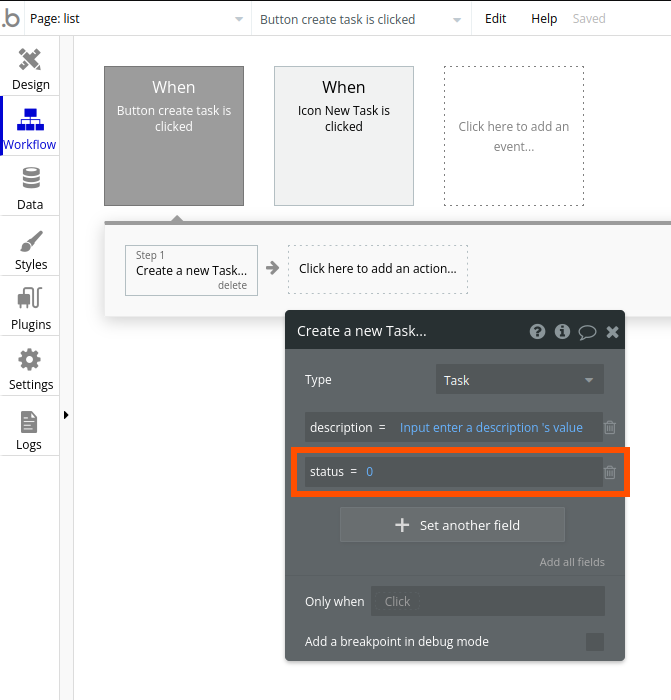
Click the area in front of the = sign. We won't be choosing anything from the dropdown menu. Simply type the number "0" and press enter on your keyboard.
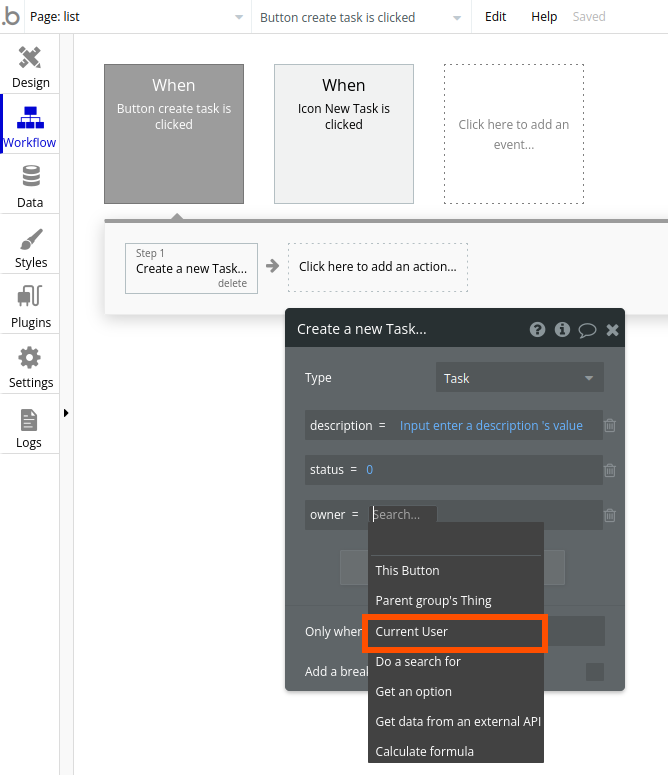
Finally, we need to set an owner for this task. Repeat the process to set another field and choose owner as the field to set. Click the area in front of the = sign. Choose Current User from the dropdown menu.
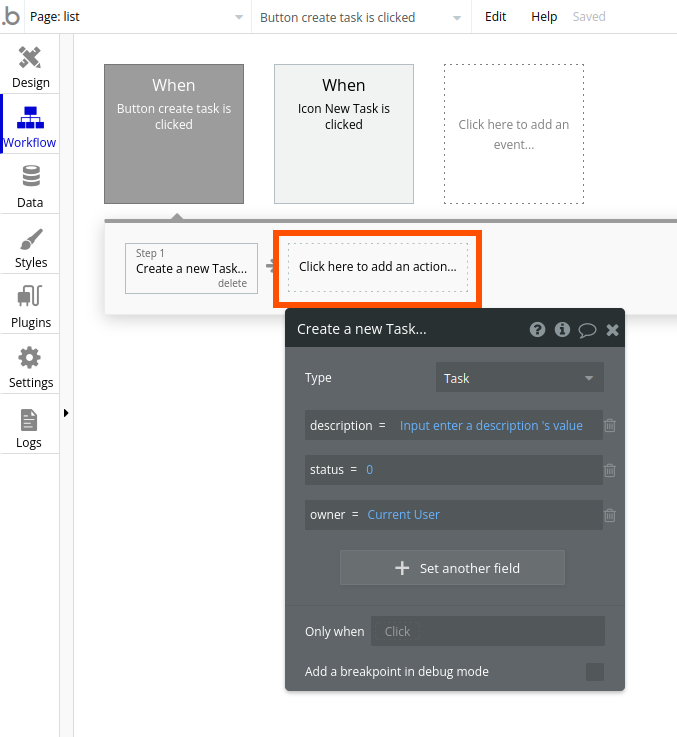
Step 1 is complete. Now, we'll associate this task with the current user's account. Click to add a new action.
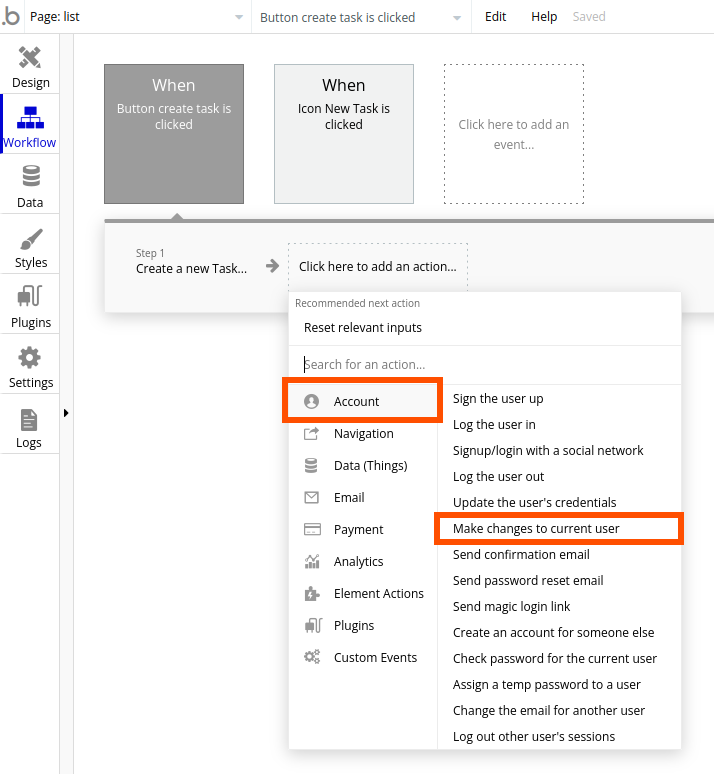
Under Account, click Make changes to current user.
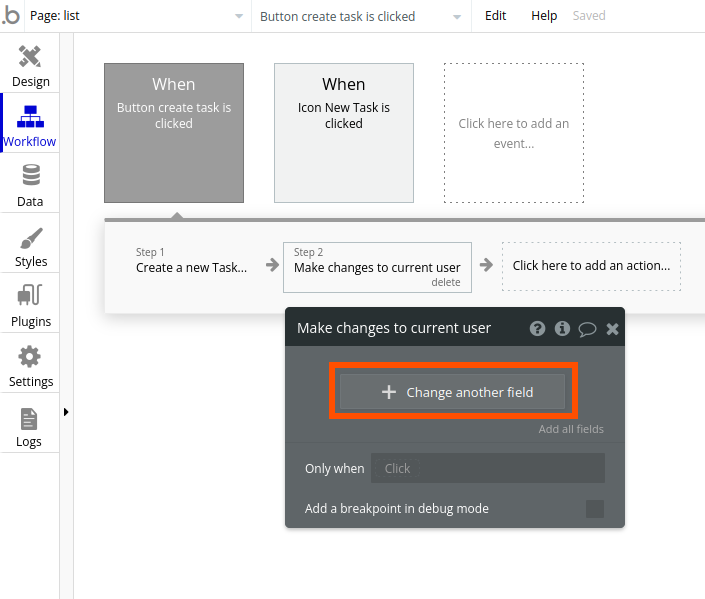
Click Change another field.
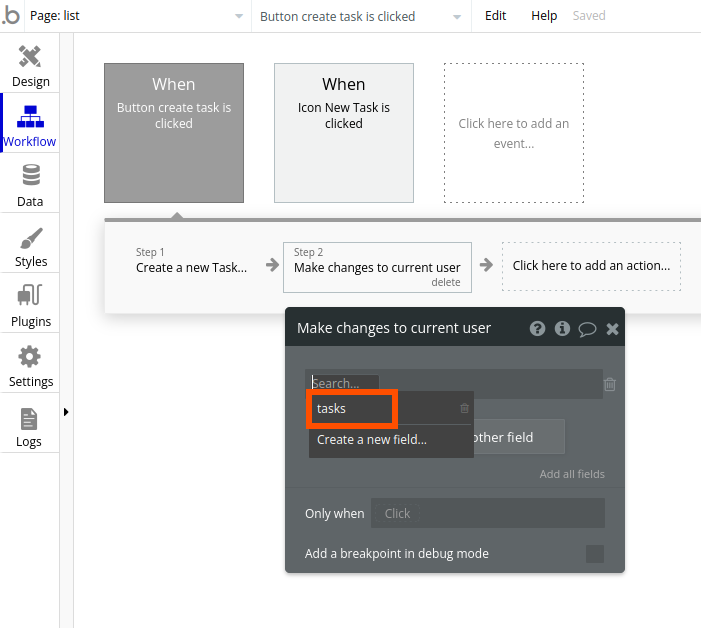
Click the input field, and choose tasks from the dropdown menu.
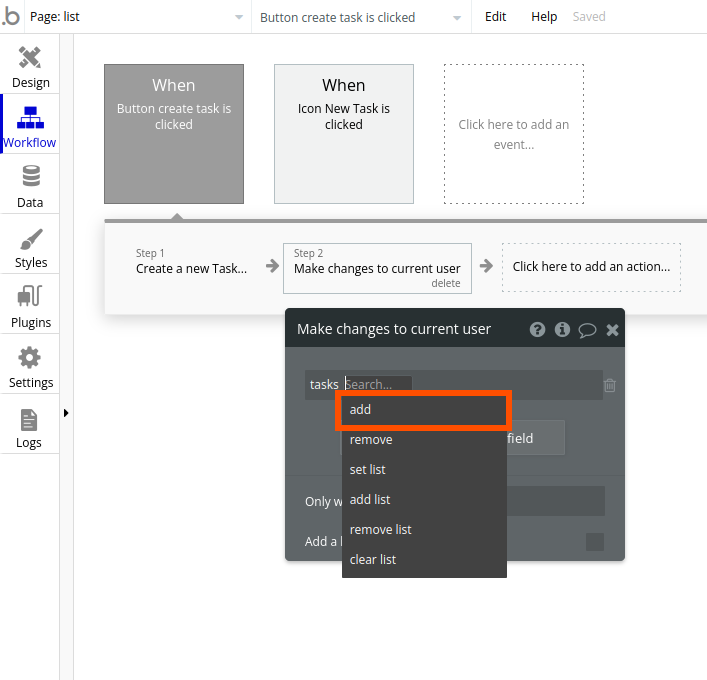
Click again, and select add.
Click again, and select Result of step 1 (Create a New Task…).
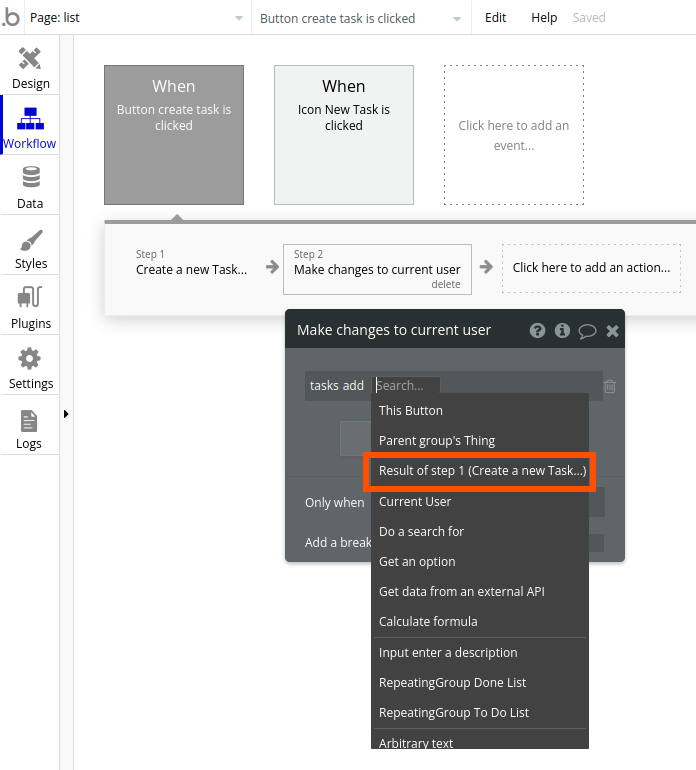
Step 2 is complete. It'll associate each task the user creates with their own account. This will save time and resources when the app looks through the database to show all the tasks from a specific user—which is why it's crucial we complete this step.
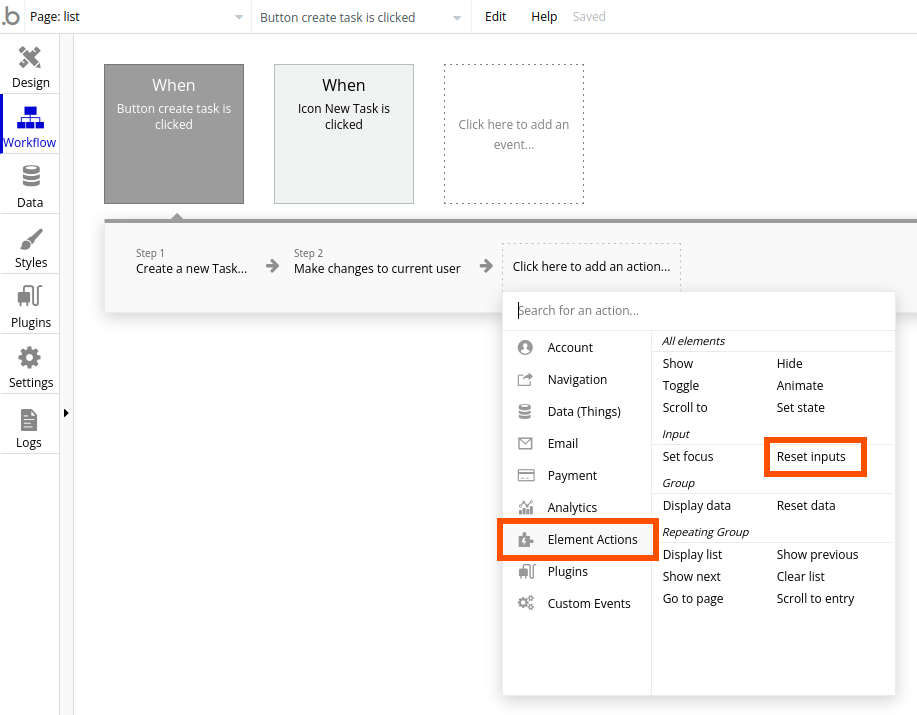
Step 3 will reset the input field, clearing the description box. If the action is not already suggested by Bubble, click to add a new action, hover over Element Actions, and click Reset Inputs.
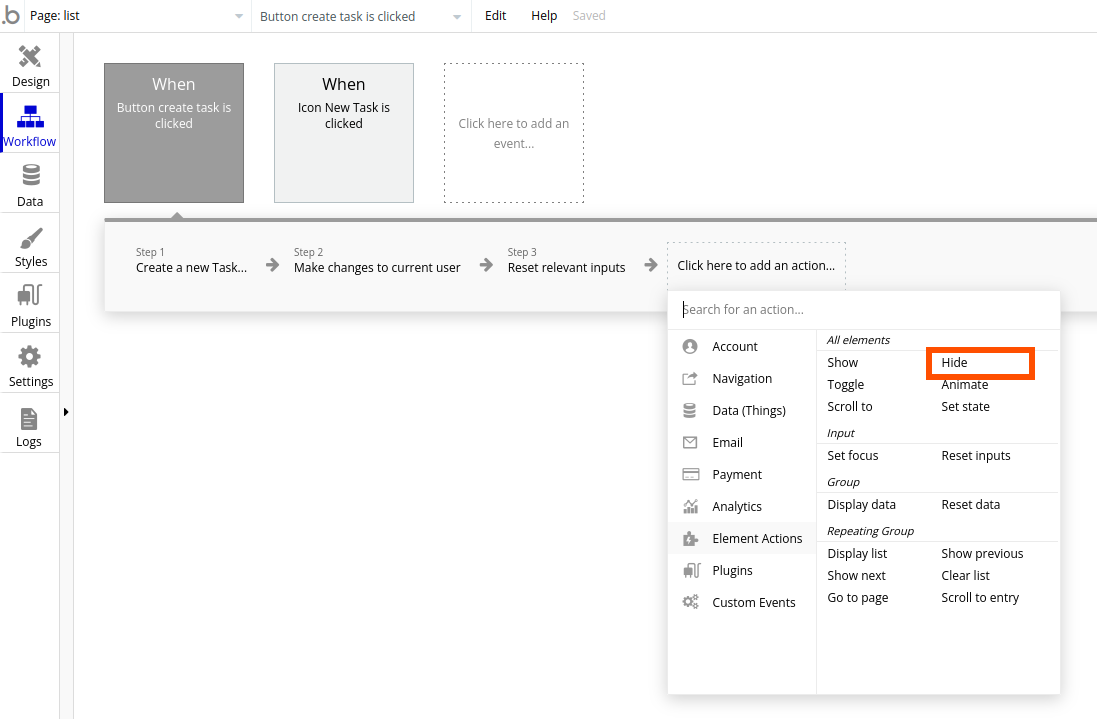
Finally, let's hide the pop-up after the task is added. Click to add a new action, hover over Element Actions, and click Hide.
Click the element dropdown and choose the Popup New Task.
This workflow is complete. We're going to configure our menu with custom element states. Click the Design tab to see our app's interface again.
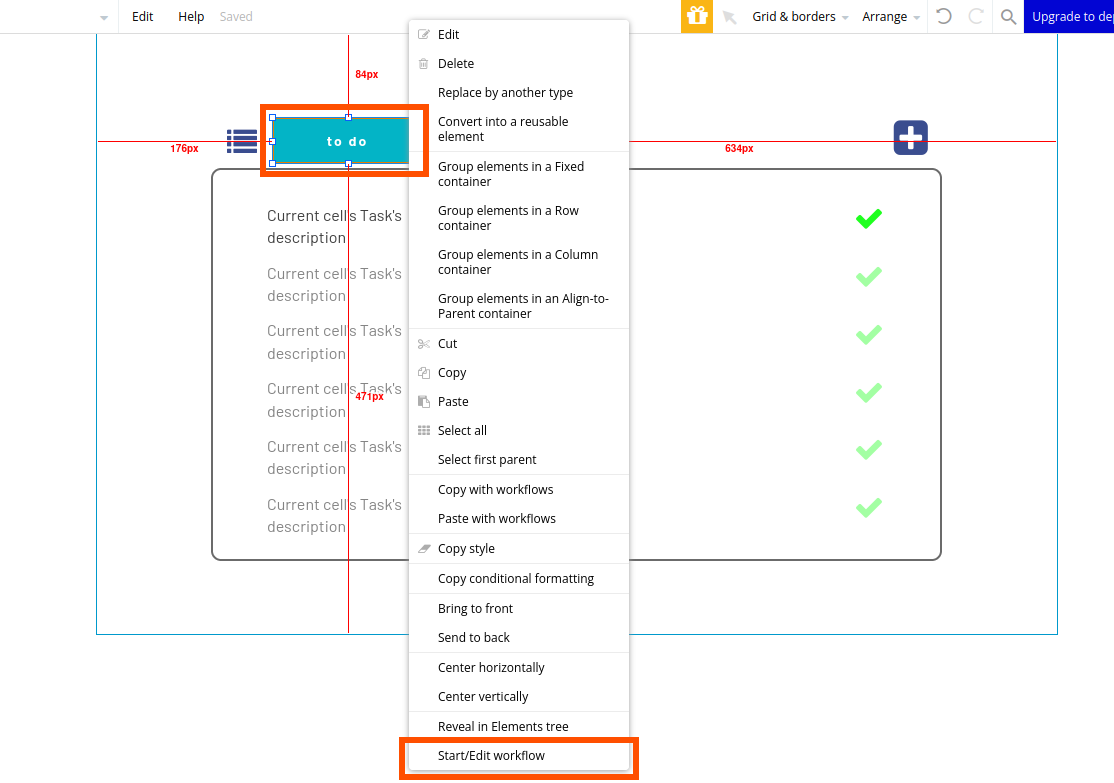
Right-click the button labeled to do, and click Start/Edit workflow.
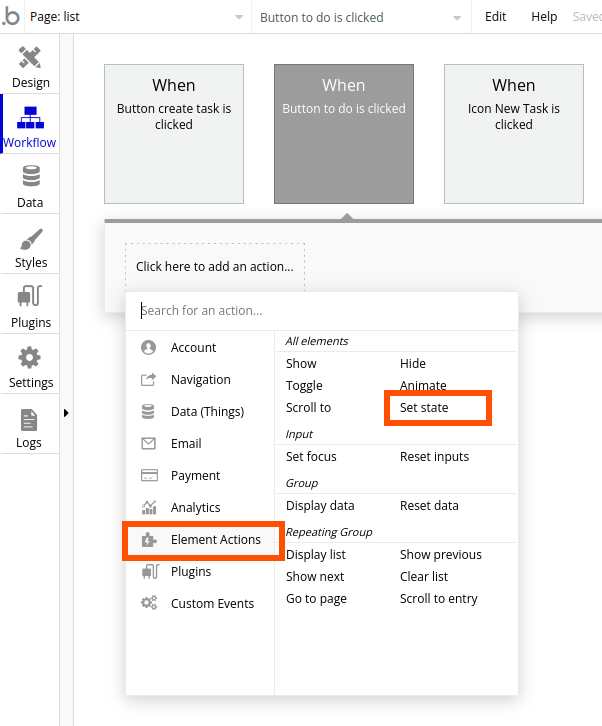
Click to add a new action. Hover over Element Actions and click Set state.
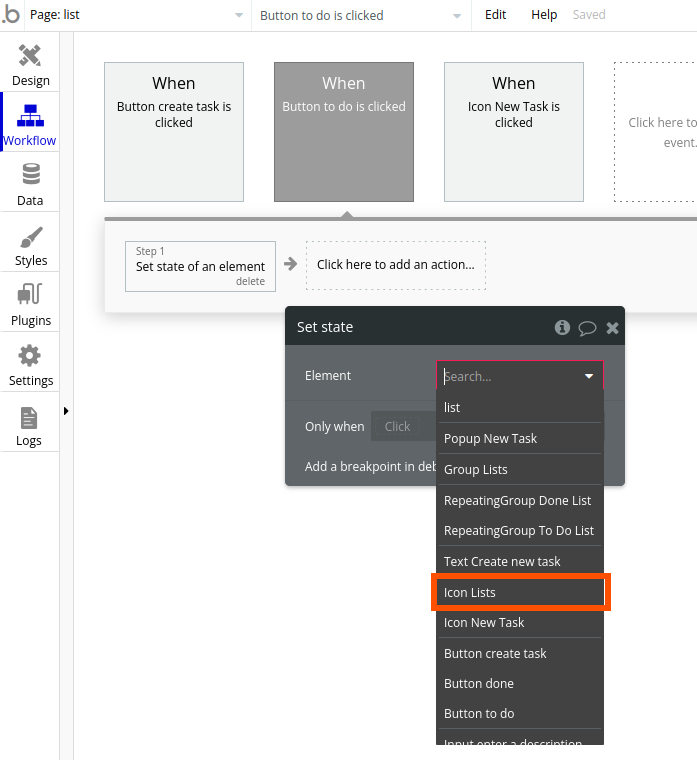
On the Element, find the icon named Icon Lists, and click it.
Click the Custom state dropdown, and choose active-list.
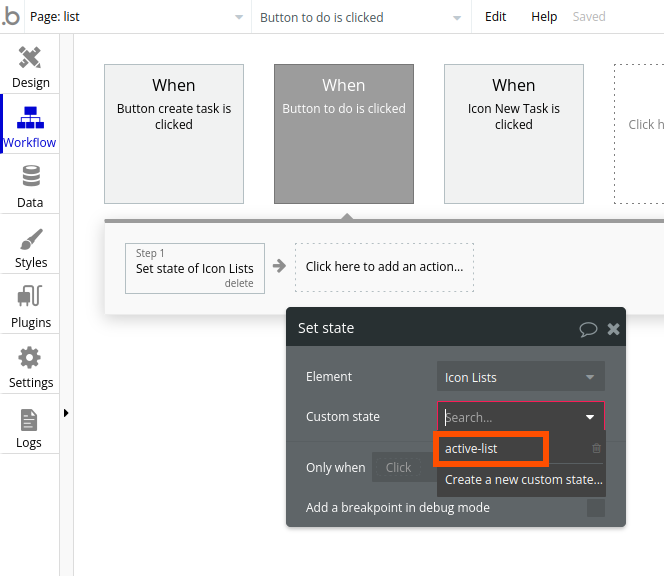
Click the Value input, type 1, and press enter.
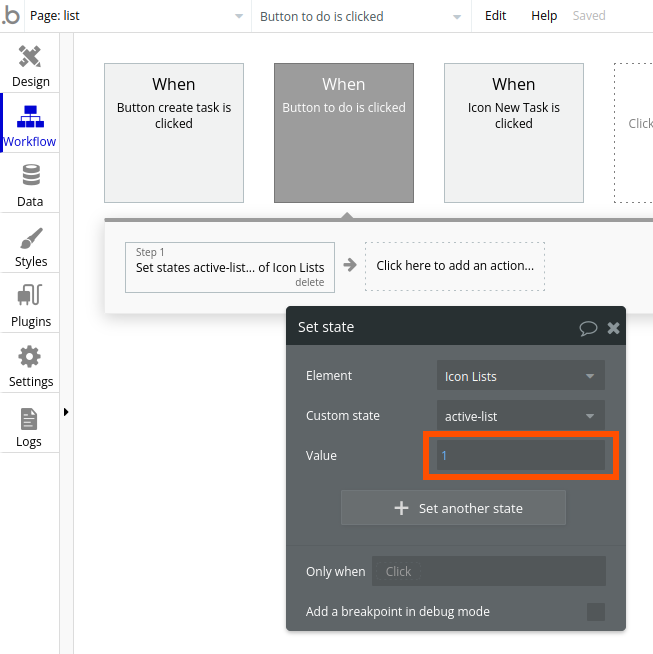
Here's what we've done here: whenever the user clicks the "to do" button, the custom state stored inside the Icon Lists will turn to 1, displaying the RepeatingGroup To Do List and hiding the RepeatingGroup Done List.
Go back to the Design tab. Right-click the button labeled done, and click Start/Edit workflow.
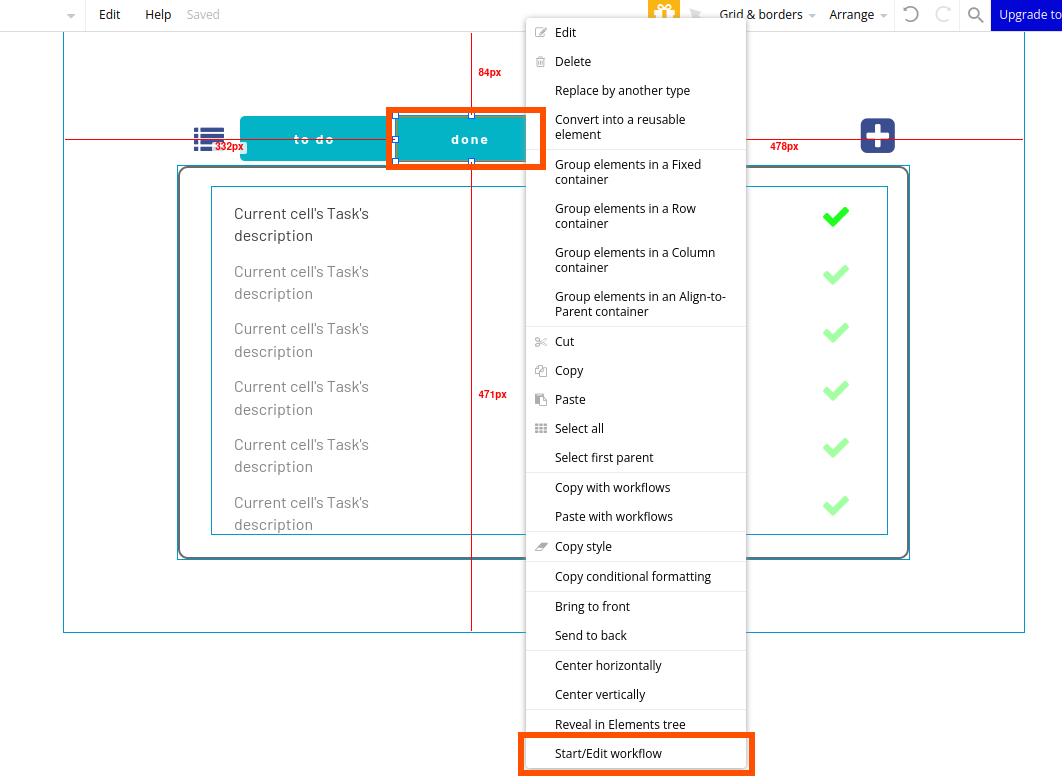
Click to add a new action. Under Element Actions, click Set state.
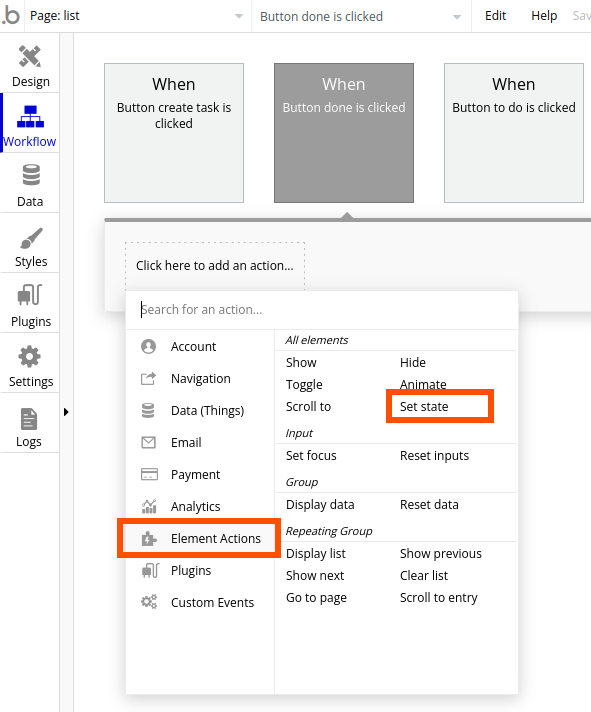
We'll repeat the same process as before. Pick Icon Lists as the element and active-list as the custom state, but this time, set the value to 2, and press enter.
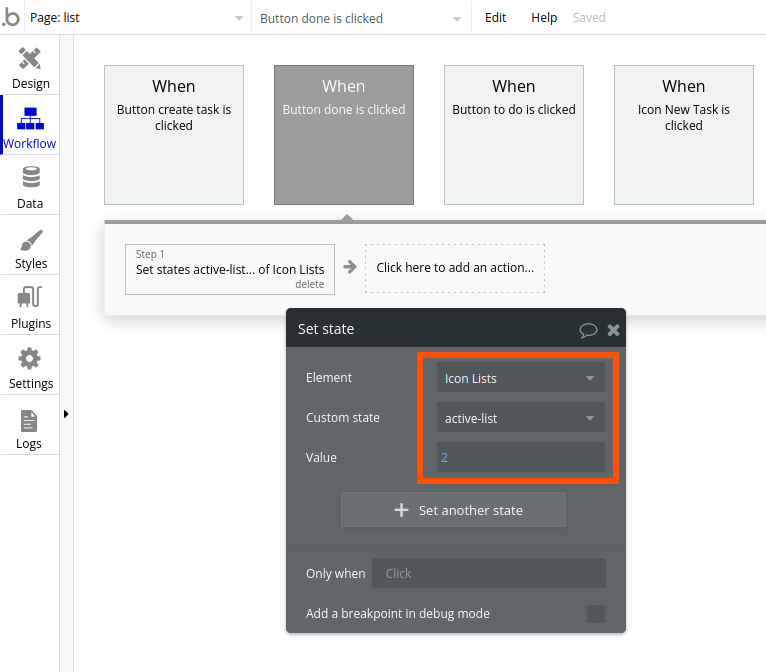
When the user clicks this button, the state stored inside the Icon Lists element will turn to 2, hiding the RepeatingGroup To Do List and showing the RepeatingGroup Done List.
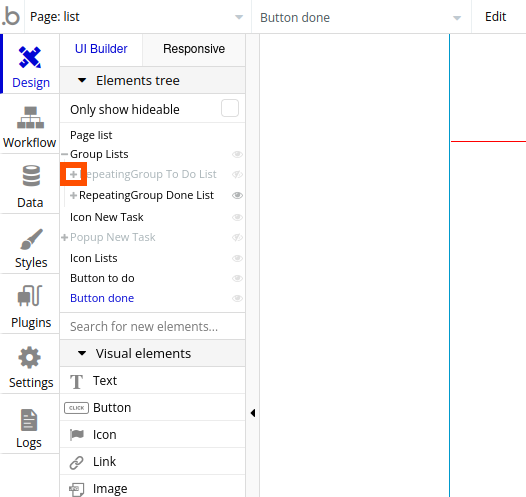
Let's go back to the Design tab. We'll take care of the workflows of the icons inside the RepeatingGroup To Do List using a slightly different approach. On the Elements tree menu on the left, click the + icon to expand the contents of the RepeatingGroup To Do List.
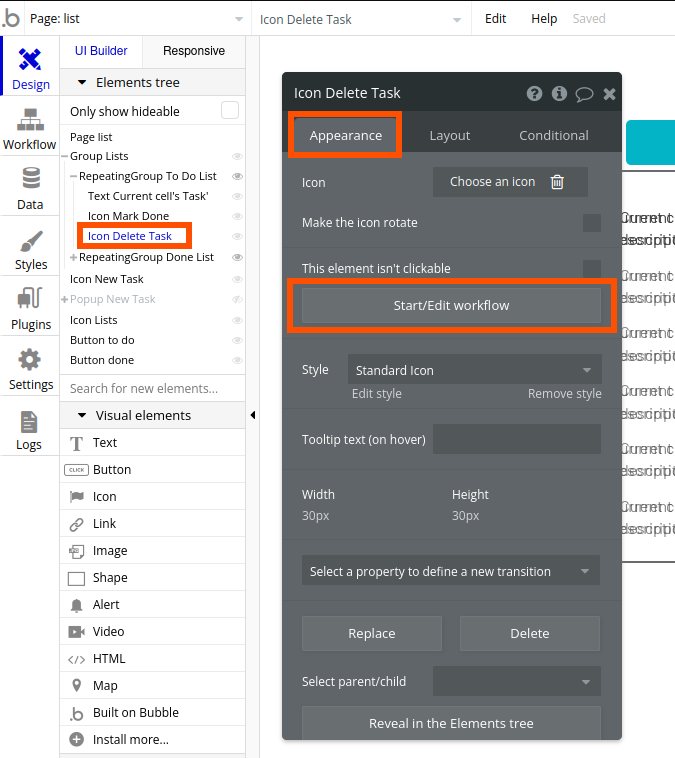
Click the Icon Delete Task. This will bring up the edit dialog box. Click the Appearance tab if it's not already showing, and then click the Start/Edit workflow button (it's another way to go to the workflow page).
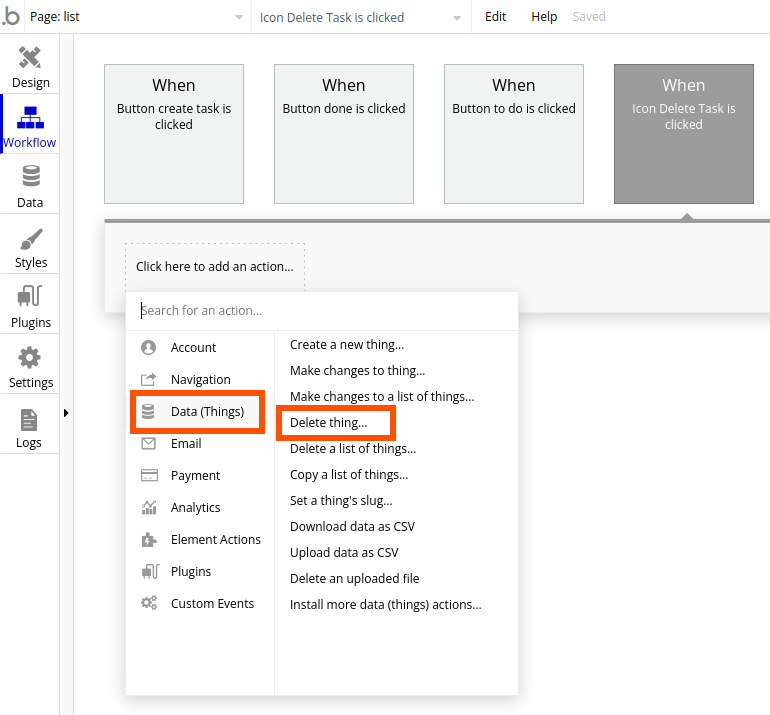
Click to add a new action. Under Data (Things), click Delete thing.
In the To delete input field, choose Current cell's Task.
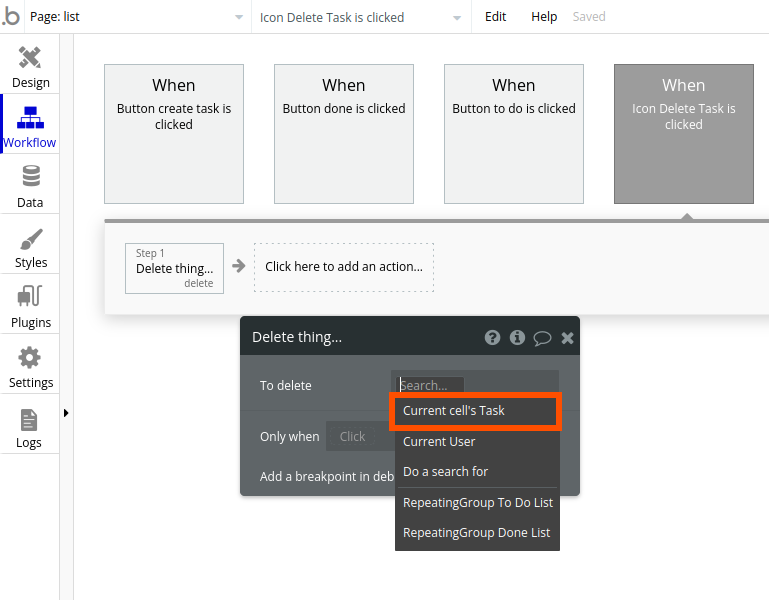
Remember how we associated each task with its owner? We need to remove this task from the owner's account as well. Click to add a new action. Hover over Account, and click Make changes to the current user.
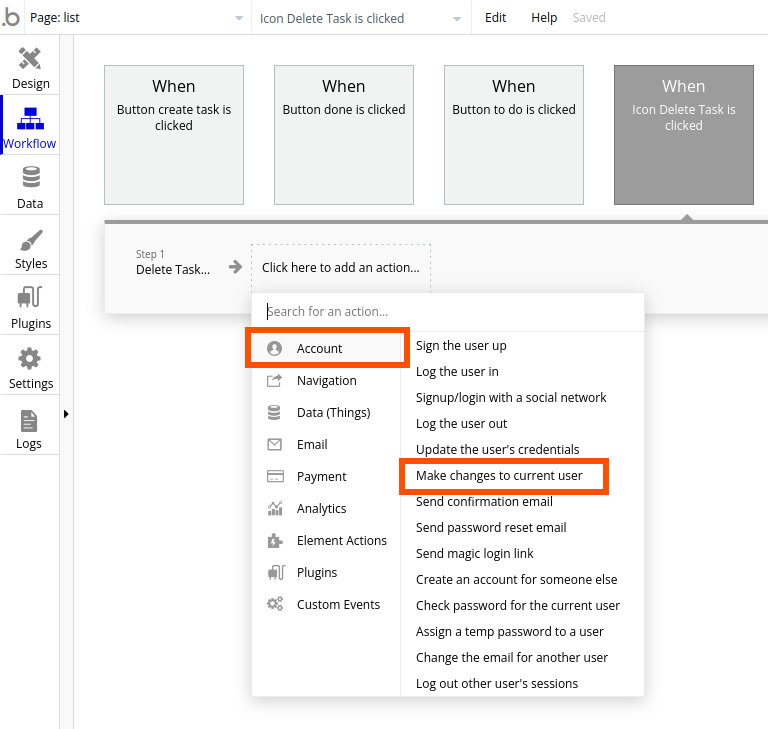
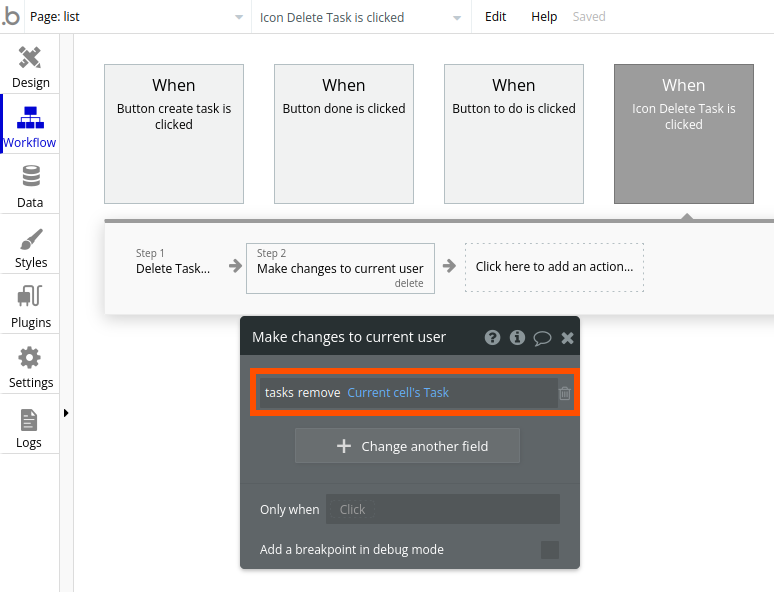
Click Change another field. Then:
Click the input field and choose tasks.
Click again and choose remove.
Click a third time and choose Current cell's task.
Now, users can delete tasks. Let's go back to the Design tab. On the Elements tree, click the Icon Mark Done to open the edit window. Click Start/Edit workflow.
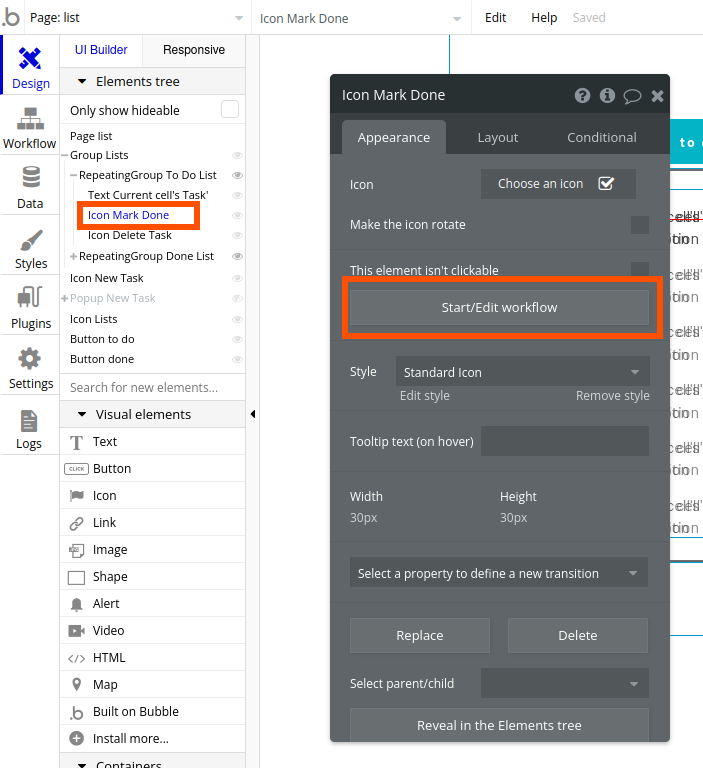
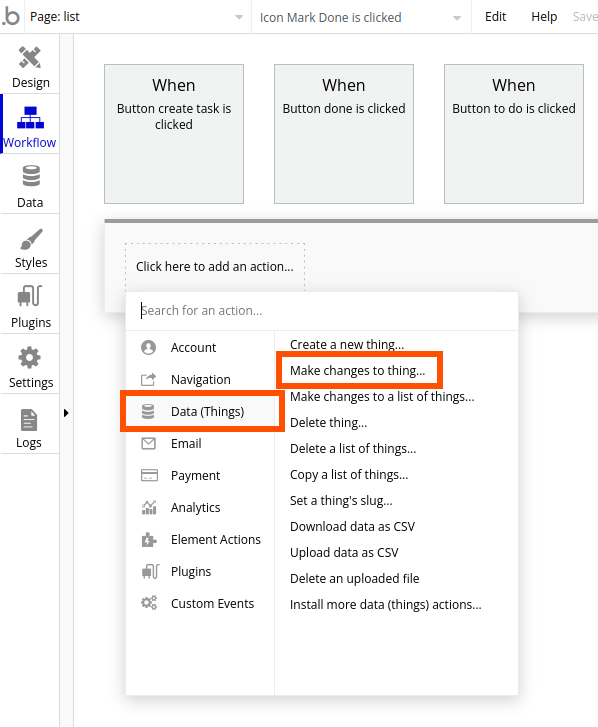
When the users click this icon, it means the task will go from incomplete to complete. We decided that incomplete is represented by 0 and complete is 5. Click to add a new action. Under Data (Things), click Make changes to a thing.
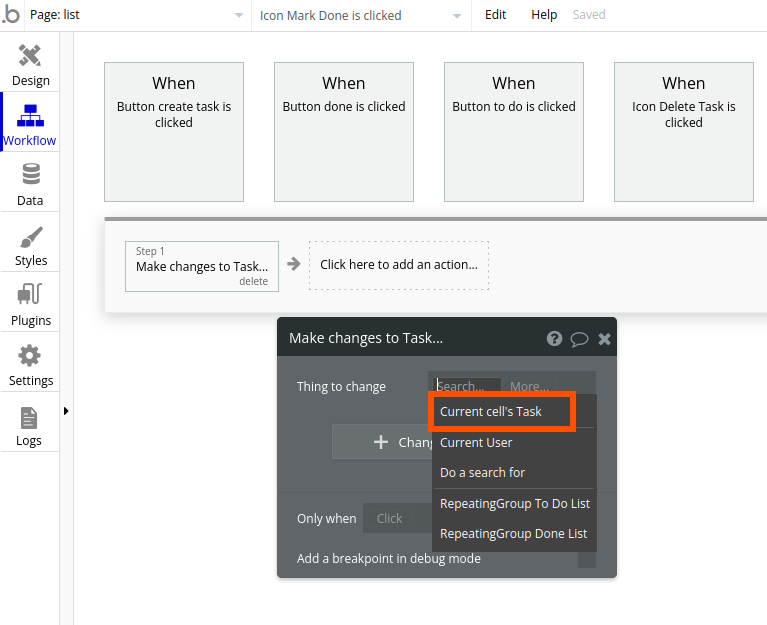
On the Thing to change, click Current cell's Task.
Click Change another field. Click the input field to pick status, and type the number 5.
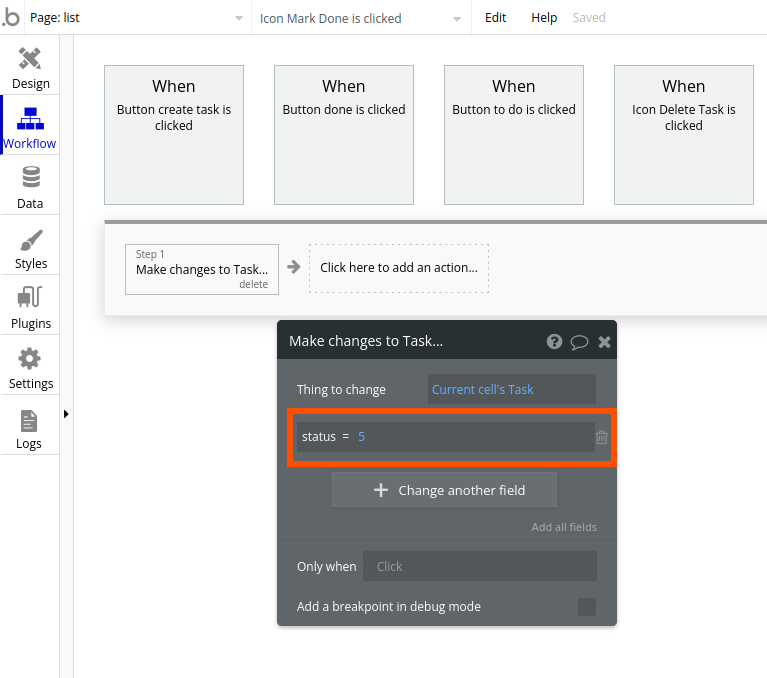
When a user clicks this icon, the task's status data field changes from 0 to 5, going from incomplete to complete.
Part 4: Testing
It's time to test and see if everything is working well. Click the Preview button on the top right of the screen.
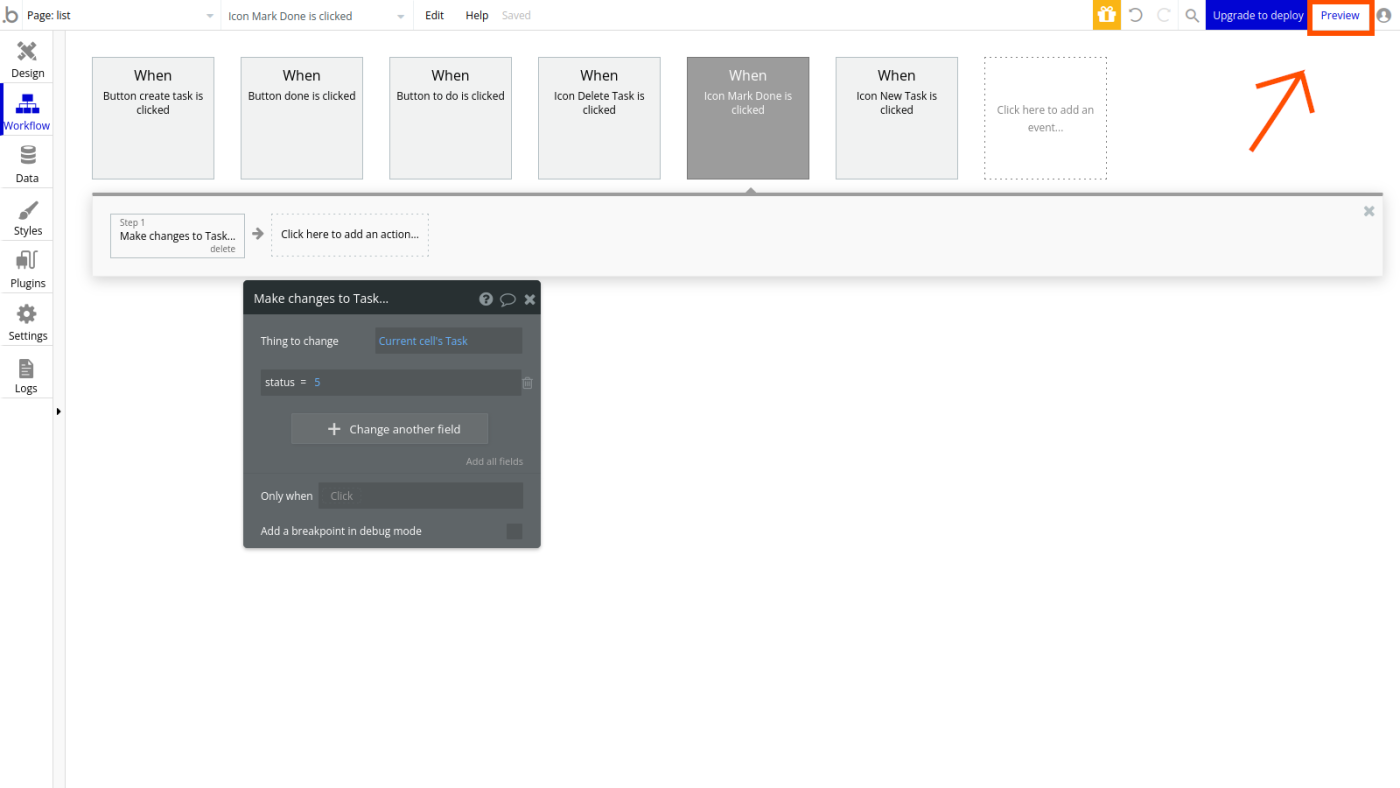
A new tab on your browser will open, showing you a preview of the final app. Use this preview window to test your app. Is the menu working well? Can you add, delete, and mark tasks as done? If so, you've completed all the steps successfully. Congratulations!
(Look for the debugger at the bottom part of the screen. You can use it to troubleshoot any problems within your app.)
Next steps
This is just the base for a small productivity app. From here, you can add as many new features as you want, while customizing the look and feel as you go.
Whether you're building something for yourself, something for your business, or an entirely new product or service, Bubble and other no-code app builders on the market give you tools you need to build a powerful and polished web app without a single line of code.
Want to know more? Explore Bubble's How to Build series, and practice your app-building skills as you replicate popular apps.
Related reading:
