Qualifying leads—sometimes called "scrubbing"—means determining which prospects are a good fit for your business. Maybe your product is tailored to enterprise customers, so your best leads are companies with over 10 million in annual revenue. Or maybe you're focused on leads with a certain job title or enough buying power to close deals.
It's a crucial part of the lead management process and makes sales outreach much more effective. But qualifying leads often requires enriching them with additional data, like a prospect's job title or company size. And when you're handling dozens (or hundreds) of leads a day, doing all of that manually just isn't sustainable.
To avoid bottlenecks and make sure your hottest leads don't go cold, you can create Zaps (what we call automated workflows) to enrich, filter, and score leads as soon as they come in—so your sales team knows exactly who to prioritize.
Zapier is the most connected AI orchestration platform—integrating with thousands of apps from partners like Google, Salesforce, and Microsoft. Use forms, data tables, and logic to build secure, automated, AI-powered systems for your business-critical workflows across your organization's technology stack. Learn more.
Skip ahead:
Enrich new leads
Obviously, the more data you have about a company or an individual, the more effectively you can qualify them. But if you have limited resources, you can't expect your team to spend all day searching online for detailed information. Instead, you can use a lead enrichment tool like Clearbit or Hunter to locate that info for you.
With these Zaps, anytime a new lead is sourced through your CRM, database, or ad campaigns, Zapier will find the prospect and add any missing gaps to your other tools (think phone numbers or email addresses).
Enrich Facebook leads with Clearbit and add to Pipedrive
Update new leads on Marketo with personal/company info from Clearbit
Find emails in Hunter to update newly-added contacts in Recruit CRM
Enrich Typeform submissions with social/company data via Clearbit and add them as users to Intercom
Sometimes lead research happens in the moment—when you're browsing LinkedIn or reviewing a company online, and you just need quick details without switching tools. With Zapier's Chrome Extension integration, you can automatically look up contact or company data with Clearbit without ever switching tabs—then send the results to yourself or save them for later.
Search Clearbit and send results via Gmail using a Google Chrome Extension
Search Clearbit and save the results to Evernote via a Google Chrome extension
Search Clearbit and send results via SMS using a Google Chrome Extension
Pro tip: Enriching and organizing lead data can be overwhelming. Simplify the entire process with our lead enrichment template, which gives you a scalable, centralized system to turn contact data into rich lead profiles in your CRM.
Boost conversions by instantly turning minimal contact data into rich lead profiles in your customer relationship manager.
Filter leads based on certain criteria
Whether you capture leads through scheduling tools, forms, or ad campaigns, not every prospect should be passed to your sales team. You might have an ideal customer profile (ICP) that prioritizes certain industries or roles—and not every contact will meet that bar.
But manually filtering and prioritizing every new lead will eat into your sales team's time and focus—and likely increase the risk of human error or delays. With automation, you can apply filters in real time to qualify leads automatically as they come in, so your sales team only sees the ones that matter most.
You can also add verification steps to weed out invalid or low-quality leads. For example, you can use tools like EmailListVerify to verify emails before a contact is added to your database.
These Zap templates will help you filter out unqualified submissions and focus on the leads that match your ideal customer profile.
Create LeadStation opportunities for new Facebook Lead Ads leads
Add new TikTok Lead Generation leads verified by EmailListVerify to HubSpot
Create filtered leads in Pipedrive when Calendly attendees are created
Create HubSpot contacts from filtered Typeform leads
Score leads based on engagement and fit
The more information you have about a lead's movements, the more you can tell if they're qualified. Did they open a marketing email you sent them? Or submit a form asking for more information about your services?
Understanding how a lead engages with your company before they've converted should give you a general idea about where they're at in the sales funnel. And scoring leads goes a step further. Instead of simply logging activity, you can assign a score based on behavior (like link clicks or webinar attendance) and fit (like job title or company size).
Doing this manually is a lot. Instead, use these Zaps to actively track lead engagement. When a lead opens an email in tools like Mailchimp or submits a form in apps like Jotform, Zapier will score that engagement then automatically log it in your CRM or database, ready for your sales team to tackle.
Enrich new Facebook Lead Ad leads with Lead Score by Zapier and log them in Google Sheets
Create engagements in HubSpot from new emails opened in Mailchimp
Enrich leads captured through a Jotform with Lead Score by Zapier and add to an Airtable base
Score LinkedIn Ads leads and send to Salesforce as leads
Want to start qualifying leads at scale? Click on the pre-made template below to start scoring and qualifying high-value sales opportunities automatically.
Use AI tools to enrich or standardize data
AI can play a powerful role in lead qualification. With tools like ChatGPT or AI by Zapier, you can enrich and standardize lead data, helping your sales team scale a lot faster.
For example, if a lead comes in with inconsistent formatting or missing details—like a vague job title or improperly formatted field—AI can clean it up, extract key information, and summarize their intent.
And when you pair AI with Zapier, you can make your workflows even more powerful. These Zaps use AI to enrich and standardize incoming data from your lead capture apps—then logs that information in CRM tools like HubSpot or Salesforce.
Add new LinkedIn leads to HubSpot and standardize data with AI
Enrich new Typeform entries with ChatGPT and add a note in HubSpot
Enrich Intercom companies with AI-generated information
Analyze and return data in AI by Zapier when new pushes happen in Zapier Chrome extension
Create HubSpot deals from Zendesk tickets with ChatGPT
Want to take AI a step further? Once a lead has been enriched and added to your CRM, you can use a Zap to create personalized sales decks in Google Slides with AI-generated content. Zapier will then message the right sales rep in Slack, so they're ready to follow up with the right assets, right away.
Create Google Slides deck with ChatGPT for new HubSpot deals
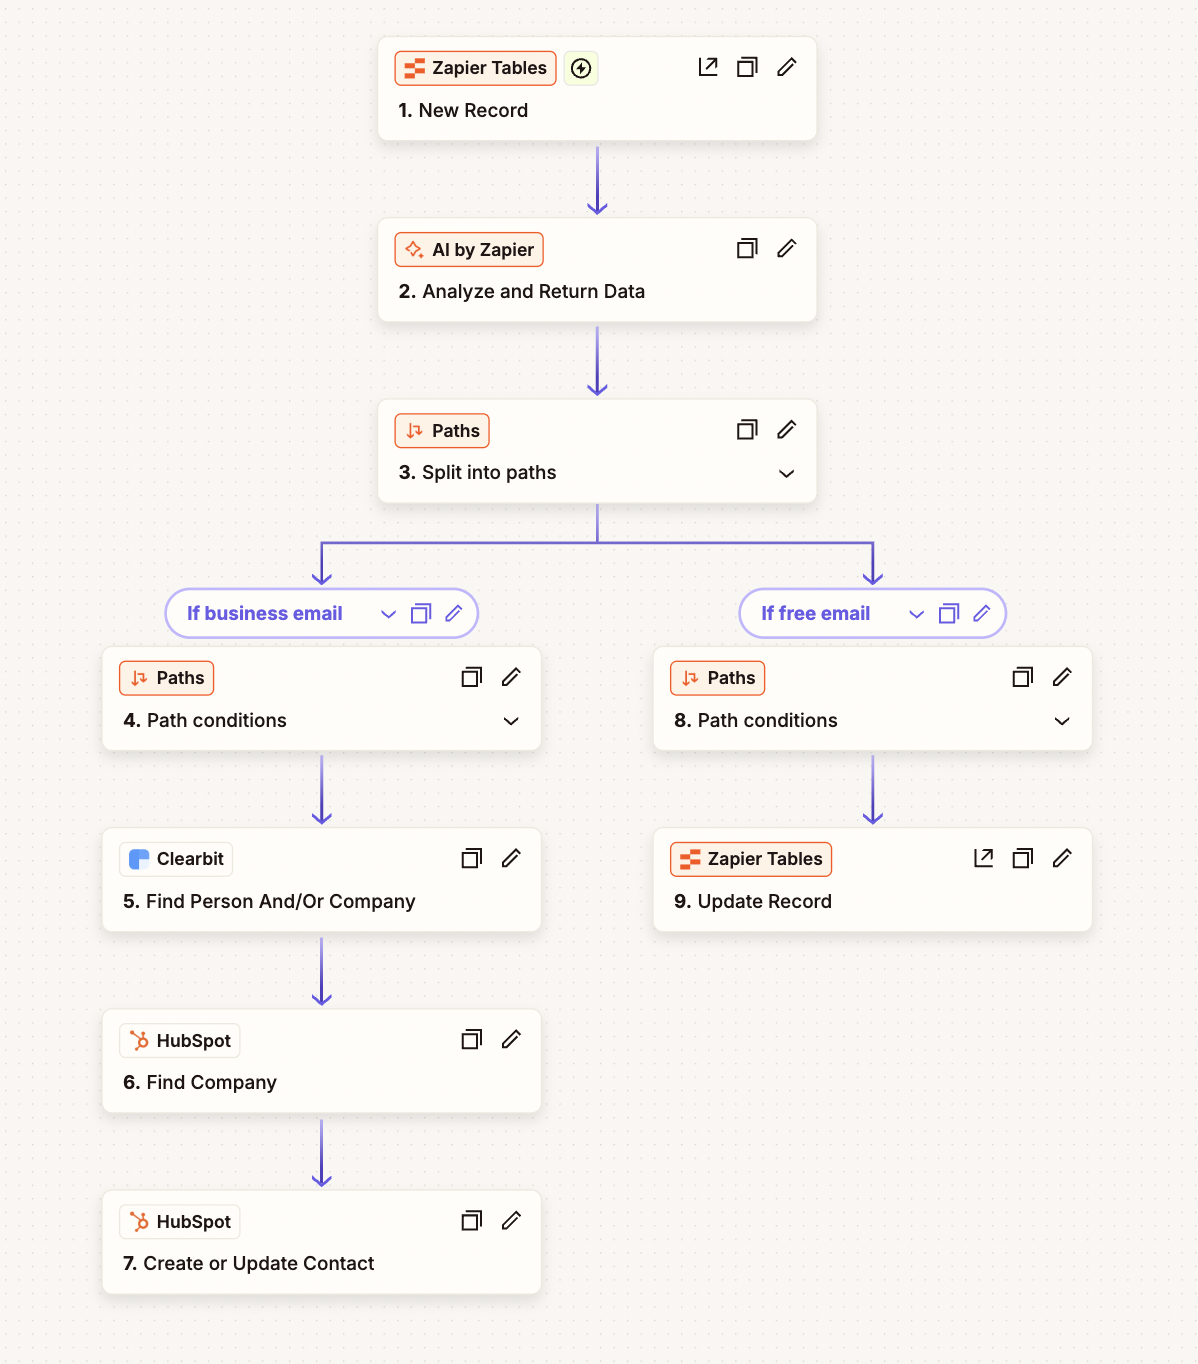
Pro tip: You can use paths to route leads based on what your AI step determines. For example, if your AI tool identifies the lead's email as a business address, the lead can be sent directly to your CRM. If it's a free email, you might choose to log it in a spreadsheet or flag it for review—keeping your pipeline focused on high-quality prospects.

Improve your sales feedback loops
Obviously, lead qualification isn't a science. What might sound like a perfect match on paper doesn't automatically guarantee success.
But feedback—especially from the sales folks on the front lines—can make a difference for future research. For example, they might be able to shed light on why a specific prospect went cold so you can fine-tune your criteria accordingly.
If you use a tool like Typeform or Google Sheets to routinely gather feedback from your team, you can use these Zaps to streamline the process. Once someone fills out a form, Zapier can either send that response straight to a spreadsheet, or ChatGPT can first provide a summary and categorize responses to save you time.
Pro tip: Want a scalable, centralized way of automating lead distribution? Click on the template below to alert sales reps based on determined criteria and let them claim leads—automatically.
Alert qualified sales reps with active claiming and decrease lead response time.
Advanced tips for automating lead enrichment
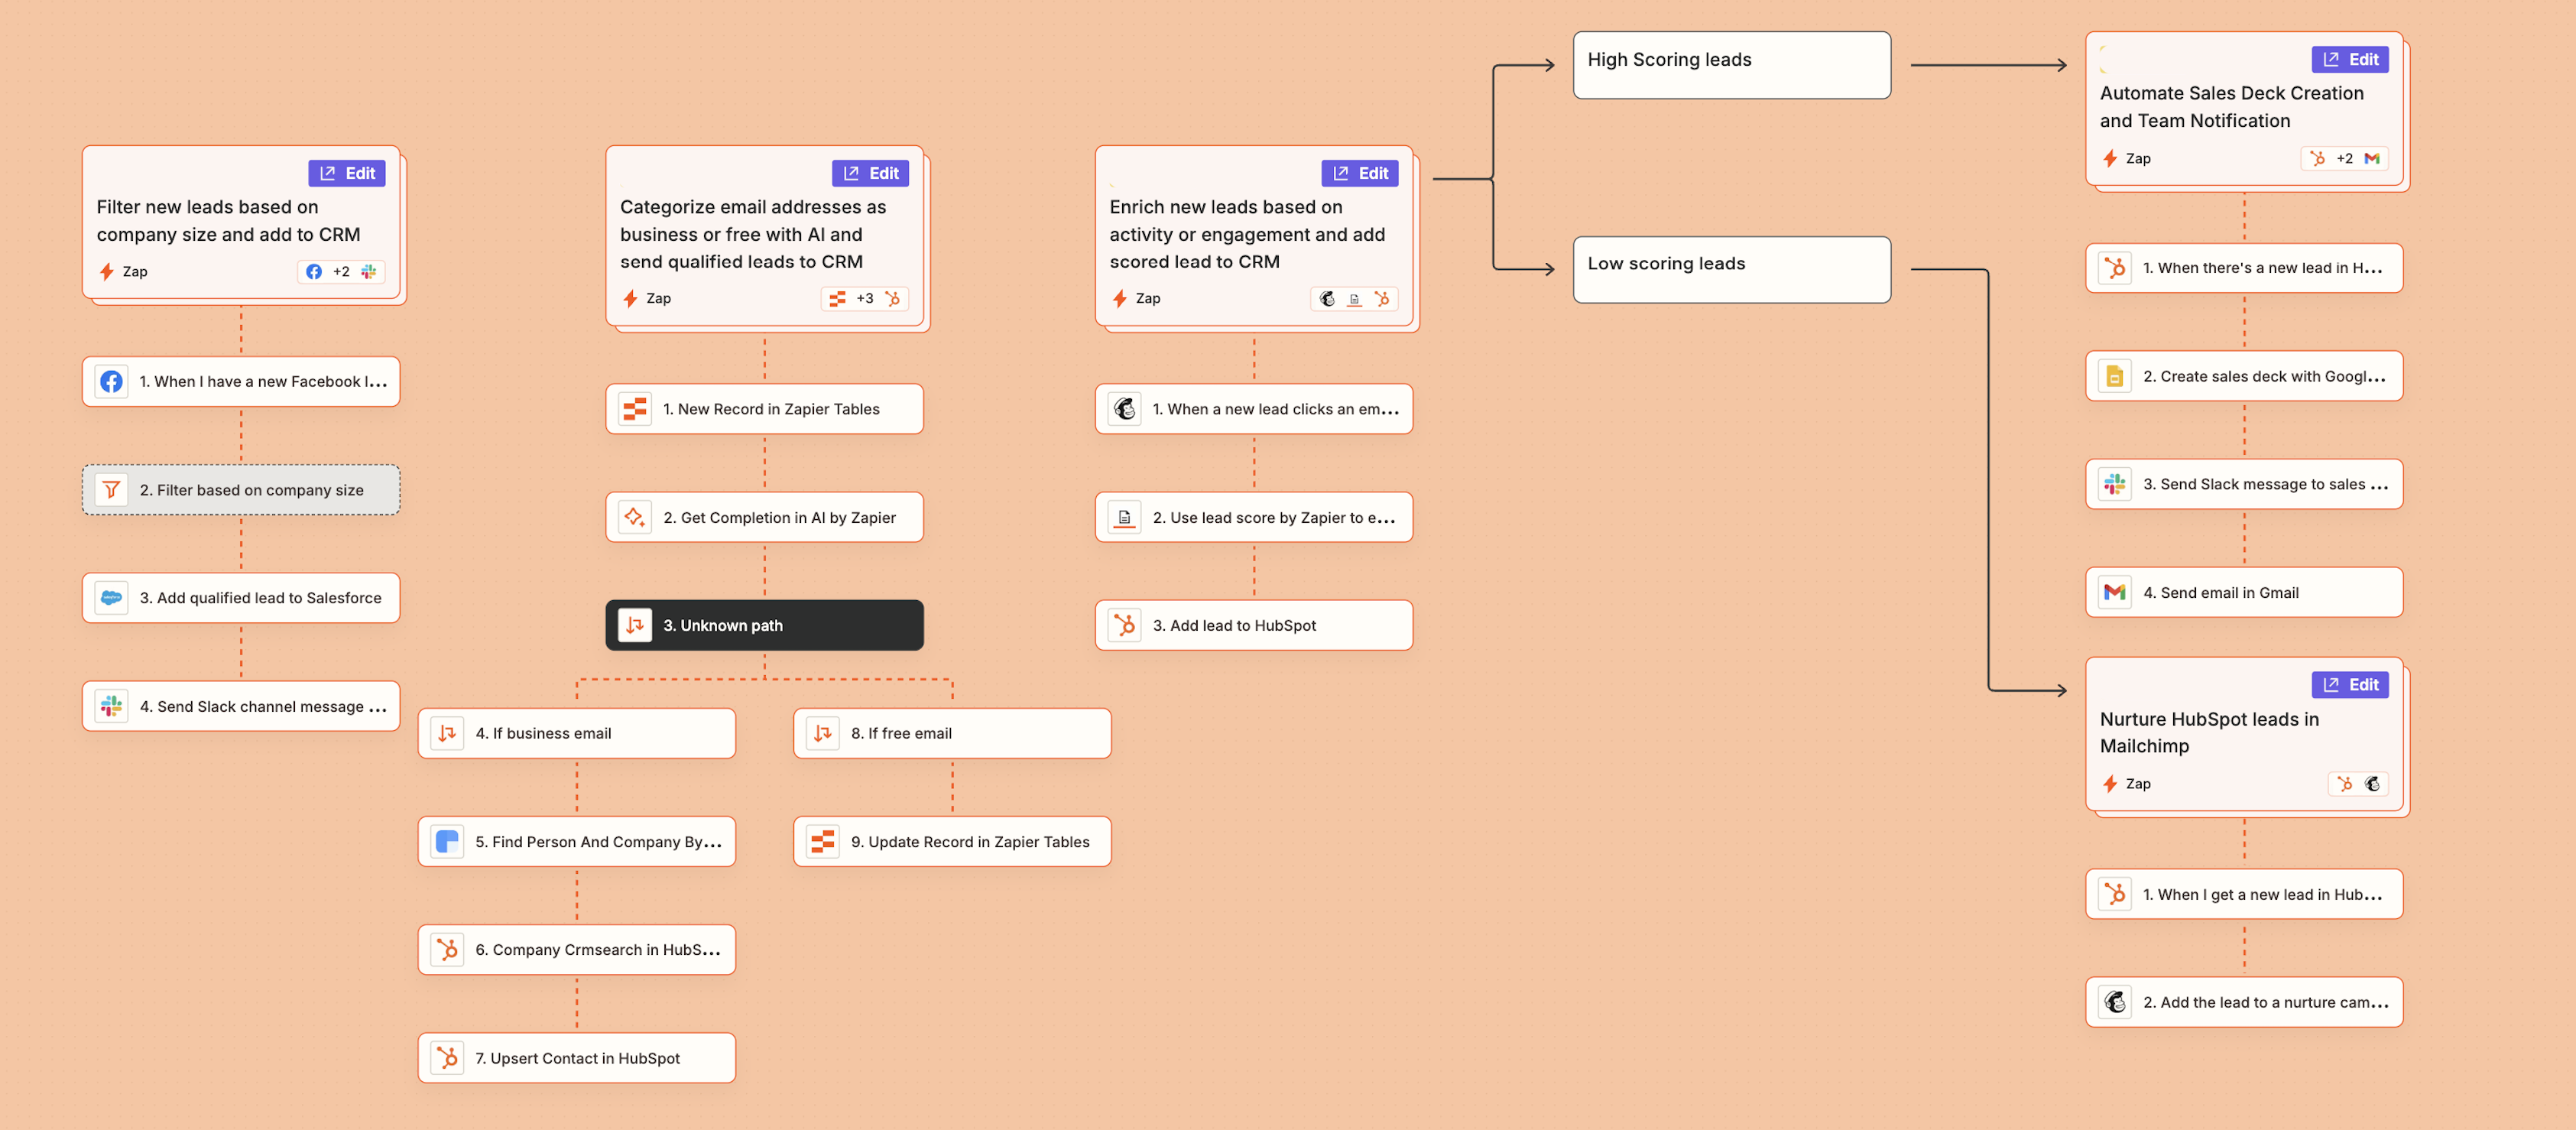
As we mentioned above, the best way to streamline your lead enrichment workflows is to go beyond a simple two-step Zap. When you start with the bigger picture, you can find even more opportunities for scaling while improving efficiency.
For example, here's a visualization (using Zapier Canvas) of how a sales ops team might build an automated lead enrichment system that captures leads from multiple sources, enriches them, filters out unqualified entries, and routes high-value prospects to the right sales reps—automatically.
Qualification made easy with automation
There are so many moving parts to lead research. But with automation in place, you can easily streamline that process from start to finish. Whether you need to automatically enrich lead data or streamline the feedback process, Zapier can help you make the whole sales process a breeze.
And if you're looking for even more inspiration for streamlining and supercharging your sales operations, we've rounded up the best ways to automate your lead management:


