Meet Matilda. Matilda runs a successful agency, which prospers when she connects the leads she meets at trade fairs to the correct salespeople on her team for follow-up. All of her sales reps have different specialties and responsibilities, so it's vital to introduce the right rep to the correct lead. Unfortunately for Matilda, she routes each lead manually, and that takes an incredible amount of time.
As the adage goes, "time kills deals." And quickly following up on leads, qualifying them, and providing a tailored response is no easy feat. This is where Zapier automation excels. By adding logic to her workflows, Matilda can not only assign leads to the right rep but filter out unqualified inquiries and prevent duplicate records in her CRM.
Zapier is the leader in workflow automation—integrating with 6,000+ apps from partners like Google, Salesforce, and Microsoft. Use interfaces, data tables, and logic to build secure, automated systems for your business-critical workflows across your organization's technology stack. Learn more.
Today, I'll describe three built-in Zapier tools I use daily as a Zapier expert to help people like Matilda turn onerous, manual efforts into automated, intelligent processes: Filters, search steps, and Paths. Even if you're not in sales, these features can help weave logic into any of your workflows and save you time.
This post was developed from a session given by Andy Wingrave at ZapConnect 2022, Zapier's annual user conference. Watch the full session in the video below.
Matilda's predicament
Back to Matilda. Matilda's primary way of generating new business is by attending conferences and through her website. And she frequently runs into the following predicaments:
Is this lead a good fit for her business? The minimum spend at Matilda's agency is $1K. She doesn't want to spend time pursuing someone who can't afford her services. So filtering out all but the best leads is critical to her successful operation.
Does the lead have a past interaction with her agency? Sometimes, Mathilda finds an excellent fit for her business, and she'll send them a detailed proposal—only to realize that her agency has already communicated with this prospect. If she had been aware of past interactions, she could have avoided this unnecessary duplication of efforts.
Where to route the lead? Mathilda has hired a team of sales reps to focus on different industries and verticals within her agency. But she currently routes these connections manually. And this can be a very drawn-out process.
Mathilda knows that speed is imperative to win business. And to do this, she needs to search, filter, and assign leads to the appropriate sales representative with her CRM as quickly and efficiently as possible. This is where Zapier comes in.
Understand the concepts
So, what do I mean when I say "Filter," "Search," and "Route?" Before we begin incorporating these tools, let's define them within the Zapier framework.
Filter: With a filter step, you set a specific condition for your Zap, which will only continue if the data from your app meets that condition. In our example, no future actions are performed if the customer doesn't meet the specific criteria. As a bonus, filters added as the second step in a Zap will ensure that records that don't meet the criteria don't count toward your task usage limit.
Search Steps: We use a search step within our Zap to find records before we categorize or segment them within our CRM. This not only ensures we don't accidentally create duplicates in our database but also allows us to create the record if it does not exist or update pre-existing records as necessary.
Fun fact: Many of Zapier's more mature applications will also allow you to pair a search step with a create step if data isn't found.
Paths: The Paths tool is built to navigate those twists and turns with conditional workflows. Paths allow a multi-step Zap to do different activities based on the data you give. As Zapier puts it—it's a choose-your-own-adventure for your workflow. A path tells your Zap what to do based on your chosen rules.
So in the case of Matilda, we want to direct leads to the appropriate person based on their industry—or perhaps even if they're an existing client. In addition to allocating specific leads to the right team members,Matilda can use paths to automatically reply to routine messages or prioritize the most urgent ones depending on the message's details.
How to set it up
So let's build it out for Matilda. I'll walk us through it using Airtable, but the methods I want to explore can apply to Pipedrive, HubSpot, Salesforce, or any of the hundreds of CRMs that connect to Zapier.
Step 1: Set up the trigger
We first want to trigger the Zap whenever a new client form comes into Matilda's Airtable using the New Record trigger. Here we'll make sure we input the necessary information from her Customers table, and we'll limit our view to only new records coming in.

Once we test our trigger, we see that we've found a record!
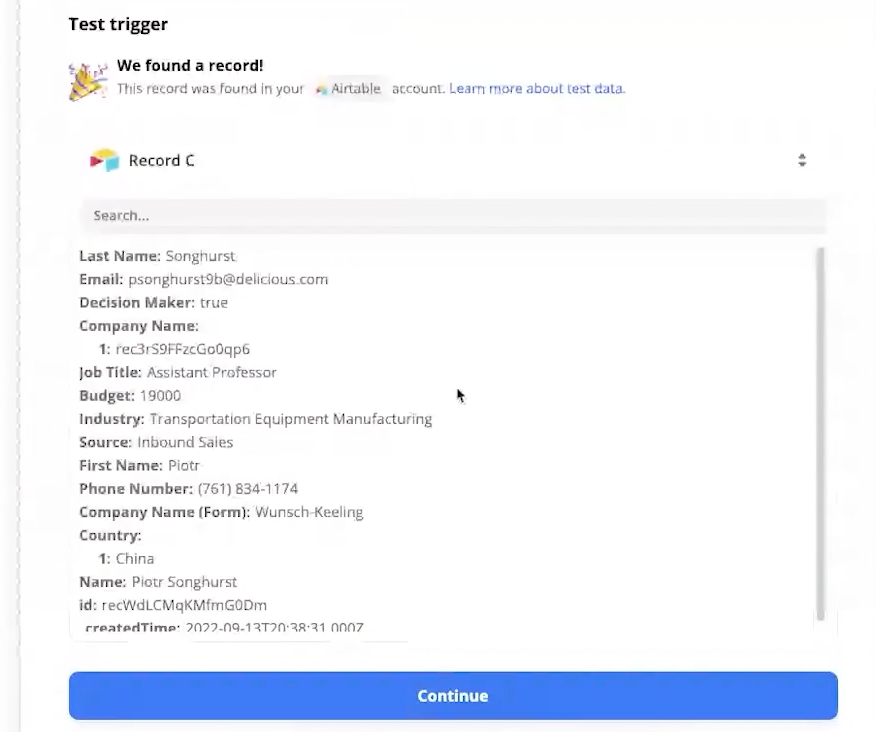
Piotr looks like an exciting prospect. We see the info he's filled out from Matilda's form: his name, contact information, profession, industry, and budget. With all that data, we can build the rest of our Zap.
STEP 2: Add a filter
As we've discussed, we want to create an initial filter that ensures that our Zap only continues if the budget meets or exceeds 1K. We'll do this by adding a filter step for the second step of our Zap.
With our filter, we'll instruct our Zap only to continue if the budget meets the budget criteria and if the lead has also given us an email to contact them.
But maybe we didn't capture the email in the form and only have a phone number. In that case, we can set up our filter using OR logic. We'll make sure the filter still meets our budget criteria, but we can say we only want to continue if they've given us their phone number. Therefore our Zap only continues if the record meets our budget criteria and gives an email address OR if it meets our budget criteria and gives a phone number.
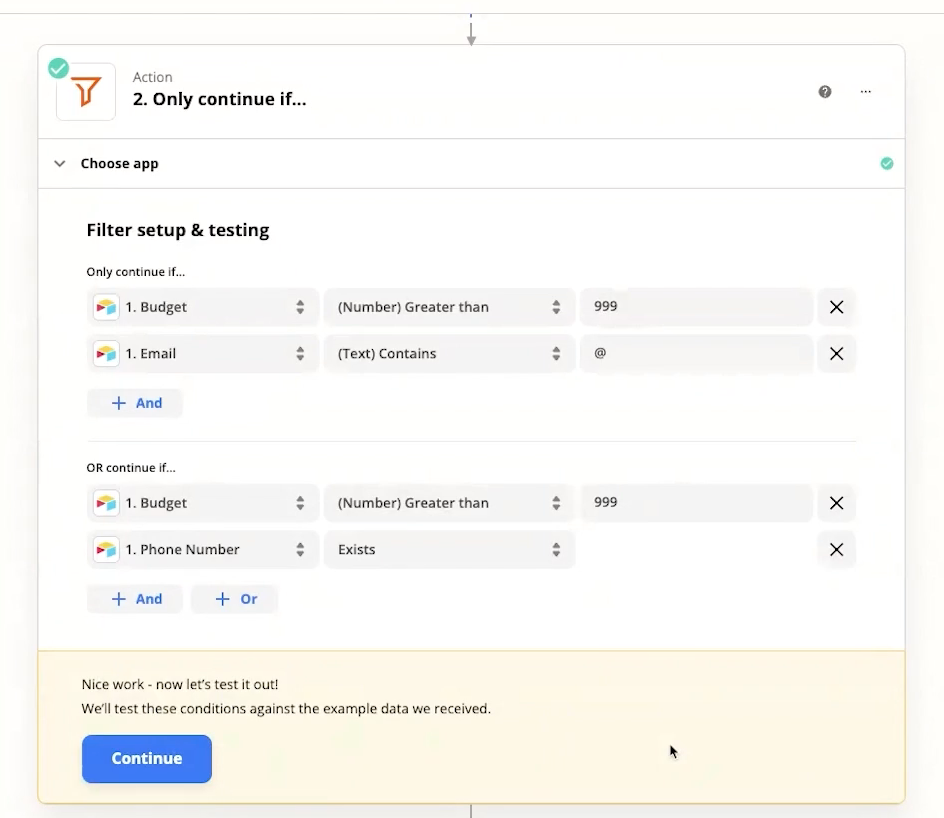
Don't forget to test it out! In the example of Mathilda's client Piotr, his record would continue as his budget exceeds the criteria, and he's given us his contact information.
Step 3: Find or Create Record in Airtable
Next, we want to perform a search step to see if Piotr already exists within Mathilda's customer table.
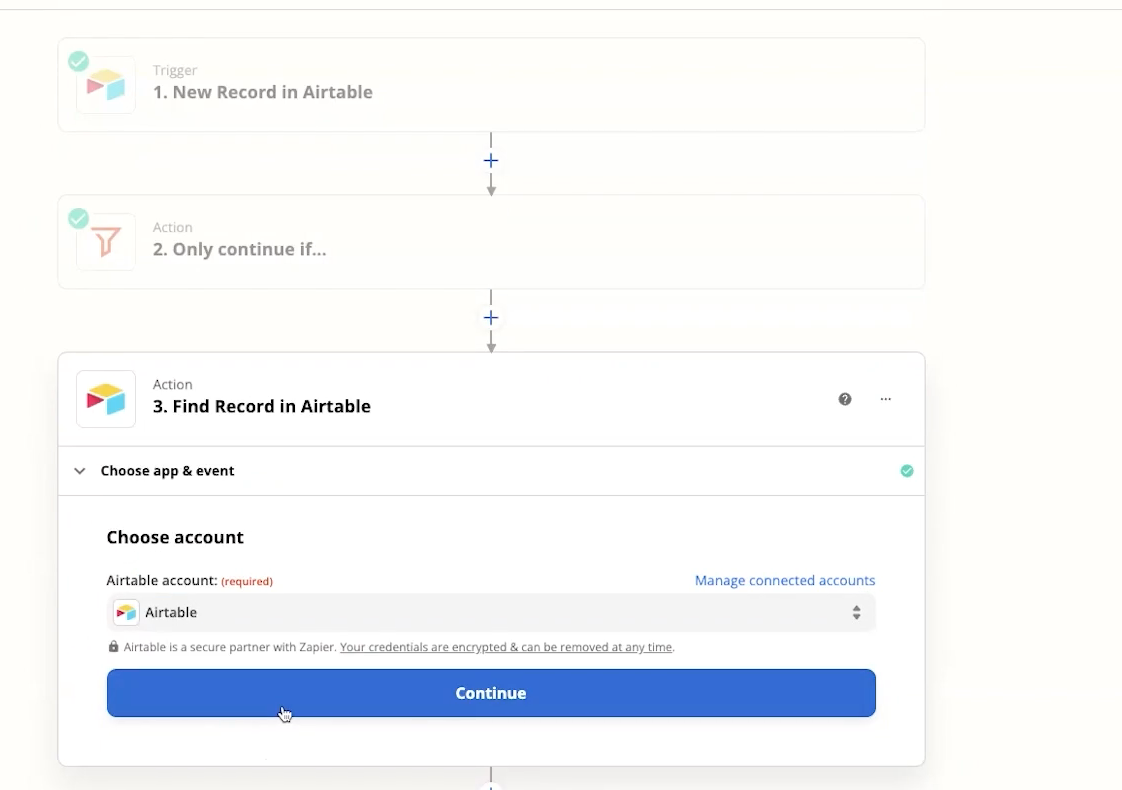
As I mentioned before, we don't want to duplicate forms within Mathilda's CRM—that would be confusing. So I'll set up this action to search by email to see if Piotr is already in her database. I'll inform my Zap that this step should be a success if nothing is found because I'll want to create a record of Piotr in Airtable if he doesn't already exist.
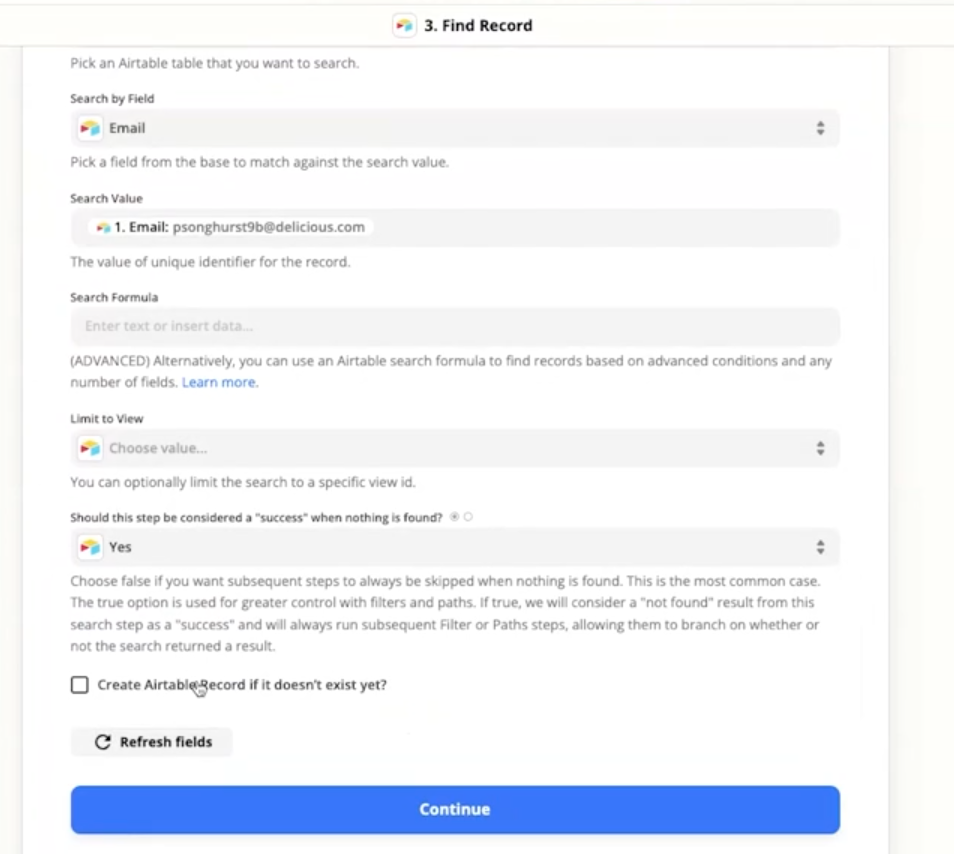
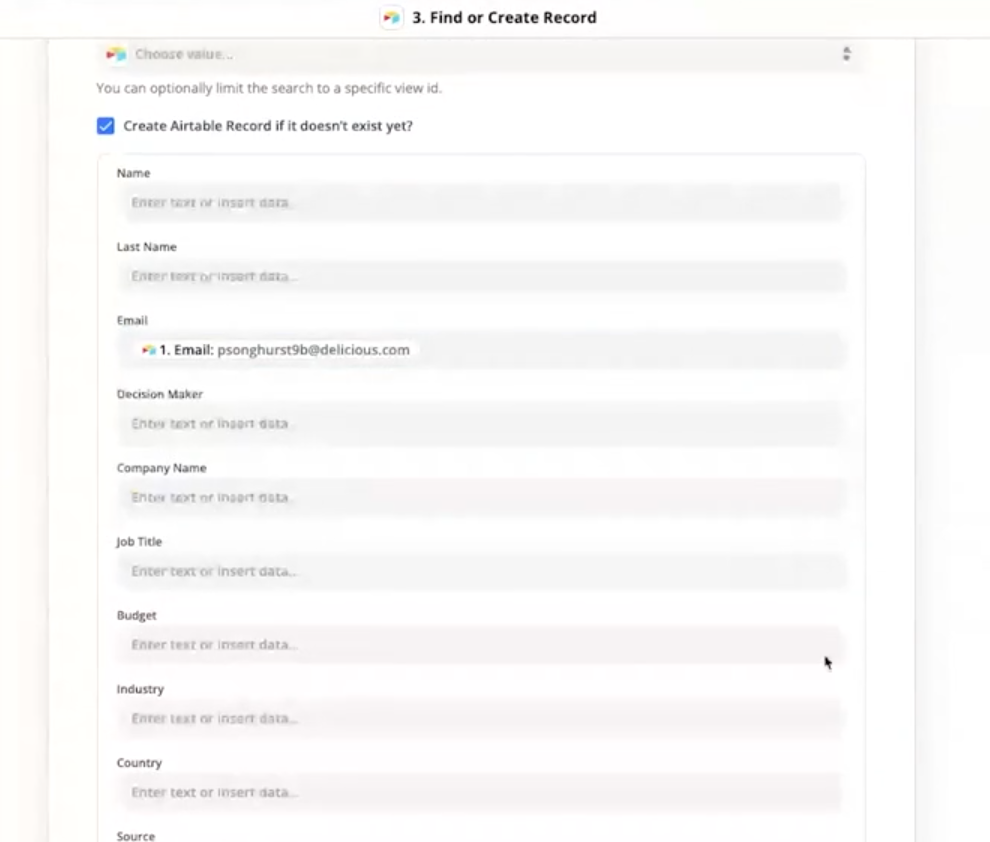
So we'll check Create Airtable record if it doesn't exist yet? and it will create a new customer record if one isn't found.
And I'll just configure the Zap to add the email address for now. We can use Step 4 below to update the customer profile and bring in all that additional data to ensure that—regardless of whether the customer is new or existing—we have the most relevant and up-to-date information.
Step 4: Update the record
With this next step, we can update either new or existing records.
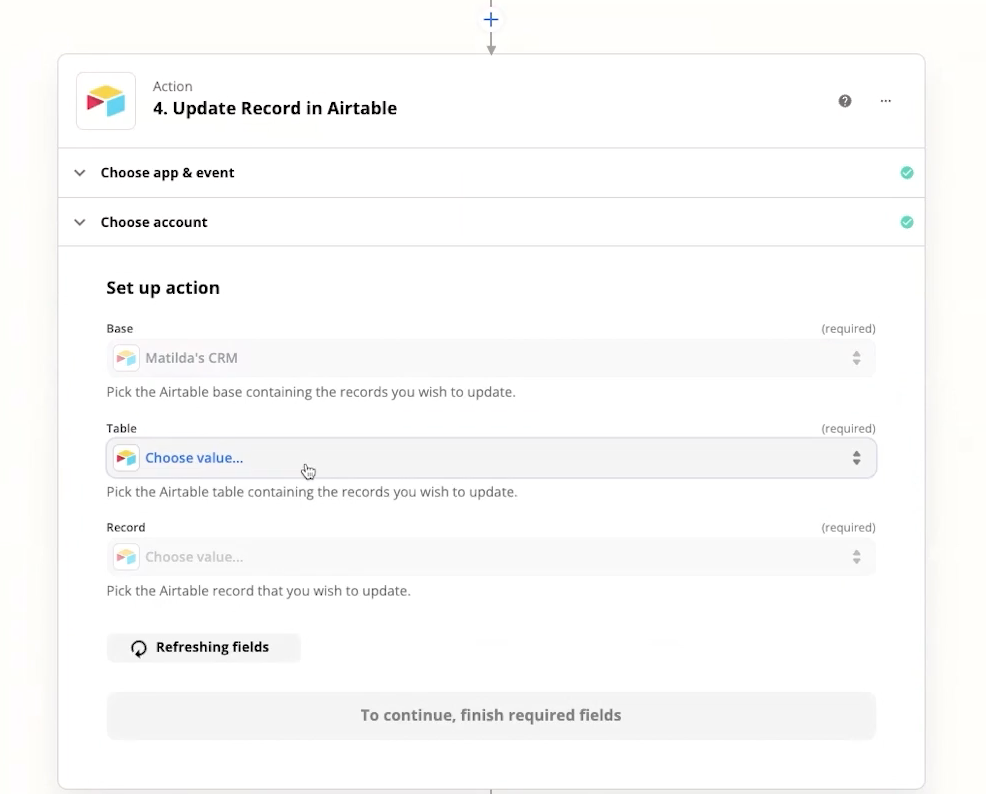
Be careful here not to hard-code to any exact record! When clicking on the record field, we want to select a custom value and assign the previously found ID.
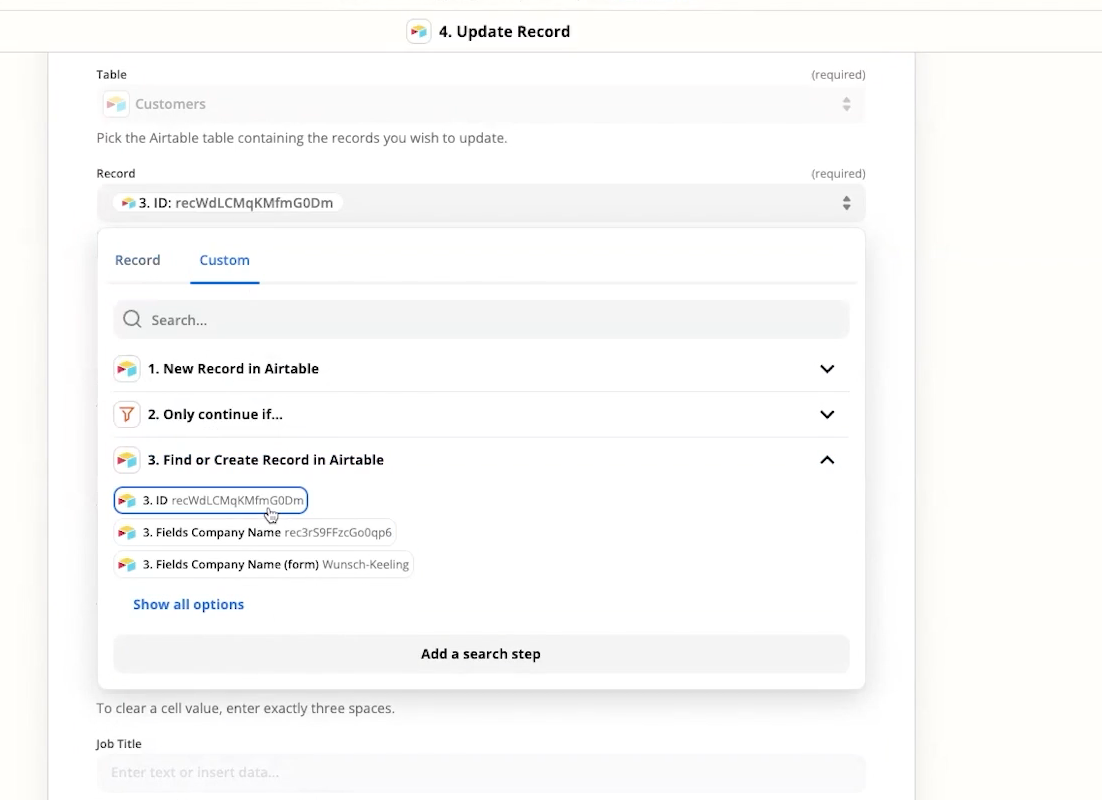
So either way—whether Piotr previously existed in the table or was just added—his record now contains the latest, most relevant information.
Step 5: Only continue if…
But we wouldn't want our Zap to continue if there was an existing deal for Piotr. Here I'll set my next condition.
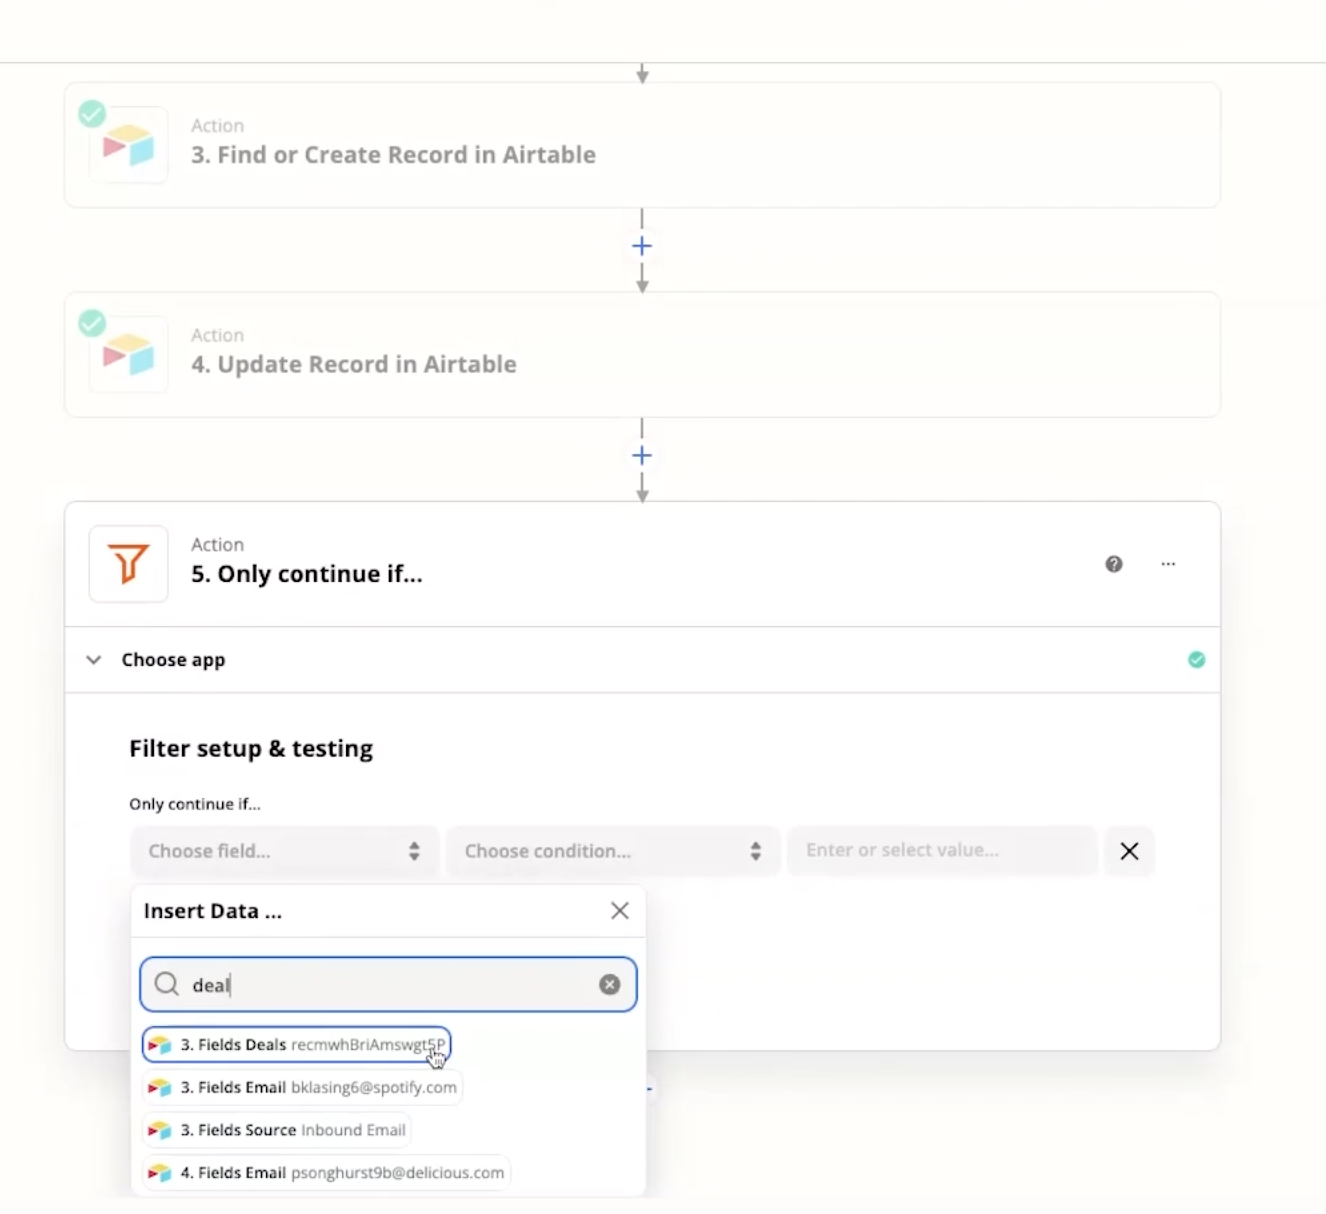
In this filter, I'm telling my Zap to only continue if a deal does not exist. Since there's no previous data on Piotr in Mathilda's "Deals" table, he would pass this filter, and it's time to assign him a sales rep.
Step 6: Search for sales rep
In Airtable, Matilda has her sales reps organized by industries. So for this search, I need to input from her "Sales Team" table to see if Piotr's industry—Transportation Equipment Manufacturing—matches the assigned sector of her team members.
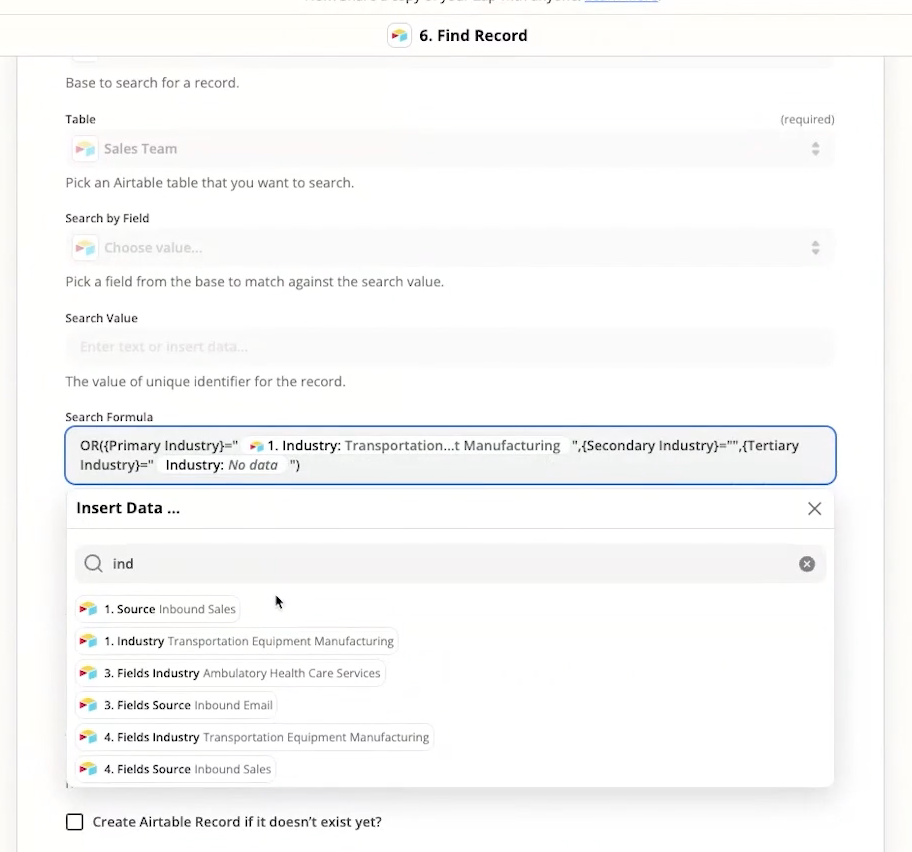
This is an advanced search defined by a formula rather than a field. You would build this like you'd build any formula in Airtable. To put it simply, you'll format an "OR" function that considers the customer industry.
There are two possible results from this step: either a matching sales rep is found or not. And that's why we need our final step—to handle either result with Paths.
Step 7: Set up your paths
At last, we've made it to Paths! We want to add path conditions to our Zap because Mathilda has decided to handle any leads that don't align with her sales team. Since Piotr is coming from an industry without an existing sales rep, Mathilda will handle first-client-contact to better determine his closest fit on the team.
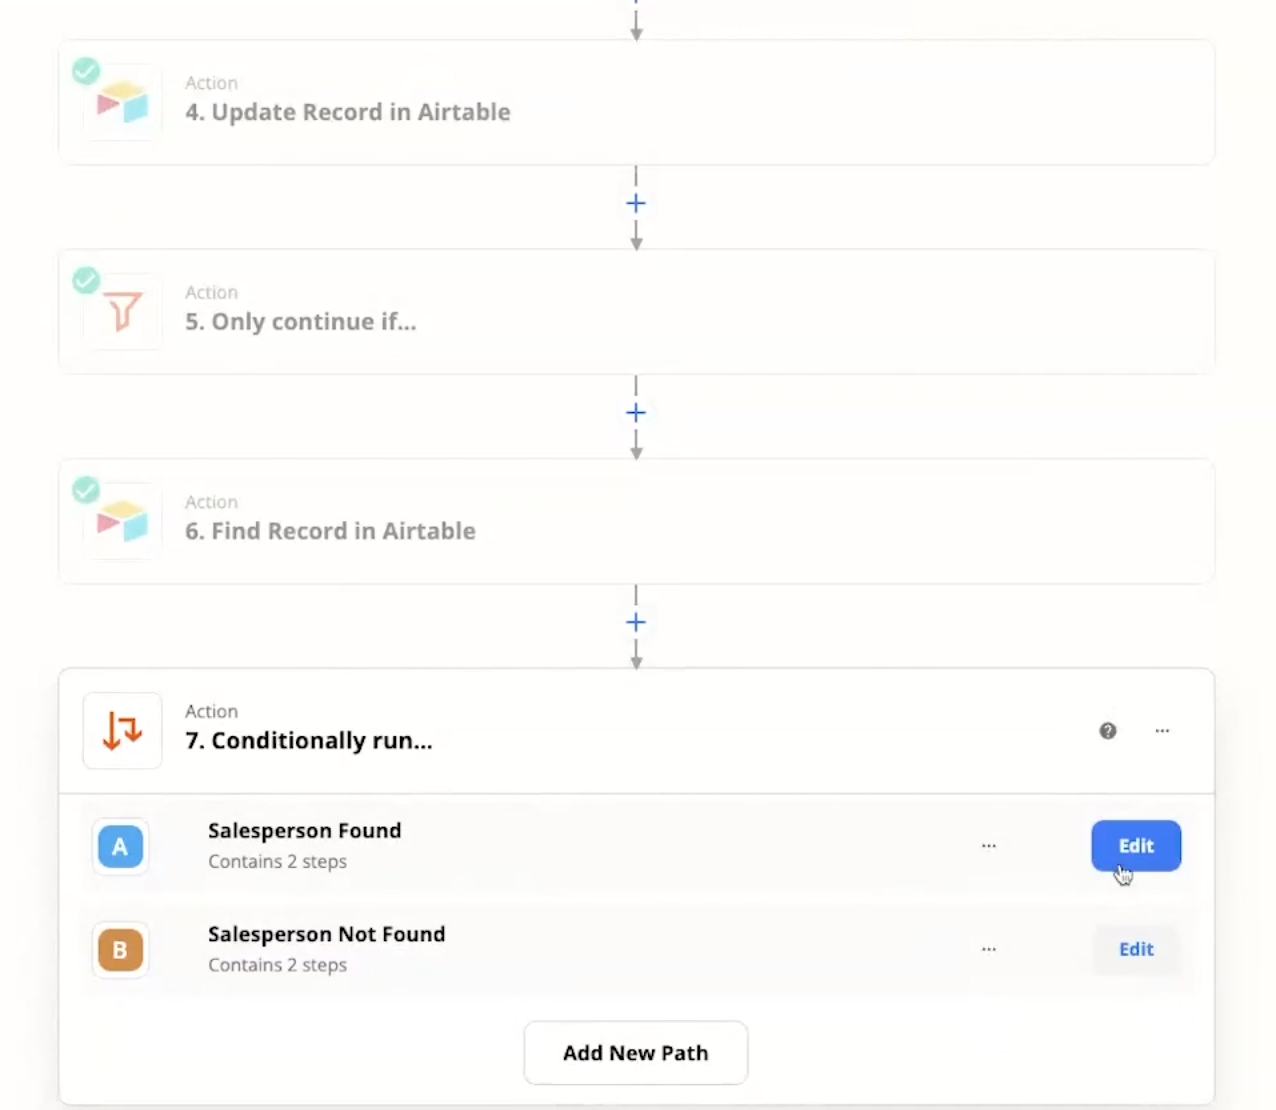
Using the Paths tool, we'll create two conditions:
Path 1: A salesperson is found. If found, the deal is sent to them.
Path 2: A salesperson is not found. Here, we hard-code the route to Mathilda.
For Path 1, I'll edit the condition only to proceed if the Sales Rep ID matches the customer's industry. Then I can assign a new deal to that rep in Airtable.
For Path 2, I'll set the condition that we can't pass the filter if a Sales ID does not match the customer's industry. I'll hard-code my next action to Matilda's ID, so it becomes her responsibility.
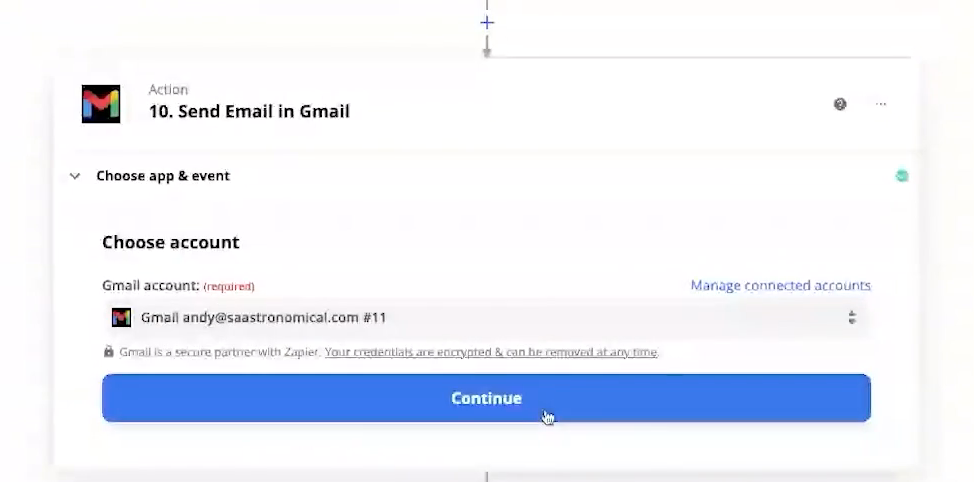
And with either path, my final action can be an automated message that notifies the sales rep or Matilda that they have a new deal. With Zapier, I can use Slack, Gmail, or any other messaging software Matilda's team might have chosen for notifications.
Closing the deal
By adding filter, search, and path steps to our Zaps, we've saved Matilda (and you) a lot of time.
Here's a quick recap:
Instead of manually approving or declining leads based on potential value, we can ensure that the leads we engage with are appropriate and have provided us with the information we need to move forward using filters.
Using search steps, we can determine whether the lead already exists in our CRM before creating a duplicate. It also allows us to update their data if it has changed since our last interaction.
Lastly, through Paths, we can use the data captured in the previous steps to route the lead to the right salesperson or Matilda in mere seconds. We can flow with each twist and turn automatically, saving time and helping us close any deal swiftly.
Related reading:

