Small and medium-sized businesses often struggle with productivity, especially in start-up or early growth mode. It seems there's always more work to do than the people, time, and expertise available to get it done.
I learned this the hard way. After a first career as a microbiologist, I co-launched a veterinary practice just for cats in 2010. My business partner ran the clinical side and I managed everything else. But after five years of looking after the marketing, sales, operations, and finance aspects of the practice, I left—burnt out and exhausted from the stress of running a business inefficiently.
Fortunately, I glimpsed the proverbial silver lining in those storm clouds. Searching for ways to relieve staff from inefficient and repetitive tasks, I stumbled across Zapier, and it literally blew my mind. Here was a tool that could automate manual tasks and empower staff to focus on the things that really mattered to a business—things like relationship building and customer care.
Zapier is workflow automation software that empowers anyone to create complete, customized, automated solutions. Combine user interfaces, data tables, and logic with 6,000+ apps to build and automate anything you can imagine. Check out this page to learn how Zapier works.
Fast-forward several years, and I now work as a business process automation specialist and Zapier Expert, at the agency I founded, Solvaa. My clients range from solopreneurs to those with loads of employees, in many different industries, located all over the world. It's a dream job, solving problems and streamlining business processes by analyzing the way a business does things. As Chief Problem Solver, I simplify systems and processes, connect technology tools together and automate whatever is possible.
Along the way, I've discovered how to apply best practices in business process management when building automations for others. In this article, I'll share some of those practices as well as tips on putting together new workflow projects, using problem-solving for existing processes, and the best ways to collaborate, organize Zaps, and share app connections.
This blog post was adapted from a presentation Kelly Goss gave at ZapConnect 2021, Zapier's user conference. Kelly is founder and chief problem solver at Solvaa, a Zapier Certified Expert agency that helps clients improve their business processes with automation, and is author of the book "Automate It with Zapier."
Business process management 101
The foundation for automation is business process management (BPM), frequently defined as "a discipline that enables organizations to discover, model, analyze, measure and improve their operating processes and procedures."
Business process automation (BPA) goes a step further by reducing costs and increasing productivity using technology to automate formerly manual and inefficient work.
And when I am working with clients, I insist on one more critical concept—process improvement (PI), which Appian defines as "the proactive task of identifying, analyzing and improving upon existing business processes within an organization for optimization."
To put it into a formula (cut me some slack, I'm a scientist by training):
BPA + PI = successful use of BPM
The BPM approach ensures that your project doesn't get overly complicated. With process improvement techniques, you'll be able to gather the information you need to understand the current process, strategize a new solution, roll it out and review it.
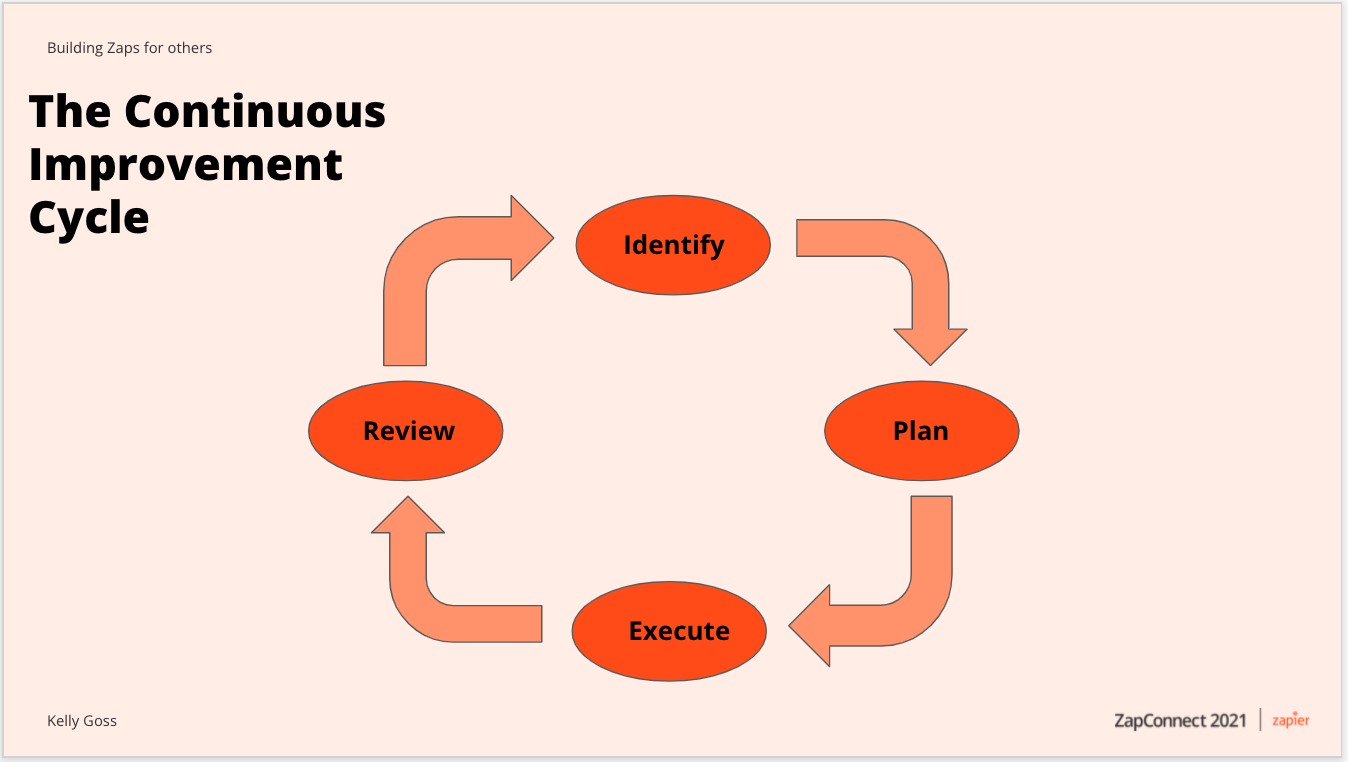
And whether you're collaborating to build workflows with team members within your company, or for clients, the simplest and one of the most effective process improvement techniques to use is the "Continuous Improvement Cycle."
The Continuous Improvement Cycle
As you can see by the graphic below, there are four stages in the Continuous Improvement Cycle.
The IDENTIFY phase
This is the most crucial part of the process. In this stage we gather data and analyze the existing processes for opportunities to automate tasks where possible. You can see that there are two main activities here—first we need to collect all the requirements for the project. In my practice, this means gathering top-level management input, such as budget, time scales, constraints, and the overall goal.
It also means including the key players using the process in your project team. This will not only help you to understand the process better but it will help you get buy-in when you want to implement the changes. Here's a tip: Use templated scoping documents in a Google Sheet or Typeform to help gather and centralize all this information. And you should eat your own dog food—use a Zap to automate the collection process.
Once you have your initial requirements in place and your team assembled, use problem-solving techniques to break the process down into steps. One of my favorite techniques is group brainstorming, which may mean using a digital whiteboard tool like Miro or Mural if the team involves remote workers.
Another technique I recommend is the 5W1H method. Here, you want to know:
Who is involved in the process?
What is involved in each step?
Why does the step need to be completed?
When does the step occur in the overall process?
Where does the step occur (in which app for example)?
How is the task completed?
With these questions answered and data collected, draw a map of the current process. Remember, all you're doing at this point is identifying how the work is getting done now. You can also use tools such as Microsoft Visio or Draw.io, but you don't need to get overly complicated with using flowcharts shapes and styles in the process map. The important thing is that the process is clear to you and the team.
The PLAN phase
Once we've done our groundwork, we need to prepare for building out and implementing the workflows. It is worth spending time on this stage as it will reduce the time spent in later stages of the cycle.
Simplify the existing process where possible. This involves reviewing the steps in the process, deciding if they are actually required, and determining if there is a better way of getting to the outcome. Next, you should identify what needs to remain as a manual step and what can be automated. Zapier's app integration pages show a handy list of triggers, actions, and searches for each app you're using. It's a terrific resource.
Now you can create the automation plan—where your creativity takes charge and you strategize how to create the workflows in Zapier. With thousands of apps on the Zapier platform and tens of thousands of pre-made templates, it's easy to find what you need to make your plan work, with no coding required. And for more complex processes, you can build Zaps with multiple filters and branching logic.
Features like multi-step Zaps and conditional logic vary based on your Zapier plan. A paid plan is required for some of them.
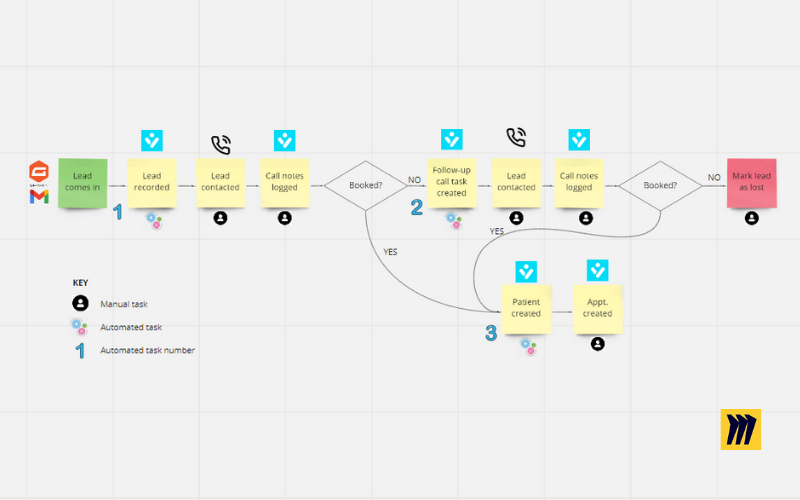
One final step in the plan sequence—updating the process map to highlight manual steps, automated steps, and their sequence (see the graphic below). Preparing a new process map at this point will help to provide a visual representation to the stakeholders during the next part.
The EXECUTE phase
Here is where we'll build the Zaps, test them, and get feedback. When automating for teams or for other organizations, it's essential to keep these best practices in mind.
Keep collaboration in mind at every step. The Zap editor gives you plenty of opportunities to do so. For instance, you can give each Zap a name and rename each step so that it is obvious what's happening at any point in the process. You should add notes to the Zap Settings Description box for a bird's eye view of the automation. I also recommend organizing your Zaps in folders, with clear titles.
Before moving the Zap into production, test it with dummy data to ensure data integrity in the apps involved. Solicit feedback from the team and get explicit sign-off from management.
And perhaps sounding like a broken record, I have to say it: update the process map one more time! But take it one step further and publish a process manual on the company's intranet or using a wiki-type tool such as Notion. And of course, Notion has a robust Zapier integration…
Now you are ready to hand the new, automated process over to the process owner. But that's not the end of the road.
The REVIEW phase
When the automated process is first launched, it should be monitored for issues. The simplest way to do this is to set up a few maintenance Zaps using the Zapier Manager trigger and a notification action step, such as creating a new task in Asana or sending a Slack or Microsoft Teams alert. You use Zapier Manager's triggers for New Zap Error, New Halted Task and Zap Turned Off, to alert you to problems with your Zap. I've included a few Zap templates here for your use.
Here are three starting points using Slack:
Send Slack notifications if your Zaps run into errors
If you want to send alerts to another app, create a Zap of your own in your account. Choose Zapier Manager as the trigger app, and whichever type of alert you'd like to receive as the trigger event. Pick the app where you'd like to be notified or have a task created as the action app, and choose an action event like post message or create task. Test your Zap, and when it works the way you want, turn it on.
Once the process is running smoothly, you should revisit it regularly. You can set up a Zap with Schedule by Zapier to create a task in your task management system such as Trello to remind you or the process owners to review the process every three months, for example. Successful businesses constantly evolve with the times and so do their processes.
Automated processes require systems
To summarize, when you're building Zaps for others, your system is essential. To leverage business process management, it should include:
Process improvement techniques
Involving the key stakeholders and users
An automation plan with process maps and documentation
Building Zaps with collaboration in mind
A clean hand-over
Continuous review cycles
Business processes improve things for everyone, so a system that takes everyone into account is essential.
