
Automation and AI can scale your work at incredible speed—but speed isn't the end all be all. Sometimes the smartest decisions come from pausing and gathering feedback rather than just barreling forth on autopilot.
Human in the Loop lets you build thoughtful checkpoints into your workflows, so your team can review and approve content, make edits, or add data at key moments before an automated process continues. To learn how to get the best of both worlds—AI efficiency with human wisdom baked right in—keep reading.
Human in the Loop is available on Pro plans and higher tiers, and each successful action counts as one task. With a Pro plan, you can only send requests to yourself. Compare Zapier plans on our pricing page.
Table of contents
Zapier is the most connected AI orchestration platform—integrating with thousands of apps from partners like Google, Salesforce, and Microsoft. Use forms, data tables, and logic to build secure, automated, AI-powered systems for your business-critical workflows across your organization's technology stack. Learn more.
What is Human in the Loop?
Human in the Loop is a built-in tool that lets you pause a Zap—Zapier's automated workflows—so a human can step in before the workflow continues.
I know, the whole point of automation is to reduce human input. But even though robots can handle a lot, human judgment is—to my great relief—still valuable. For example, maybe you're working with AI-generated content that needs a human review before you feel comfortable publishing it on your website. Or maybe you need someone to double-check that expense reports have the right receipts attached to them before payments get processed. Those human checks are possible with Human in the Loop.
What's great about this tool is you can send your data for review through email, Slack, or any of the thousands of apps that connect with Zapier. And all collected data and approved and rejected steps get logged in your Zap's change history, in case you need to maintain compliance or track decisions over time.
A few limitations to keep in mind: Every designated reviewer needs a Zapier account, and you'll need to share the Zap with reviewers for this process to work. You also can't add Human in the Loop steps within or after Looping by Zapier steps. You can have too much loop!
Features of Human in the Loop include:
A New Approval Requested trigger: Whenever a new approval is requested, do things like log requests in a table, notify a Slack channel, or kick off follow‑up workflows in your CRM.
A Request Approval action: Pause workflows when you need a simple yes-or-no answer from a reviewer to continue.
A Collect Data action: Pause workflows to gather additional information from reviewers when you need more than just a straightforward approval.
Customized context: Add custom messages with requests or instructions when asking reviewers to approve, reject, or provide data.
Flexible notifications: Choose to notify reviewers by email or Slack. Or, set up a second Zap with the New Approval Requested trigger to send custom requests for collecting data or approving steps through any apps that integrate with Zapier.
Reviewer access settings: Assign reviews to internal teammates or external collaborators, while keeping control over who can approve or edit each step.
Audit log: Admins see a record of all data collected, approvals, and rejections in their account's audit log, so they can trace who reviewed what and when.
Workflow controls: Decide whether rejections stop the Zap entirely or allow it to continue running.
Note: If you choose Request Approval as the action event, you can let reviewers edit the Zap's output, too—or you can keep it as a simple step that lets people only submit an approval or rejection. For example, if an AI step in your Zap generates an email draft, you could let reviewers edit the subject line or message content before approving it to be sent.
What you can do with Human in the Loop
Here are a few ways to make use of a Human in the Loop step:
Humanizing AI-generated content
When customers reach out to you, you want AI to generate the initial response—but you also want to add personalized touches to the message.
What this might look like:
You receive a new customer inquiry in Typeform.
ChatGPT generates a response based on the form data.
Human in the Loop's Collect Data action event pauses the workflow, so you can review the message and add personal touches that make it feel more natural.
Gmail delivers the humanized response to your customer.
Editing auto-generated social media posts
You want to share newly published blog posts on social media, but you want the option to edit the caption before it goes live.
What this might look like:
RSS by Zapier triggers when a new RSS feed item gets published.
You map the blog post description to a Human in the Loop Request Approval step, which sends you an alert to review and potentially edit the description.
Facebook publishes the approved content to your page with the blog post title, link, and approved description.
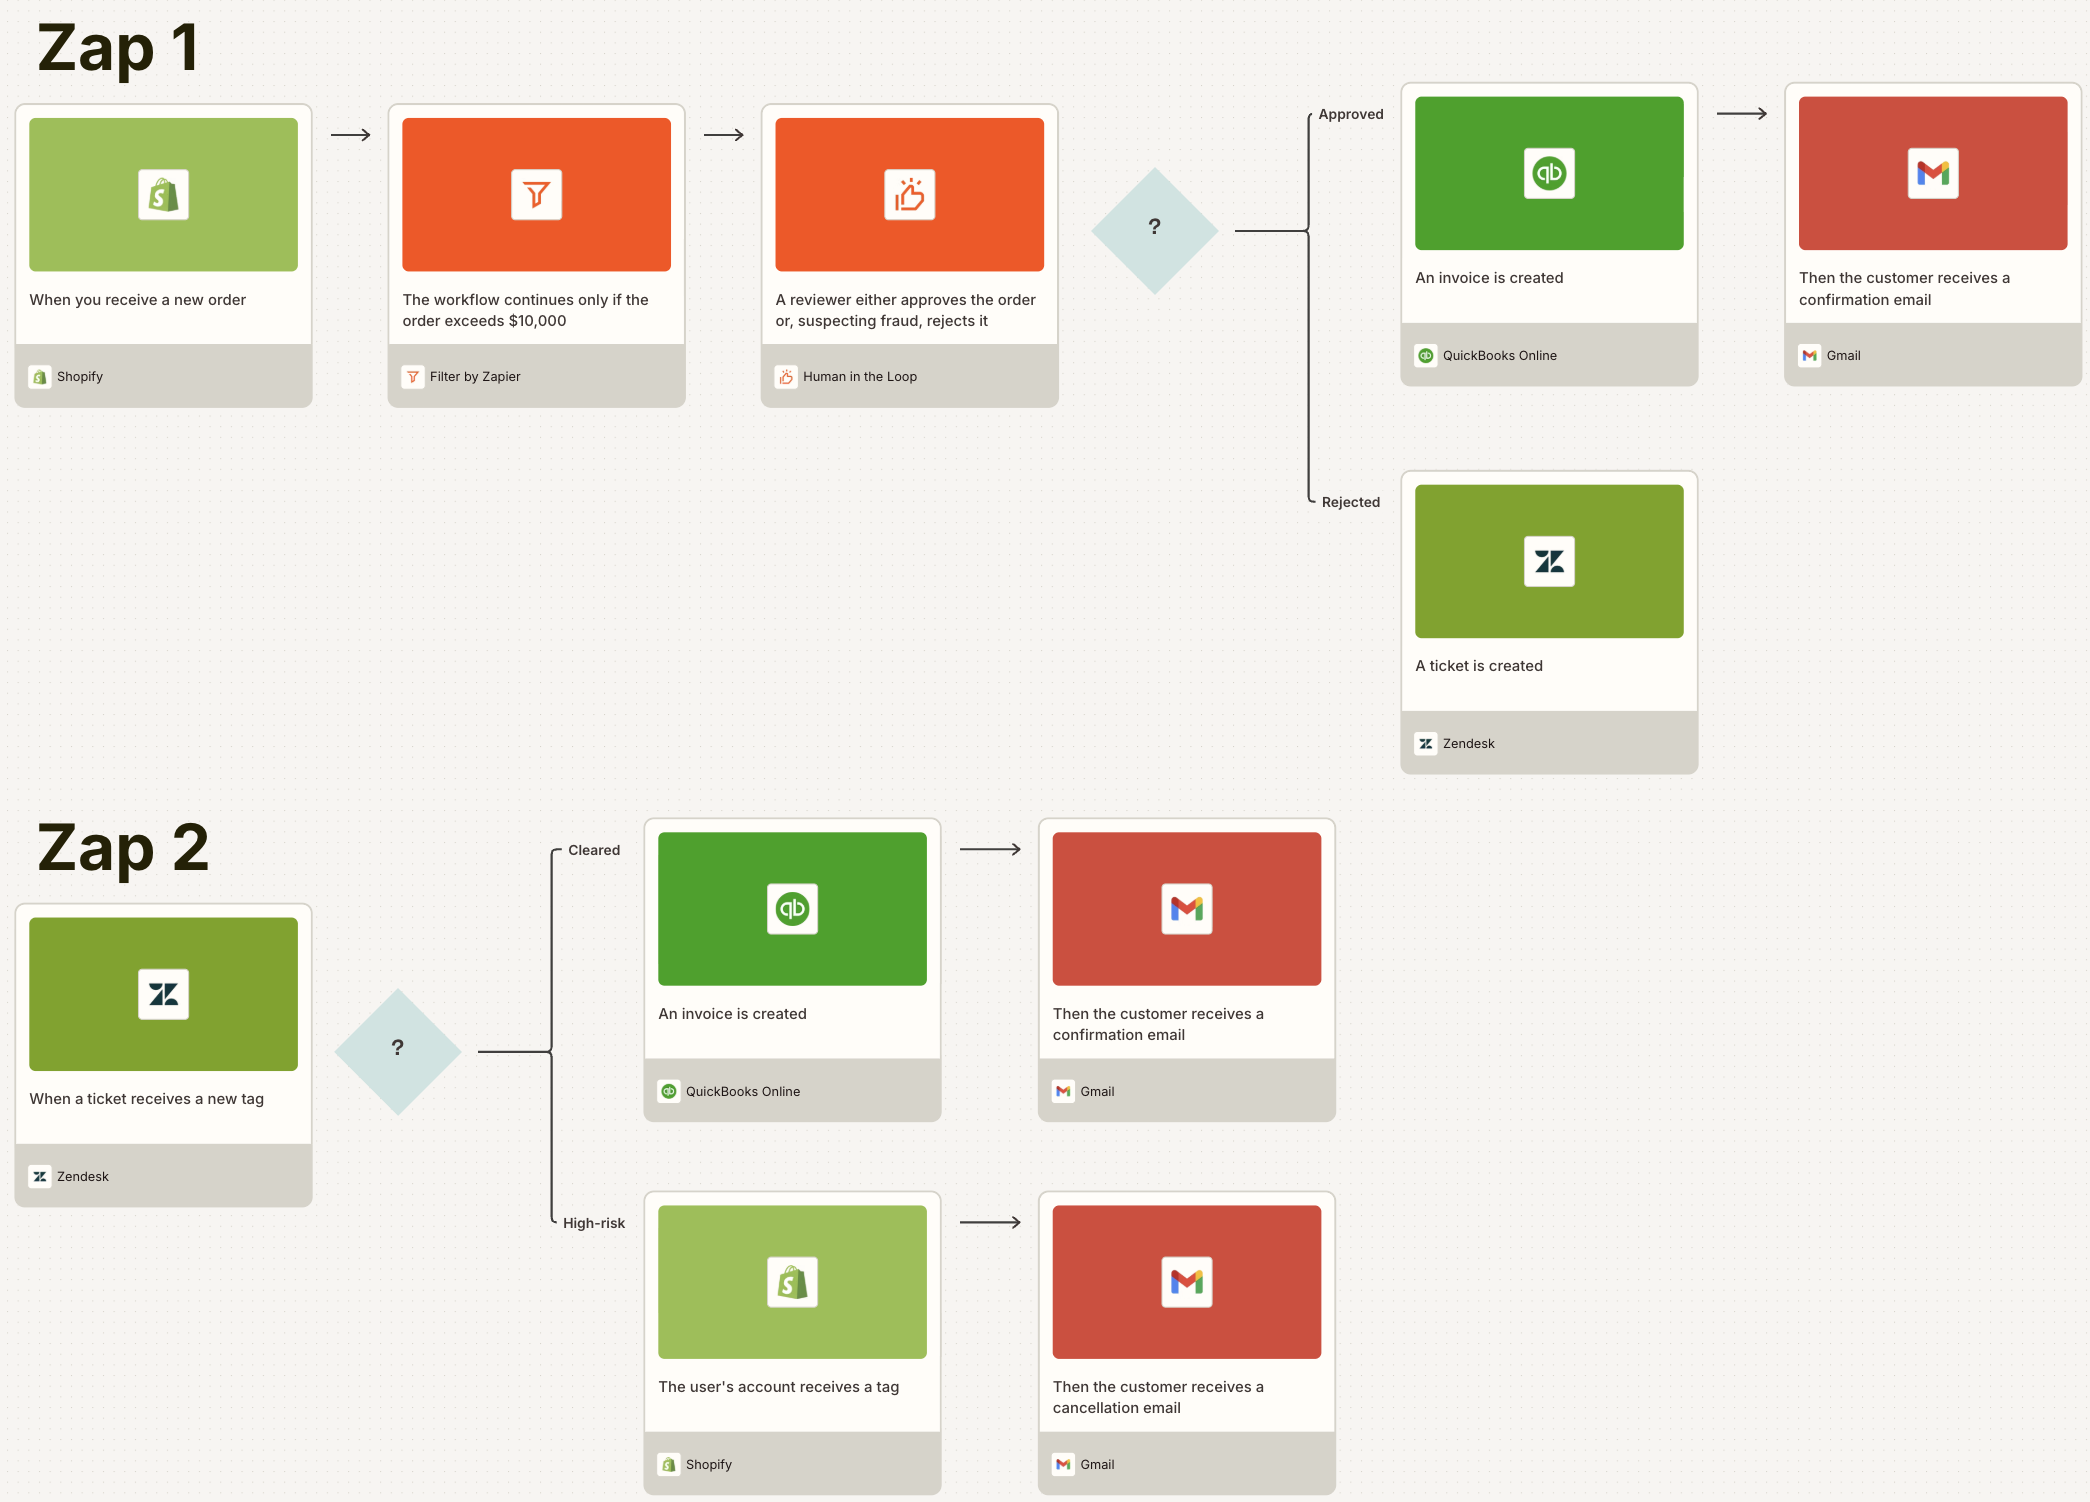
Detecting fraud in high-value orders
You want to implement quality control and approval workflows for high-value orders, for fraud-protection purposes.
What this might look like:
You receive a new order in Shopify.
Filter by Zapier continues the workflow only if the order exceeds $10,000.
Human in the Loop's Request Approval action event pauses for a reviewer to investigate the order.
With Paths by Zapier, you branch the workflow:
If approved, an invoice is created in QuickBooks Online.
If rejected as potential fraud, a ticket is created in Zendesk to log the transaction.
A second Zap is triggered when a new tag is added to a Zendesk ticket—either "cleared" for verified transactions or "high-risk" for fraudulent activity.
With Paths by Zapier, you branch the workflow again:
If the ticket receives a "cleared" tag, an invoice is created in QuickBooks Online.
If fraud is confirmed, Shopify tags the customer's account for future reference.
Gmail sends either a confirmation or cancellation notice.

How to get started with Human in the Loop
Ready to add human oversight to your workflows? Log in to Zapier and head to the Zap editor.
First, set up your trigger step. Choose the app and event that'll begin your workflow and any actions you want to happen before the Human in the Loop step.
When you're ready, add an action and select Human in the Loop as the app.

For your action event, choose Request Approval if you need a simple yes-or-no decision from reviewers. Choose Collect Data if you need reviewers to provide additional information beyond just approval. Configuring these two action events is similar, but you'll need to follow slightly different steps.

Collect data
If you choose Collect Data, you'll need to enter a message to send the reviewer and specify what information you want reviewers to provide in the Data inputs field. To map dynamic data from previous steps, just click the + button or type a forward slash (/), which opens a modal that lets you select and insert values.

From here, choose where to send your requests. You can either send an email or a Slack message—or trigger another Zap, which effectively lets you send a request through any app you want. If you decide to trigger a Zap, you'll set up that second Zap in a later step.

Next, select your reviewers. (Remember, every reviewer you add needs their own Zapier account.) Then set timeout settings for how long to wait before automatically continuing or stopping the workflow if no response comes through. You can even send reminders to follow up with reviewers.

Once you've tested this step, you can map data while setting up subsequent action steps. Go to the action where you want to map the collected data, then click the + button or type a forward slash (/) to open the modal that lets you select values. Each data input you created for Human in the Loop will appear with the label Submitted Content followed by your input field name. For example, if you created a data input field called Summary, you'll find it listed as Submitted Content Summary.
When you eventually run the Zap, here's what that request will look like in Slack.

And here's what it'll look like in your reviewer's inbox.

Pro tip: Are you building a Zap that triggers when you get a new email—and also includes a Human in the Loop step that sends email notifications? Be sure to add a filter step to exclude emails from Zapier. Otherwise, you'll create an infinite loop where each Human in the Loop email notification triggers your Zap repeatedly. Read more about using Filter by Zapier.

After the reviewer clicks Go to Zap, they'll be taken to the Zap run, where they'll be able to submit their feedback.

Request approval
If you choose Request Approval, the setup is much the same. But this time, instead of specifying data inputs, you'll configure which content needs to be approved. You can also customize the approve and decline button text and decide what happens if the reviewer declines (either have the Zap stop or let it continue).
In the Configure tab, you can choose whether you want to send an email or a Slack request—or trigger another Zap to build a custom notification through another app. If you go this route, you'll set up that second Zap in a later step.
To send yourself an example notification, click Send a preview under the Notification section.

Then click Continue. This will run a test that displays the input and output data for this step. This will not send a request to your reviewers.
When you run the Zap, the email and Slack notifications will look identical to those from the Collect Data action event. The only difference is in the Zap run itself. Instead of submitting feedback, the reviewer will be prompted to approve or decline the content.

When you're finished testing, set up your subsequent action steps that'll run after the Human in the Loop step. Then remember to test and turn on your Zap.
Build a custom notification with a second Zap
If you decide to send a request by triggering a Zap, you'll need to set up a second workflow. This second Zap works with either action event (Request Approval or Collect Data) and lets you send your request through any app that connects with Zapier—not just Slack or your email provider.
To set this up, create a new Zap in the Zap editor. Then select Human in the Loop as your trigger app and New Approval Requested as your action event.
In the Configure tab, you can optionally add field names that correspond to data you want to send from your first Zap. This lets you include relevant details (like customer info or the content being reviewed) in the message you send to reviewers.

When you're finished configuring this step, click Continue and run a test.
Finally, add an action step to wherever you want to send the review request. Just be sure to map a link to the first Zap run—that's where the reviewer will go to submit their response inside the Zap.
For example, if you want to send the request through Microsoft Teams, you'd link the Zap run under Document Content in the Configure step.
Note: The second Zap's primary job is to deliver the request through your chosen app—you don't need any additional action steps after that for it to work. When the reviewer clicks the link, they're taken back to the first Zap to submit their response, and that first Zap continues with its remaining actions. You can add extra actions to the second Zap if you want (like logging the request or creating tasks in your project management tool), but that's optional.
When you're done adding action steps, remember to publish the Zap and turn it on.
Add human checks to your workflows with Human in the Loop
For ideas that only people can dream up, add a human-in-the-loop step to your workflows. You'll enjoy the efficiency that automation provides without losing those valuable opinions from your teammates.
Ready to give it a try? Visit the Human in the Loop integration page for inspiration, check out our help guide for more details, or jump straight into the Zap editor to start building.


