Outlook doesn't make designing custom, gorgeous newsletters very intuitive…at all. There isn't a way to create a newsletter in Outlook the same way as there is in Gmail, with just a click of a button. But there are a few workarounds I'll unpack, so you can still send a newsletter from Outlook.
One thing to keep in mind: there are a million versions of Outlook out there, and some newsletter creation options are only available for some of those versions. For example, while it's only available in a Preview build right now, you might have access to a new feature called Outlook Newsletters.
These steps are based on the version I use—Microsoft Outlook for Mac (Version 16.100.1).
Table of contents:
How to create a newsletter in Outlook
If you're planning to use the web version of classic Outlook to execute your email marketing campaigns and create a newsletter, you can expect to do a bit more work compared to the desktop version.
With the web version, you can't format a message how you want it and then save it as a template. If you don't have access to Outlook Newsletters, all you can do is create a boring ol' email template by selecting My Templates from the three horizontal dots on the top bar and clicking +Template. There aren't options to design or upload templates like there are in Outlook for desktop.
But on Outlook for desktop, here's how to create a newsletter.
1. Start with an Outlook newsletter template
If your boss is insisting that Comic Sans "isn't professional," here are a few third-party apps you can look into for leveling up your Outlook newsletter game.
Note: You can import templates ending in ".emltpl" for Mac or ".oft" for Windows into Outlook for desktop. Some sites may let you export templates to Outlook for web, but these can't be saved as templates.
If you're more into doing the DIY thing in the Microsoft universe, you can also grab templates from Word. Here's how to import templates into Outlook for desktop.
Locate the template in your downloads. Right-click and select Open With, and then click Microsoft Outlook.
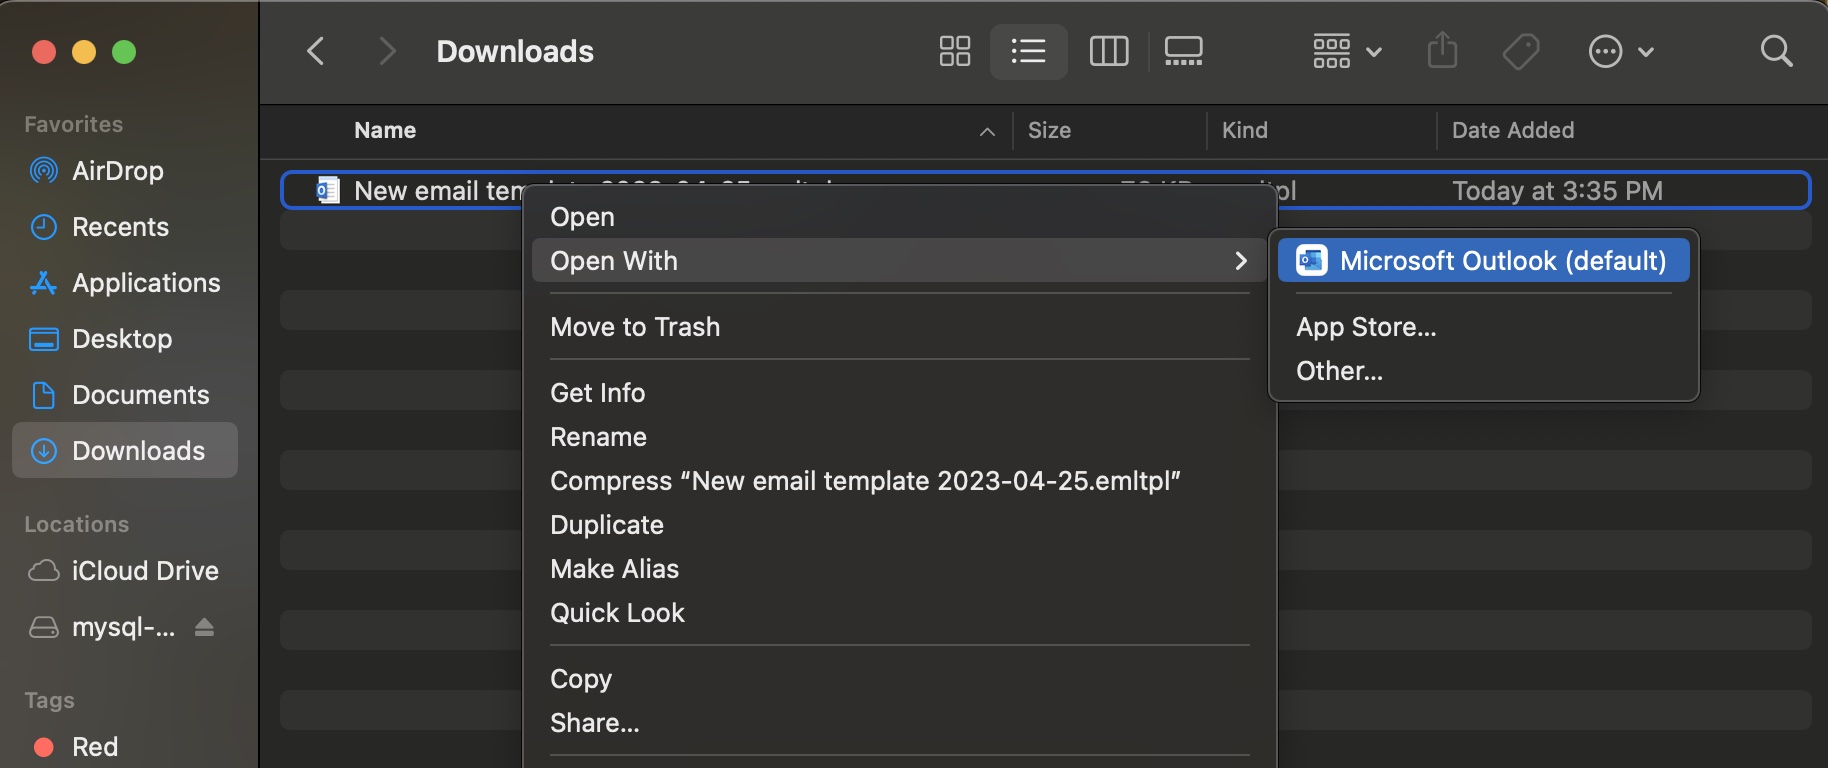
The template will open in Outlook, and you can edit it and send it from there.


2. Use Outlook's design features to edit
If you want to add a little (and I mean a little) flair to your Outlook newsletters but don't want to use a third-party app, Outlook has some basic design features. These features aren't available on my version of Outlook (thanks, Microsoft!), but Microsoft offers steps to jazz up your newsletter if your version allows it.
If you use a PC, Microsoft recommends Publisher for designing more detailed newsletters. For those on the new Outlook, Newsletters in Outlook also offer some decent templates and formatting features. You can also use Copilot, integrated directly into Outlook, to generate and edit text in your newsletter.
3. Add images to your Outlook newsletter
We're living in the 2020s—what's an email newsletter without a GIF or a cringey meme? You can include images and GIFs in the template itself or while you edit it on the desktop app. You can't add images to templates with the web version, but you can add them later when editing your newsletter.
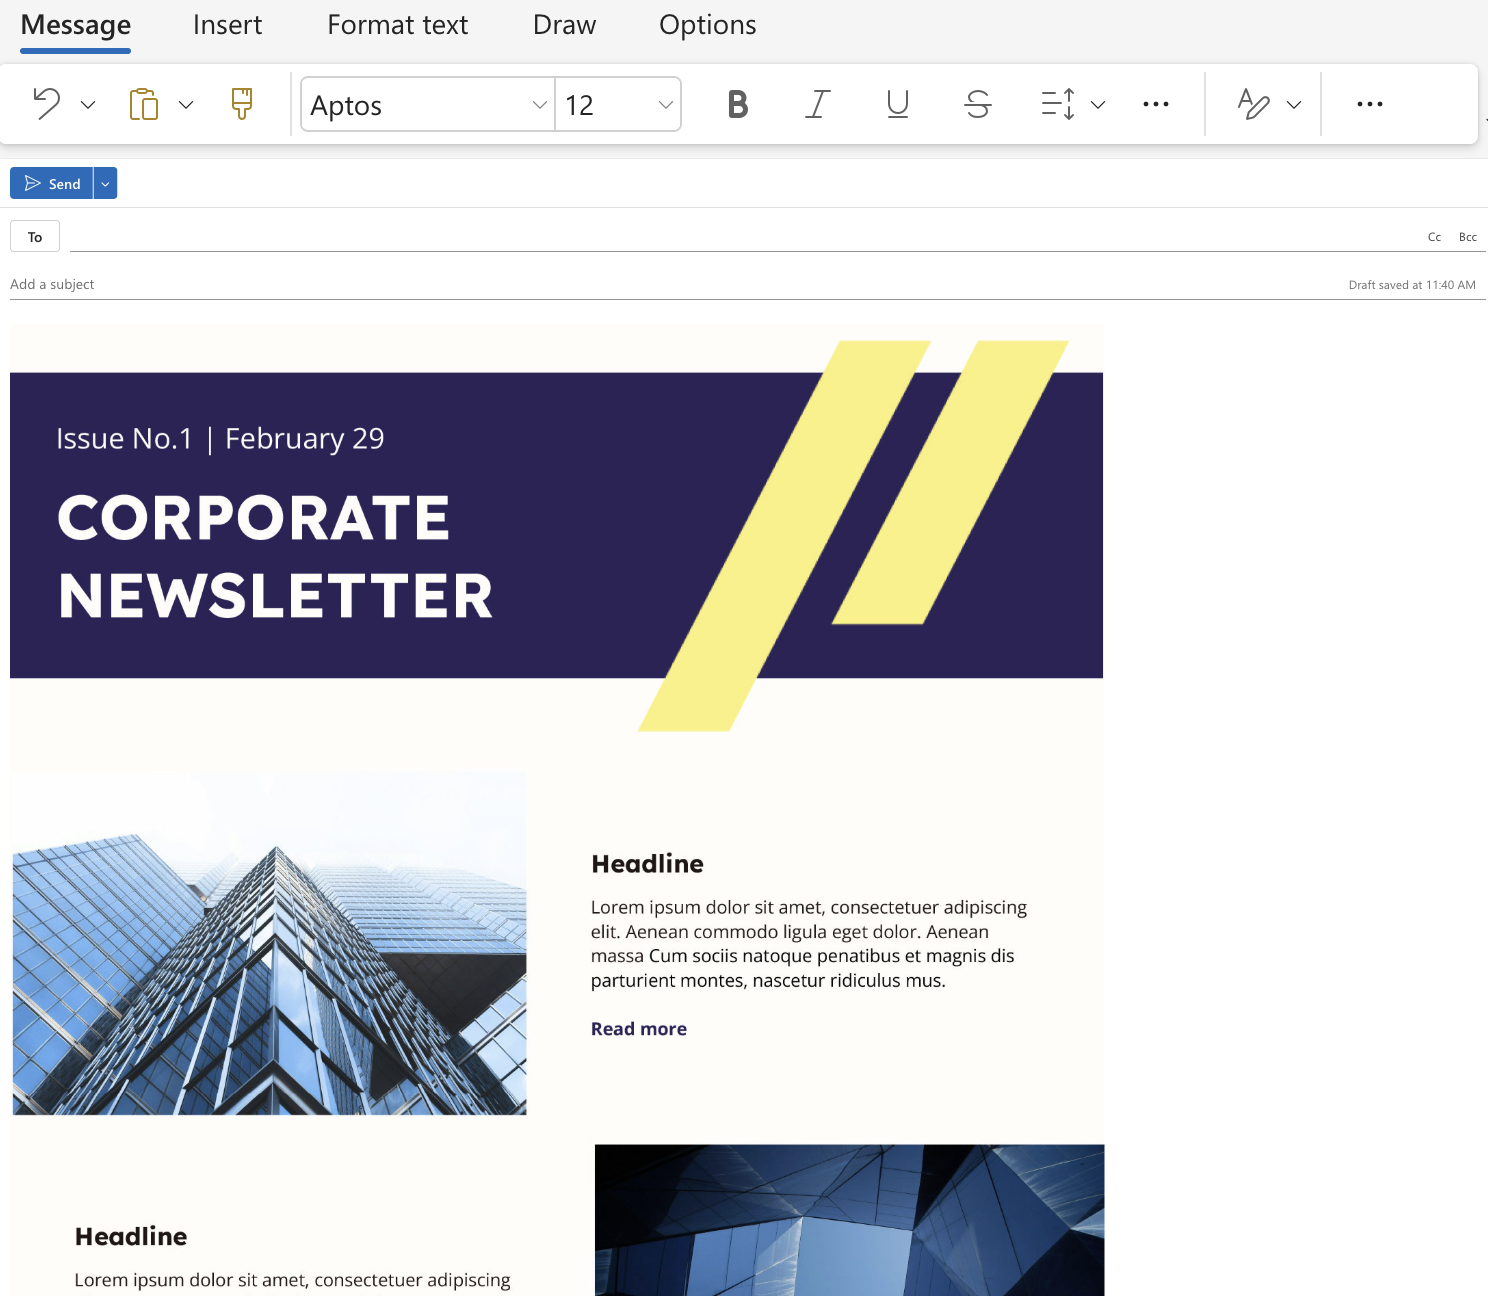
Start a new message with your template.
Click Format > Insert Picture…
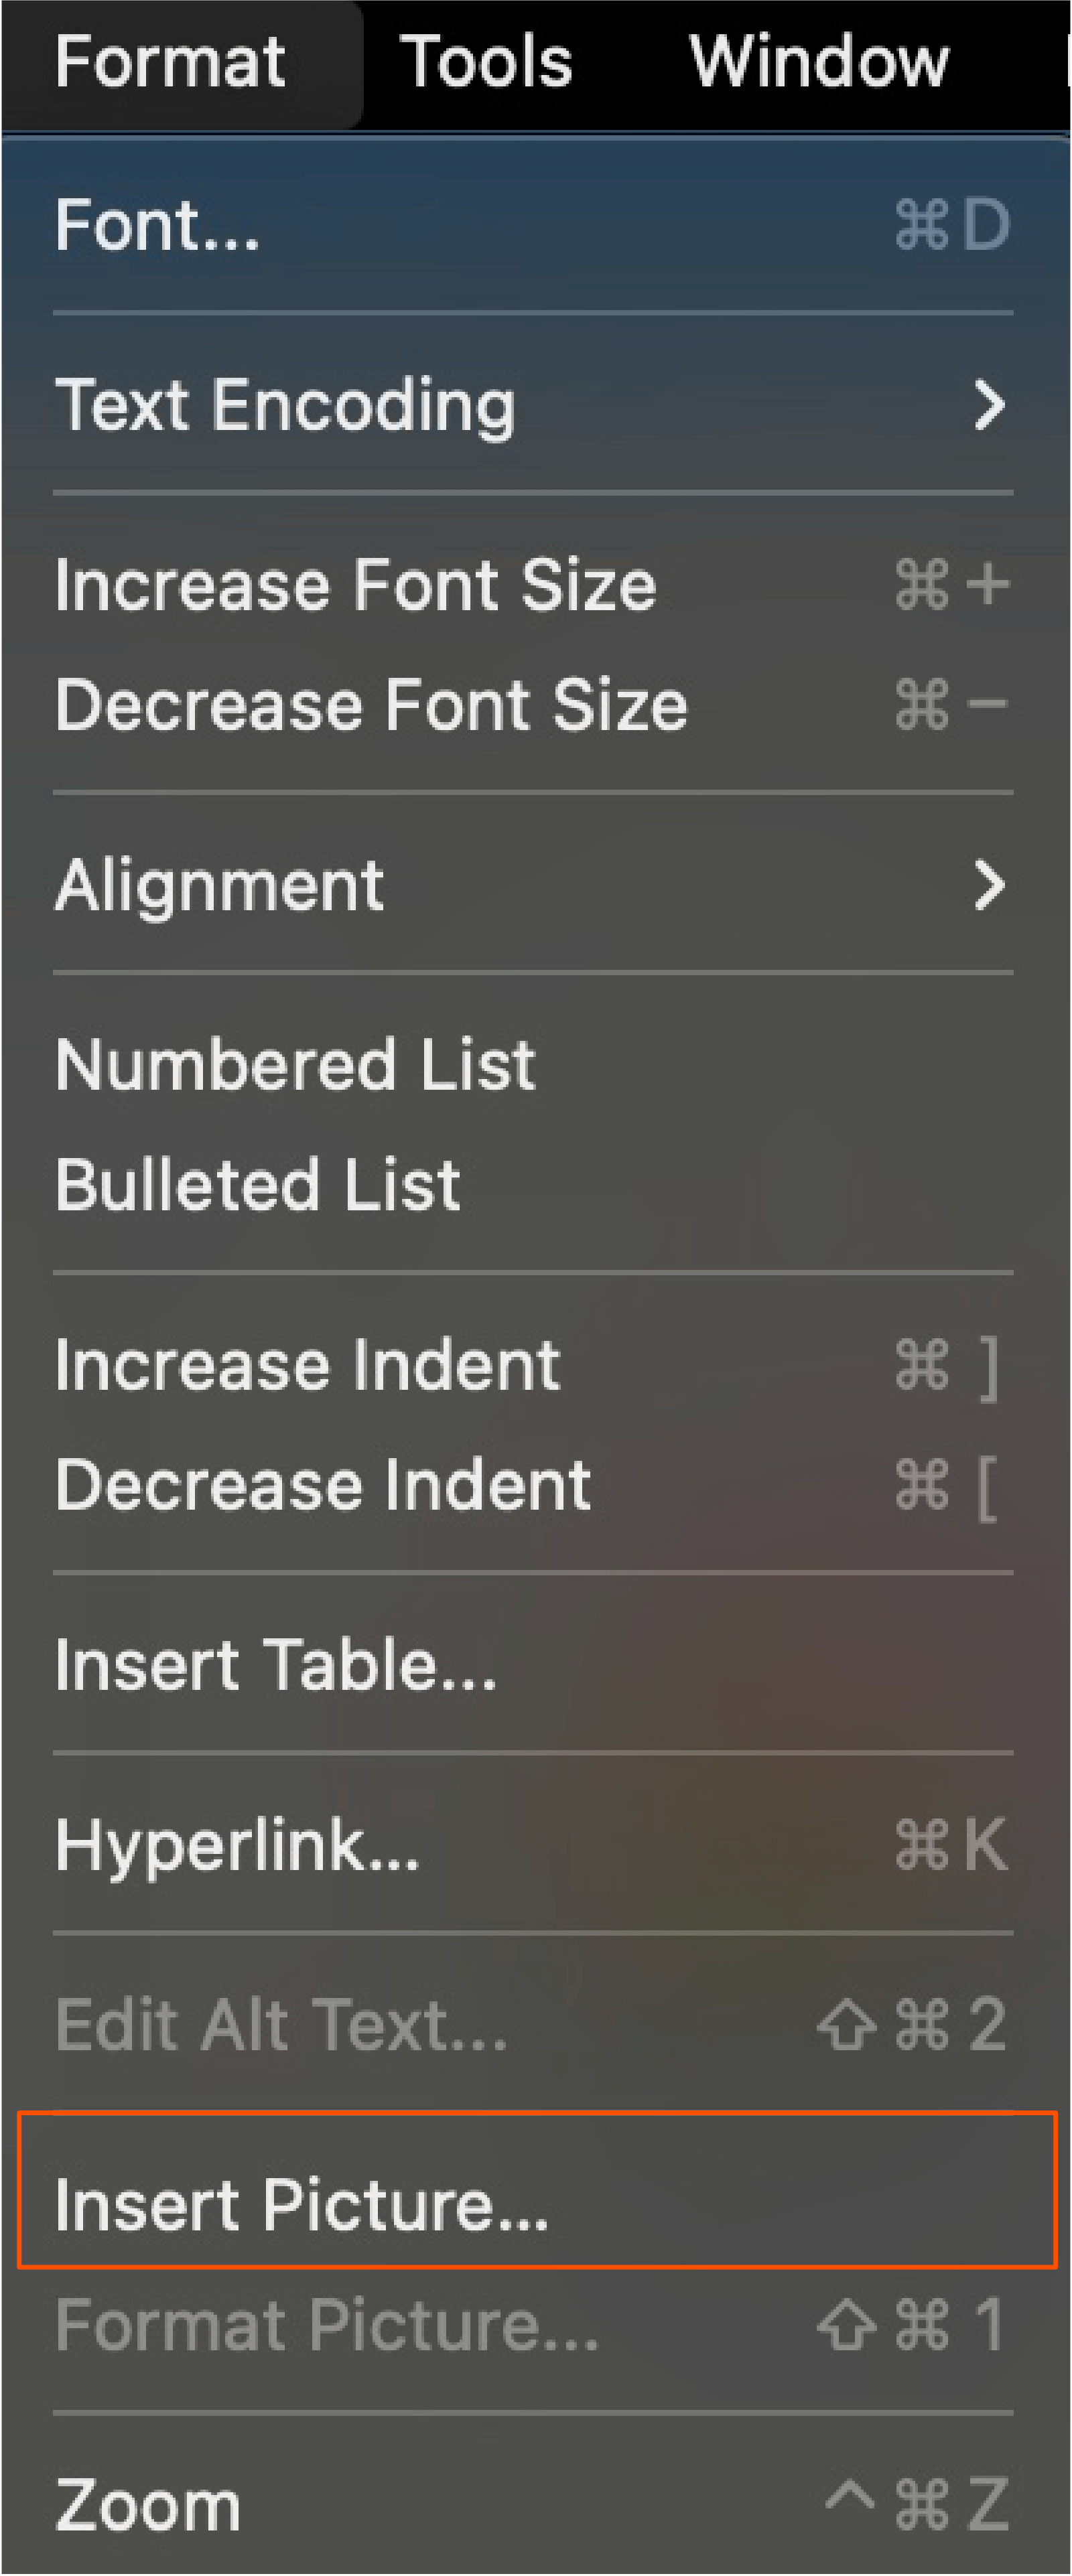
Select the image(s) you want to include from your files, and click Insert.
Format as necessary.

Here's another way to add images to your email:
Under the Insert tab, click Pictures.
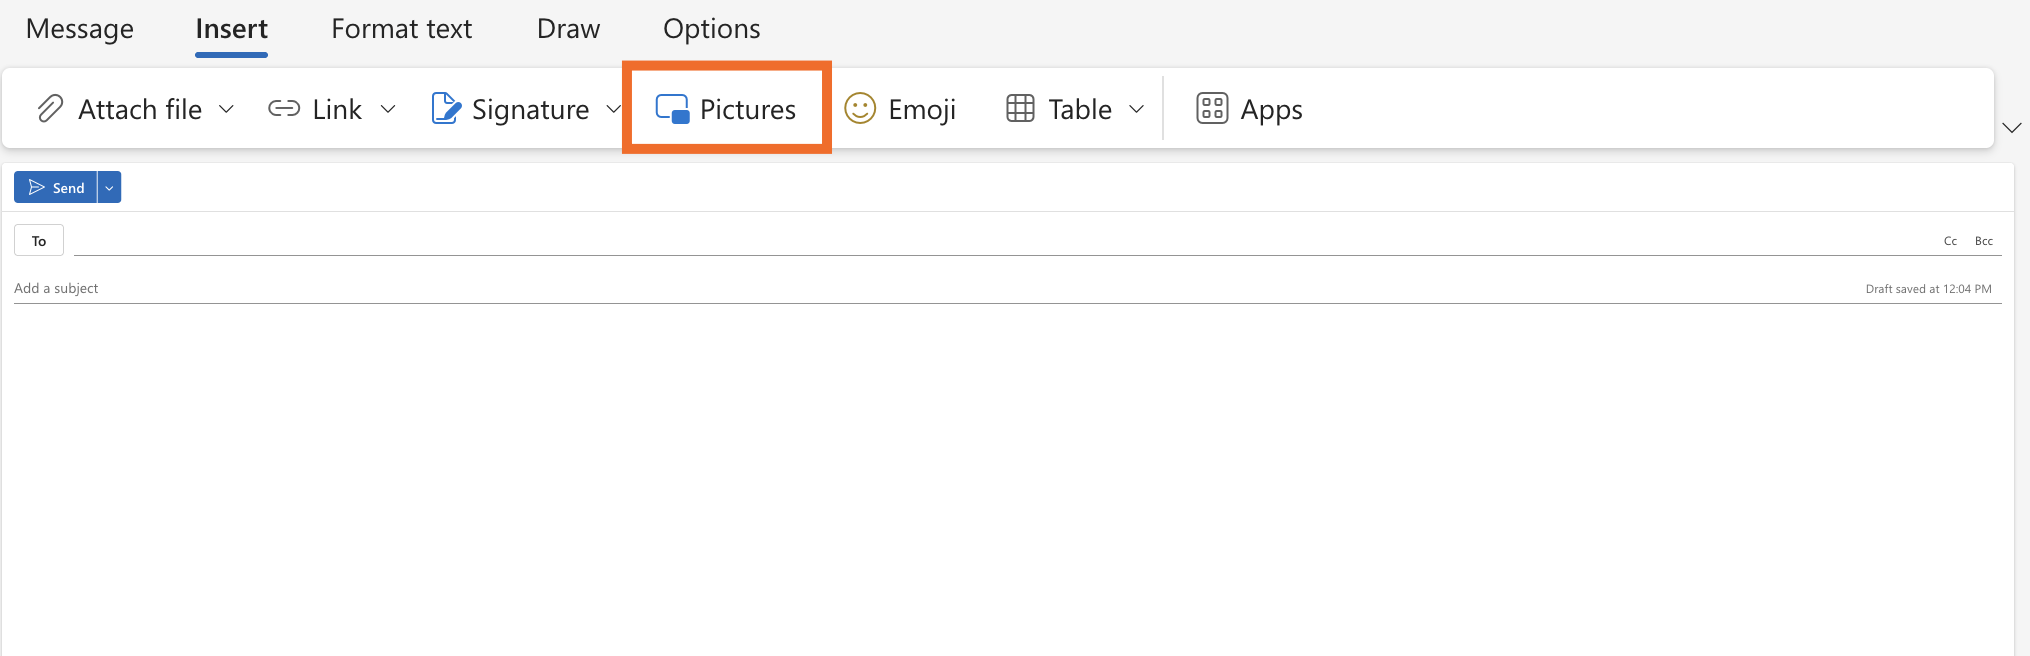
Choose an image from your files and double-click to add it to your email.

4. Save your newsletter as a template in Outlook
Don't let all your hard work go to waste. Save your newsletter as a template in Outlook for desktop so you can repurpose it over and over again.
Open your new newsletter in Outlook, but don't include a subject or recipients yet.
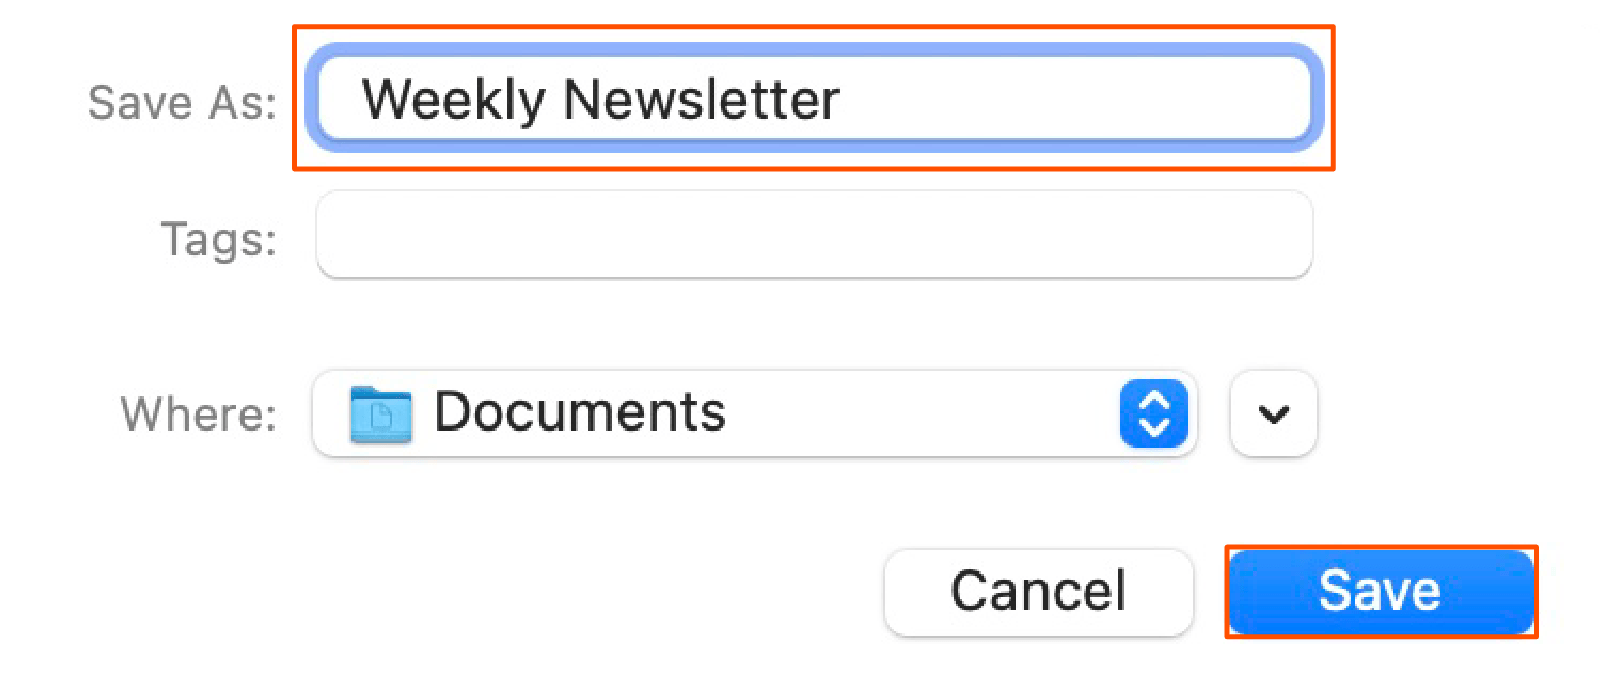
Click File and then Save As Template…
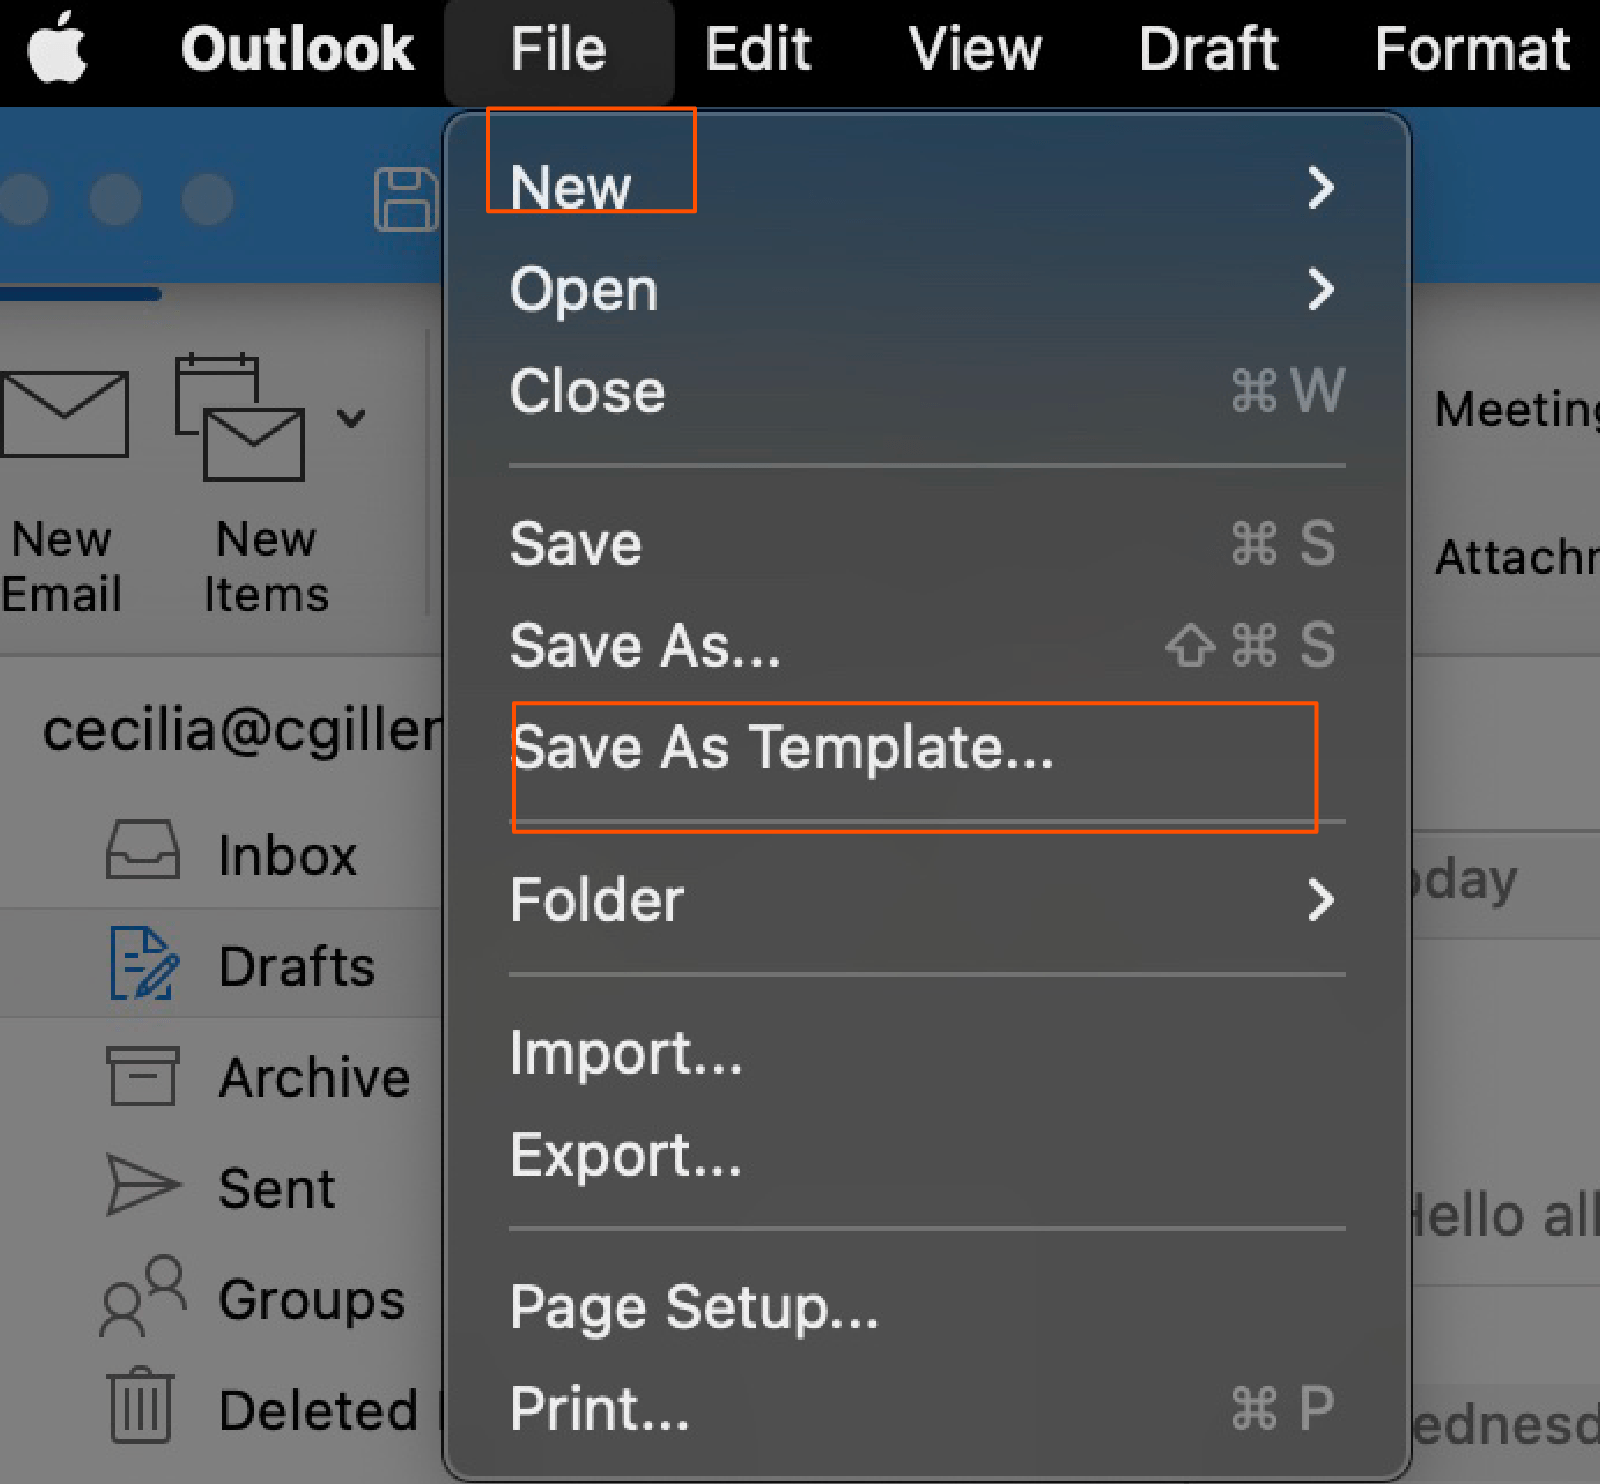
Name your newsletter template, and click Save.


How to use Outlook Newsletters: An alternative option
If you're on the new Outlook, and the steps above seem like too much bother (because they absolutely are), Outlook Newsletters is what you want. It's rolling out to users with a work or school account under a qualifying Microsoft 365 subscription, so if you don't have it yet, you should soon. With a simple interface that practically holds your hand through the process, Outlook Newsletters lets you create and distribute newsletters entirely in-app. Here's how:
Check to see that Outlook Newsletters has been enabled by your administrator.
Select the Newsletters icon in the left-hand navigation bar.
Click the Create Newsletter button in the top-left corner.
Choose a preset template from the menu or create your own template with the blank option.
Title your newsletter, save it as a newsletter or a template, and assign it to the appropriate group.
Click the Add Authors button in the top menu to invite people to collaborate.
Fill in the content, then click Preview to review before publishing.
Click Next to move on to the sending phase.
Enter the intended recipient group into the BCC field, then click Send.
How to open a newsletter template in Outlook
If you're following along outside of Outlook Newsletters and you're ready to take your new template for a spin, follow these steps in Outlook for desktop.
Click File > New > Email From Template.
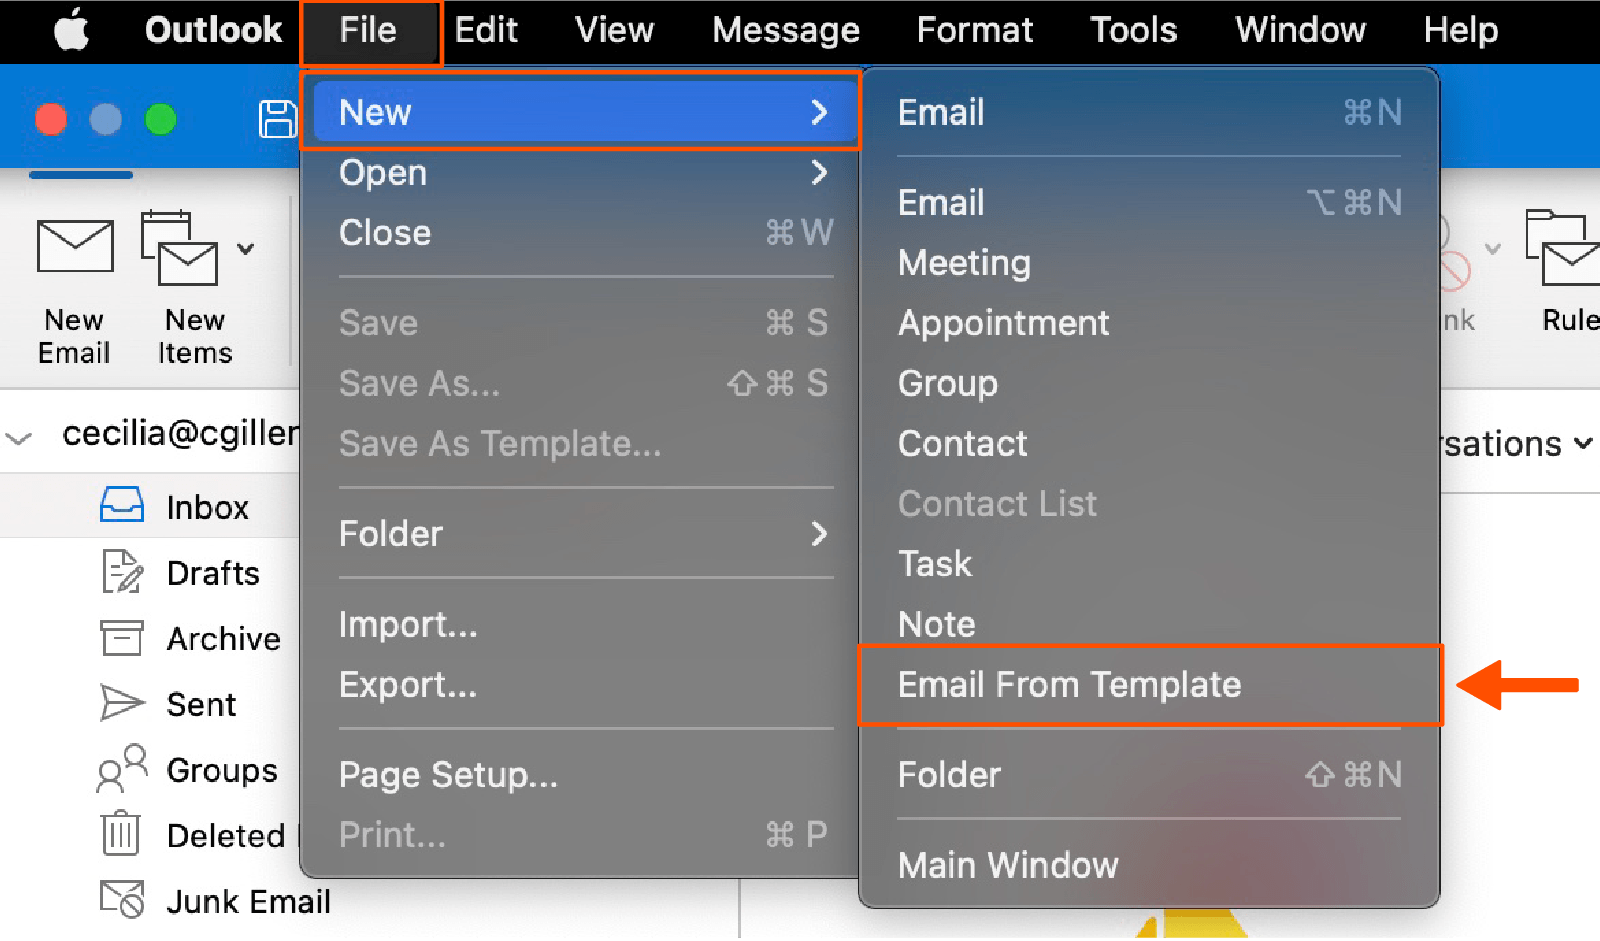
This will show all your email templates. Select the one you want and click Open.
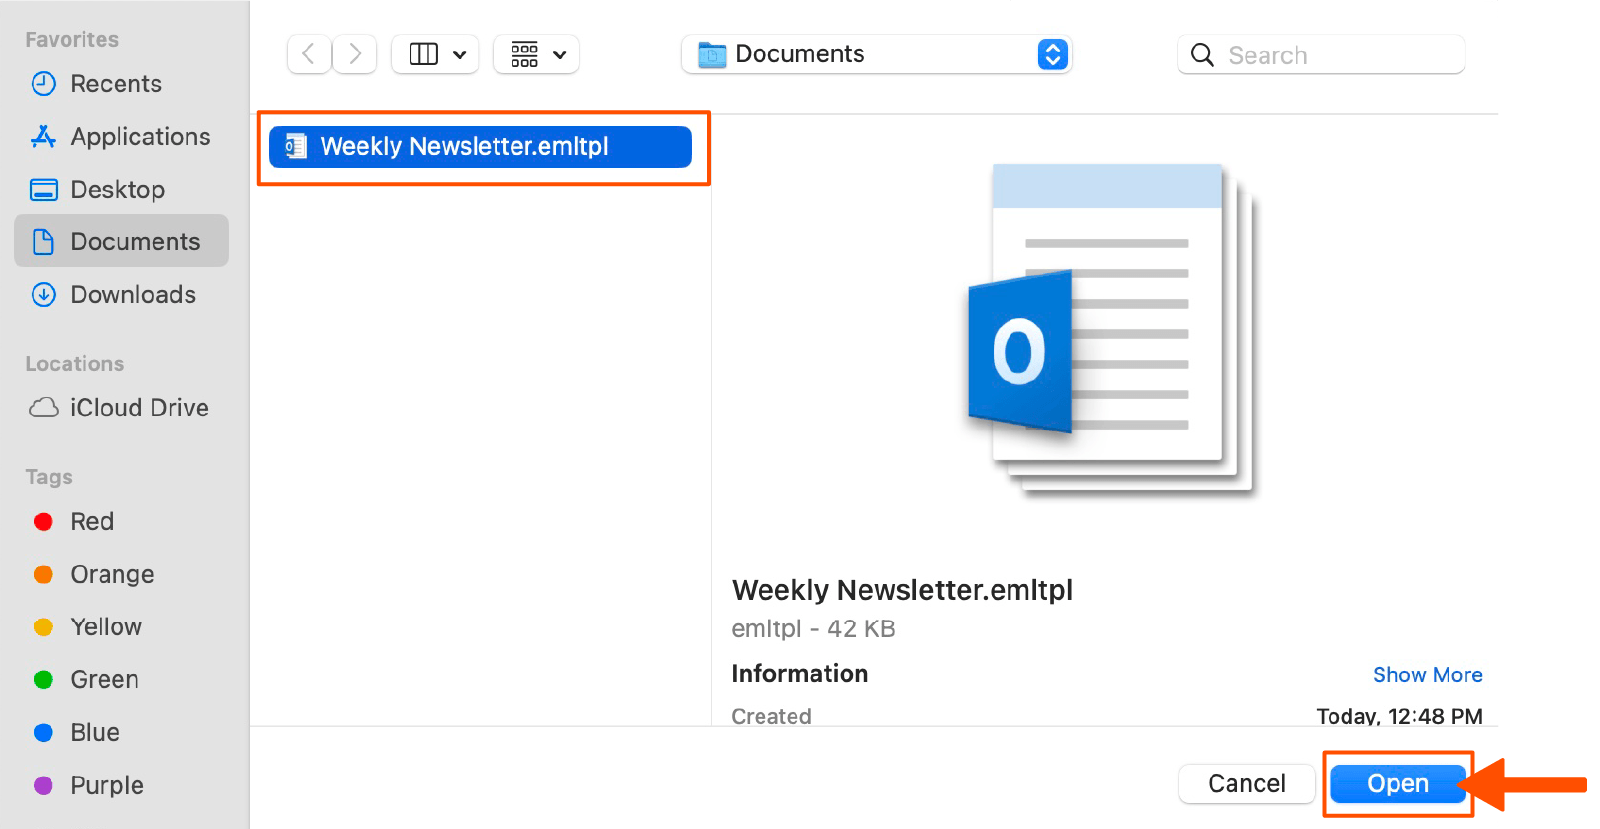
Your template will open as a new message.
Edit your newsletter as needed.


How to create a newsletter mailing list in Outlook
While I love nothing more than adding hundreds of recipients one by one, sometimes I have actual work to get done. Here's how to create a group in Outlook to serve as your newsletter mailing list.
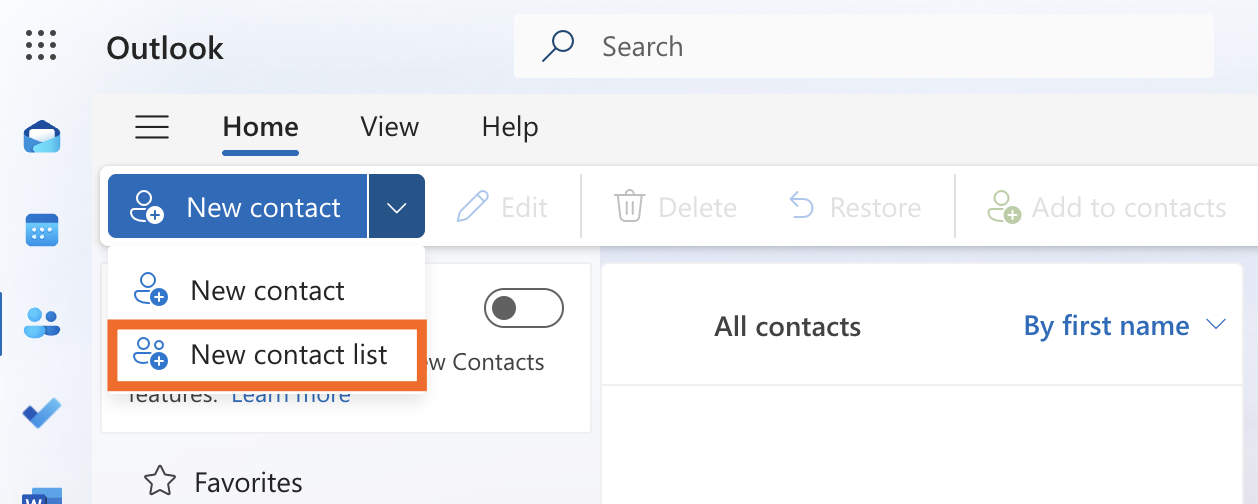
Click the Contacts button on the left-hand side of Outlook. This will bring you to the Contacts view.
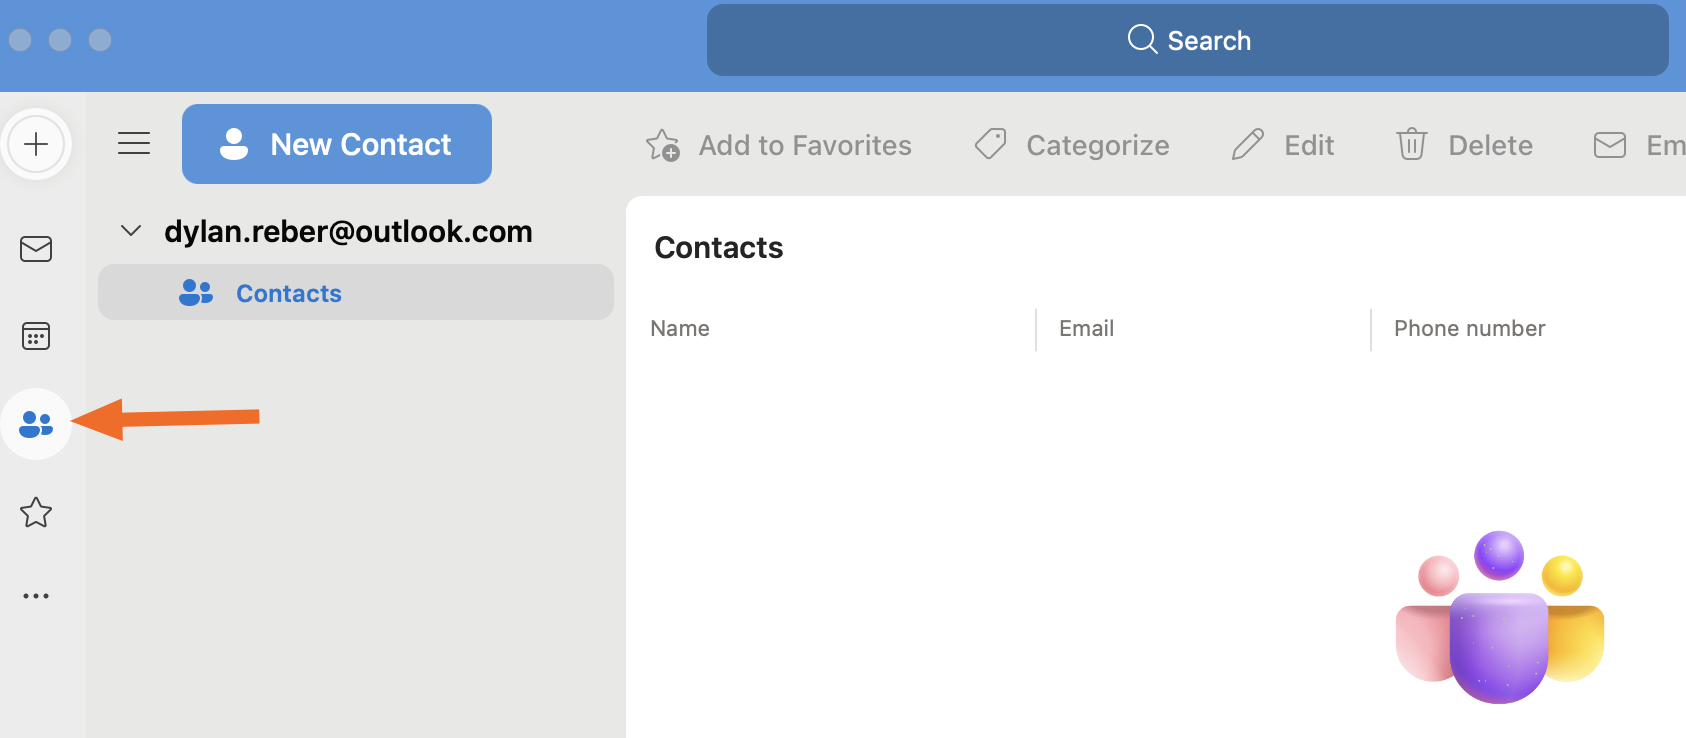
Click the dropdown arrow next to New contact, and click New contact list. (Note: the list feature currently only works on the browser version of Outlook.)
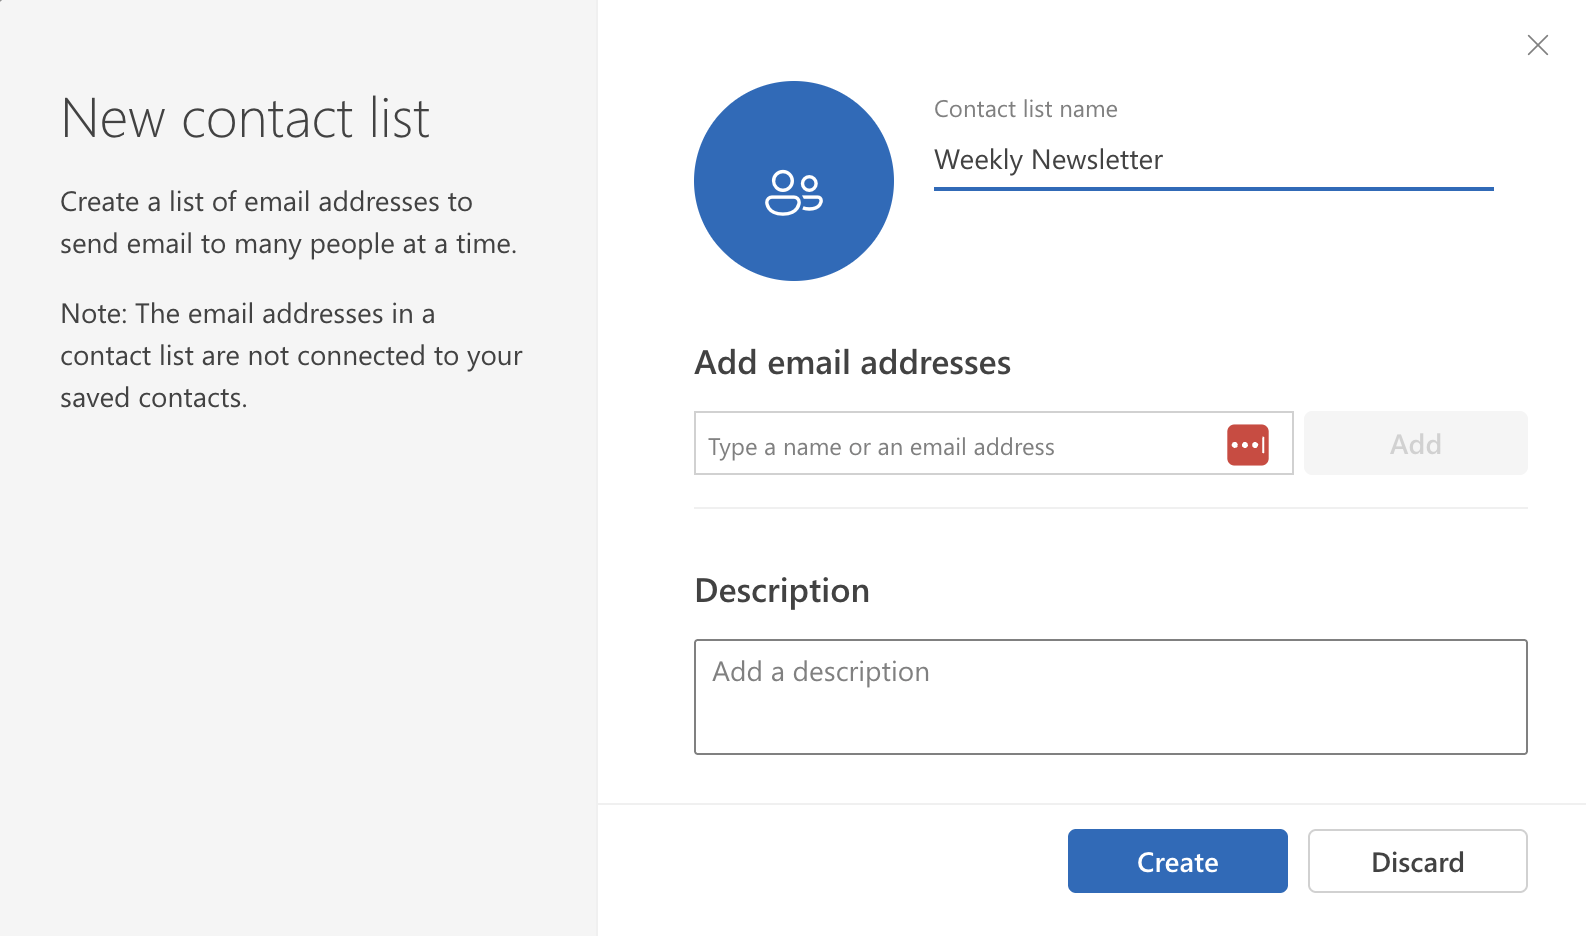
Name your group, add the email addresses of your desired recipients, and click Create.


Now your recurring newsletter recipients are just a click (rather than 30 minutes of copying and pasting) away.
How to send a newsletter in Outlook
Here's what to do when you're ready to hit send and forget about the newsletter almost as quickly as you created it.
After you've opened your newsletter template and edited it how you see fit, click BCC above the subject line.
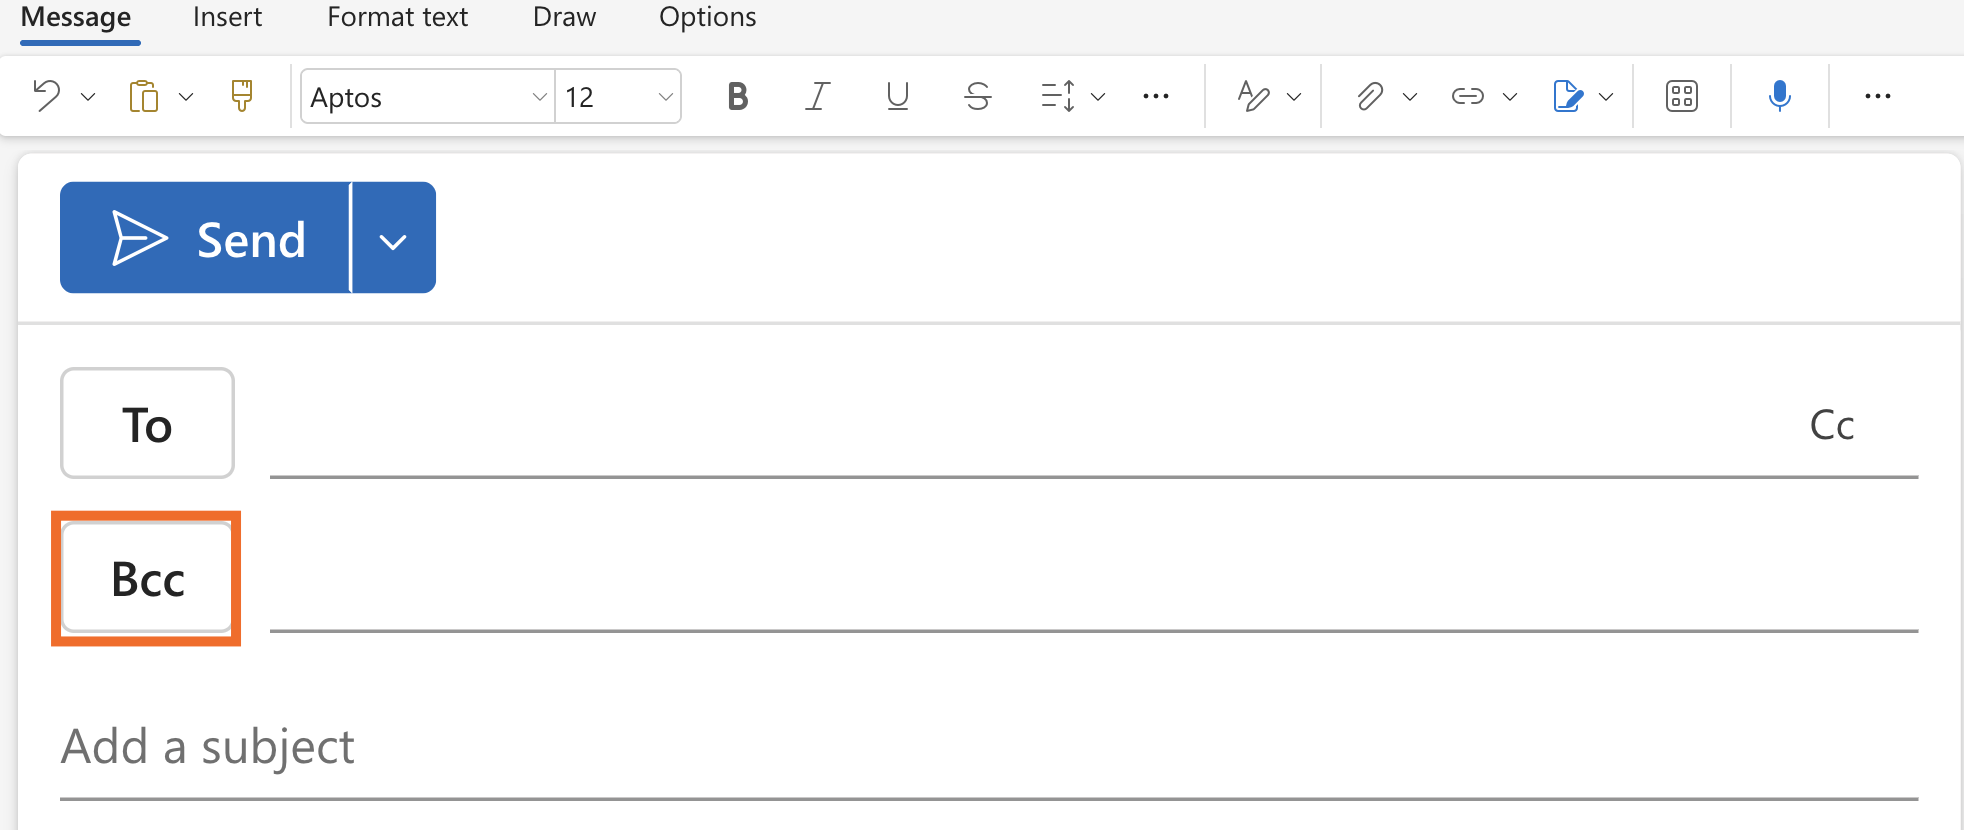
Select the contact list you created earlier, then click Save.
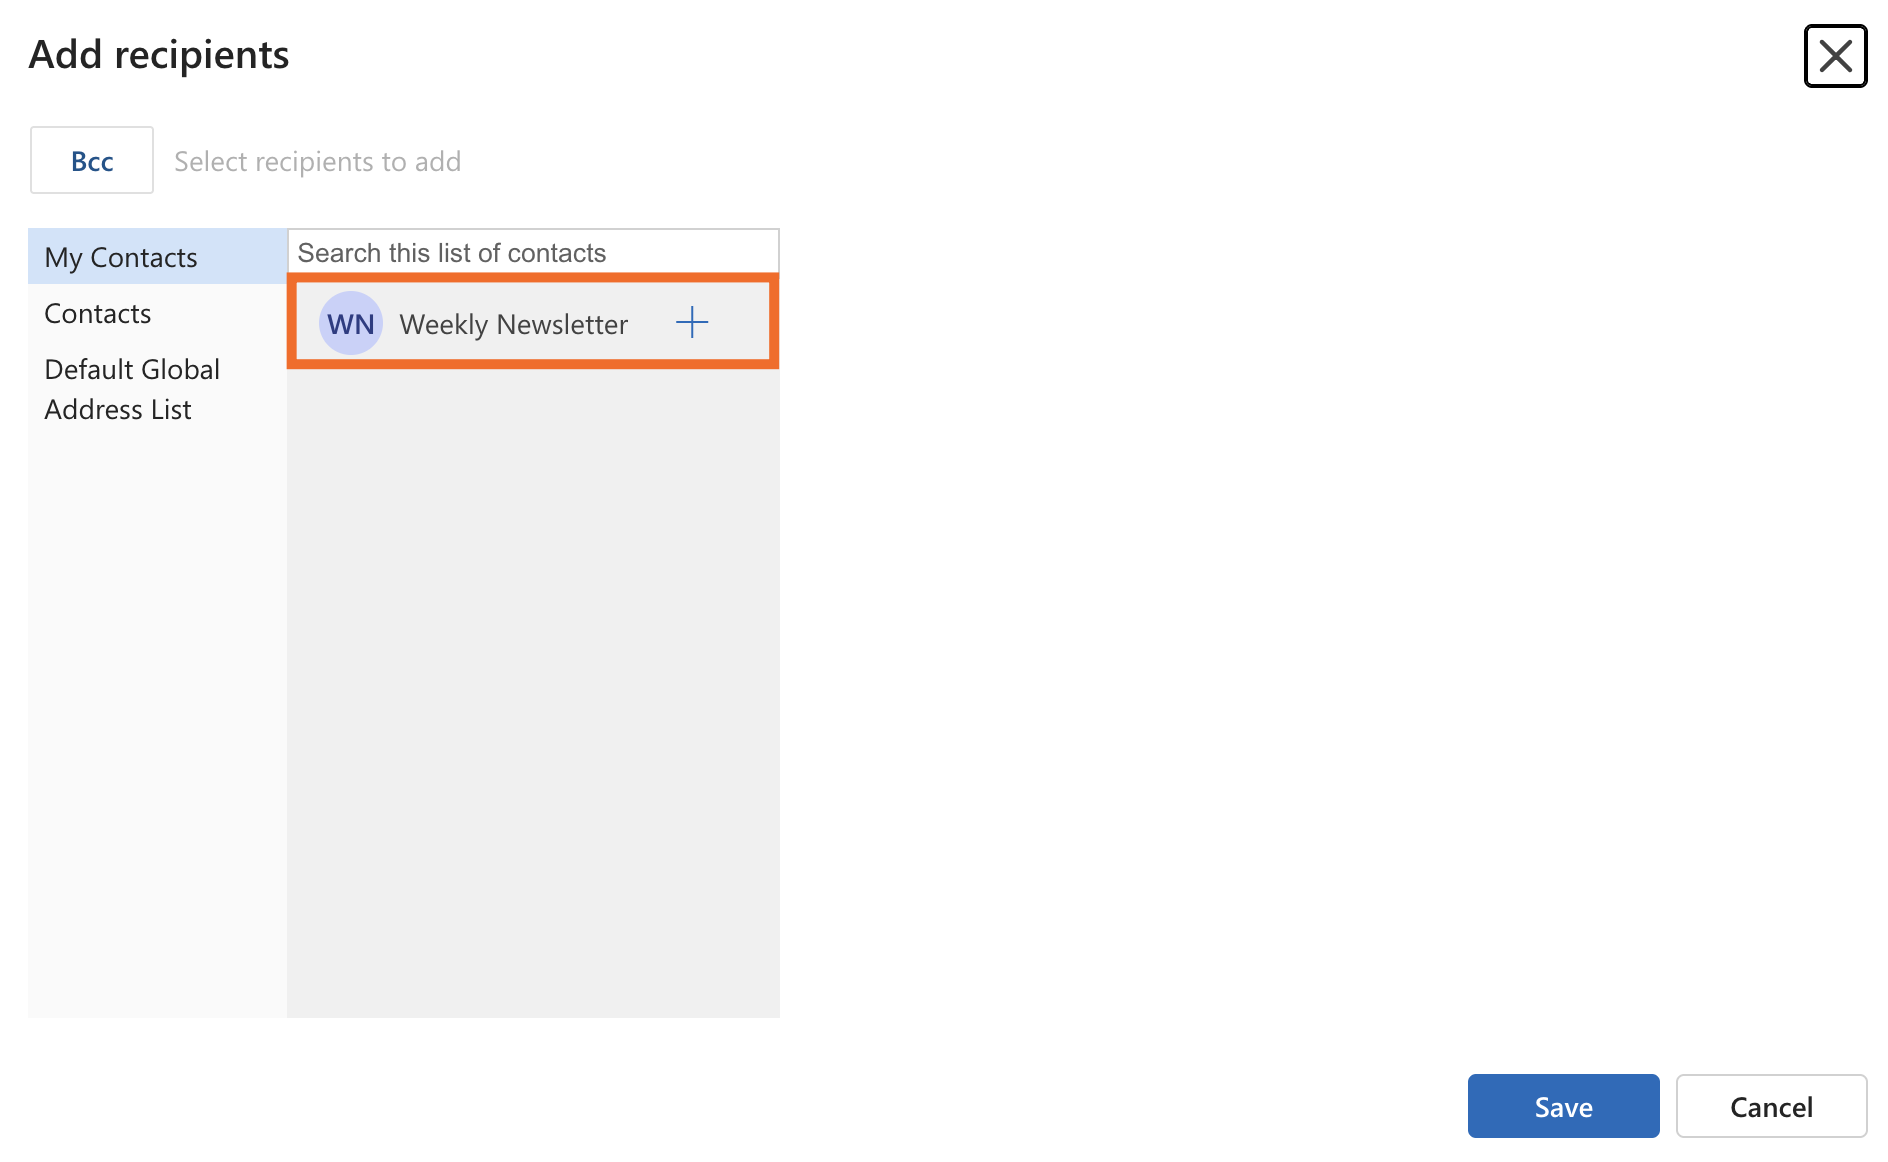


It's best practice to put your mailing list in the BCC field for newsletters, so recipients can't see each other's email addresses (or, dare I say it, reply all).
How to use the Outlook mail merge feature
Outlook has finally caught up with Gmail by adding a mail merge feature, which adds a touch of personalization to your sending process. Rather than appearing as a clearly impersonal group email, your newsletter shows up as an individualized message on the recipient's end. Their own email address will show up in the "to" field rather than the "BCC" field. It's a small difference, but it counts, especially when accompanied by other personalization features.
In the new Outlook, you can find mail merge under the Options tab or as a dropdown arrow attached to the Send button.
With classic Outlook, mail merge is activated through Microsoft Word and requires an external data source to input contacts, like an Excel spreadsheet. Here's a step-by-step guide to access it:
Make sure you have Microsoft Word for desktop installed—mail merge is only available here.
Navigate to the Mailings tab in Word, then click Start Mail Merge, and select E-mail Messages in the dropdown.
Click Select Recipients, and then select Use an Existing List to link your spreadsheet.
Click the Insert Merge Field button to add personalization placeholders in your email.
Click Finish & Merge, and select Send Email Messages to send your finalized newsletter.
In addition to making it feel more personal, mail merge also makes it more likely that your intended recipients are actually going to see your beautiful newsletter, as individual emails are much less likely to be flagged as spam than emails sent to large groups using BCC.
Automate your Outlook templates
If you're spending so much time in Outlook that you're sending newsletters from it, you should also be automating your Microsoft Outlook email with Zapier.
Zapier connects Outlook with thousands of other apps, so you can create connected systems that get work done for you. For example, a client email could spin up a CRM update, schedule a follow-up call with available team members, draft a tailored proposal with AI, and log all activity in your database for reporting. Even routine operational emails—like vendor invoices or status updates—can launch end-to-end processes: extracting data with AI, updating financial systems, reconciling records, and alerting compliance teams. These orchestrations turn Outlook into a hub that coordinates across your apps and AI, so you spend less time managing email and more time acting on insights.
Learn more about how to automate Outlook with Zapier, or get started with one of these pre-built workflows.
Send Microsoft Outlook emails for new Typeform entries
Dispatch emails in Microsoft Outlook with new leads in Facebook Lead Ads
Create email copy with ChatGPT from new Microsoft Outlook emails and save as drafts
Zapier is the most connected AI orchestration platform—integrating with thousands of apps from partners like Google, Salesforce, and Microsoft. Use forms, data tables, and logic to build secure, automated, AI-powered systems for your business-critical workflows across your organization's technology stack. Learn more.
Outlook newsletter FAQ
Still have questions about creating a newsletter in Outlook? Check out the answers to these frequently asked questions.
How can I create a recurring newsletter reminder?
One way to automate your newsletter is to set a recurring reminder to send your newsletter with Outlook's calendar feature. This won't automatically send your email, but it will remind you it's time to send it out.
Click the calendar icon on the left-hand side of Outlook.
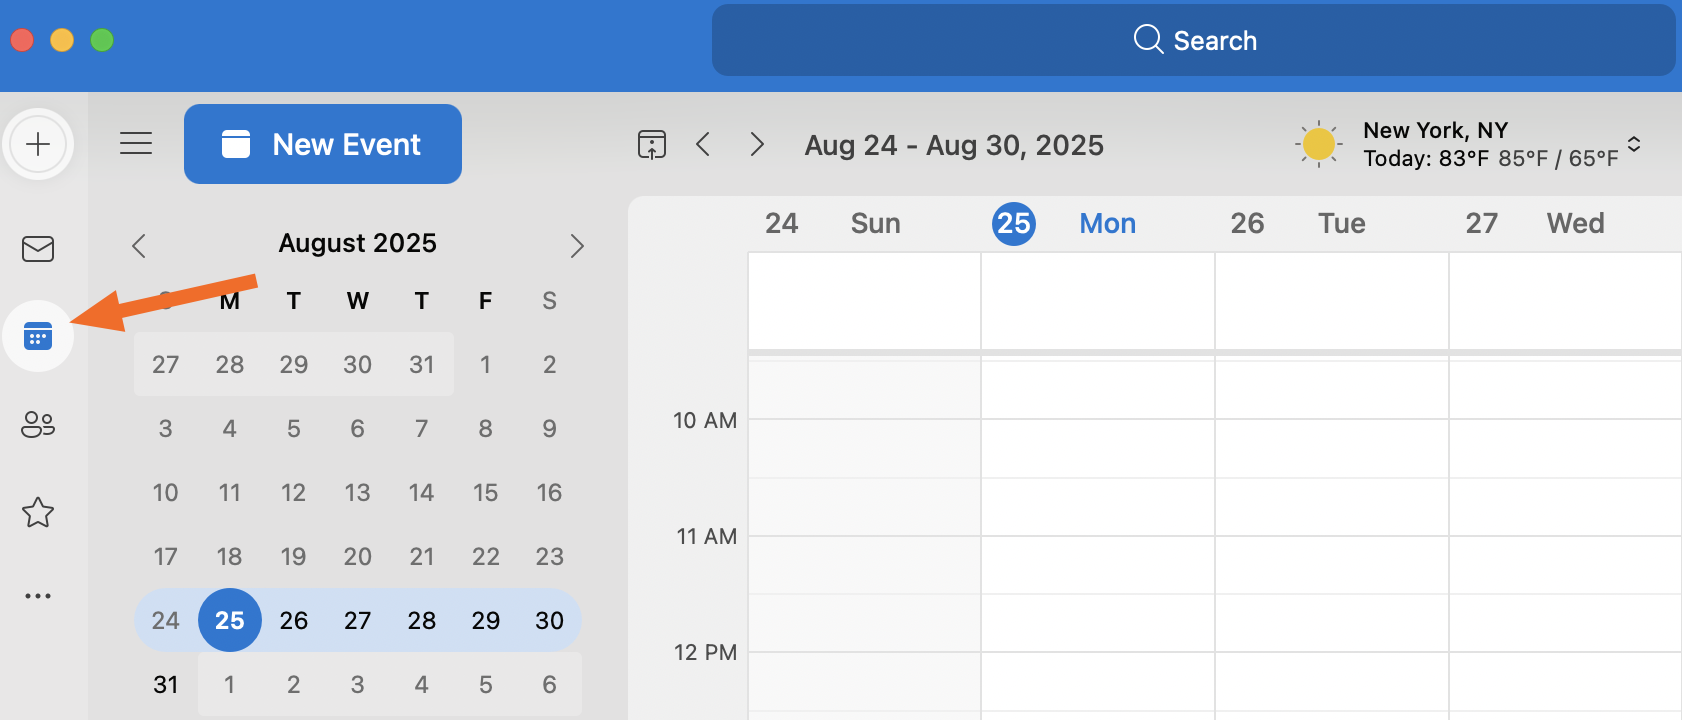
Click on New Event near the top-left corner.
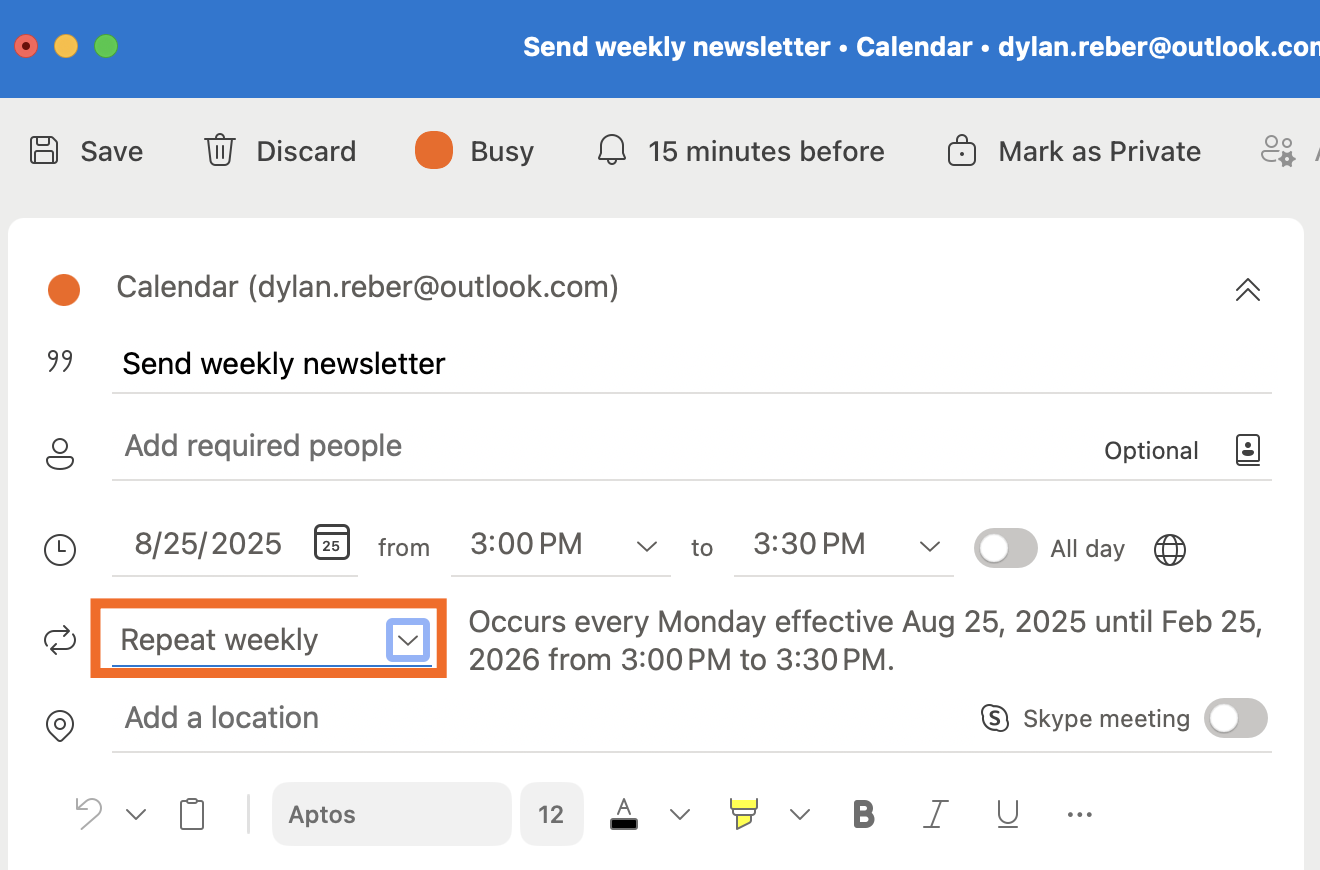
Fill out the appointment window, including a title, the first start date, and time. Then, click the dropdown arrow next to "Do not repeat" and change it to "Repeat weekly." (You can also set it to repeat daily, monthly, or yearly.)
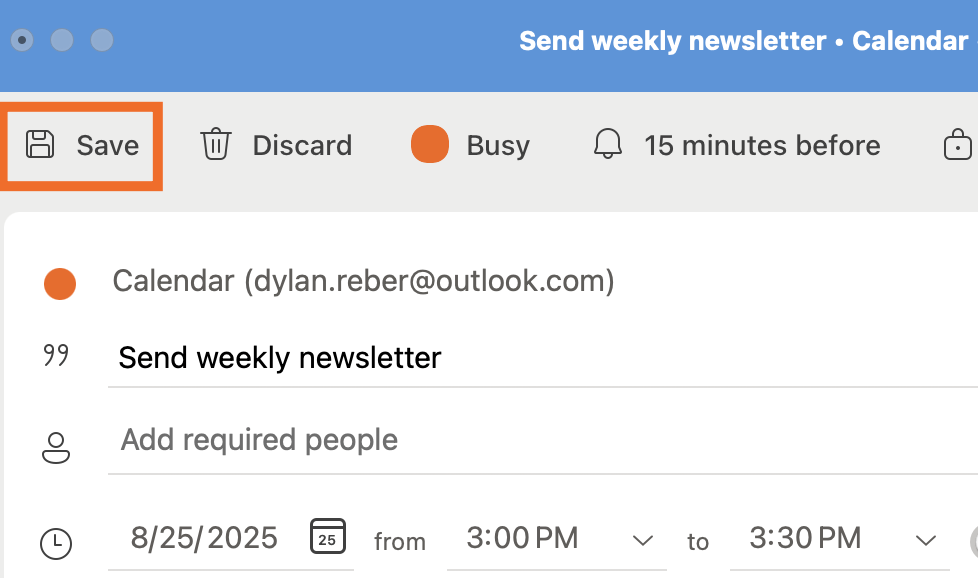
When you're done, click the Save button in the top-left corner of the window. Now, you'll get a weekly reminder to send a newsletter at your scheduled time.


How do I format an Outlook email to look like a newsletter?
You can design your own newsletter template in Outlook, or you can upload templates ending in ".emltpl" for Mac or ".oft" for Windows into Outlook for desktop.
Use a third-party template app of your choice to design your newsletter template. Save your template file in the same folder you keep the rest of your templates.
To open, click File > New > Email From Template.
This will show all your email templates. Select the HTML file you uploaded, and click Open.
Does Microsoft have a newsletter template?
Yes, Microsoft Word has a few pre-made newsletter template options that you can customize. But since these are staged in Microsoft Word, you can't intuitively import them to Outlook and edit them there. If you want to edit a template in Outlook, download templates with the ".emltpl" extension (for Mac) or the ".oft" extension (for Windows) from a third party that offers templates in these formats.
Can Outlook send out a newsletter?
Outlook isn't exactly the optimal software for creating and sending newsletters, but it is capable of doing it. The best way to send Outlook templates is to download a third-party template (in a file ending in .emltpl or .oft) so you can edit it within Outlook. I'd also recommend doing this in the desktop version of Outlook rather than the browser version, which is… limited.
How do I access Outlook Newsletters?
To access Outlook Newsletters, you'll need to meet a handful of conditions:
You'll need a Microsoft 365 work or school account and access to new Outlook.
You must have a valid Entra ID.
You need to have an Exchange Online Mailbox and access to SharePoint.
Your administrator must enable the feature and grant you permission to access it.
Related reading:
Microsoft Outlook tips and tricks for better email management
Outlook email signature templates—and how to create your own
This article was originally published in May 2023 and has also had contributions from Bryce Emley and Dylan Reber. The most recent update, with contributions from Jared Ramirez, was in September 2025.