
Team chat apps are great for one-off communication with your coworkers and it's much faster than email. But when you're getting the same questions over and over in chat, or need to make sure your team is up-to-date on information from other apps, you need help from a bot.
Quite simply, bots run automated tasks online. There are many different types, but for the purpose of this article, we're going to talk about chatbots—bots that run automated tasks in chat apps—and specifically, how to create them for Microsoft Teams.
There are a variety of pre-made bots available in Microsoft Teams, and you can also create a Teams bot from scratch. But if you can't find a ready-made bot and you don't know how to code, there's a third option: Zapier.
With Zapier's automated workflows, there are two types of bots you can build:
Auto-responder bots will respond when someone mentions another user or uses a specific phrase in Microsoft Teams. These are great for when a person is out of office, or answering questions that often come up in chat.
Notification bots watch what's happening in other apps and send any updates to Microsoft Teams, eliminating the need to toggle between different apps. Tired of toggling windows to check on Salesforce leads? A notification bot will be your friend.
We'll walk you through how to create an auto-responder bot using Zapier. And we'll even show you how to add AI into the mix to personalize the response each time. Here's how.
If you're interested in setting up a notification bot, check out our tutorial on building Zaps in Microsoft Teams.
How to create an auto-responder in Microsoft Teams
Whenever you're on vacation, it can be annoying (and anxiety-inducing) to return to a million alerts and unread messages in chat. Or maybe you get tired of copying-and-pasting the same form to order office supplies whenever a team member asks about it.
With an auto-responder bot, it will watch Microsoft Team channels for specific mentions or phrases. Whenever someone says those magic words, the bot will automatically reply with a message.
Here's how to set it up:
Install the Zapier app in your Microsoft Teams workspace (and make sure to sign up for a Zapier account if you haven't already)
Click the button below to use our template.
Connect Microsoft Teams and choose your auto-responder trigger
Customize the message you want to send
Test your Zap and turn it on!
We'll be working from a Zap Template—what we call our pre-made automated workflows—for this tutorial.
Send auto-reply messages in Microsoft Teams for new mentions in Teams
Before you begin
Make sure you've installed the Zapier app in your Microsoft Teams workspace. If you don't have a Zapier account, don't forget to sign up too. (It's free to start!) Not only will you be able to create automated workflows with Teams, but you'll also be able to do so without leaving the app.
Connect Microsoft Teams and customize your trigger
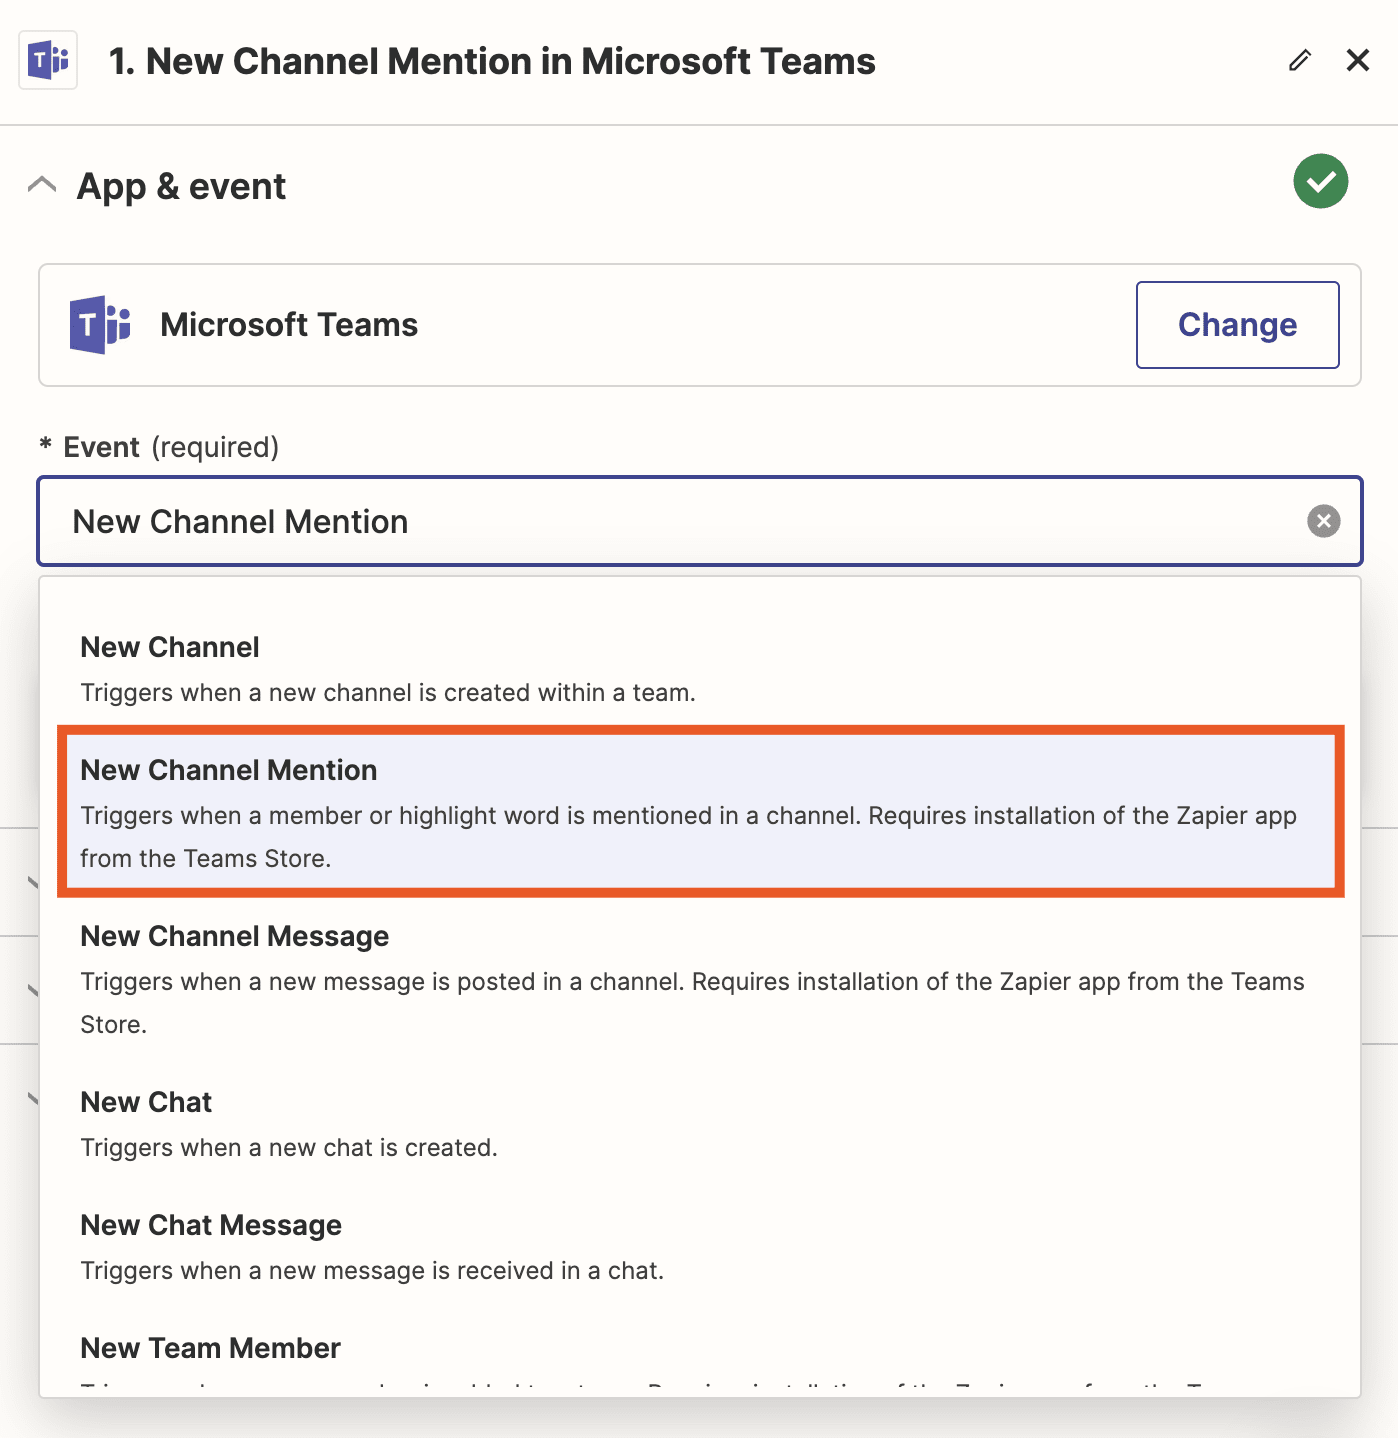
Click on the template above, which will take you directly to the Zap Editor to begin creating your Zap. If you're starting from scratch, search for and select Microsoft Teams for the trigger app and New Channel Mention for the trigger event, then click Continue.
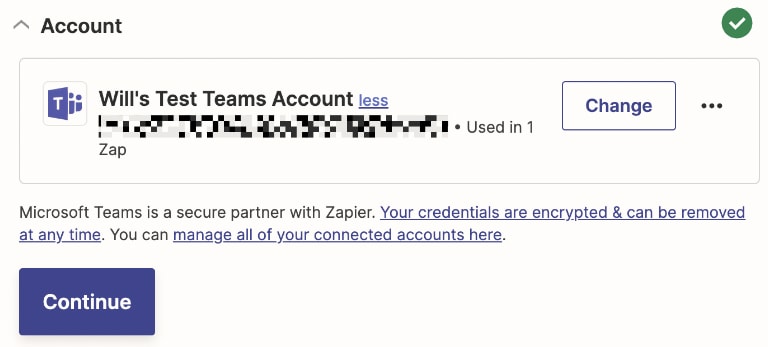
Next, connect your Microsoft Teams account. If you've already connected Teams to Zapier before, just click on the dropdown menu to select your account. Otherwise, click +Connect a New Account to connect your workspace. Once you've selected your account, click Continue.
If you're building your Zap from the Microsoft Teams app and you're connecting your Teams account for the first time, Zapier will redirect you through your web browser. Once you've authorized Zapier to access your workspace, you can continue building your Zap from your web browser—or go back to the Microsoft Teams app and continue where you left off. You won't lose any progress.
Next, we'll customize how you want your auto-responder to trigger. Under Team, select your workspace from the dropdown menu. Under Channel, select which channel you want your auto-responder to trigger.
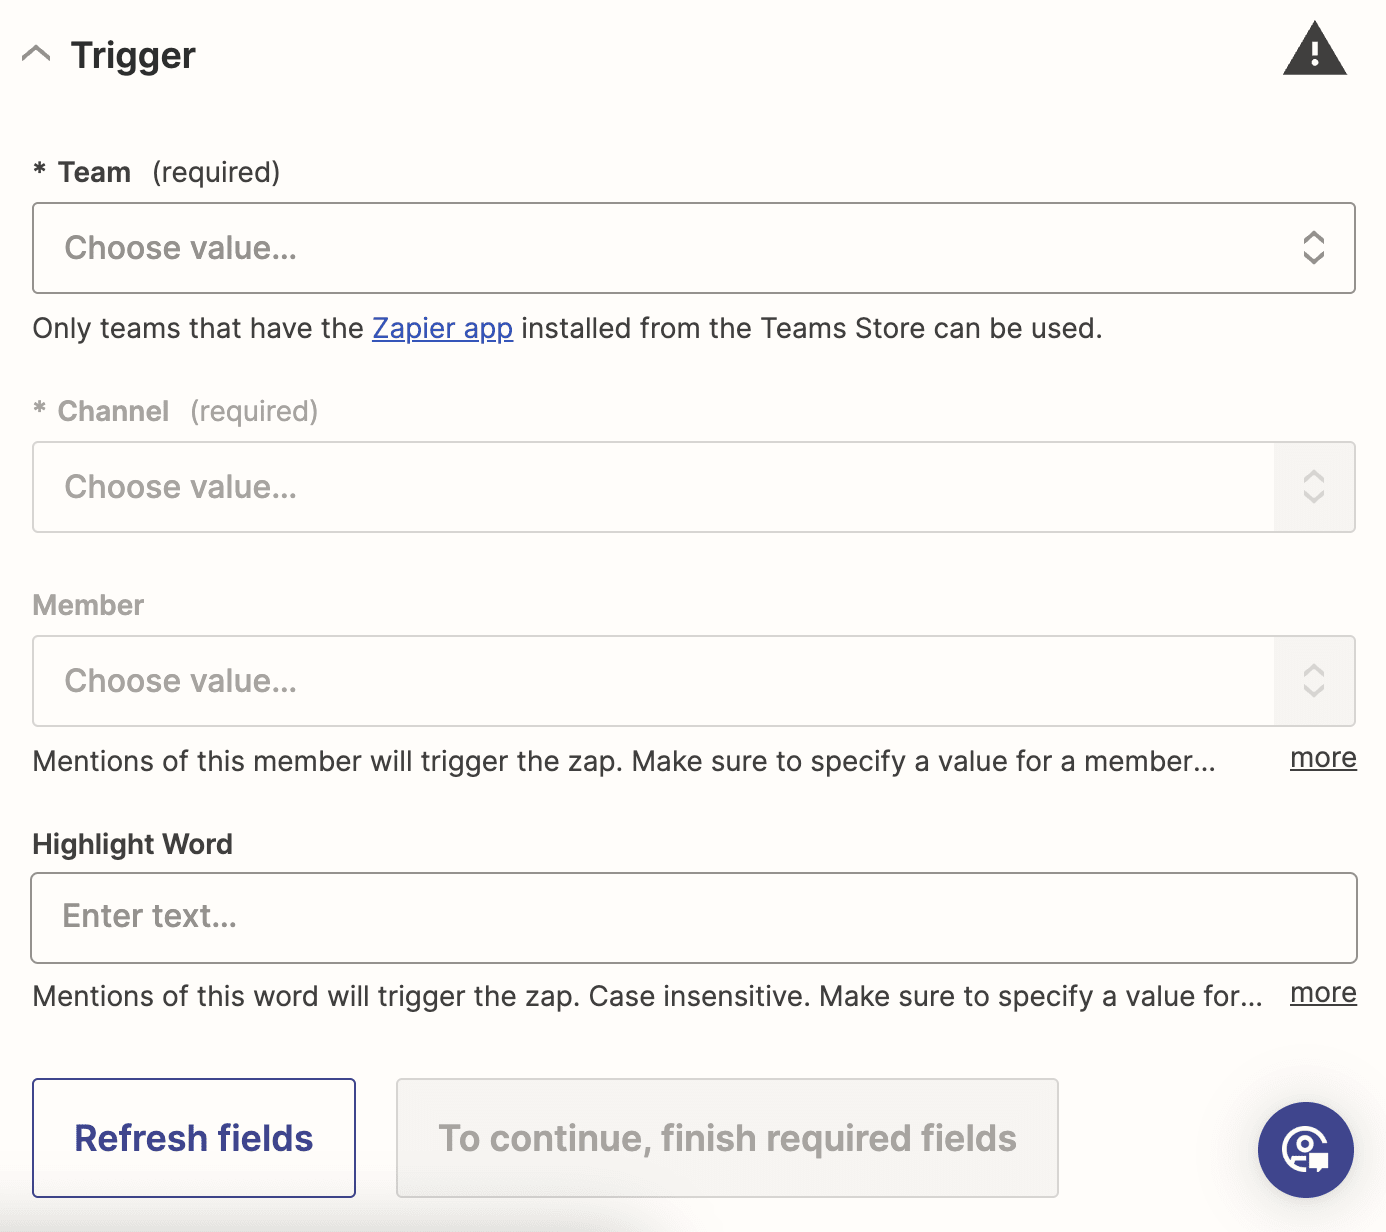
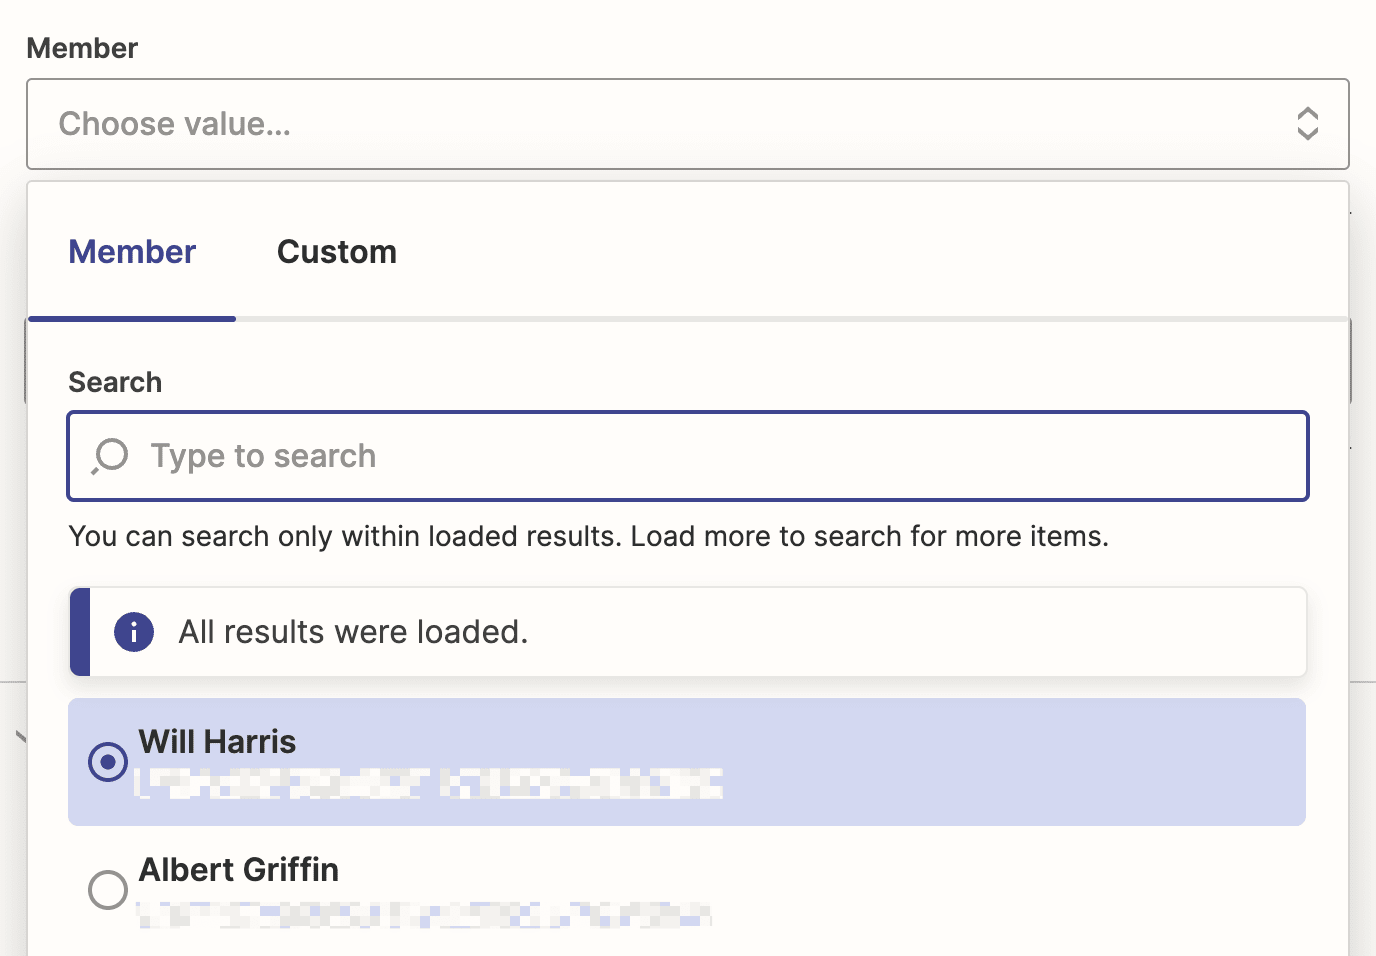
If you want your auto-responder to trigger if someone says a specific phrase (e.g. "YubiKey order"), type in your word or phrase in the Highlight Word field. If you want your auto-responder to trigger if someone @ mentions a specific user, select the user from the dropdown menu.
In this example, we want to create an out-of-office bot, so we're going to select a specific user. When you're done, click Continue.
Note: Filling in both Highlighted Word and Member means your bot will trigger whenever someone @ mentions a specific user AND uses the key phrase. Both conditions have to occur for the Zap to trigger.
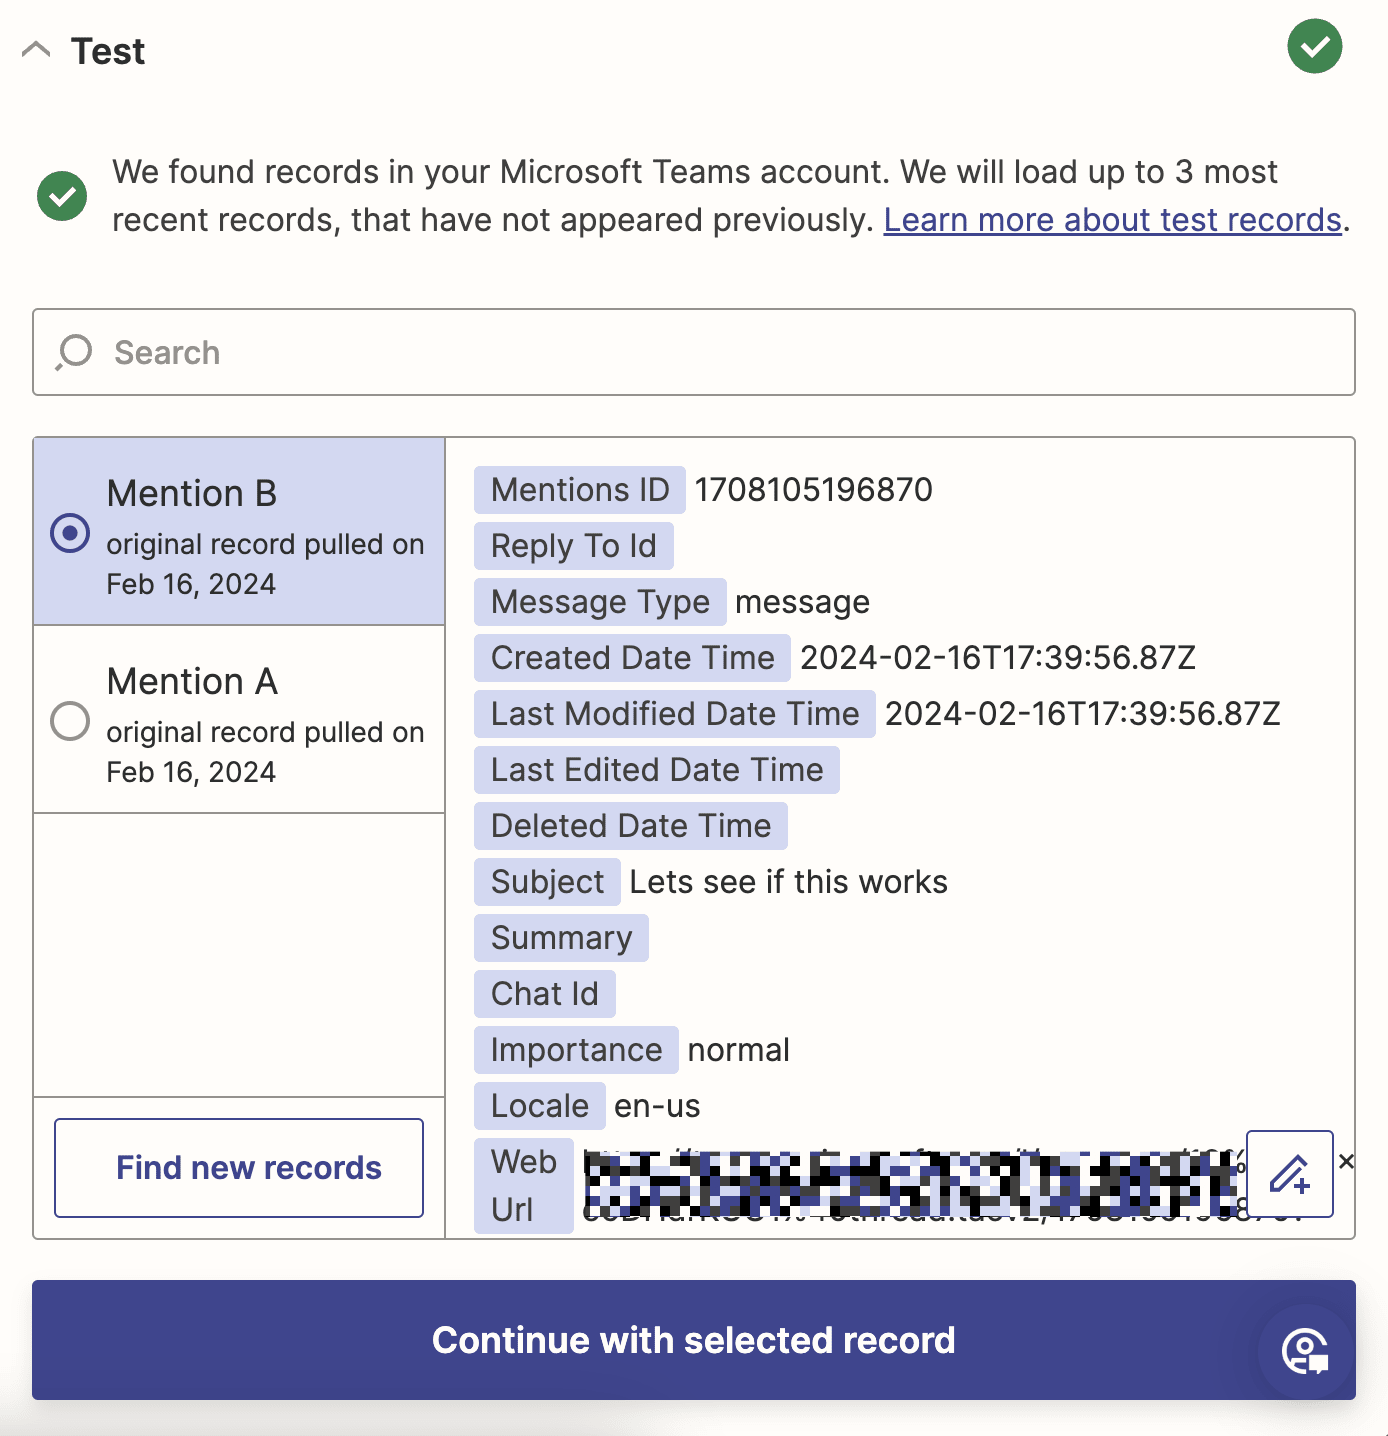
Now it's time to test our trigger. Zapier will find the most recent mention, according to the criteria we set in the previous step. Zapier will use this test information in later steps to build the rest of our Zap. Click Test trigger.
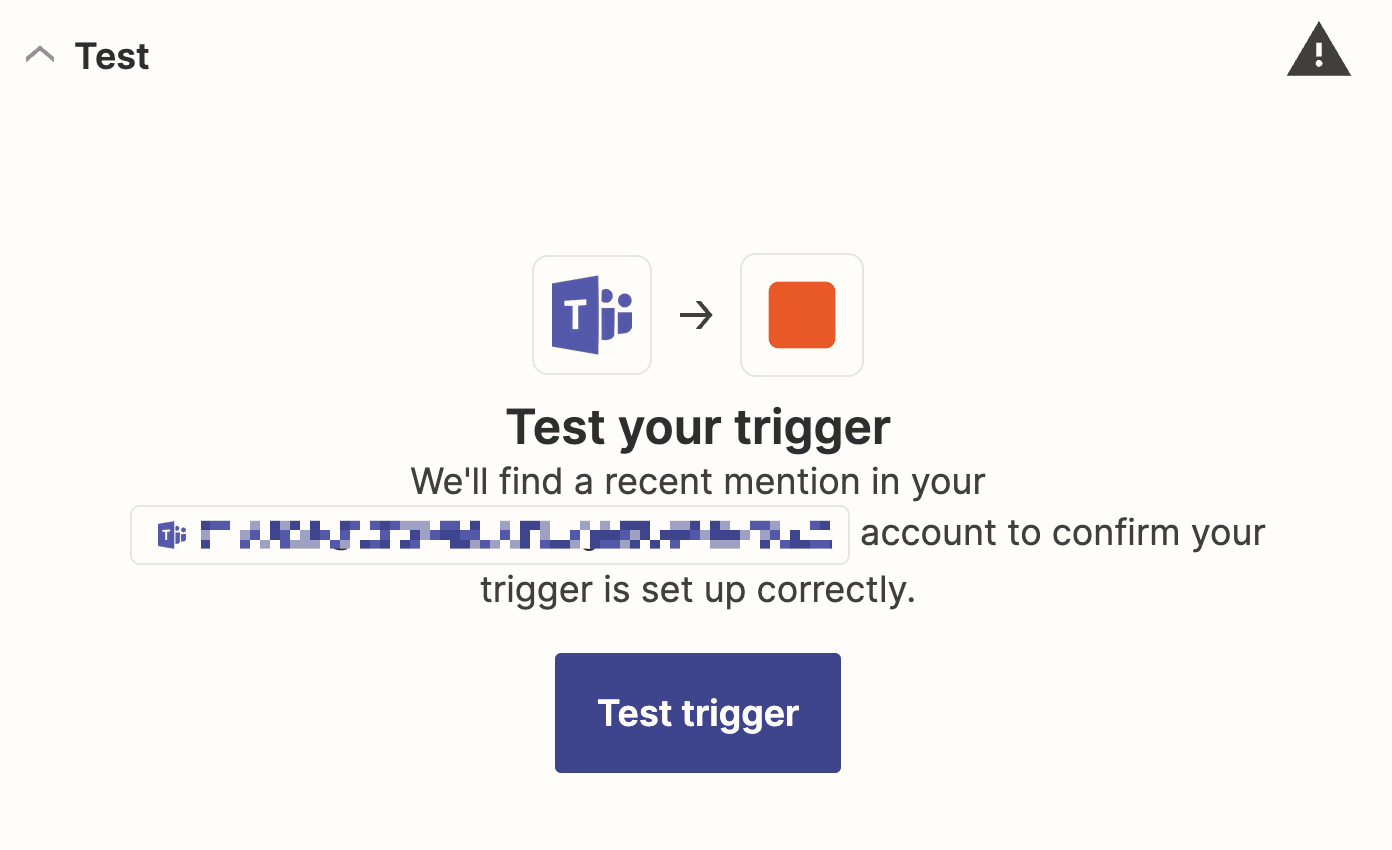
If your test information looks correct, go ahead and click Continue with selected record. If something doesn't look right, go back to the previous step to adjust your settings. If Zapier can't find anything, send a test message in your Teams channel with the specific mention and re-test.
Customize your auto-responder message
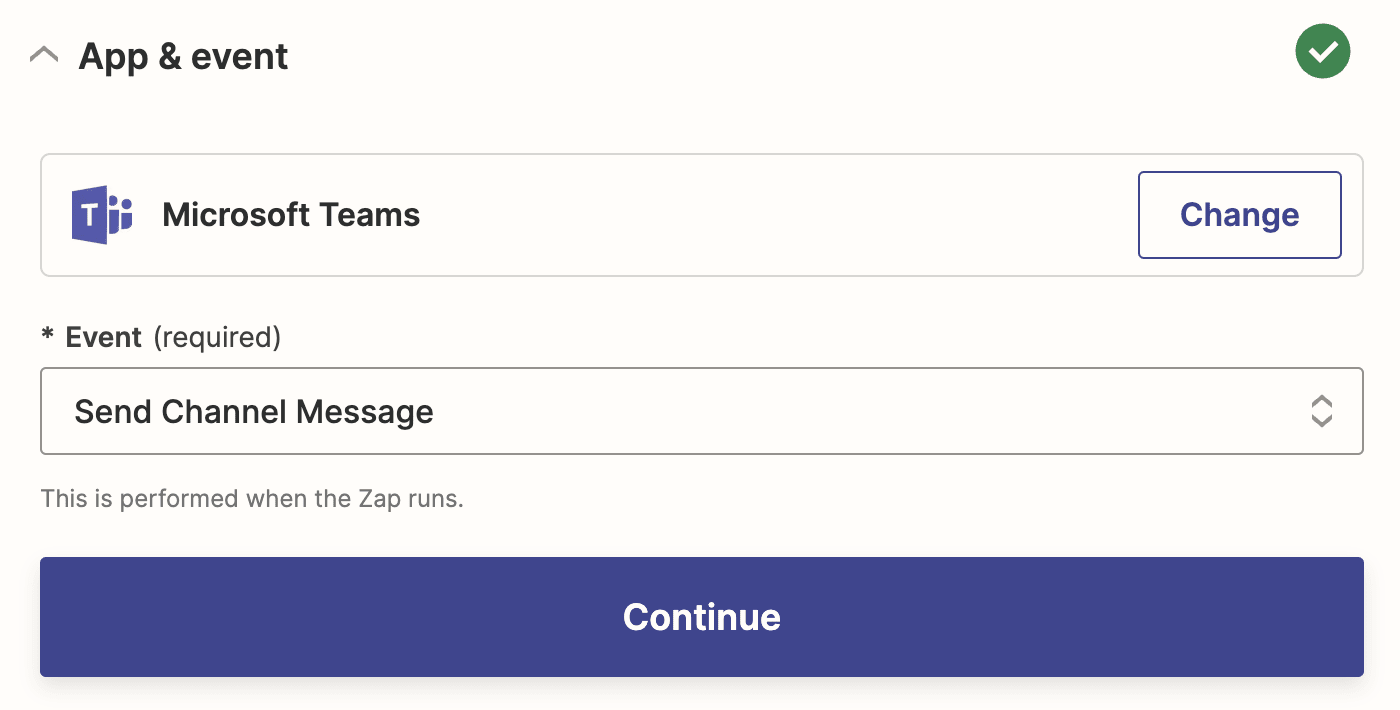
If you're working from the template, the action app and event will be pre-selected for you. If you're starting from a blank slate, search for and select Microsoft Teams for the action app and Send Channel Message as the action event, then click Continue.
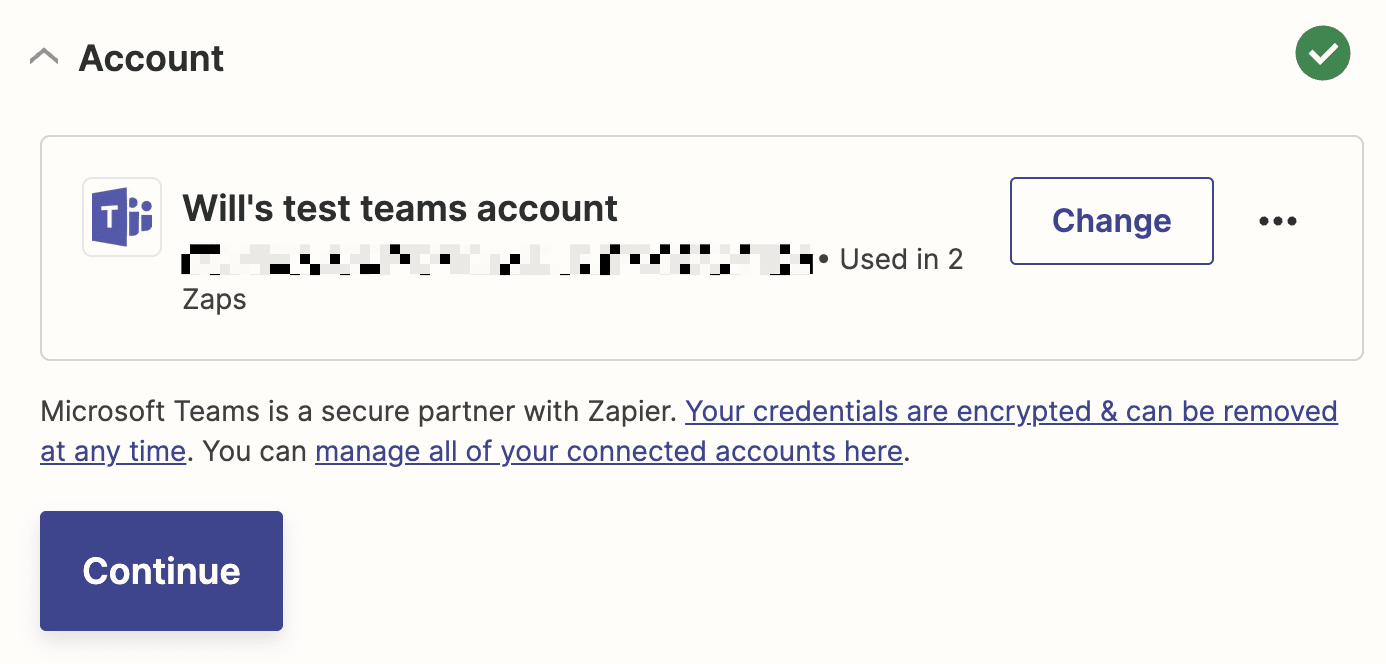
Select your Microsoft Teams account from the dropdown menu and click Continue.
Next, select your Microsoft Teams workspace under Team. In the Channel field, select the channel you'd like your message to appear—it should be the same channel your mention came from.
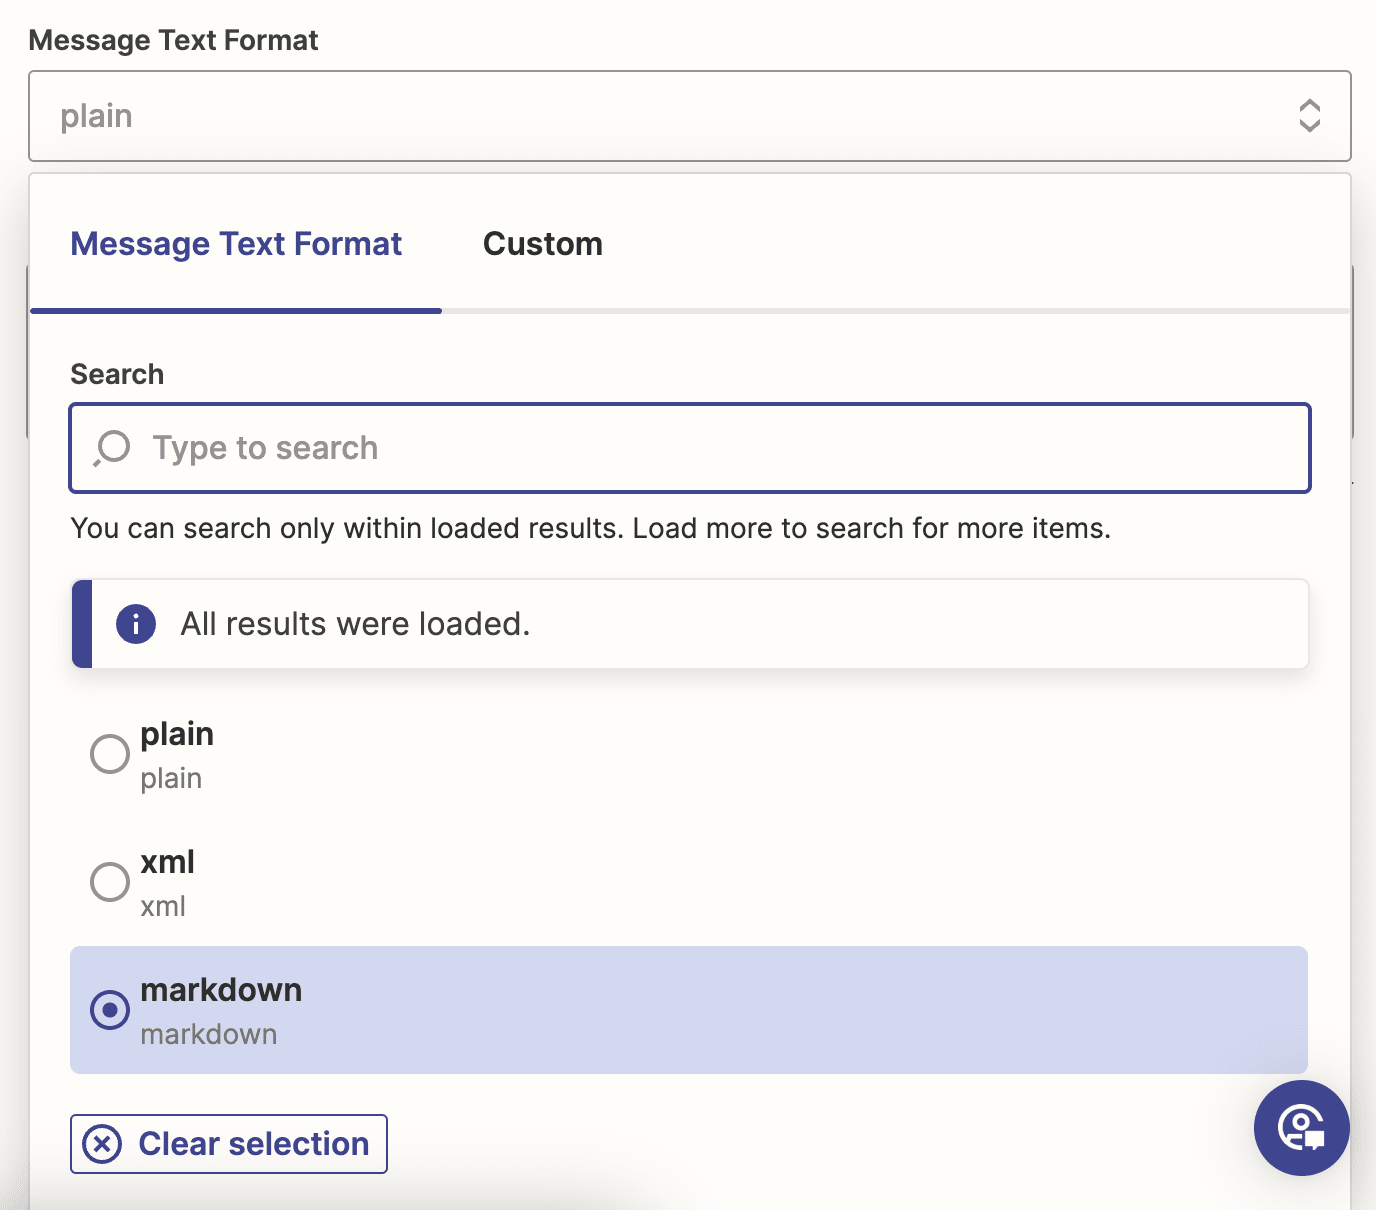
Since we're creating a vacation responder bot, we want to include a link to our out-of-office doc so our teammates can fill us in on anything we missed, Under Message Text Format, click on the dropdown menu and select Markdown. If you don't need to include any special formatting in your message, such as bolded text or hyperlinks, Plain is also fine.
Markdown is a formatting language that's simpler to write and read than HTML code. New to Markdown? Check out our guide.
In the Message Text field, type out the message you'd like your Zap to send. In this example, I used Markdown to link to my out-of-office doc.
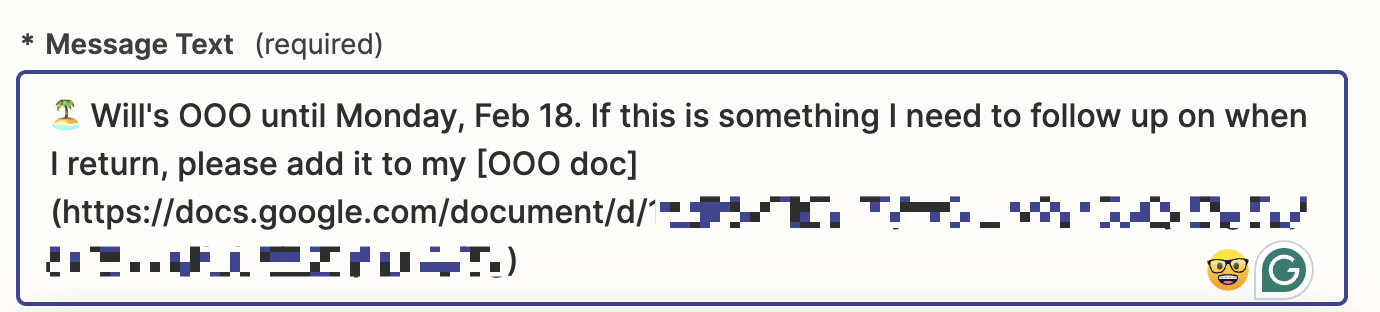
When you're done formatting your message, click Continue.
Need more help easing back to work after a vacation? Check out our automation tips.
Test your Zap
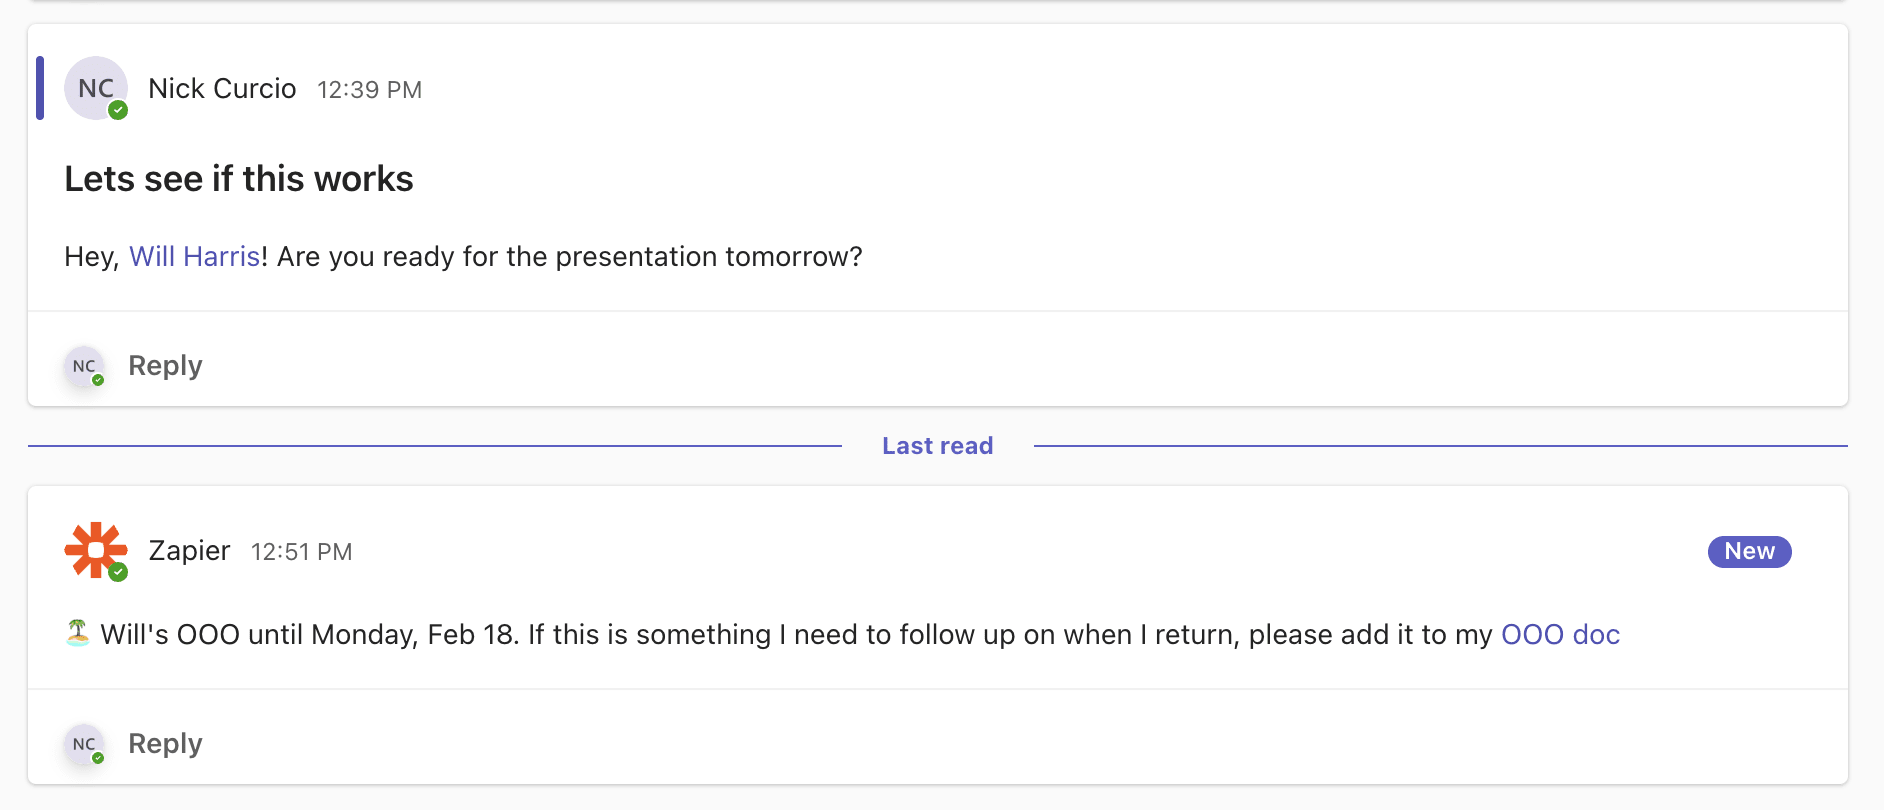
Now it's time to test our Zap. Click Test step and Zapier will send a new message using our instructions from the previous step.
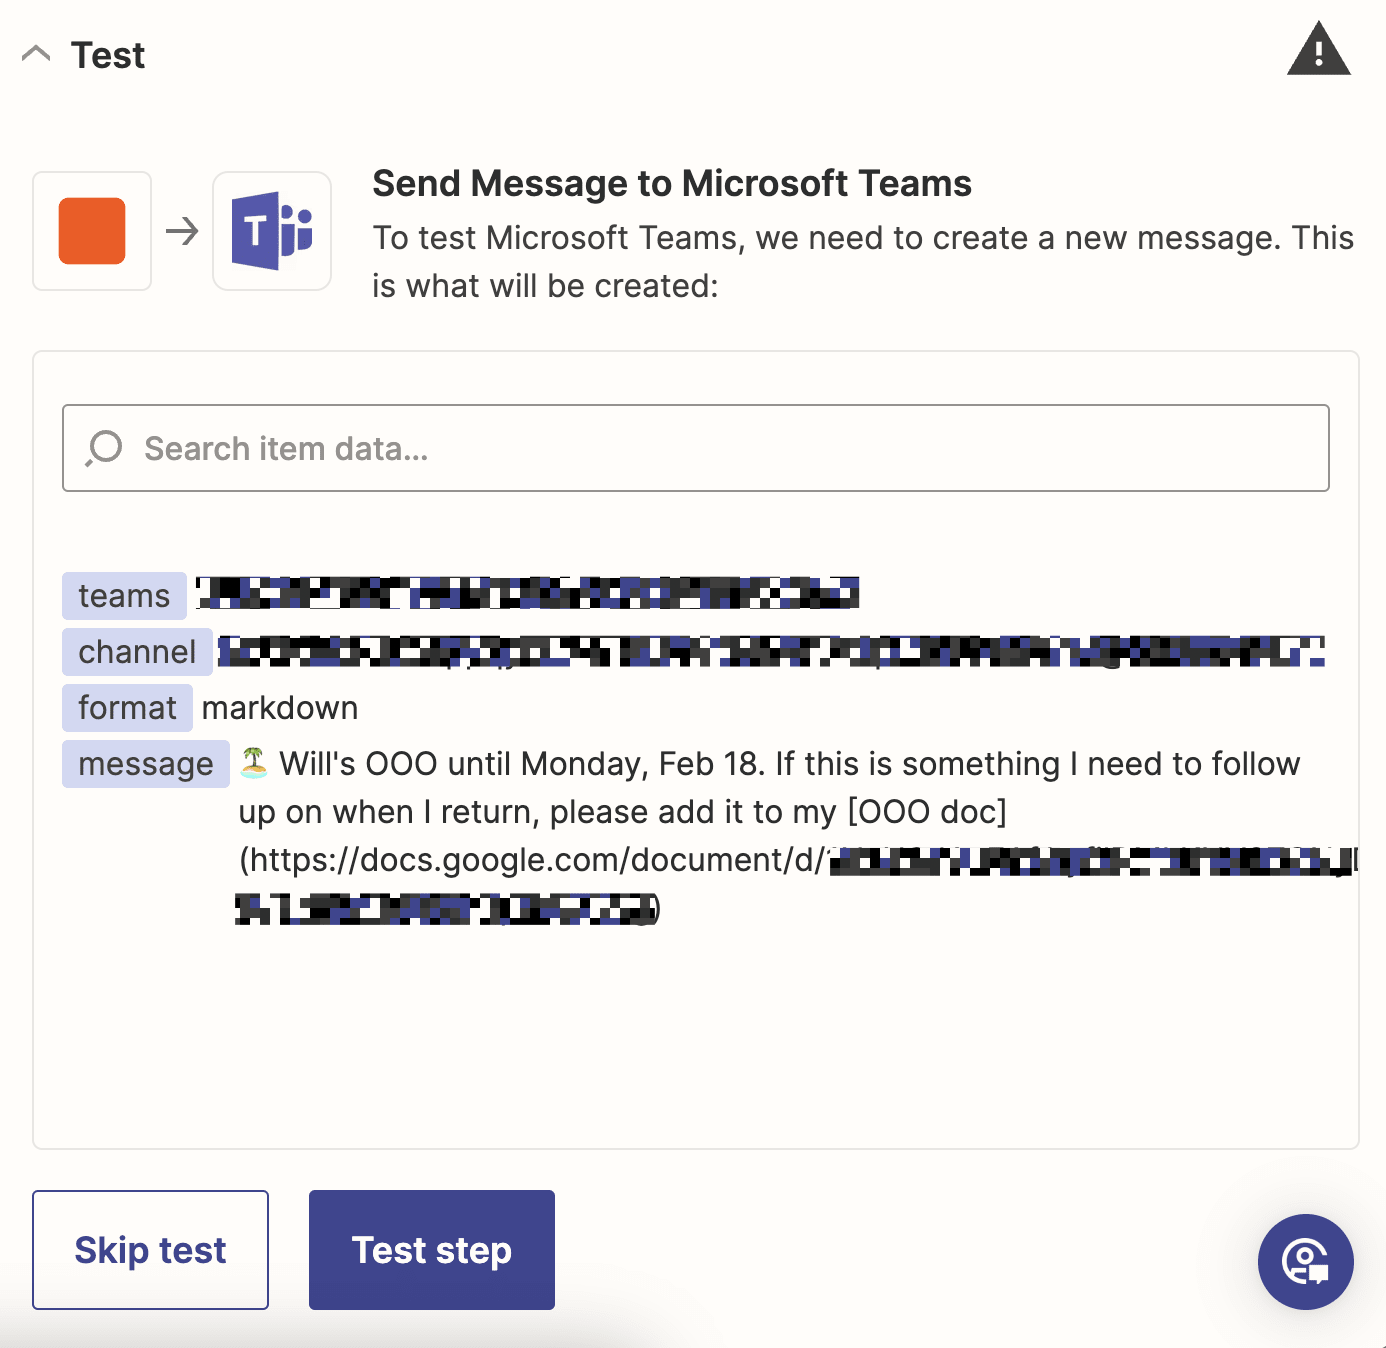
If something doesn't look right, you can go back, make changes, and re-test your Zap. Once everything is set up correctly, you're ready to begin using your Zap.
If you made an auto-responder bot to handle common questions, you can leave your Zap on. Since this is a vacation autoresponder, you'll want to turn off your Zap when you're working and turn it on when you are actually out of the office.
If you want to get a little more advanced, try adding extra steps to your Zap—for example, looking up your work calendar for vacation time before sending your vacation message—so you don't have to remember to turn your Zap on or off.
Now you've created your own auto-responder bot in Microsoft Teams!
Create an AI auto-responder in Microsoft Teams
If you want to create a simple, static auto-responder in Microsoft Teams, the instructions above will do the trick. Or, you can add AI into the mix and let your bot respond differently based on the message you receive. And it only takes one extra step.
Multi-step Zap workflows—available on our paid plans—allow you to add multiple actions, filters, and even branching logic so you can do more, automatically. Learn how to use multi-step Zap workflows.
Add AI to your Microsoft Teams auto-responder
Before you get started, you need to set up an OpenAI account. Once you've opened your account, Go to API Keys in the left sidebar.

Next, click + Create new secret key to generate a new API key. Be sure to copy the key once you're done, as you'll need it to connect your account to Zapier.
Now, to start your Zap. The trigger step is going to be the exact same as the Zap above. But instead of selecting Microsoft Teams for your first action step, select ChatGPT for the action app and Conversation for the action event.
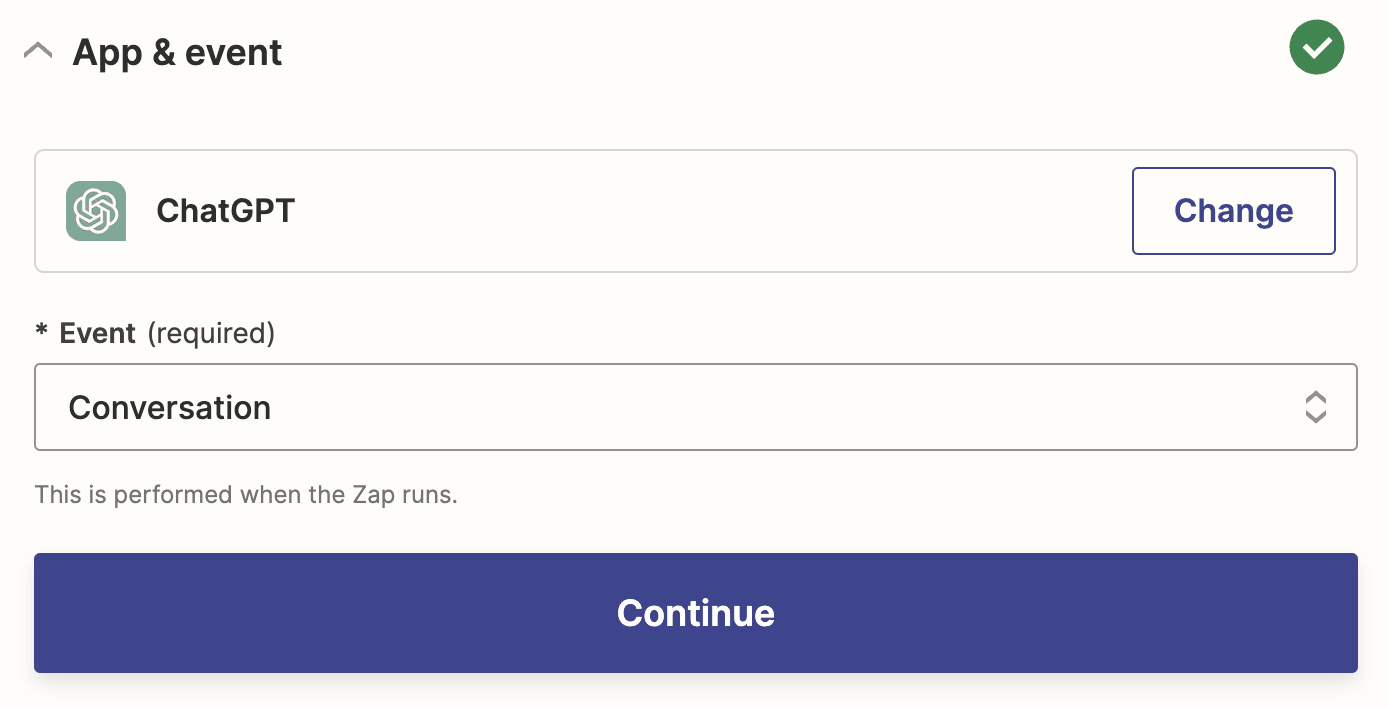
Click Continue.
Next, either select your ChatGPT account from the dropdown menu or click + Connect a new account. To connect your account, paste the secret key you copied earlier into this field when the pop-up appears.
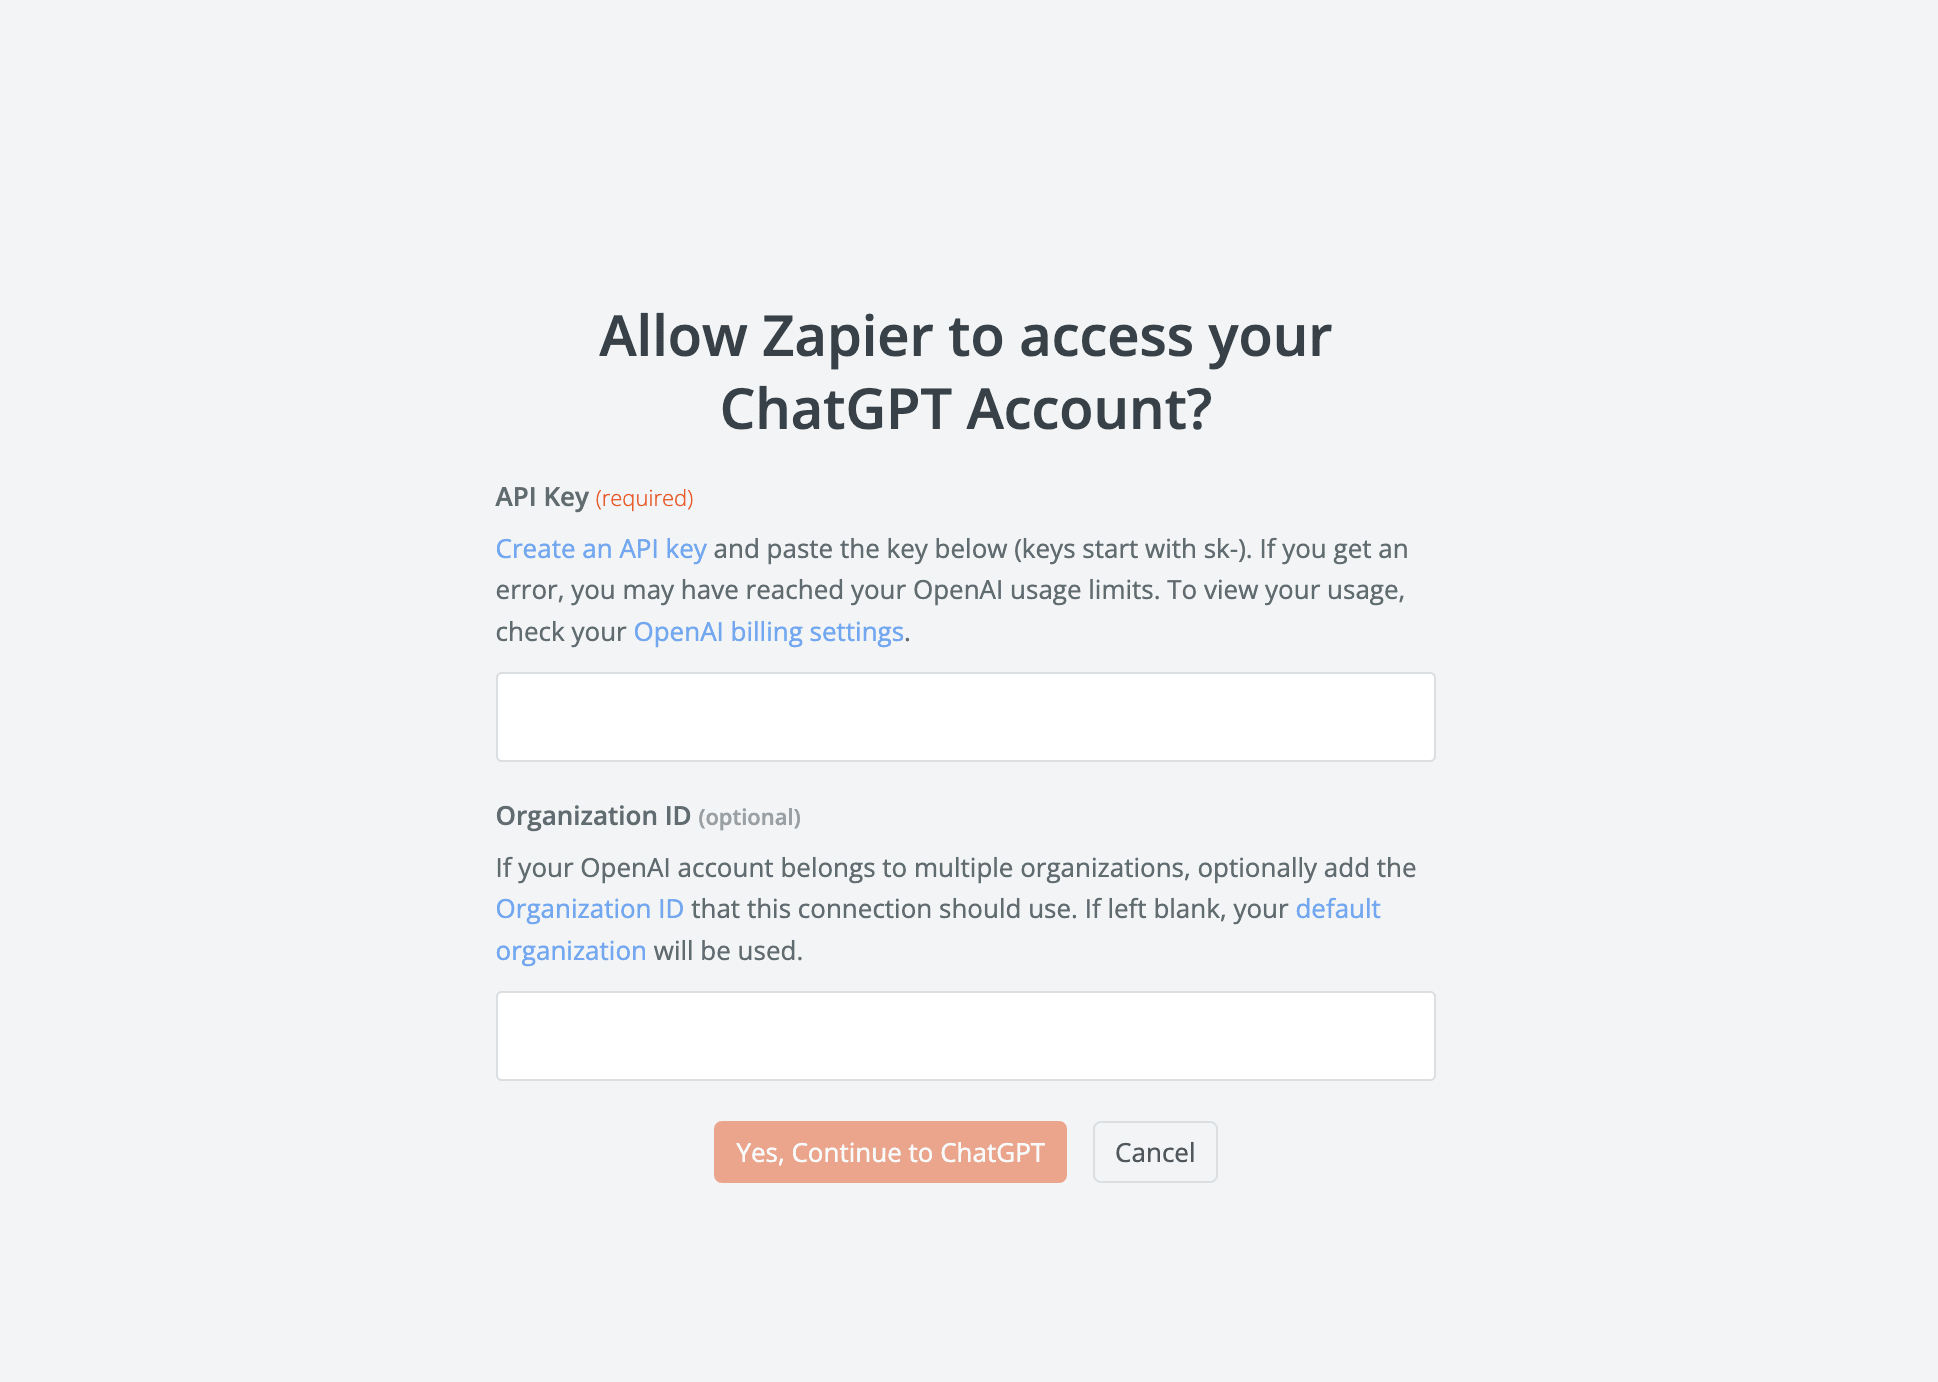
Click Yes, Continue to ChatGPT.
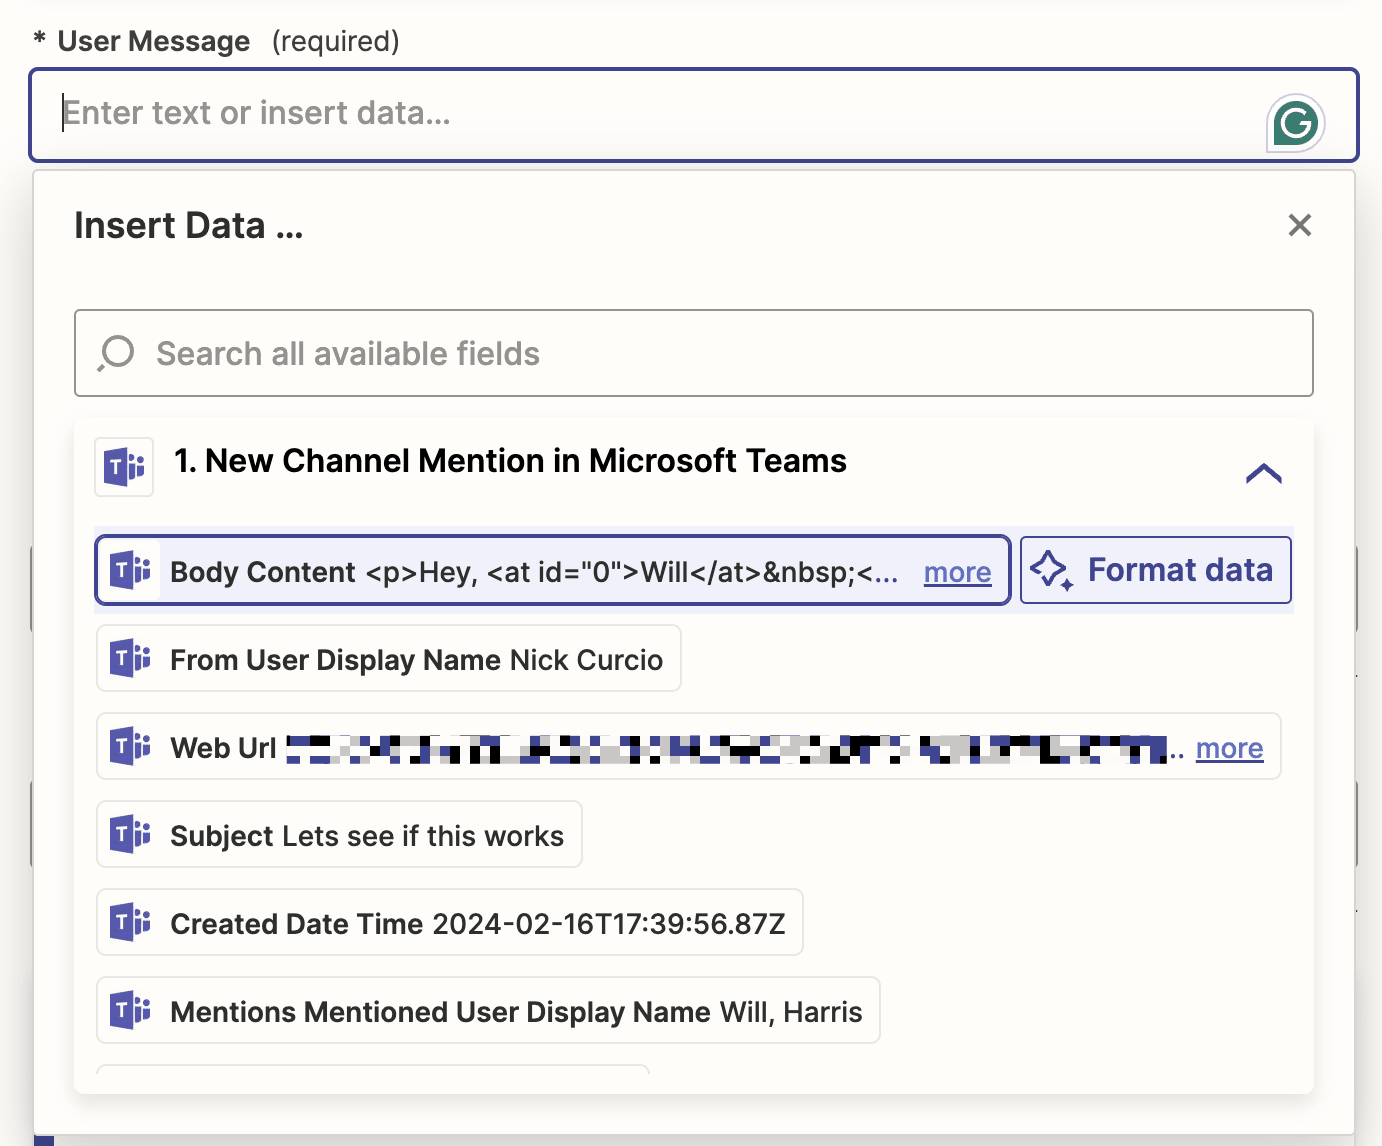
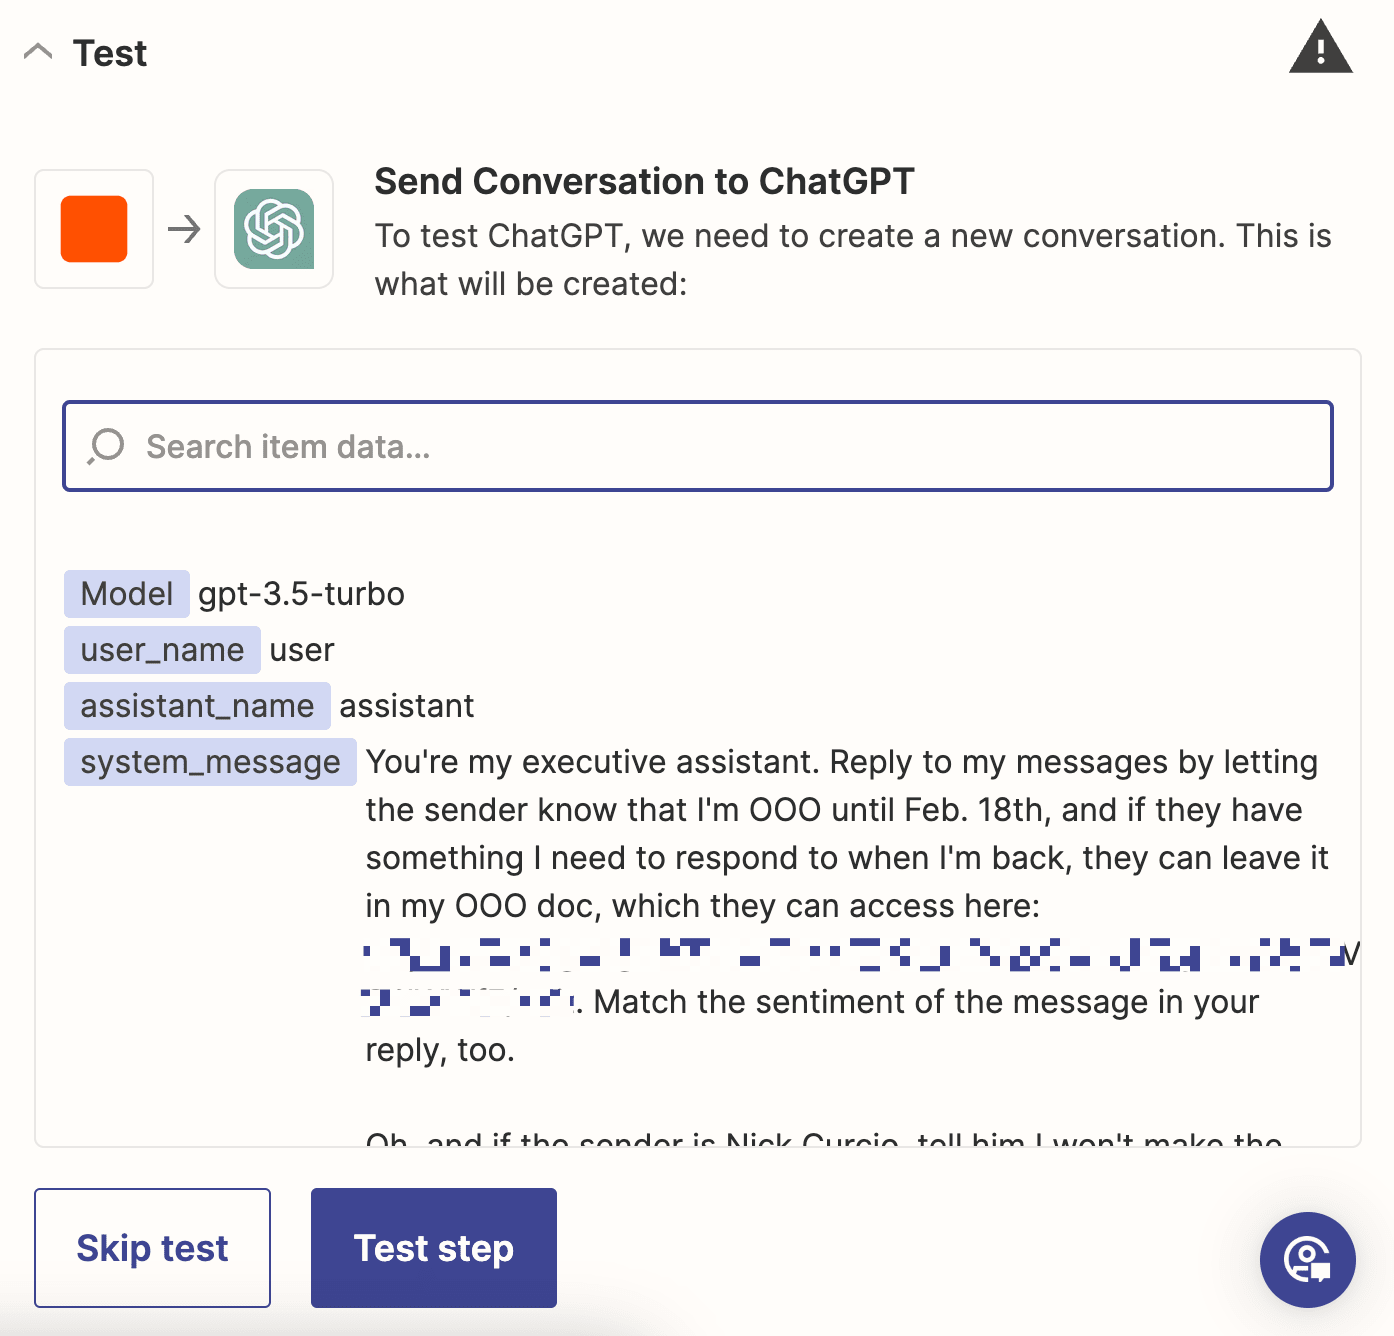
Now, in the User Message field, select Body Content from the Insert data dropdown. This will pull in the message from Microsoft Teams, and send it to ChatGPT to respond to.
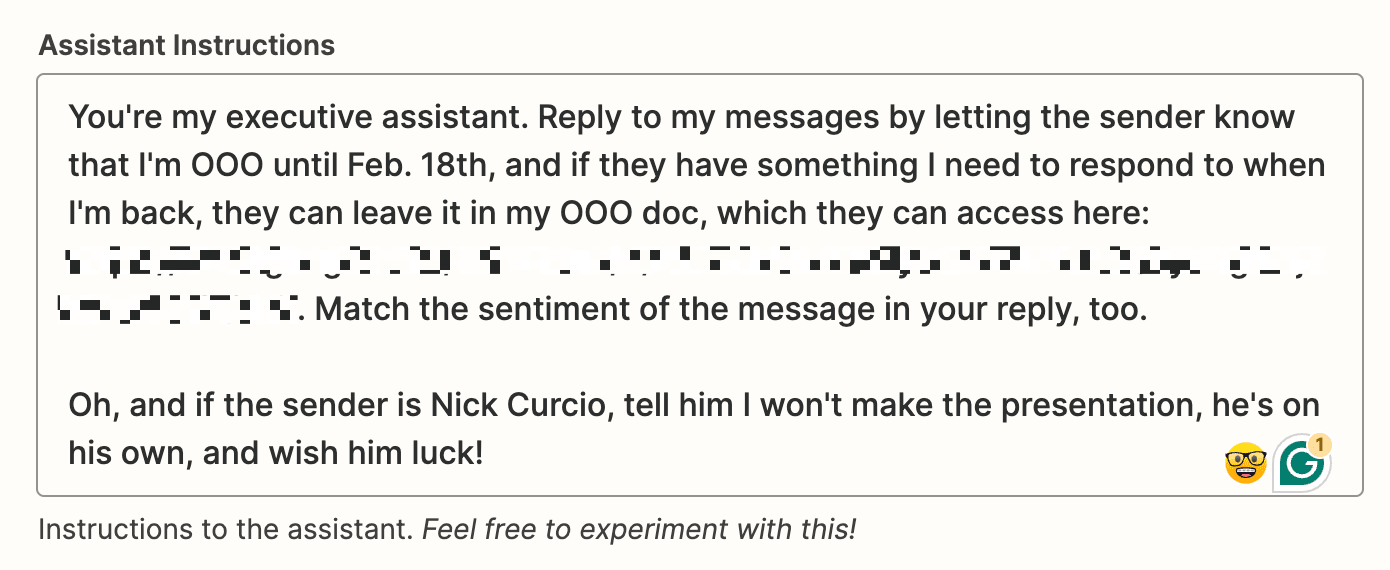
Then, in the Assistant Instructions field, tell ChatGPT how you'd like it to respond to the message. You can give notes on tone, voice, or even leave specific instructions based on the sender of the message. Feel free to get creative here.
If you want, further customize your message by giving your assistant a name or by adjusting the temperature (creativity). None of that is necessary for this workflow, however.
Click Continue when you're done customizing your prompt.
Then, click Test step to test your step and have Zapier send the prompt to ChatGPT.
If everything looks good, click the + button at the bottom of your screen to add one more action step.
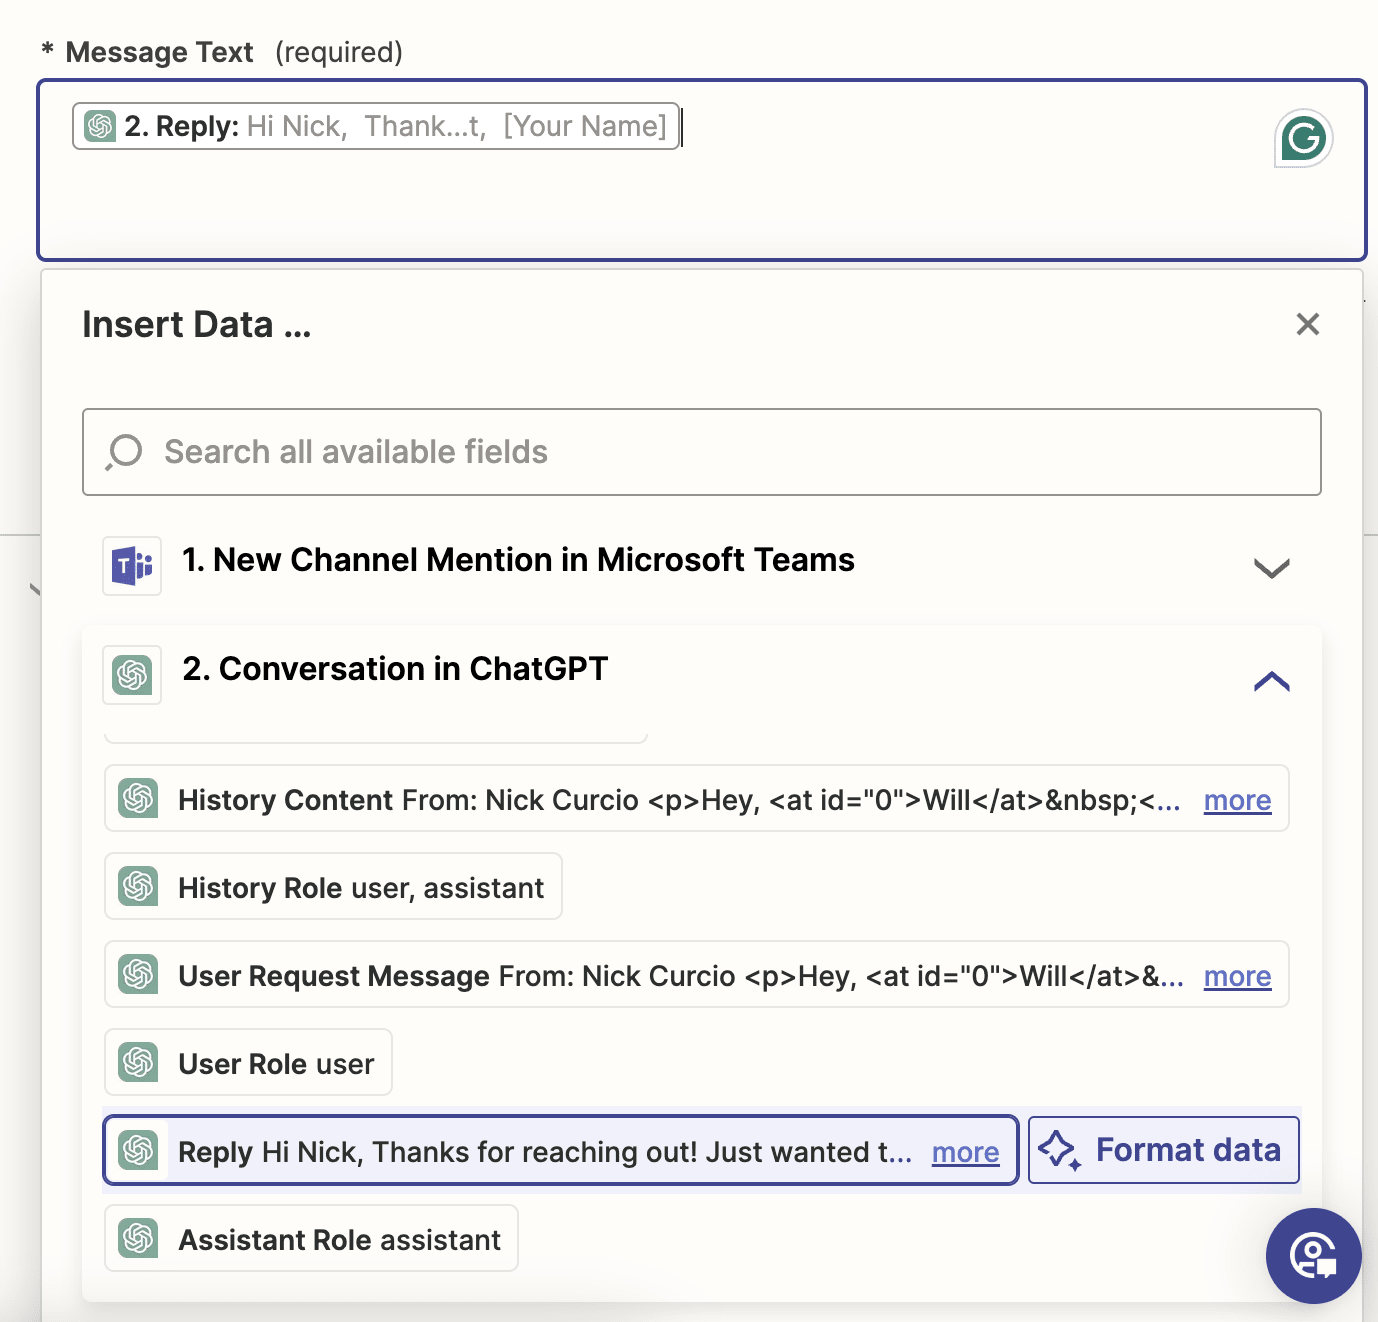
The setup for this third step is going to be the exact same as the one you used to post to Microsoft Teams before—with Microsoft Teams as the action app and Send Channel Message as the action event.
The only difference is, instead of typing out your message in the Message Text field, select Reply from the ChatGPT action step section in the Insert Data dropdown.
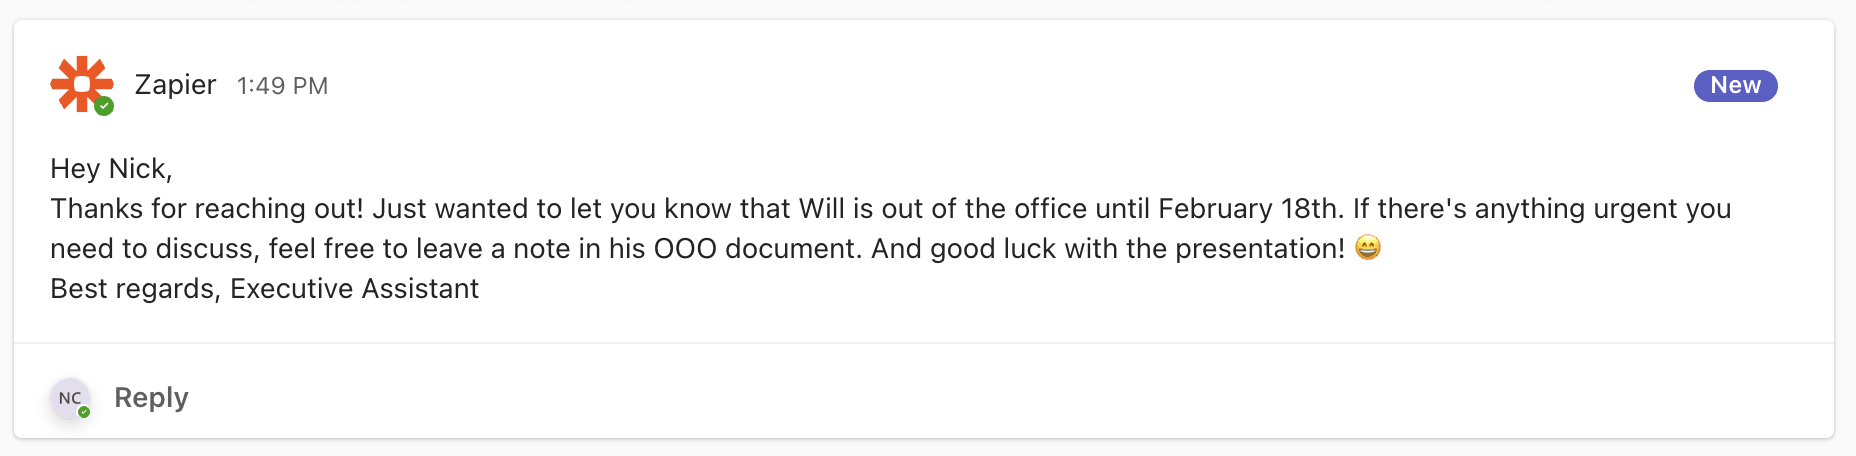
Now, instead of replying with the same, static response, your bot will use ChatGPT to automatically generate and respond with unique replies for each message you receive.
This article was originally published in October 2020. It was most recently updated in February 2024 by Will Harris.


