A couple years ago, I handled email marketing for a literary website. I was new to email marketing at the time, so I found it challenging and time-consuming to craft and send brand-new emails every Monday and Thursday to our steadily growing list.
That was until I heard of drip campaigns. The thought of dedicating a day or two to setting up all the emails that would land in our subscribers' inboxes on autopilot sounded divine. So I tried it—and it was a game changer for me.
Drip campaigns cut down my work time, so I could focus on analyzing metrics and doing work that moved the needle toward business growth. Here's how to set up drip campaigns in Mailchimp, along with a few tips to get it right.
How to create a drip campaign in Mailchimp
A drip campaign is a series of automated emails you send to people based on the action they take. This action can be placing an order, abandoning a shopping cart, signing up for your webinar, using the chatbot on your site, or something else entirely. Depending on the action they took, you'll decide the number of emails to send, the content of those emails, and the rate at which you'll send them.
The beauty of drip email campaigns is that you only write the emails once—then you automate them with your drip email software—in this case, Mailchimp. Once you've set it up and confirmed that it's working as it should, just sit back and relax—the emails will automatically arrive in your subscribers' inboxes at the right time and in the right order.
Note: For this breakdown, I'm using Mailchimp's Essentials plan, which gives you access to advanced features like time delays, conditions, if/else functions, and more. If you're using the free version, you'll only be able to automate a single email.
1. Select the right option
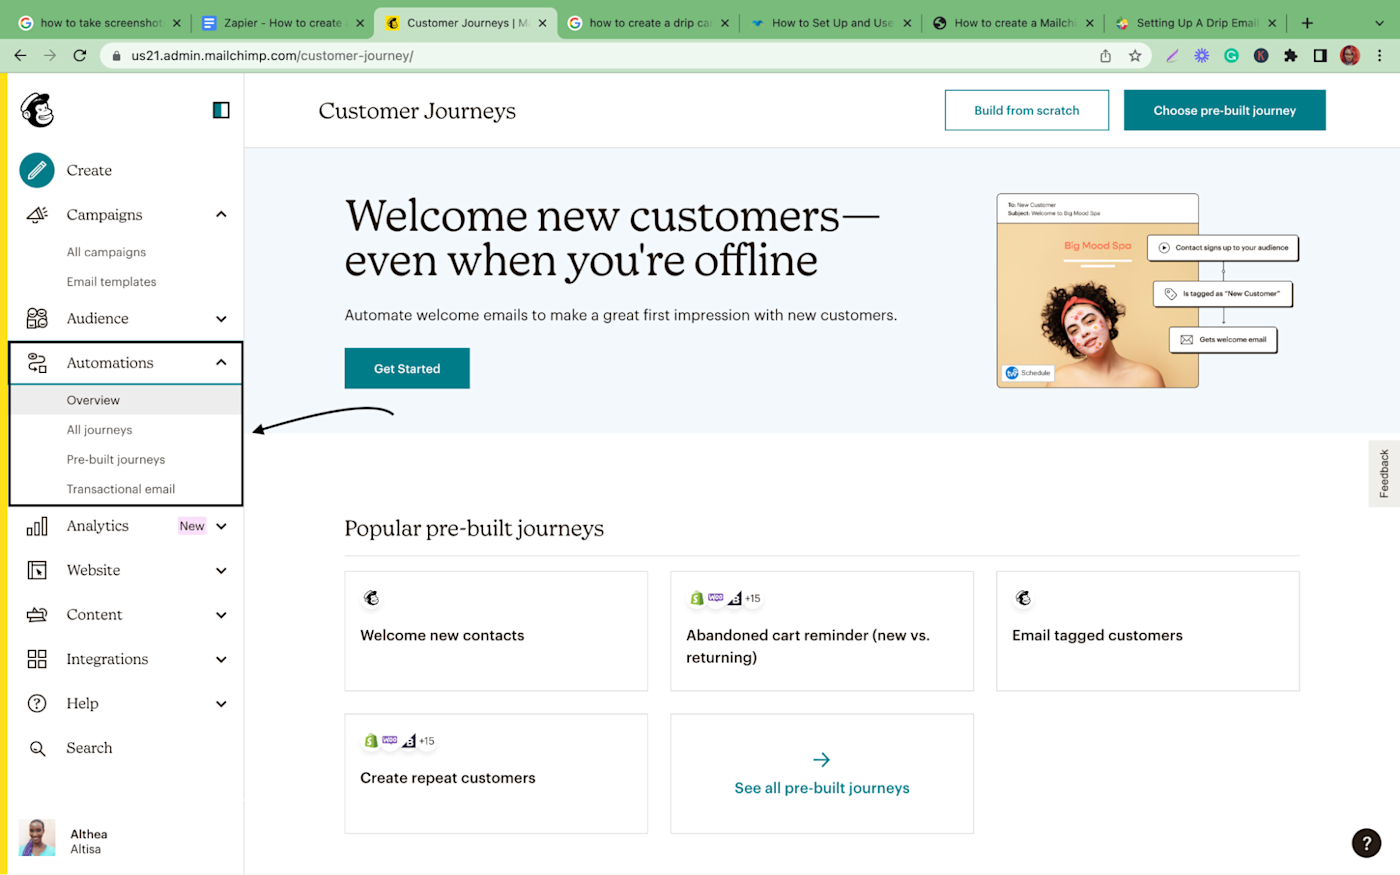
When you log in to your Mailchimp account, select Automationsin the main menu, and click on Overviews.
2. Choose the kind of automated emails you want to send
Mailchimp provides a number of pre-built customer journeys you can choose from to create your first drip campaigns. For instance, you can create a welcome email series for new contacts or send email reminders to customers who abandoned their carts.
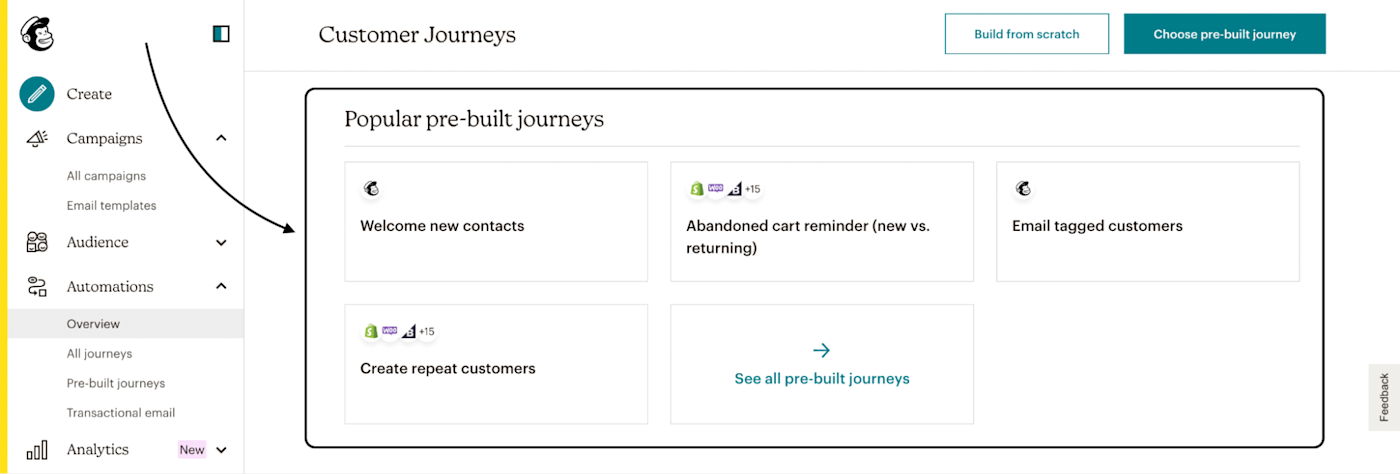
If you click See all pre-built journeys, you'll find over 50 pre-built journeys created by Mailchimp experts. There are also explanations for each of the templates, so you'll understand how to use each one.
If you can't find the right pre-built journey for your needs, you can create yours from scratch. For custom campaigns, you'll have to set up your own workflow and choose what you'll send to your customers and when.
3. Customize your customer journey
Say you want to create a welcome email series for your new subscribers. Click Welcome new contacts > Use this journey. On the page, you'll see a diagram depicting what the journey will look like.
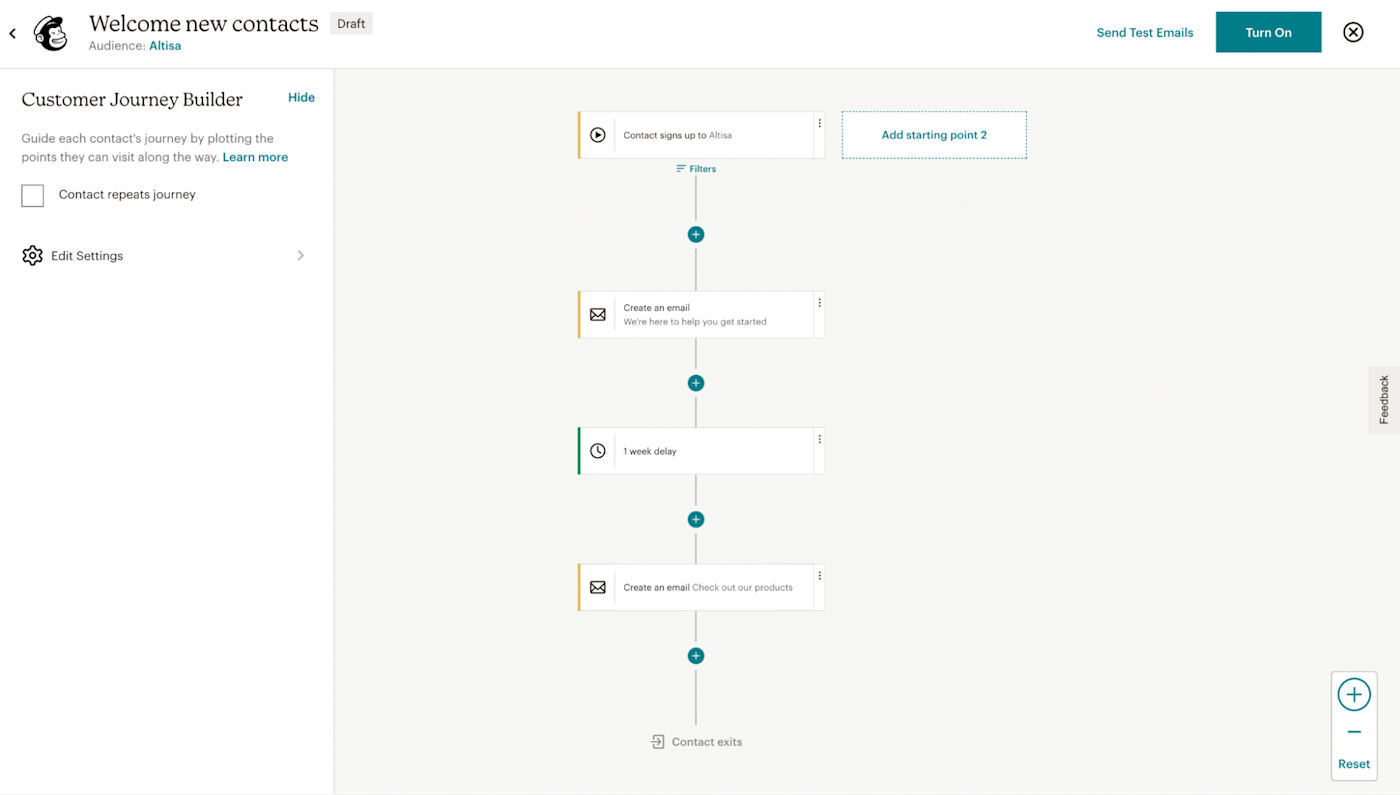
From there, you can change the starting point, add new journey points with the Plus (+) sign, and delete journey points you don't want. For journey points, you can add time delays, use if/else functions, and include percentage splits (if you want to test different pathways).
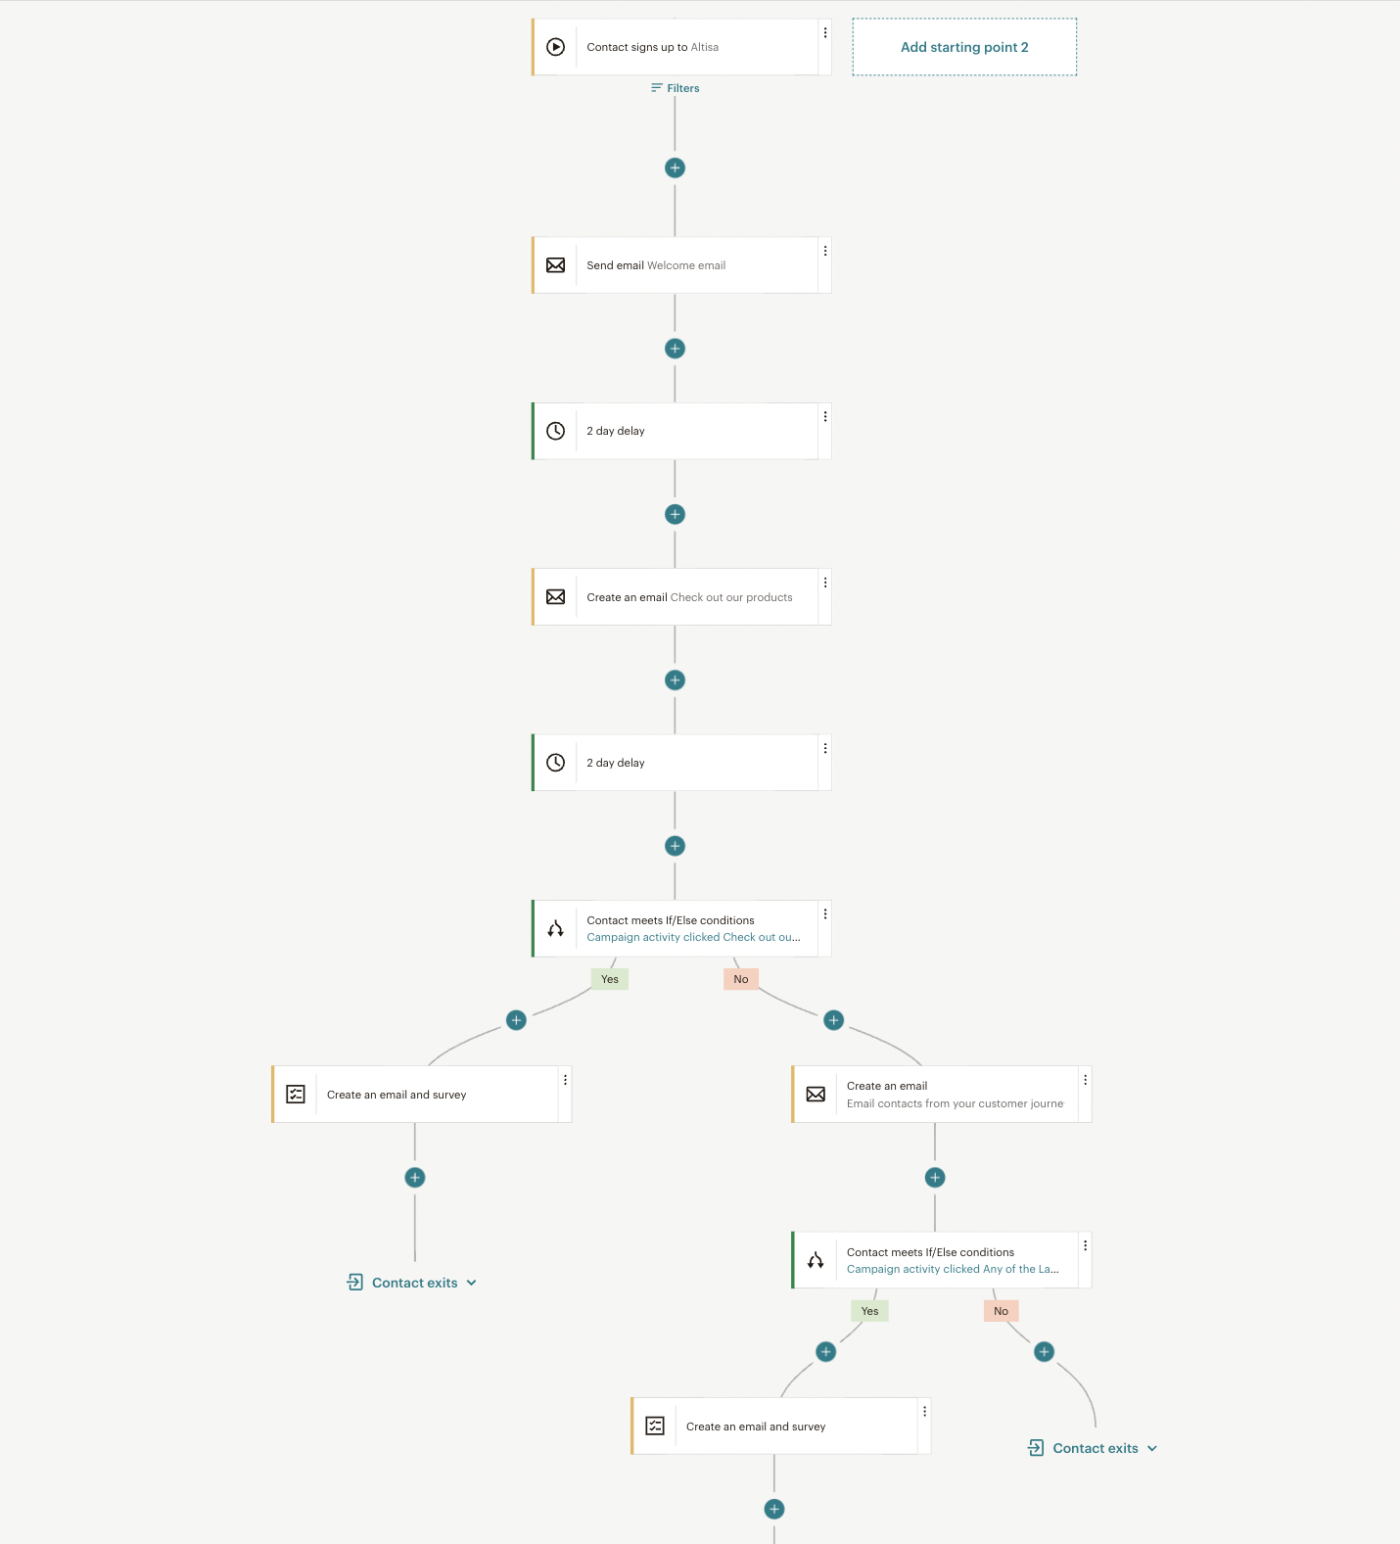
Let's use an example. Here's what I want my welcome email series to look like:
Someone signs up to my list.
I send them a basic welcome email and wait for two days.
After two days, I send them another email showing them my product.
Then I wait for two more days. If the person clicks the link in the email to my product page, I send them another email with a short survey so they can tell me what they think of my product. If they don't click the link, I send them an email expounding on the features of my product.
If they're convinced and visit my product page, I send them the email with the survey. If not, I move them to a different pathway (a lead gen pathway, preferably).
Here's what that looks like when I customize Mailchimp's default customer journey.
4. Set your email criteria and design your emails
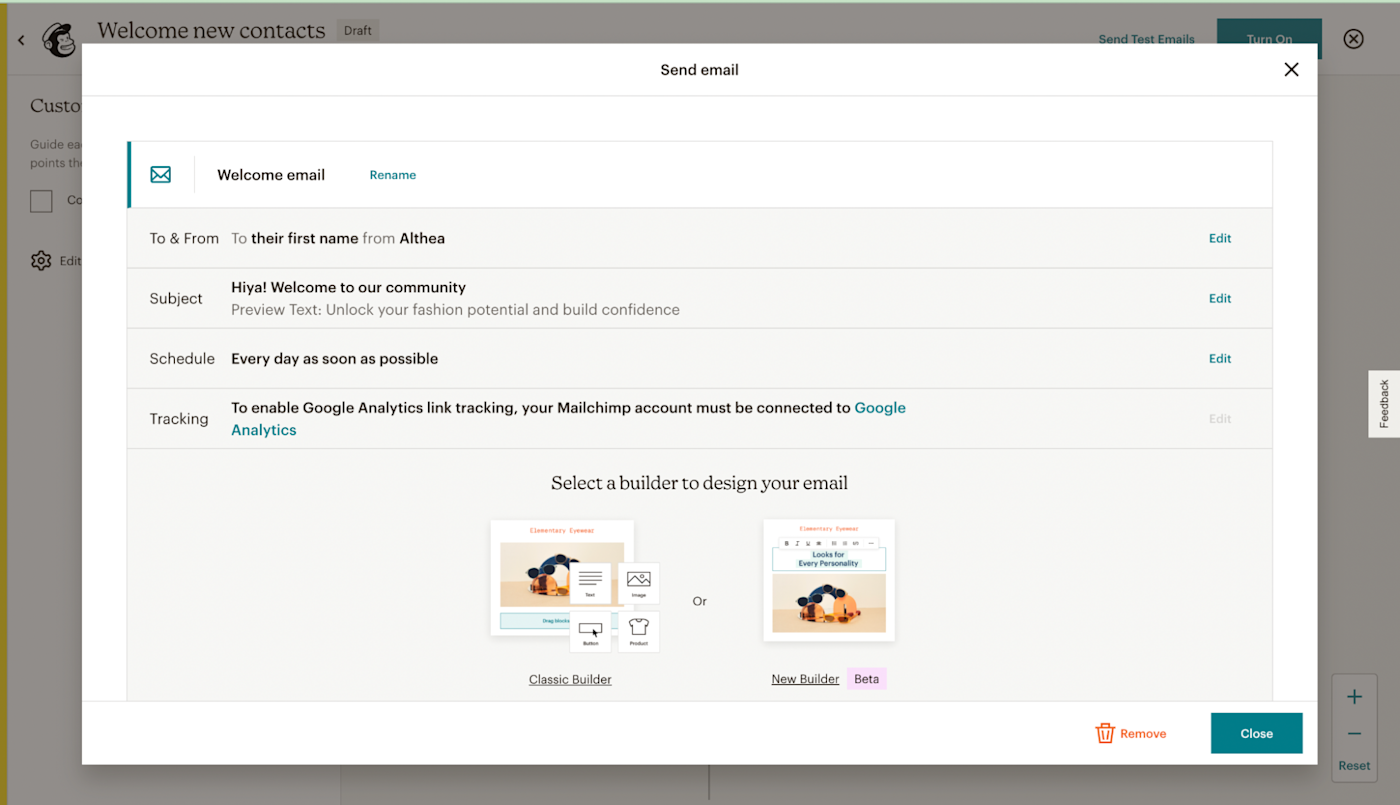
Now that you've customized your customer journey, it's time to start adding your emails. For the first email, click on the journey point to create your welcome email.
When you do, you'll see a pop-up box that allows you to rename that email, change the To and From addresses, add a subject line, set a schedule, and set up Google Analytics tracking. You'll also need to choose the builder you'll use to set up your email: Classic Builder or New Builder (still in beta testing).
Next, you'll choose a template or layout for the email. In the builder, you'll be able to add your text, images, videos, buttons, products, and more to the email. In the Styles menu, you can change the colors and fonts of your email's background, header, body, footer, and more. You can even add custom code to zhuzh things up the way you like.
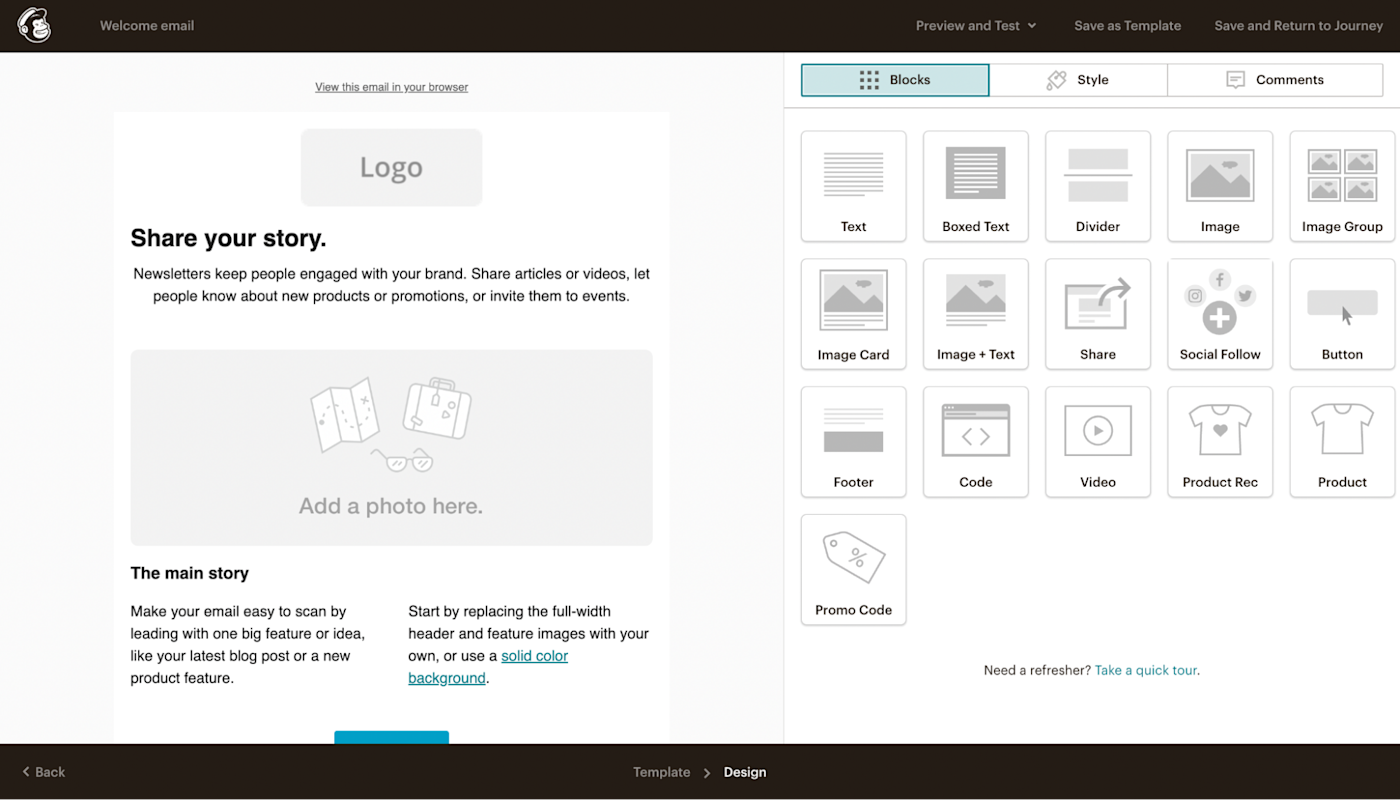
Once you're done setting up your first email, you can preview and test it with your own email address to ensure that the email looks great on all devices and is working as it should. Then click Save and Return to Journey. There, you'll click on the remaining journey points and continue to design your emails.
5. Publish your drip marketing campaign
After you've added your emails, navigate back to the Customer Journey Builder, and click Turn on. And voilà! You've created your first drip email marketing campaign. If you've set your criteria right and activated Google Analytics tracking, your emails will deliver automatically, and you'll be able to measure the performance of your campaign in your GA dashboard.
3 tips for setting up Mailchimp drip campaigns
As you're setting up your Mailchimp drip email campaign, here are three suggestions based on my experience with drip emails.
Segment your audience and create a separate drip sequence for each
No matter how many email subscribers you have, chances are not all of them subscribed to your list for the same reason. They're also not likely to be at the same exact point in your buyer journey. So if you're going to create drip campaigns, you should create different ones to cater to the different people on your list.
To start, you'll have to segment your list to put your subscribers into different buckets. For example, you might have new prospects who just downloaded a lead magnet, existing customers who just took advantage of a discount you were running on your most popular product, prospects who've only engaged with you once, and people who match your buyer persona to the T. These people shouldn't all receive the same drip campaign.
Instead of sending a long, complicated drip campaign, create several smaller ones specifically for each bucket—like in the example above, where I'd move a subscriber who didn't click on my product page after the second email to a different pathway. That pathway is another drip campaign entirely.
By segmenting your audience and sending them personalized drip campaigns, you'll be able to cater to their needs and have a better chance at converting and/or retaining them.
Set up date-based drip campaigns
Setting up date-based automations helps you reach out to your subscribers on dates that matter to them (and you).
For example, you might email your subscribers on the anniversary of their buying a product or signing up to your list. Or if you sell products on a membership or subscription basis—such as a paid newsletter, gym membership, or B2B SaaS product—you should create a drip campaign to inform your audience when their subscription is about to be renewed. In your email, remind them of how valuable your product is and how they've benefited from it. If you have new products or features in the works, let them know.
Experiment with frequency
The downside of drip email campaigns is that it's easy to get carried away. Deciding the best frequency to use requires you to think about different factors, such as the list segment you're targeting, where your reader is in your sales funnel, the content of the email, and so on.
The best way to find the right frequency is to experiment with it. I've found that click-through rates (CTR) are a great indicator as to whether your email frequency is working well. If your CTR ranges between 2-5% or above, it's very likely that your email frequency is good and your content is awesome. If your CTR is less than 2%, you might be sending emails too frequently, which means that your subscribers don't take action because they received your last email yesterday. Or you could be sending too few emails—which can make your readers not trust you because they don't remember who you are or what you offer. A low CTR can also mean that your content isn't valuable or relevant enough, or that you have a vague (or nonexistent) call to action.
Running tests is the only way to figure out what part of your campaign you can improve on to get the results you're looking for.
Take your Mailchimp drip campaign to the next level
Once you've set up your drip campaigns in Mailchimp, take them to the next level by connecting them to the rest of your tech stack using Zapier. Here are a few ways to automate your email marketing with Mailchimp, and you can also check out how to automate your drip campaigns even further.
Related reading:
