
When my dad goes on vacation, he sometimes boards his pup at a little dog hotel. Instead of texting my dad whenever Sherlock goes to the bathroom or enjoys a treat, the staff send him a report card of daily highlights when he returns. It's everything my dad wants to know, delivered right when he wants it. Can you imagine him getting pinged every time Sherlock decided to do his business? He'd never get a moment's peace.
If you're drowning in notifications at work—one new lead alert, another form submission ping, a task completion buzz—you could use the same approach and batch them all together. That's exactly what Digest by Zapier does. To learn how it works and set up your own automated digest, keep scrolling.
Digest by Zapier is a tool available on Pro plans and higher tiers. Compare Zapier plans on our pricing page.
Table of contents
Zapier is the most connected AI orchestration platform—integrating with thousands of apps from partners like Google, Salesforce, and Microsoft. Use forms, data tables, and logic to build secure, automated, AI-powered systems for your business-critical workflows across your organization's technology stack. Learn more.
What is Digest by Zapier?
Digest by Zapier is a built-in tool that collects information from your Zap workflows (what we call automated workflows) and releases it in batches. So instead of receiving individual notifications every time your Zap runs, you get a consolidated summary delivered on a schedule you set.
Let's say you've built a Zap that sends you a DM in your chat app every time your team receives a new lead. But what if you want to review your leads on a weekly basis instead? Rather than deal with constant pings, you can choose to get a more manageable summary of all your leads every Monday morning by adding a Digest step to your workflow.
You can even collect information from multiple sources and deliver them all in one digest. For example, if you monitor leads from your landing page, social media, and email campaigns, you could create a digest that delivers leads from all those categories in a single Slack message or email.
Features of Digest include:
Easy workflow building: You can give each of your digests a unique name (32 characters max), so you can easily reference them across Zap workflows.
Custom formatting: Structure your digest content with HTML, Slack formatting, or Zapier Formatter to get exactly the look you want: emojis, bold text, dates formatted consistently every time…whatever works for the app you're sending content to.
Flexible delivery: Send digests daily, weekly, monthly, or when they reach a certain number of entries—or trigger delivery from another Zap entirely.
Conditional workflows: Use the Find Digest action to peek at contents without releasing them. This is great for building Zap workflows with logic tied to your digest contents. For example, you can choose to format messages differently based on how many entries you've gathered.
Note: Digest steps don't count toward your task usage.
What you can do with Digest by Zapier
Here are some practical ways to put Digest to work:
Compile a monthly expense report
You want to get notified about submitted expenses without getting constant alerts.
What this might look like:
Your Zap triggers when an employee submits a new expense in Xero.
Digest's Append Entry and Schedule Digest action adds the employee's name, expense amount, and a link to the form to a digest that's set to deliver once a month.
Gmail sends your finance team a compiled report with all the submissions from that month.

Celebrate weekly team wins
You want to recognize what your team has accomplished every week without overwhelming your team channel with notifications.
What this might look like:
A task is marked completed in Asana.
Digest's Append Entry and Schedule Digest action adds the task name, assignee, and completion time to a digest set to deliver every Friday at 4 pm.
Once the digest is released, AI by Zapier rewrites the list in a celebratory tone.
Slack posts the AI-enhanced summary in your team channel, so everyone can see and celebrate your progress together.
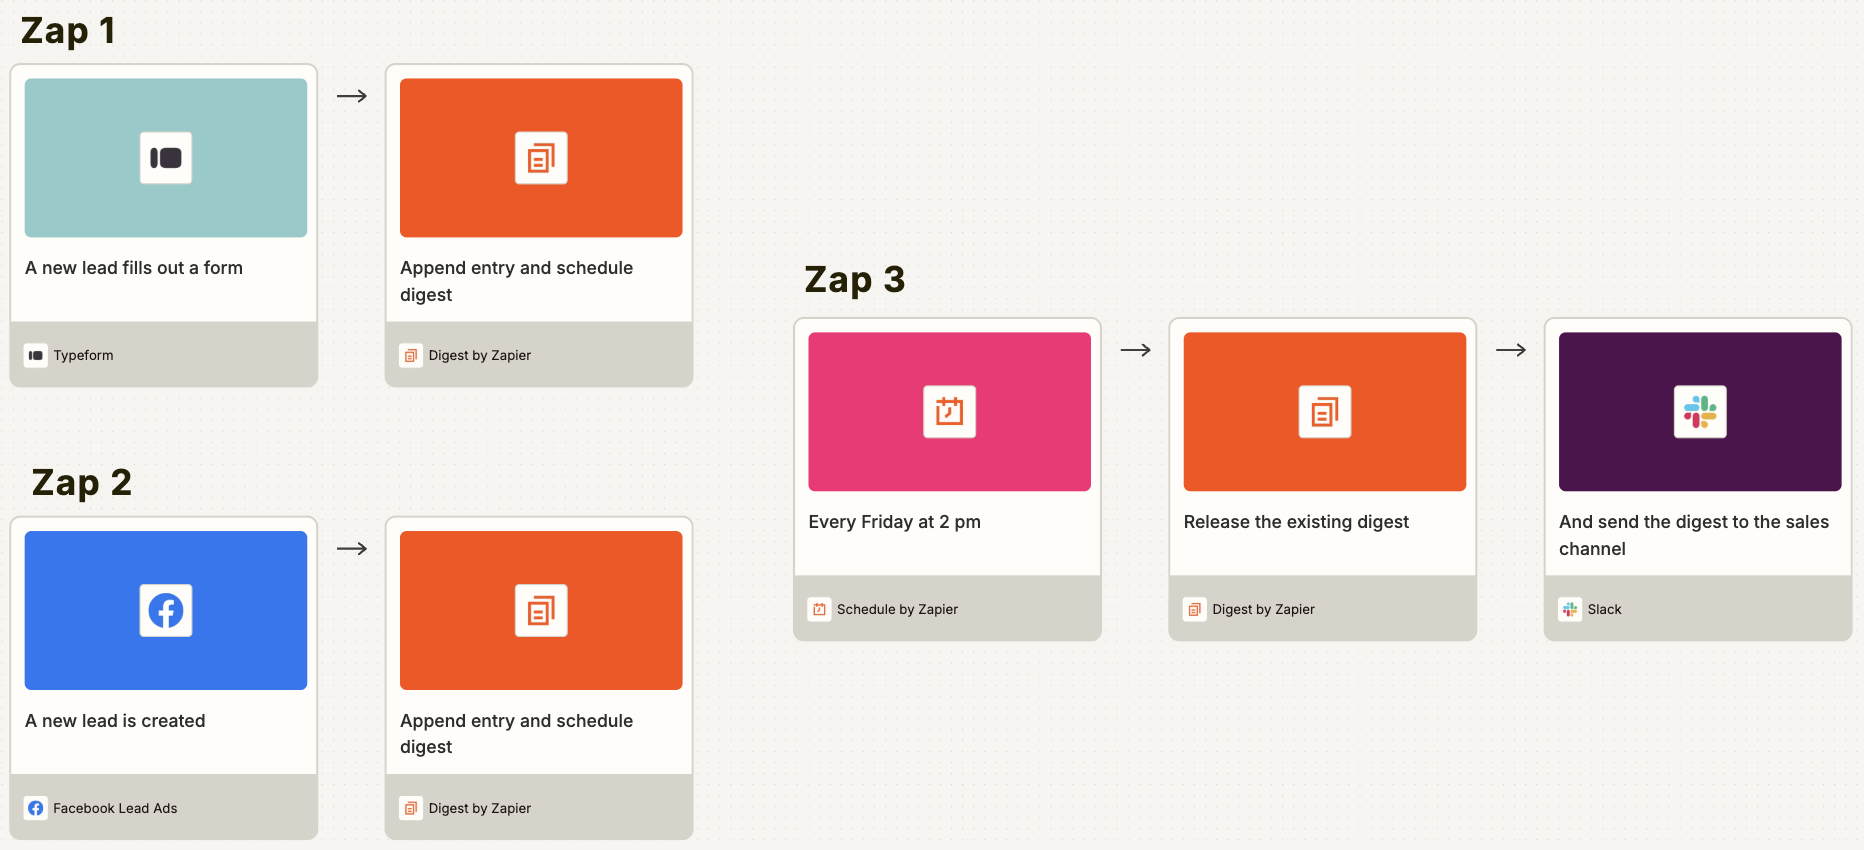
Send your sales team a weekly lead summary
Your sales team wants to review all the new leads they've gotten from two sources without getting pinged for each one individually.
What this might look like:
Your first Zap triggers when someone submits your Typeform survey.
Digest's Append Entry and Schedule Digest action adds their name, email, and "Typeform" as the source to a digest set to deliver manually.
Your second Zap triggers when a new lead comes in through Facebook Lead Ads.
Digest adds each lead's name, email, and "Facebook" as the source to the same digest.
Your third Zap triggers using Schedule by Zapier every Friday at 2 pm.
Digest's Release Existing Digest action releases the contents of the digest.
Slack sends your sales team channel a compiled message with all the week's leads from both sources.

How to get started with Digest by Zapier
Ready to set up a digest? Log in to Zapier, head to the Zap editor, and follow these steps.
First, set up your trigger step and any actions you need to collect the information you want to include in your digest. Next, search for and select Digest as your action app. You can also find it in the Utilities tab on the left-hand panel.

For your action event, choose Append Entry and Schedule Digest.
In the Configure tab, name your digest. This is not what you'll see in the final digest content. Rather, this name is for internal organization, so you can easily identify your digest when you create other Zap workflows.
In the same tab, fill out the Entry field. This can hold static text and dynamic data (information mapped from previous steps), formatted in whatever way you want the content to show up in your digest.
Note: You may want to format your digest differently based on the app you'll be sending the digest to. Read our help guides to formatting emails using HTML, formatting content for Slack, and using Zapier Formatter.
To map dynamic data from previous steps, click the + button or type a forward slash (/), which opens a modal that lets you select and insert values.
Next, in the Frequency field, choose how often the digest should be delivered. You can choose to send the digest Daily, Weekly, or Monthly. You can also pick Threshold. In that case, the digest will get released when you reach a specific number of entries that you set.
There's one more option, Manual, but that requires a bit of extra setup, so let's finish the "standard" setup first.

After choosing your frequency, finish configuring your step, then click Continue. Add another action step to your Zap, so your digest has somewhere to go—like Slack, Gmail, or whatever app you want to receive your digest.
Then remember to test your Zap and turn it on.
Now, if you choose Manual delivery, that means you control when the digest is released using a separate Zap. This is great for collecting information from multiple sources into one digest or releasing digests on a custom schedule.
If you schedule a manual release, your first Zap will end with the Append Entry and Schedule Digest action. You won't add a destination app to that Zap.
The next step is to create a separate Zap to release your digest. So once you're done configuring the first workflow, in a new Zap, pick Schedule by Zapier as your trigger app. Then add another Digest action. This time, pick Release Existing Digest as your action event.

Now configure the step by choosing the same digest from your other Zap.
Finally, add another action step to your Zap, so your digest has somewhere to go. And when everything's been set up, again, remember to test your Zap workflows and turn them on.
Reduce notification noise with Digest
You get enough distracting notifications—turn down the noise with Digest by Zapier. It transforms an otherwise constant stream of alerts into organized, actionable summaries delivered exactly when and where you need them.
Ready to start building? Head to the Digest by Zapier integration page, read more in our help guide, or go straight to the Zap editor.
Related reading:
This article was originally published in 2022, written by Krystina Martinez. It was most recently updated in July 2025.


