Google Docs is a great business productivity application with most, if not all, of the features you could want from a word processor. But some users have been slow to abandon desktop office applications for cloud-based options, because they fear they’ll lose functionality.
For those who doubt the practicality of Google Docs—or have yet to make the most of Google’s powerful word processor—here are over three-dozen tips and tricks that make the app more useful. These should be of help to not only professionals, but students and educators, as well.
Adding and Editing Images
1. Insert an Image by Its URL
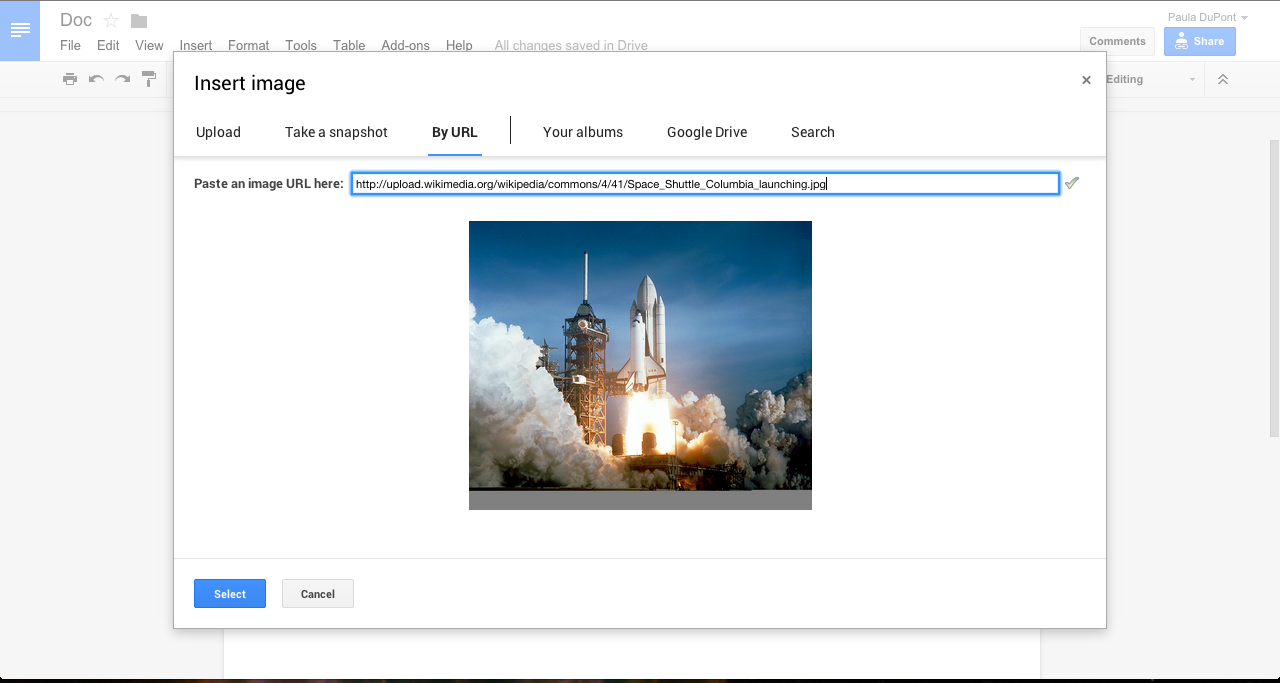
Any word processing application worth mentioning allows users to insert images from a local hard disk. But Google Docs allows you to add any online image via a URL—just click "Insert" in the menu bar, select "Image" from the dropdown list, navigate to the "By URL" option and paste your image link in the text box. Docs saves the image in your document, so even if the original file is removed from the internet or, the image stays just where you placed it. Bonus: you can also add images using Google Drive, your hard drive in the cloud.
2. Search for an Image
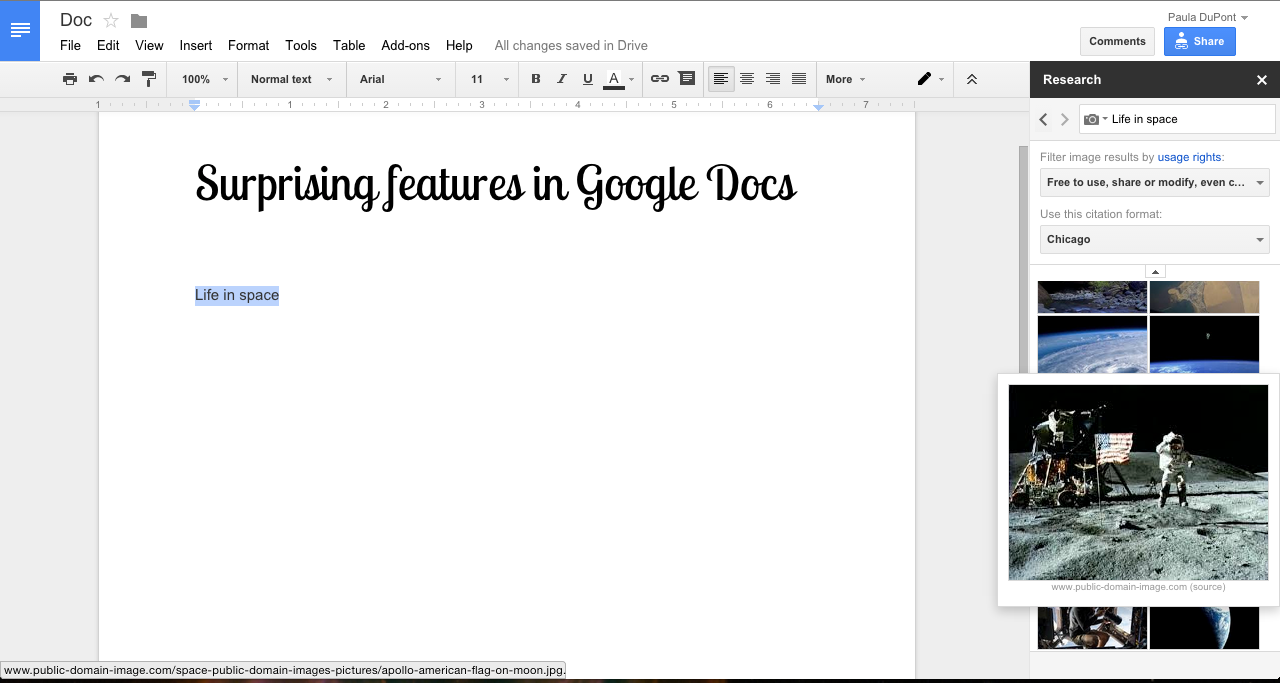
If you want to add an image but haven’t yet found the right pic, there’s no need to leave your document and kill your productivity: The "Research" tool can help you search the web for images by keyword right within the "Research" sidebar.
To use this feature, activate the Research sidebar underneath the "Tools" menu. From there, filter images by usage rights—make sure you’re not using a picture that requires any special license—and automatically add a citation with the "Citation" dropdown. (If you don’t want or need to include a citation, simply select and delete the superscript that automatically appears.) Clicking an image in the "Research" results will take you to the URL where the image appears, and dragging the image will allow you to place it in your document.
3. Edit an Image
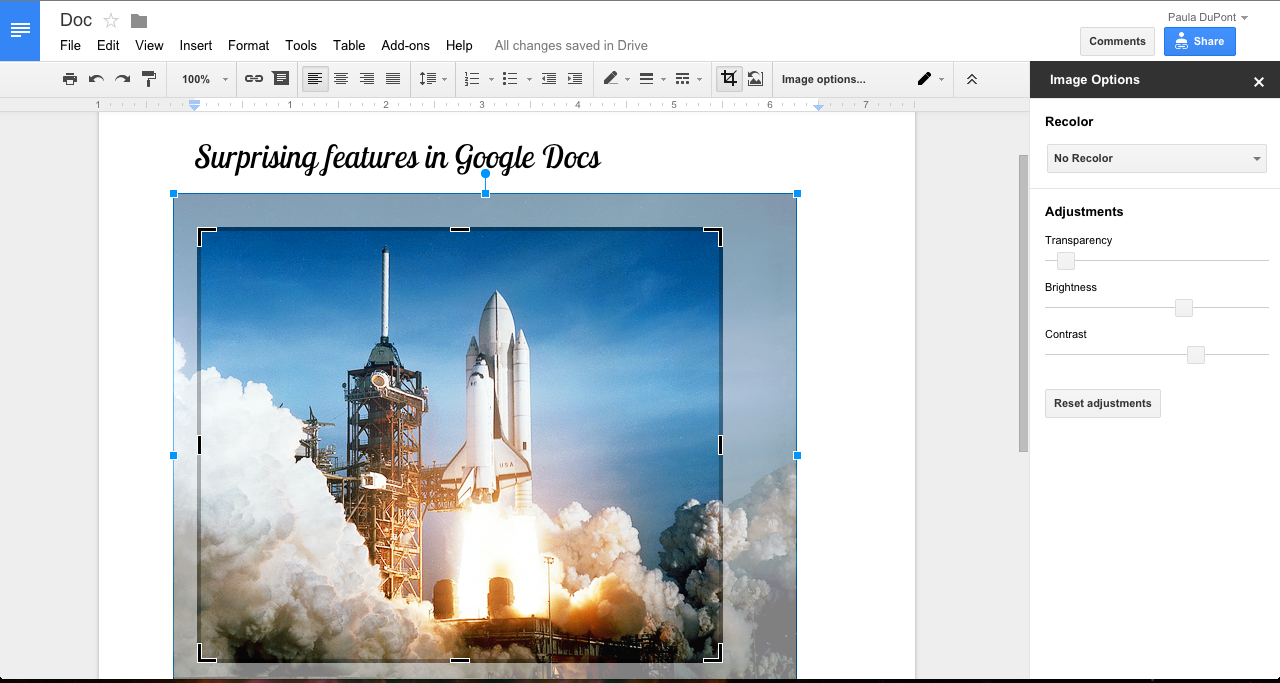
A secondary click on the image or a click on "Image Options" in the toolbar with the image selected will bring up a few features specific to an image file, including the crop and edit functions. The tools here are pretty basic, but Google Docs allows you to edit the image’s transparency, brightness, and contrast from the "Image Options" sidebar.
4. Add Image Alt Text
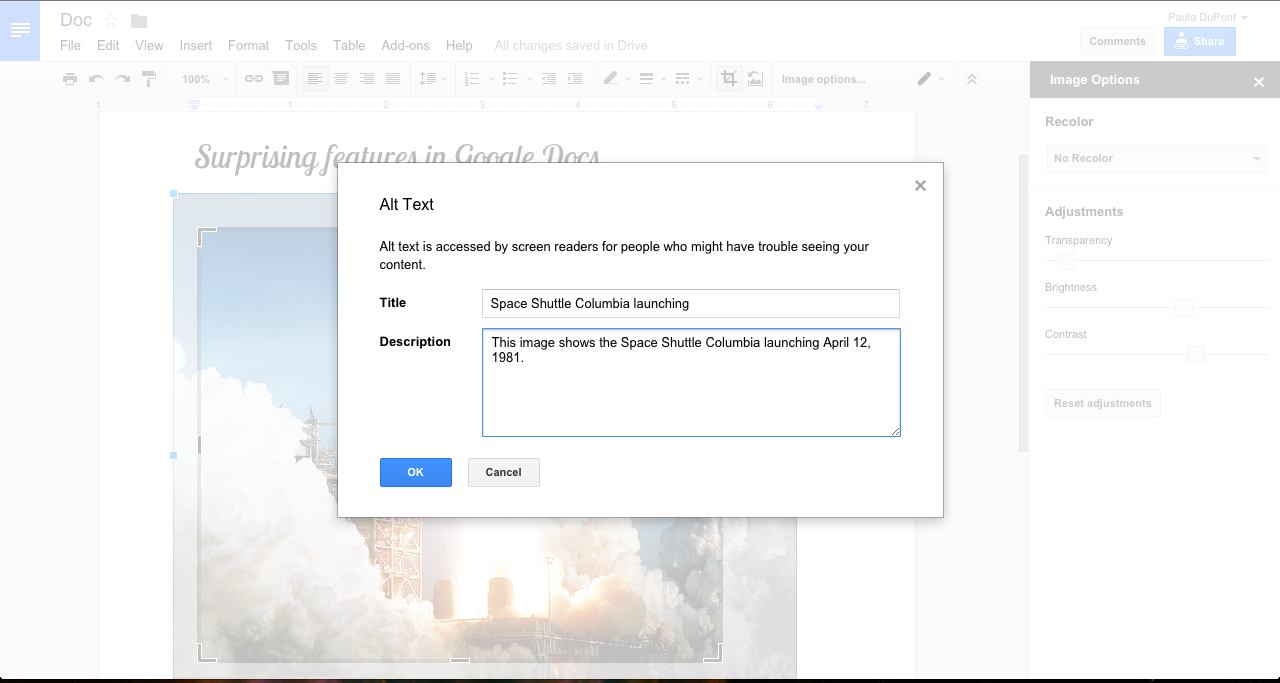
"Alt Text", located in the menu bar's "Format" dropdown, adds an alternate text title and description to the image. This text won’t usually appear in your document, but it comes into play when someone has accessibility features turned on, or when the reader's connection is too slow to load images.
5. Insert Maps
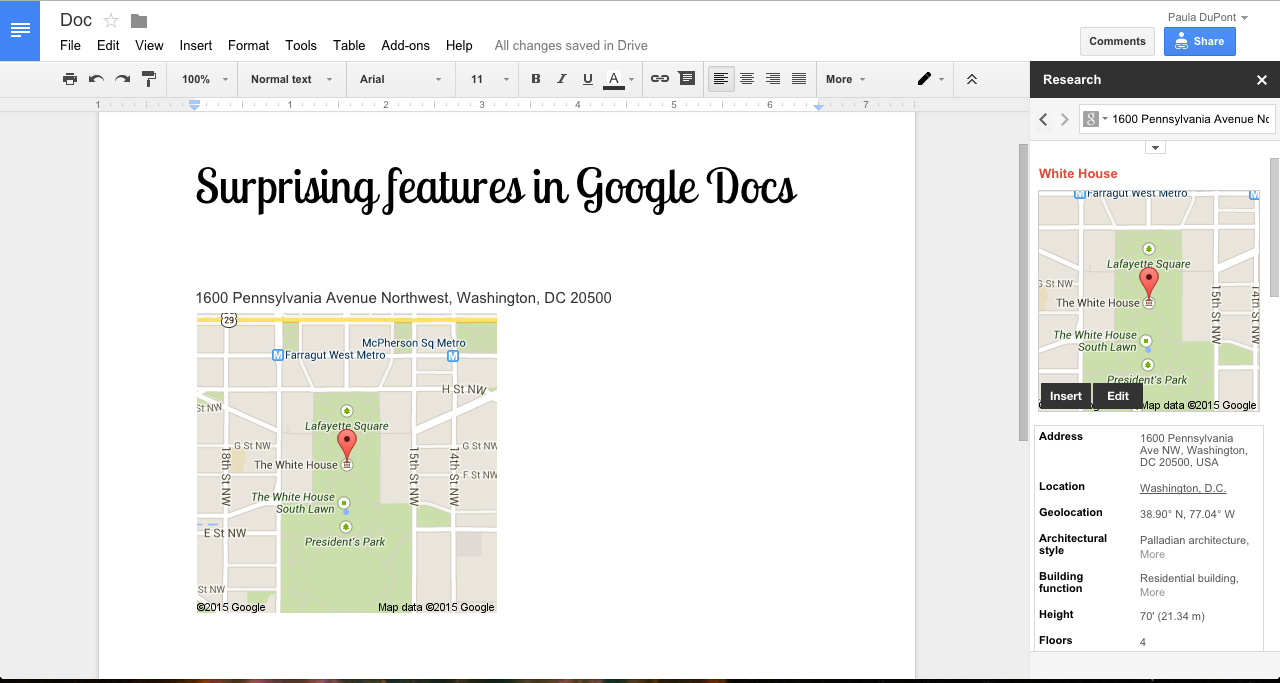
Maybe it’s not a traditional image you need, but a map. Again, the "Research" tool is your friend: Performing an "Everything" search for an address or location will yield a map result. Scroll down for more information about the location, or insert map the image into your document. Hit Edit on the map result to change how the location is displayed before adding it to your Doc.
Share and Collaborate
6. Publicly Share a Doc
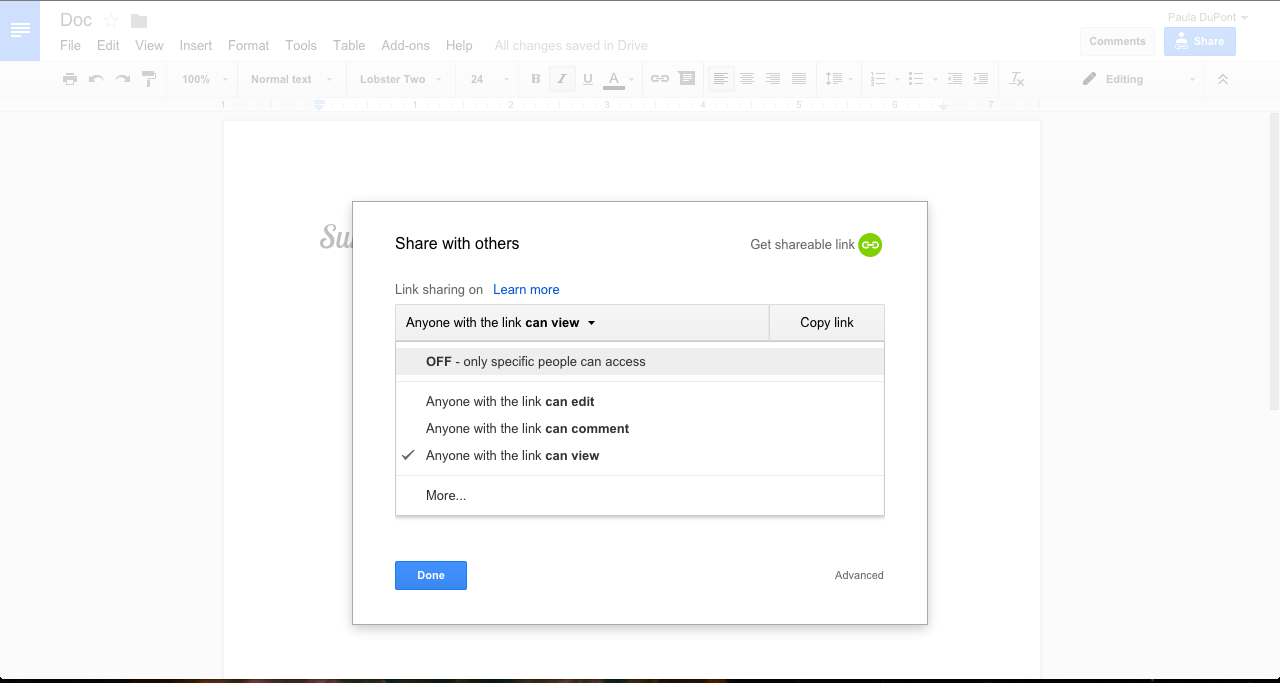
The Google Docs veterans out there are saying "well, duh," but the ability to share documents is one of the word processor's biggest assets. Though you may already be an old pro at sharing documents with colleagues and friends, public sharing can also be really useful if you’d like to embed a document on a website or just give anyone access.
7. Publish or Embed a Doc on the Web
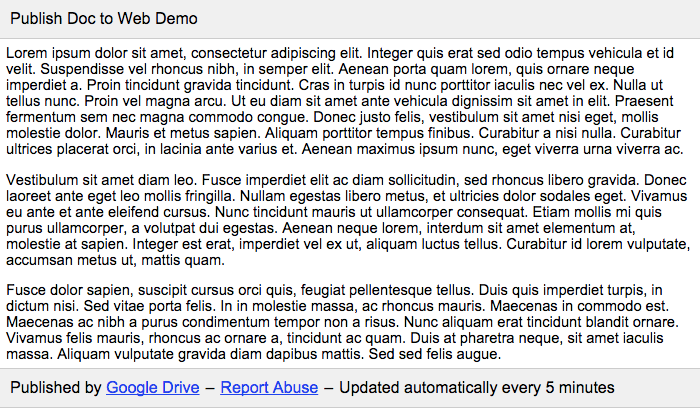
One Google Doc feature that's easy for veterans to even overlook, however, is the ability to either publish a document as a webpage or embed it within a page. To do so, visit "File" in the menu bar and select "Publish to the web…". From there you'll either retrieve a public URL, which displays only the body of your document, or an embed code, which also show only the document's body. If you update the doc, the page or embed is updated within 5 minutes, too.
8. Toggle Editing Permissions
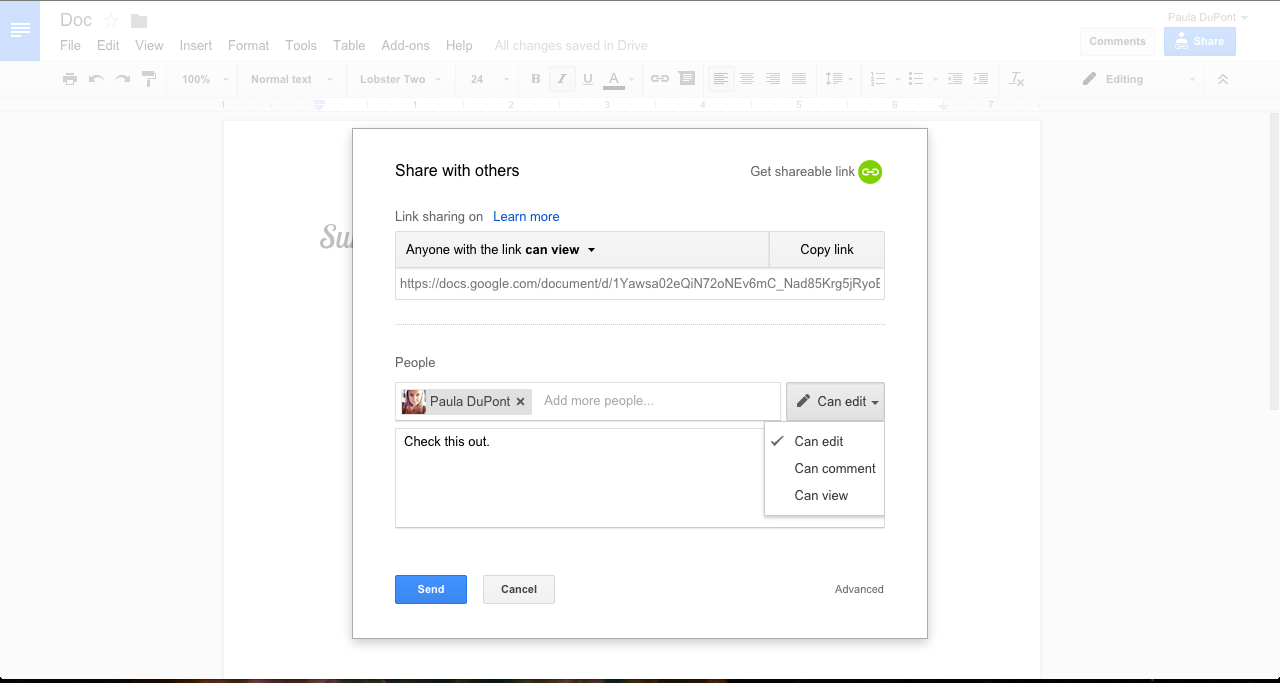
For works in progress, collaboration tools are where it’s at. Google Docs allows you to make a document visible to only a few people, and control how each person interacts with the document. To just share information internally, allow specific people to view your document and nothing more.
That’s not incredibly useful for feedback, though. For that you need the "Can edit" and "Can comment" permissions. To collaborate with another user, give them full access to edit the document, but if you’re just looking for some feedback, limit them to commenting only.
9. Utilize Comments and Notifications

Commenters can leave you notes on your work, tagged to specific locations in the document, but they can’t edit anything. You can respond to Google Docs comments to discuss changes, and mark a thread as "Resolved" once you’ve decided whether to make the changes suggested. A thread can be opened to further discussion at any time—even for "Resolved" comments—by clicking the "Comments" button in the upper right.
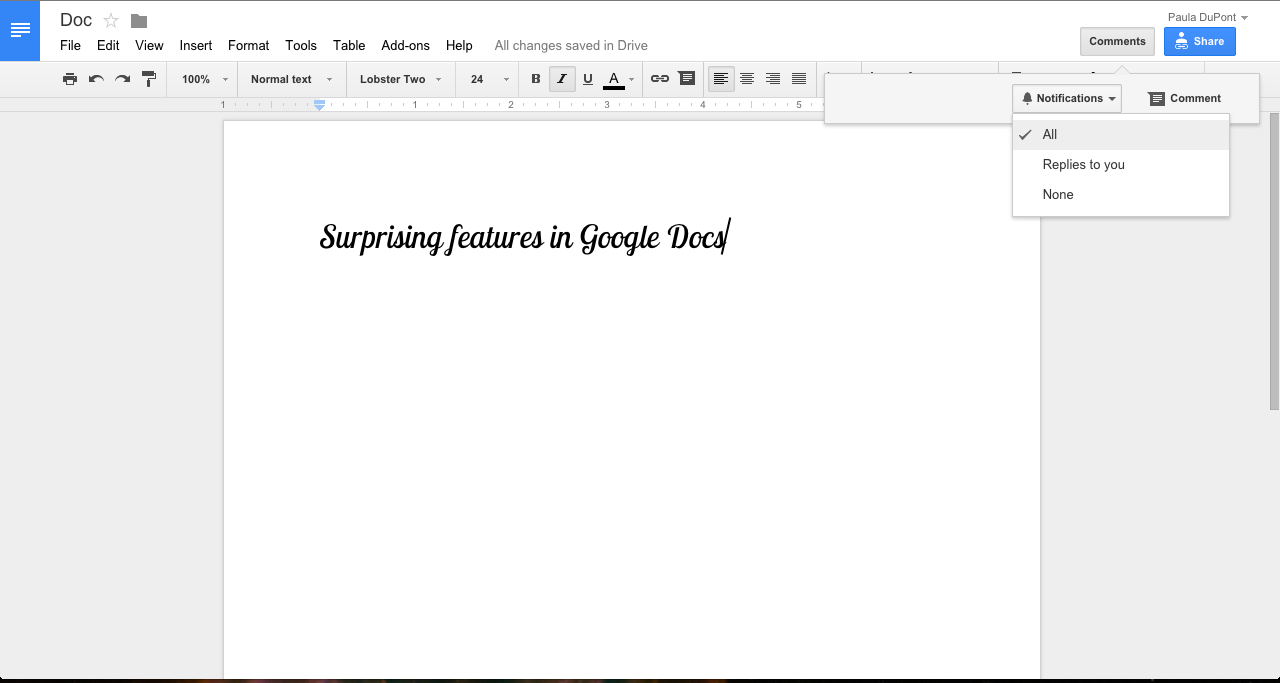
You can also keep track of comments by changing your notification settings: choose to be notified of all comments, only replies to your comments, or no comments.
10. Tag Individuals in Comments
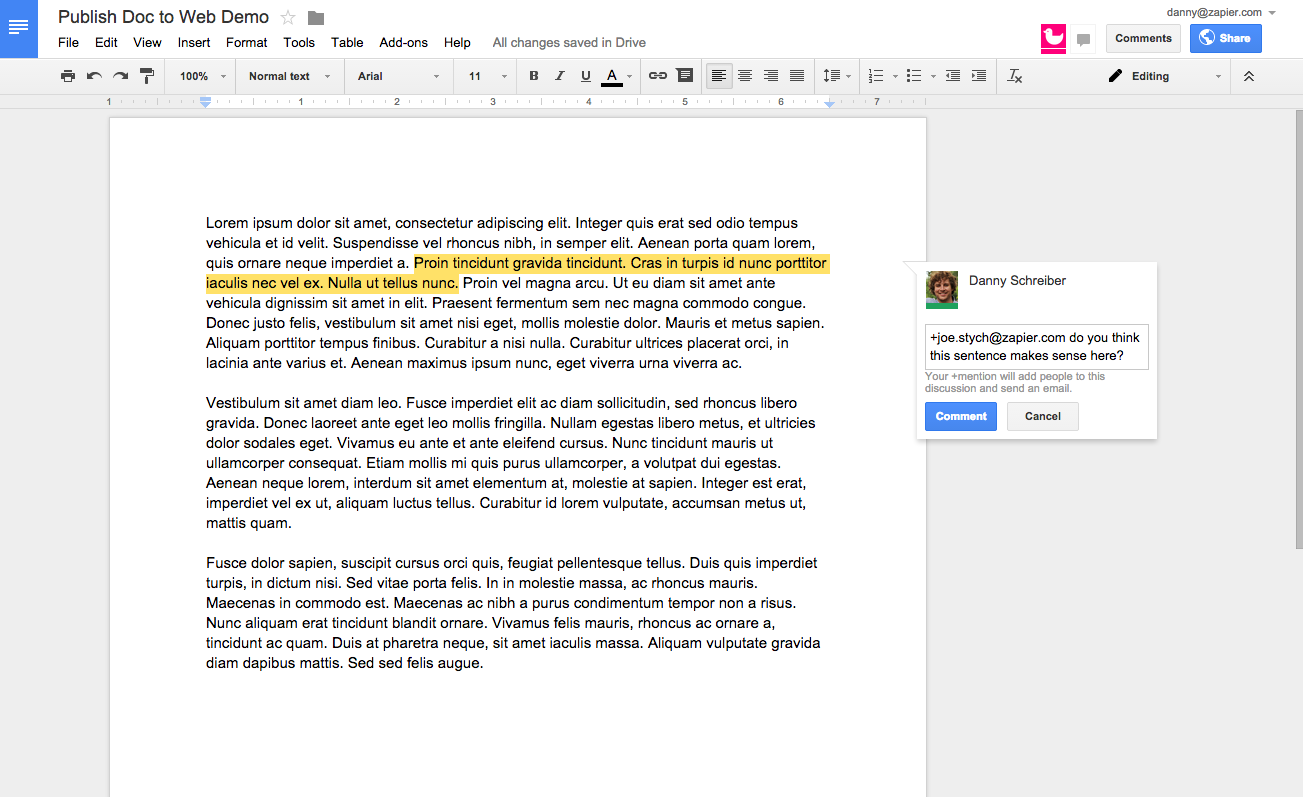
If you want to make sure you get someone's attention, tag them in your comment. It's simple: type an @ or + sign, then start typing the name of one of your co-workers. Google Docs will show you options based on your Gmail contacts, and notify the person you mentioned via email. If the person you mentioned doesn't have access to the doc, you'll be asked to choose permission levels for the user.
11. Email Collaborators
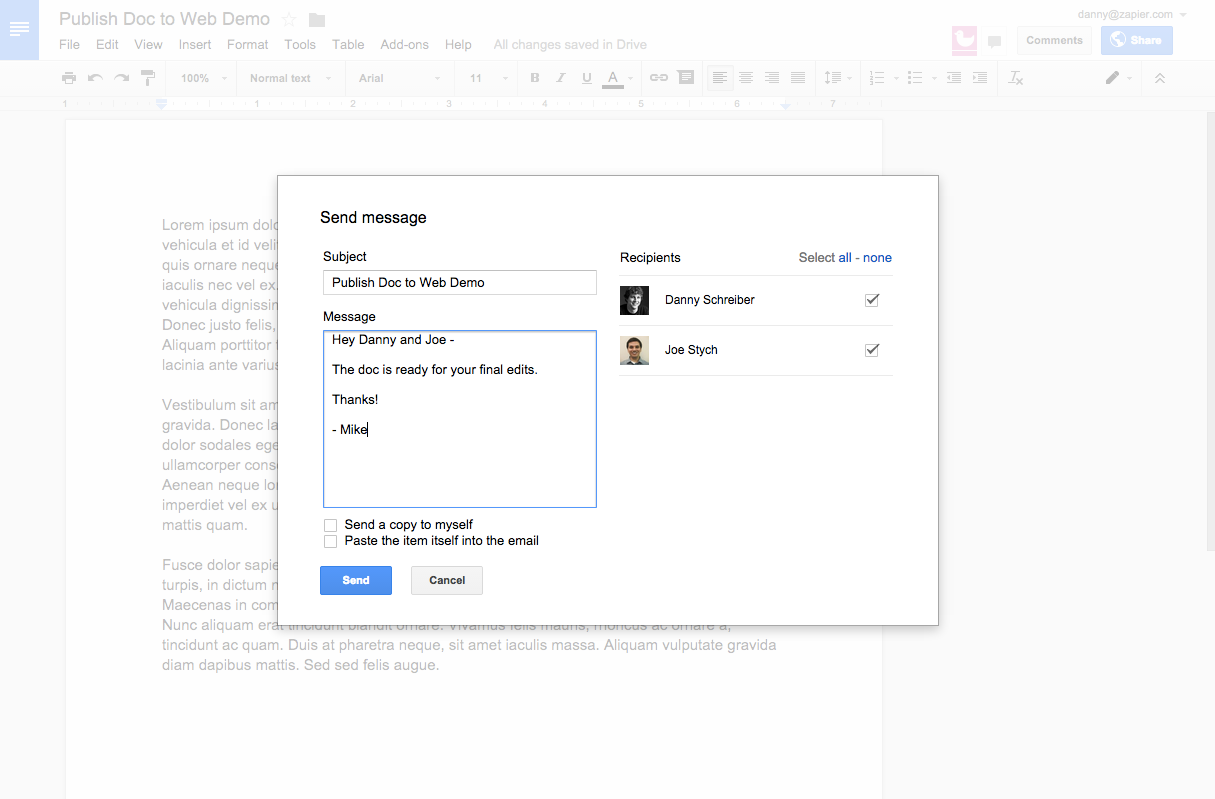
When you initially share a Google Doc, collaborators will receive an email, in which you have the option to compose a note. Beyond that initial email, however, the only email they'll receive going forward is either a notification when a suggestion they've made is acted upon or when they're tagged in a comment. If you'd like to email all collaborators, maybe to tell them you're ready for their final review of the doc, Google gives you that option—"Email collaborators…"—under "File" in the menu bar.
12. Email a Document
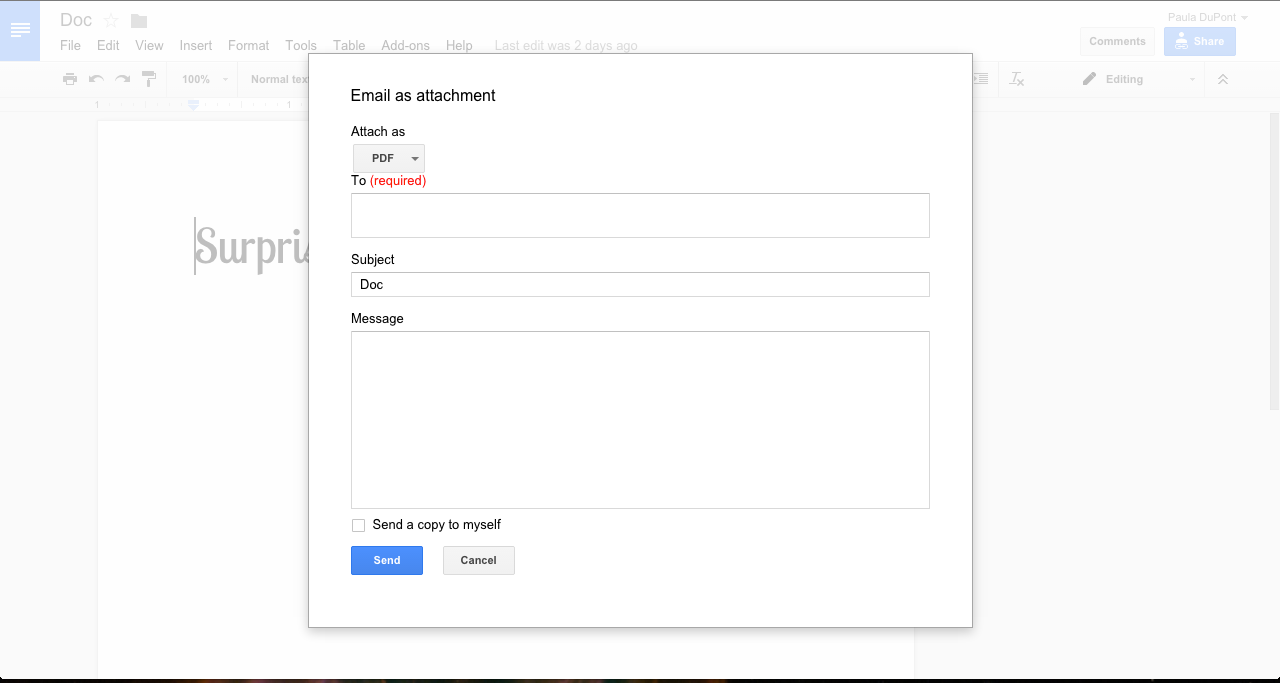
This might sound crazy, but not everyone has a Google account, or even a passing familiarity with Google Docs. Less experienced users might get bogged down in the functions of shared documents, but you may still wish to have their feedback or provide them with access to your completed document.
That’s where "Email as Attachment"—accessed under the "File" dropdown in the menu bar—comes in. Enter your contact’s email address, and add a message before sending. You can select a file type, including PDF, DOCX, and RTF, or just let Google Docs paste the document into the email.
13. Download a Document as a PDF, Word Doc and More
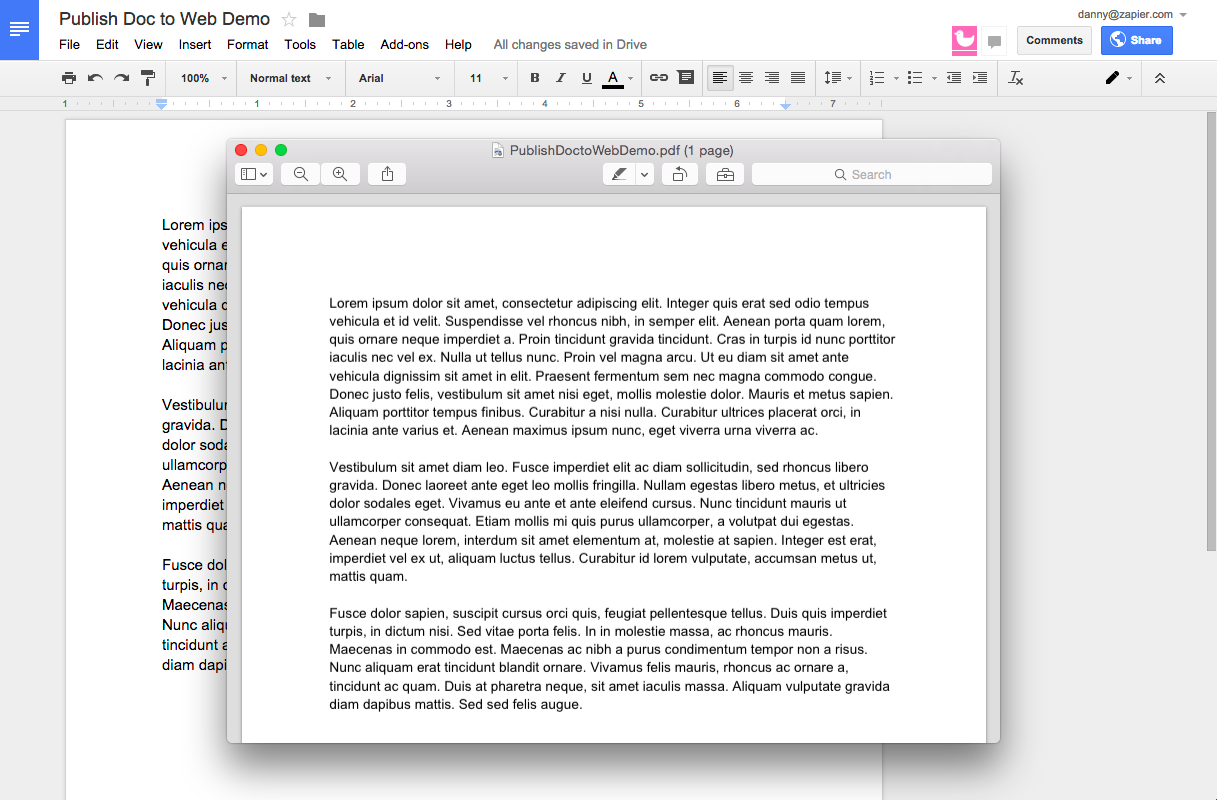
If you're creating a resume or writing an assignment in Google Docs, you'll want to send the recipient a finished copy rather than an editable document. To do so, download your Google Doc as a PDF. You'll find this option under "File" in the menu bar, where you'll select "Download as…". There you have the option to export the doc not only as a PDF but as five options: Microsoft Word (.docx), OpenDocument Format (.odt), Rich Text Format (.rtf), Plain Text (.txt) and Web Page (.html, zipped).
14. Change Viewing Mode to Review Final Draft
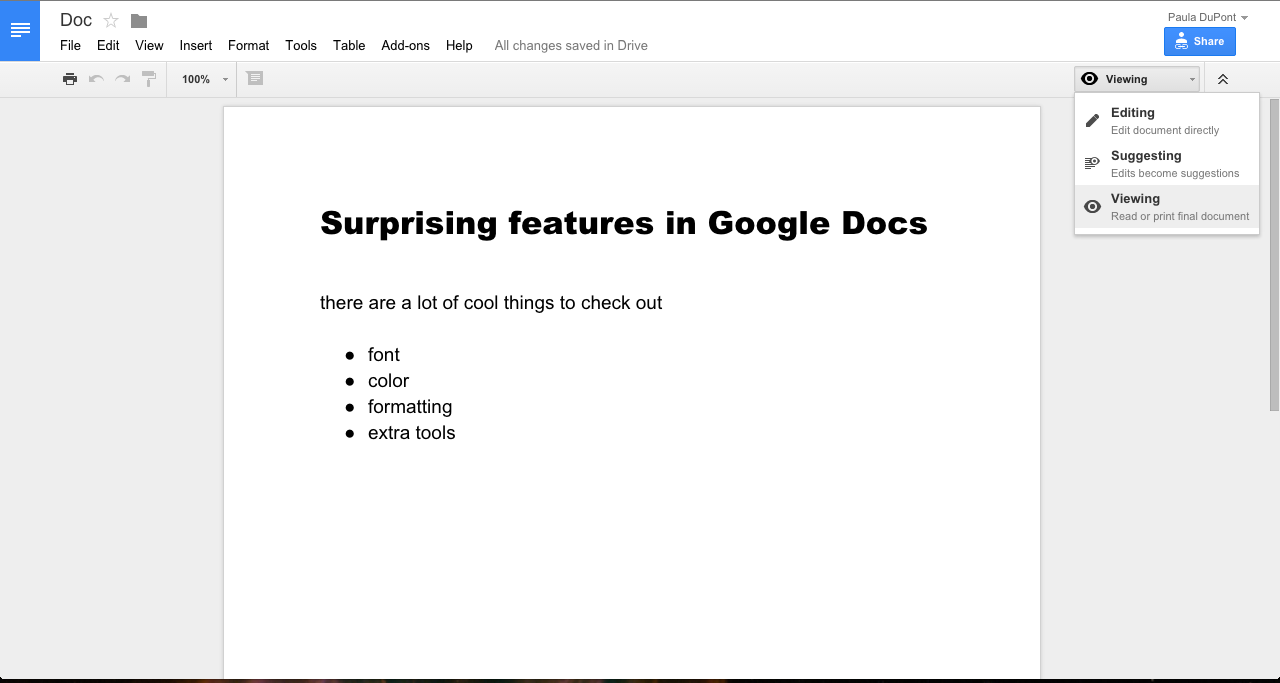
You can allow others to view your document without editing, but there are times you’d like to do the same. This will likely come at the last stage of the draft, after you’ve ironed out all of the errors. Choose "Viewing" from the toolbar dropdown in the upper right to read through your document without making any changes. No accidental keystrokes will inadvertently change your document, nor will cats running across your lap replace all of your hard work with random gibberish.
15. Track Edits with Suggestions
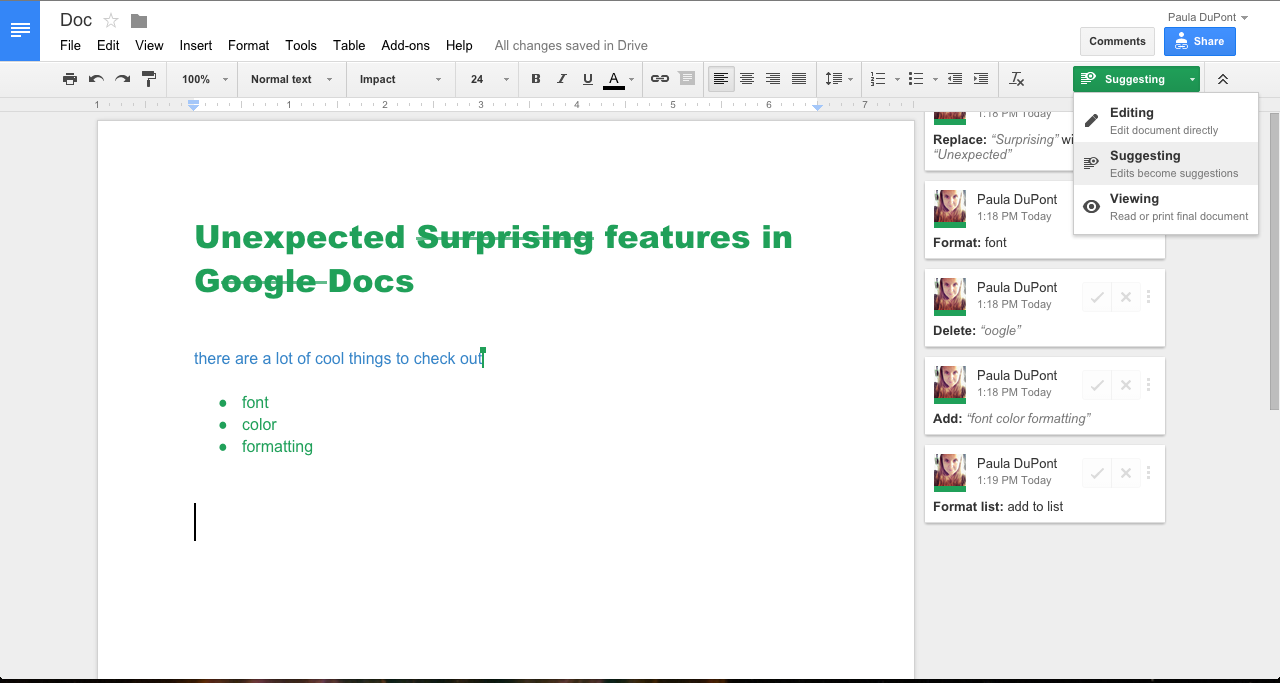
Rather than editing a document, try "Suggesting". Similar to Microsoft Office’s Track Changes, "Suggesting" allows you or a collaborator to edit a document without committing the changes. All suggestions are marked in a secondary color and tracked in the right sidebar. From there you can accept or reject the proposed changes. If you have any questions about changes made by a collaborator, return to the comment feature to discuss the changes before making them permanent.
16. Backtrack with Revision History
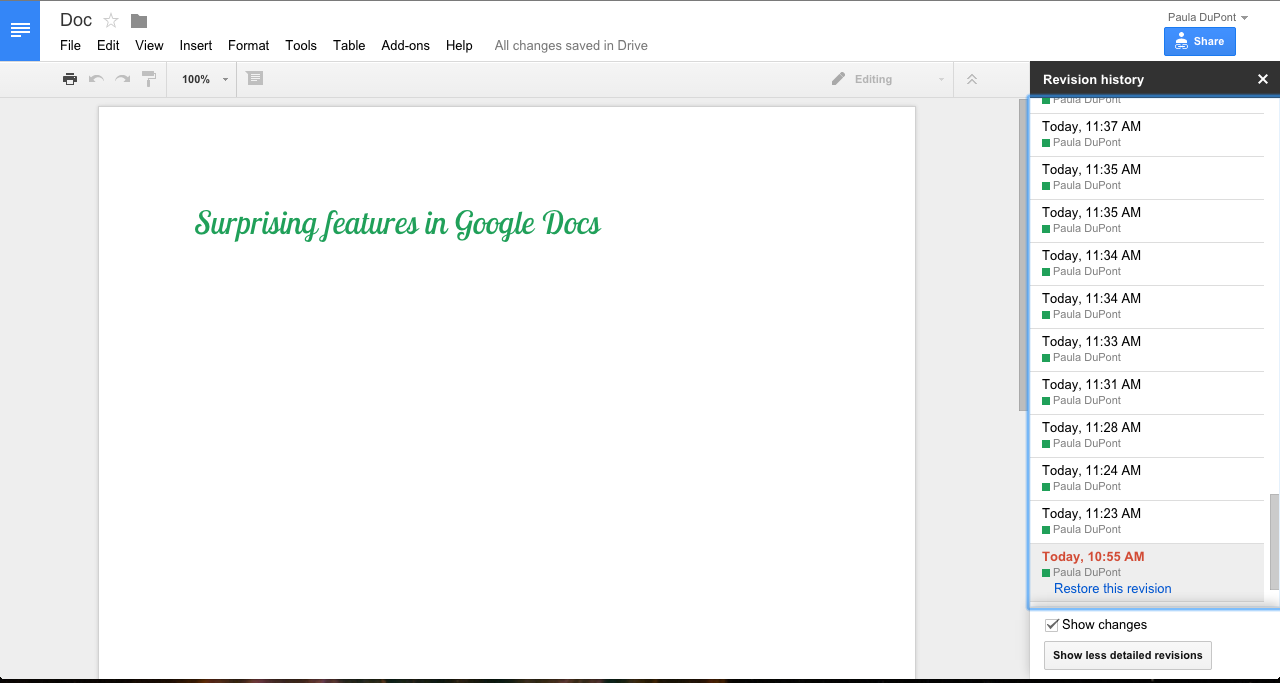
From the "File" menu, select "See Revision History" for a list of changes made in the document, all the way back to when it was first created. Unfortunately, the revisions list isn’t very descriptive, giving only the date and time of the revision and the name of the editor. With "Show Changes" selected, however, you can take a look at how the document was edited for each revision, allowing you to easily revert to or compare with a previous version if necessary.
Shortcuts and Tips to Speed Up Editing
17. Learn Keyboard Shortcuts

There are a ton of keyboard shortcuts in Google Docs to speed up editing. While the basics—like Control + I in Windows and Command + I in OS X to italicize text—are all included, there are a bunch of Google Docs-specific shortcuts designed to cut down on mouse clicks.
Google provides a list of all of its Docs shortcuts, accessible from the "Help" menu. Shortcuts are broken out by operating system (OS), so you won’t need to figure out the various keystrokes from Mac to PC to Chrome OS.
18. Access Menu Items with the "Search the Menus" Shortcut
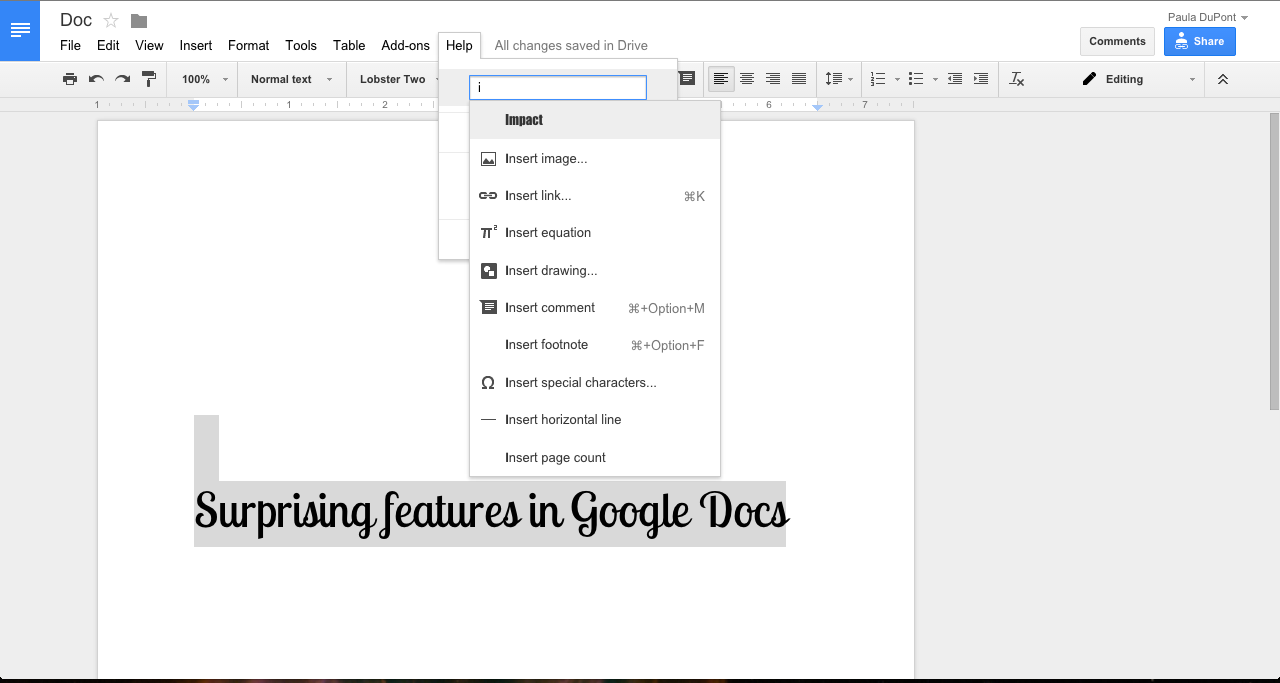
There really are a lot of shortcuts available in Google Docs, but this is one of my favorites. It's the "Search the Menus" shortcut, accessible via the Alt + / or Command + / keystrokes. This shortcut opens the "Help" dropdown and places the cursor in the search field. But you’re not going to search the FAQs: Instead, you can search all of the menus in Docs.
By typing in what you want to do, you can accomplish a lot without bothering with any of the actual menus. Quickly change fonts, apply paragraph formatting, insert special characters, run a spell check, and a lot more.
19. Quickly Add a Link
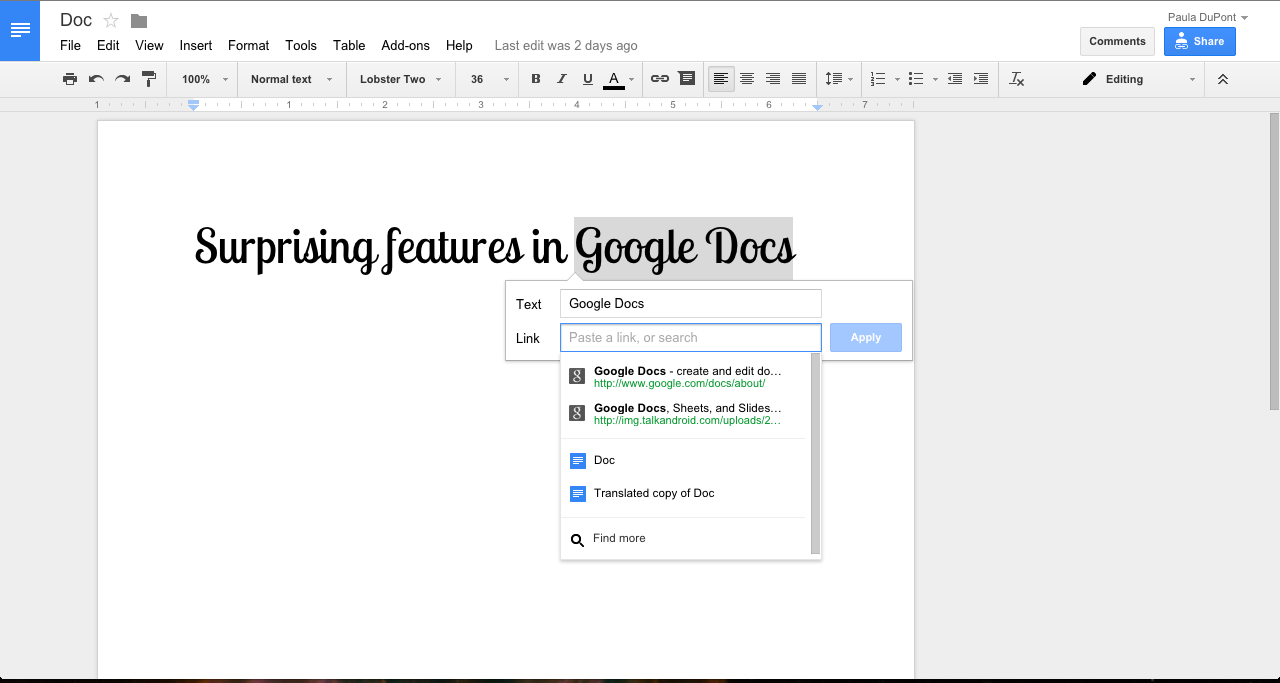
Any editor will let you link a string of text to a URL, but Google Docs makes it a bit easier to link to exactly the page you want. Of course, you can link text by selecting it and then clicking "Link" from "Tools" in the menu bar, but if you’re not sure of the URL you need, enter a search term into the "Insert Link" field. Google will do a quick search and provide you with the top results, including search results from your other documents.
20. Remove Unwanted Formatting
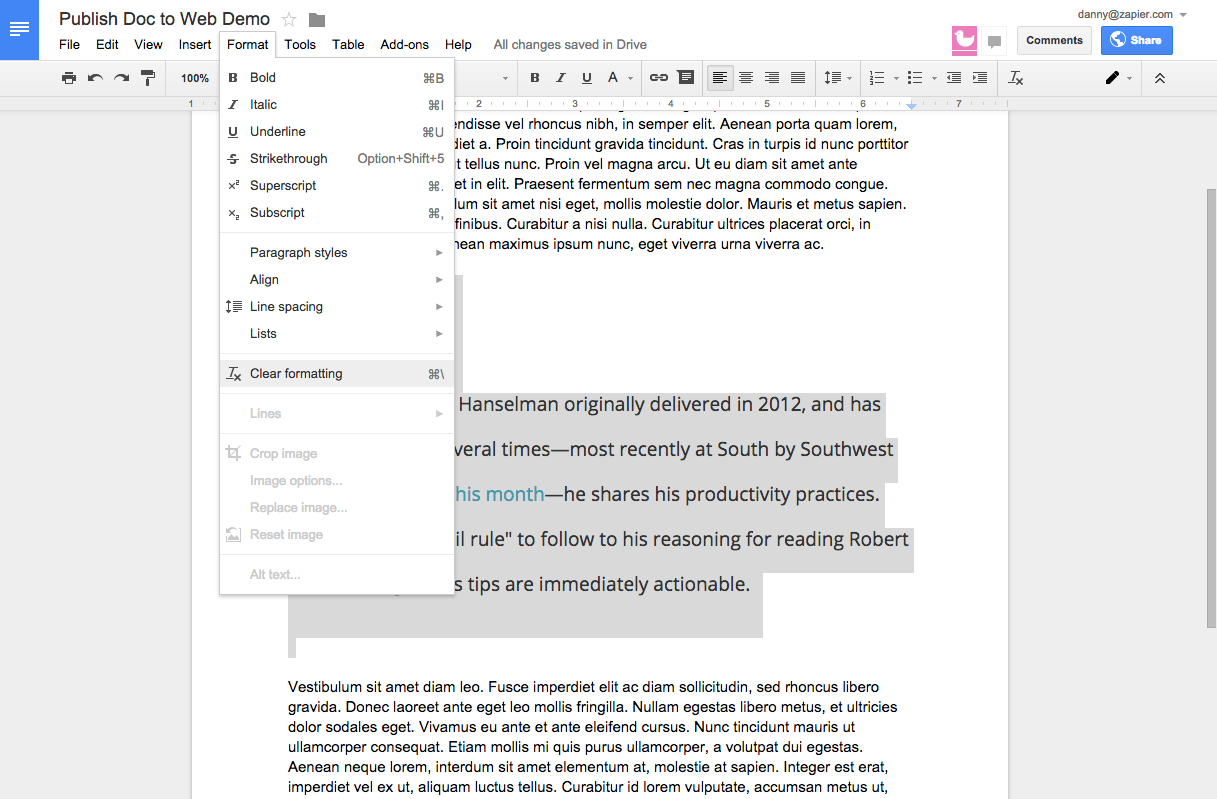
Ever find yourself accidentally pasting in text that's formatted in a foreign text? It's unruly to edit and doesn't look nice on your page. To quickly dismiss this nasty formatting, highlight the text, select "Format" in the menu bar and click "Clear formatting." You could also highlight the text and use the keyboard shortcut, Command + \.
21. Streamline Math Writing with Equation Shortcuts
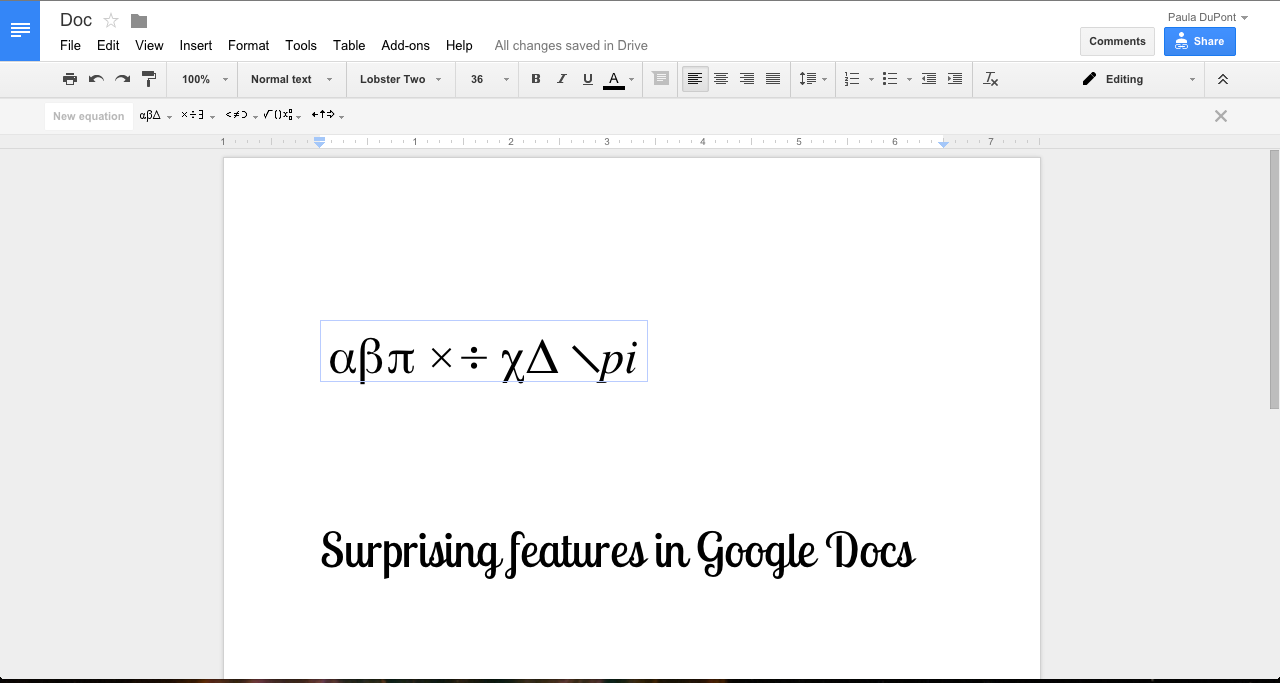
If you’re crunching numbers while you write, the Google Docs equation shortcut can be a time saver. They don’t rely on memorizing special keystrokes, so they’re easy to implement with very little effort. Select "Equation" from the "Insert" menu to place a new equation field in your document. From there, just type names of the symbols you wish to include, preceded by \. Greek letters, math operators, and relations symbols are all included, and you can get a full list of shortcuts from the Google Docs Keyboard Shortcuts list, accessible from the Help menu.
22. Create Your Own Shortcuts
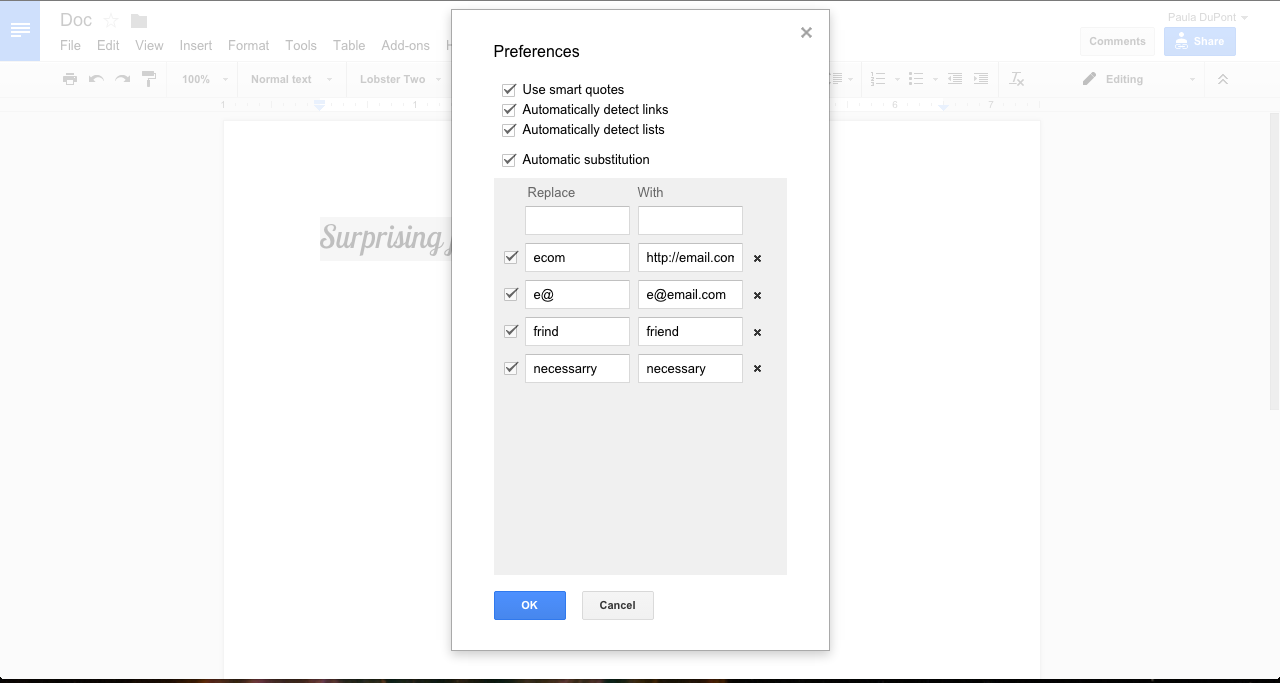
Google Docs allows you to create your own shortcuts with "Automatic Substitution" in "Preferences," found in the "Tools" dropdown. Use personal keyboard shortcuts to automatically fill in words or phrases you use repeatedly, mimicking popular text expansion applications. Another great use is to add frequently misspelled words, allowing Google Docs to autocorrect your errors without running a spell check.
23. Adjust Auto-Editing
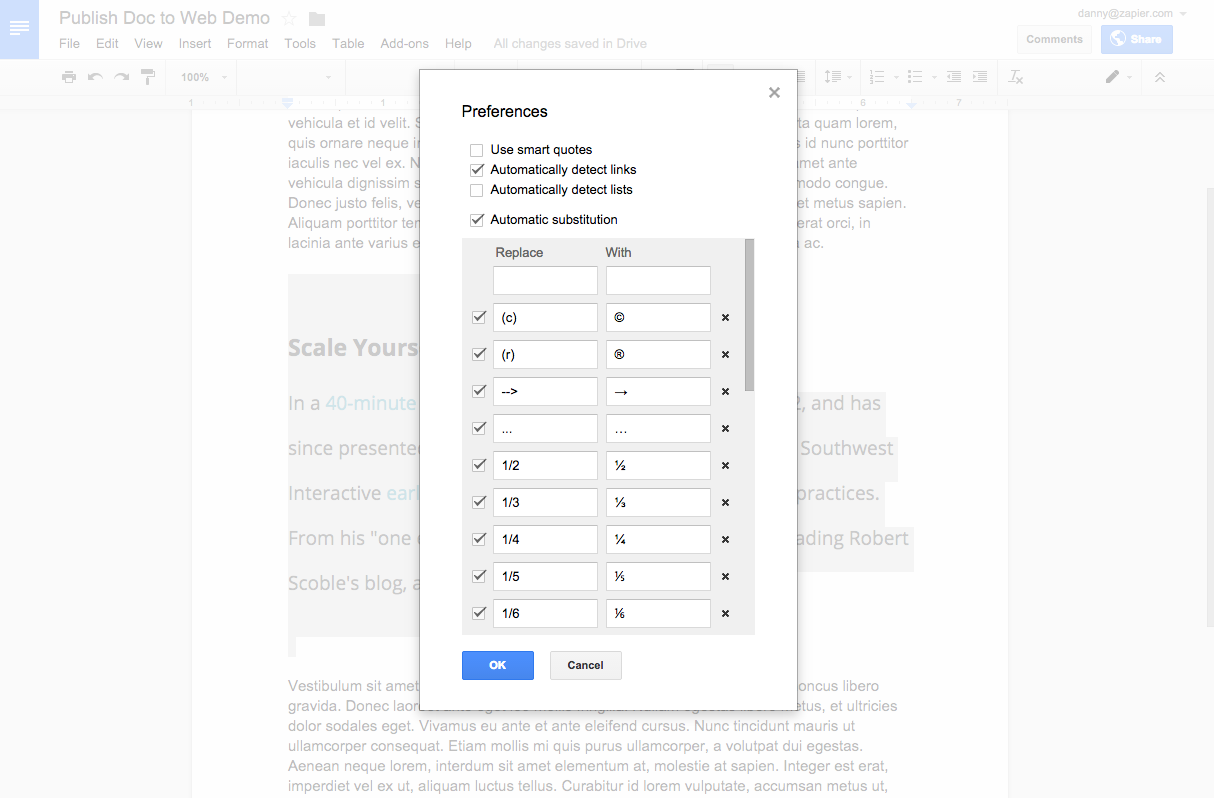
Also located in your "Preferences" options are three formatting features that are worth considering for your work. First, "Use smart quotes" gives you the option to employ the quotation marks that indicate the opening and closing of a statement rather than the vertical lines. "Automatically detect links" will instantly change https://zapier.com/ to https://zapier.com/. And "Automatically detect lists" will indent your text when you
create a
list
with hyphens.
24. Manage Your Personal Dictionary
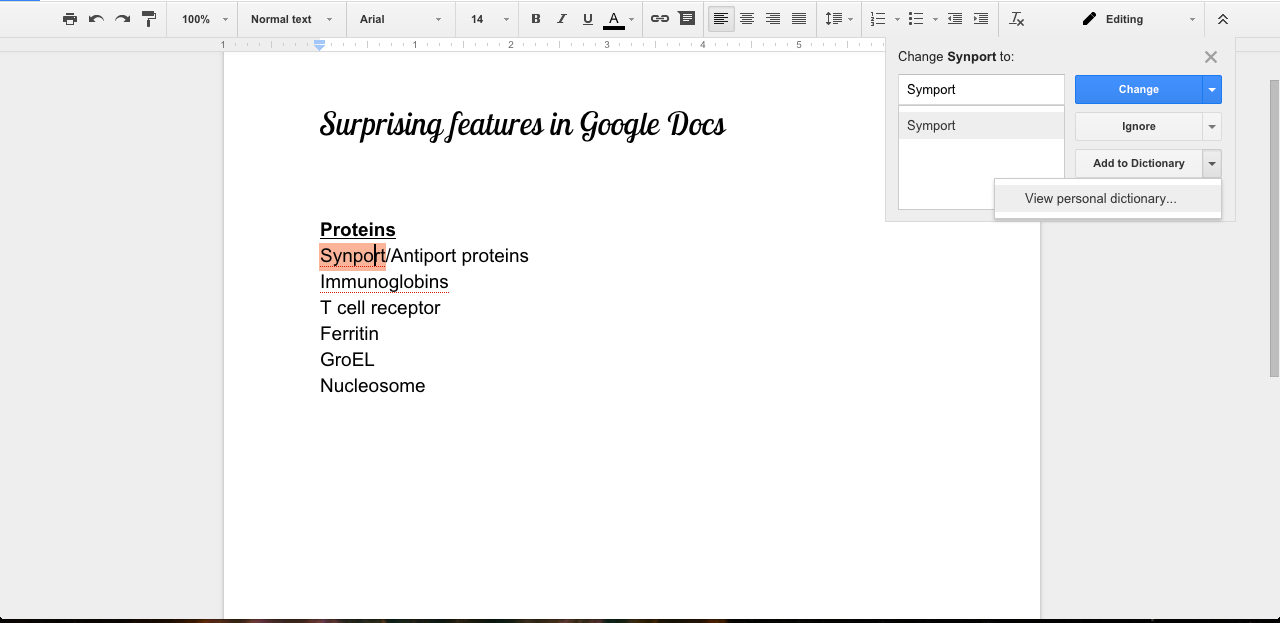
The "Personal Dictionary" is similar to "Automatic Substitution": it lets you bypass names or uncommon words to prevent Google Docs from questioning your spelling. You can add red-underlined words that Google has already flagged by secondary-clicking on the word and choosing "Add to Personal Dictionary," or open your "Personal Dictionary" from the "Tools" menu and add words manually.
25. Use Compact Mode
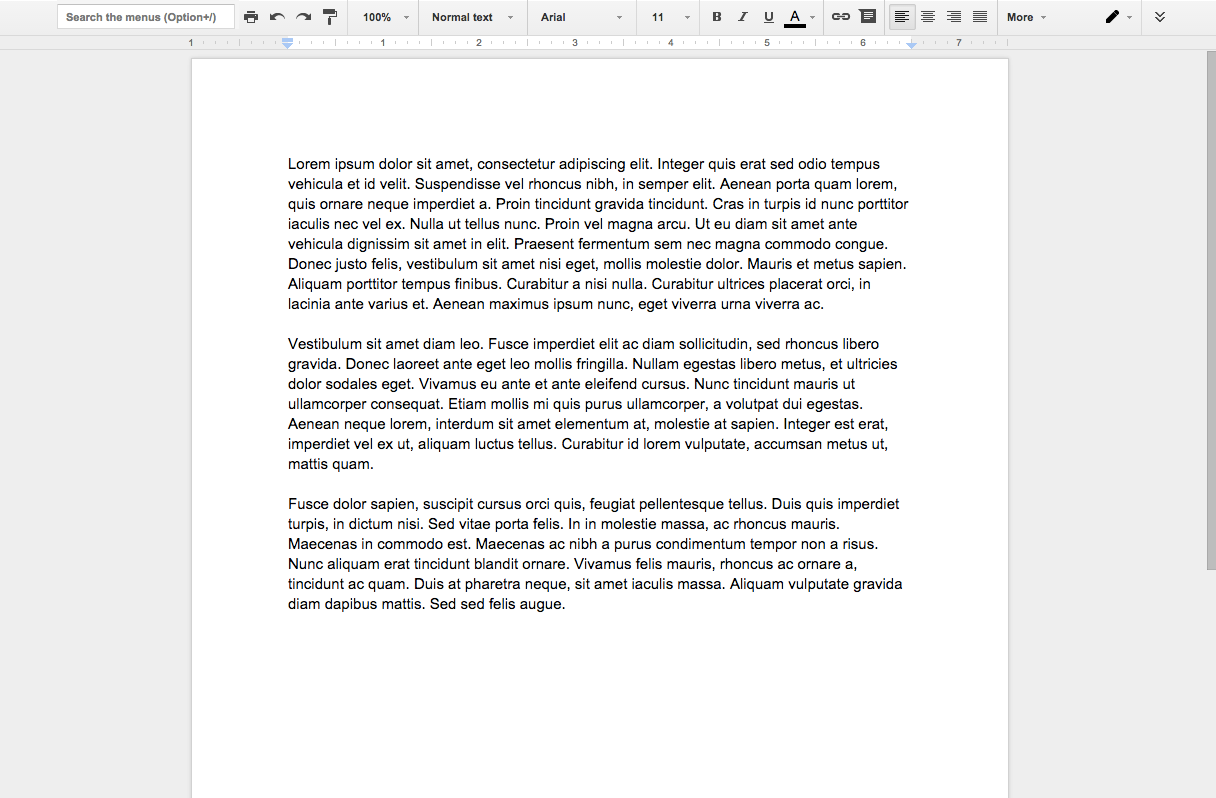
If you're working on a small screen, this next tip might be your favorite: select "View" from the menu bar and click "Compact controls." Notice the difference? It's slight, but it is a bit more room and less distraction—the doc title and menu bar are now hidden. To bring them back, either the hit the double arrows in the upper right corner or key Control + Shift + F.
26. Adjust Page Setup
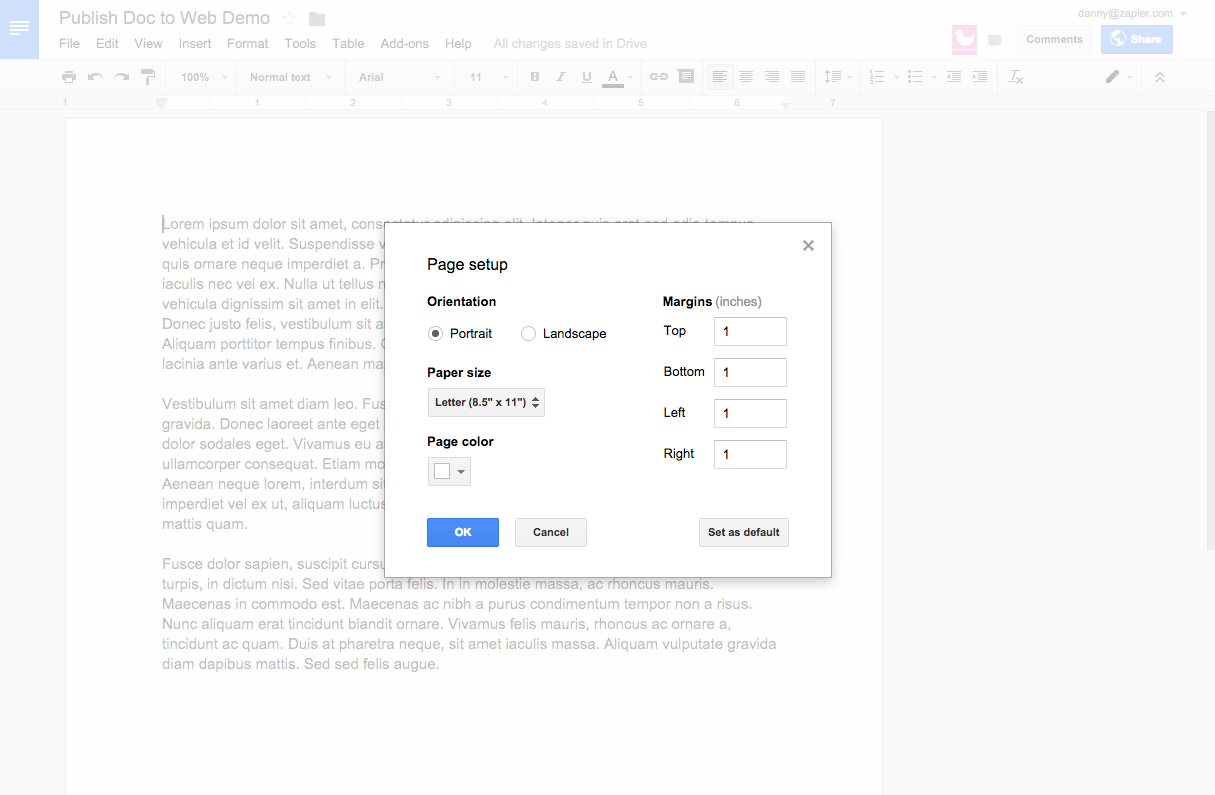
Need your document in landscape orientation? How about a blue background? Wide margins? Google Docs' "Page Setup" option under "File" in the menu bar will let you manage these options plus change your page size.
27. Dig in with Apps Script
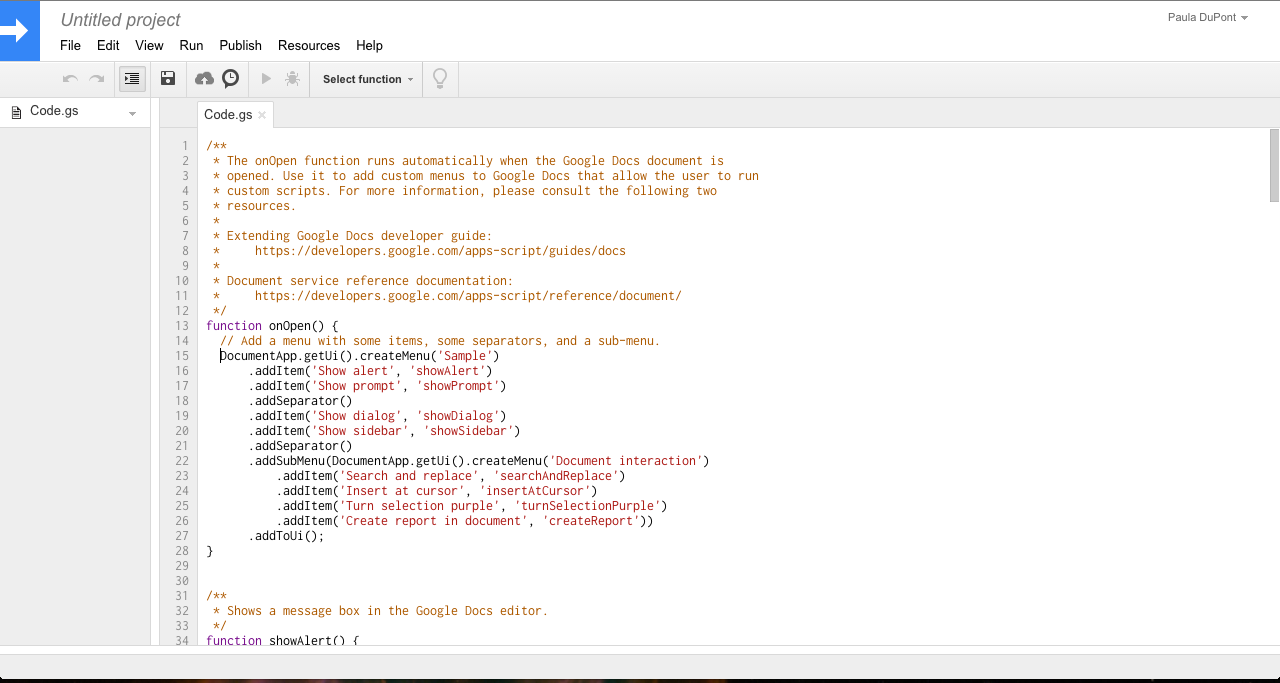
A big plus for people who like hands-on ways to improve their workflow is Google Apps Script. Scripts can create and modify documents, streamlining how you interact with your document, or they can customize the Google Docs user interface, placing the tools most important to you in easy reach.
Google suggests you should have some familiarity with Javascript before digging into Apps Script, and suggests some free courses that will work for beginners. If you’re already comfortable with Javascript, though, Google offers a guide for making the most of Docs with scripts.
Writing Tools for Scholars
28. Get Definitions and Synonyms
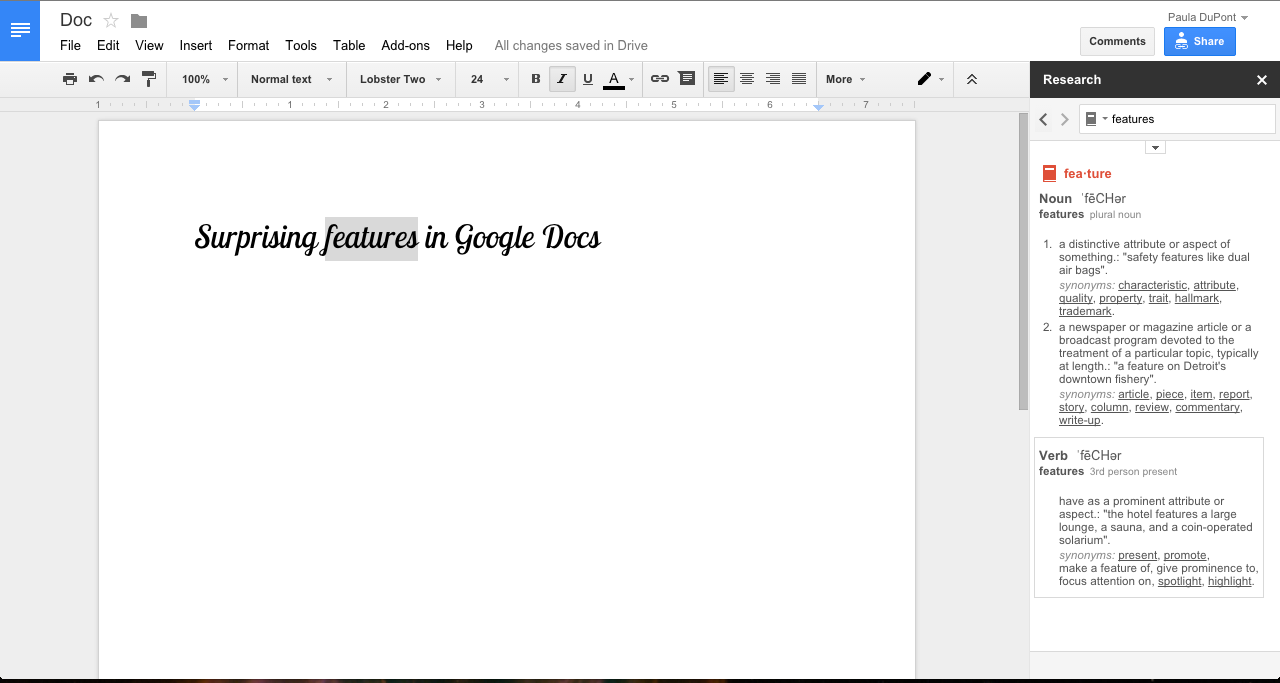
We’ve already discussed the "Research" tool and how to use it to find and insert images into your document. But it can also help you find definitions, synonyms and antonyms using the "Dictionary" search. While each word’s dictionary entry is pretty small, the "Dictionary" search can save you the trouble of leaving your document to search another site, a real productivity killer.
29. Cite Scholarly Articles
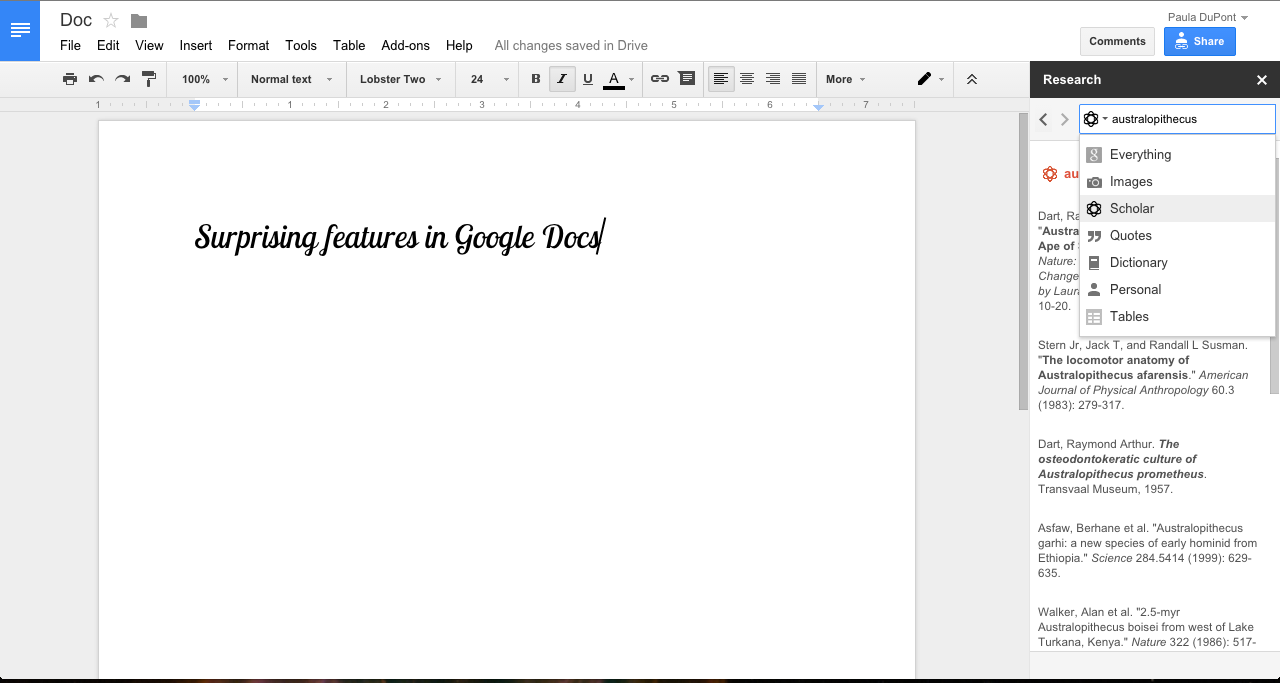
The "Scholar" search in the "Research" sidebar can provide you with sources for your research paper or assignment. The results are truncated, but Google Docs will provide you with some of the most cited works on a given topic or keyword.
Select a result to read the source document and see how many people have already cited it in Google Docs. If you decided to use the source in your document, the "Research" sidebar will automatically add a citation in your preferred format, either as a footnote or as an inline citation.
30. Find Famous Quotes
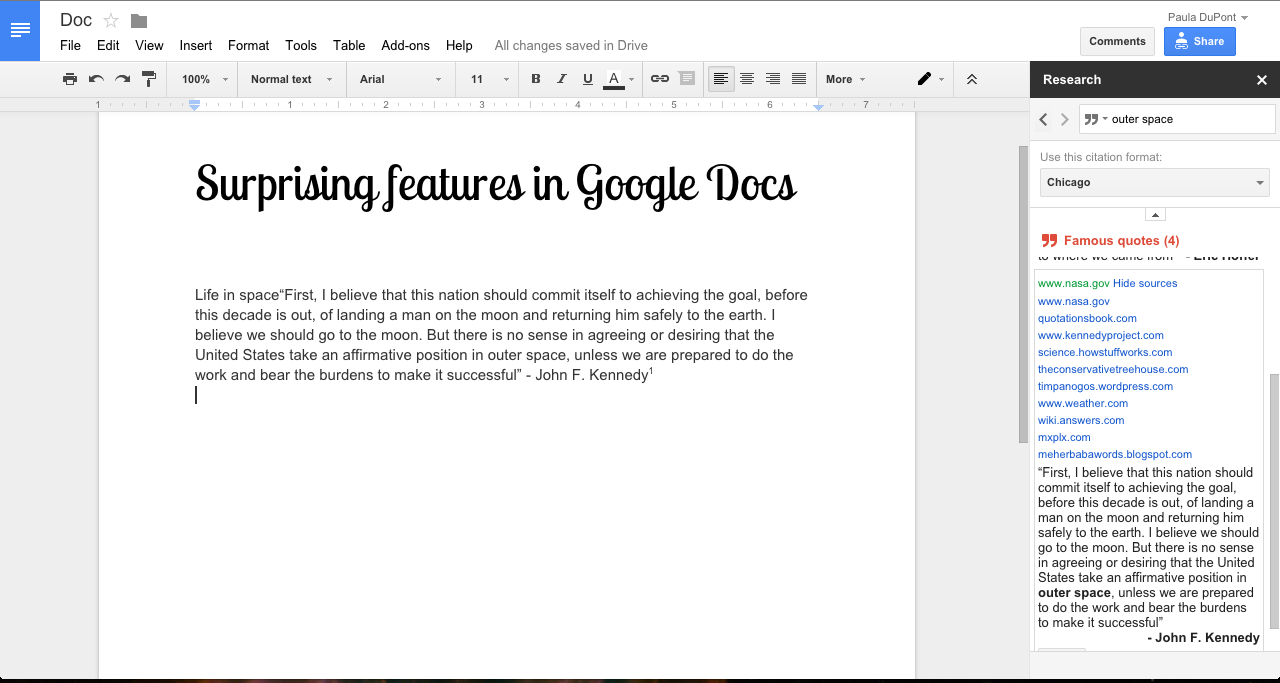
Well-placed quotes can be a big help in driving your argument home, but general quotation searches can be unreliable. The "Quotes" search in the research sidebar will provide fewer but higher quality quotes results, and you can examine the sources for each quote to determine its reliability.
If you choose to include a quote in your document, select Insert from the Research sidebar. Again, Google Docs will automatically include a citation in your preferred format, this time linking back to the quote site in a footnote.
31. Add Footnote Citations
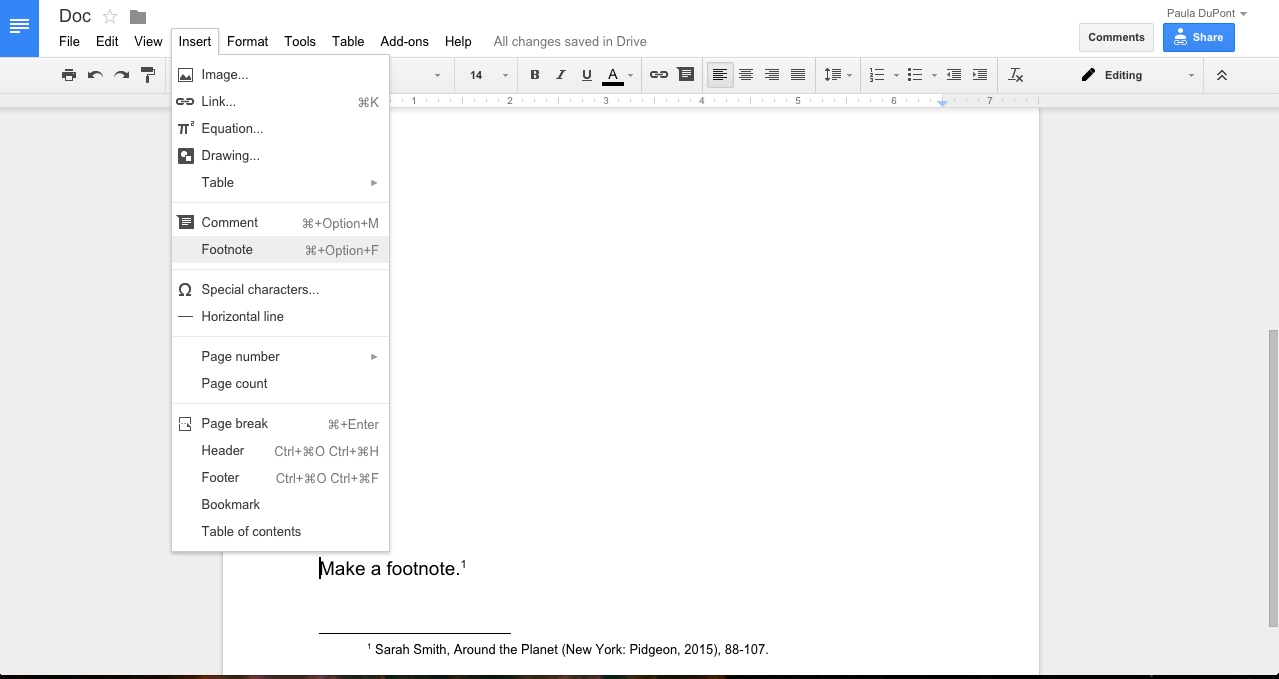
It’s likely most of your sources are going to come from books and articles you’ve found elsewhere. In that case, you’ll need to create your own citations. That’s where the "Footnote" insertion tool comes in: Google Docs won’t automatically generate your footnote citation the way it will when you add a source from the "Research" sidebar, but it does place a superscript number in your text that coordinates to an empty citation in the footer.
Tip: Along with your footnotes, your page footers can now include unique text—or no text—on the first page, and you can choose how you want page numbering to appear, both from the Insert menu.
32. Create a Table of Contents
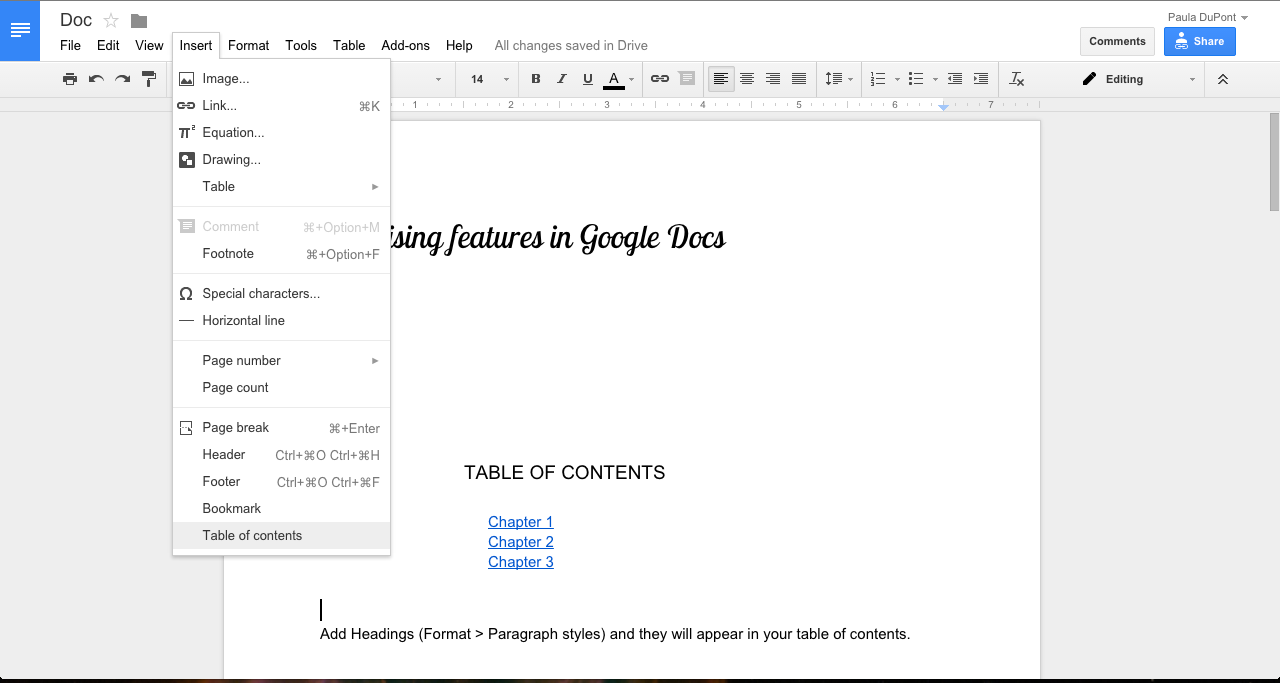
Tables of contents aren't just for textbooks, and creating one can be a real slog. Luckily, Google Docs will automatically create a table of contents for your document from the "Insert" menu.
Add "Headings" to your document chapters or sections with the "Paragraph Styles" dropdown, and Docs will add them to the table of contents. If your readers are viewing your document on the internet, the table of contents will be linked to the various document sections.
33. Translate Your Whole Document
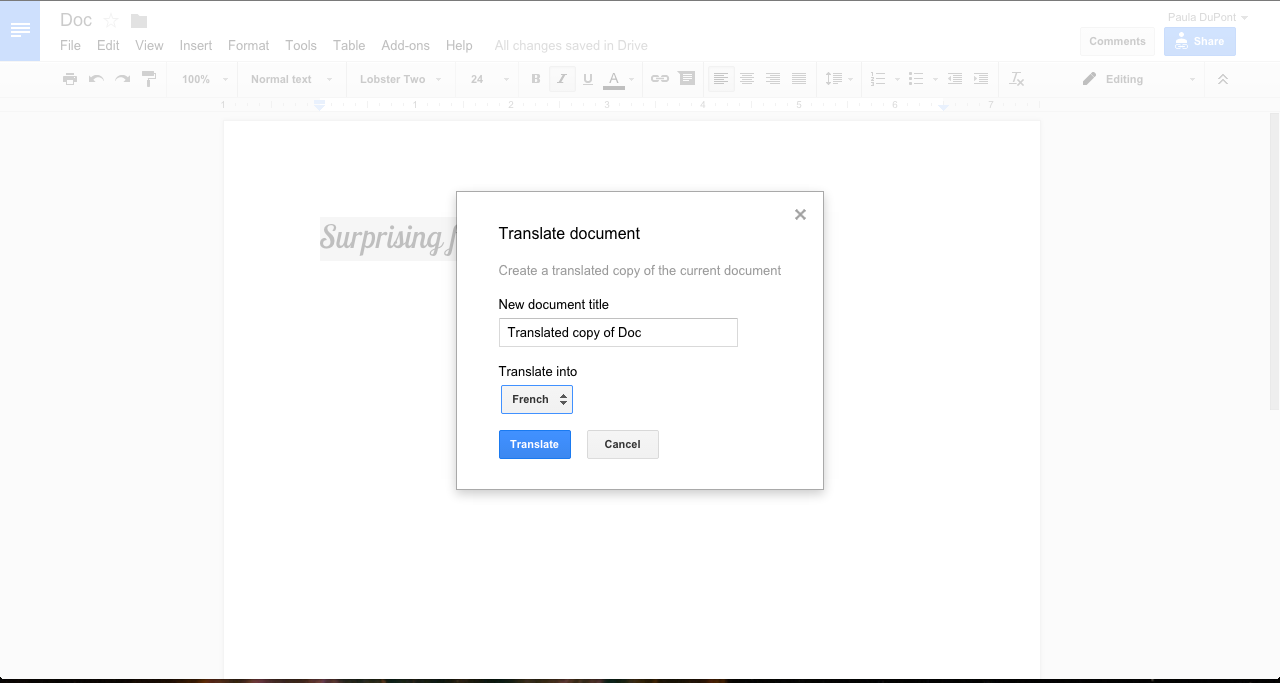
Google Docs will translate your document into dozens of different languages from the Tools menu. Google’s translations aren't perfect, so don't rely solely on Docs for translations, but it will be useful if you’re reading a document in another language and need some help. Translate Document creates a new, translated version of the original document, so it’s not great for inline translations. Fortunately, there’s an add-on for that.
Get More with Add-ons and Integrations
34. Translate a Single Word or Phrase
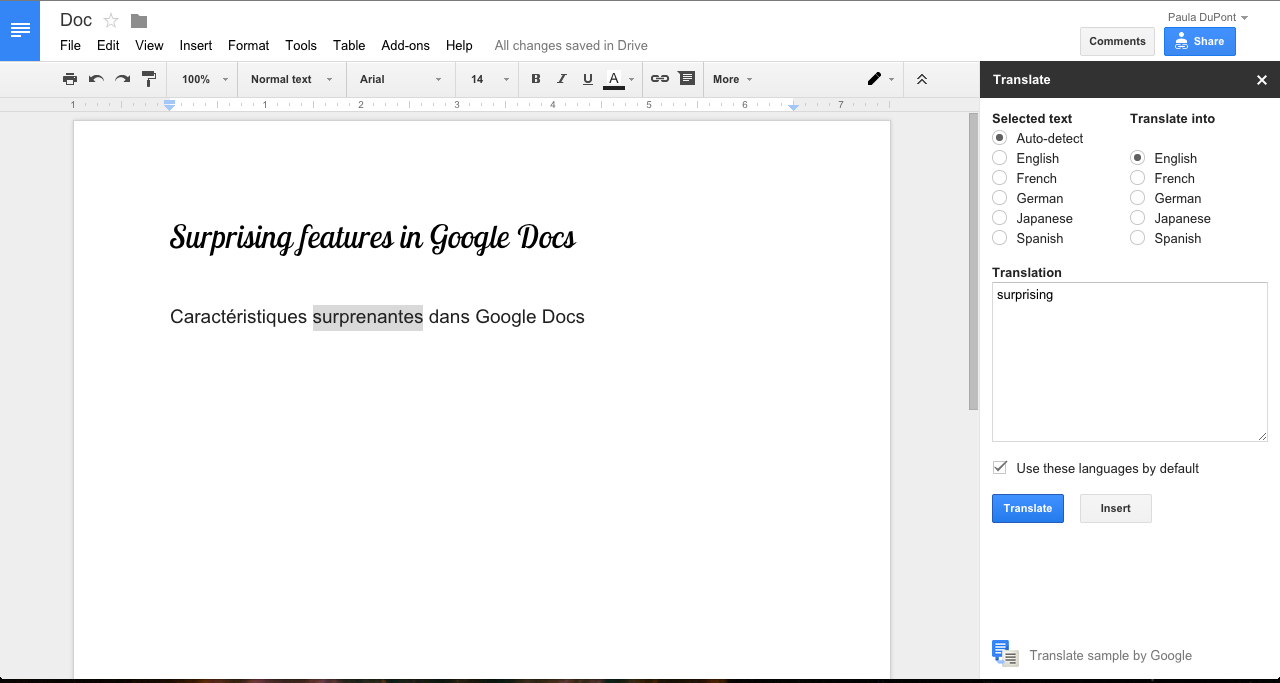
The Translate add-on, found in the Google Docs add-ons store, will translate just a word or phrase rather than the full document.
Unfortunately, the translation add-on is limited to five languages, so if you need to translate to Italian, Korean, Finnish, or nearly any other language, your best bet is going to be the built-in document translation.
35. Browse the Add-ons Store
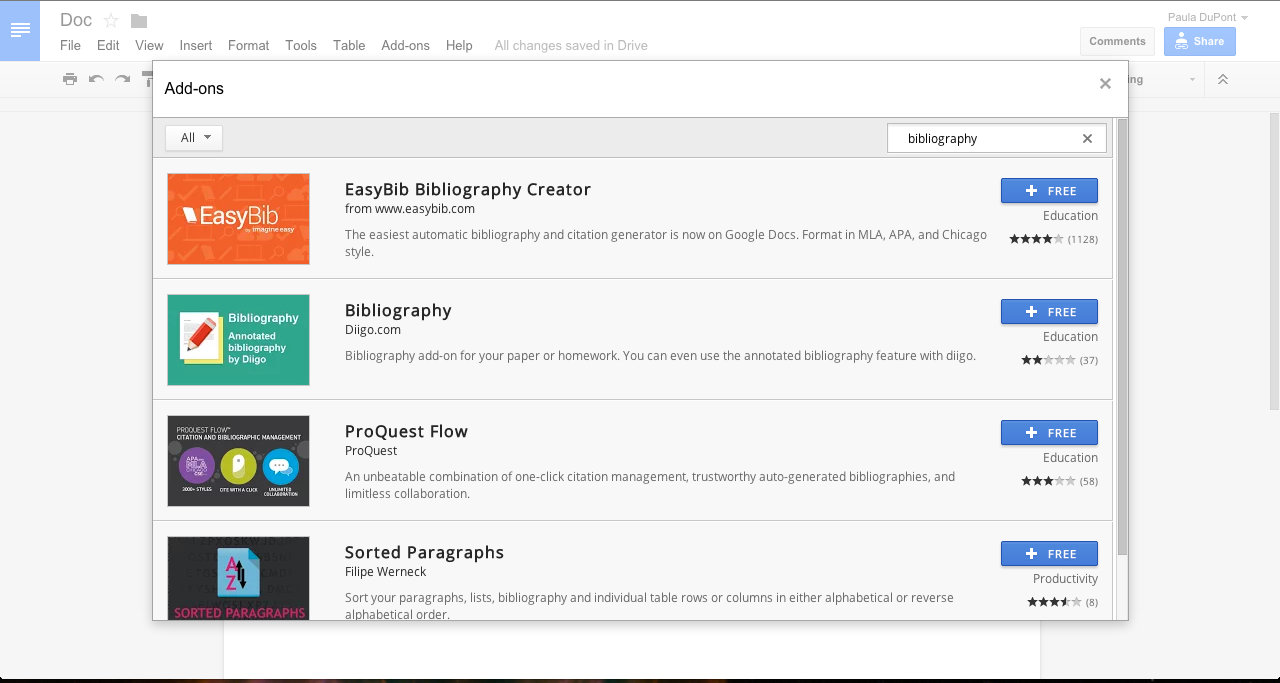
Select "Get Add-ons" in the "Add-ons" menu to navigate to the Google Docs Add-ons store. Some of the most popular add-ons will be listed on the front page, but you can also browse by categories like Education, Business Tools, and Productivity. If you don’t see what you want, try a keyword search.
Once you’ve installed an add-on, you can access it from the "Add-ons" menu. It’s worth noting, though, that most add-ons come from third-party developers and, while some add-ons are great productivity boosters, some may not work as advertised.
36. Edit Microsoft Office Documents
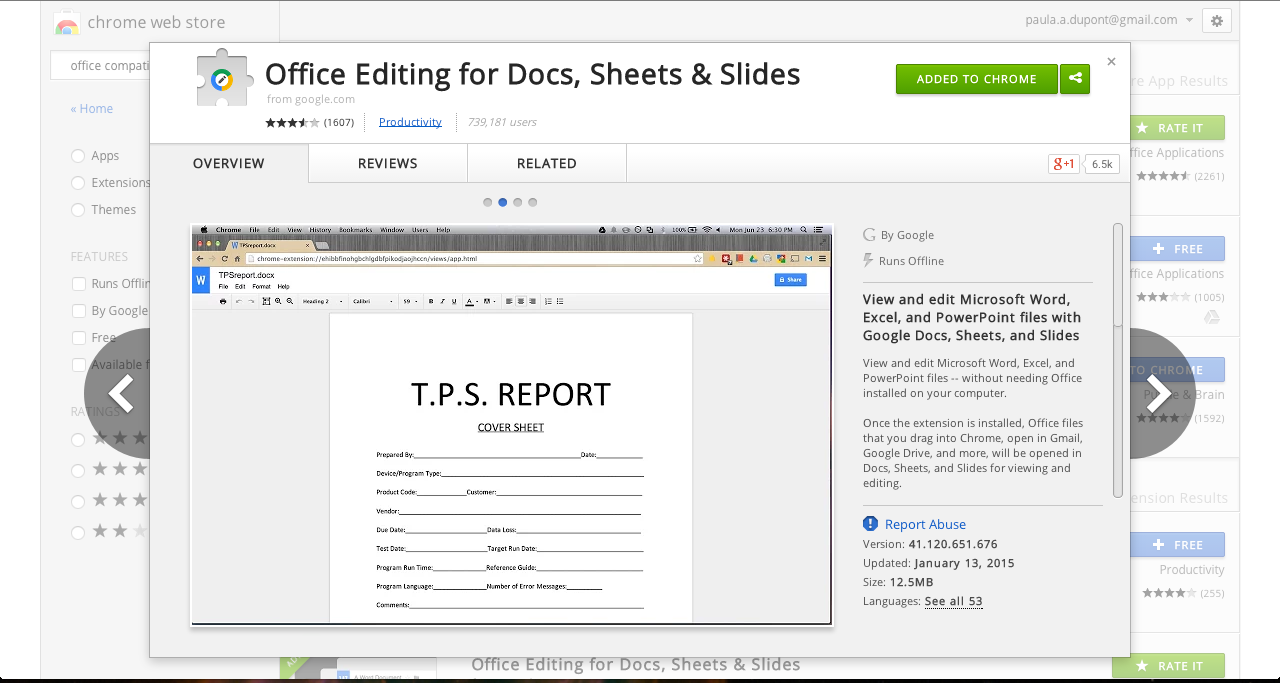
One of the most useful add-ons is Office Editing by Google. It’s actually a Google Chrome extension, so you’ll be restricted to the Chrome browser, but it integrates seamlessly with Google Docs to handle Microsoft Office files. Without the add-on, you can view Office files in Google Docs, but you can’t edit them.
Editing functions are limited while in Office Compatibility Mode, but at least you get some access to your DOCX files without relying on Microsoft Office. If you need the full functionality of Google Docs, you can save a copy of your original file in a compatible format.
37. Automatically Save Email Attachments as Google Docs Files
Google Docs is all about streamlining the writing process. A big part of that is having your documents available anywhere, consolidating them in one place rather than keeping out-of-date copies in your email inbox, on a USB drive, and wherever else.
Using Zapier, an app integration tool, you can automatically copy any email attachment that hits your inbox to Google Drive, allowing you to edit it at any time in Google Docs.
38. Spruce up Your Documents with Templates
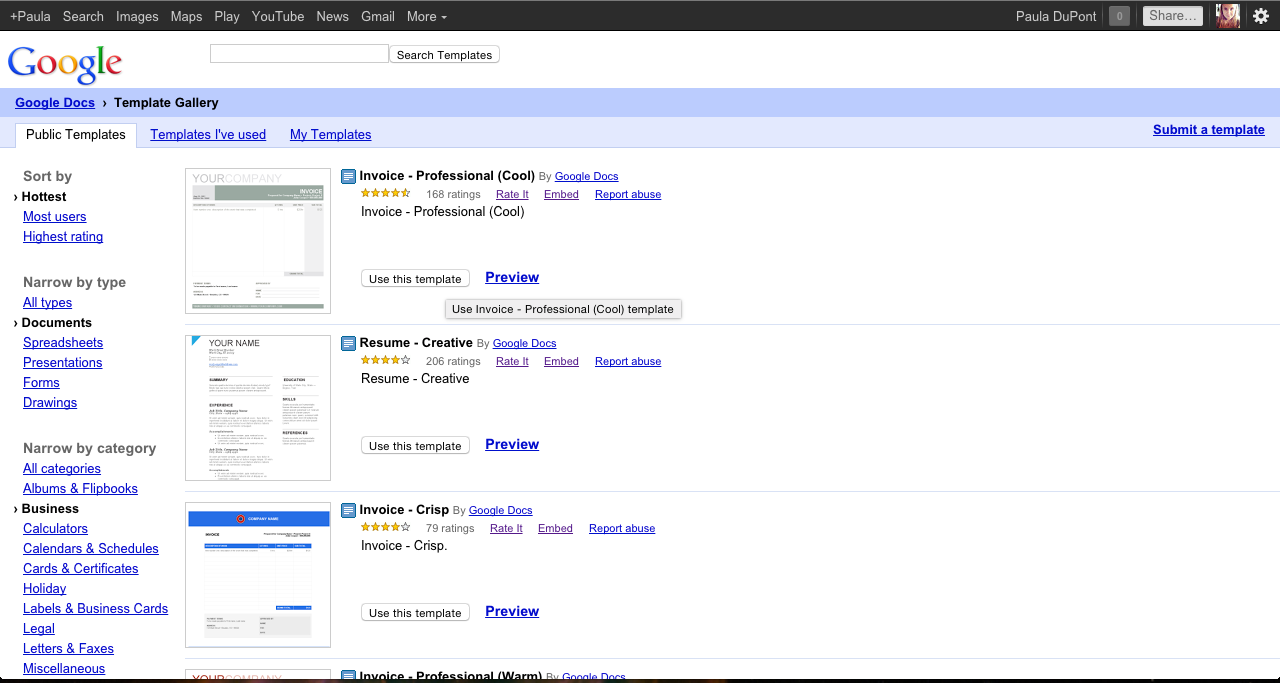
One of the most underutilized features of Google Docs is the Template Gallery. There are hundreds of well-formatted templates to choose from, and each template will open as a new file in Google Docs. While the Template Gallery seems to tip heavily towards invoice and resume templates, there’s a large range of templates in a variety of categories.
39. Get More Fonts
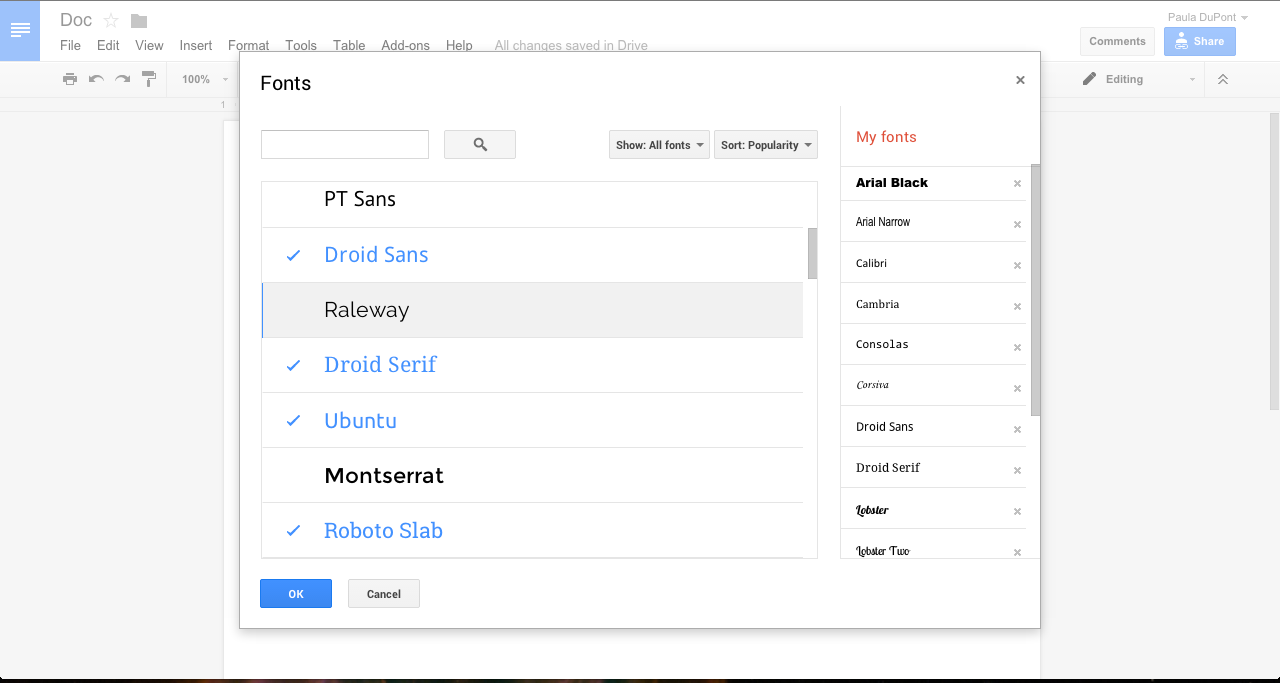
You may already be familiar with the open source web fonts provided by Google Fonts. Now, every one of those open source fonts is available in Google Docs.
From the "Font" drop down, click "More Fonts." Browse fonts by type—such as serif, sans serif, and handwriting fonts—and sort alphabetically or by popularity. Add a font by selecting it from the fonts list, and remove a font from your personal stash by clicking the "X" next to its name in the list on the right. All fonts added here will appear in the "Font" drop down and can be used in your document like any other font.
40. Write In (Just About) Any Language
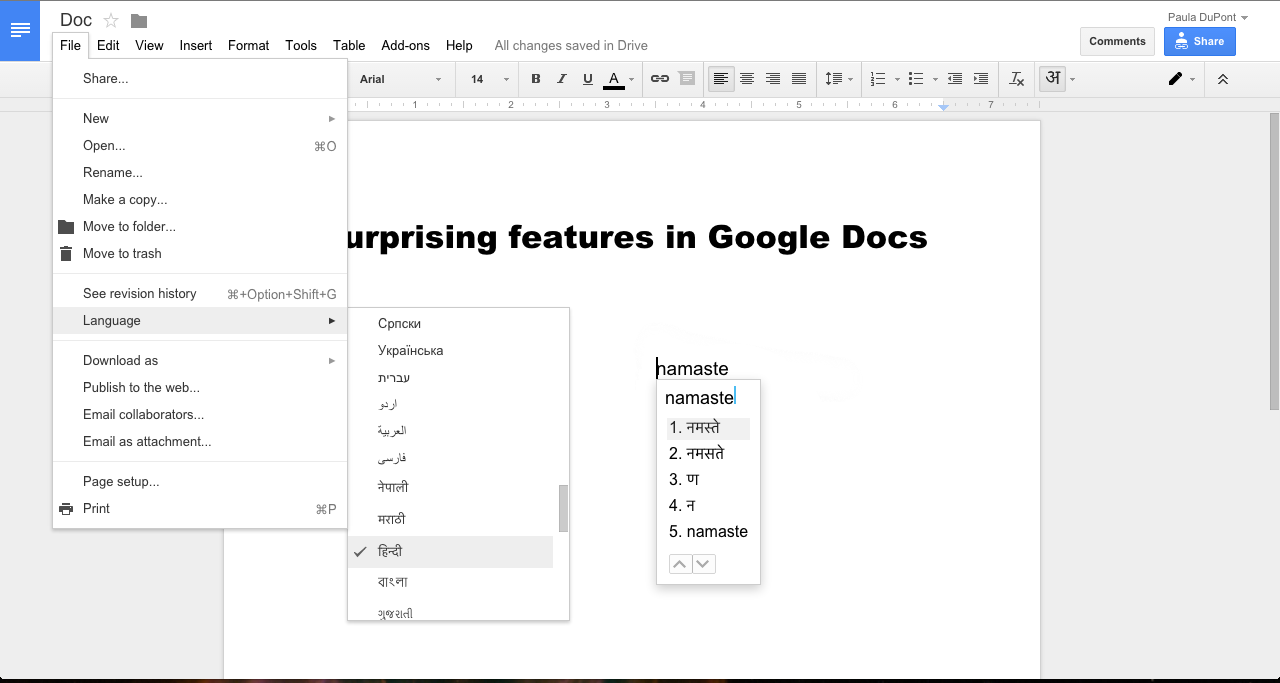
Google Docs isn't handcuffed to the English language. To change the default language for your document, select Language in the File menu. Sure, you’ll see lots of languages that use the same alphabet as English, but there are also lots of others that would be almost impossible to work with without a special keyboard.
41. Automatically Import or Export Docs
Maybe you rely on Google Docs, but prefer another cloud-storage app like Dropbox, Box, or Onedrive for your files. No worries, you can still do your word processing in Google Docs even if you're uncommitted to Google Drive.
Using app integration service Zapier again, you can start automatically sending files from one cloud-storage service to another. For example, take Dropbox and Google Drive: create a Zapier integration to automatically copy new Dropbox files to Drive or utilize an integration that copies Drive files to Dropbox. When setting these up, you can select specific folders in your cloud storage provider, too, and use multiple Zapier integrations to keep the two services in sync.
42. Take Advantage of Offline Editing
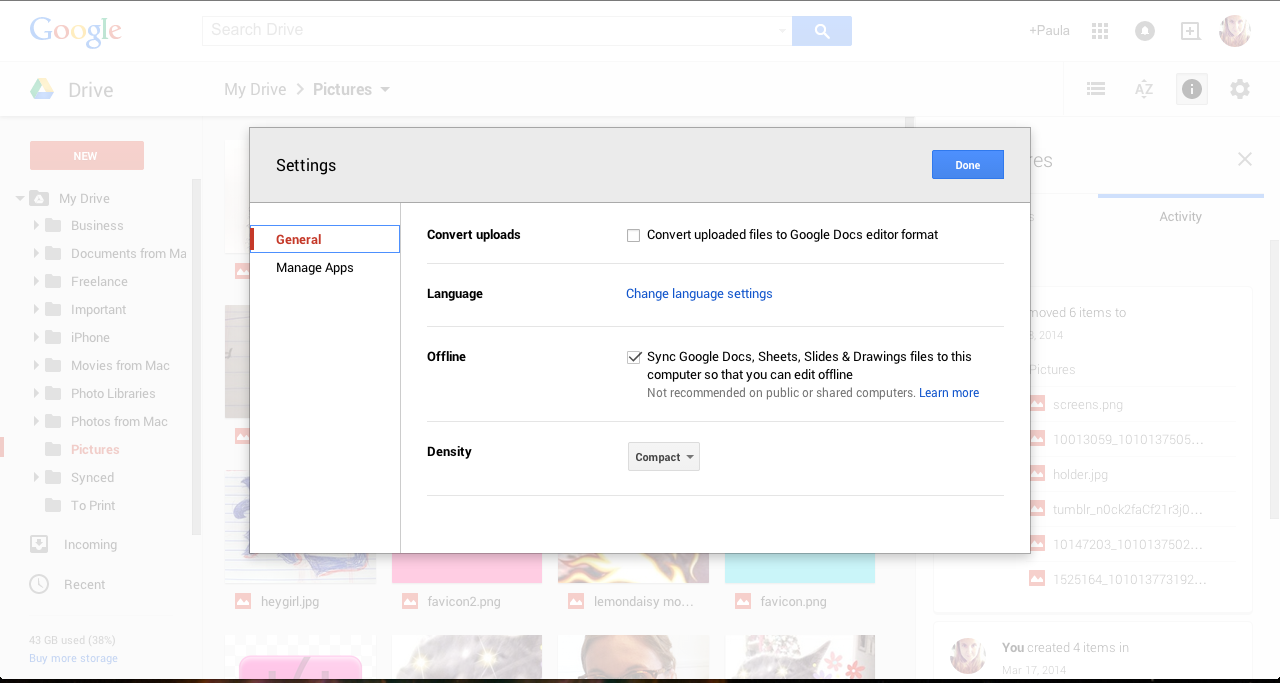
Offline Editing allows you to save a copy of your document on your device to edit while you aren't connected to the internet, and your document will sync when you’re back online. Offline editing may be old-hat for some users, but it’s a pretty big deal if you don’t have a 24/7 internet connection.
You’ll need to use Chrome to make offline access work, and it’s best to only use one Google account per Chrome profile. In the Chrome menu, sign in to your Google account. Offline access will automatically be turned on the next time you visit Google Docs.
Bonus: Learn More About Google Sheets with Zapier's Free Book
Need to crunch numbers and manage data alongside your documents? Google Docs companion spreadsheet tool, Google Sheets, is the tool for you. It includes the core spreadsheet features you'd need, along with add-ons and a built-in form tool to gather info and connect your spreadsheet to web services.
To help you get started, we're written an entire book about Google Sheets: The Ultimate Guide to Google Sheets. It takes you from the spreadsheet basics of creating new sheets and formatting your data all the way to building custom apps inside your spreadsheet and automating it with Google Apps Script.
Whether you're a beginner spreadsheet user, or are trying to switch from Excel, it's the perfect resource to help you get more out of the Google Apps suite.
Your Turn
This list a few years ago might have been half as long, but the team behind Google Docs has continued to roll out new features and enhancements. So these tips are far from all there is—missing, for example, are the options to "Find & Replace" a word or "Insert Table," two handy features for professionals.
What Google Docs feature have you found most helpful to your work? Which tips did we miss sharing?
Updated Feb 25th to add info about Google Docs new page footer features
