For most K-12 teachers, a standard teaching day is roughly 8:00 a.m. to 3:00 p.m.—but that's just time spent inside the classroom. Add in all the additional work—grading, lesson planning, scheduling, conferences, and so on—and teachers end up looking at 12-16 hours of work per day.
Google's suite of cloud-based apps can help teachers save time. In this article, we'll explore a few ways that educators can use Google's free apps to automate some of their less engaging responsibilities and spend more time doing what they do best: teaching.
G Suite for Education is a suite of Google apps that includes all the familiar favorites—ones like Google Sheets, Google Calendar, and Google Docs—along with one app that was created with educators in mind: Google Classroom. However, because not all teachers have access to G Suite for Education, we're not including Google Classroom in this piece.
1. Grade Tests and Quizzes Automatically with Google Forms
If you've ever wished you had your own personal Scantron system to grade simple-answer tests and quizzes for you automatically, you're in luck: Google Forms has a feature that does exactly that.
To create a test/quiz in Google Forms, log in to Google Forms with your Google account, and click the Template Gallery link. Scroll down, and you'll see a section of form templates for educators. Select Blank Quiz.
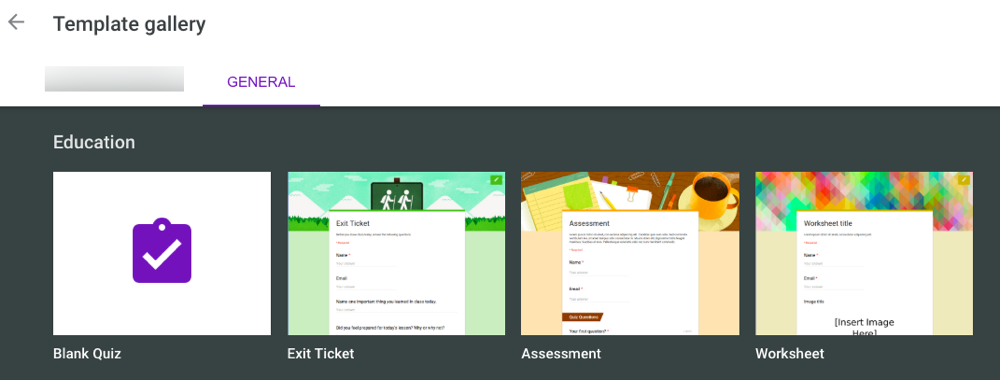
Using this template, you can create, distribute, and automatically grade multiple choice, checkbox, or dropdown quizzes and tests. You can also choose what test-takers see during the quiz—keep scores private, or let students know whether they got the answer right immediately.
Creating a quiz in Google Forms
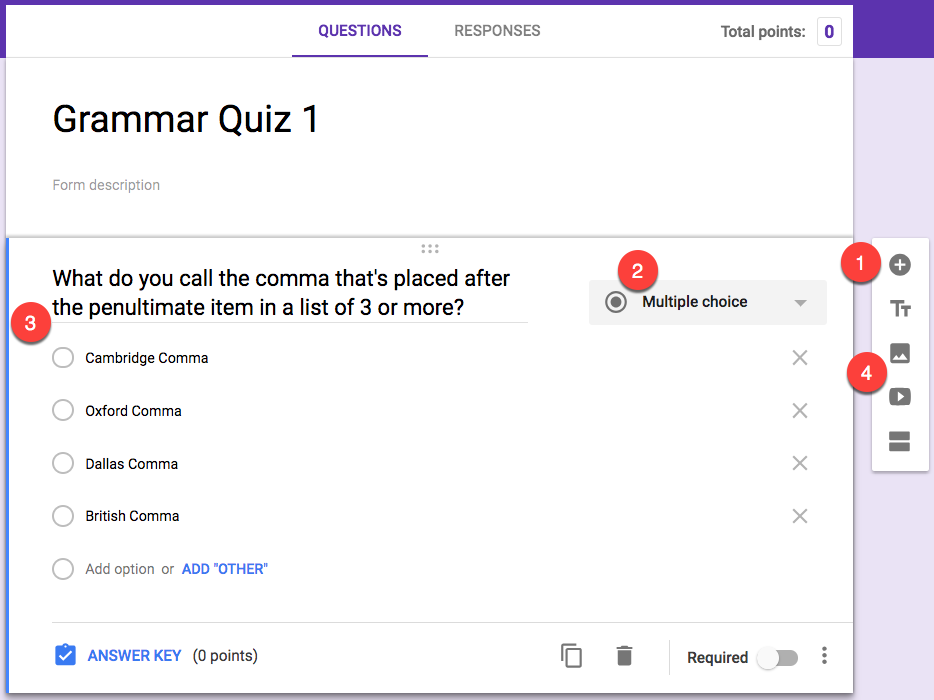
To use Google Forms to automatically grade your quizzes and tests, you have to create both the quiz and answer key in Google Forms. To build your quiz:
Click the plus symbol to add a question to the quiz.
Use the dropdown menu to choose the type of question you're asking (short answer, multiple choice, checkbox, dropdown, etc.).
Type in your question and, if applicable, any answer options.
Add images or videos to the question if needed for explanations or examples.
Adding an answer key to your Google Forms quiz
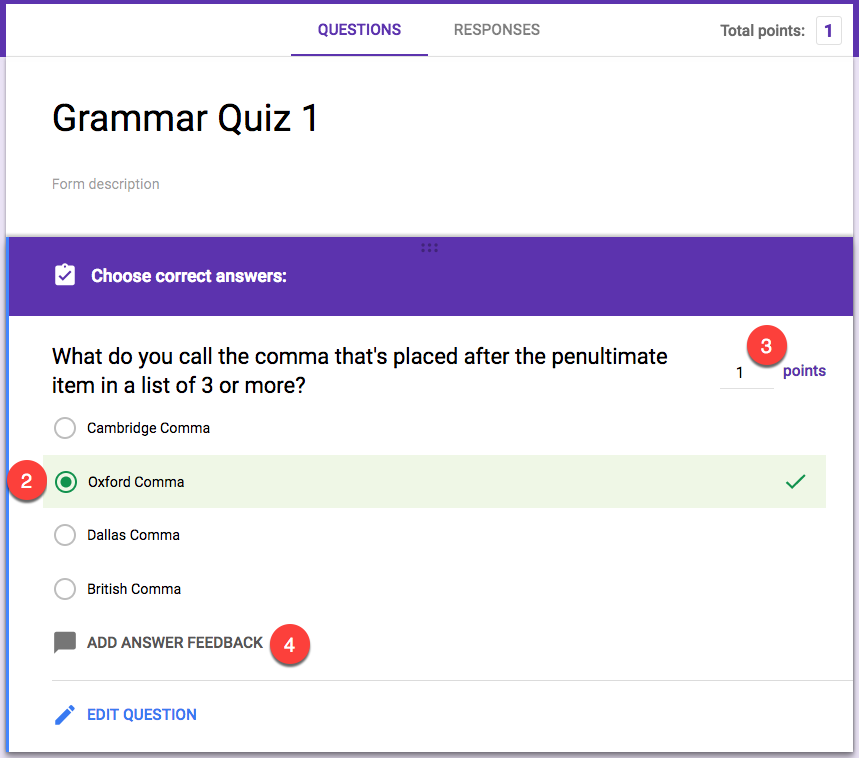
Once your question is complete, it's time to add an answer key, assign a point value to the question, and provide any feedback you want students to see after answering the question:
Click the Answer Key link below the question.
Choose the correct answer for the question.
Assign a point value for the question.
Click the Add Answer Feedback link if you want to provide students with feedback after answering a question. Enter the feedback you want to provide for correct and/or incorrect answers, and click Save.
Adjusting quiz settings
Repeat all of the steps above for each question you want to add to your quiz. When you're finished, click the Send button, and adjust your quiz's settings:
General Settings:
Check the boxes next to Collect email addresses and Response receipts if you want your students to turn in a printed confirmation that they completed the quiz.
Check the box next to Restrict to users in [your school's domain] and trusted domains if you want to force your students to take the quiz from their school-provided Google accounts.
Check the box next to Limit to 1 response if you don't want students to be able to take the quiz more than once.
Presentation Settings:
Check the box next to Show progress bar if you want students to see a visual indicator that shows how many more questions they have to answer.
Check the box next to Shuffle question order if you want all of your students to receive the questions in random order.
Customize the text in the Confirmation message box. This is the text that displays when students complete the quiz and is a good place for reminders like "Make sure to print this page and turn it in tomorrow morning."
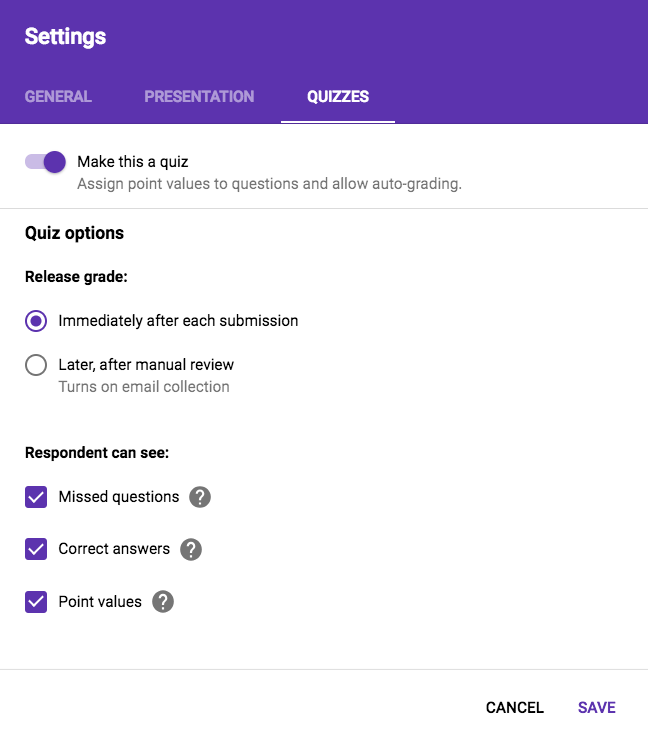
Quizzes Settings:
Choose when students should receive their grade by selecting the radio button next to either Immediately after each submission or Later, after manual review.
Check the box next to Missed questions if you want students to be able to see which questions they answered incorrectly.
Check the box next to Correct answer if you want students to be able to see the answer key after their quiz has been graded.
Check the box next to Point values if you want students to be able to see how many points each question is worth.
Sending your quiz and collecting results
After saving your settings, click Send again. Choose how you want to send the quiz to students: You can send it by email, create a custom URL for the quiz, or embed the entire quiz on your class website. If you're sending the quiz via email, enter your students' email addresses, and click Send.
After your students have completed the test, return to the quiz to see the grades for each of your students. You can type these into your gradebook software manually, or click the spreadsheet icon to send your quiz grades to a new or existing Google Sheets gradebook.

2. Calculate Grades and Gather Important Insights with Google Sheets
If your school uses gradebook software, it probably calculates your students' grades for you—you just have to enter the grade and assignment weights into the system. But if your school hasn't invested in gradebook software, Google Sheets simplifies the process of tracking and calculating student grades.
Creating a Google Sheets gradebook
If you're a master spreadsheet user and know how to set up formulas quickly and easily, you may not need help setting up the complex formulas you'll need to calculate and weight grades. But if you're not familiar with spreadsheet formulas—or if you want a tool that does the heavy lifting for you—you may want to use the GradeBook for Google Sheets & Classroom add-on.
GradeBook for Google Sheets & Classroom creates a gradebook in Google Sheets using data you enter manually or import from Google Classroom (if your school subscribes to G Suite for Education). To create a gradebook using the GradeBook add-on:
Navigate to Google Sheets, and create a new, blank spreadsheet.
Click the Add-ons tab, and select Get add-ons.
Type
GradeBook for Google Sheets & Classroominto the search bar and click enter.Click the Free button in the GradeBook for Google Sheets & Classroom row to install the add-on.
Select the Google account you want to use with the add-on.
Review and accept the required permissions.
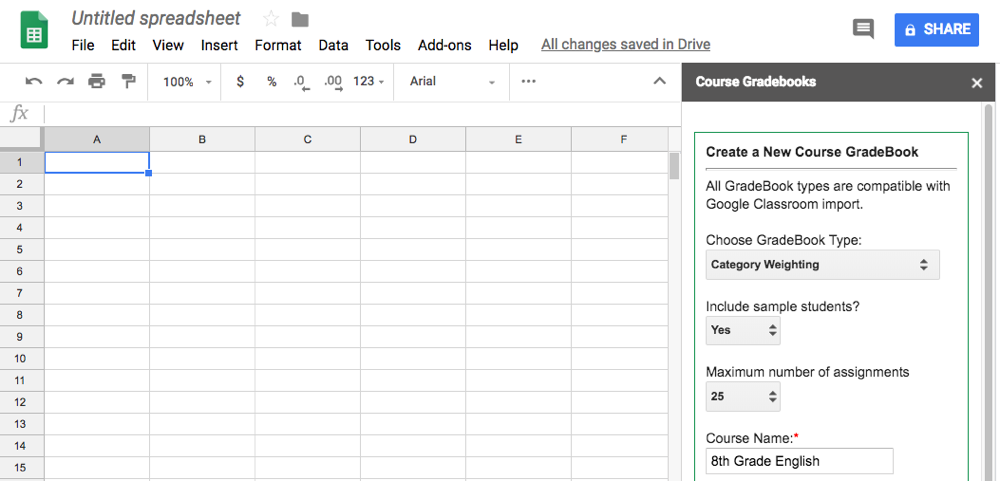
Once the add-on has completed its installation, click the Add-ons tab in your Google Sheet again, hover over GradeBook for Google Sheets & Classroom, and select Create and View GradeBooks. When the system is finished creating your gradebook, a new window opens to the right of your spreadsheet. Use it to set up your new gradebook:
Choose a gradebook type to automatically set up the calculations for weighting assignments.
Enter a name for your course.
Fill out any other details you want to include in your gradebook.
Click Create Course to continue.
When your course gradebook is ready, click the link at the top of the Course Gradebooks sidebar to open your new gradebook. Your Google Sheets gradebook will open in a new tab.
If you're calculating grades by weighting assignments in different categories, you need to first set up your categories and weighted percentages in the Settings tab of your new Google Sheets gradebook.
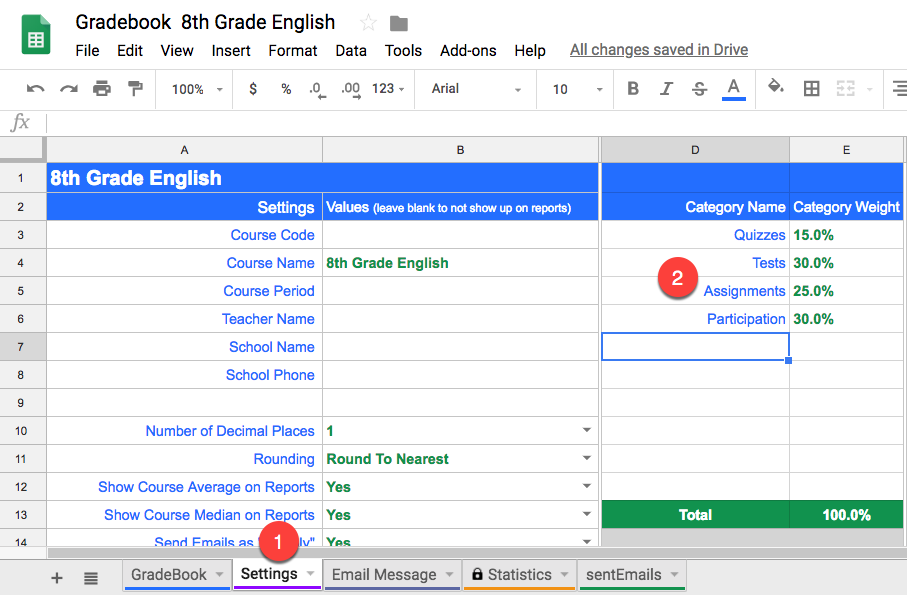
Now, you just need to add each student to their own row in the GradeBook sheet and add your assignments, assignment categories, and assignment details. When you finish grading an assignment, add students' grades, and GradeBook automatically calculates the grades for you.
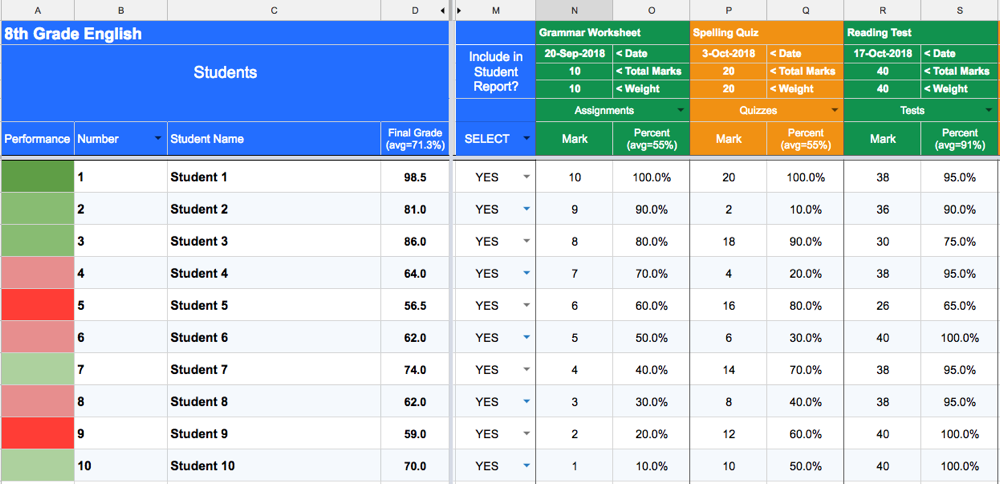
GradeBook for Google Sheets & Classroom Price: Free for all Google Sheets features. From $18/year for the premium add-on that includes the ability to export course reports to Google Docs or PDF.
Gather important insights with Google Sheets' Explore function
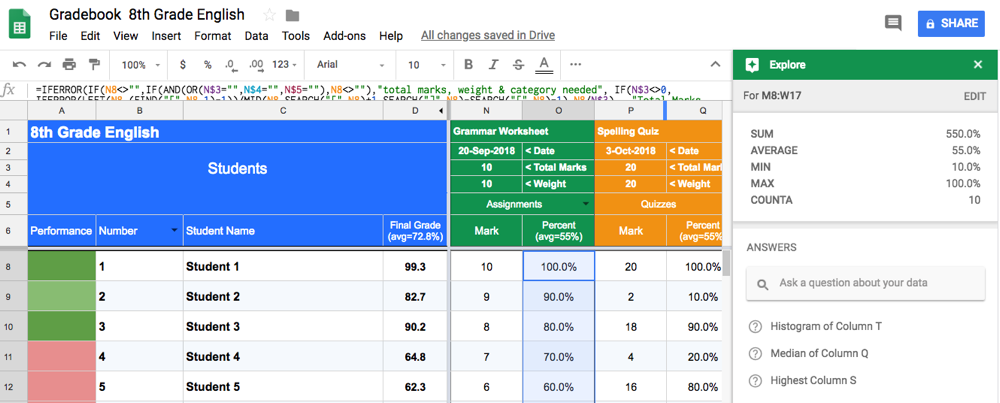
Hiding at the bottom of any Google Sheets spreadsheet is an Explore feature that helps you visualize the data in your gradebook and gather important insights.

Use Explore to quickly track student progress or test results. Because it's automatic, you'll be able to gain insights you might not have thought to ask for.
Let's say you want to find the average grade in your class or on a test. Rather than figuring that out yourself, Explore does it for you automatically. Open your gradebook; highlight the column, cell, or data cluster that you want information for; and click the Explore button.
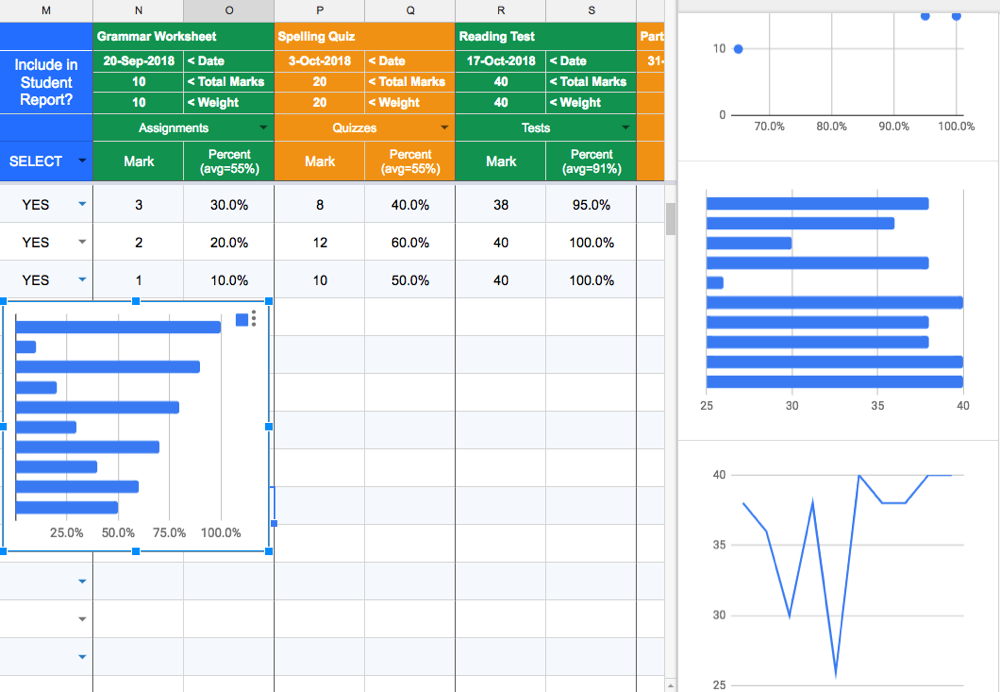
The Explore function also creates different graphs and visuals of your data that you can drag and drop into the spreadsheet.
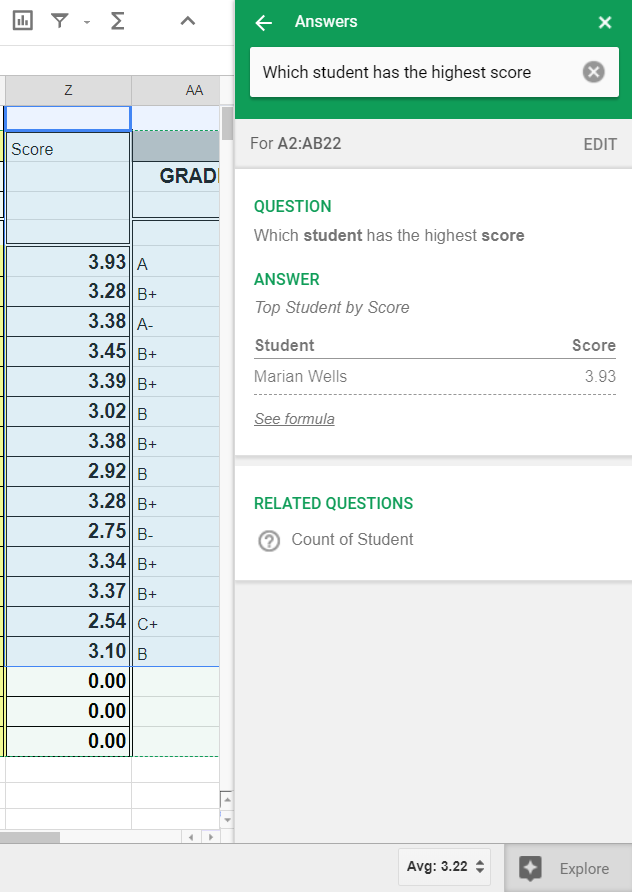
Finally, if you have questions about your data, you can type them into the Explore Answers box. A nice time-saver is being able to use natural language (e.g., "Which person has the top score") to ask questions instead of formulas. Keep in mind that the answers are found using your column titles, so make sure your question matches the information in your gradebook. For example, if column Z in the screenshot below said "Grade" instead of "Score," I'd phrase my question as, "Which student has the highest grade?"
3. Grade Papers More Efficiently with Google Docs
Having your students submit their papers electronically using Google Docs makes it easier to avoid some of the excuses your students rely on to avoid late work penalties; "the printer broke" no longer cuts it. Plus, you don't have to worry about students using sneaky fonts or odd line spacing to turn a four-page paper into the required five pages—you can see exactly what fonts and formatting they've used.
But Google Docs is helpful for a lot more than policing your requirements. Teachers can also use it to fact- and plagiarism-check, suggest copy edits, leave comments, and review previous drafts.
Check facts and test papers for plagiarism using the Google Docs Explore function
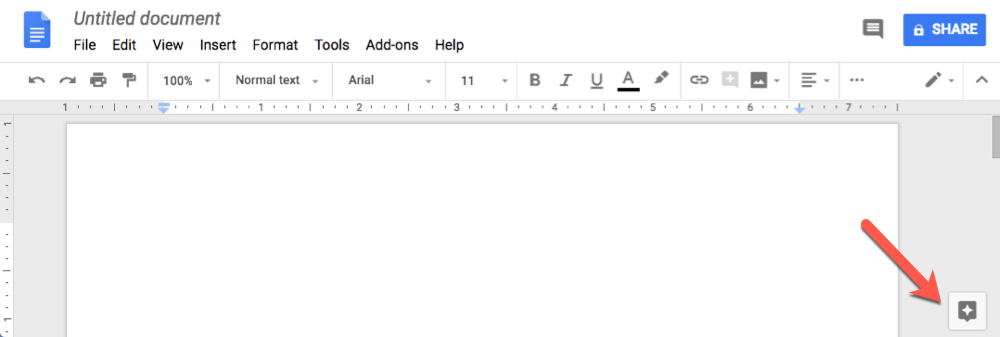
The Explore function isn't exclusive to Google Sheets; Google Docs also offers this feature. Like in Google Sheets, the Explore button in Google Docs can be found in the bottom-right corner of the window.
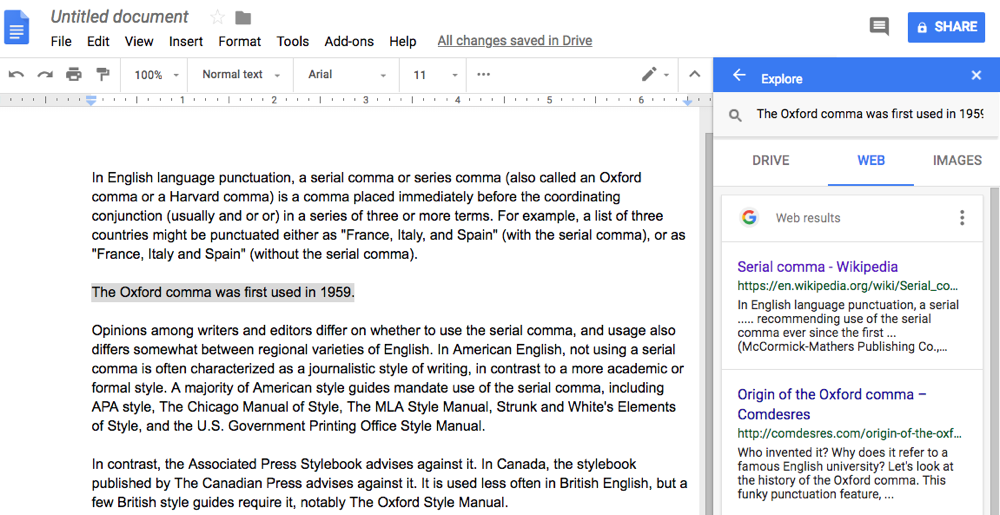
When you click Explore, a menu on the right side of the document appears. Use it to search the web like you would on Google—it instantly pulls up research, image, and content suggestions from the web.
To fact- or plagiarism-check while grading student papers, click Explore, and either type a topic into the search bar or copy and paste text directly from the doc. You'll receive research, article, and image suggestions for that specific text.
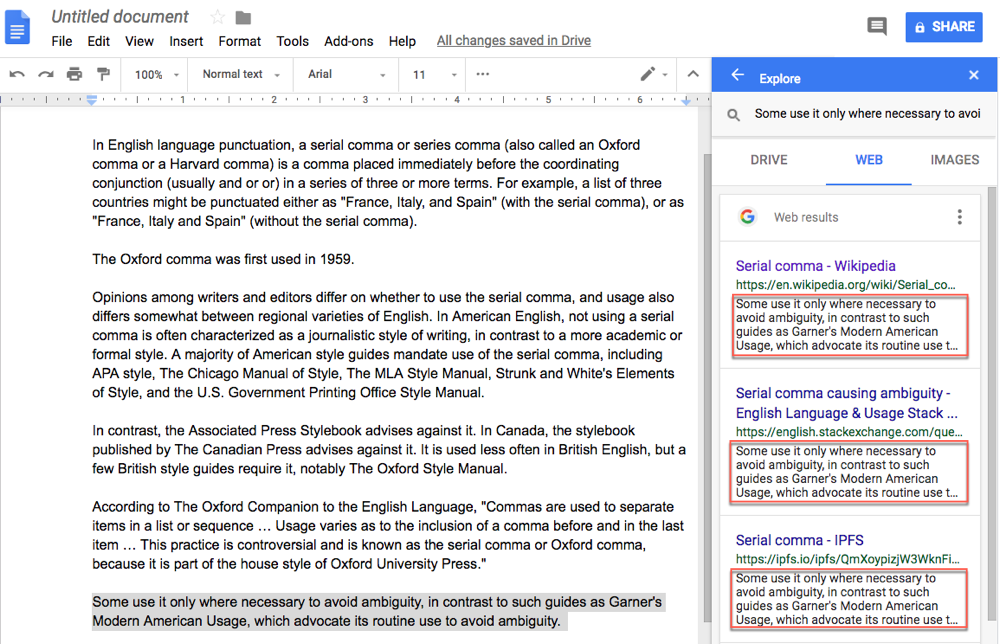
Explore is particularly helpful if you think a student may have plagiarized some (or all) of the content of their paper. Copy and paste a suspicious phrase, and Explore will populate results for any content that's been published online that uses the exact same words.
Suggest copy edits and leave comments on student papers
Google Docs' suggesting mode lets you suggest copy edits on student papers easily—no red pen required. After opening a student's paper, click the pencil icon, and switch to Suggesting mode. Now, you can suggest changes for your students to review when it's time to revise the paper.
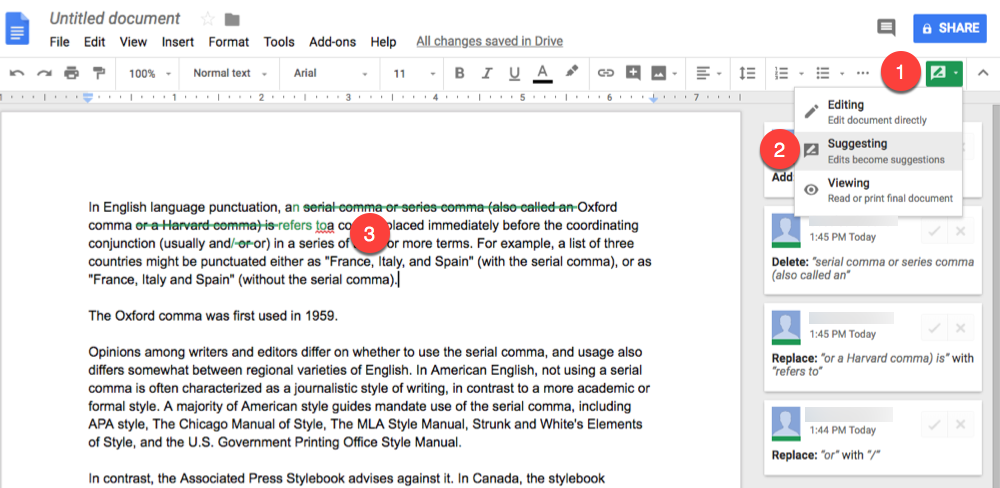
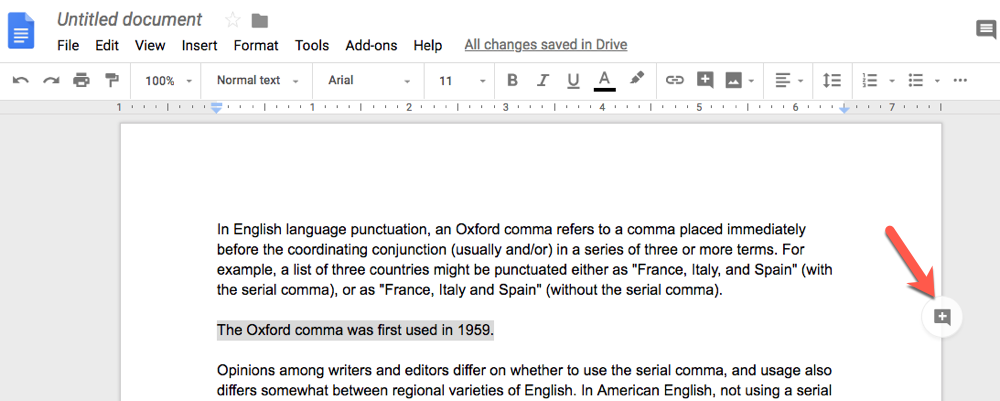
You can also leave comments for things you want students to revise, expand upon, or remove. Highlight the respective text and click the comment icon to attach a comment to that section of the copy.
Review previous drafts of student papers
It makes life easier when you're grading final drafts of papers if students turn in earlier drafts with your comments, but some students always seem to lose track of earlier drafts and fail to turn them in. With Google Docs, that's no longer an issue.
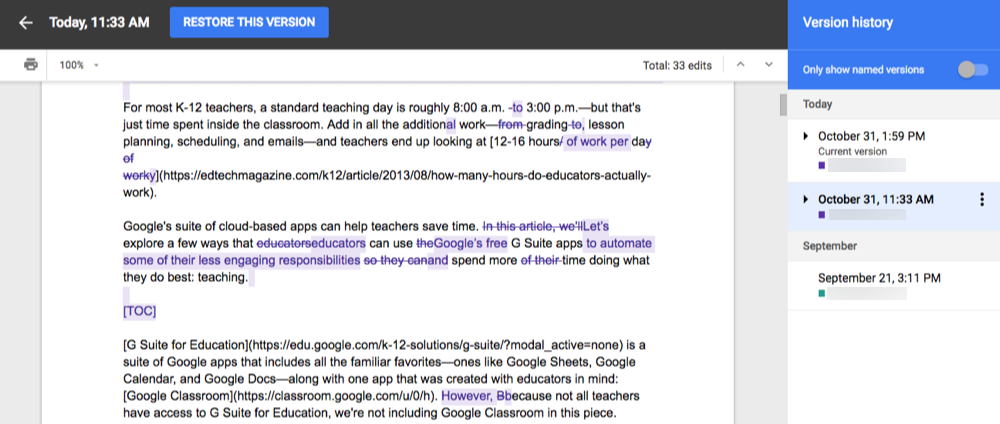
Google Docs saves copies of every revision that's made to the document, so you can easily see what you revisions you asked for in previous drafts. Plus, you can compare earlier drafts to later ones to see the exact changes students made.
To review previous versions of Google Docs, click the All changes saved in Drive link in the app's toolbar. Then, you can click through previous versions to see exactly what was changed in each.
4. Build Presentations Quickly with Google Slides
Google Slides makes it easier than ever to create slideshows to use in your lessons. First, take advantage of a number of predesigned, education-focused templates so you don't have to start building every slideshow from scratch:
Navigate to Google Slides.
Click the Template Gallery link at the top-right corner of the page.
Scroll down. At the bottom of the page, you'll see a variety of education templates designed specifically for teachers and students.

If you can't find the perfect template, you can also create your own. After finalizing a slideshow you'd like to use as a template in the future:
Navigate to the Google Slides homepage.
Click the Template Gallery link.
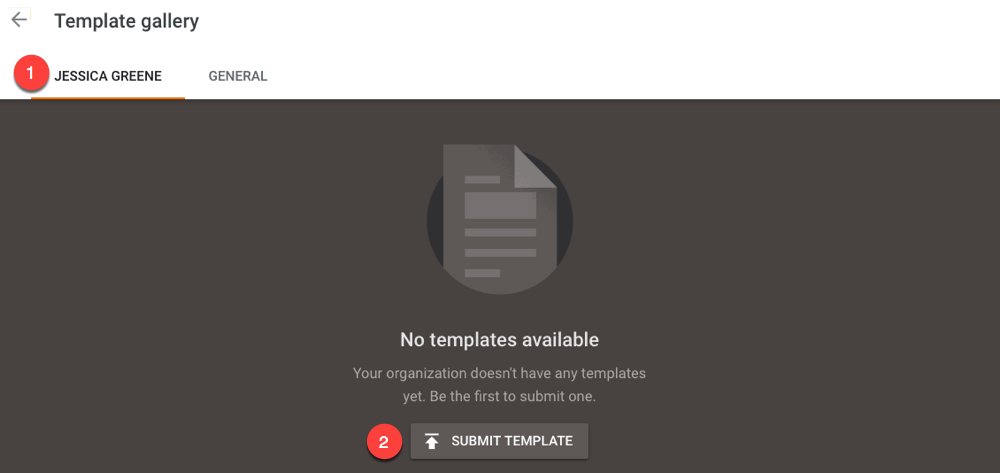
Click the tab to the left of the General tab. If you're using a school account, the tab you want to click will display your school's/district's name. If you're using a personal account, it displays your name.
Click the Submit Template button.
Click Select Presentation, and navigate to the slideshow you want to use as a template. Click Open.
Select a category for your template, then click Submit.
Now, you can use that design as a template for all future slideshows by selecting it from your template gallery.
Build your slideshow quickly with Explore
While creating a slideshow, use Google Slides' Explore function to build and design your presentation quickly. You'll find Explore in a familiar location: at the bottom-right corner of the screen.
Like the Explore function in Google Docs, Slides' Explore lets you search the web without leaving your presentation. Use it to search for and find information quickly, or to find images and insert them directly into your presentation.
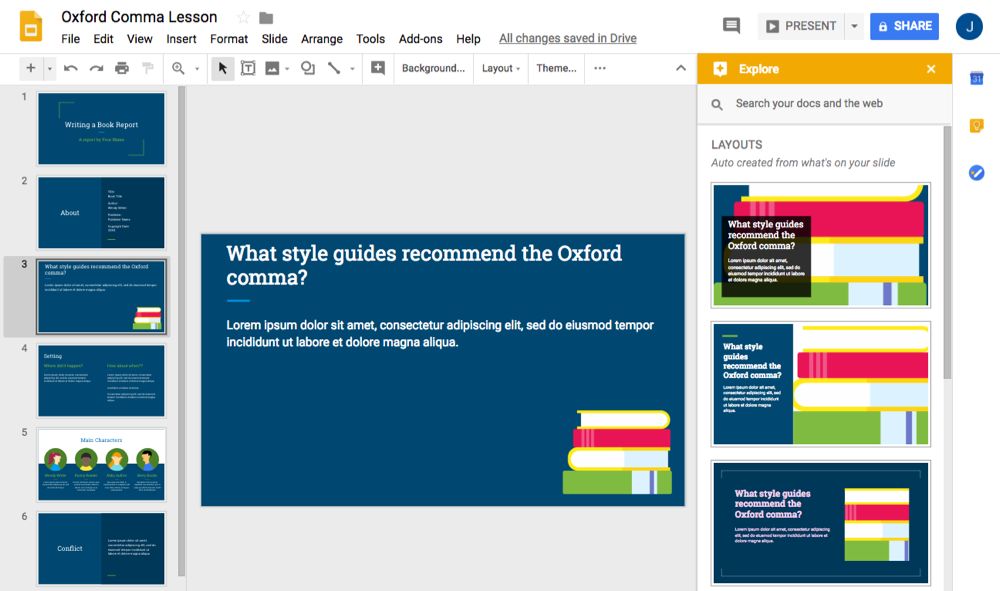
Explore also helps you create a professional-looking presentation with as little effort as possible. Type some information into your slide and click Explore, and Slides will recommend a few different designs to use. Click the one you like, and it reformats the slide for you instantly.
Save Even More Time with Zapier's Google Automations
Once you're saving time by automating some of your work with Google apps, you may be interested in finding even more ways to reduce the number of tasks you're responsible for. With the following Zapier automations for Google apps, you can get back even more of your day by letting technology take care of repetitive tasks for you.
If the format of your test/quiz doesn't lend itself naturally to Google Forms' automatic grading, you can still use the tool to administer tests automatically. Use the following Zap to have each student's quiz responses automatically sent to your email, and you'll no longer have to worry about printing or misplacing test papers.
Send emails for new Google Forms responses in a spreadsheet
Want to send students an email confirmation—or further instructions—after they've taken a quiz in Google Forms? Use the following Zap to send your students an email from Gmail after they've completed a Google Forms test.
Send email via Gmail for new Google Forms submissions
Google Docs are automatically saved to Google Drive, but what if your school uses OneDrive or Dropbox for file storage? Use these Zaps to automatically copy your Google Docs files to your school's preferred file storage app.
Create text files in Dropbox for each new Google Document
Google apps are not only convenient and free, but they also have a low barrier to entry. All of the apps have similar features, so learning one helps you learn all of the others. This convenience helps teachers become more time-efficient.
Even if your school doesn't pay for G Suite for Education, you can still shave off hours of additional teaching work each week—things like grading and lesson planning—with Google's free apps, letting you focus more of your time and effort on your students.
