Zapier connects to thousands of apps, but maybe an app or action you need isn't available, or a native integration doesn't let you set OAuth scopes. Without them, IT might not approve the integration you want.
In the past, there was just one workaround: to paste the API key for your desired app into Webhooks by Zapier steps. But that makes keys visible to anyone who can view your Zap (what we call an automated workflow). If anyone with access gets phished or reuses a password, there's nothing standing between the attacker and your keys.
API by Zapier is a newer, more secure way to make authenticated outbound API calls to any endpoint. Keep scrolling to learn how it works, ways you can use it, and why it's a companion—not a replacement—for Webhooks by Zapier.
API by Zapier is in beta, and it's available on Pro plans and higher tiers. Compare Zapier plans on our pricing page.
Table of contents
What is API by Zapier?
API by Zapier is a built-in tool that lets you automate apps without a native Zapier integration. It makes authenticated HTTP requests from inside a Zap, with credentials stored in a connection rather than the Zap step itself. And it supports GET, POST, PUT, PATCH, and DELETE, so you can read, create, update, or remove records against any endpoint that accepts these methods.
When you build a connection in API by Zapier, it's tied to a specific app and person. You can choose the authentication method: no auth, a static token (API key or bearer), or OAuth 2.0 with your own client credentials and scopes.
Credentials live in the connection—not the Zap—and get injected at runtime, so teammates who view the Zap never see them. That matters more than it might sound—and it has nothing to do with whether you trust your teammates (I'm sure they're wonderful).
Plaintext credentials leak through screenshots, screen shares, and accidental shares with contractors or partners. If someone gets into an account through phishing, credential stuffing, a reused password, or a hijacked browser session, they can just read the key right out of the step.
Per-person connections also make offboarding easier. Normally you'd comb through every webhooks step across your Zap workflows to find which use a departing teammate's credentials, and which will break when they leave. With API by Zapier, credentials live in their own connection, visible on a single page, so you know exactly what to revoke.
Every connection is also scoped to a domain filter—an allowlist of hostnames the connection can reach. Credentials only travel to addresses you've approved. For example, let's say you're creating a connection with your HubSpot API key and you set the domain filter to api.hubspot.com. If someone points that connection at a different URL (like a server they control), Zapier will refuse to send the request. Your key never leaves the building. Without a domain filter, that same request would fire away.
This is a real safety net against credential theft, accidental misconfiguration, and scope creep. Even if someone gains access to the connection, they can't redirect it. If someone pastes the wrong URL into a step, the connection won't fire against an unintended service. And a connection built for one purpose can't quietly be repurposed for another.
You can also set an optional test URL so Zapier can verify the connection works before you build with it. For admins, API by Zapier shows up on the App Connections page like any other app, so you can manage access, restrict the app across your team. If you're on an Enterprise plan, you can use managed app controls to govern who can create and use connections.
Finally, API by Zapier isn't limited to outbound requests. It can also trigger Zap workflows by polling an endpoint on a schedule—useful any time you need to "listen" to an API that doesn't send webhooks, like a reporting or analytics tool.
Key features of API by Zapier include:
Flexible authentication: Connect using no auth, API keys or bearer tokens, or OAuth 2.0 with your own client credentials and scopes.
Secure credential storage: Credentials live in the connection, not the Zap, and are injected at runtime so they never appear in step inputs or logs.
Domain filtering: Each connection is locked to the domains you specify, so credentials can only be sent where you've authorized them.
Admin governance: Manage connections from the App Connections page, restrict the app across your team, and control sharing with managed app features for Enterprise.
You can also expose API by Zapier through Zapier MCP and Zapier SDK. That means your AI tools and code can call any API you've connected. To learn more about Zapier MCP and Zapier SDK, check out this guide.
Webhooks vs. API by Zapier: What's the difference?
Both tools let you talk to APIs that don't have a native Zapier integration, but you'd use them in different situations.
Use Webhooks by Zapier if:
You're catching inbound data. You need an external service to push information to your Zap (via catch hook or catch raw hook). API by Zapier can trigger Zap workflows too, but it does so by polling, reaching out on a schedule to check for new data, rather than passively receiving it.
No authentication is needed. The endpoint you're calling is public or already secured some other way (like an IP allowlist), so there are no credentials to protect. API by Zapier supports a "no auth" option too, but Webhooks has a simpler setup with fewer fields to configure.
You need to send form-encoded data. Webhooks lets you pick a body format (form, JSON, raw) and map fields with a simple name-value UI.
You already have Zap workflows running with Webhooks. If this is true, there's no need to rebuild your Zap workflows if they're working fine. Make the switch to API by Zapier only when you're creating something new or when security concerns make it worth it.
Use API by Zapier if:
Your request requires authentication. API keys, bearer tokens, OAuth 2.0—API by Zapier stores them in a secure connection, not in the Zap step. Nobody who views or edits the Zap can see your secrets.
You want to reuse credentials across Zap workflows. Set up the connection once, then use it in as many Zap workflows or MCP tools as you need. No more pasting the same key five times.
Security or compliance matters. Domain filters lock each connection to approved hostnames, so your credentials can't be redirected somewhere unexpected. Admins can manage and restrict connections from a single page.
You're on a team. Per-person connections mean you always know whose credentials are in use. When someone leaves, you know exactly what to revoke and where to find it without looking through individual Zap steps.
What you can do with API by Zapier
Here are some ideas for putting API by Zapier to work:
Post new Salesforce opportunity details to a Slack channel
You want to alert your sales team in Slack when a new opportunity lands in Salesforce, but pull a custom field that the native Slack integration's built-in action doesn't expose.
What this might look like:
Your Zap triggers when a new outbound message is received from Salesforce.
API by Zapier calls a custom Salesforce REST endpoint to pull the custom field values you need.
Slack posts a formatted summary to your deal desk channel.
Log new API items to a BigQuery data warehouse
You want to pull records from a niche vendor API that has no Zapier integration and store them in your data warehouse for analysis. But you don't want to build a private integration on the Developer Platform just to read a single endpoint.
What this might look like:
API by Zapier polls the vendor endpoint on a schedule and picks up new records using a Dedupe Key.
Formatter by Zapier cleans up field values, normalizing casing, stripping whitespace, and reformatting dates.
Google BigQuery adds the cleaned record to your warehouse table as a new row.

This visual diagram was created in Zapier Canvas, our free built-in tool for mapping out your automated workflows.
Provision new BambooHR employees across internal systems
You want every new hire in BambooHR to be auto-provisioned in your internal systems and your HRIS, with a different path for contractors versus full-time employees.
What this might look like:
Your Zap triggers when a new employee is added to BambooHR.
A filter step stops the Zap unless the employee's status is active.
API by Zapier calls your internal provisioning API to create the user account.
Formatter by Zapier transforms the employment type into the format your downstream systems expect.
A path step splits the Zap based on employment type.
For full-time employees, Workday creates a full-time employee record in your HRIS.
For contractors, Slack pings IT with the contractor's details for manual review.
##toc-how
How to get started with API by Zapier
The setup below covers Zap workflows, but setting this up in Zapier MCP works much the same way. Note that the API by Zapier trigger is unavailable in Zapier MCP since the "trigger" in an MCP workflow is always you making a request in your AI tool.
Trigger API requests in Zap workflows
Log in to Zapier and head to the Zap editor.
Search for and select API by Zapier, then choose the New Item from API action event.
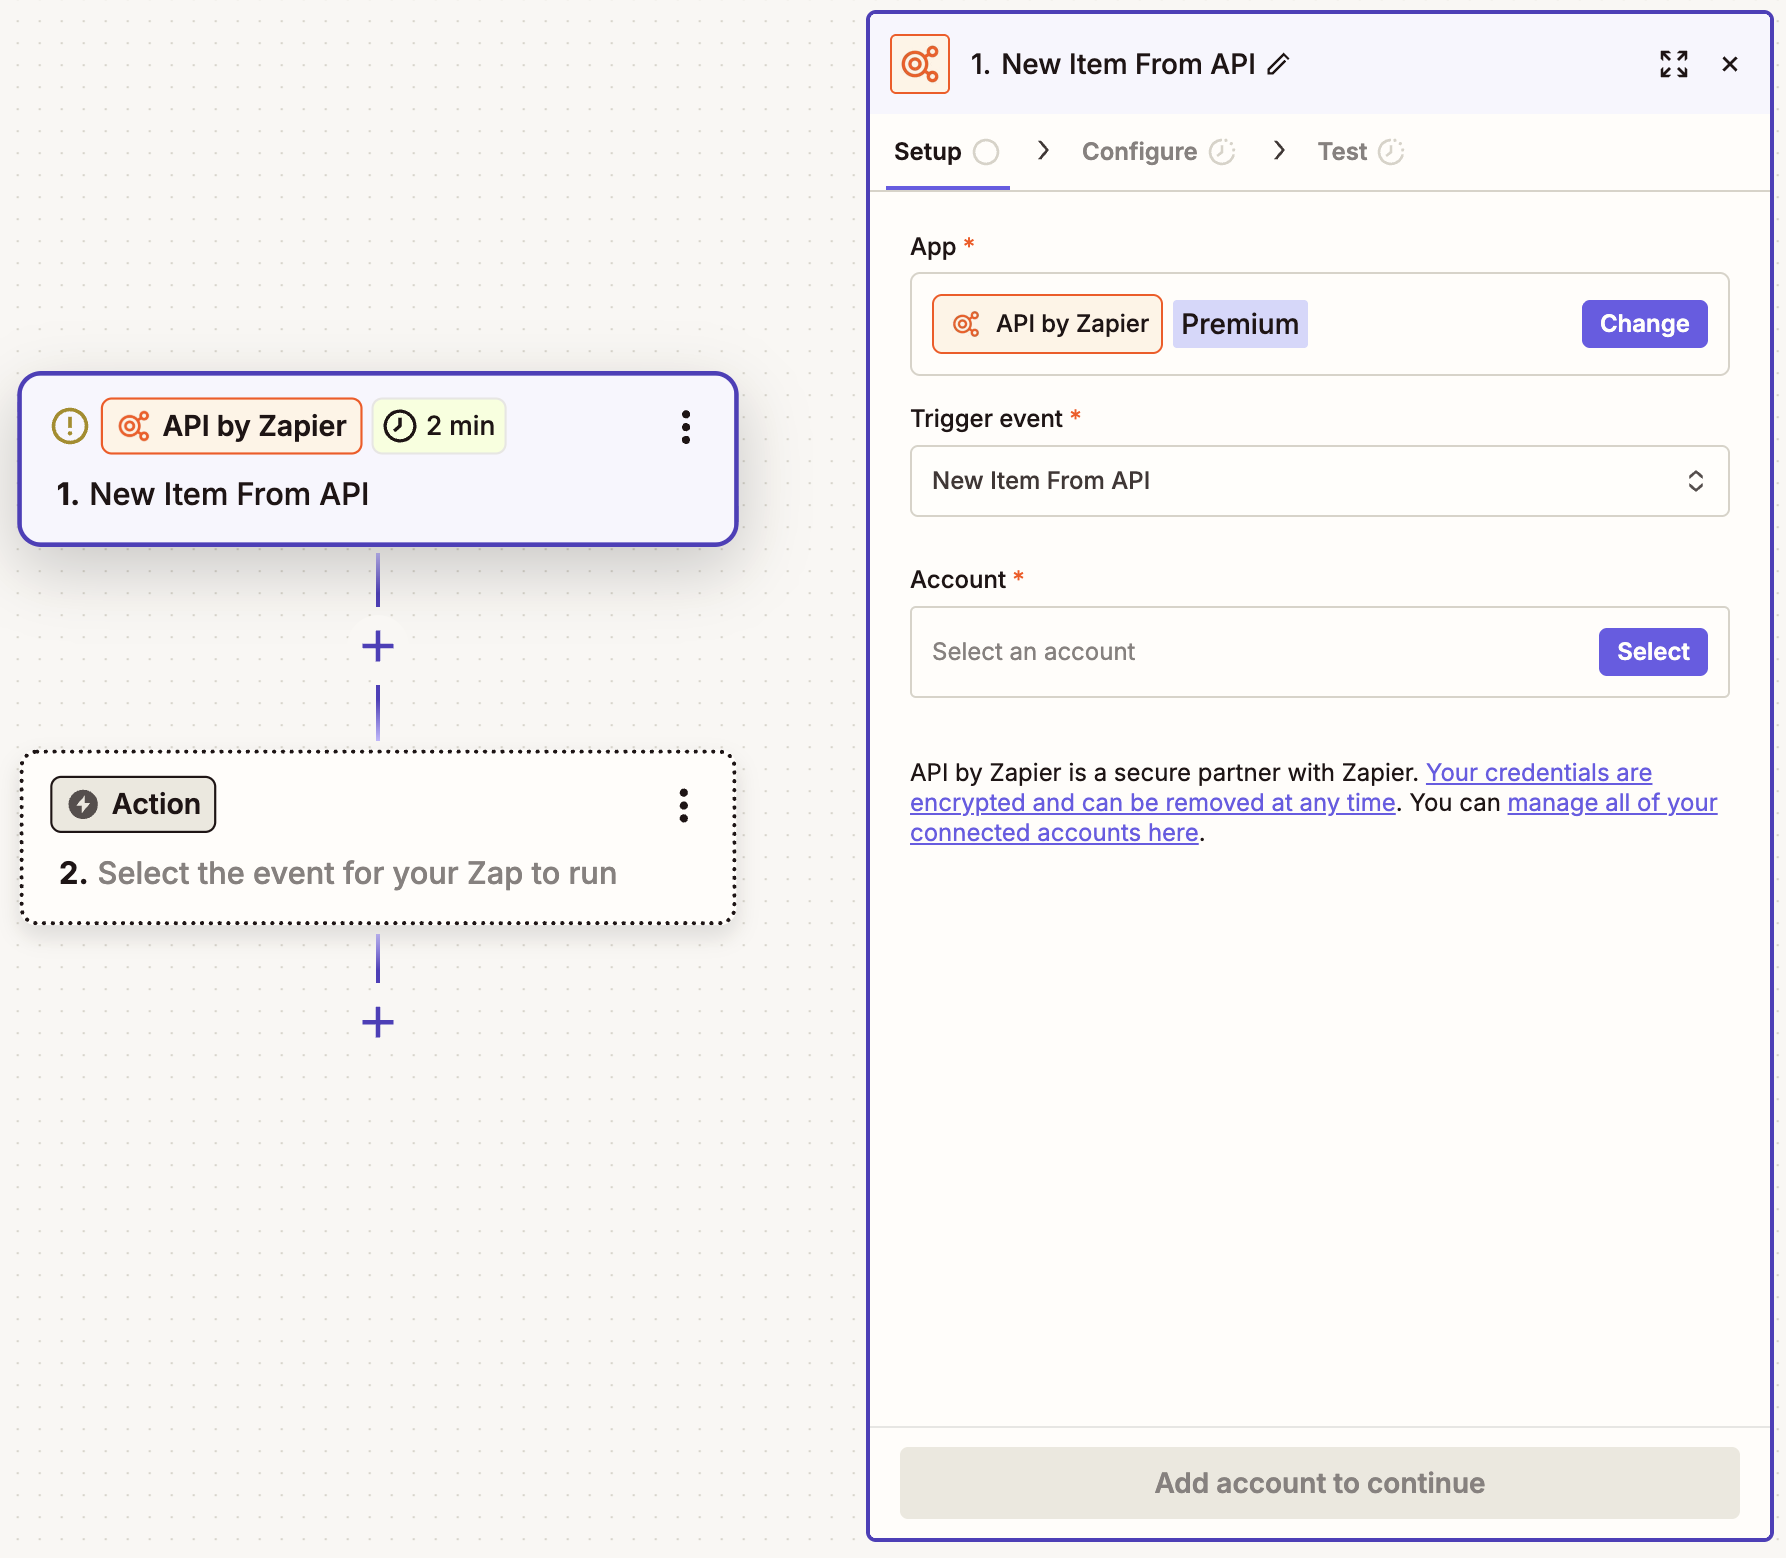
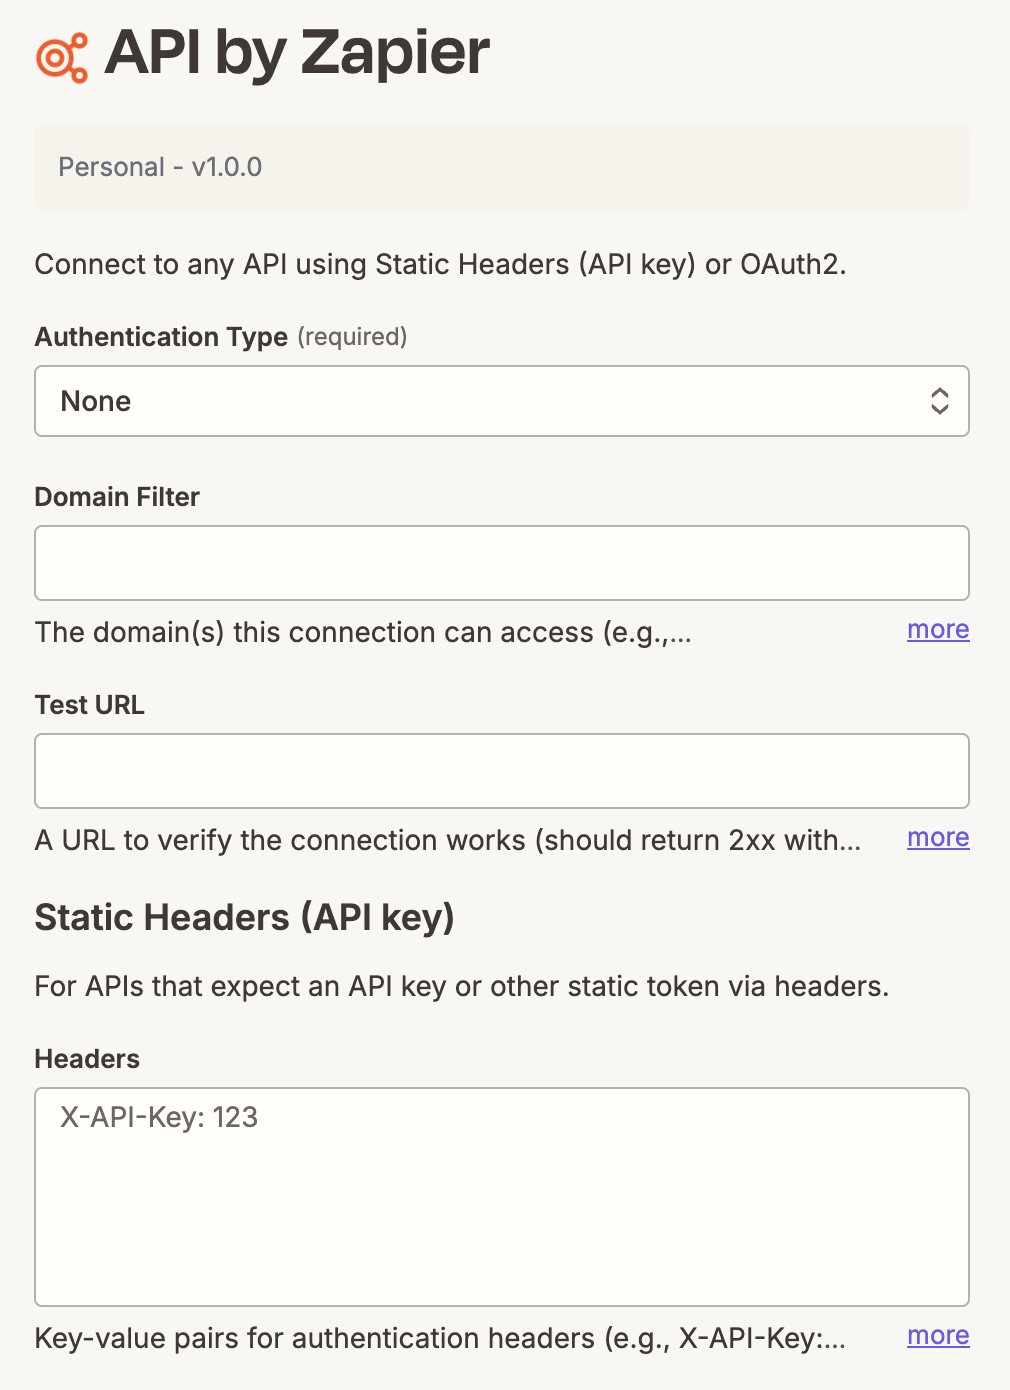
Click Select then + Connect a new account. This will open a window that looks like this.

Select an authentication type and domain filter. Depending on the auth type you chose, fill out the Static Headers field or scroll down and fill out the OAuth2 fields. When you're done, click Connect.
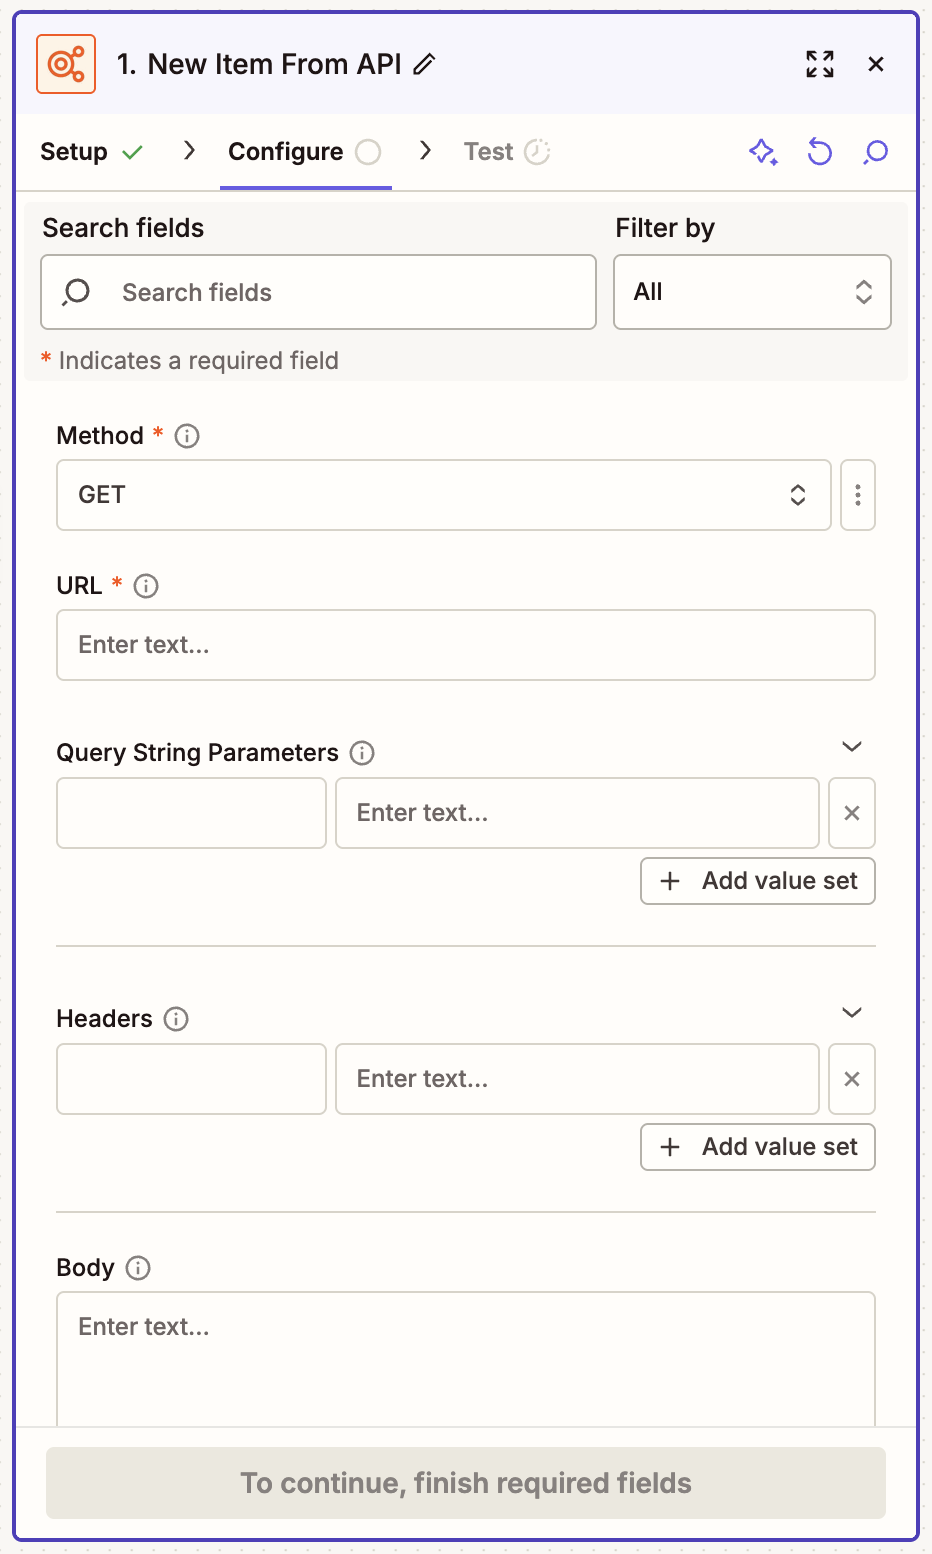
Next, configure your trigger by selecting your HTTP method and URL. The latter should match the domain filter you entered in the previous step. You can also add query parameters, headers, or a body if the API needs them. Below that, you'll see fields for a Response Filter and Dedupe Key. These tell Zapier where to find items in the response and how to spot new ones. They ship with defaults that work for most APIs, so you can skip them to start.
Test your step to make sure it's working correctly. Then continue adding as many actions as you need. Remember to test your Zap and publish when it's ready.


Send API requests in Zap workflows
Log in to Zapier and head to the Zap editor.
Search for your trigger app and select the event you want. This is the data your Zap will start with. Unless you add steps in between, it's what will get passed directly to the API request, too.
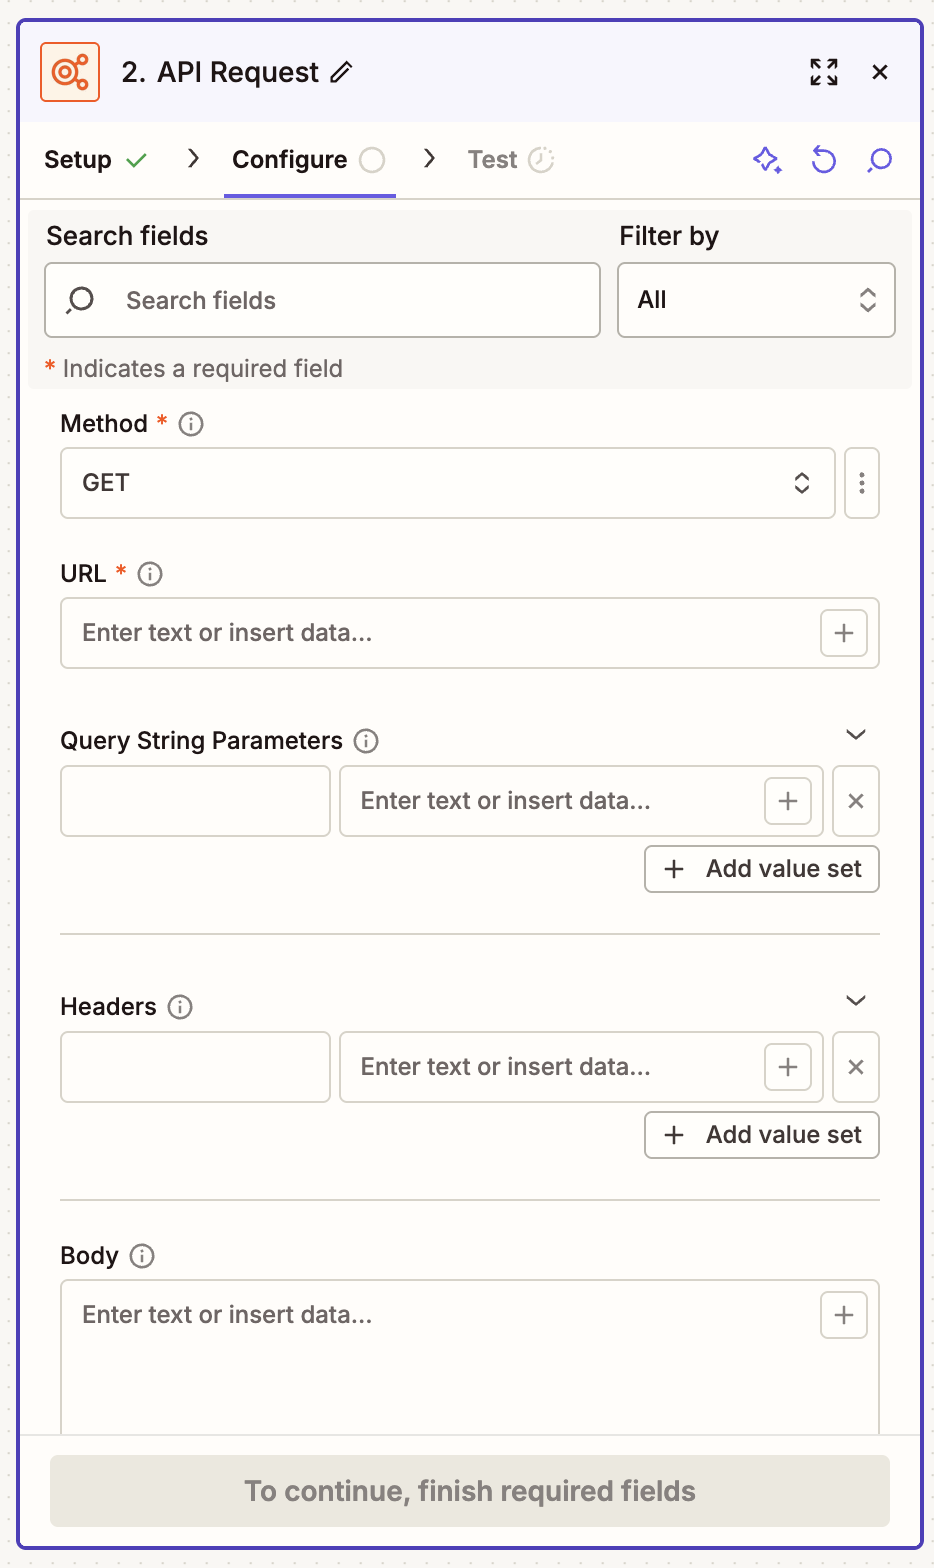
Now add an action step. Search for and select API by Zapier. Then choose the API Request action event.

Click Select then + Connect a new account. This will open a window that looks like this.
Select an authentication type and domain filter. Depending on the auth type you chose, fill out the Static Headers field or scroll down and fill out the OAuth2 fields. When you're done, click Connect.
Configure the request. Choose the HTTP method, enter the endpoint URL, and build out headers, query parameters, and the request body as needed.
Add any additional action steps your workflow needs, like Filter by Zapier, Formatter by Zapier, Paths by Zapier, or the downstream app where the data should land.
When you're done, remember to test and turn on your Zap.


Call any API securely with API by Zapier
API by Zapier gives you a safer, more flexible way to reach any endpoint from a Zap or MCP tool—no plaintext credentials, no custom app build required, and no need to wait for a native integration.
Ready to dive in? Visit the API by Zapier integration page for inspiration or our help guide for more guidance.