OpenAI and Anthropic models can read text and look at images just fine, but video is a big no-no. If you're building a tool or a product that absolutely needs that type of media, you'd have to engineer a long workaround, decomposing it into multiple images and then feeding them as an input. A big techie flex if you manage to do it, but is it worth the time?
Google has the answer if you want to go faster. Its latest models, led by Gemini 4 Carbon, focus on multimodality, being capable of consuming multiple types of media, including videos and PDFs. Combine that with a large collection of models specialized in image and audio generation, and direct integrations to other Google products such as Search and Maps, and the list of reasons for getting your API key keeps growing.
I wrote this Gemini API guide to help you understand what Gemini can do and how to set up the calls to start talking to it, so you can extend a product or internal tool with Gemini's capabilities.
Before you dive in: If you're looking to connect these models to the apps you use at work, you can do it without any API setup. Learn more about how Zapier can add AI to your existing workflows and how to use Gemini with Zapier.
What you need to know before you begin
You'll have an easy time following this guide if you understand the basics of building app integrations. If that's not you, I recommend that you:
Spend some time checking out Zapier's API guide, which explains everything about calls, status codes, and returned data.
Understand the basic principles of JSON, a notation language that makes communications between systems more reliable.
If everything I just said is already familiar to you, let's head forward.
Table of contents:
What is the Gemini API?
The Gemini API is a collection of endpoints that you can call to use the Gemini AI model features inside your own apps as part of an action or a program. You connect by writing code or configuring an API request in your platform of choice, passing on prompts and settings that adjust how the model should process your request. Once complete, you get the result back in your app, so you can save it or use it as a part of a workflow.
With the Gemini API, you can build features into your apps that can take nearly any type of input, including video and audio, to generate text, images, and audio. This includes screen-aware helpers that use what you're seeing to provide guidance or answer questions; visual analysis tools that summarize or extract written notes from a video; or multimodal apps that combine voice-controlled interfaces with camera input to create an entirely new experience.
The top models on offer are:
Gemini 4 Carbon (and its faster siblings Argon and Hydrogen), a multimodal model with a context window of 1 million tokens (about 750,000 words). It accepts text, image, and audio as inputs, as well as video and PDF files.
The Gemini 3.x series includes Flash models known for fast processing, as well as speech-to-text, text-to-speech, and live translation options.
The Nano Banana series, one of the most popular image generation models out there.
The Antigravity Agent, designed specifically for coding workflows.
And the Lyria series, turning text or images into music.
There are two main ways to set up an account and unlock access to the API endpoints. The first one is via Google AI Studio, a streamlined experience that helps builders get a quick start with Google's AI products. The other option is via Google Cloud Platform's (GCP) Gemini platform (some features still labeled as Vertex AI), the developer interface that exposes more models and settings.
This guide covers the process of getting a key and calling the API using Google AI Studio, which thankfully provides a more straightforward access route without having to deal with GCP's complexity. If you need to run requests at a larger scale or need enterprise-grade tools, learn more about Gemini platform and check out all the available models in the Model Garden.
Gemini API pricing
The Gemini API has three pricing tiers. The free one includes limited usage of the more basic models, with requests and outputs being used for training Google's models. The paid plan operates on a pay-as-you-go basis, where you pay for the tokens you consume. There's also an enterprise option unlocking support and advanced features, but you'll have to talk to sales to set it up. Here's the gist.
Free plan (Google AI Studio) | Pay-as-you-go plan (Paid or Enterprise) | |
|---|---|---|
Price | Free for Gemini 3.x and Omni series models | Most powerful Gemini 4 Carbon at $4 input, $20 output (per million tokens). Varies based on the size of the prompt and model used; pay less for inputs but more for outputs |
Data privacy | Prompts and responses may be used by Google to train future models | Data isn't used to train Google models |
Rate limits | Limited across requests per minute (RPM), tokens per minute (TPM), and requests per day (RPM), depending on model | Varies per model; tier-based options that progressively unlock higher rate limits depending on previous usage, billing tier cap, or contract terms for enterprise plans |
You used to have to go through GCP to access the paid version of the Gemini API, but that's changed: you can now set up a billing account and manage usage inside Google AI Studio. This welcome change comes at the expense of rate limits no longer being clear; keep an eye on the Rate Limits tab to see if you're close to hitting any ceiling.
Google might try to upsell you to a Google AI One plan while you're using Google AI Studio, but don't fall for the trap if you're only building integrations: that only includes higher usage while using the web interface of Google AI Studio. It doesn't offer API credits, as those are always pay-as-you-go.
How to get a Gemini API key and set up Gemini API connections
Put on your favorite playlist, turn off notifications, and let's start building. But first, if all you want to know is how to get your Gemini API key, here's the short version. Keep scrolling for more details.
Log in to Google AI Studio.
Click the key icon in the bottom-left.
Click the Create API key button.
Name your API key, tie it to a project, and click Create key to finish.
Copy your key and save it somewhere safe.
Now, let's dig deeper into how to use the Gemini API.
Step 1: Create a Google AI Studio account
Go to the Gemini API website, and click Get started. Follow the steps to create a new account or sign in with your existing Google credentials.
Step 2: Open the API documentation and reference
The API documentation will help you understand features, use cases, and ways to set up your project to take advantage of everything that Google's AI models can do. The API reference is a technical resource that actually lists the endpoints and how to interact with them.
Keep them open and browse as you build to solve problems and customize outputs.
Step 3: How to get a Gemini API key
Once you log in to Google AI Studio, you can use the Playground to test an idea before setting it up, and access the vibe coding tool in the Build section to create a prototype from a prompt.
But here's how to grab your API key:
Click the key icon in the bottom-left.
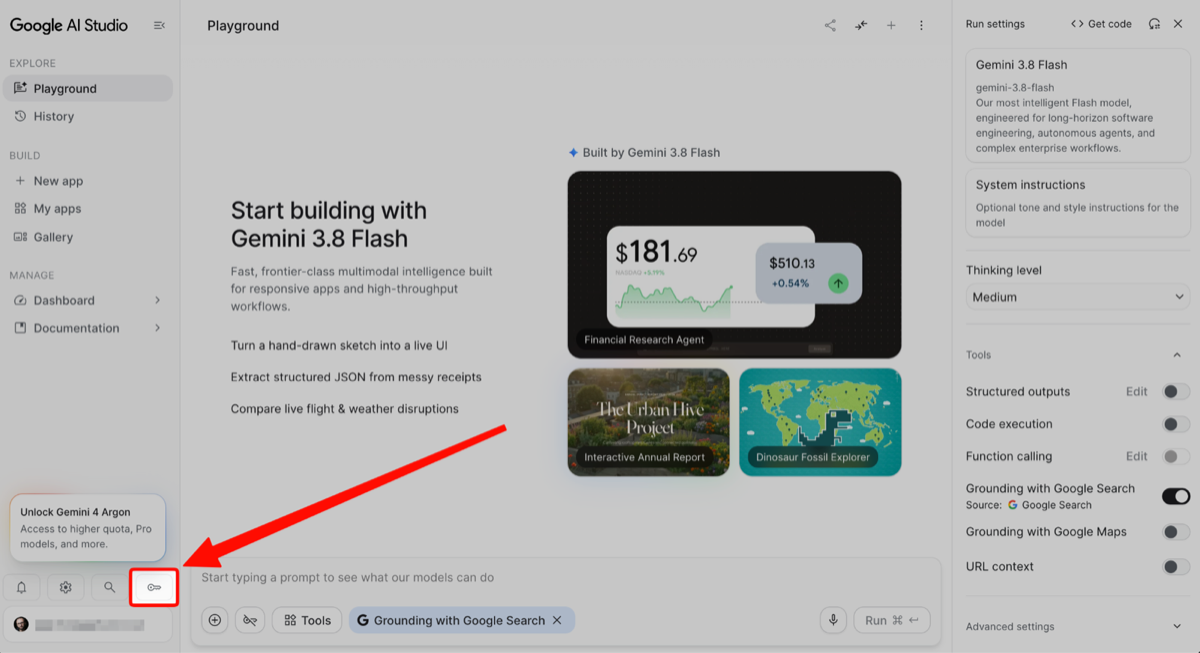
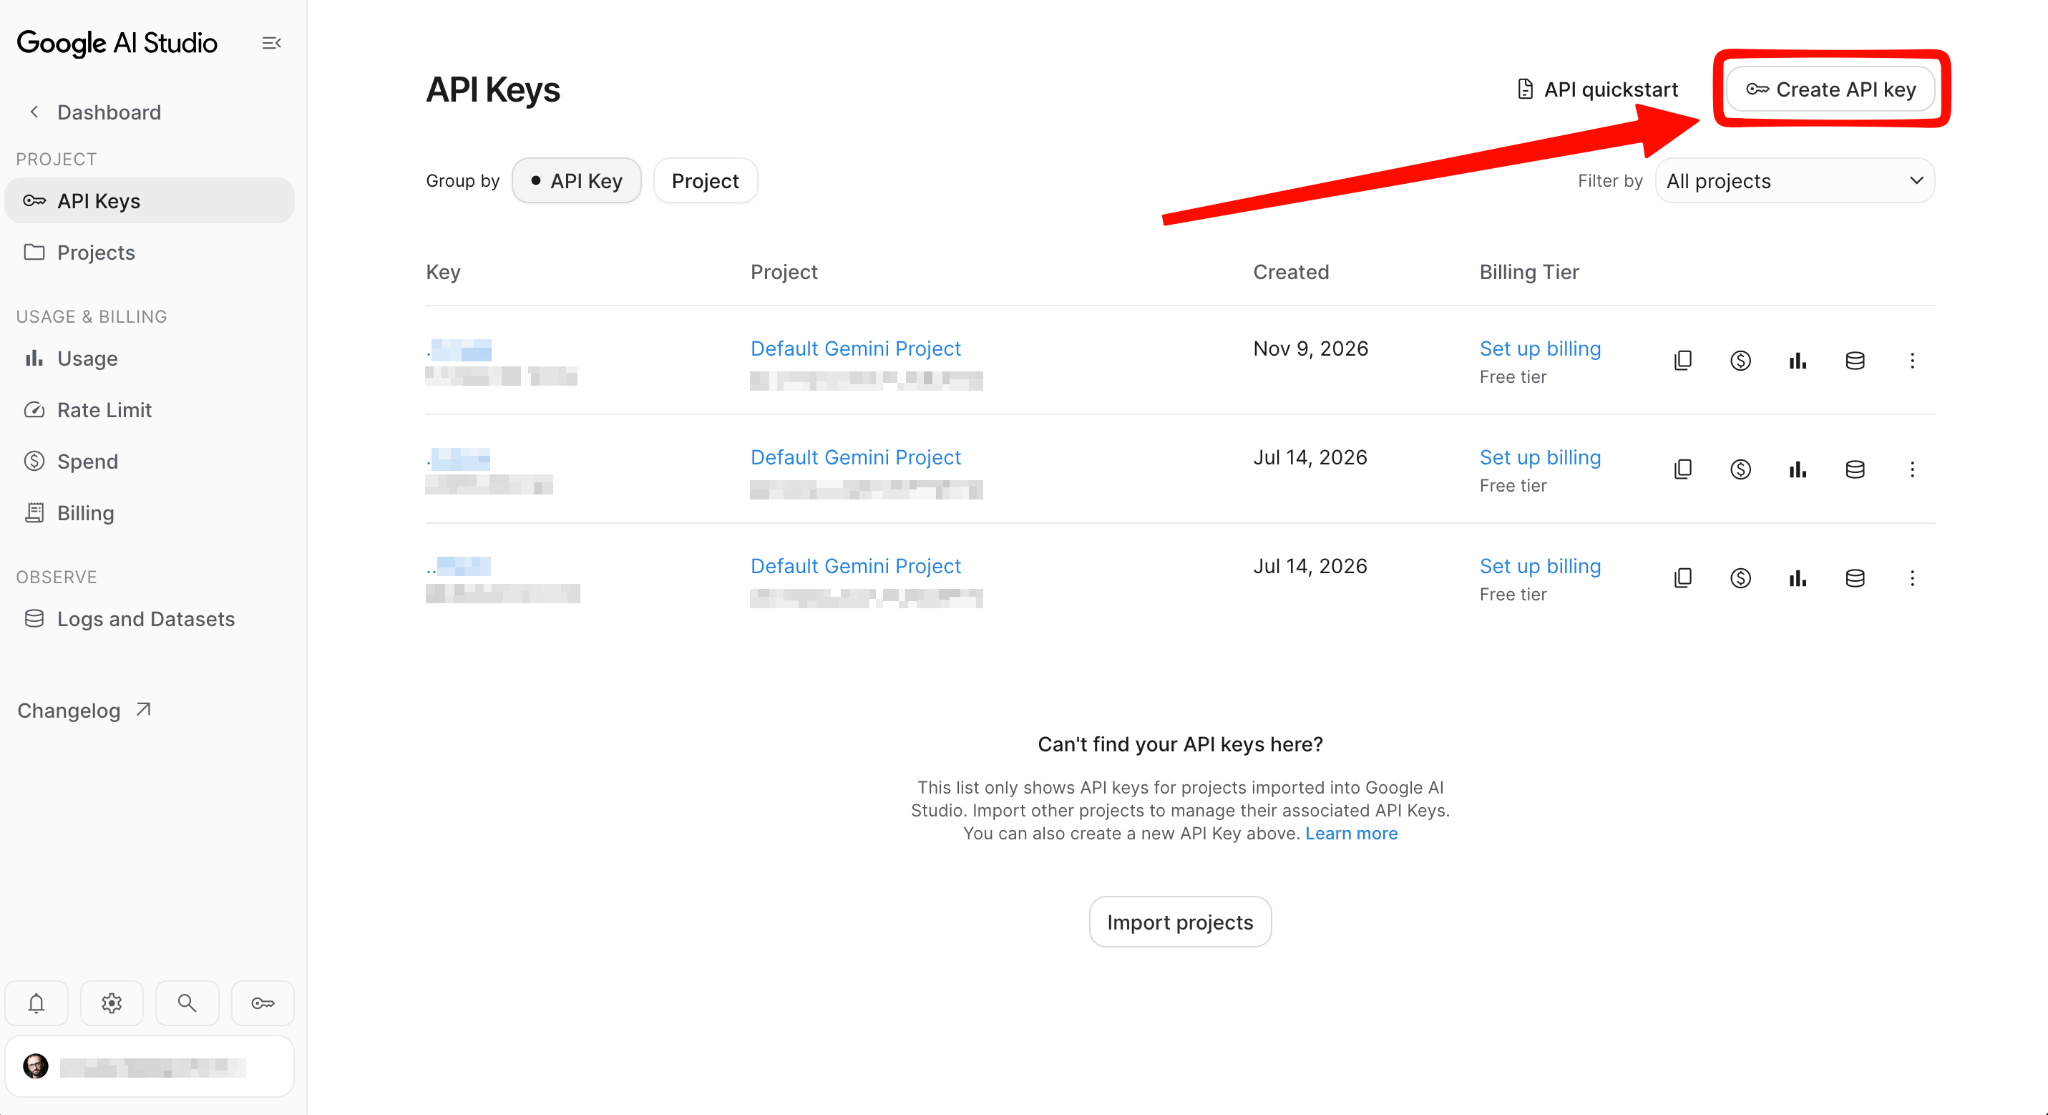
Click the Create API key button.
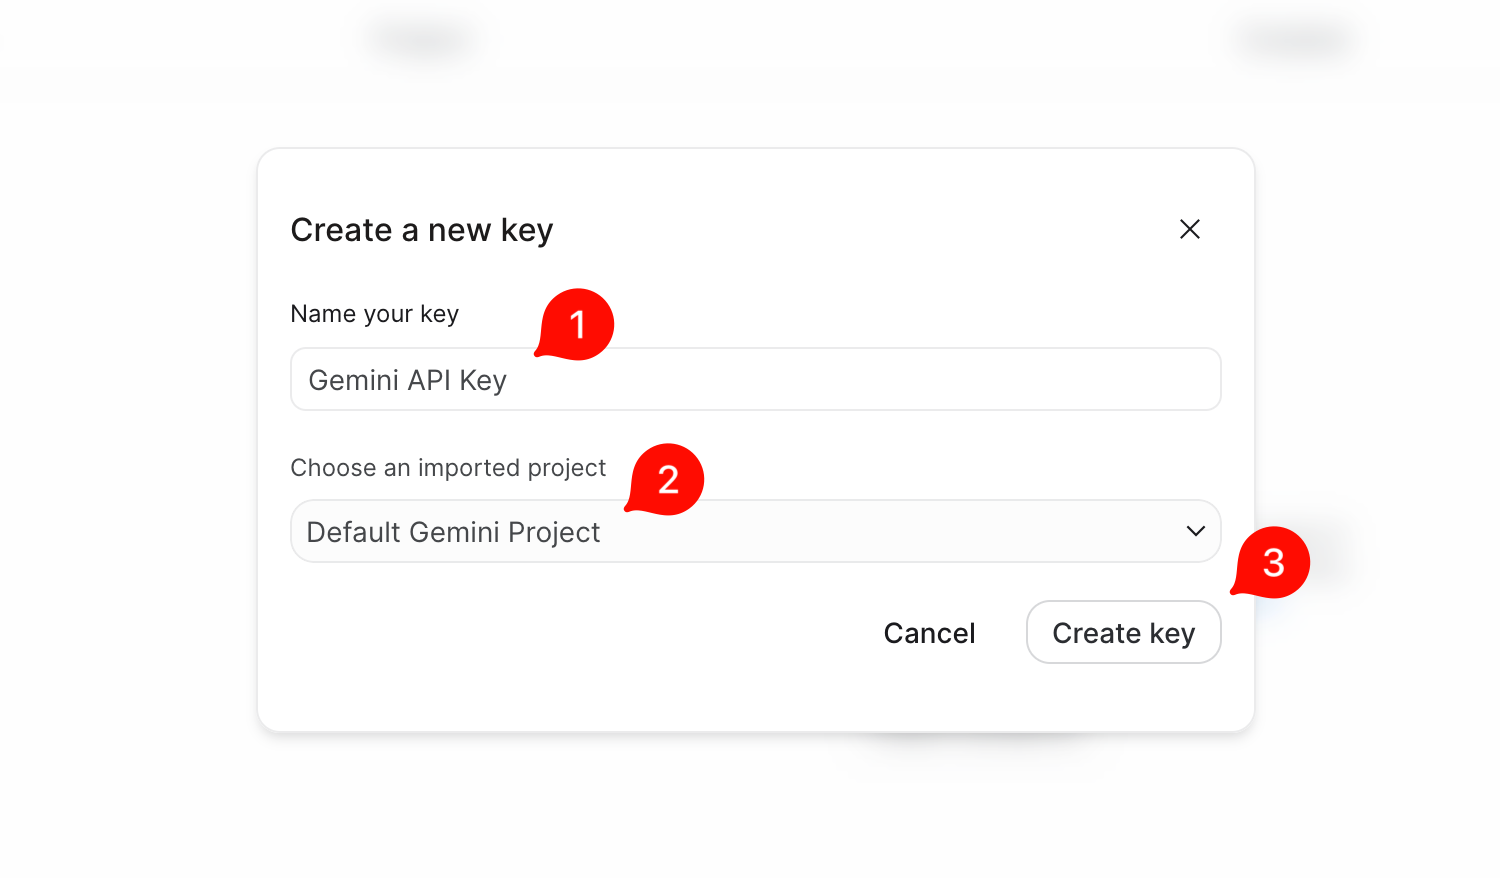
Name your API key, tie it to a project, and click Create key to finish.
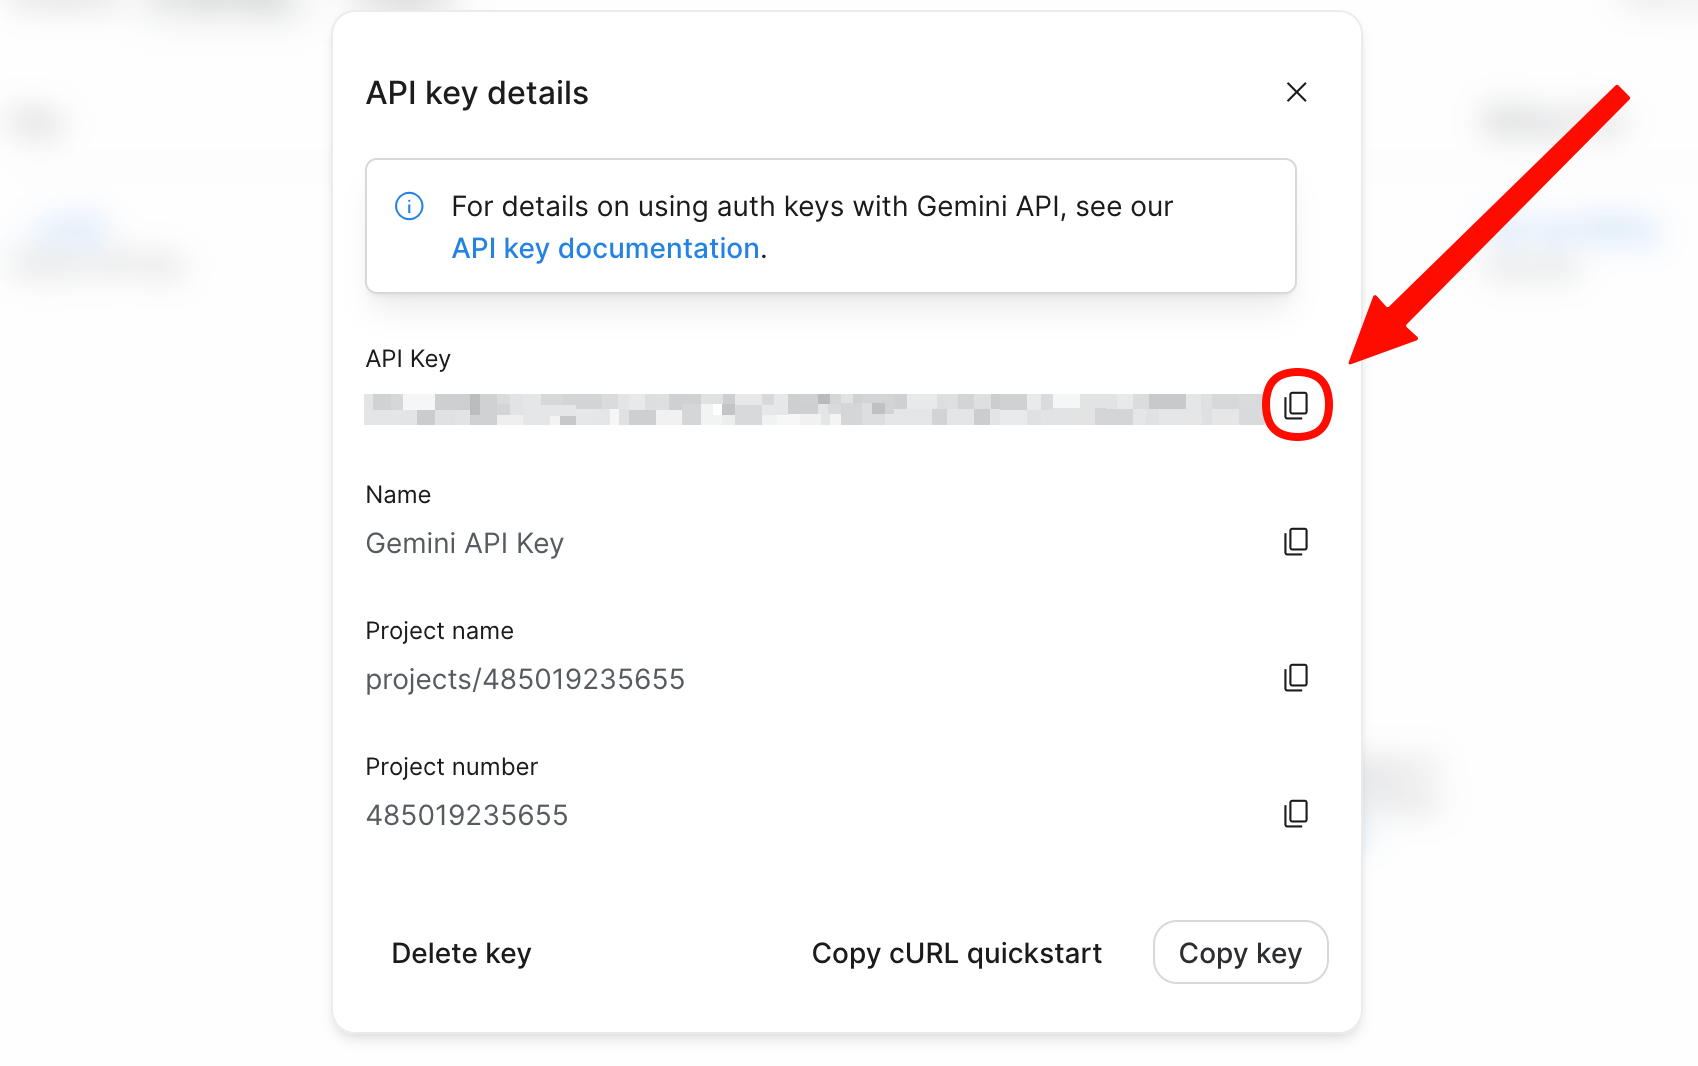
Your new API key appears on the screen. Copy it and save it somewhere safe: if someone finds your key, they may use it and run up your usage costs or disable your endpoints.


Step 4: Set up the API call
We have all the details we need to start calling the Gemini API. If you want to follow along, you can create a free account in Postman, an API engineering platform. You can also get the job done with a no-code app builder or internal tool builder.
If you're following along in Postman, log in to the dashboard and click Workspaces.

Next, click Create workspace.

Name your workspace. Suggestion: Gemini API Test.

Your Postman workspace is up and running; it's time to build the request. Click the plus icon on the left menu.

Choose HTTP from the dropdown list.

Take a look at what information you'll need to set up your call in the API documentation, available through a quickstart card on the main page. There are multiple ways to get started depending on the code language or framework you're using; the best for this guide is REST.

The curl snippet shown above (a terminal command for running an API call) starts out with POST, which is the call's method. In Postman, change the method from GET to POST.

Back in the API documentation, copy the URL that appears right after the method, and paste it into the corresponding input field in Postman.

Let's pause here and make a mistake so you can understand how to debug problematic calls in the future. Click Send right away.

Take a look at the response interface below. The error code (1) tells you the type of issue you're facing: in this case, it's an HTTP 403 Forbidden. The response from Google's server (2) gives more details: we haven't entered an API key, so the endpoint won't give us access.

Building an API integration can involve intense troubleshooting sessions, but don't be discouraged: search online for the error code or pass it on to your favorite AI agent, and fix the request based on what you learn.
Let's keep going and add the missing API key to the request's headers. In Postman, click on the Headers tab.

Return to the API documentation and copy the first value under the -H (header) flag, x-goog-api-key, and paste it into Postman.

Paste your API key as the value of x-goog-api-key.

Next, add the request's content type header with the key Content-Type and the value application/json.

The call's initial setup is complete, so we can move on to customizing the body, containing the instructions you'll be passing into Google's infrastructure.
Step 5: Set up the body of the call
In Postman, click the Body tab.

Back in the API documentation, copy the body of the request enclosed within the -d (data) flag. Leave the apostrophes out: the content that matters is inside them, including the curly braces.

If you didn't set up billing in Google AI Studio, swap the google-4-carbon model for a free one such as gemini-3.8-flash or gemini-3-flash-preview. Note that free-tier models can go through high-demand periods: that can make requests time out or give you a 503 Service Unavailable error.

You can find more model codes on the corresponding documentation page: look at the Endpoint column and paste your desired model in the request's body. Make sure to keep it within quotation marks; the call fails without proper formatting.
We're ready to test the call. Click Send and see what happens.

If you followed this guide closely so far, you'll see a 200 OK code. You'll find the content of the response by scrolling all the way down.

Step 6: Pass your prompts
We're talking to the Gemini API now, but this isn't useful if you can't pass your prompts. On the Postman request tab, replace the value inside the "text" key with your text. Make sure the double quotes remain at both the beginning and end, otherwise the call will return an error.

After you click the Send button, you'll see the new response on the bottom part of the screen.

Step 7: Change the settings
You can add more parameters to the body of the call to control the generation settings in Gemini: head over to the API reference for creating an interaction to see them all.
Scroll down to the system_instruction key. This lets you pass instructions along with every prompt, accepting a string (text or numbers enclosed in quotation marks).

In Postman, add a comma after the end of the line with the input, and add the key "system_instruction"; follow with a colon, and then with the value "End every response with the word avocado."

After you finish adding this parameter, click Send to see the response.

The output incorporates the system instructions that you passed.
A note: There's a little trap with the parameters that can be confusing for beginners: some parameters accept a list of other parameters, not a single value. For example, when you look at generation_config and expand the list, you'll see more parameters.

From this list, you can't add parameters such as max_output_tokens in the same place as system_instruction. Instead, these need to be nested in the generation_config parameter as part of a list, as shown in the image below.

Every parameter that has the same dropdown in the API documentation follows this pattern. You can add as many nested parameters as you want, all separated by commas.
Step 8: Integrate Gemini into your apps
You can integrate basic Gemini functionality into your apps using Google AI Studio and the free API. Refer to the documentation of your no-code or internal tool builder on how to connect APIs to it, and you'll be able to start setting up calls in no time. For example, here's a guide on how to set up API connections using FlutterFlow.
Use Zapier to connect to Gemini
I know you just read an entire guide on how to use the Gemini API, but depending on what you're looking to do, there's an easier way.
With Zapier, you can add Gemini models to your workflows without any API setup. You'll build it straight from your AI tool (including Gemini Enterprise)—just tell your agent what you want to do and let it know you want to use a Gemini model for the task. You don't even need a Gemini account to make it happen: you can choose a Gemini model that uses Zapier tasks instead. Zapier handles the connection, so there's no key to create or paste in.
The Zap starts when something happens in your apps, like a new email or form response. Gemini only runs in the step that needs judgment, like drafting a reply or triaging feedback, while regular steps handle the rest across 9,000+ apps. If your team uses Gemini Enterprise, Zapier MCP also lets you take action in those apps right from the Gemini chat. Learn more about how Gemini works with Zapier.
Google Gemini API: FAQs
Google may have started last in the AI race—remember PaLM and Bard?—but it has been on an upward trajectory ever since, competing on equal terms with the best models out there. If you need flexibility, multimodal capabilities that include video, and native integration with Google products, you can't go wrong with Gemini.
So we covered a lot of ground. Got a few lingering questions?
Is the Google Gemini API free to use?
You can access a free tier for the Gemini API with a limited model selection and lower rate limits for testing purposes. Here's a detailed breakdown of the Gemini API pricing. You can also access Gemini models without a Gemini API key on Zapier.
What are the available languages for Gemini's API?
When connecting to the Gemini API using Google's GenAI SDK, you can use 5 languages: Python, JavaScript/TypeScript, Go, Java, and C#/.NET. As for human languages, each Gemini model has their own list of supported languages, with Gemini 3.8 TTS leading with 130 languages. Take a look at the model details page for more information.
What are the available regions for Gemini's API?
Gemini API and Google AI Studio are currently available in over 120 countries, including Australia, Canada, Egypt, Indonesia, Japan, and the United States. Here's the full list of supported regions.
Related reading:
This article was originally published in July 2024. The most recent update was in November 2026.