Discord is a staple in both the professional and personal parts of my life. I use it to manage a community, stay in touch with my friends, and get better at video games. One feature makes my life easier no matter why I have the app booted up: roles.
While simple at first glance, Discord roles have all sorts of customization options that keep servers running smoothly. They help server owners manage the content their community members see. Plus, if you know how to use roles to their fullest potential, the people in your server can use them to filter their communication.
I'll dig into what Discord roles are and how you can use them to successfully manage a community.
Table of contents:
What are Discord roles?
Discord roles are groups you can sort your Discord server members into that determine their appearance and privileges. Here are some of the aspects of roles you can customize:
The color of role members' names
The actions role members can perform in your server, such as attaching files to messages or managing other members
Which channels role members have access to
The way that connected apps and integrations affect a role (such as a specific role for a Zapier bot)
How to add roles in Discord
Here's how to make roles in Discord:
Click your server name in the upper-left corner of your server.
Go to Server Settings > Roles.
Click Create Role.
From there, you can manage all the following settings. (Note: the default role, @everyone, applies settings to everyone in the server who doesn't have a specific role and serves as default settings for new roles.)
Display settings
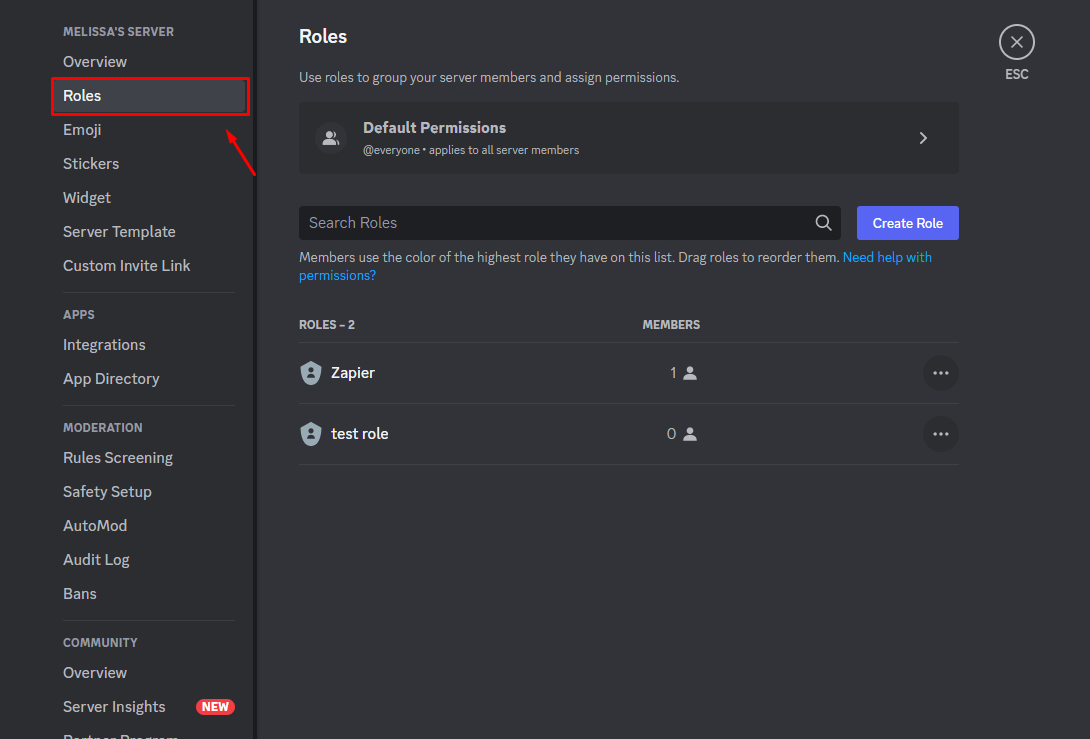
The first tab that appears when you go into Discord's role settings is the Display tab. Here, you can manage how each role looks to the rest of the server with these settings:
Role color: Choose a color for the names of members included in this role. This color will appear in channel messages and the online users list on the right side of the server.
Role icon: If your members boost your server—pay money to give it extra perks—to Level 2, you can also give roles an icon. This icon appears next to the names of members of that role.
Display role members separately from online members: Toggling this option on will give members of this role their own category in the online users list.
Allow anyone to @mention this role: This setting allows users who normally can't tag roles in messages to tag them using the @ symbol and the role name. When someone tags a role in a message, everyone in that role will see a red dot next to the channel's unread notification, and the message itself will be highlighted.
View server as role: This is my favorite feature for managing Discord servers. When you click this button, you'll see your Discord server the exact way people in that role see it. It's a great tool for making sure roles can (or can't) see certain channels or features.
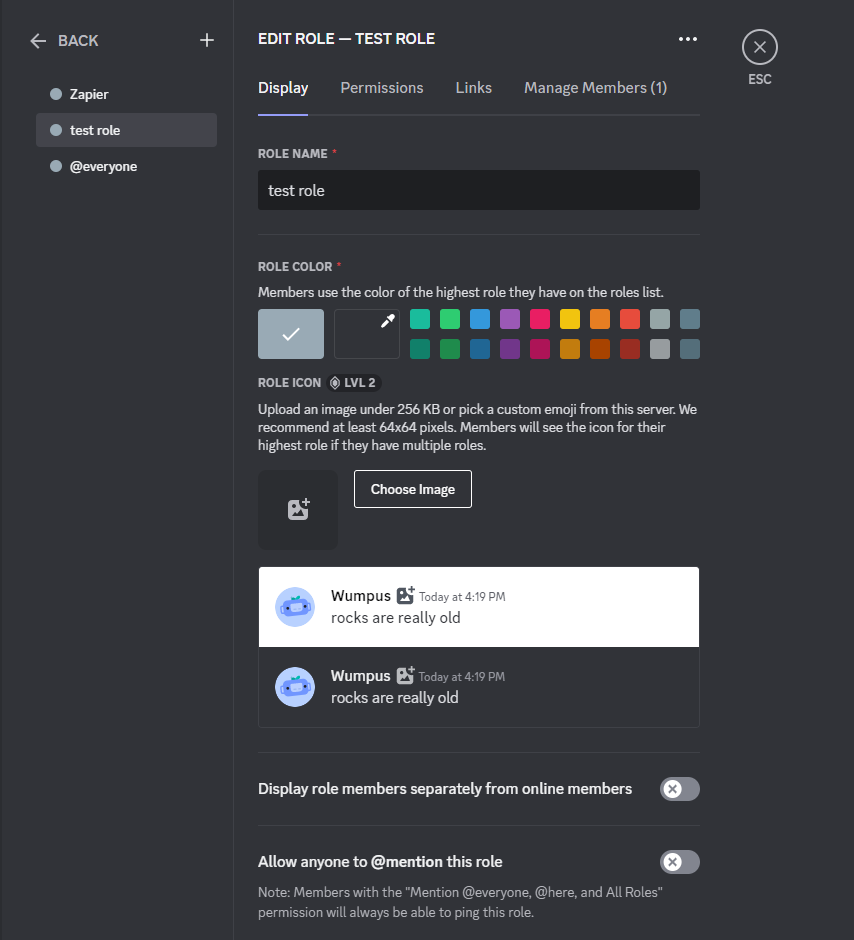
When a member has multiple roles with special display rules, their name color, icon, and online status category will depend on the role hierarchy you set. So, for example, if a member has two roles with different name colors, their name will have the color of the role highest on your hierarchy list. You can change role hierarchy using one of two methods:
On the main Roles page, click and drag the six dots that appear when you hover over a role name to move the role.
When you're managing permissions for a specific role, you can drag the roles on the list to the left to set your hierarchy.
Role permissions
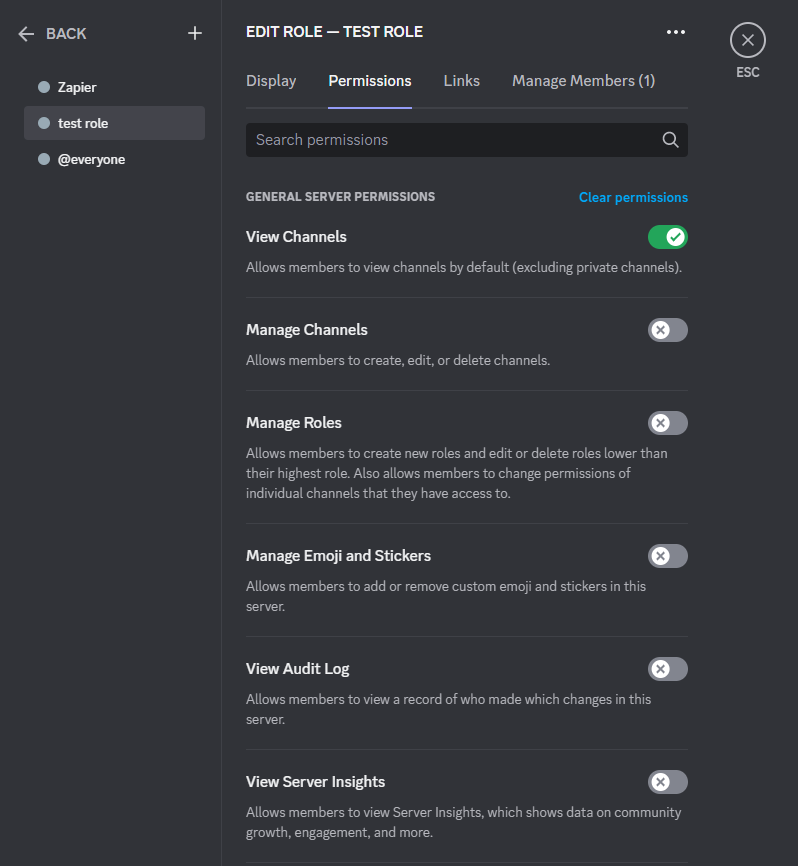
When you click over to the Permissions tab, you'll find the bread and butter of role settings. Discord organizes its numerous role permission settings into the following categories:
General server permissions: Determine how members in this role can manage channels, roles, emoji, stickers, or the server itself.
Membership permissions: These settings control if role members can manage other members through actions like changing their nicknames, creating invites, and banning them.
Text channel permissions: Here are the role permissions for the interactions most Discord members use, such as sending messages, adding reactions, starting threads, and mentioning other members.
Voice channel permissions: Decide what role members can do in voice channels, including joining, speaking, and using video. If you plan on having large voice channel discussions, you can also turn on the Priority Speaker setting to make role members more easily heard.
Apps permissions: These permissions dictate what this role can do with Discord apps, like the ones used for activities.
Stage channel permissions: Stage channels are special channels where only members with special permissions can speak. In this section of the role permissions, you can choose if role members can request to speak in one of these channels.
Events permissions: This section has one setting that allows role members to create, edit, and cancel events.
Advanced permissions: Click the Administrator button to give a role every permission available and bypass all channel-specific permissions. Handle with care.
Linked roles
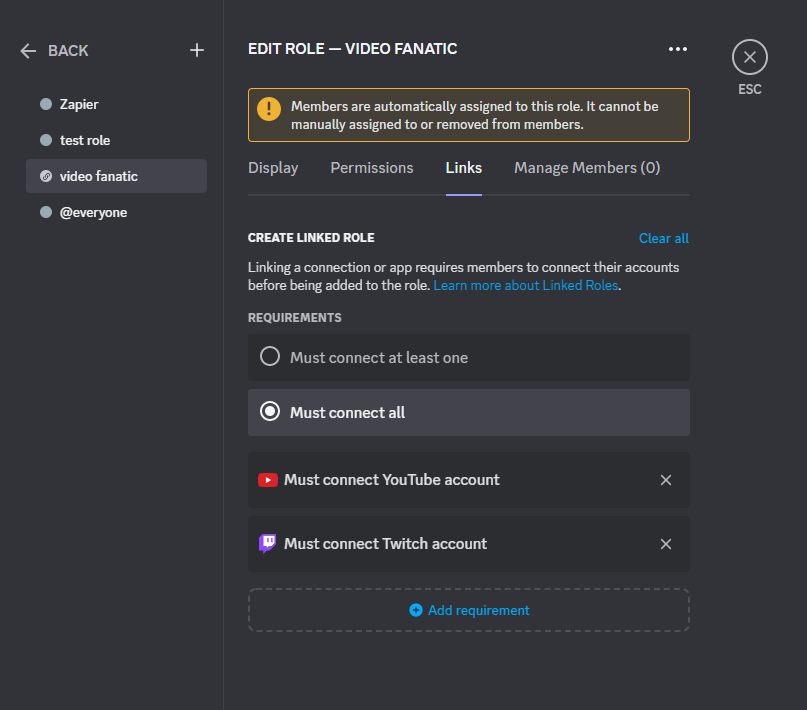
Go to the Links tab to adjust linked roles that associate certain roles with connections to outside apps. For example, you could give members with YouTube and Twitch connections a role for video fanatics.
Each app connection has different functionality, with some apps having more variables than others. For example, Discord can tell if someone is a Reddit mod, but not if they're a Twitch subscriber. As this functionality grows and rolls out to servers, you can fill in the gaps with Zaps like this one:
Zapier is a no-code automation tool that lets you connect your apps into automated workflows, so that every person and every business can move forward at growth speed. Learn more about how it works.
Managing members within a role: How to assign roles in Discord
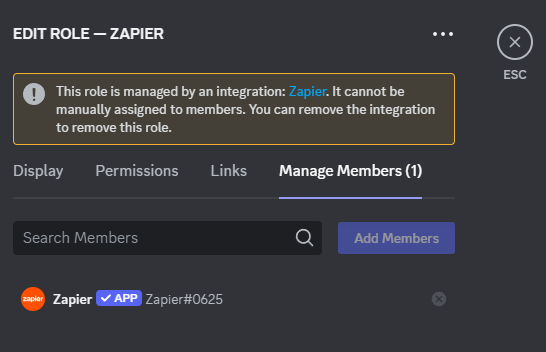
The last tab, Manage Members, lets you view the members within a role, manage their settings, and add new members to the role. Click on a role name to view the members in that role. As you can see in this screenshot of my Zapier role, you can't add or take away members from an integration-related role.
Discord roles ideas: What can you do with Discord roles?
Try these ways to manage your community using the tools I just covered.
1. Create separate channels for different roles
When you create a new channel, click the Private Channel toggle, and decide which roles can access that channel.
You can also go into the Edit Channel menu and click Permissions to change an existing channel's permissions and get more granular with them. The X icon denies that permission for that role in that channel, the slash icon defers to the role's base permissions, and the checkmark icon allows that permission for that role in that channel.
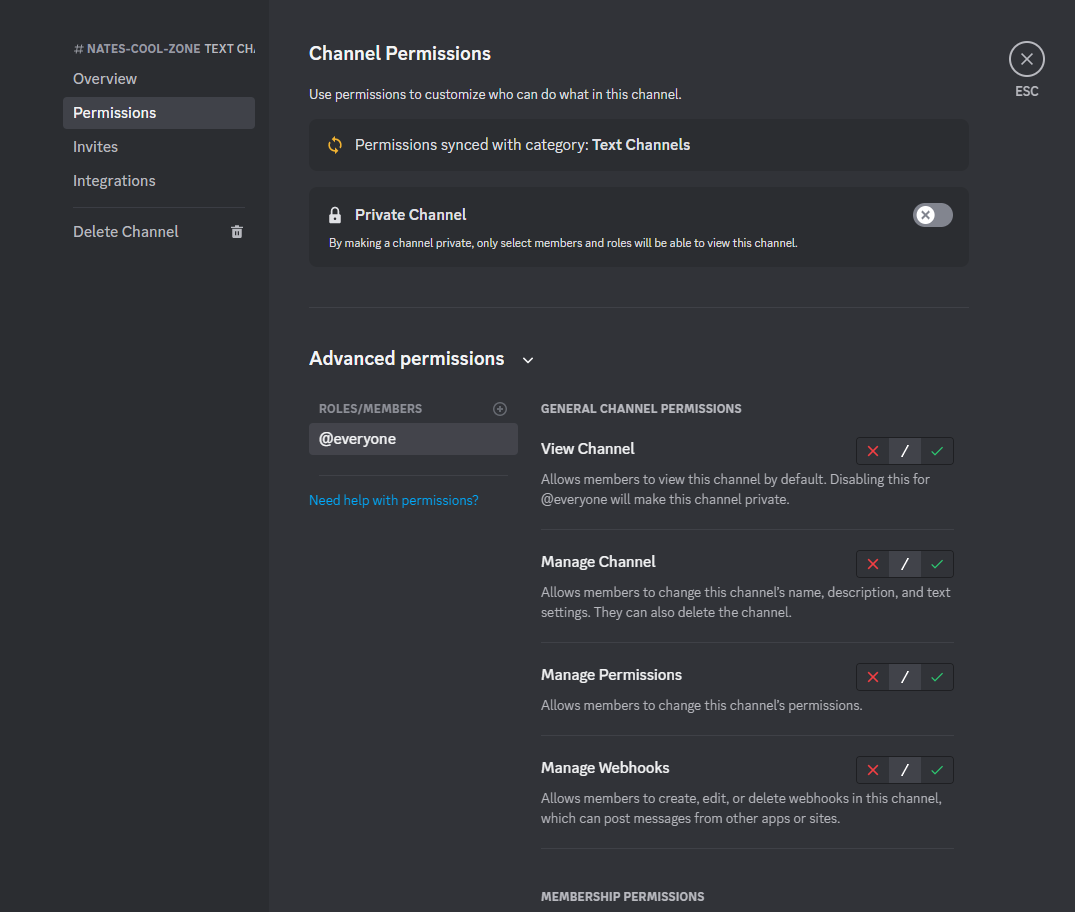
This also works with channel categories—right-click on a category name and go to the Edit Category menu's Permissions options.
2. Set up a rules screening process
Using a special Zapier trick you can find in this blog post and my post on building a Discord community, you can add a rules screening process to your regular Discord server. Here's how the process goes:
Create a role that has access to your general channels, and remove that access from @everyone and other non-admin roles.
Make a #rules channel listing your community rules, and include a message instructing members to react with a certain emoji if they've read them.
Set up a Zapier automation (Zap) that assigns the role with access when members react to a message. Connect your access role with your message asking members to react when they've read the rules.
Community servers have a built-in rules screening process, but this Zap can help when you don't need or want a community server. It's a matter of deciding what you want for your welcome experience and community members.
3. Let server members choose their channels and roles
You can also use the Zapier trick to create a "self-serve" feature for your members, where they can assign roles to themselves. Discord opts people into all channels available to them by default (as opposed to Slack's opt-in features). This trick lets members join the exact channels they want when you gate certain channels behind roles they can choose for themselves.
For example, maybe you'd like to create a channel for talking about guinea pigs, but you know that not all of your members will want to join. You can add a "Guinea Pig Fanatic" role to your server with access to a #guinea-pigs-rule channel that members can get by reacting to a message.
Using this method, members can also choose optional roles for getting tagged in messages or sharing details about themselves like pronouns.
4. Build discussion channels for your admins
Depending on your community and organization hierarchy, you could benefit from having private channels for your admin team. These channels provide a space to talk about your server's direction or decide how to handle a tricky interaction.
Discord requires one of these channels for a community server, so moderators can get updates from Discord's community team. But if you communicate with your other admins mainly through Discord, you can also benefit from having an admin channel in your regular server.
5. Tag the members of a role in a message
If you toggle on the ability to tag a role in a message in the role's Display menu, you can tag specific roles in announcements geared toward them. The message will be highlighted for them, and they'll get a special notification by the channel name.
You could, for example, provide a role for joining your badminton group and tag everyone in that role when you want to play a game. Even without a dedicated channel, you can coordinate people within a certain role through role tagging.

6. Manage bot and integration permissions
Discord integrations and bots sometimes need certain permissions set to work properly. Go into the settings for your bot or integration's dedicated role to get everything set up. For example, you need to have the Manage Webhooks permission on to get Zapier working.
7. Offer unique Server Subscription perks
Server Subscriptions and Shops use roles to determine what community features subscribed members receive. You can automatically add people who subscribe to your server or buy a product to roles with perks like:
Access to special channels
Updates on exclusive events, merch drops, and gifts
Use of unique emoji and interaction features
Special icon and name color
Automate your way to an efficient server
The power of Discord server roles lies in their ability to automate your everyday server operations: your everyday interactions become more organized and fun with some adjustments to your role settings. On top of your Discord roles, you can automate your server further with Zapier. Learn more about how to automate Discord to make your members' experience even better, or get started with one of these pre-made workflows.
Send new YouTube videos in Discord channel messages
Related reading:
