When a critical incident occurs, you can send your on-call engineer a text, chat message, or email alert. But emergencies don't always happen at convenient times. If they're asleep or just happen to be away from their computer, a phone call is way more likely to get their attention. Plus, hearing incident details can be easier to process than reading them—especially if your engineer has just woken up or is in the middle of some other task.
Manually looking up who's on call, crafting a concise message, and placing the phone call burns valuable time when every second counts. In this tutorial, I'll show you how to automatically find your on-call engineer in a Zapier table, then deliver AI voice alerts through Telnyx whenever a PagerDuty incident occurs—but you can swap out these apps for the tools you prefer using, as it'll be a similar setup. Let's dive in.
Zapier is the most connected AI orchestration platform—integrating with thousands of apps from partners like Google, Salesforce, and Microsoft. Use forms, data tables, and logic to build secure, automated, AI-powered systems for your business-critical workflows across your organization's technology stack. Learn more.
Auto-alert engineers with AI voice calls for critical incidents
Zapier is an AI orchestration platform that lets you streamline your work by connecting your work apps into automated workflows. These workflows are called Zaps, and they can do lots of tasks for you—including delivering voice alerts for critical issues. You can build your own Zaps from scratch without any coding knowledge, but there are also many pre-built templates to help you get started quickly.
To build this Zap, you can start from scratch in the Zap editor or click the template below. (The template will save you some clicks by automatically populating your trigger and action steps.) If you don't already have a Zapier account, you'll need to create one. Then just follow the directions below to set up your Zap.
Instantly alert on-call engineers to critical incidents
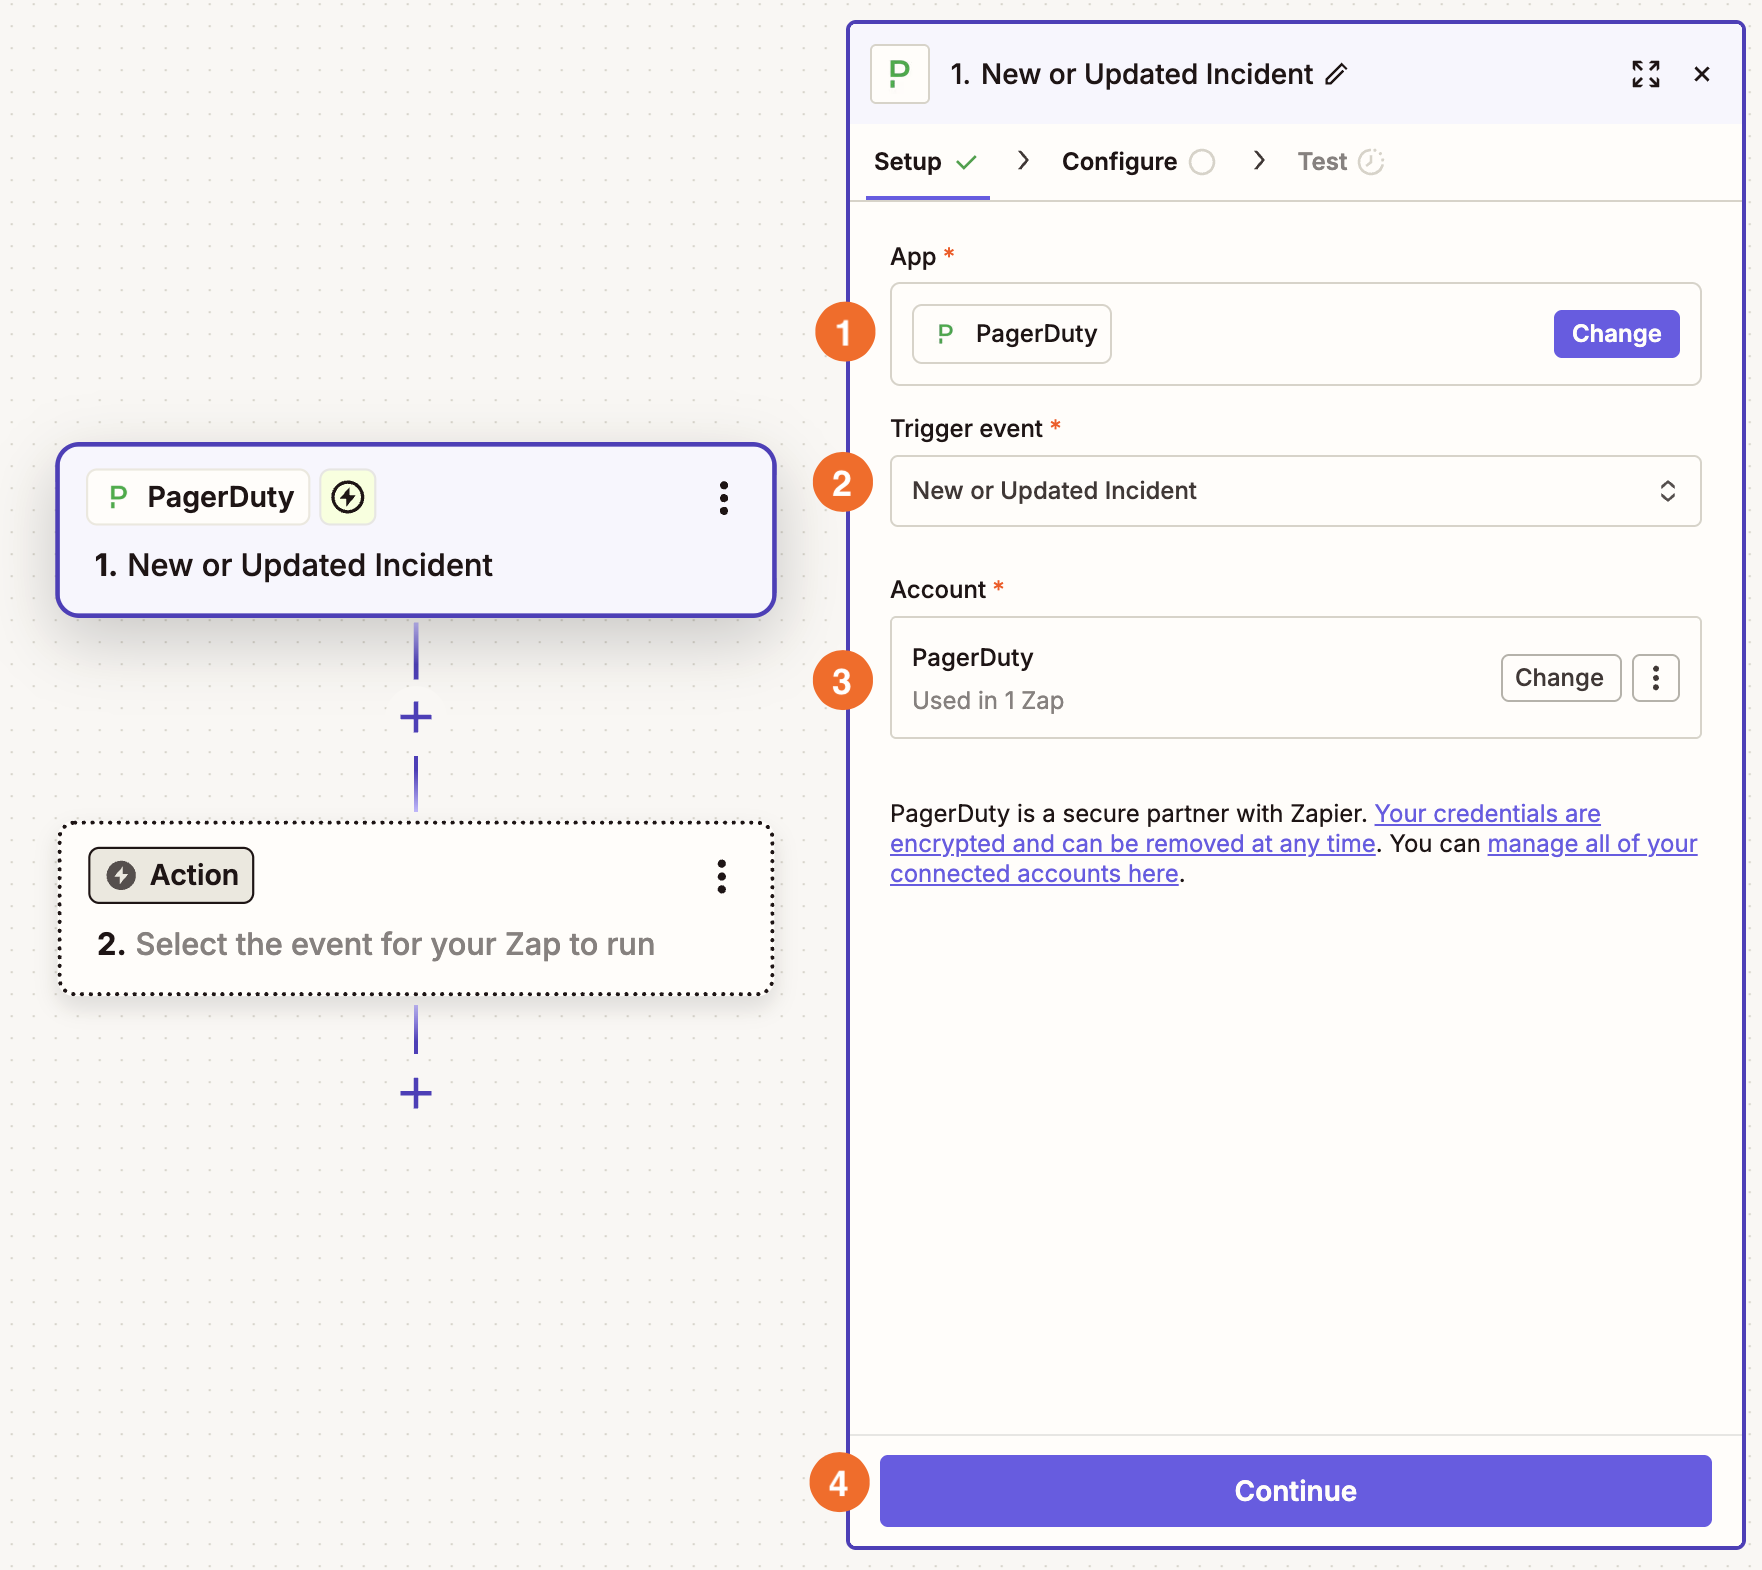
Set up your PagerDuty trigger
Create your trigger, choosing PagerDuty as your app and New or Updated Incident as your trigger event. If you started with the template, this will already be done for you.
Connect your account—this will require you to enter an API key—and then click Continue.
In the Configure tab, specify which service in your PagerDuty account you want this Zap to monitor. For example, you may have different services for website monitoring or payment processing. When you're done, click Continue.
Now test this step and pick a high-urgency incident as your test record. (If none exists, click Edit in the modal and modify the record's urgency field so it says "high." This will make setting up your Zap easier.)
Now click Continue with selected record.


Set up your critical incident filter
Next, let's make sure this Zap only runs for critical incidents.
In your next step, choose Filter as your app.
Filter by Zapier is a built-in tool that lets you add conditional logic to your Zaps. For more details, check out the feature guide.
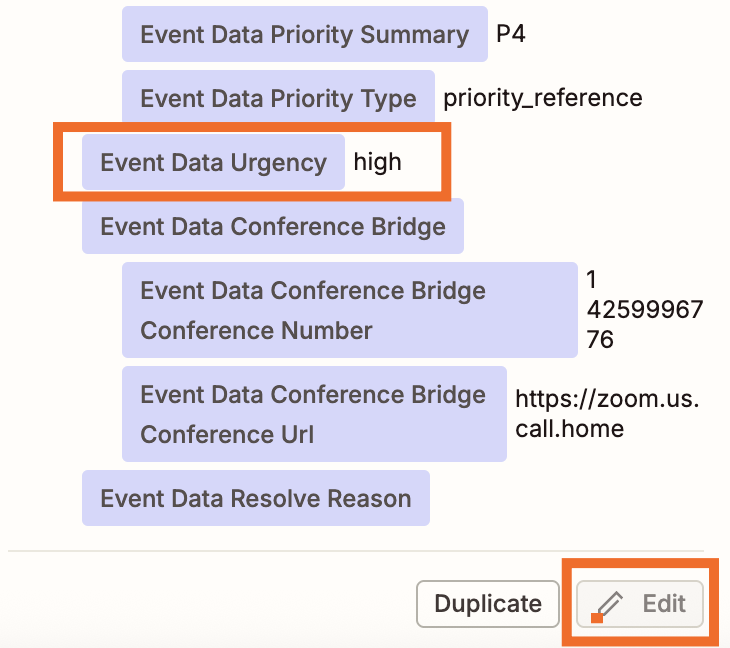
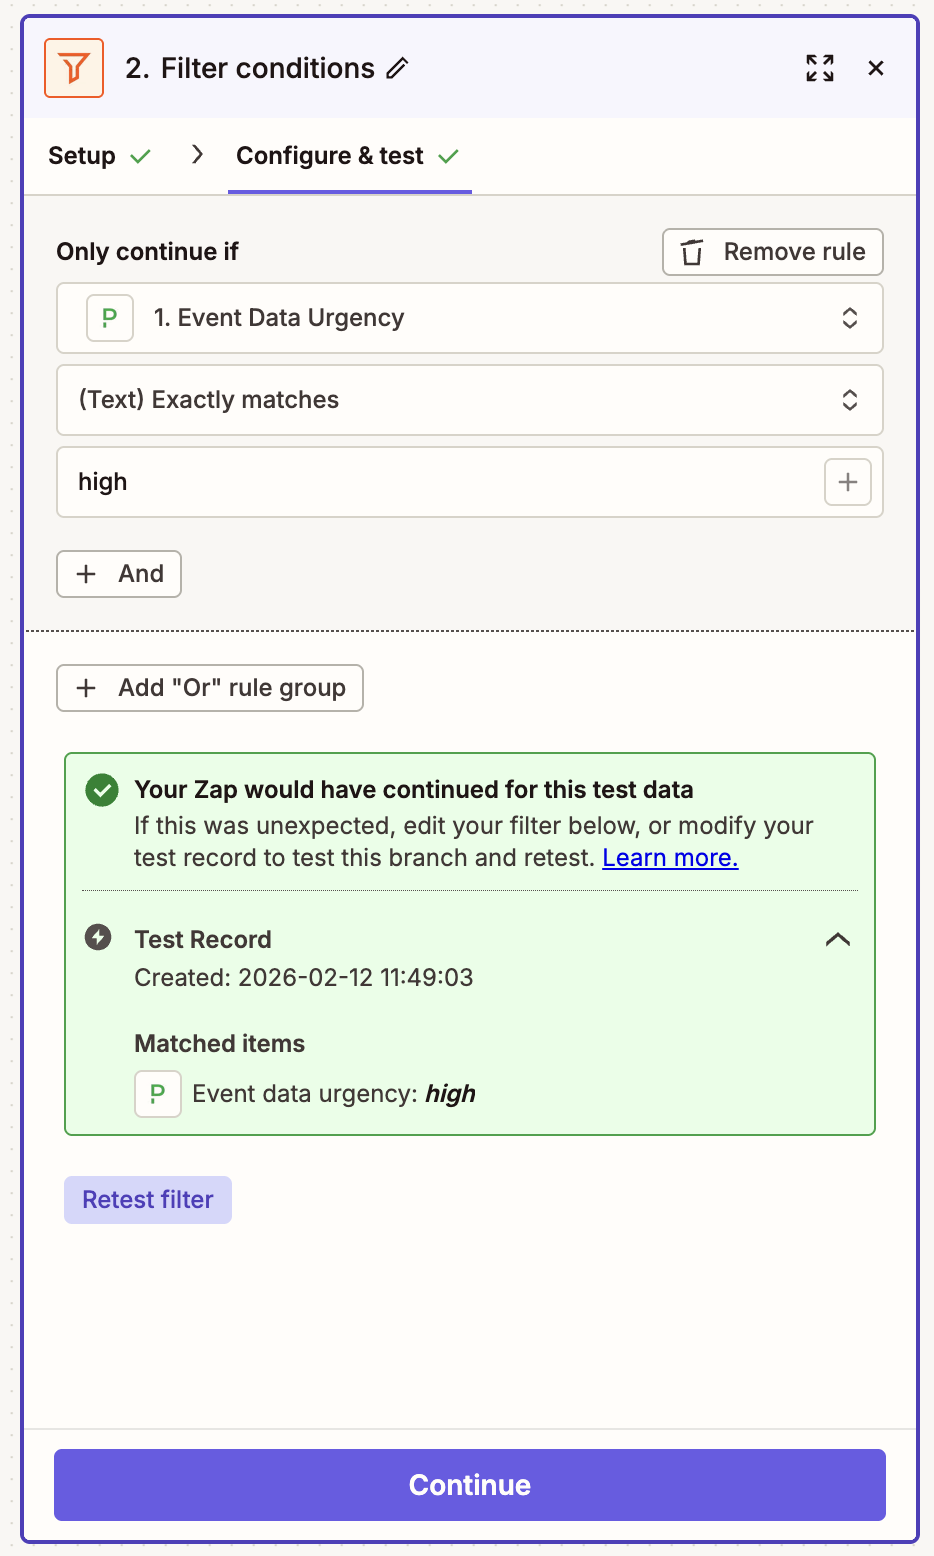
You need to map fields from your PagerDuty trigger to make this filter work. So click Choose field… and select Event Data Urgency.
Click Choose condition… and select (Text) Exactly matches, then type high—this field isn't case sensitive, so don't worry about capitalization.
Click Continue to test the step. Zapier will let you know whether the Zap would've continued if this particular incident occurred. (Since you selected a high-urgency incident, the result should be positive.)
Click Continue.

Set up your Zapier Tables action to find the on-call engineer
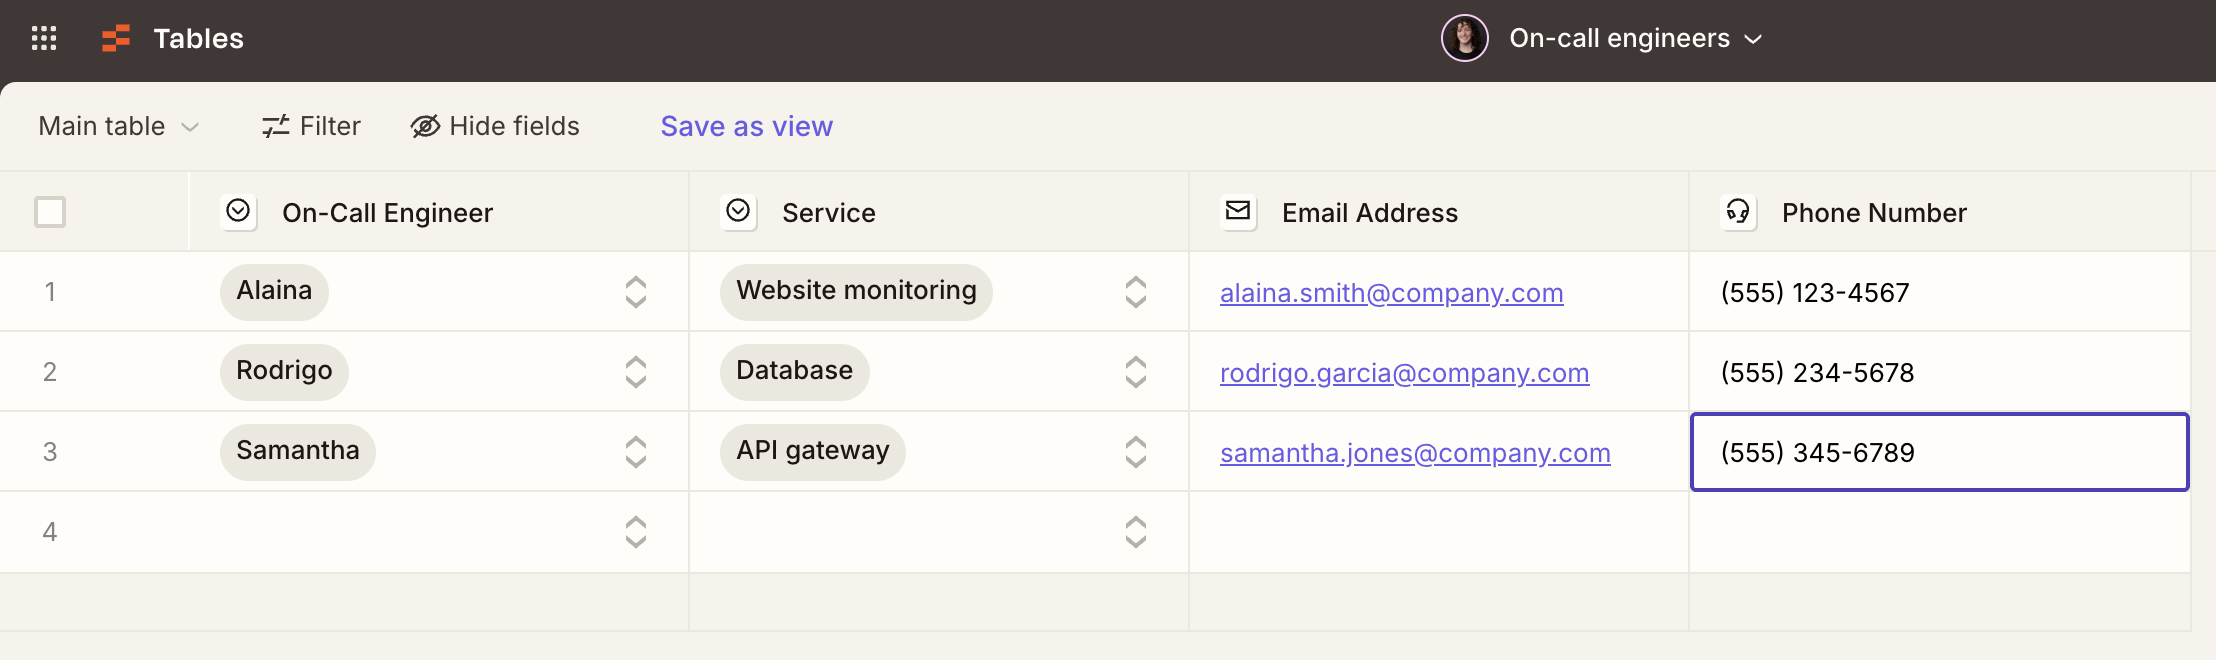
Your next step will identify who's on call. I'll show you how to look this information up in a Zapier table, but remember that you can swap Zapier Tables out for whatever app you use to store on-call schedules.
Choose Zapier Tables as your app and Find Record as the action event. Then click Continue.
In the Configure tab, select the table that contains your on-call schedule information. Here's a simple table I created with engineer assignments organized by service.
Do you assign engineers by some other criteria? Zapier Copilot, our built-in AI assistant, can help you set up a table, configure your search step, or even build your entire Zap based on your specific workflow. Just open a Copilot chat window and describe what you need in plain language. Learn more about how Zapier Copilot works.
Set your Filter Count to 1, since you only want one engineer returned in this workflow. In Lookup Field 1, select the column name that corresponds to how you assign engineers. I'll set my Operator to "is exactly" and map the Lookup Value to the service name from my PagerDuty incident data.
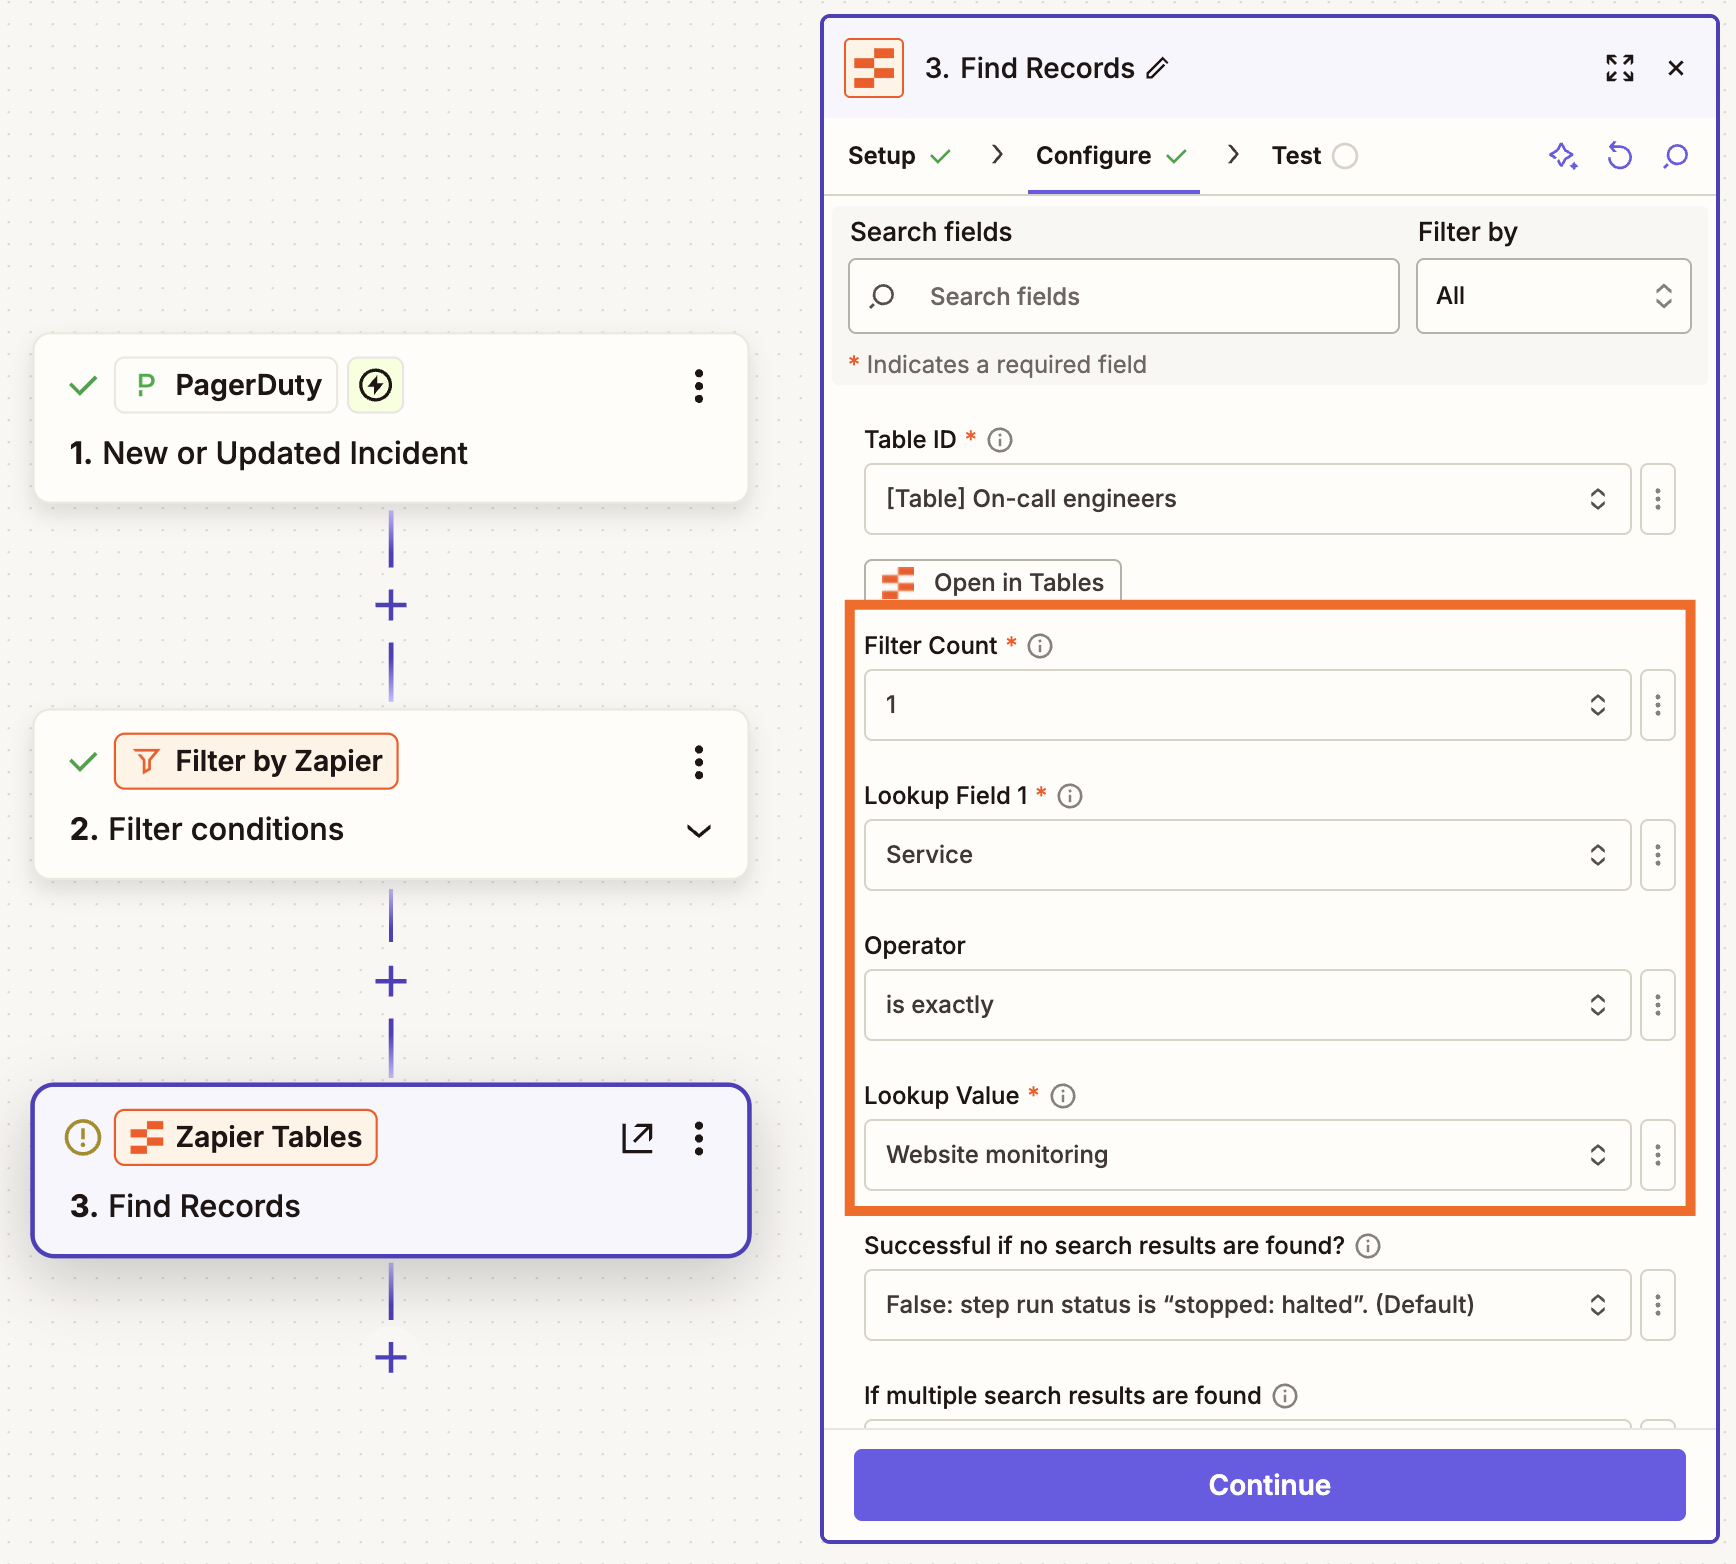
When you're done, click Continue. Then test your step. It should locate the correct engineer.
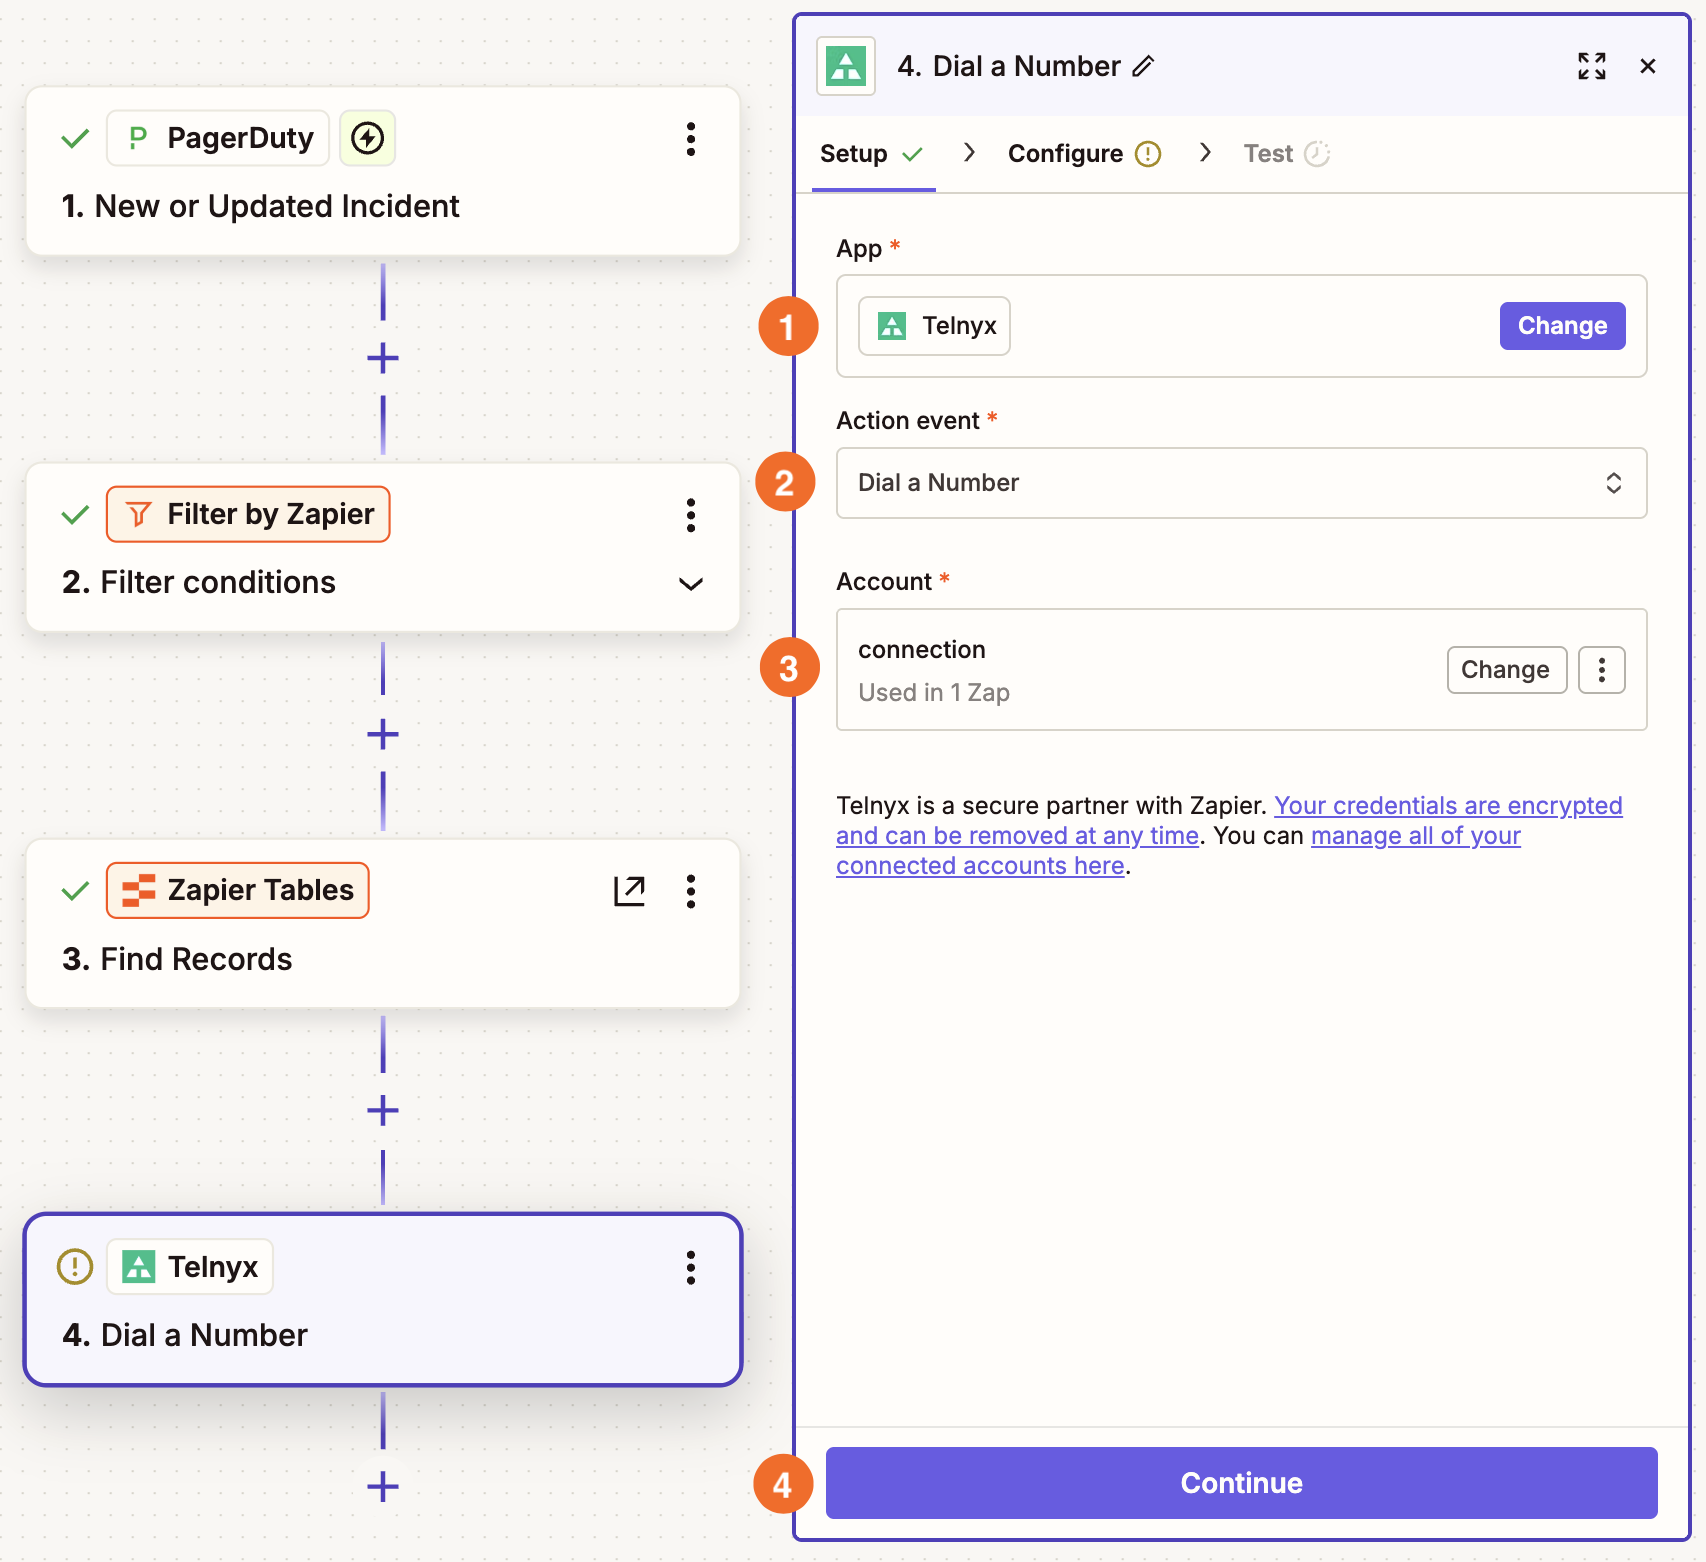


Set up your Telnyx action to call the engineer
Now let's connect our Zap to the AI voice agent.
For this specific Zap, choose Telnyx as your app and Dial a Number as the action event.
Then connect your Telnyx account and click Continue.
For this step to work, you need to select your Telnyx connection ID, which is the phone system you're routing the call through, and your source number, the number that'll show up on the recipient's caller ID. Set up both in Telynx, then, back in the Zap editor, map the ID and number in the appropriate fields.
Finally, map the correct engineer's phone number to the Destination Number and click Continue.
Set up your Telnyx action to deliver the AI voice alert
In your final step, choose Telnyx as your app and Speak Text as the action event. Then click Continue.
In the Configure tab, you'll craft the message that will be spoken to your on-call engineer. In the Call Control ID field, map the call control ID from the previous Telnyx step. In the Text field, create a message, mapping whatever PagerDuty information you want to include in the message. To personalize the message, you can even include the engineer's name from your Tables step.
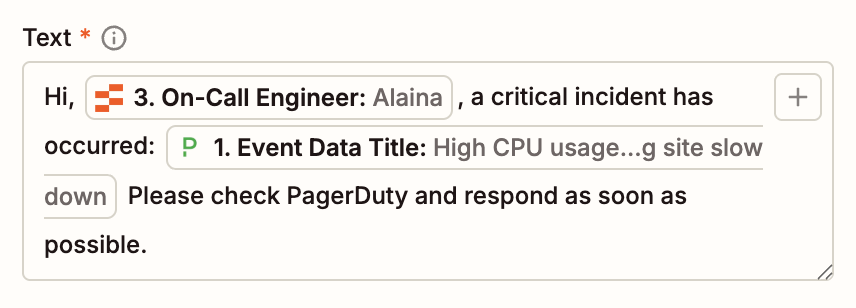
Pro tip: Want a more natural-sounding message? Add an AI by Zapier step to this workflow with a prompt to summarize the PagerDuty incident. Then map the AI-generated summary to your Speak Text action. To learn more about using AI steps, check out our feature guide.
Click Continue, then test the step. You should see a written version of the audio Telnyx will send.
Finally, remember to click Publish to turn your Zap on. Now every time a critical incident occurs, your on-call engineer will receive a call with an audio recording describing the incident.