You have a ton of apps and tools to choose from when it comes to taking notes and saving information. OneNote, however, stands out among note-taking apps for its incredible flexibility, colorful interface, and robust features.
Over the last decade or so, I've tried dozens of note-taking apps and strategies—from using plain text files or good old paper notebooks to powerful tools like Evernote. I always come back to OneNote. If you haven't given it a try yet, you might be about to discover your new favorite productivity tool.
OneNote has been around for a dozen years as part of the Microsoft Office suite. Despite that, the app has long been probably the most underrated app in Microsoft's arsenal. You can chalk that up to the software being a paid app limited to Windows up until a couple of years ago.
That means many people have been missing out on what makes OneNote such an awesome, all-purpose tool not just for notes, but for capturing information of any kind.
Feel too limited by simple notes apps and tend to think visually and non-linearly? You'll likely appreciate OneNote's freeform notes canvas, which lets you add any kind of content—including text, images, videos, tables, and files—anywhere on the page.
Fond of scribbling on napkins or sketching out ideas? OneNote's inking tools let you draw using your trackpad or mouse, as well as a stylus or your fingers if you use a tablet or touchscreen PC.
Tend to collect a ton of research and want a way to easily organize it? OneNote was designed just for you, with features such as a web clipper, email-to-notes, and quick notes shortcuts, not to mention that intuitive notebook interface.
It's the digital notebook that lets you take notes any way you want. In this OneNote tutorial, we'll teach you how to take your notes to the next level.
OneNote Tutorial: Get to Know Notebooks, Sections, and Pages
The first step to getting started with OneNote, naturally, is to go grab the free app at https://www.onenote.com/. OneNote is available for Windows, Mac, Android, and iOS. There's also an online version and a Windows 10 App version that's more touch-friendly than the desktop version and also simpler. Each version differs from the others at least slightly in terms of features, with OneNote on Windows desktop packed with the most features. However, the essential ways you can use OneNote, such as how you organize notes, are the same no matter what device you're using.
Note: You'll need a Microsoft account to use OneNote since your notebooks and notes will be stored on Microsoft's free cloud service, OneDrive. If you are an Office 365 subscriber, however, you can store your notebooks anywhere on your hard drive.
Let's take a look at the interface:
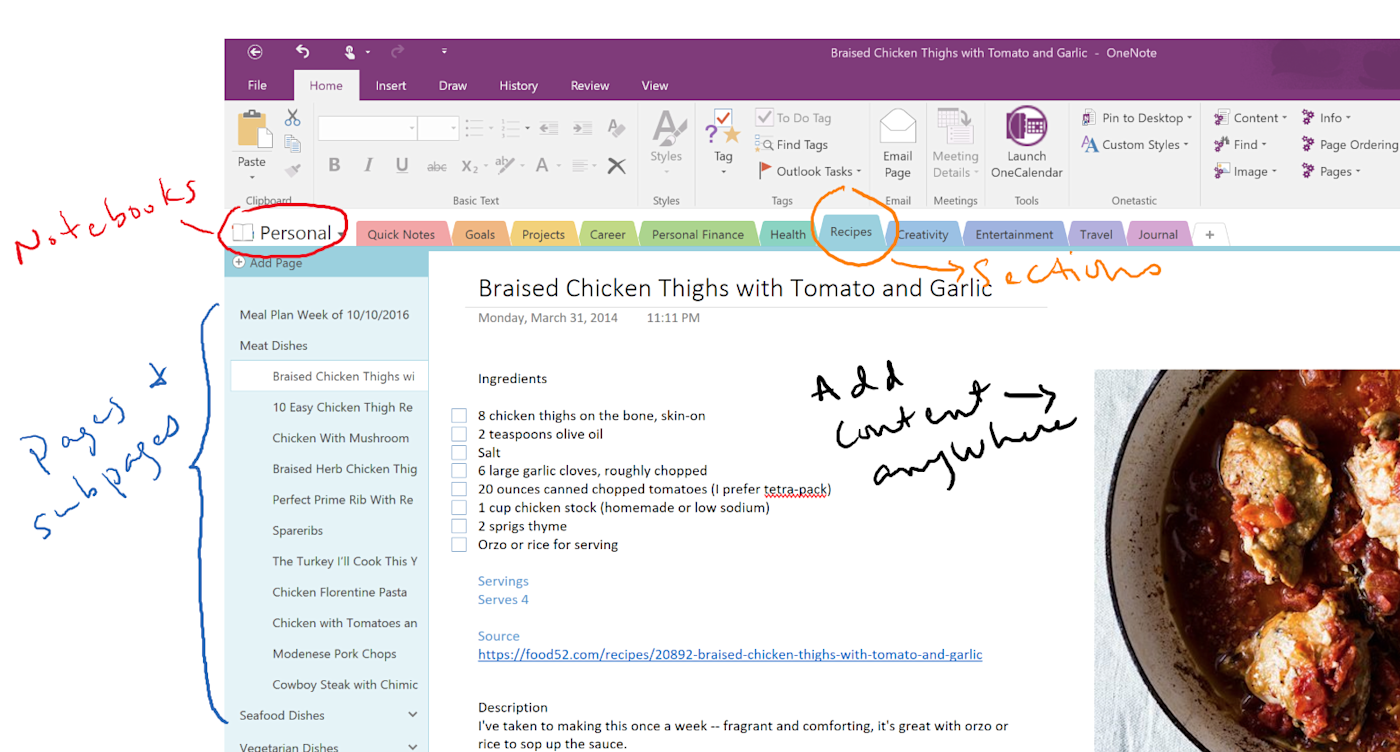
If you've ever used a spiral notebook or a binder for your notes—especially if you've used tabs to split pages into sections—using OneNote will be intuitive for you. The three main parts to OneNote are notebooks, sections, and pages.
Notebooks let you collect related information in one central place, just like you would with a paper notebook. For example, you could have separate notebooks for Home, School, and Work or make even more specific notebooks, such as Home Improvement Projects, Calculus 101, or Client Project X.
Switch between notebooks using the dropdown arrow or, in the Windows version, keep your notebooks list open in a sidebar by clicking the dropdown arrow and then the pin icon.
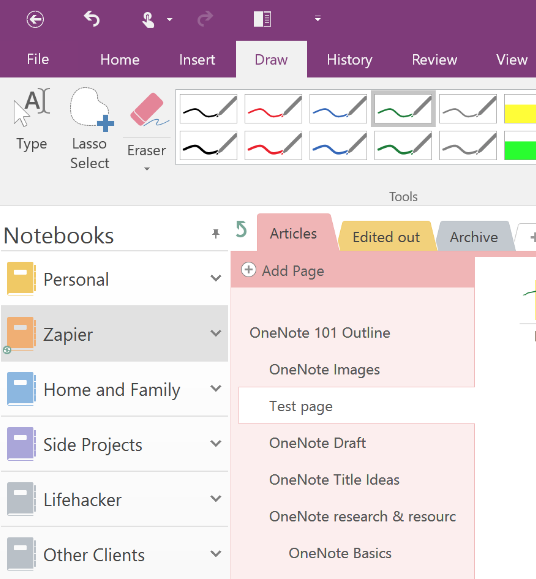
Sections help you group information in each notebook with colorful tabs running across the top of the app. For example, if you have a notebook for a specific project, you could create sections for each phase of the project or other criteria. Each section holds one or more notes—which are fittingly called pages, to carry the notebook analogy further.
Pro tip: OneNote gives you 16 colors to choose from for those section tabs. Set up a color scheme to organize your pages visually and consistently across your notebooks. For example, all money-related sections could be green, all creative-related sections purple, and so on.
Sections can even be grouped together. That comes in handy when you have too many section tabs to fit on one screen. For example, if you had a meeting notes notebook with sections for each monthly meeting as well as quarterly and yearly review meetings, you could group all the monthly meetings into one section group. Right-click on a section tab and select "New section group," then you can add sections to your new group.

Want to secure the pages in a section? You can password protect them by right-clicking on the tab. This time, select "Password Protection."
Pages are listed in the right-hand navigation pane (or the left, if you change the settings in the Windows program). Unlike typical notes apps that work like word processors, on OneNote's pages, you can place and drag content around anywhere on the page: checklists next to photos, text boxes side by side, audio recordings next to your notes, and so on.
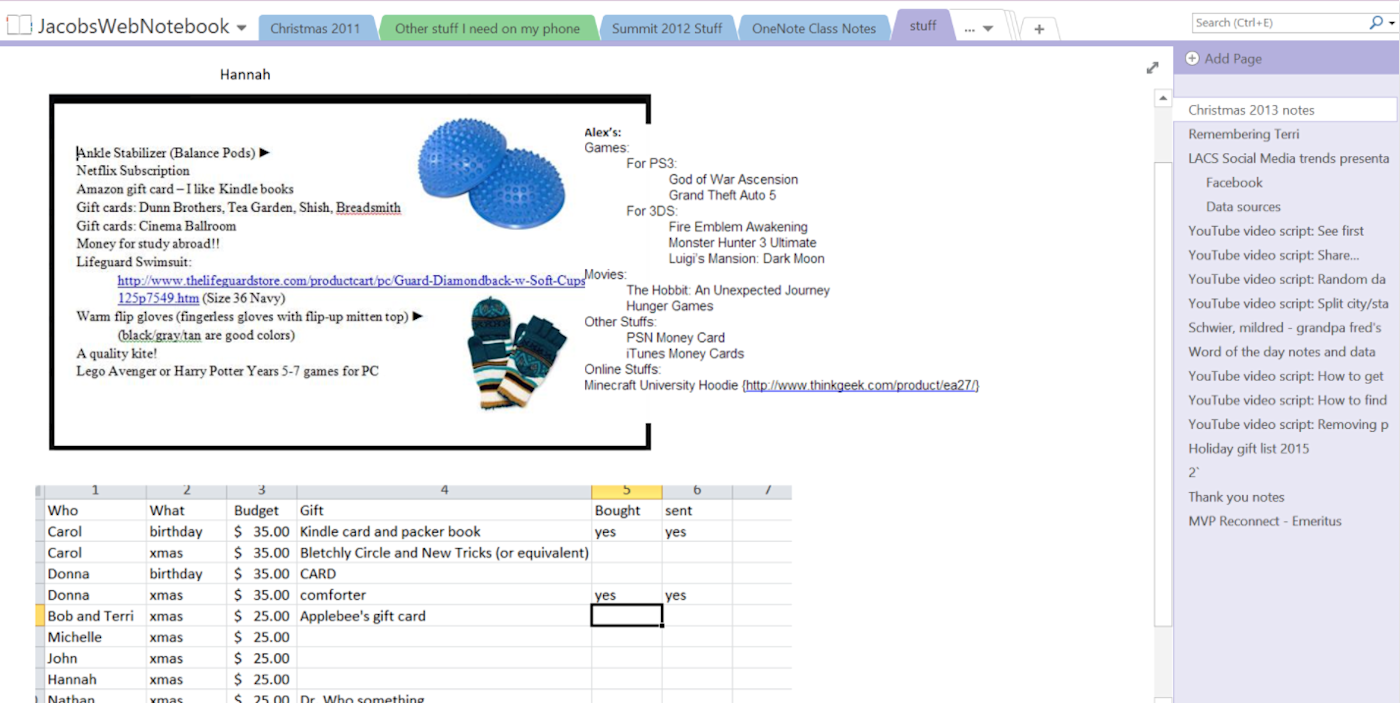
This freeform layout not only helps you create versatile notes with different kinds of content positioned exactly how you like, it aids in the creative and learning process. When taking notes during a meeting or class, for example, you can paste in reference material or questions to the side of the page.
Kathy Jacobs, a former software tester and OneNote MVP, uses OneNote not just for notes but for writing her articles on Medium precisely because OneNote doesn't force you to think linearly:
I can add images and annotations in the article or to the side. I can mark changes, sources, and things to research right on the page. I find it easier to do what I need in OneNote than in Word. And since the reviewing options were added to OneNote, I can research in OneNote and send it straight to the page.
I also find that the text I copy and paste from OneNote to the web is cleaner than any I have ever created in Word.
I similarly use OneNote as my main writing tool because while writing a draft, I can cut parts of it I'm not sure I want to keep but still have them accessible to the side of the draft just in case I change my mind. In other note or writing apps, I'd have to go back through the revision history to find those removed words.
Tip: For selecting text or objects to copy or cut them, use OneNote's versatile keyboard shortcut. If you click outside of any section on the page and press CTRL + A, OneNote will highlight all of the sections on the page. When you press CTRL + A within a section, OneNote will highlight just the paragraph or object your cursor is currently on. Press CTRL + A again to highlight everything in the section. And press that keyboard shortcut a third time to highlight all of the sections on the page.
Another unique advantage to OneNote is the ability to create a hierarchy of notes. You can create up to three levels of pages and subpages and then easily collapse or expand them by clicking the up or down arrow next to the top note. This makes skimming through a long list of pages easier and helps organize related pages.
On Mac, this works a bit differently, as you can't collapse the subpages. Instead, the pages panel shows a preview of the copy on each page, and you can collapse those previews to see just the page titles.
You can even drag-and-drop pages and sections to reorder them however you like—something also not possible in most other notes apps.
OneNote Notebook Examples
Now that you're familiar with the interface, what are you going to do with OneNote?
By default, OneNote comes with a "Personal (Web)" notebook that you can use as your central notebook. But you can create an unlimited number of other notebooks and, within them, an unlimited number of sections and pages.
Before you dive in, think about the kinds of information you want to create or collect so you can establish a structure for your notebooks and then start stashing everything in OneNote.
One way to define your notebooks is to consider the roles you play—such as consultant, parent, friend, volunteer, homeowner, artist, amateur chef, and so on (a la Franklin Covey's productivity system). Then create distinct notebooks for each role.
Or you could create notebooks based on the types of information you're collecting and recording. For example, you might have a notebook for tasks and projects management—perhaps use OneNote with the Getting Things Done, GTD, system or as a digital Bullet Journal.
If your projects tend to require lots of notes or research, create a notebook for each project, effectively turning OneNote into a project management tool, thanks in large part to its great integration with Outlook and other Microsoft Office apps. And you could create another notebook just for reference materials you will turn to time and again.
As a loyal OneNote user (since circa 2004), my notebooks have morphed over time. Currently, I have notebooks for:
Home and Family: with sections for emergency info (contacts, locations of documents, insurance information), home reference, computer reference, personal finance, travel logs, and a section for each family member. This is shared with my husband and password-protected.
Zapier Work Notebook: with a section group for articles plus sections for meeting notes, marketing projects, HR stuff, and work-related travel
Freelance Clients: One notebook for each client with sections for administrative stuff (invoices and contracts), article ideas, article drafts and research, and an archive of completed articles
Side Projects: with sections on personal projects and bucket list things I'd like to accomplish (someday), such as learning French and writing a children's book
Jacobs says she has too many notebooks to list, but her main ones include:
Two shared notebooks on OneDrive that are accessible from anywhere containing: sections on family history, pieces written, income tax notes, monthly budgets, Christmas lists conference notes, presentation materials, and so much more
Travel packing and to-do lists for trips
Moving notebook that contains everything imaginable, from what goes in the car to what goes on the truck to what gets sold to when we plan to stop where and who we are connecting with
Two recipes notebooks. One is the recipes Jacob and her husband use to teach their outdoor cooking class. This contains the notes for the classes and the recipes they have posted online. The other is a shared recipe notebook that the couple gave to our goddaughter when she graduated high school.
Shared notebooks used with her co-author to write their book about OneNote. "We set it up to share content with each other and to make sure we had everything covered that was in the outline. It made it much easier to develop examples—all we had to do was take screenshots of the features as we used them to develop the book."
Your notebooks will depend on your interests, of course, but a little structure up front will help keep your notes organized.
Don't worry too much, though—you can always drag or right-click on pages and sections to move them to other parts of OneNote. And you can close notebooks that are no longer active, such as a finished project notebook, to keep the notebook list tidy (right-click on the notebook and choose "Close").
Especially for teachers: OneNote offers a Class Notebook Add-in that helps teachers create custom lesson plans, a handouts library, and interactive lessons for students directly within OneNote. Students get their own OneNote workspaces that you can collaborate with them on individually.
Capture Your Ideas or Information from Anywhere
A note-taking and information-capturing app is only as good as its ability to help you get your ideas and any other kind of content quickly onto the page. Thankfully, OneNote offers several ways to do that. And it offers special tools to enhance your notes with things like automatic math calculations and icon-based tags.
The Many Ways to Create a Note in OneNote
What You See Is What You Get (WYSIWYG): Typing a note in OneNote is just like using Microsoft Word. You get the familiar Office Ribbon with text formatting tools and a few preformatted styles you can apply.

If you use the inking option in OneNote—writing by hand with your stylus or finger on a touchscreen—OneNote's superb handwriting recognition will even be able to search your scribbles or convert your writing to text.

Related: Do you love making mind maps or sketchnotes? Pair OneNote with a tablet or tablet PC, such as the Microsoft Surface Pro, and brainstorm or doodle away right on the screen.
Create a Quick Note: You don't even have to have OneNote open to create a note. On Windows, press Win + N to create a note, which will be saved automatically to your Personal (Web) notebook under the Quick Notes section. Or press Win + Shift + S to take a screenshot; you'll be asked where you want to save the image.
On iOS, you can use 3D Touch to quickly add a new note or take a photo and send it to OneNote, as well as view recent notes. And on Android, you can use the OneNote Badge—a floating button on your screen to do the same. On both platforms, you can save links to websites as OneNote notes from your mobile browser's sharing menu.
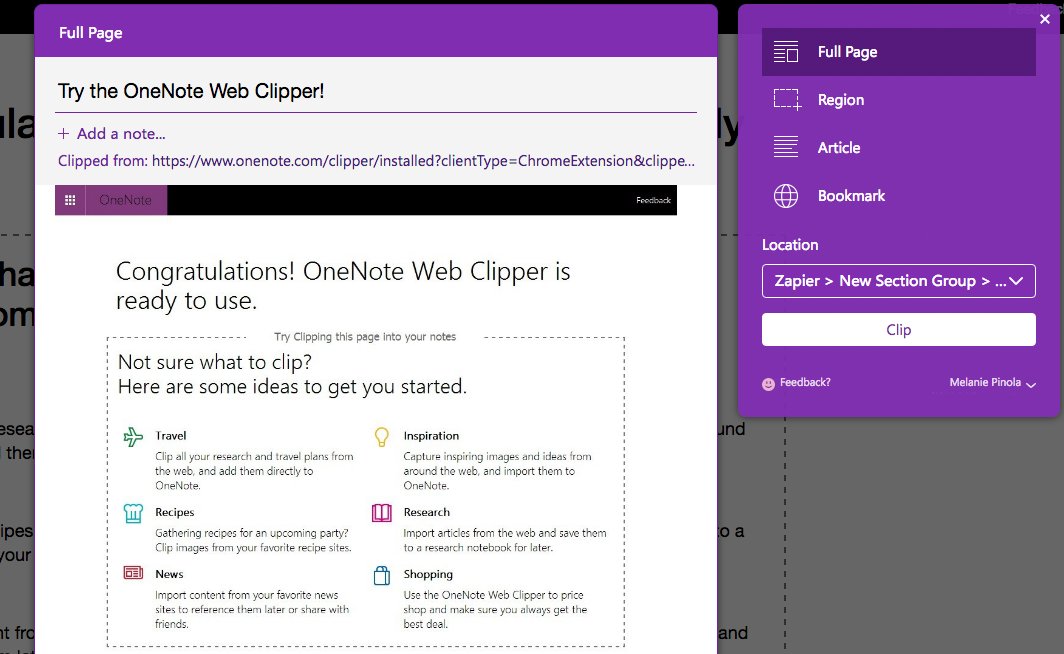
Use the Web Clipper: Similar to Evernote, OneNote has a web clipper browser extension that lets you quickly save anything from the web. You can save the entire page, a portion of the page, a stripped down version of the page with just the text or a link to the page with preview copy. Select which notebook you want to send the clipping to and add a note about it if you like.
Send Emails to OneNote: Forward or send any email to me@OneNote.com to have it saved in OneNote in your default notebook and section of your choosing. You'll need to set up one or more email addresses you want this to work with first.
Pro Tip: To send the note to a different section in your default notebook, use the @ symbol before the section name (e.g., @Receipts) in the subject line.
Scan Documents or Take Photos with Office Lens: Microsoft's Office Lens app for Windows 10, iOS, and Android uses your device's camera to capture notes on a whiteboard, scan receipts or business cards, and more. It automatically trims and cleans up your images before saving them into OneNote for you.
Dock OneNote to the desktop: The "Dock to Desktop" feature for OneNote on Windows desktop puts OneNote into a minimalist, mostly menu-free panel on the side of your desktop, so you can take notes while referring to another app, such as a video in your browser, a PDF file, or other reference material.
Pro tip: Use the Ctrl + Alt + D keyboard shortcut to quickly dock OneNote
Automatically Create OneNote Notes from Your Favorite Apps
Want to save even more time? Automatically create new notes by integrating OneNote with over 500 other apps using Zapier. For example, you can create OneNote notes from Trello cards or labeled emails in Gmail, save Slack messages to OneNote, and more:
Add notes on OneNote for upcoming Google Calendar events
Add labels to new Gmail emails to create notes in OneNote [Business Gmail Accounts Only]
Create OneNote notes from new or moved Trello cards
Embed Anything in OneNote and Create Special Kinds of Notes
OneNote's pages are versatile and smart. You can embed all sorts of content in OneNote and make that content searchable or convert it to a different format. For example, from the Insert menu, you can:
Record audio or video: Record a lecture, interview, or meeting, and you can search for key terms within the audio or video file later. You'll need to enable searching within audio or video from OneNote's option settings first. (Video recording is not available on the Mac.)
Insert a PDF printout or an image: Any text in the PDF or picture will be searchable (easy OCR option to copy text from images with a right-click!), and you can also annotate the content using the tools in the Draw menu.
Attach a file: Add any kind of file to a note as a shortcut. For some types of files, such as Word docs, spreadsheet files, PDFs or plain text files, you can click on the "eye" button on the file thumbnail to see a preview of the file contents.
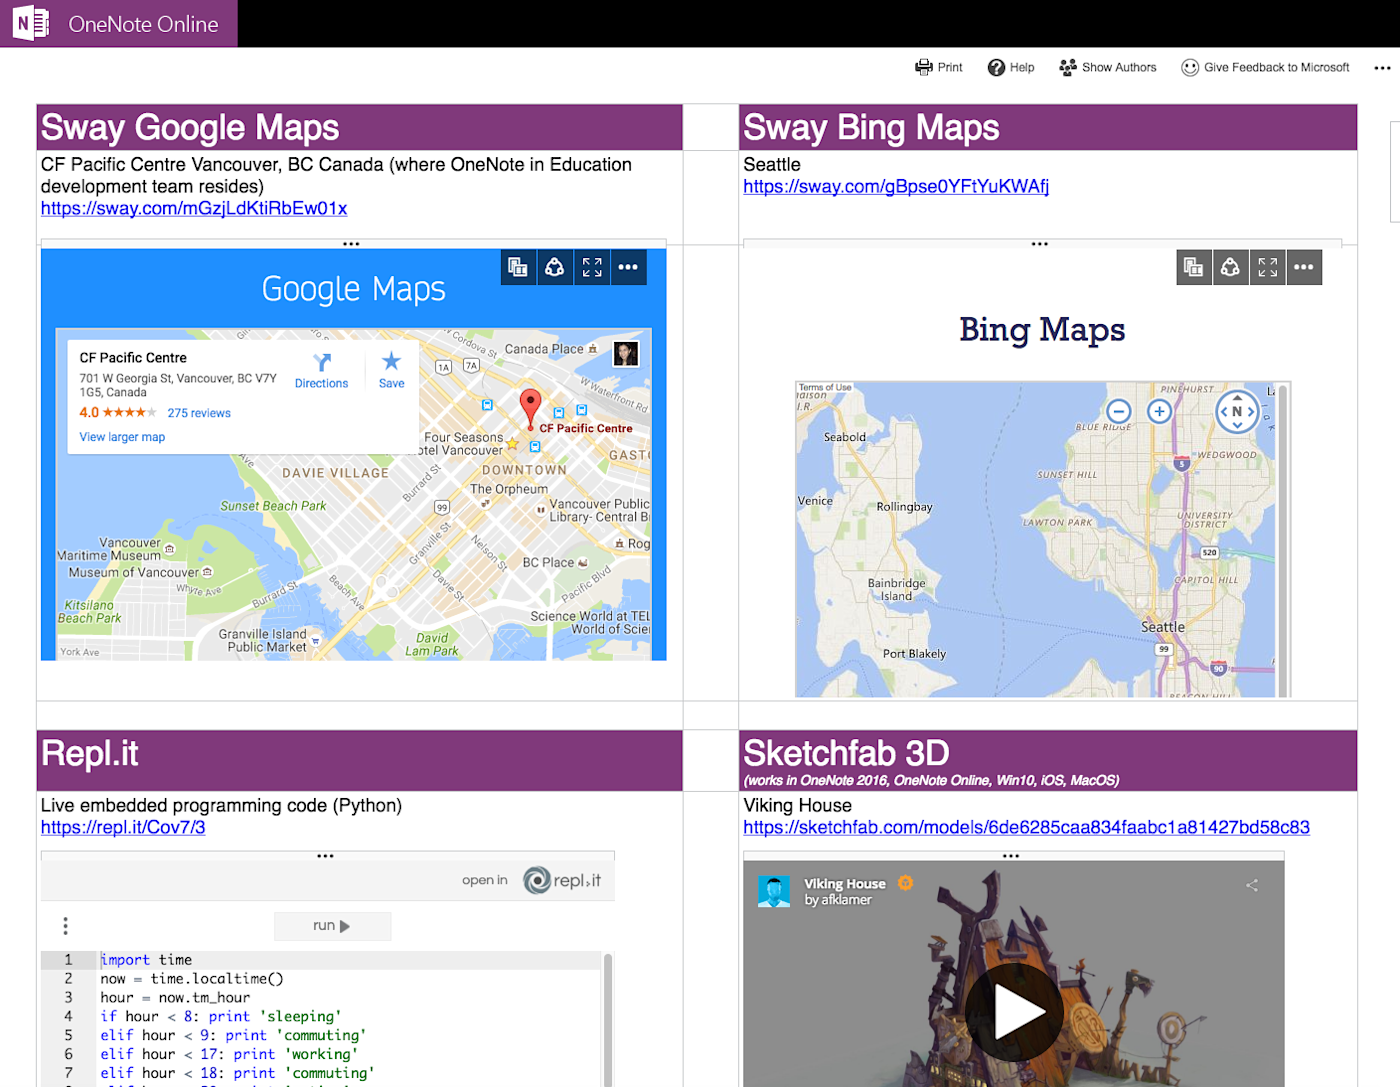
Embed live, interactive objects: Insert YouTube videos, Google Maps via Microsoft Sway, 3D sketches from Sketchfab, animated GIFs, live programming code from Repl.it, Vine videos, and much more. Here's a demo page of the live objects you can embed into OneNote via OneNote Central's curator Marjolein Hoekstra, OneNote MVP. (Follow their Twitter for the latest OneNote news and tips.)
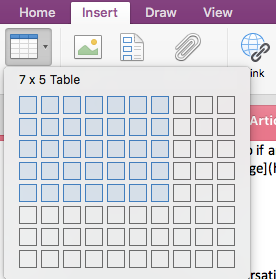
Add a table: Just click the table button in the Insert menu and select how many rows and columns you want for your table to create one on the page.
On Windows desktop, you can also embed an Excel spreadsheet—changes made to the spreadsheet file are reflected in OneNote and vice versa.
Pro Tip: You can also just type a word or phrase and then press the Tab key to automatically create a table.
Draw and insert shapes: With the desktop apps, you can draw on the page or annotate anything on the page with OneNote's drawing tools. Highlight a part of a screenshot, make a rough sketch of a logo, and more.
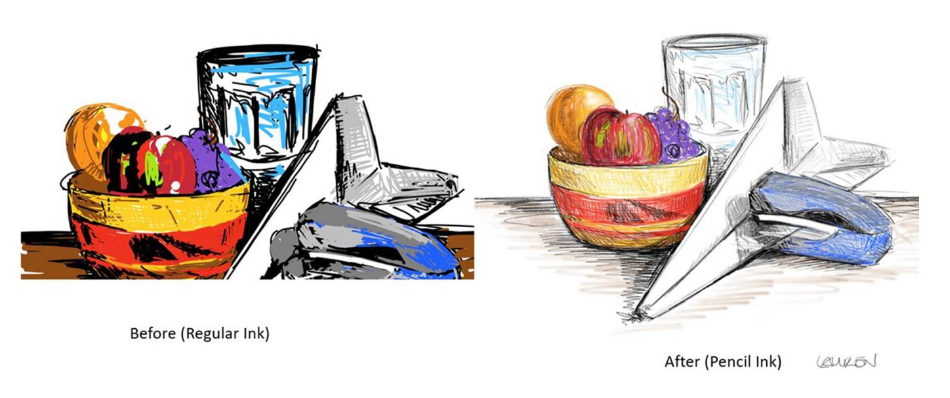
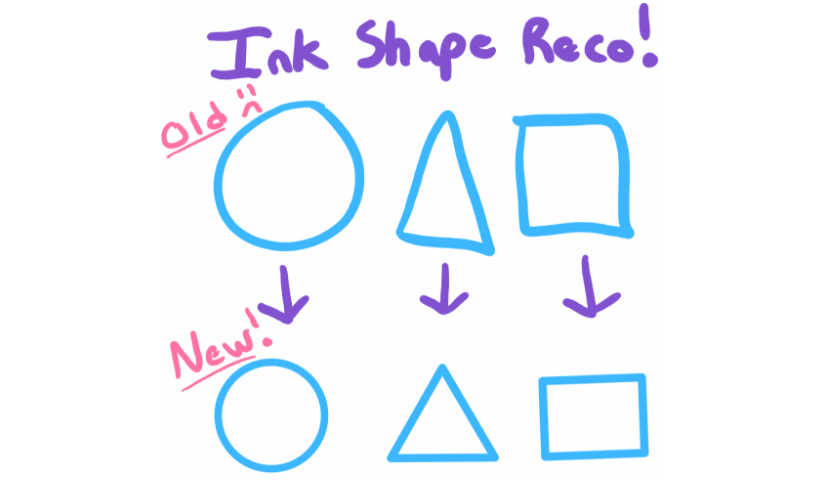
OneNote's ink shape recognition tool can even take your rough hand-drawn shapes into perfectly formed ones.
Insert math equations and perform calculations: Work with math a lot or even just occasionally? Wait 'til you see how OneNote can help you out there. Just start typing in an equation, such as 5*7+(9/3.14) and then the equal sign (=) right after (no spaces), and OneNote will calculate the answer for you.
In the Windows 10 app, handwrite any formula—even quadratic equations—and OneNote will not only solve the formula for you, it'll walk you through the steps needed to get to the answer. (I wish I had this during college calculus.)
Organize, Tag, and Link Your Notes
With the wide variety of content types you can add to your notes, and the many ways to capture information quickly, it's easy to amass a ton of pages and notebooks in OneNote. The main problem that can lead to: How will you find the information again later?
OneNote's search box can help you find the information you need on the current page, a section, section group, or specific notebook, as well as search all notebooks at once. Standard search operators work well here.
Related: Learn the search secrets of your other favorite apps, including Trello, Slack, and more
Tag Parts of a Page
Beyond search, though, you can also structure your pages and notebooks for easy organization and readability using OneNote's tags.
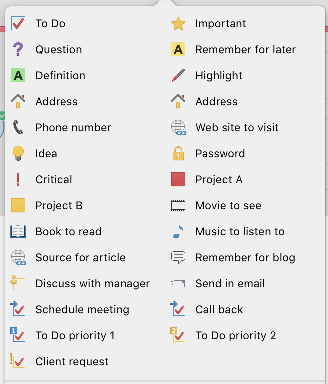
Unlike other apps that let you tag only the entire note, with OneNote you can tag any part of the page. So, for example, you can tag one paragraph as an idea, a sentence later on as a to-do item, and another part of the page as critical. Think of these tags like sticky notes you can apply to your notes. You can create custom tags in the Windows desktop version of OneNote.
Tags not only make your notes more scannable, they make drilling down to specific types of content across your notebooks a breeze. One Windows desktop, for example, when you search for a word or phrase or use the "Find Tags" button in the Home menu, OneNote's tags summary pane shows you the tags you've applied and gives you quick access to them.
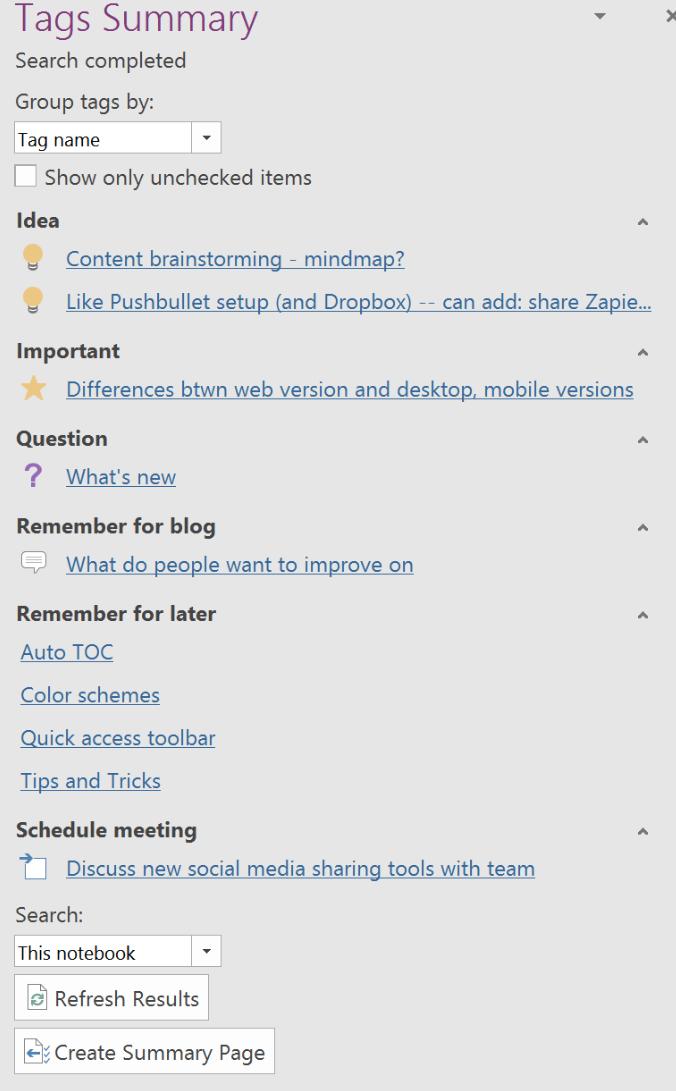
Pro tip: In that Tags pane, click the "Create Summary Page" to get a page in your notebook with all the tags you've added.
Link Your Notes Together
Another feature that will help you organize your notes better: Links. You can add links to other pages, to notebooks, and even to specific paragraphs. Right-click on what you want to create a link for and choose "Copy Link To…" Then paste the link on the page you want to add it.
Pro Tip: If you know the name of the page or notebook you want to link to, just type in its name between double brackets, like this: Worked on [[OneNote Draft]] article. OneNote will insert the link for you.
This linking ability means you can create your own personal wiki easily in OneNote.
Share Your Notes
If you want to collaborate on notes and projects with others, OneNote's got your back. You can share shopping lists with your significant other, reference material with your team, and pretty much anything else you store in OneNote.
First, make sure your notebooks are synced to your OneDrive account if you want to share them with others.
In the Windows desktop app, click File then Share to share the notebook with others via email or grab a link to the notebook. Or you could go to File then Send and email the current page of the notebook, save it as a PDF attachment, send the page to Word, or create a blog post from the page.
On the Mac and OneNote Online, click the sharing icon at the top right of the app (it looks like a person with a plus sign on it) to get the sharing options.
Anyone you share your notebook with can access it on the web or in their OneNote app. Any changes you make on the page will happen in real-time, with the person's initials next to each item added or changed.
Extend OneNote's Power with Add-ins
OneNote is already a powerful note-taking and information collection tool. You can get even more out of OneNote with third-party add-ins and services.

Onetastic supercharges OneNote with tools like custom styles, seeing your notes in a calendar view, and access to hundreds of free macros. The latter puts shortcuts to frequent tasks such as moving a page to the top of a section, getting the word count on a page, or creating a new page with today's date as the title in the OneNote ribbon. You can also create your own macros or edit macros you download, so you can truly customize how OneNote works for you.
Onetastic is available for OneNote for Windows desktop and is free for the built-in tools but costs $15 for the pro license, which gives you access to the macros.
If you connect OneNote with Zapier, you can also automatically copy OneNote notes to your other favorite apps. For example:
Post messages to Slack channels with new notes from OneNote
Add Google Tasks from new notes in sections on OneNote
Create your own OneNote integration with your favorite apps
More: OneNote also has its own integrations with apps such as Chegg, Doxie Mobile Scanner, and NeatConnect—so if an app or tool isn't supported on Zapier, you can check OneNote's apps page.
OneNote might seem intimidating because of the empty pages and all of the features compared to simpler note-taking apps, but once you get started using it, you might just never turn back.
Play around with the kinds of things you can store in your notebooks, try out some of the tips above, and let us know how you're using OneNote.
Keep reading:
Title photo by Microsoft.
