
When you're building a new product or service on the web, connecting your database to an API can be one of the more daunting tasks. There are about a million ways to do it, and each of them has its own specifications.
But what if you don't have the time to jump waist-deep in custom code? That's where Zapier comes in. Using Zap workflows (our word for automated workflows), Google Sheets, and webhooks, you can connect your information to any API without the anxiety of writing code from scratch.
Here are step-by-step guides for three different use cases. Each one takes about 10 minutes to complete (or 30 minutes total, if you're going for the webhooks hat trick).
Table of contents
Before you begin
The examples below will require a Zapier account—it's free to sign up. Once you're signed in, you can create new Zap workflows using the "Create Zap" button or go to zap.new.
To make sure you're ready to connect webhooks with your Google Sheets spreadsheets, you'll need to put the sheets in the right format for use with Zapier. Most importantly, each column should have a header in the first row (think of it as giving each column a name).
Need help? Check out our webhooks guide or ask for help in the Zapier Community.
Make regular GET requests that create new Google Sheets rows
When working with an API for an app that stores information for you—like a customer relationship manager (CRM), chat app, or spreadsheet—they will often have a URL (or "endpoint") that provides that information as a list.
Using a Zap, we can check for new items that get added to that list and save them to a Google Sheets spreadsheet for easier reference and sorting. From start to finish, this will take five steps:
Create a spreadsheet (or pick an existing one) and give it column headers in the first row
Add the Webhooks by Zapier Retrieve Poll trigger
Add the Google Sheets Create Spreadsheet Row action
Test the action and publish the Zap
To start, find that URL from your app and copy it. Usually, it will be listed in the app's API docs, using terms like "list" or "GET."
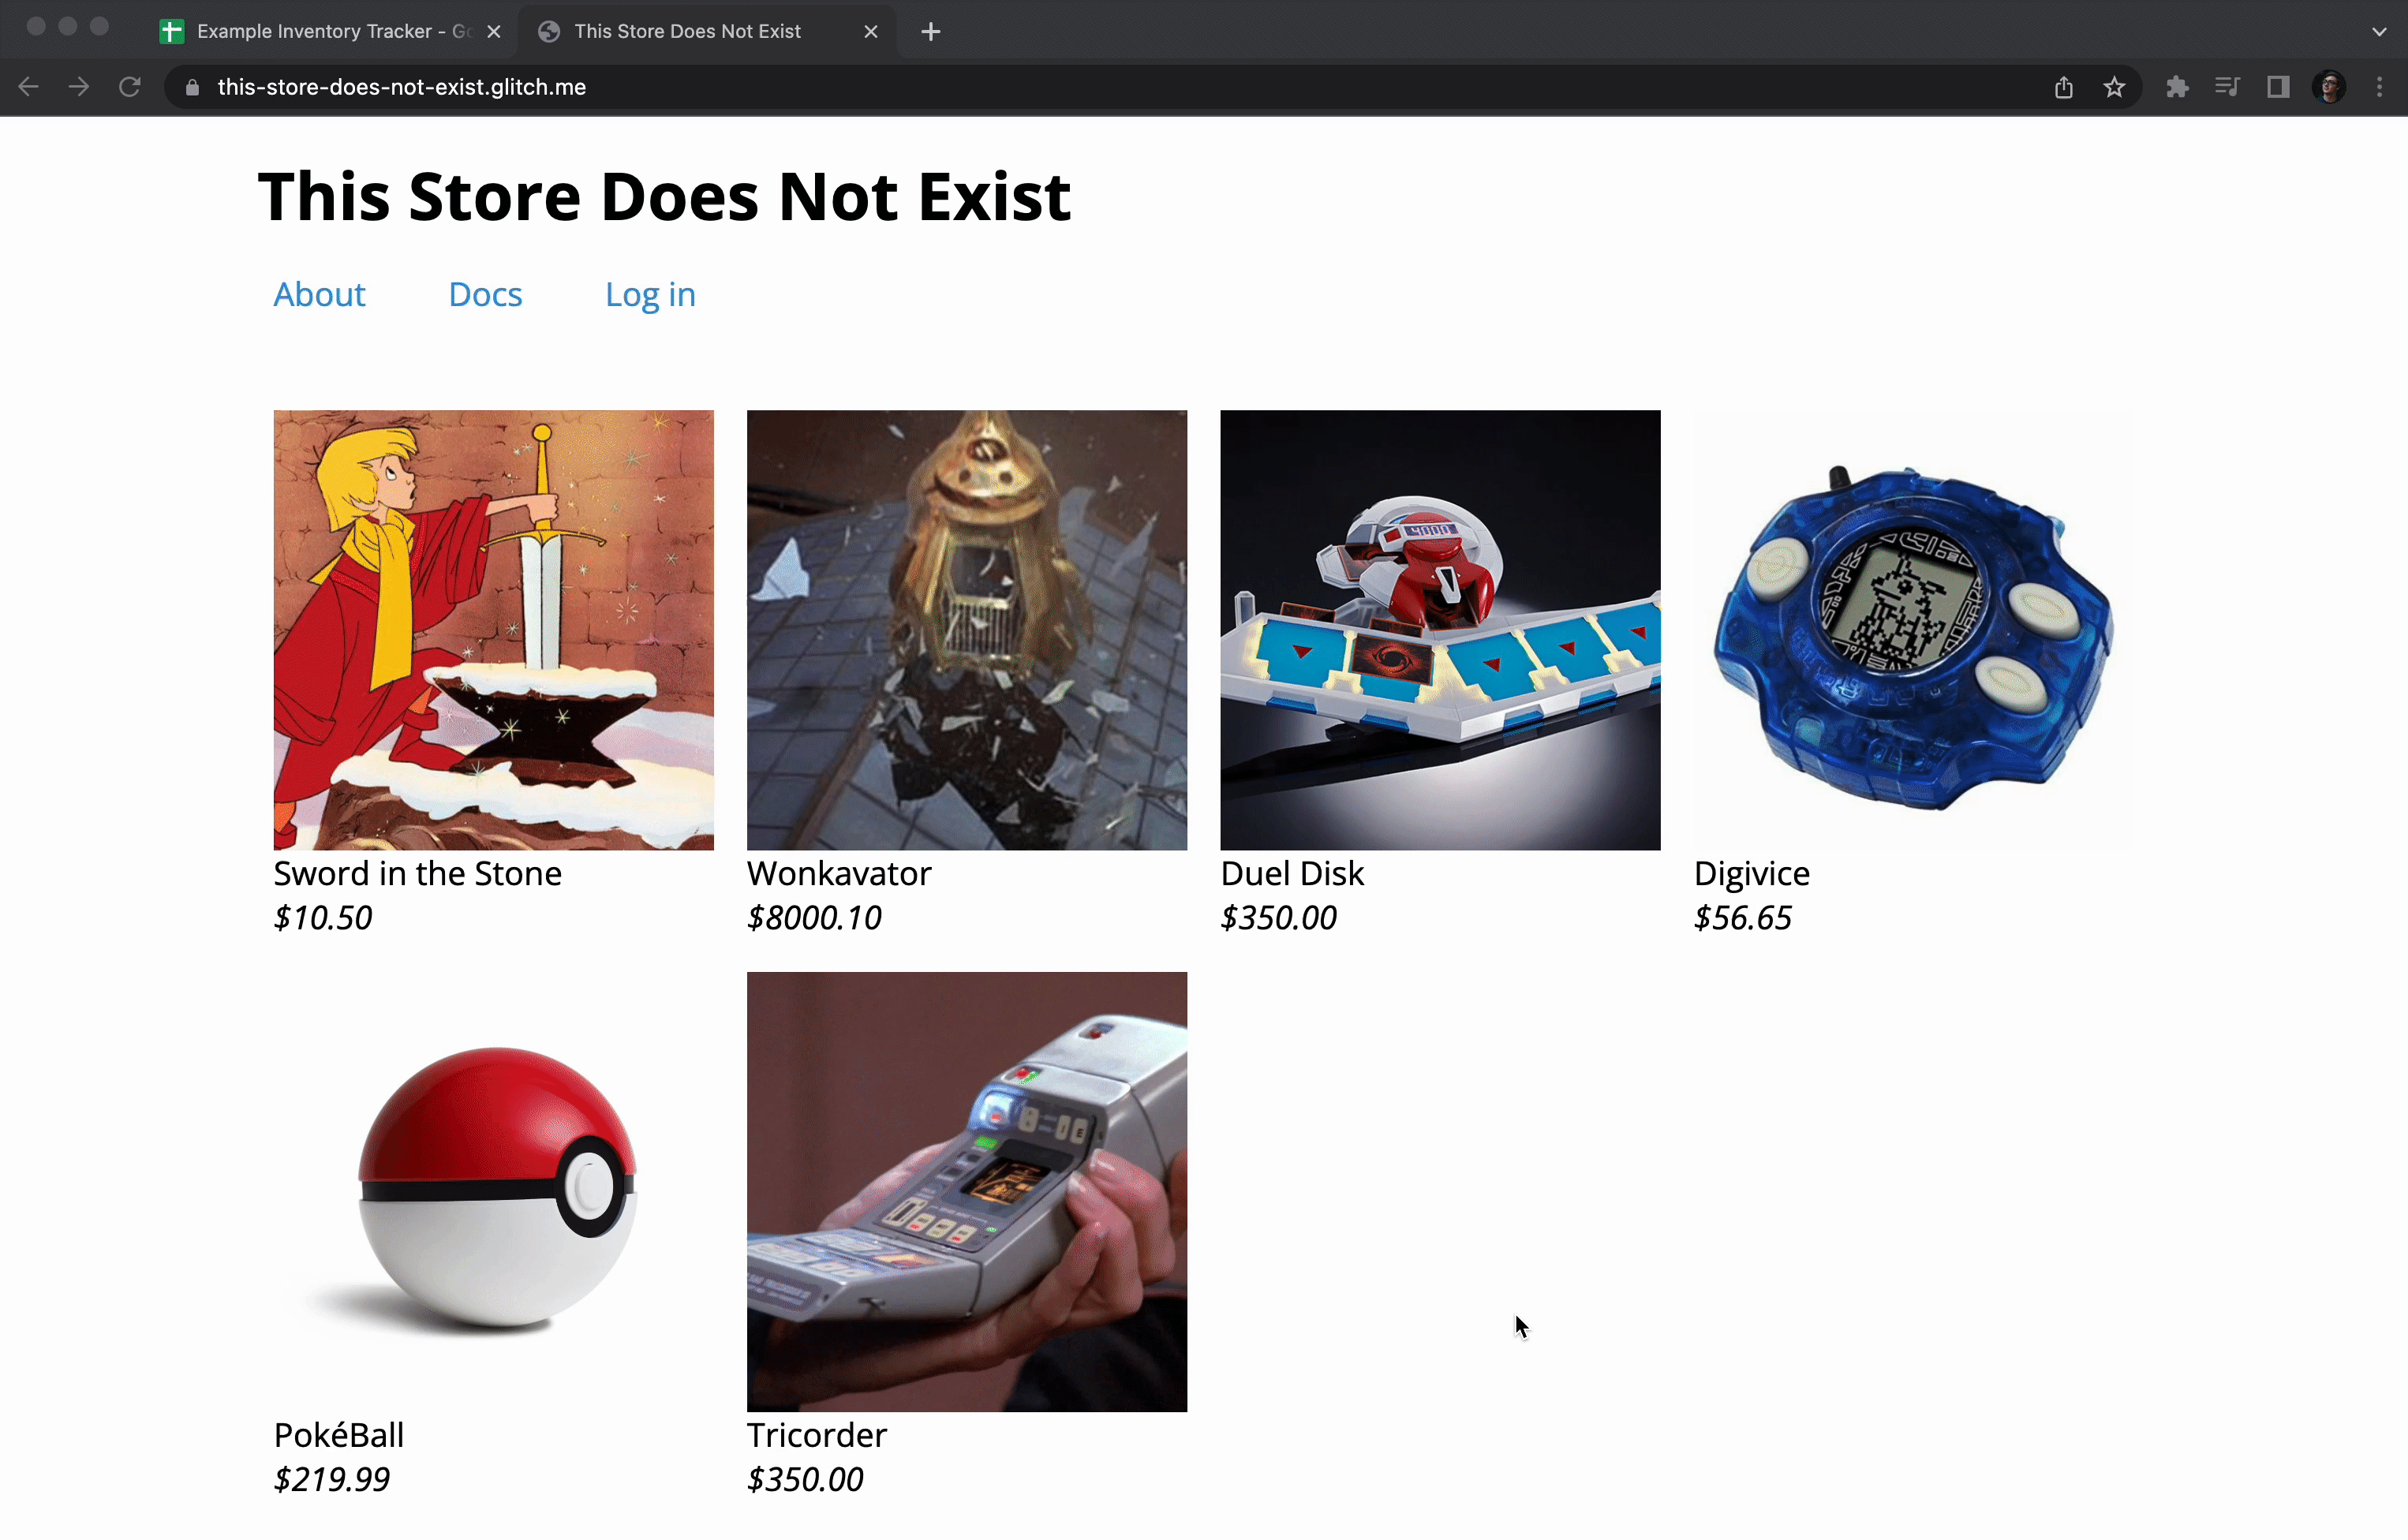
For this example, I'll be using products from a fictional online store listed at this URL: https://this-store-does-not-exist.glitch.me/products
Once you have the URL in hand, create a new Zap and select the Webhooks by Zapier app as the trigger app.
Webhooks by Zapier has three different trigger events to choose from: Retrieve Poll, Catch Raw Hook, and Catch Hook.

The latter two will provide you with a unique URL that you can have apps send data to (learn more about those here). Retrieve Poll tells the Zap to send a request to another URL at regular intervals.
Since we want to retrieve data from a list hosted by another app, select Retrieve Poll, then click Continue.
The next screen will have several fields you can fill in. The only required one is URL, which is the location of the list you'd like to monitor with this Zap.

The other fields are optional but are useful if things don't look quite right in the next step. For example, you can use the Basic Auth field if the list requires a username and password to view, or the Key field if the same URL provides multiple lists and you only need one of them.
Note: To get the most out of the Retrieve Poll trigger, the list provided by the URL should be in "reverse chronological" order, meaning the newest items should show up first. Most apps do this by default, but you may want to check their documentation to see if they require a "sort" or "order_by" parameter to put everything in the right order.
Once the required fields are filled in, click Continue, and you'll be asked to Test Trigger. That will have the Zap check the URL, see what data it provides, and show you the first three items as Sample Data.
When you're happy with the sample data you're getting, click Continue and use the + button to add a new action to the Zap.
In the new action, select the Google Sheets app, and the Create Spreadsheet Row event.

Click Continue and connect your Google Sheets account when prompted.
At this point, you should have a Google Sheets spreadsheet ready to receive data. If not, you can head to sheet.new to start a new one.
To prepare it for use with Zapier, add Column Headers in row one to tell the Zap where it should place each value. For example, I'll want to assign columns for the product Name, Description, Price, Inventory Level, and Image.

Back in the Zap, select that worksheet in the Google Sheets action, and you should see those column headers appear as fields to be filled. You can then map each value from the webhook trigger to its respective field.

As an added bonus, Google Sheets lets us enter formulas directly into the input fields, which I've taken advantage of by adding an IMAGE formula to the Image field.
Now when you select Continue and then Test the action, you should see that sample data appear as a new row in your spreadsheet.

Congrats! Now you can publish the Zap, and any time a new item appears in the webhook URL, it will automatically show up as a new row in your spreadsheet.
Note: If you would prefer to update an existing row in your spreadsheet instead of creating a new one, you can replace the Create Spreadsheet Row action with Lookup Spreadsheet Row then Update Spreadsheet Row.
You can also use this Zap template to set up this workflow. Click Try it to be taken to the editor to set it up.
Send Google Sheets data to a webhook with POST
Now that we've covered getting information from a webhook and into Google Sheets, let's do the opposite: send information from a Google Sheets spreadsheets to a webhook URL using a POST request. This is great for cases where you not only want to track information in a spreadsheet but send updates back to the server that hosts the API.
Note: There are several different kinds of request methods we can use, depending on what we're looking to accomplish. The most common is GET, which gathers information, and POST, which sends information. You can read about all of the different methods and their uses here.
In this example, I'm going to use Google Sheets to add new products to my online store, which accepts new product information via this webhook URL: https://this-store-does-not-exist.glitch.me/product
Setting up this Zap will take five steps:
Create a spreadsheet (or pick an existing one) and give it column headers in the first row
Add the Google Sheets New or Updated Spreadsheet Row trigger
Add the Webhooks by Zapier POST action
Test the action and publish your Zap
Usually this takes about 10 minutes the first time, but once you've got one under your belt, future Zap workflows like this only take a couple of minutes to set up (I'll race you!).
To get started, create a new Zap, and add a Google Sheets trigger. For most cases, New or Updated Row is a great trigger event to start with.

Click Continue, connect your Google Sheets account, then pick the spreadsheet you want to monitor for changes.
The New or Updated Spreadsheet Row trigger also lets us select a specific column to monitor so it triggers on new rows or when something changes in that column. That's handy if you only want some changes to be sent to your webhook.

Select Continue and test the trigger. You should see the last few rows of the spreadsheet appear as Sample Data, showing we're able to get information from the sheet successfully.
Note: Remember to add column headers in the first row of your sheet so Zapier knows what to call each value. Check out this guide for more tips on setting your spreadsheet up to work with Zaps.
Once the Sample Data looks correct, click Continue, then use the + button to add a new action. Then select Webhooks by Zapier as the action app and POST as the action event.

On the next screen, you'll see several fields to help customize the POST request we're making to your API. Only the URL field is required, as that's where we'll send the request. The other fields might be useful depending on what your API needs.

Payload Type determines the format we'll put the data into before sending it. This is equivalent to Content-Type if you're used to sending this kind of request manually.
The Data fields are where you'll send the data in key-value pairs. For example, to send the product's name, you can enter "name" into the field on the left as the key, then map the name value into the field on the right. If you leave the Data fields blank, The Zapp will send all values provided by the previous action.
Here's what the Data fields look like for my store example:

Wrap Request in Array tells the action to take the data and put it inside an array. This option isn't used very often, but some API require it, so it's a good thing to keep in mind if things don't look right during testing.
The File field lets you attach a file to the request—this automatically sets the Content-Type to multipart/form-data and makes it easy to send files to apps that support them.
The Unflatten field is only relevant if some of the values you're sending are nested, meaning there are values stored inside other values. When that happens, put two underscores between each value name. For example, if you have a "product" value that has a "details" value inside it, we'd call it "product__details". Changing Unflatten to false disables that.
At the bottom of the action, two fields help you work with APIs that have specific authentication requirements, and you need to make sure that you're actually allowed to do what you're asking them to do. Those are Basic Auth and Headers.

Basic Auth lets you enter basic username/password credentials for APIs that use HTTP authentication. More often, you'll use Headers to enter specific header details required by the API. Usually, you'll find those requirements in your app's API documentation under "Authentication". In my case, my API's requirement is a header called "api_key", with its value set to my personal, super-secret API key.
Once the fields look correct based on your API's documentation, select Continue.
At this point, you can test the POST request but bear in mind that it will actually send the data shown to your API. If you're feeling good about how things look at this point, I'd recommend selecting Skip Test, which will let you publish the Zap right away and try it out with real data from your spreadsheet.

Once the Zap is live, you should see that when you update the Trigger Column in your spreadsheet, that row's data will send to your API as a POST request. Keep an eye on your API to see it show up. Here's a quick GIF showing what that looks like in my store example:
Note: Although Google Sheets' triggers are labeled as Instant, not all rows will trigger your Zaps right away. They have a slight delay built in to help make sure that rows aren't processed while you're still typing. In the GIF above, I edited out about a minute of waiting for the new data to appear in my store.
You can also use one of these Zap templates to set up this workflow. Click Try it to be taken to the editor to set it up.
Trigger webhook POST requests with new or updated Google Sheets rows
POST to a webhook when a new row is created in Google Sheets
Look up data in Google Sheets to use in a custom request
Another benefit of integrating Google Sheets with webhooks is that you can use your spreadsheet as a reference table and look up information before sending it to its final destination. Setting that up in a Zap takes five steps:
Create and fill out your spreadsheet, making sure to include column headers in row 1
Create a new Zap and add any trigger you prefer
Add the Google Sheets Lookup Spreadsheet Row action
Add the Webhooks by Zapier Custom Request action
Test the action and publish the Zap
This kind of Zap can be used for a wide array of purposes. As an example, let's say that we want to use an API to send custom messages to our customers on their birthdays. To start, we can add the Schedule by Zapier trigger to check for a birthday every day. Then, add the Google Sheets Lookup Spreadsheet Row action.

After connecting your Google Sheets account, you can select the Spreadsheet and Worksheet you want to search in, then fill in the Lookup fields.

In the Lookup Column field, select the column that you want to search within. In Lookup Value, type in the value you'd like to search for or map it from a previous step. In my case, I've mapped the month and date from the trigger, separated by a slash:

You might have also noticed the Supporting lookup fields. These are useful if you want to really narrow down your search or have lots of rows that might have the same information in your selected Lookup Column. For example, if I wanted to select a row with a matching birthday and name, I could use the Supporting fields to do that.
Once the fields are mapped, select Continue and test the action. If there is a row that matches your search, it will appear as sample data. Otherwise, you might see an error message.

If that happens, don't panic! Double-check the trigger sample data, and check your spreadsheet to see if a row should have been found with that data.
If not, what I like to do is create a temporary row just for testing, then re-test the action to receive that row as a sample.

Sample data in hand, use the + button to add a Webhooks by Zapier action. We've used POST and GET in the above examples already, so let's use the Custom Request event this time.

Custom Request is the most advanced option in the Webhooks by Zapier app, as it lets us fully customize the request. That can sound daunting, but if the API you're sending data to has documentation, usually all you'll need to do is copy the work they've done already. Let's take a look at my birthday example:

I've gone ahead and selected PUT in the Method field, but you can select whichever option your API requires. Because this is just an example, I've entered a URL from httpbin.org, a great resource that returns whatever you send it, making it perfect for testing this kind of action.
I've also set Data Pass-Through to False here—setting it to True would prompt the action to automatically send all of the data from the previous action. That could make things easier, as you wouldn't have to put anything in the Data field. But it only works if the previous action is giving us exactly the data that the API is expecting, so use with caution.
In the Data field, we can use a combination of mapped values and manually-entered text to create the raw data we'll send to the API. This is where copying from your API's documentation will come in handy unless you're already used to writing in JSON or XML. In my case, I'm going to send the birthday information as JSON.

And because I've used JSON here, I'll also need to update the Headers field to tell the API that I'm using the "application/json" content type.

Note: The "Content-Type" header is used by API to determine what type of data it's receiving, so it can be processed correctly (these types are also called "MIME types", presumably because they're silent and mysterious). There are several types to choose from, and you can read more about them here.
Once you're ready, select Continue and test your action (or skip testing if you're feeling confident).
If everything is set up correctly according to the API, we should see a successful response from their server. In my case, httpbin has sent back exactly what I sent them, which is perfect.

Now you're ready to publish the Zap and start using your spreadsheet as a tool to help organize and fill in data that's missing from the Zap's initial trigger.
This setup can be used for birthdays (like my example above), gathering detailed information about customers or products, lead enrichment, or anything else that you can use a spreadsheet for.
Note: For extra credit, take a look at the Method field again—did you notice that you can use a custom value to fill it in? That means that you can even map a value from your spreadsheet to change the request's method each time the Zap runs. That way, your spreadsheet can determine not only what data to send, but what method to send it with!
The next level in automation
Whether you've built all of the examples above or just one, you've just tackled two of the most powerful tools in the automation tool belt: spreadsheets and webhooks. And not only that, you did it without having to write your own code! Take a minute or two of the time you saved to celebrate—you earned it.
If you're interested in learning more about using the Webhooks by Zapier actions and triggers, check out this page for all of our documentation. Similarly, this guide has everything you'll need to be a Google Sheets automation hero, and I think that's pretty cool.


