Writing is hard.
Whether writing the next Great American Novel or keeping up with your blog's demand for new content, you have a lot to juggle. Research, outlines, notes, drafts, edits, publishing—let alone the actual writing process.
Scrivener makes it easier. Made by writers for writers, Scrivener is designed to be the only app you need open while you write. Boasting a versatile suite of organizational tools and outlining and storyboarding views, this app streamlines the writing process from idea to published work, and keeps everything organized so you can just write.
That said, Scrivener can be a little overwhelming when you first get started. I personally had several false starts with Scrivener before I finally fell totally in love with it—now I use it for everything. Not to worry, there are really only three sets of tools you need to understand in order to use Scrivener productively.
This article won't give you all the ins and outs of Scrivener’s many features and uses. It will instead help you hit the ground running with Scrivener and its core features so you can take your writing from idea to polished draft to published piece in one of the most robust writing apps available today.
Scrivener runs on Windows, Mac, iPhone, and iPad. You can get a free 30 trial for Mac and PC from the Scrivener site, then buy a copy for $45 for macOS, $40 for Windows, and $19.99 for iOS from the App Store.
Why Scrivener?
Originally designed for novelists, Scrivener has been embraced by all kinds of writers, from students to professional bloggers. The main appeal? Its power to organize your writing.
Compared to word processors like Word or Google Docs, Scrivener is a whole different ballgame with its focus on managing your writing. Imagine the organizational power of Evernote, combined with the powerful simplicity of a Word document, minus the inconveniences of using both apps together.
Break your project into multiple documents to avoid endless scrolling (don't worry, Scrivener will automatically compile them all into one). Edit freely without the hassle of tracking changes—Scrivener lets you quickly save and browse "Snapshots" of your project history. Switch between Document, Outline, and Corkboard modes to refocus your attention during the lifecycle of your project.
Everything in Scrivener is designed to help you compartmentalize and organize your work, breaking down both the writing and editing processes into focused, manageable chunks.
Scrivener's great for business writing, too. Check out some of these third-party Scrivener templates from All Indie Writer:
Get Started with Scrivener
Unlike its more minimalistic, Markdown-focused cousin Ulysses (which we explored in more detail here), Scrivener bombards you with a lot of options as soon as it opens. Let's walk through the basics of the app to get you oriented before we start writing.
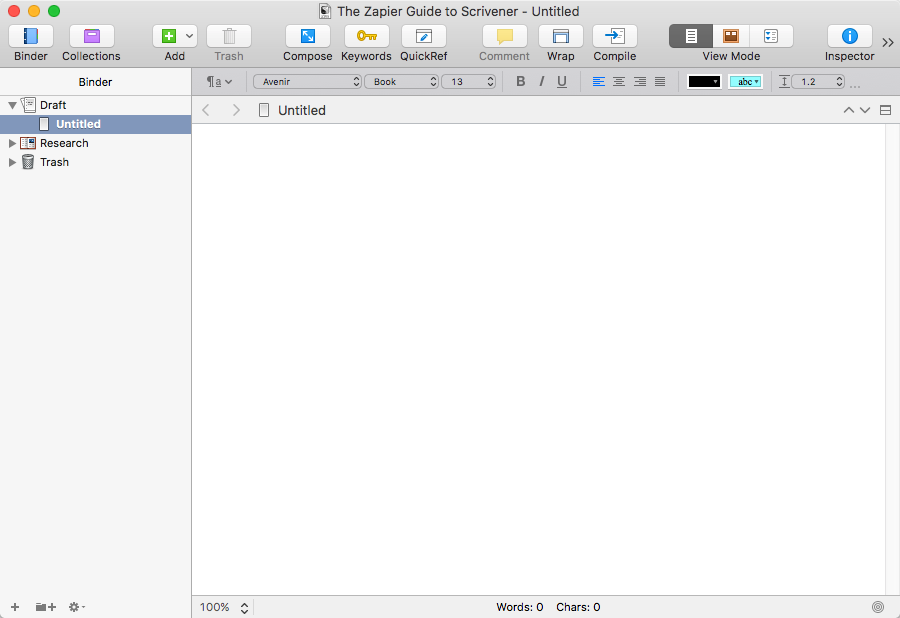
First, you'll be prompted to choose a template and name your file (don’t worry if your project doesn’t fit any of the default options).
Scrivener will then greet you with a familiar word processor interface, with rich text formatting options in the toolbar above the writing pane.
There are a ton of other features you can use in Scrivener to organize your writing notes and research, outline your article or book, and more. For now, let's look at the most important Scrivener features to take your writing from draft to finished piece. It all comes together in what Scrivener calls "the Binder"—the collection of folders that contain all the work related to a writing project.
The Binder
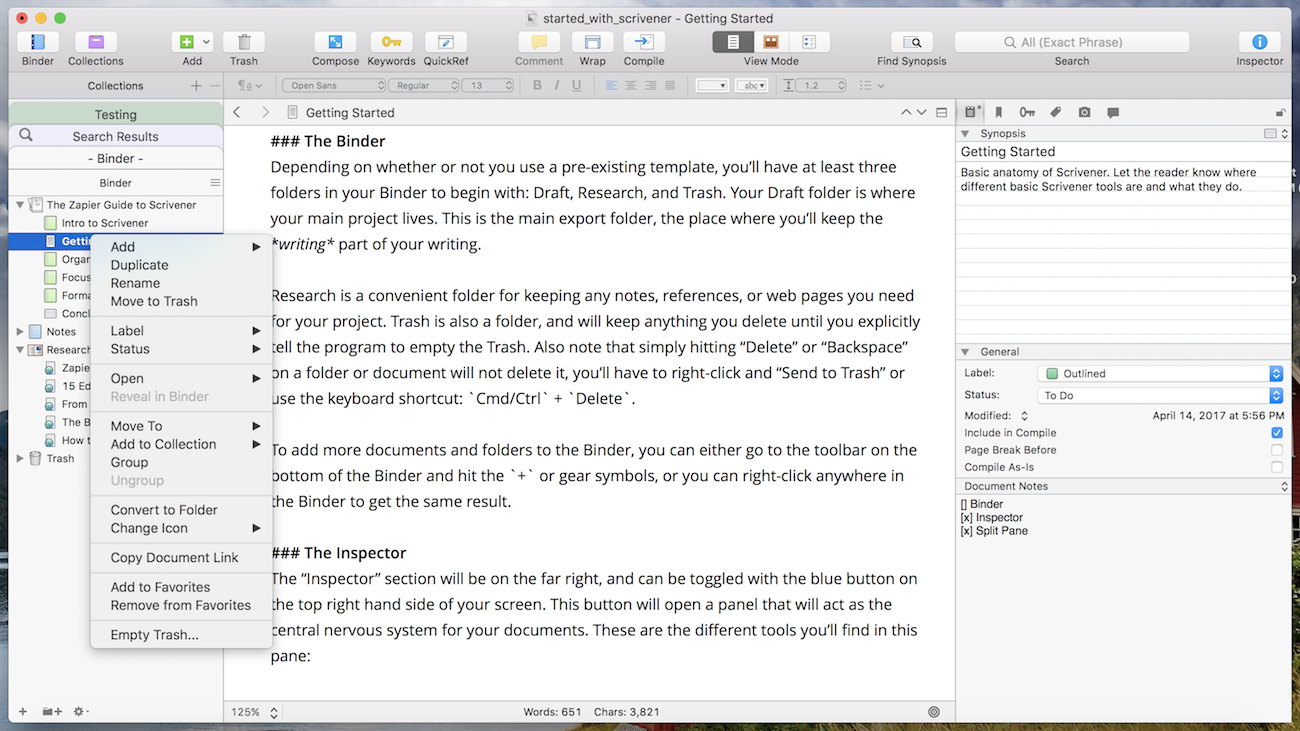
Depending on whether or not you use a pre-existing template, you’ll have at least three folders in your Binder to begin with: Draft, Research, and Trash.
Draft is the folder where your main project lives. This is the main folder to export at the end of the project, the place where you’ll keep the writing part of your writing. For example, if she were to write the next Harry Potter book in Scrivener, J.K. Rowling would likely add a folder for each chapter within the "Draft" folder. Each scene would be its own document to make revisions easier (more on that later).
Research is a convenient folder to keep any notes, references, or web pages you need for your project.
Trash is also a folder, and will keep anything you delete until you explicitly empty the Trash in Scrivener. Also note that simply hitting "Delete" or "Backspace" on a folder or document will not delete it—you’ll have to right-click and select "Send to Trash" or use the keyboard shortcut
Cmd/Ctrl+Delete.
To add more documents and folders to the Binder, you can either click the + or gear symbols in the toolbar on the bottom of the Binder, or right-click anywhere in the Binder to add a new item.
We'll learn more about the Binder in the How to Organize a Project in Scrivener section below.
The Inspector
The "Inspector" tools will be in a panel on the far right or can be toggled with the blue button on the top right side of your screen. This panel is the central nervous system for your documents, giving you access to notes, references, past document versions, and more—all quickly available while you write. These are the different tools you’ll find in this pane:
Synopsis. Jot ideas or a description for your document.
Document Notes. The scratch pad for your document, sitting just beneath the main Inspector pane. Here, you have as much room as you need to make plain text notes and view them as you write. For example, I use these notes to jot down a micro-outline for the document which I can refer to while writing.
References. Keep track of references for your document or project in this part of the Inspector. You have three options for references in Scrivener: Add an internal reference (a note or another document), link to another file on your computer, or link to a web page.
Keywords. Add and manage keywords to organize and catalog your documents. Keywords are useful for grouping themes, settings, ideas, or topics. (We'll talk more about keywords and how to use them later.)
Snapshots. Don’t worry about version control ever again. Snapshots let you capture versions of your documents by pressing
Cmd/Ctrl+5. Want to save a snapshot with a title? UseShift+Cmd/Ctrl+5. You can then view them in the Inspector. (More on snapshots later.)Comments and Footnotes. Need to leave notes for yourself or future editors/collaborators? Leave document comments the same way you would in Word or Google Docs. You can also add footnotes, which will later be properly formatted and included when you Compile your project (more on that later, too).
How to Organize a Project in Scrivener
While you can certainly use Scrivener for smaller writing projects or other projects where you'd use a word processor, its real strength is in its capacity to organize large writing projects. From novels to non-fiction to thesis projects to long-form articles, Scrivener is an excellent tool for gathering a lot of thoughts and information into something cohesive and usable.
Advanced Binder
The Binder is the main way you'll navigate your Scrivener project, but it’s also one of the Scrivener’s best organization tools. If you choose a template for your project, the Binder will come with a few pre-created folders, but don’t let those limit your creativity.
Outline your project by creating new documents for each section. While it’s essential to split novels or nonfiction book projects into chapters and scenes, it’s also helpful for projects like longform articles. Split each section into its own document so you can more easily manage your editing process.
Create as many folders as you want, or simply drag and drop relevant notes or research onto an existing document to make that document the parent content, a form of folder where the folder itself includes text, too. (For example: a novelist may include backstory notes or plot ideas as child files of a character document.)
You can also create "Collections." These function as special Binders that display folders and documents from your main Binder. Think of a Collection like a filtered view that lets you highlight only the documents or notes you want to see. For example, a blogger who organizes a year's worth of content in Scrivener might use a Collection for each month, to give herself an uncluttered view of upcoming blog posts.
Note that this is not actually a second Binder—if you create a new document within a Collection, it will create a new folder in your Binder. You also have to manually add documents and folders to a Collection. Collections are excellent for organizing notes and research. As another example, you could create one Collection per major chapter or section of a book/eBook, then add the chapter document(s) and all notes and research into the Collection, making them easily accessible.
Since you can collapse and reorganize the Binder and Collections however you want, it helps to play around with different folder systems so you can find something that fits your writing process well. You can also create and arrange folders specifically to use with Scrivener’s main outlining tools, Corkboard Mode and Outline Mode.
Corkboard Mode
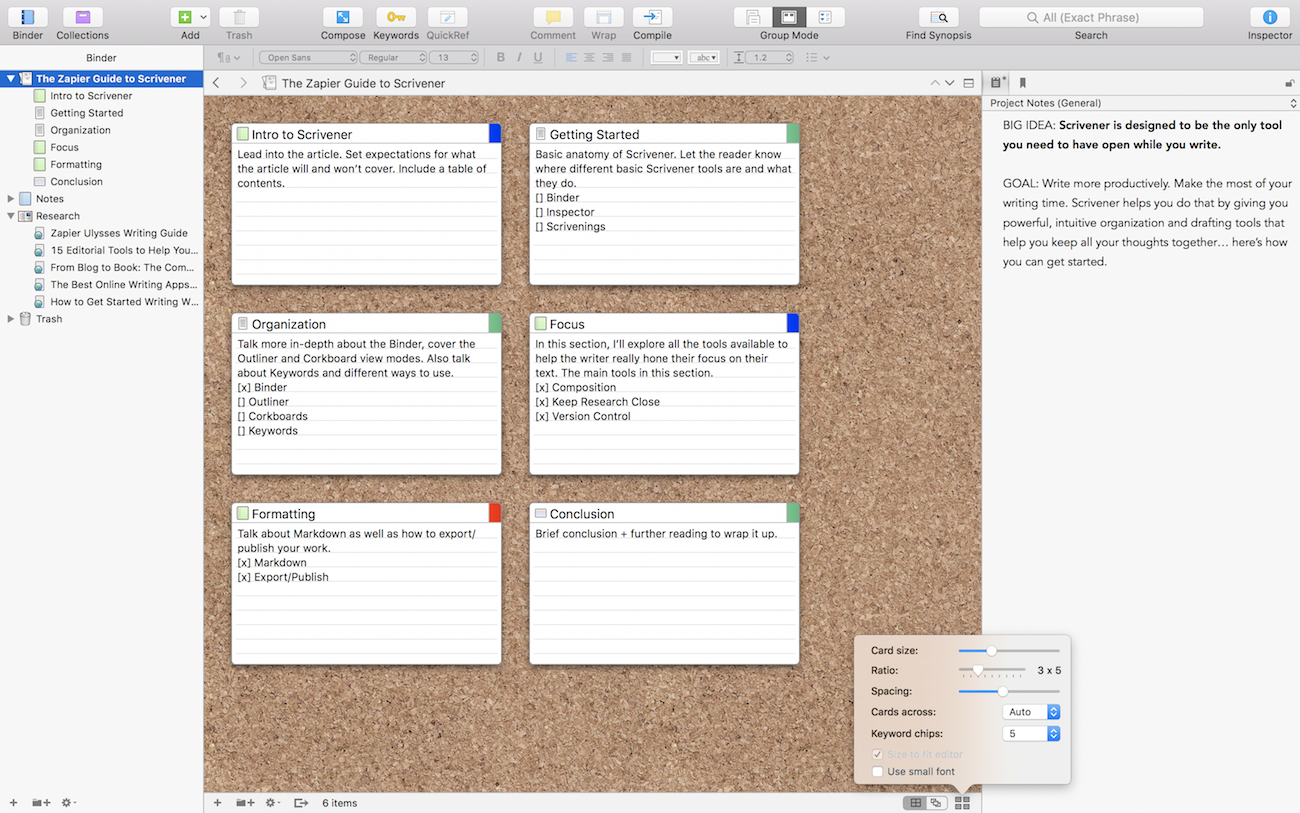
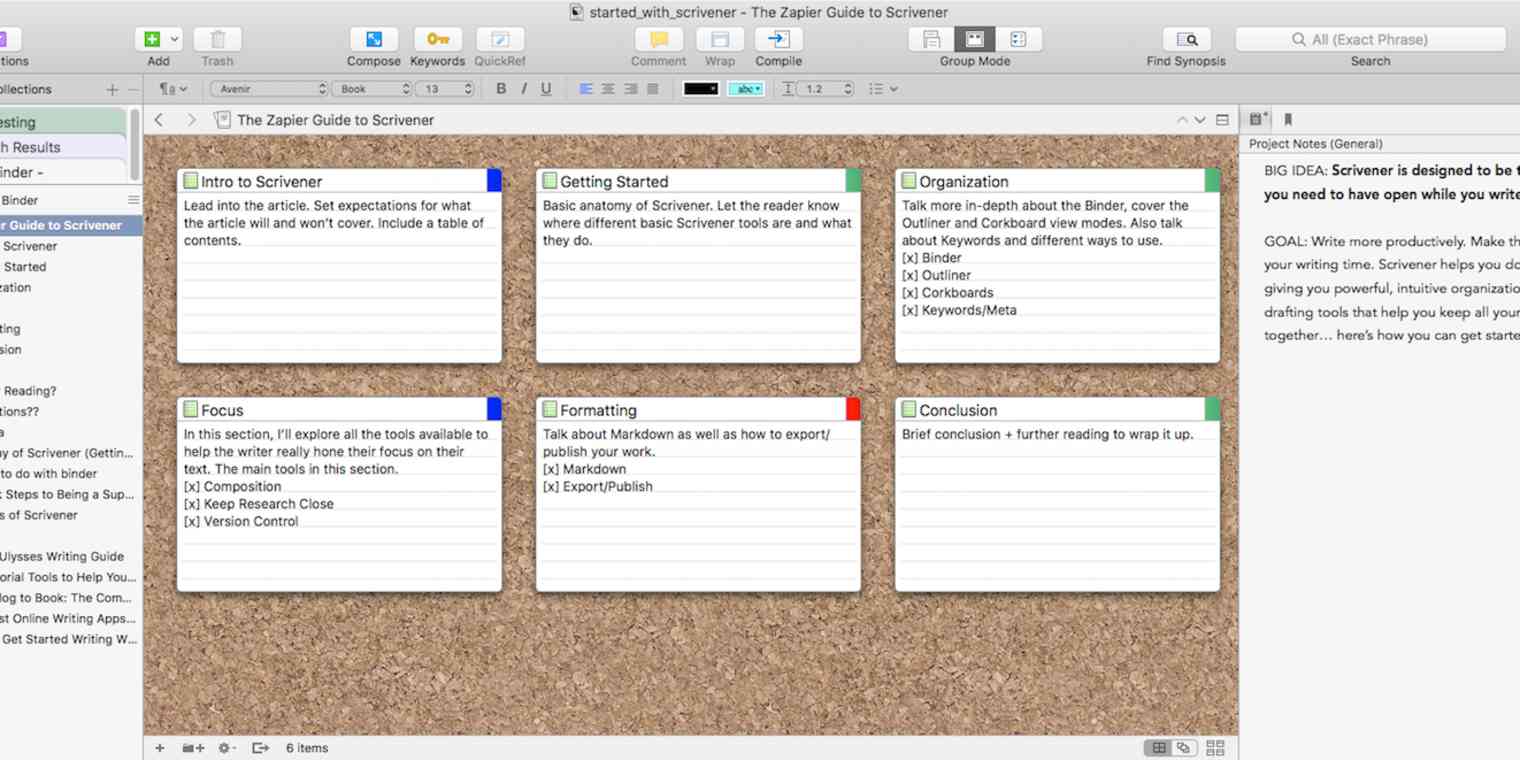
Scrivener provides three ways to view your documents: The default Document editor, along with Corkboard and Outline views. Both Corkboard and Outline modes give you a visual way to outline and review your project, but each serves a different purpose.
Corkboard provides you with a bulletin-board view of a selected folder. Every document in the folder is displayed on this board as an index card. By default, the index cards display your document’s title, synopsis, and a color marker for your labels. You can also adjust Corkboard settings to display keyword color markers, status stamps, and card number.
Create storyboard folders in this mode specifically for the purpose of rearranging ideas and drafts corkboard-style, or outline your main draft folder using this view mode.
Outline Mode
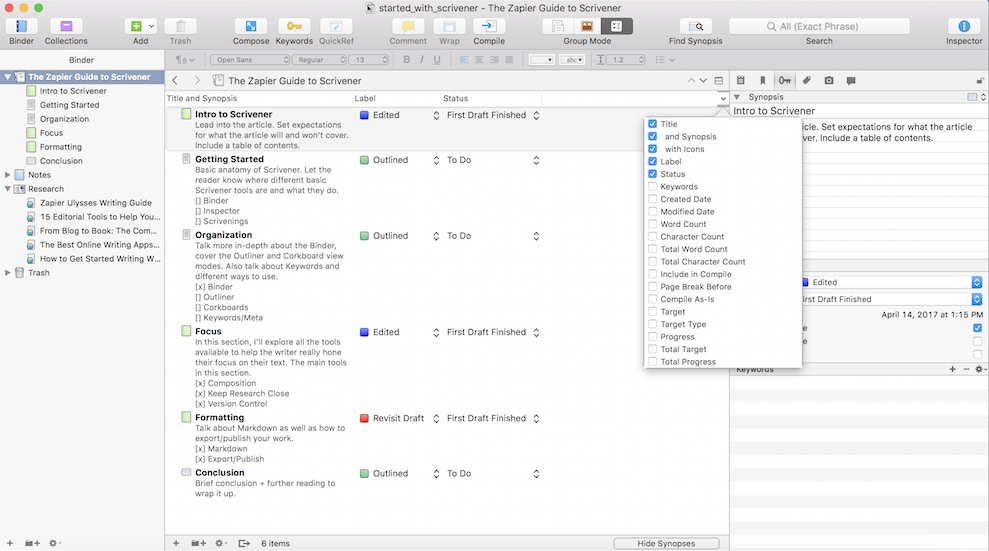
Outline Mode serves the same purpose as Corkboard Mode, but with more classic visuals. Outline displays the documents in a selected folder in an almost spreadsheet-like format. As a default, the outline displays document title, document synopsis, labels, and status. Customize this view by adding or removing any one of 20 different field types, such as word count, target progress, keywords, and many more.
While Corkboard Mode is fantastic for brainstorming and initially organizing or storyboarding a project, Outline Mode gives visibility to a lot of important data for writers who are drafting or revising.
Keywords & Custom Metadata
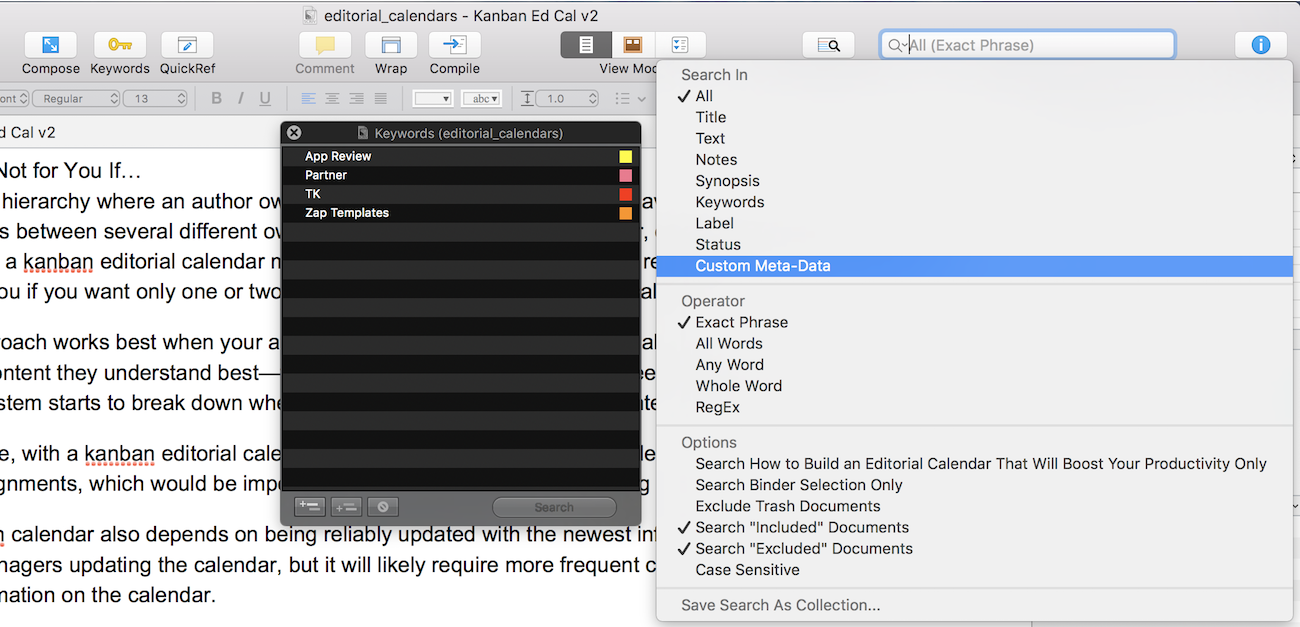
Two of Scrivener’s oft-overlooked features, Keywords and Custom Metadata are powerful tools to help you manage longer projects. These are both tied into Scrivener’s search function and allow you to quickly find documents based on custom criteria.
Keywords can be added to documents to group themes, settings, and ideas. Add keywords from within the Inspector panel (look for the key icon). You can create and add as many keywords as you want, and you can organize keywords into keyword hierarchies. (Bear in mind, however, that keyword hierarchies are for organization only—search will only pick up the keyword itself, not any parent keywords.)
Novelists might use keywords to keep settings consistent—for example, the keyword "Hogwarts Main Hall" could be applied to every scene that takes place in that location, making it easy to check consistency in revisions. Or, you might use it for something even broader: "Character Moment," "Harry’s History," or "Major Plot Moments."
Custom Metadata adds another dimension to Scrivener’s search by allowing you to create custom data fields. You can then search or review documents with these fields specifically. The best part is that this metadata is completely customizable.
Non-fiction writers might use custom metadata to keep track of sources referenced (even source material chapter and page number!) for a particular document, to make it easier to find, reference, and fact check later.
Novelists might use these fields to track specific characters or settings in tandem with keywords. For example, you might have the keyword "Character Moment" for a certain scene, and, in a custom "Character" field, have "Hermione Granger."
You may be wondering right about now—when should I use keywords and when should I use custom metadata?
Honestly, there’s no right answer. In some ways, these functions are even interchangeable (you could easily create the keyword "Character Moment: Hermione" instead of using keywords and custom metadata). Really, it’s up to you and how you want to organize your documents/scenes, chapters, and notes. Figure out the themes, moments, arcs, or details that are most important for you to track, then create a keyword or metadata system that makes it easy for you to find those later.
How to Write Distraction-Free in Scrivener
A writer loves nothing more than hitting their flow—that state where you’re totally consumed with \writing and everything just works. Yet for most of us, hitting flow is difficult.
Scrivener seeks to help writers achieve—and remain in—their flow state by adding tools and layouts to help keep you as focused on your project as possible.
Composition Mode
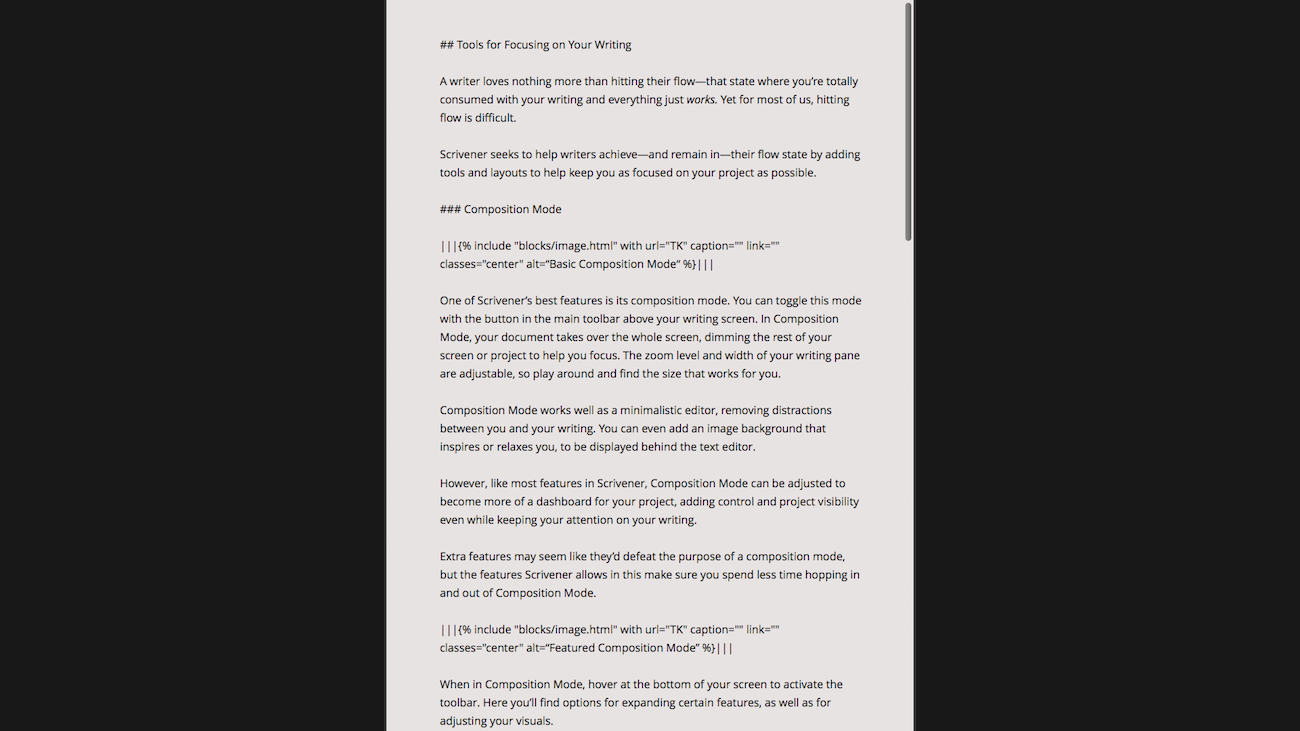
One of Scrivener’s best features is its composition mode. You can toggle this mode with the arrow button in the main toolbar above your writing screen. In Composition Mode, your document takes over the whole screen, dimming the rest of your screen or project to help you focus. The zoom level and width of your writing pane are adjustable, so play around and find the size that works for you.
Composition Mode works well as a minimalistic editor, removing distractions between you and your writing. You can even add an image background behind the text editor that inspires or relaxes you.
Then, like most features in Scrivener, Composition Mode can be adjusted to become more of a dashboard for your project, adding control and project visibility even while keeping your attention on your writing.
Extra features may seem like they’d defeat the purpose of a composition mode, but the features Scrivener allows in this make sure you spend less time hopping in and out of Composition Mode.
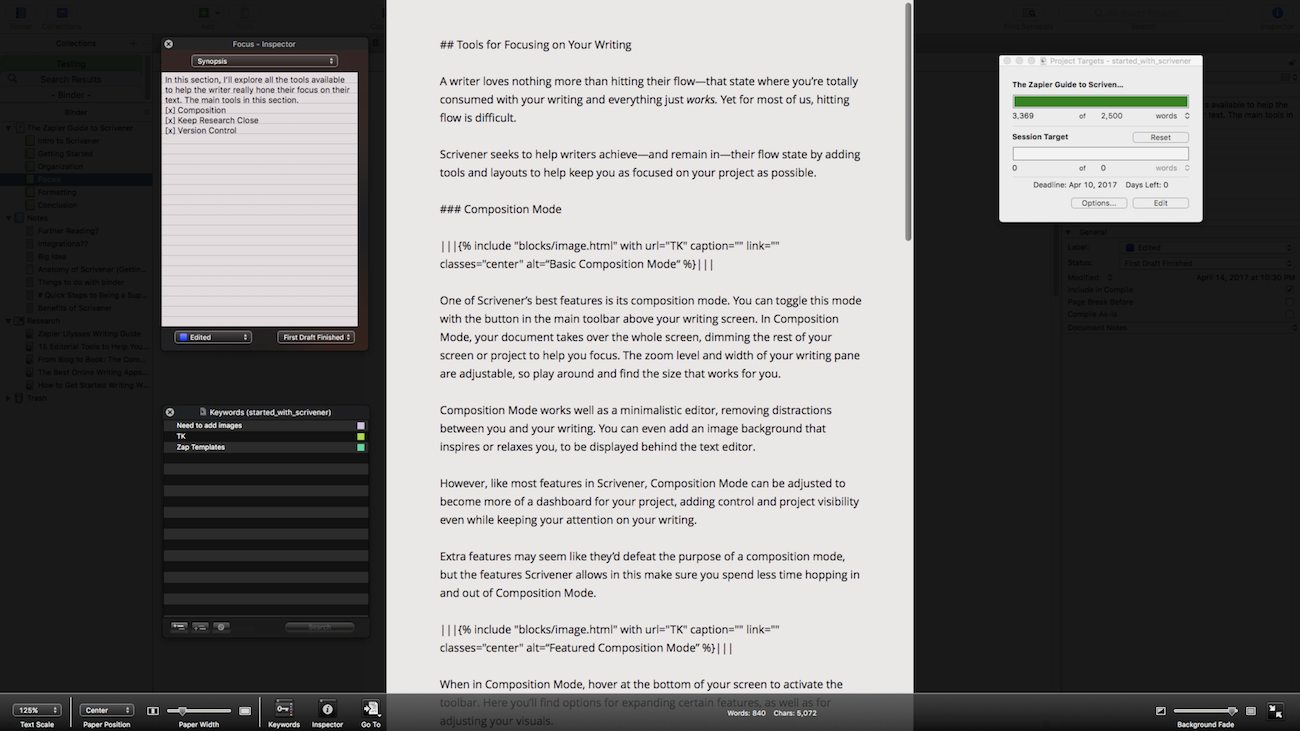
When in Composition Mode, hover at the bottom of your screen to activate the toolbar. Here you’ll find options for expanding certain features, as well as for adjusting your visuals.
The Inspector pop-up sits beside your main document and provides you with quick access to details like your synopsis, comments, document notes, references, pictures, and more. So whether you need to reference notes, or add notes or comments as you write, you can quickly do so without leaving Composition Mode.
Quickly monitor or add Keywords via a pop-up window, which you can leave floating next to your writing pane for quick reference.
Finished and ready to move to the next scene or section (or need to check on some research)? Use the Go To menu to move between documents from within Composition Mode.
A quick tap on Cmd/Ctrl + Shift + T brings up your Project Targets. This window lets you know the total word count of your document, as well as how many words you’ve written during this particular session. You can adjust this window to reflect wordcount goals (total and per session), as well as deadlines.
Scrivener also has a Typewriter Mode, which will make your text scroll up while you write, keeping your focus always on the same line. You can toggle this mode quickly with Ctrl + Cmd + T on a Mac, or from the Formatting -> Options menu on Windows.
Keep Your Research Close
For most writers, it’s natural to bounce between your word processor and your browser to double check a source, reference an image, or find the right quote. Problem is, even that "productive" hop onto the Internet often leads down a rabbit trail of clicks and distractions.
Scrivener breaks that pattern with tools to keep your research close at hand. Every project comes with a "Research" folder, where you can keep and refer to live web pages. Simply right-click on the Research folder, hover over "Add" and select "Web Page." Once you add the page, it will be available in Scrivener, even if you go offline.
Writing with Split Panes
Think it would be great if you could have your research pulled up alongside your draft? Scrivener thinks so too. Under the View menu, in the dropdown Layout, you’ll find the option to split the writing pane either horizontally or vertically.
This gives you two different writing screens you can navigate. Click once in the pane you want to navigate, then click in the Binder to select a web page, note, or document. You can also do this with folders, then select a Corkboard or Outline View Mode to view your project outline while you write.
Version Control
"Kill your darlings" is common editing advice for fiction writers, meaning you shouldn't get too attached to any one character, chapter, or even paragraph. This means that sometimes, you’ll have to delete a lot of great stuff for the sake of the whole.
Of course—who’s to know if you’ll actually need those paragraphs later? While you could try copy/pasting anything into a different document before editing, or using "Save As," Scrivener has a simpler solution.
With Snapshots, you can instantly save the current version of the document working in (in its entirety), and refer back to it later. This version control system is literally as easy as Cmd/Ctrl + 5. (To save a snapshot with a title to quickly find that darling you killed, use Shift + Cmd + 5 on Mac, or Ctrl + Shift + 5 on Windows.)
To view your Snapshots, open the Inspector and, in the Inspector mini-toolbar, select the camera icon. This will show you all the snapshots you’ve taken for that document. You can review the previous version in the Inspector pane, or you can choose "Compare" and see all the differences between the selected Snapshot and your current version. If you need to return to an earlier version, you can Roll Back a document to a Snapshot version with just one click.
How to Format an Article or eBook in Scrivener
One of the most time consuming parts of a project can be the formatting. Whether it’s just a matter of rich text vs Markdown, or whether you are doing a project that requires complex formatting—such as a novel or a thesis—Scrivener is here to help.
Markdown
Markdown format has gained a lot of popularity in recent years due to its ease of use—once you learn the formatting codes, it’s easy to add formatting without distracting yourself from your writing.
But not all blog platforms accept Markdown formatting (and whose boss would want to see a report full of hashtags and asterisks)? Luckily, Scrivener makes it easy for you to write in Markdown and convert to other formats with just a couple of clicks.
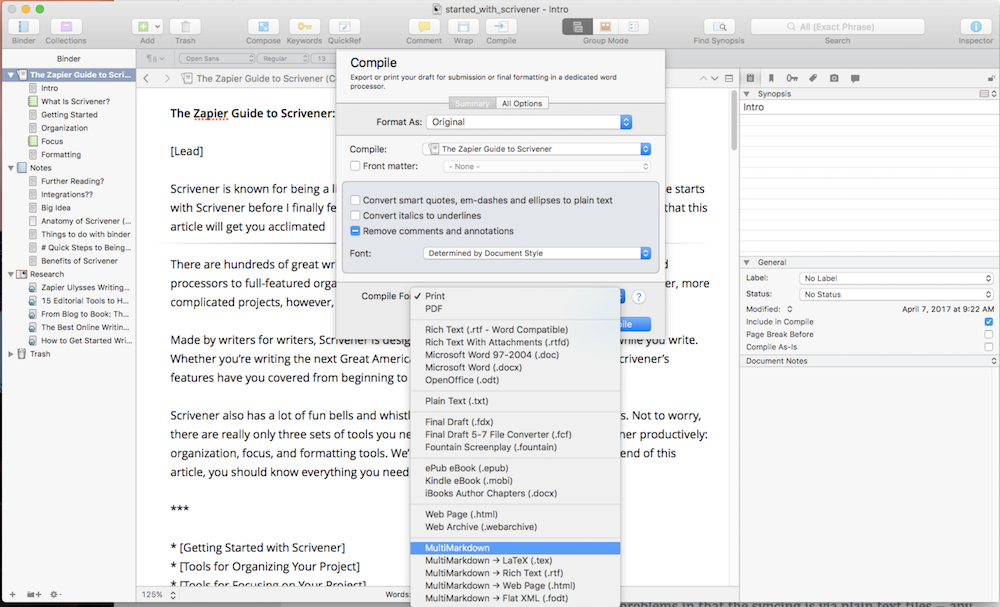
When your project is done, go to File > Compile and then choose from the dropdown "Compile For" menu (shown above) to export to popular formats like Rich Text or HTML, as well as LaTex and Flat XML.
If you’re new to Markdown, you can even jot down your own Markdown cheat sheet into your document notes, to make it easier to reference while you write.
But hey, if Ctrl/Cmd + B is still more natural for you, don’t worry. Just use the standard keyboard shortcuts or the formatting toolbar to add the style you want, then Scrivener makes it easy to convert bold and italic formatting from rich text to Markdown or any other format you need.
Export & Publish
So you’ve reached the end of your project. Now what? Well, that depends on the type of project you wrote, and the final form you want it to be in. Scrivener supports several different formats, from novel layouts to annotated books to simple document formats.
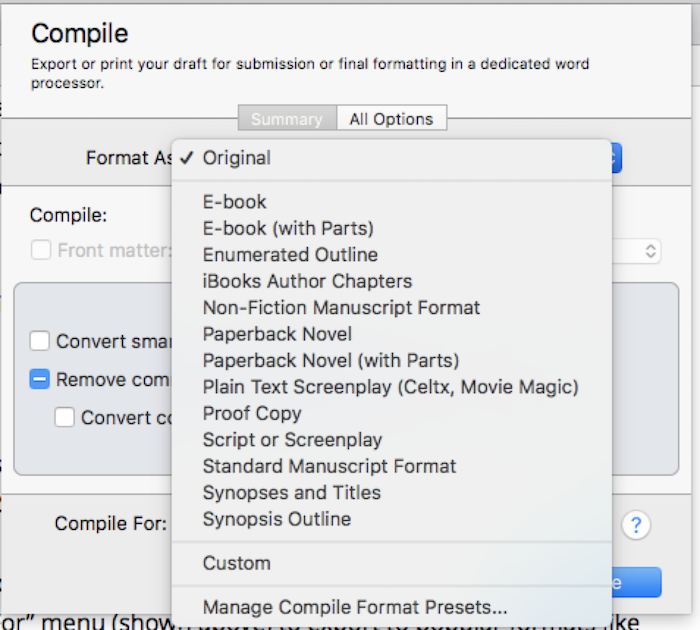
You can either choose from one of these presets, or create your own customized compile to adjust settings like formatting, layout, fonts, and page settings.
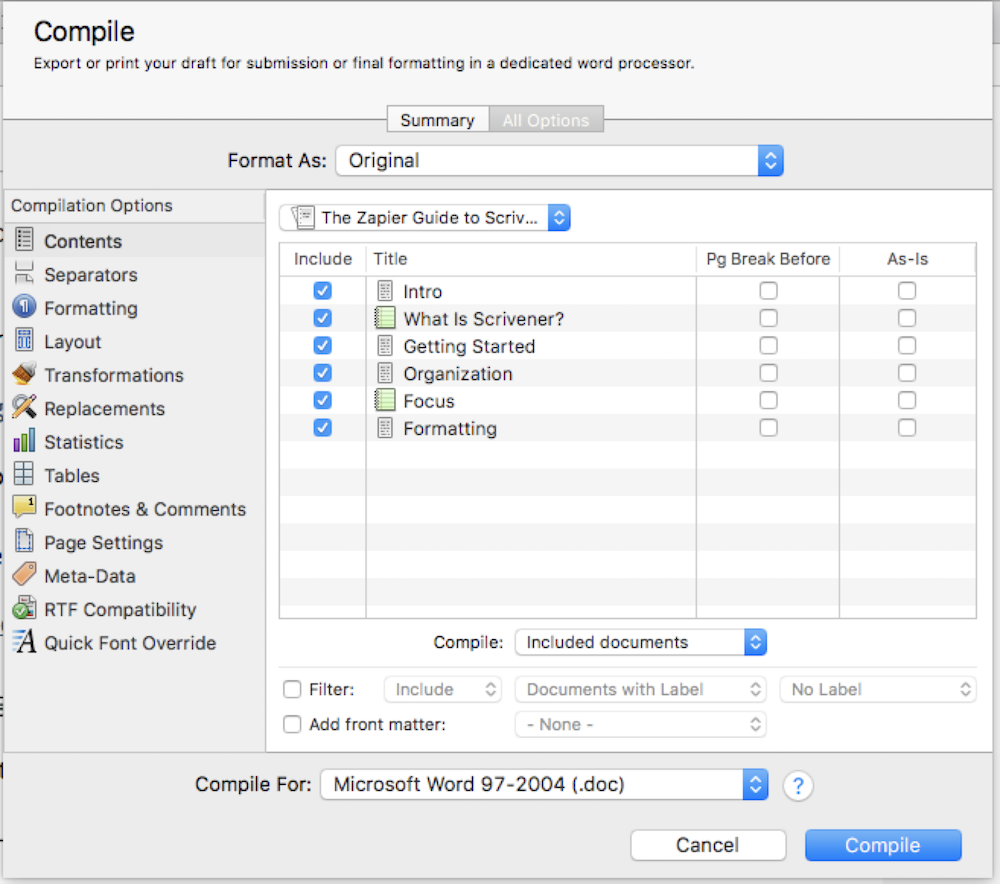
There are a lot of options to play with, and the details are beyond the scope of this guide. But don’t worry—if you want to simply export your work as a unified document, you can.
For Format As choose "Original", then at the bottom of the window, in Compile For choose "Microsoft Word 97-2004" for a simple .doc format. (Choose .docx or PDF in the same manner.) This will export your project—any documents and notes you choose to compile—into one document.
Now that you have the basics down, you can explore all the other features Scrivener has to offer. The beauty of Scrivener is that you can experiment with different folder structures, settings, and view modes to find the best workflow for your project. So have fun, make mistakes, and get messy!
Further Reading
Take Scrivener further with the detailed Scrivener Guide PDF, or check out one of their team's recommended books on Scrivener.
Publishing your work on your own? Check our complete guide to writing, editing, and publishing your first eBook, filled with tips we've learned about the Amazon Kindle Store and iBooks after publishing over a half-dozen books.* Before that, be sure to polish your writing with these 15 editorial tools to help you proof your text.
Writing in a team? You might want to write your own copy in Scrivener, then bring it together with your team's work in one of the best collaborative writing apps—including our team's favorite, Google Docs.
Want to check out the best Scrivener alternatives? Check out our in-depth guide to Ulysses, a simpler, Markdown-focused alternative to Scrivener, or check out the Zapier team's favorite writing apps especially for writing in teams.
