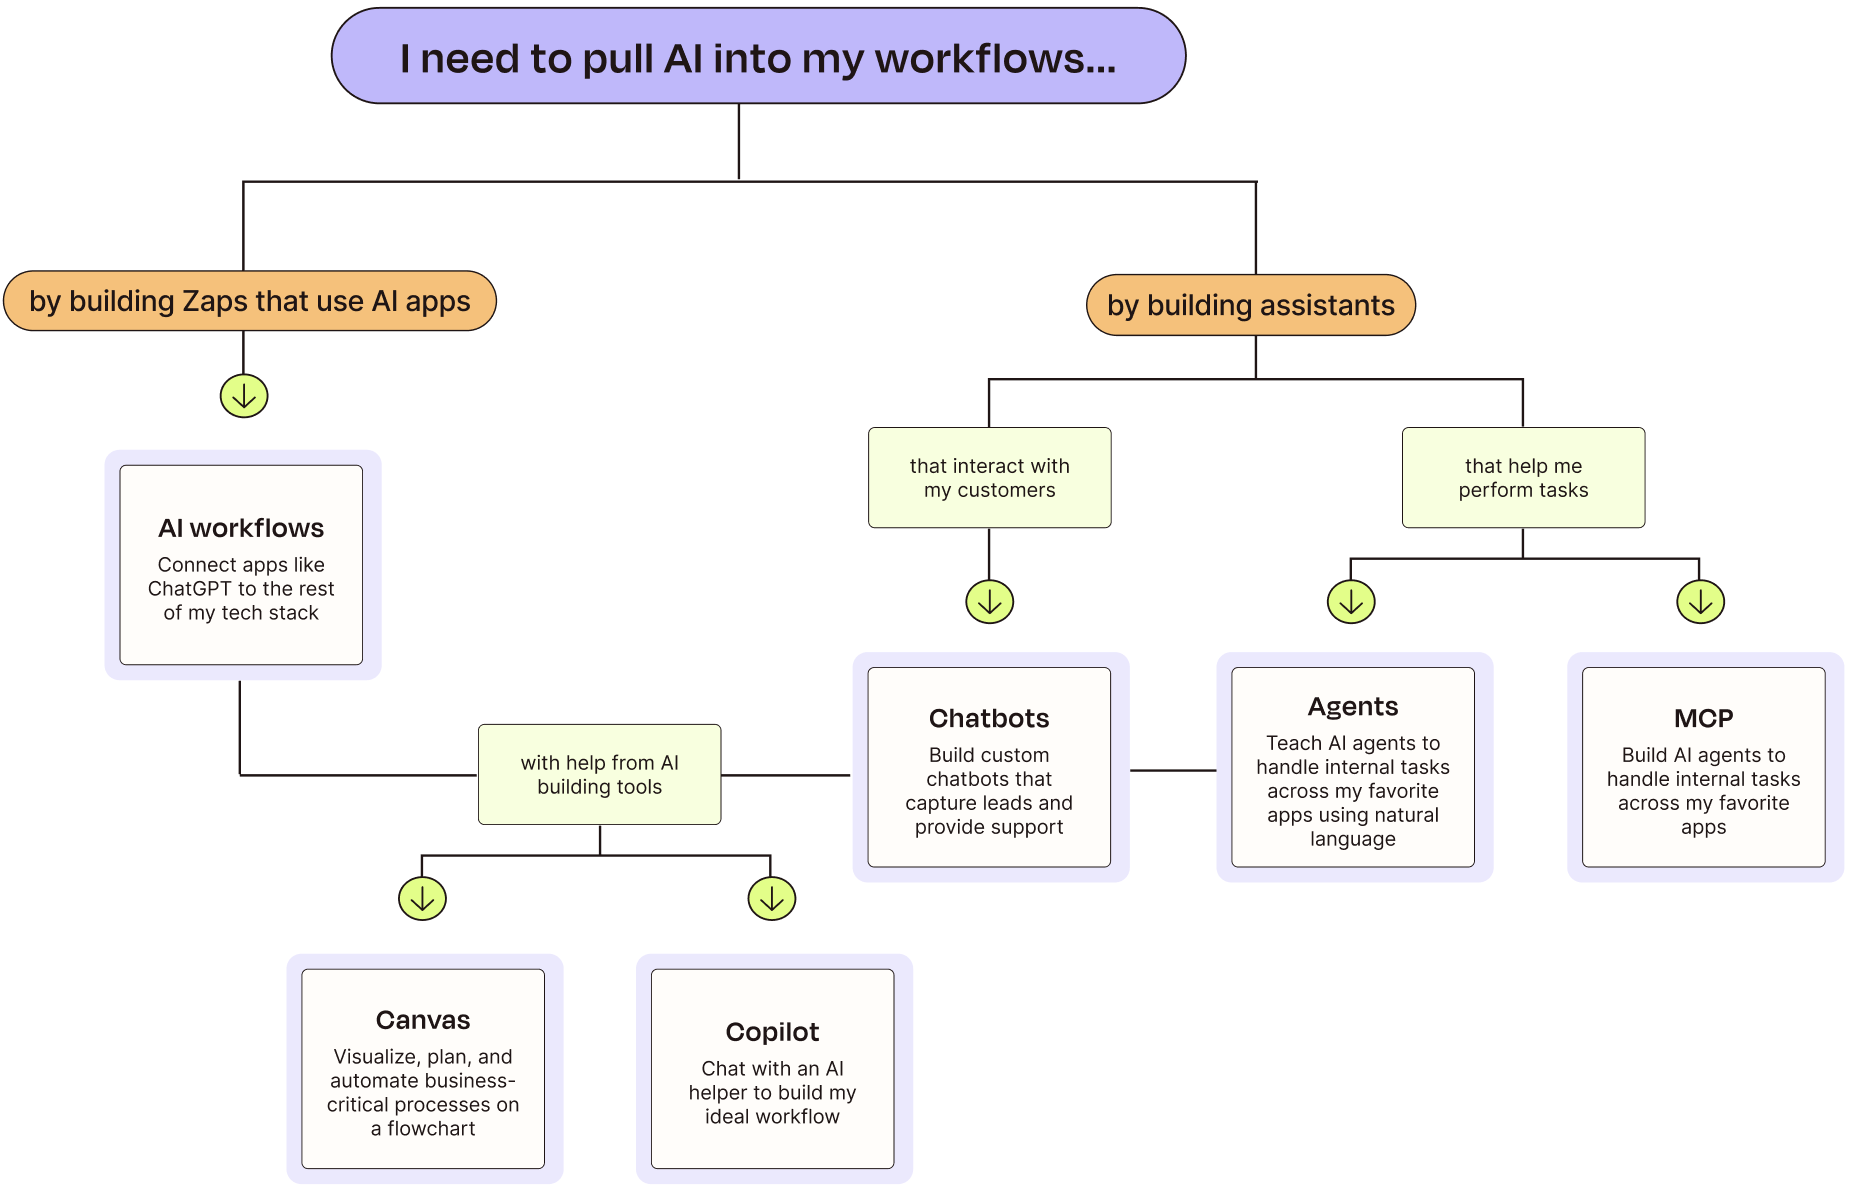
Welcome to Zapier! This platform is the AI orchestration layer that bonds your tools together—including your AI apps, your agents, and your chatbots—with enterprise-grade security.
Below, I'll show you how you and your team can benefit from Zapier. And I'll introduce you to our essentials, what you'll use to build automated, AI-powered workflows with us: Zaps, Tables, Interfaces, Agents, and Chatbots.
By the time you're done reading this, you'll be equipped to build intelligent systems safely and at scale.
Skip ahead
What is Zapier?
Zapier is the most connected AI orchestration platform on the market. It empowers innovators and builders to create and scale workflows across their tools, teams, and data—no coding required.

With Zapier, you can complete tasks through automated workflows we call Zaps. And with the following products—which connect seamlessly with Zaps—you and your teammates, whether they're technical or not, can build sophisticated, automated systems:
Zapier Tables: Databases that can store, organize, and manage data from Zaps, and even trigger Zaps from buttons
Zapier Interfaces: Brandable forms that instantly trigger workflows from responses
Zapier Agents: Specialized AI-powered assistants that work across your apps in the background
Zapier Chatbots: AI-powered bots that can answer external or internal questions
You can build automated systems yourself or with the help of Zapier Copilot, an AI assistant that's embedded in every Zapier product. Chat with it using plain language, and it'll brainstorm, build, configure, and troubleshoot workflows for you. Learn how it works in our feature guide.
Automation and AI automation
Below, I'll break down how you can use Zapier. But first, it's a good idea to understand a little bit about automation—a process that can scale your company's work, streamline business-critical processes from start to finish, and deliver real results across teams—as well as how it differs from AI automation.
What is automation?
Automation is simply setting something up to run automatically. Automation is all around you, even if you don't realize it. Take your smartphone, for example. You receive alerts whenever you receive a text message, a voice mail, or an email. That's automation!

For example:

What is AI automation?
Automation runs your work on autopilot. Layer in the power of artificial intelligence, and you've got AI automation.
Pairing automation with AI gives you the ability to run even more complex workflows automatically. It lets you delegate certain tasks to AI—like summarizing or writing content, classifying text through pattern recognition, extracting data, and analyzing information.
This means your teams can automate work that previously required human judgment. Glean customer intent from support emails. Analyze data to predict inventory needs. Route work to the right team based on the content of a request. You're in control. You run point on building your perfect automated AI system. And with AI handling the time-intensive, repetitive stuff, you're free to focus on tasks that require your unique, human perspective.
What can I do with Zapier?
You understand the basics of Zapier and automation. So, what can you actually build here?
Automate workflows
Automated workflows—we call them Zaps—tell your apps to follow this simple command: "When this happens, do that."
Every Zap has a trigger and one or more actions. A trigger is an event that starts a Zap, and an action is what your Zap does for you. You can add more than one action after your trigger. When you publish your Zap, it will run the action steps every time the trigger event occurs.

When a Zap runs, each successful action it completes counts as one task. (Triggers don't count toward task usage, nor do certain actions performed by Zapier's built-in apps.)

Think of these as building blocks for your Zap. Start with your trigger and add the action or actions you want Zapier to perform.
Once you've mastered Zaps, you can connect them to our other products.
Store data
If you automate a process that relies on spreadsheets, you can instead store that data in Zapier Tables. Like your favorite spreadsheet tool, Tables offers a familiar row-and-column grid with CSV imports, formulas, and the ability to create filtered, shareable views.
The difference? Tables is built for automation.
The Tables integration comes with triggers, actions, and even search actions. That means you can launch workflows based on changes made to a table, let your Zaps check for existing information in tables, and more. Tables are included in every plan, and neither triggers nor actions count as tasks—they're free.
Create forms
Forms are a common trigger for Zaps. However you use forms—to kick off a lead flow, collect requests from coworkers, take customer questions, or start internal processes—you can use Zapier Interfaces to build them.
Make chatbots and agents
With Zapier Chatbots and Zapier Agents, you can build AI-powered assistants that work with your existing apps and internal knowledge sources. Conversations or agent activity can trigger workflows across your entire stack.
Where do they differ? Chatbots enable user-facing chat experiences that you can embed on your site or route messages to from channels like email, Messenger, or Zendesk. They're optimized to answer questions with your knowledge, collect leads, and trigger Zaps.
Agents, on the other hand, execute multi-step workflows across your apps using instructions, live data sources, and app triggers and actions—running on demand, on a schedule, or when you're not around.
What should I automate with Zapier?
The best candidates for automation tend to be deterministic processes: tasks like creating the same types of content, replying to standard messages, or extracting similar data from emails.
If you and your team still don't know where to begin, look for workflows that match these criteria:
You do this task frequently. Example: You send a weekly reminder to your team to fill out a meeting agenda.
You regularly move info from one app to another. Example: You add tasks from a project management app into your personal to-do list app.
You have a manual task that doesn't scale as your business grows. Example: You copy event attendee email addresses to a spreadsheet.
AI could improve the output of your task. Example: You summarize new meeting transcripts, then send it to your team. (AI could do the summarizing for you, at a fraction of the speed.)
You need a process that centralizes workflows, forms, data, and AI. Example: You want to build your own automated IT helpdesk, onboarding system, and lead routing process.
How to use Zapier
Let's start with our signature tool: the Zap.
Before you create a Zap, it's helpful to think about what you're trying to accomplish. For example, let's say you want a contact form on your website, and you want to store the form submissions in a Google Sheet—but you don't want to copy and paste them manually.
Now define the problem you're trying to solve. Ask yourself:
What apps do I want to use? (A form app and a spreadsheet app)
What event will trigger my Zap? (When there's a new submission in our form app)
What action will my Zap perform? (Add the form submission to a spreadsheet)
What info do I want to move between those apps? (The contact's name, email address, and the reason for contacting us)
Before you get started
Create your form, and enter a sample submission. It's helpful if you use information that'll be recognizable to you later. For example, instead of using random characters, enter something that will make sense—you'll use that data in Zapier to test your Zap. (We recommend using superhero names or fictional characters so you won't confuse your test with a real submission.)
Create your spreadsheet, and be sure to name your columns. This will be important when you set up your Zap.
Set up your trigger
The Zap editor is where you'll create new Zaps and edit existing ones.
Remember: A trigger starts your Zap. (Think of it as the WHEN of any automation.)
When you open the Zap editor, you'll be prompted to pick an app as your trigger.

You'll see the apps you use most frequently, built-in apps from Zapier, and popular apps. You can select from one of these, or look for the app you want to use in the search bar. If you're starting from a template, one of our pre-made workflows, this will be selected for you.
Next, you'll be asked to choose a trigger event. This is the event that happens in your trigger app that signals Zapier to start your Zap. In this case, it's when a new form entry comes into our form app.

Trigger events vary between different apps and app types. For example, a task management app might have New Task as a trigger, while a spreadsheet app could have New Spreadsheet Row.
Next, you'll be prompted to sign in to your app account if you haven't connected it before. Once you've connected your app, select the account you want to use with your Zap.
Note: For each app you connect, Zapier will ask for a general set of permissions, which allows you to be flexible with your Zaps. The only actions Zapier takes on your app accounts are those a given Zap needs to accomplish what you've set up.
Next, you'll customize your trigger event. Click the dropdown menus in this step to select the right options. In this case, we need to select the specific form we want to trigger our Zap.

Customizing your trigger event will look different depending on your trigger app. Sometimes you might not need to do any further customization.
After you've set up your trigger, you need to test it to ensure it works. When you click Test trigger, Zapier will look for data that already exists in your trigger app account and pull that information into the Zap editor. That means you need to have one real instance of your trigger, so Zapier can use it as a "sample submission."
Tip: If your Zap involves sending information to someone (like an email), it's helpful if your test information uses your own email address or contact info for someone else in your company because the email will actually get sent during the testing process.
In this example, we need at least one form submission to already exist in our form app in order for Zapier to use it as a "sample submission." Zapier pulls in the last form submission that our form app received. If a submission doesn't exist yet, try submitting a form before testing your trigger.

When you test your trigger, Zapier is only looking for information. It's not posting or changing any information that already exists in your trigger app.
Although you have the option to skip this step, it's important to follow through. Testing your trigger ensures that Zapier can find the information you want. You'll also use this information in later steps as you continue setting up your Zap.
Look through your test data to confirm that it's pulling in the right information from your trigger event. Select the test data you'd like to use, then click Continue with selected record. The Zap editor will take you to set up the action step of your Zap.
Set up your action
The action is the DO part of your automation. Actions are the events you want your Zap to perform after your trigger occurs. Without an action, you don't have a complete Zap.
Just like you did with your trigger, select your action app. Once you've selected your app, choose your action event—which is what you want your Zap to do. If you're using a template, your action app and event will be pre-filled.
In our example, we want to add form submissions to a spreadsheet. Select your spreadsheet app, and then choose the event that will create a new row.
Just like with trigger events, action events vary between different apps and app types. For example, one spreadsheet app might have an action event called Create New Row while another app's event is called Add New Row.
Next, you'll be prompted to sign in to your action app account if you haven't connected it before. Once you've connected your app, select the account you want to use with your Zap. Click Continue when you're done.
Next, the Zap editor will prompt you to further customize your action event.
Zapier separates the data that comes in from your trigger event into individual pieces, which can then be used in your action fields.
In order to get your information from App A to App B, you need to tell Zapier what information from your trigger app should be sent to which place in your action app. We call this "mapping" those fields.
In this example, you'll see our labeled spreadsheet columns are now fields for us to fill in with information from our form app. (This is why it's important to label your spreadsheet columns!)

If you want to use information from your trigger app, click the + sign in an empty field (where you see "Enter text or insert data…") within your action step—or just type a forward slash (/). A modal will appear with pieces of data from your trigger app.

Then, select the information you want to add to each field. Think of it like multiple choice: You can select one option or several, and you can add custom text. And unless a field is labeled "required" in red, you don't have to add an option.
When you map a piece of data—such as a contact name—what you see in the editor is a placeholder. This placeholder data will only be used by your Zap when you test it. When your Zap is turned on, real data from your apps will be used when your Zap runs.

For example, we see the name "Dorothy" appear when we map it to a field in the Zap editor, as that was the contact name we entered in the test form submission. When the Zap runs, the name of the person who submits the form will be used instead.
If you want the same information to be used in a particular field every time a Zap runs, you can enter text instead.
For example, we want to add the text "Homepage form" to each spreadsheet row the Zap creates, in order for us to know that the submission came from the homepage contact form. In the field labeled Source, we'll enter "Homepage form."
Once you've mapped your fields, click Continue.
Test your Zap
After you've set up your action, it's time to test your Zap. When you click Test step, Zapier will test your Zap by performing the action, according to how you've mapped your fields in your action step.
You'll see a preview of the action your Zap completed, but it's always good practice to check your action app to see how it looks. (This is why you should use superhero names or fictional characters in your test.)
In our example, we'll go to our spreadsheet app to check that the right information was sent from our contact form.

When you test your Zap, Zapier will perform the action in your action app. This means that when we test our example Zap, a new row will be added to our spreadsheet. However, it's important not to skip the test. The test is how you'll check whether your Zap is working correctly. You can always delete changes made in your action app after you've completed the test.
If something doesn't look right, make any changes you need in the Zap editor and test your Zap again. Once you're happy with how your Zap works, click Publish.
Note: There are pre-made Zaps—which we call Zap templates—that you can use. You'll find Zap templates in the app directory and in many of our blog posts. When you start from a template, you'll find some selections made for you in advance, but you'll always need to connect your app accounts and confirm the setup of each step.
If you're looking to take your productivity to the next level, you can supercharge your workflows with things like:
Or you can connect your Zaps to these other products.
Collect data with Interfaces and store data in Tables
In the example Zap above, you can just as easily swap the trigger and action apps with Zapier Interfaces and Zapier Tables. The Zap creation process is the same, and creating your form and table is just as intuitive.
But since both products are free, they can materially cut back on costs for your data-heavy workflows. Plus, forms and tables built on Zapier are made for automation—with instant, native triggers and actions that kick off Zaps directly, keeping your workflows fast and reliable.
So try setting up the same workflow with Interfaces and Tables instead. You can find guided setup instructions accompanied by screenshots in our Interfaces and Tables feature guides.
Create custom chatbots
If you have an isolated chatbot on your website or intranet pages that doesn't "speak" to other apps you use, you're not getting the most you can out of these AI assistants. With Zapier Chatbots, you can have Zaps trigger from certain events—like after a chatbot conversation ends, or when someone clicks a button mid-chat.
And just like with Interfaces, you can automatically send leads collected mid-conversation to Tables or log whole conversations for analysis. Zaps can also summarize chatbot transcripts, share insights to Slack, create tickets when certain conditions are met, and more. Learn everything you need to know about building and customizing a chatbot in our Chatbots feature guide.
To spin up a chatbot fast, try one of these ready-made templates:
Use your business content to resolve support and lead questions with a customized chatbot.
Repurpose existing content with a list of digital marketing ideas, powered by OpenAI.
Answer prospect questions quickly and close more deals with an OpenAI-powered chatbot.
Create AI-powered agents
Agents are powerful teammates that you train with prompts to fulfill specific roles in your organization—and when you build them on Zapier, they're easy to connect to your other apps. You may want to build an agent instead of a Zap, particularly if you need to set up an automated system quickly. But they can also work hand in hand. You can trigger agents from Zaps and app events, or even invoke an agent mid-Zap, putting you in the driver's seat of building the perfect system for your team.
We cover all the features you get with Agents—along with best practices, prompting tips, and detailed setup instructions—in our dedicated feature guide.
If you just want to dive in, try one of these ready-to-go agent templates:
AI tools for building fully automated systems
Once you've got the hang of creating automated systems, there are even more products in Zapier's AI orchestration platform that can help you build smarter, end-to-end systems and processes:
Zapier Copilot is an AI-powered assistant that helps you build cross-product systems from start to finish—accessible both when you first log into Zapier and inside any Zapier product.
Zapier Canvas is an AI diagramming tool that maps and optimizes your processes to help your team document, refine, and automate with ease.
Zapier MCP is a translator between AI tools and apps that lets you carry out any of Zapier's 30,000+ actions right inside your AI tools.
This guide was originally published in May 2025 by Elena Alston. The most recent update was in December 2025.