There used to be 101 tricks you could pull to get to the top of Google's search results. And one by one, Google's squashed those shortcuts to make sure only the best content comes to the top.
Today, the fastest way to get to page one of Google search results (and stay there) is to write quality content and market that content well. In other words, the best search engine optimization (SEO) strategies in 2016 align closely with today's tops digital marketing practices.
So if you're following these strategies, why hasn't the blog post you published months ago now surfaced as the top result for its topic? Turns out, there are still a few things content marketers can learn from SEO professionals like myself. There are the correct keywords to target, broken pages on your site to clean up, and offline relationships to maintain so others link to your site.
Let's look at three key SEO tools and how you can use them to help publish quality content that stays at the top of search results—the right way.
Google Keyword Planner: How do your customers talk?
Majestic: Who likes and trusts you?
Screaming Frog SEO Spider: Is anything broken on your site?
Google Keyword Planner for Data-Driven Content
Google Trends is a fun tool to see how many people are searching for a given topic at any time. Want to see how how the popularity of smartphones has risen over time, or how seasonal search terms fare during the rest of the year? Trends is the place to check.
And yet, it's not that detailed. You can't, for instance, see what other similar topics people search for.
Google Keyword Planner is the tool for that. A free bonus tool in the Adwords builder, Keyword Planner gives detailed insight into the search habits of your potential customers. It helps you discover how your customers really talk, not how you think they talk.
Instead of Google Trends' limit of five keywords, Keyword Planner lets you look up an unlimited number of keywords. It then gives you similar keywords people are searching for, along with a rough idea of the amount of monthly search volume for each term.
This can help an SEO team identify keywords to target, but it can also help your company decide how to position your brand. It can also be a great tool to help pick content ideas for your blog and other pages on your website.
Let's take a closer look on how to get started with Keyword Planner.
1. Launch Keyword Planner with a keyword idea
To get started, open Google Keyword Planner—though if you haven't used it, you'll first see an Adwords setup screen. Just click the "Skip the Guided Setup" link to skip setting up an ad campaign. Then, click the Tools button in the top right, and select "Keyword Planner." Click on the text that says, "search for new keywords using a phrase, website or category."
This opens a drop-down with a number of different fields. In the first field, put in your desired keyword or keyword phrase. Just take your best guess; type anything you're interested in writing about. For the purposes of this example, we are going to use the phrase, "how to write a blog post." Now, click the blue "Get ideas" button at the bottom.

2. Test your keyword assumptions
The next screen shows you a blue bar graph that gives you the average monthly search volume for all of the relevant keywords for the phrase, "how to write a blogpost." Not all of these keywords are relevant, but that's perfectly fine at this stage. The next few steps will focus on narrowing down our list to relevant topics and ideas around our idea.
In the bottom left corner of the bar graph, you will notice two tabs. One tab says "adgroup ideas" and the other tab says "keyword ideas." Click the tab that says "keyword ideas." At the top, it will show you the average monthly search volume for the specific term that you put in. In this case, the term "how do write a blogpost" gets about 50 searches per month. That level of search volume is nothing to get excited over.
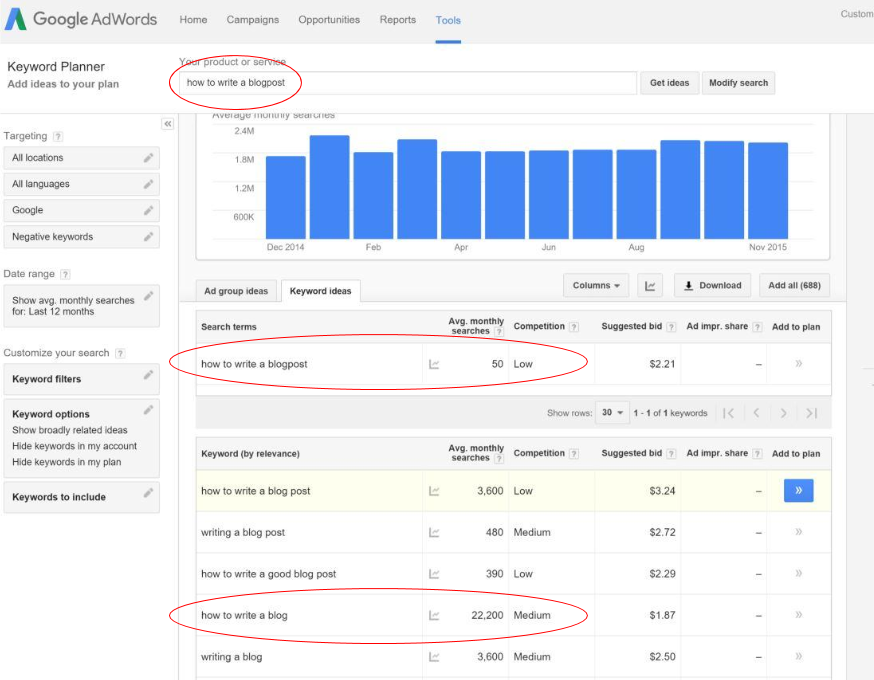
Let's pause here and examine this screen for a moment. What can we learn? Our original idea of using the term "how to write a blogpost" returned 50 monthly searches. Take a look at the suggested keywords in the table below. What do you see? There are a number of other ideas with much more search volume around those terms.
And this gets us back to our original assertion in that we can use Keyword Planner to get an idea of how people actually think and talk. As you can probably see, people use the term "how to write a blog" far more than "how to write a blogpost."
What would this mean for you in positioning the copy on your website? Are you sure that your customers think and talk how you think and talk?
3. Generate new content ideas
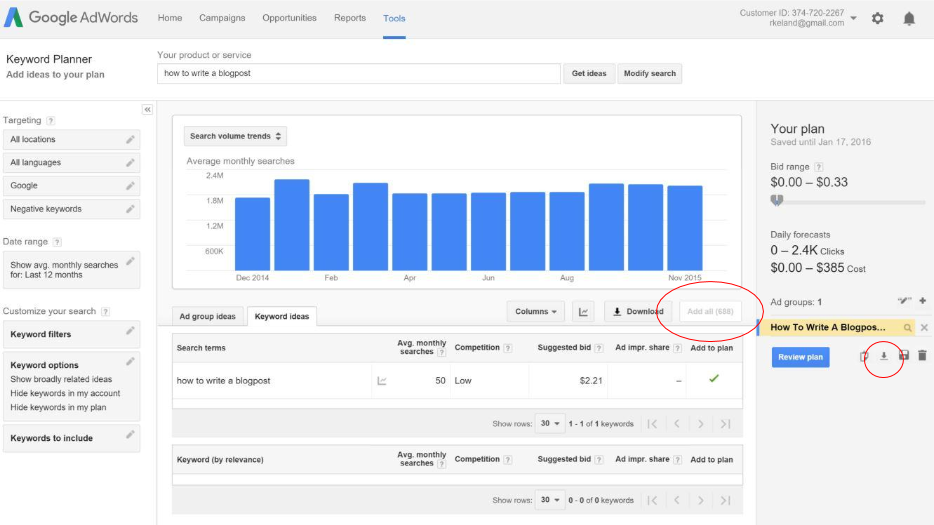
Next, we are going to export the list of relevant keywords to a CSV file to open in a spreadsheet app. This gives us much more sorting and filtering power. In the bottom right corner of the blue bar graph click the button that says "add all." Click the down arrow icon in the right column and export the file to a CSV.
Open the CSV, and delete the following columns, as they're data you'd need when buying an ad—not when looking for a blog title idea: Ad Group, Keyword Type, Currency, Segmentation, Suggested Bid, Impr.Share, Organic impr. share, and Organic avg. position.
This will leave you with three columns: Keyword, Avg. Monthly Searches (exact match only), and Competition. Now highlight the three columns, and add a filter—the funnel-shaped icon in Excel. After that, sort the Avg. Monthly Searches column from largest to smallest. Your sheet should look like this:

Now you have a sorted list of relevant keyword ideas. The next step is to begin picking through this list to come up with new content ideas that you perhaps never thought of before.
If you are a blogger, small business owner with a website, or a professional content marketer, you should master this tool. It's simple, completely free, and gives you the power to make data-driven content and copy decisions.
Related: For more tips on finding keywords, we recommend Brian Dean's in-depth Google Keyword Planner guide.
Majestic to Find Who Links to Your Site
Arguably the oldest and most hotly debated SEO tactic is link building. Google took the search engine world by storm in large part by their emphasis on links. The way Google initially worked is that it checked to see which pages were linked to the most, and then puts those at the top of its search results. Ideally, the articles linked to most would be authoritative, scholarly articles that explained the topic best.
Today, things aren't as simple and poor link building can easily send your website straight to the bottom of the search results. You need quality sites to link to your web property, as far too many spammers fill comments and forums with links trying to boost their own rankings.
Wonder who's linking to your site? Majestic is one of the most popular tools to find uncover that information. It's a powerful crawling tool that finds every website linking to your site.
SEO professionals primarily use this tool for SEO audits and for competitor backlink research. But, there is another way to leverage this tool by the non-SEO professional: discover your online fans.
Take a moment and think about what needs to happen in order to set up a link from one website to another. Links don't appear by magic. If a legitimate link exists, that means somebody noticed your content or website and found it valuable. Moreover, they found it valuable enough to take the time to go into their website editor, find a place to put the link, copy and paste the URL, and republish the page.
The savvy digital marketer understands that these linking websites are the online relationships that are worth nurturing and growing. Most likely, you have a number of websites, organizations and companies that think you or your brand is pretty cool. Let's go find out who they are.
1. Sign up for an account
Go to majestic.com and sign up for an account. For this tutorial, you'll need a Majestic Silver account, which costs $49.99 per month.
After you sign up for an account, type in the URL to your website in the search bar, leaving out the https:// part of the URL.

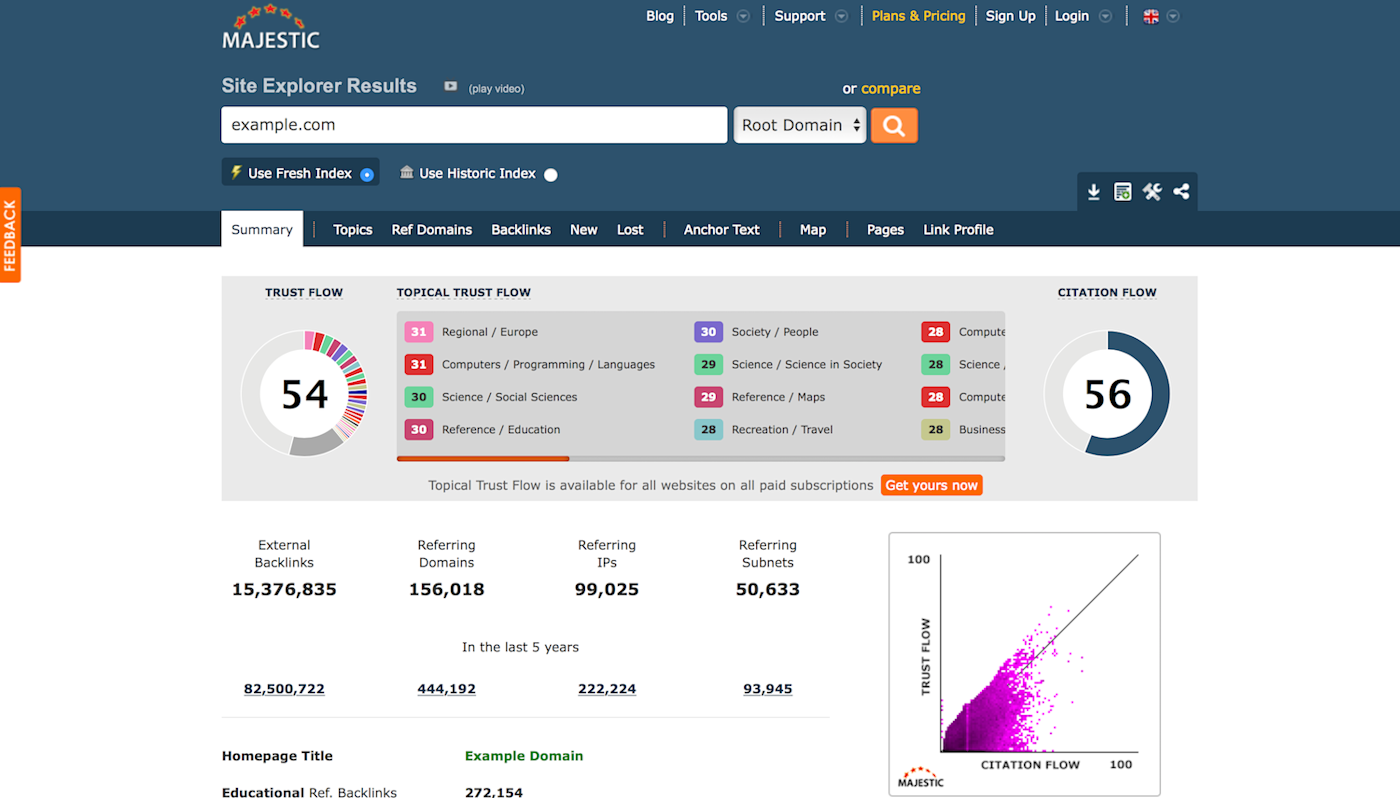
Let's first familiarize ourselves with the summary page as seen in the image above. Remember, this is all data on other websites that are linking to you, not information that is representative of your website itself.
For the purposes of this exercise in which we'll use the site infanctcpr.com, we'll focus on the referring domains number. In this case, there are 46 referring domains. Let's take a closer look at these 46 sites.
Tip: Majestic includes a lot of terms you may not be familiar with, so be sure to check the Majestic Glossary if you get lost.
2. Create a report
Go to the navigation bar at the top of majestic.com. Under the "tools" tab click on "my reports." We are going to generate a .xls sheet with all of the linking domains so that we can begin to see who is linking to us.
Scroll down to the field that says "analyse a new website" and insert your website here, then click "create report." On the next screen make sure that you select the "use fresh index" and "standard report" buttons.
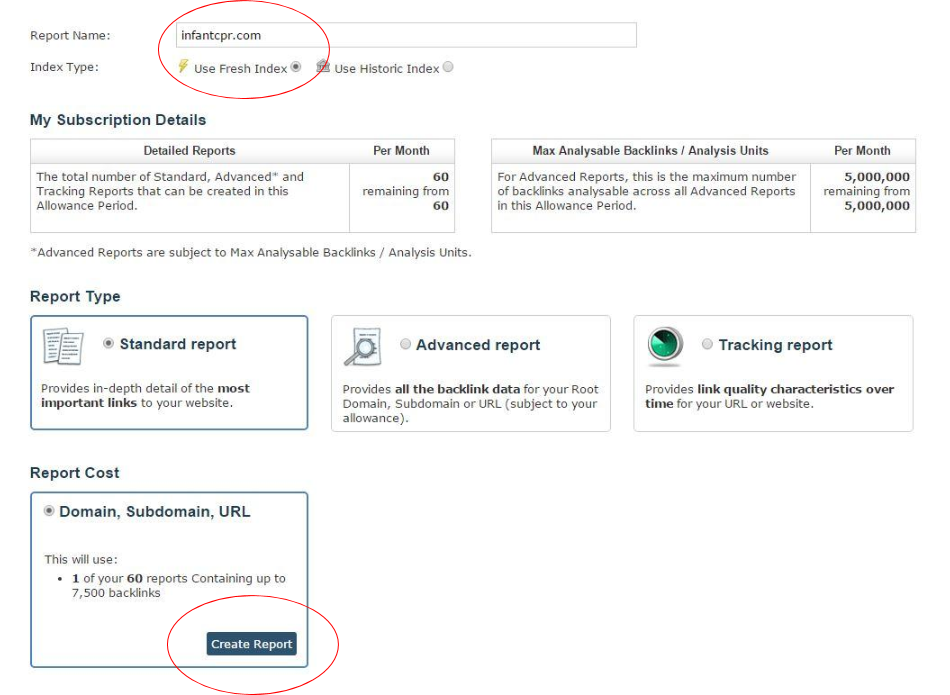
After this, click "Create Report" at the bottom left of the page. Click the link that takes you back to your reports page and click on the report that you just created. On the following screen open the non-www version of your website. It should be at the top option on the list.
The next screen shows you all of the data. We are almost finished, but first we need to get the data into our spreadsheet to organize it better. At the bottom right of this screen, click download data and choose the format that you want.
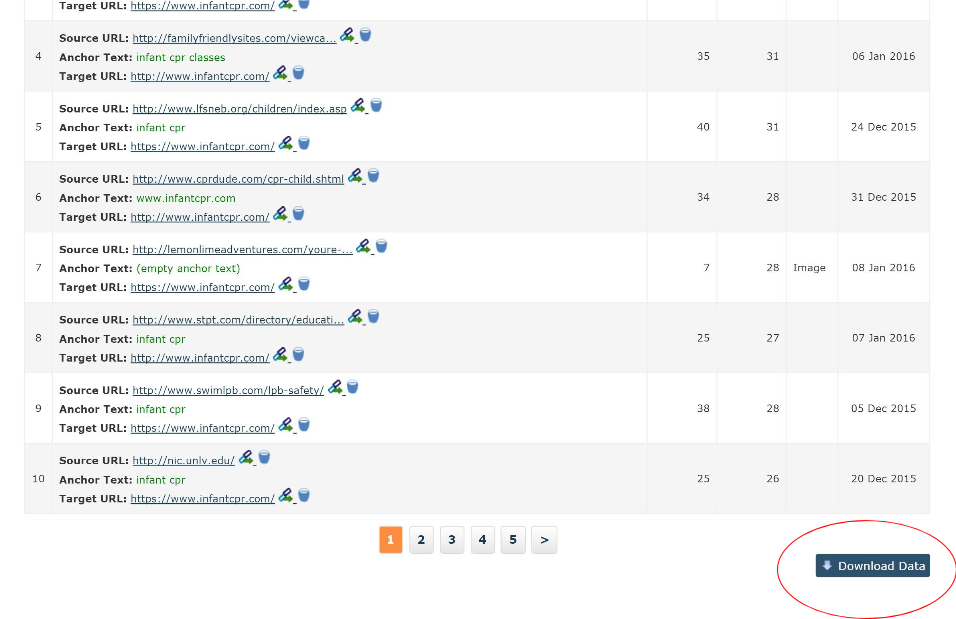
Open the spreadsheet file and delete the following columns (from left to right), as they're not important for this exercise: RefDomain; ACRank; DateFound; every column with the term "Flag", which should be six columns; TargetCitation; and TargetTrust.
You should have the following six columns
Target URL: This is the specific URL that the link is pointing to.
Source URL: This is the specific page on their website where the link is located.
Anchor Text: This is the exact language that is acting as the underlined link text.
RefRootDomain: This is the main website that is linking to you, not necessarily the specific page.
SourceCitation: This is the citation score of the website that is linking to you.
SourceTrustFlow: This is the trust flow of the website that is linking to you.
Next, apply a filter to the columns and sort by the column trust flow or citation flow from largest to smallest. You'll end up with a sheet that looks like this:
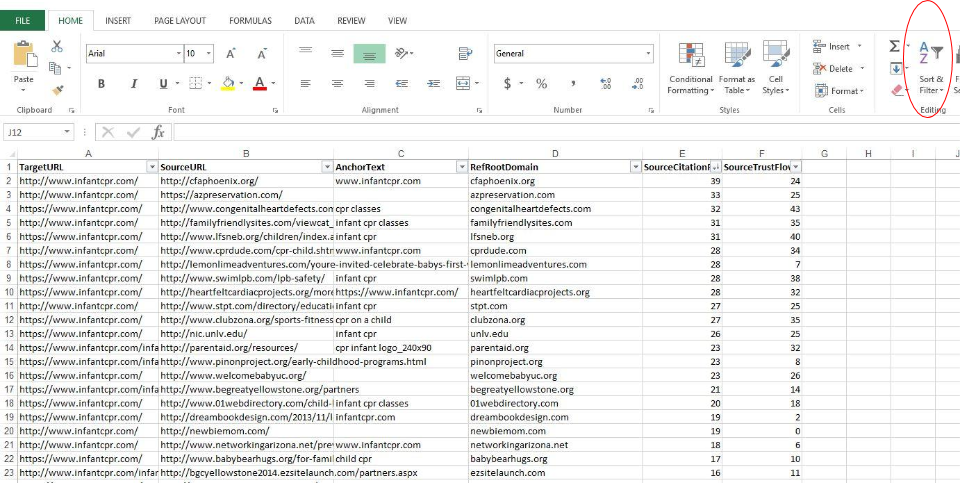
Ok, let's take a step back. What have we just created? Well, we now have a sorted list of every website that is linking to you, the authority of that website, and the specific page that the link is on. As a digital marketer or a small business owner, you now have visibility into who is linking to you.
The next steps are up to you.
Do they have big social media followings that you can take advantage of? If they have linked to you once, can you suggest other blog posts or pieces of content that they can link to as well? Perhaps just call them, introduce yourself, and build your online network. The point is this: You can take advantage of this powerful SEO tool to help you create an online network of fans and followers to help you continue to spread the word about your business, website, and content.
Tip: For more help getting started with Majestic, take a few minutes to watch this introductory video guide.
Screaming Frog SEO Spider to Examine Your Website
Over time, websites can get messy. Broken links, pages that don't exist anymore, and massive images that slow everything down are just a few of the characteristics that can drag a website down.
From this perspective, it's helpful to think of your website like a car. Every once in awhile, you need to take it to the shop to get its tires rotated and oil changed. This is what Screaming Frog SEO Spider can help you do.
SEO professionals use Screaming Frog primarily to assist in SEO audits. This tool has a lot of depth, but for the purposes of this article, we are going to focus in on just a few key things that can help you clean up your website.
1. Check for broken or missing pages
Unlike the other two tools, Screaming Frog SEO Spider is an app you'll need to download and install, but it's free for both Macs and PCs. So first, download and install the app.
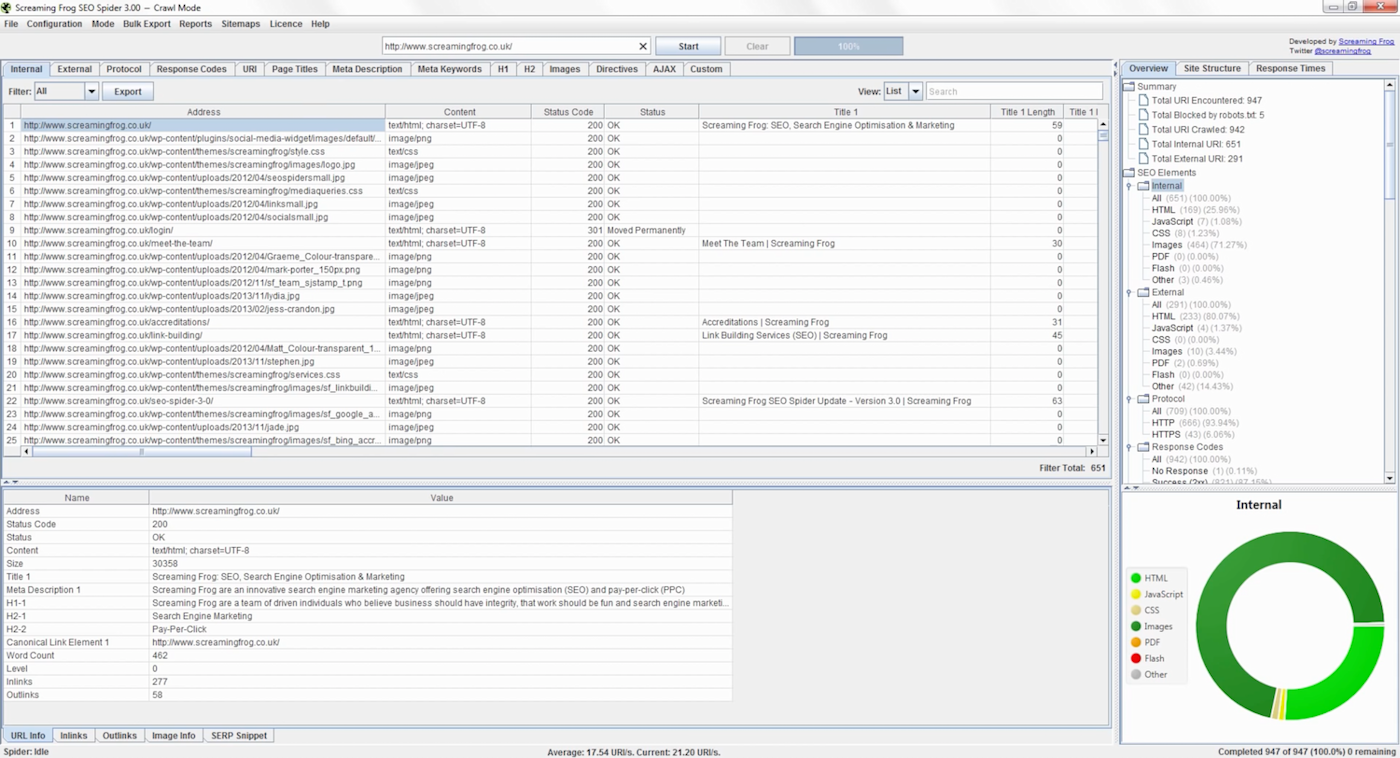
After you open Screaming Frog, type your website in the bar at the top, again without the http://www., then click Start. Screaming Frog will begin to crawl your site. The amount of time this takes depends on the size of your website. After the crawl is complete, you will see something that looks like this:
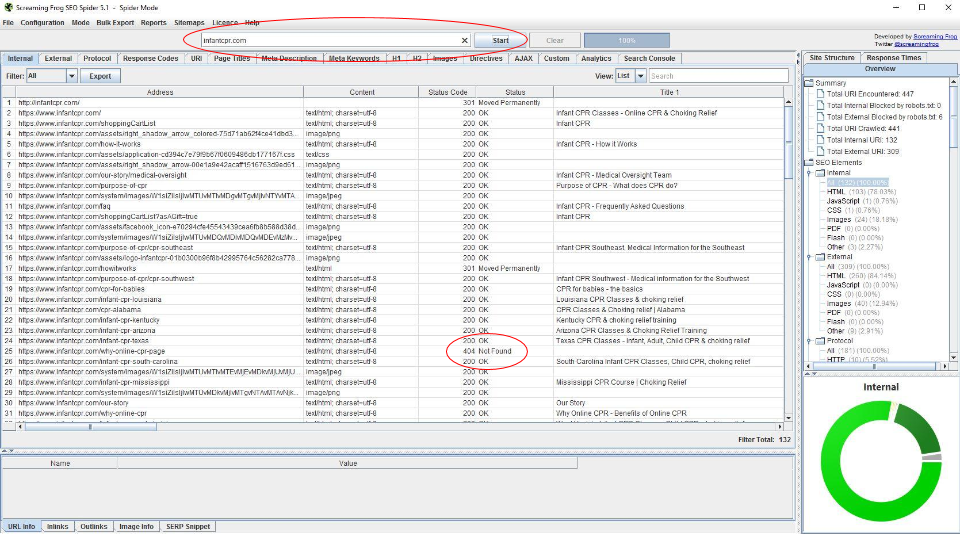
There is a lot of information on this page, so don't panic. We are going to focus in on the two quickest and easiest wins that you can gain from this free tool.
Let's first look at the column in the middle of the screen called "Status Code." Status codes simply tell you what happened when you sent the request to visit a webpage. If the pages no longer exists or it can't be found then it will return a status code called a 404 error, which means a page has been deleted from your website.
If you moved the page to a new URL then you might see a 301 or a 302 redirect. When you put a 301 or 302 redirect in, then you are telling the server that if anybody tries to access page No. 1 (the original page that is no longer there), that you want them to be automatically taken to page No. 2 (the live page). Have you ever clicked on a link and watched the URL quickly go from one set of words to a different set? If you have, then you probably just went down the 301 path.
Status codes that return anything in the 200s mean that everything is ok!
So, what's the point? Well, if you have lots of 404 errors then you are likely missing out on traffic to your website. Why not turn those 404 errors into 301 redirects? Did you know that you can take all of those dead-end pages and open them up again?
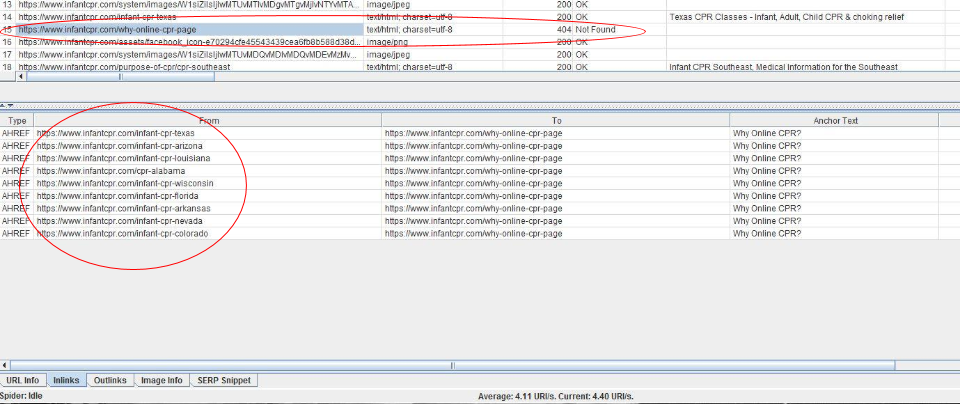
In the example above, you will notice one 404 error on the list. It is the /why-online-cpr-page URL. Take your mouse and highlight that row. In the bottom left corner, click the tab that says "inlinks." This pulls up all of the pages that have the link to /why-online-cpr-page. In order to fix this 404 error, you simply need to go to that page and change the link so that it points to a page that exists.
2. Check your page titles
The second column that we will focus on is called "Title 1." This column shows the title tag for each page and is one of the most important SEO signals in existence—it's literally what shows up on Google's search results. You should always have a custom and well-worded Title tag in place.
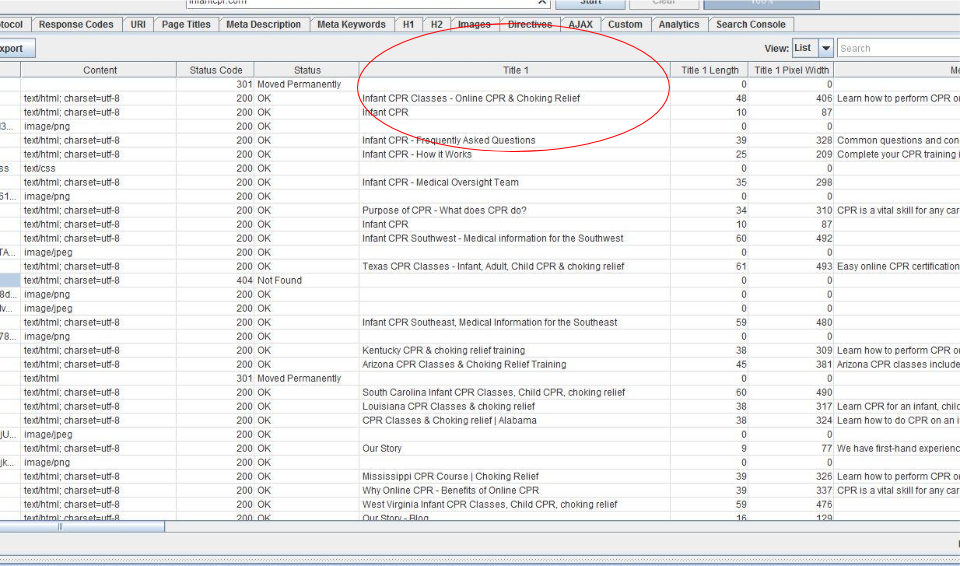
Notice in the image above how there are blanks. This simply means that there is not a custom title tag for that page. So, it's time to go in and fix that. Open each of those pages on your site, add a title tag, and the head on to the next page that needs a title.
Related: Screaming Frog SEO Spider is a powerful tool for regular maintenance on your website—and that's far from all it can do. Dig deeper into Screaming Frog's features with the SEO Spider user guide, or for more info on title tags, check Moz's title tag guide
Time to Tune Up Your Website
It's not enough to have a website for your business—and even posting to your blog regularly might no longer cut it. You'll need to publish articles that target what your customers are searching for, enlist other sites to link to your content, and ensure there's no broken pages hanging around your site.
Further Reading
Learn more about how to improve your site's search rankings with Moz's free Beginner's Guide to SEO book
Make sure your blog posts get read and your products get noticed with these 10 apps to help build a content outreach workflow
Using WordPress? Here are 40 essential tips and tools to get the most out of your WordPress blog
Credits: Tools photo by Janne Moren via Flickr.


