
Recording calls is the best way to focus all of your attention on the conversation, without the hassle of taking notes and inevitably forgetting what your incomprehensible shorthand meant. And now that transcription is table stakes for AI, you can easily have a written record of everything too.
The only complicated part is figuring out what buttons to click to record and transcribe a call depending on which device you're using. I'll walk you through almost every possible option.
Note: Before you record a call, you should (and depending on where you live, must) let anyone you're recording know. It's alarming that I even have to say this, but here we are.
Table of contents:
How to record a phone call on your phone
Both iOS and Android have built-in call recording options, and they work almost identically. Just keep in mind that not all regions support call recording, so your mileage may vary.
If you can't get call recording working, you might want to try using the very rudimentary method of putting your call on speakerphone and using another device (like a computer, second phone, or audio recorder) to record the conversation. Not ideal, but it gets the job done.
How to record a phone call on iPhone
Apple introduced call recording with iOS 18, so you'll need an iPhone that's compatible with Apple's 2024 software update. You can check your current software version under Settings > General > About, and attempt an update under Settings > General > Software Update.
Here's how to record a call on an iPhone:
First, place your call. In the top-left corner of the screen, you should see a call recording button.
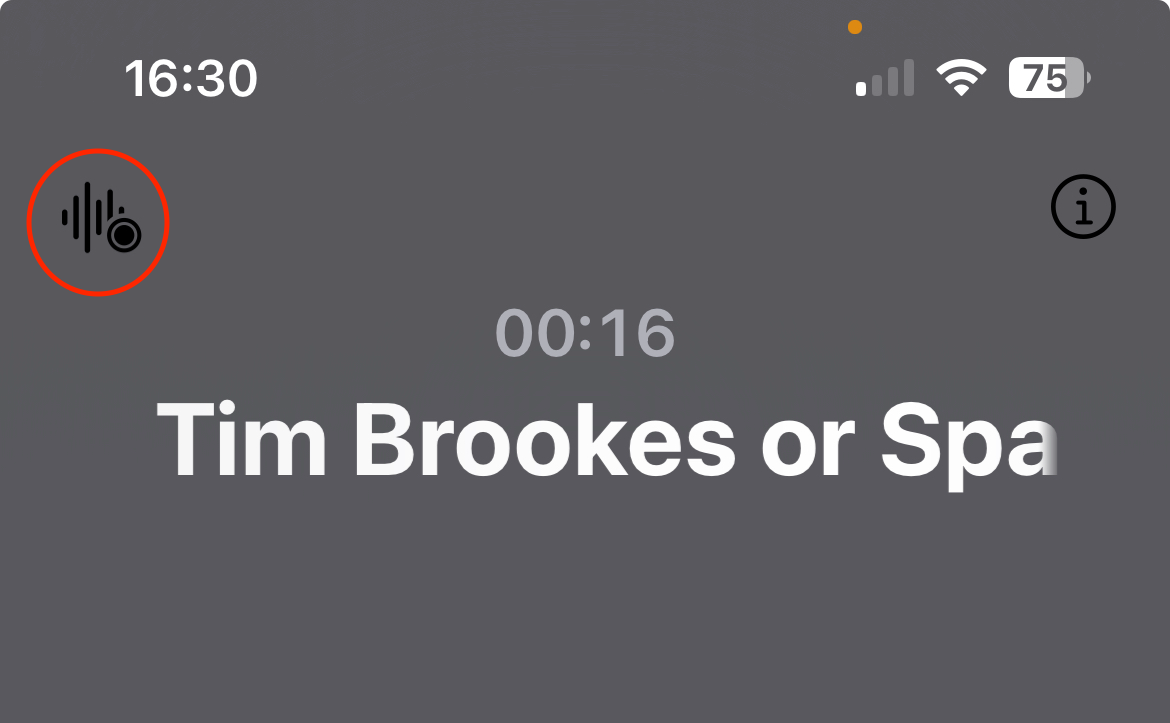
Once the call has been answered, you can tap on it, after which you and the person on the other end of the call will hear a short notice that the call is being recorded.
You can now conduct your call as normal, and at any point, you can stop recording by tapping the Stop button that appears in the recording monitor—or you can just hang up, and your recording will automatically stop.

Your call will be saved to the Notes app, along with an automatic transcription. To delete the recording, delete the note.


How to record a phone call on an Android
Things work almost identically on Android using Google's official Phone app included as part of Android 9 or later. This was introduced in 2018, so even older phones should support this feature.
Place your call. From the calling screen, you should see a Record button that you can tap.
You'll hear a short warning to both parties that the call is being recorded.
You can now conduct your call as normal. To stop recording, tap Stop recording or just hang up.
Your recordings can be found on the Recents tab in the Phone app. Tap History to see older recordings, and use the Share button to export your recording. When you clear the call log, your recording will also be deleted.
Note: You can do some other fancy stuff with call recording on an Android—take a look at Google's help docs to see how you can turn on "always record" for unknown numbers or certain contacts, or set how long to keep recordings.
How to record a phone call on your computer
If you're taking a phone call on your computer, the setup is a little more complicated, but it's still possible.
How to record a phone call on a Mac
macOS doesn't include the ability to route system audio to a recording device natively, so the setup is a bit fiddly, but it should work if you follow the instructions below.
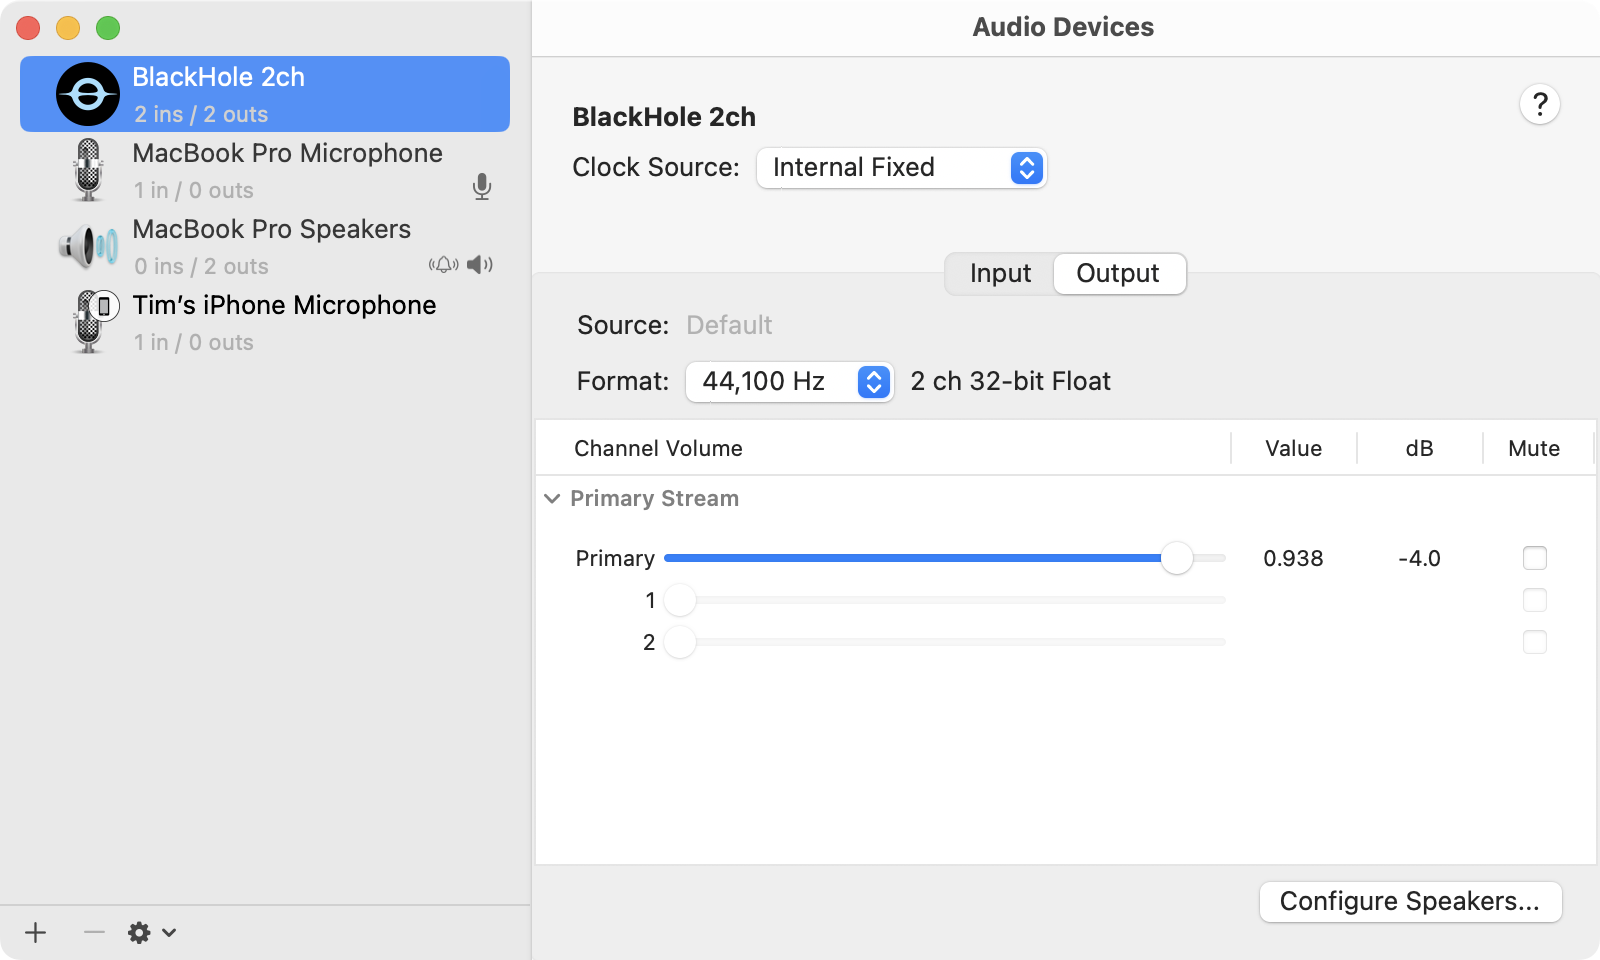
Install the BlackHole loopback driver. This creates the virtual audio device necessary for system audio capture. The software is donationware, so you can pay what you like (or not at all). Download and install Blackhole (the "2ch" two-channel version is fine) as you would any other Mac app.
With the installation completed, open the Audio MIDI Setup utility (you can either search for it using Spotlight or find it under Applications > Utilities). You should see a new device called "BlackHole 2ch" in the list of devices on the left.
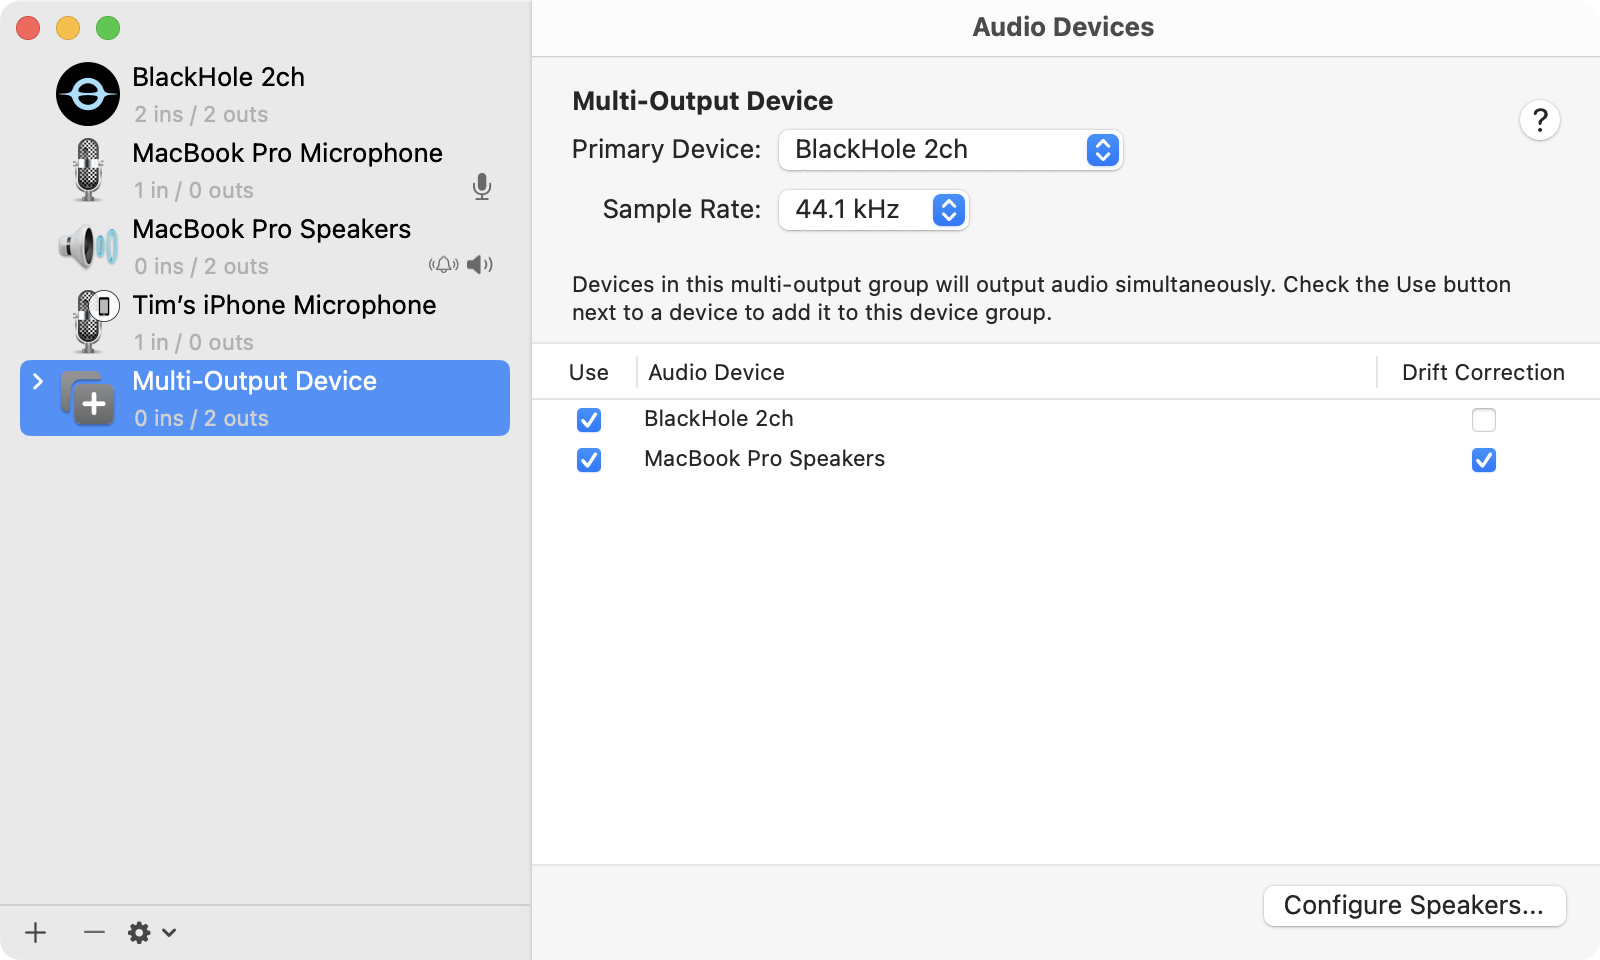
Click the + plus icon, and choose Create Multi-Output Device.
With your device created, enable both your Mac's speakers and the "BlackHole 2ch" option. This will allow you to send audio to BlackHole and hear it at the same time (without this step, you'd only capture incoming audio that you couldn't otherwise hear). You can rename "Multi-Output Device" to something more appropriate if you want.
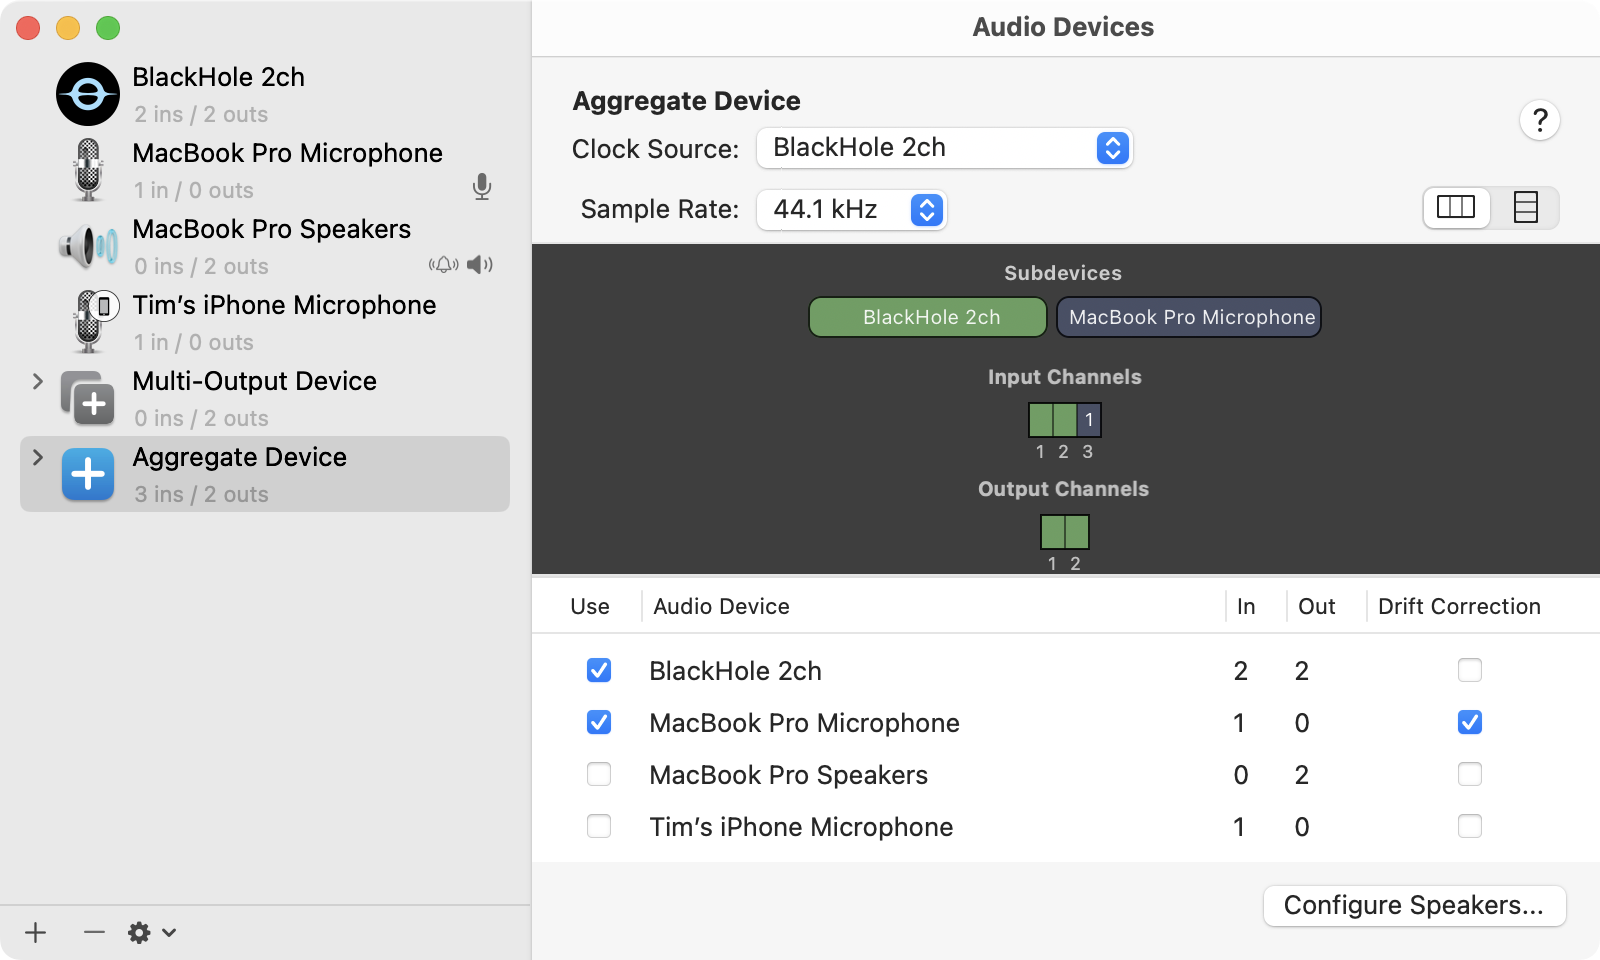
Click the + plus icon again, and choose Create Aggregate Device. Make sure that "BlackHole 2ch" and the microphone you'll be using to make the call are both selected here. This creates an audio output that you can record from that includes both your system audio and any input captured by your microphone. You can rename the "Aggregate Device" to something like "System Voice Mix" if you want.
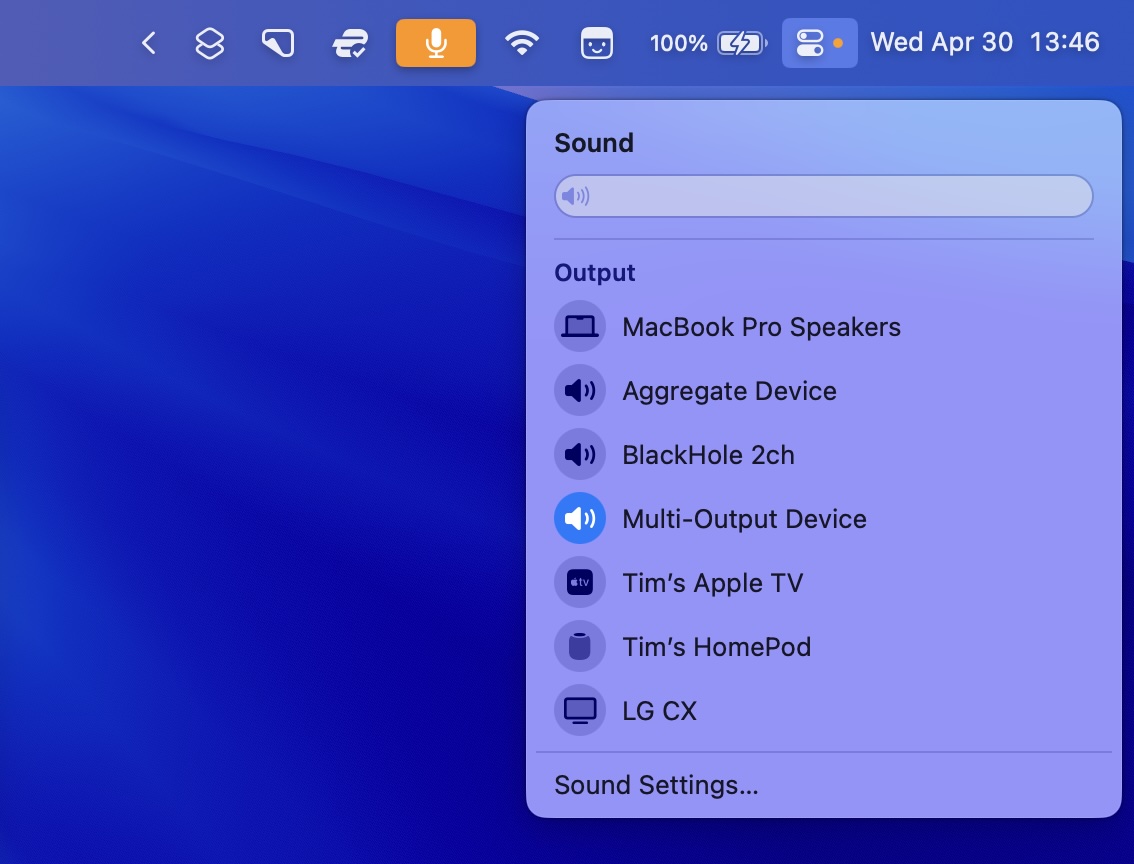
It's time to send your system audio to the Multi-Output Device. This will route anything your Mac hears into BlackHole. The easiest way to do this is to click into Control Center in the top-right corner of the screen, click Sound, and then choose Multi-Output Device (or whatever it is you decided to call it). You can also use System Settings > Sound > Output to select the device.
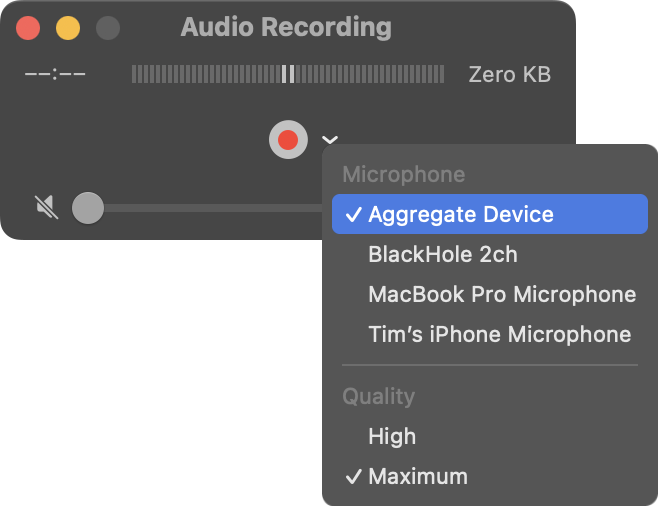
Now it's time to record audio. We'll be using QuickTime Player since it's included with your Mac, but you could just as easily use an app like Audacity or any other audio editor that's configured in a similar way. With QuickTime Player open, click New > Audio Recording at the top of the screen. Click the dropdown arrow next to the red recording button, and select Aggregate Device as the input.
Hit Record, and perform a quick test to make sure everything is set up correctly. You can easily do this by playing a YouTube video and speaking over the top, then ending and playing back the recording. When you're happy, you can record your call. Hit
command + Swhen you're done to save the file.
Once you're done recording, you'll want to switch your Mac's default output (in Control Center or System Settings) back to the internal speakers, since you won't be able to control the volume while outputting to the aggregate device you created.


If this all seems a bit complex, you can use call recording software like Audio Hijack ($69) to record audio from any source alongside your microphone. This allows you to nominate specific sources for far more control.
How to record a phone call on a Windows PC
It's a little more straightforward to record a call within Windows—you just need a simple tweak and a free download. But there is a caveat: you need to be using headphones (ideally wired, to cut down on any latency); otherwise, you'll end up with an echo or feedback.
These instructions are specific to Windows 11, but the same method works on Windows 10.
To get started, right-click on the Start menu, and choose Settings > System > Sound.
Under the Advanced section, click More Sound Settings.
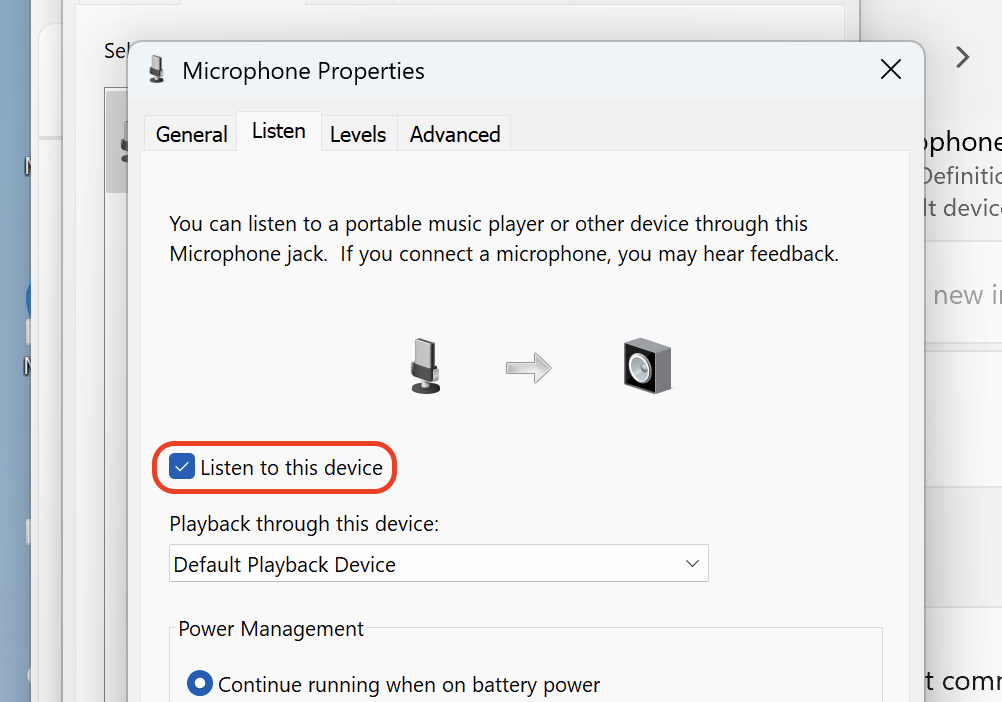
Select the Recording tab in the window that appears, then double-click on your microphone.
Now's a good time to plug in those headphones. Under the Listen tab, check the box that reads Listen to this device, and then click OK.
Dismiss the other windows, and note how you can now hear your microphone input (if you can't, make sure the correct microphone is selected under Settings > System > Sound).
In order to capture system audio with your microphone input looped in, you'll need to use a free audio editing app called Audacity. Grab and install the latest version of the app, then start it up. You don't need to sign up for any cloud services for this, though you might be asked to do so.
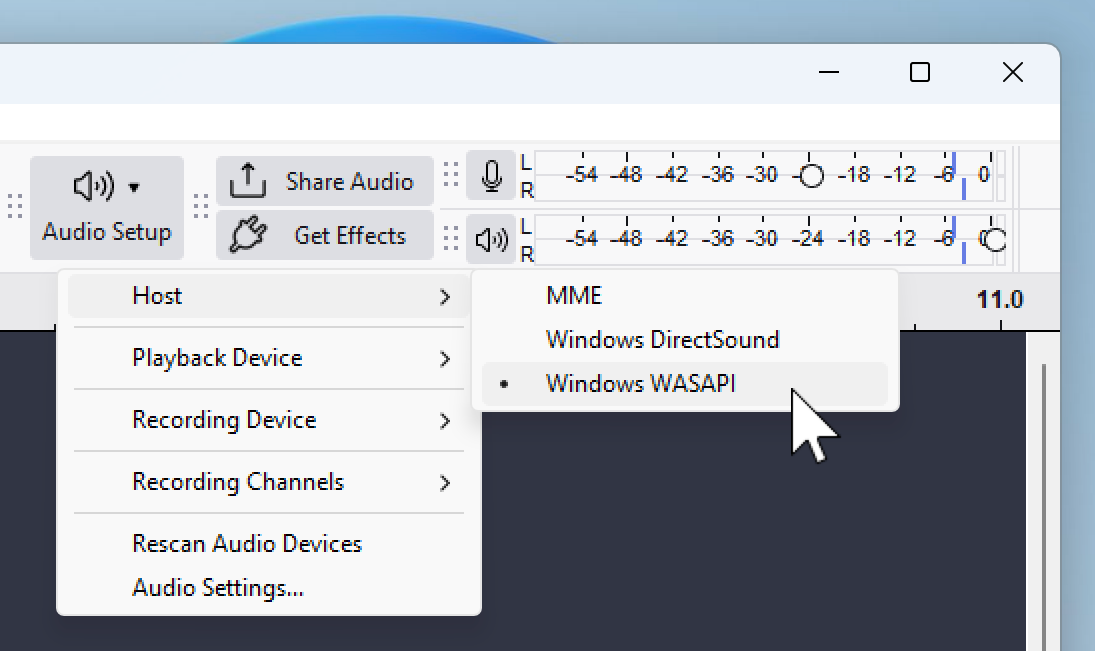
Click Audio Setup in the main toolbar, then make sure Windows WASAPI is selected under Host.
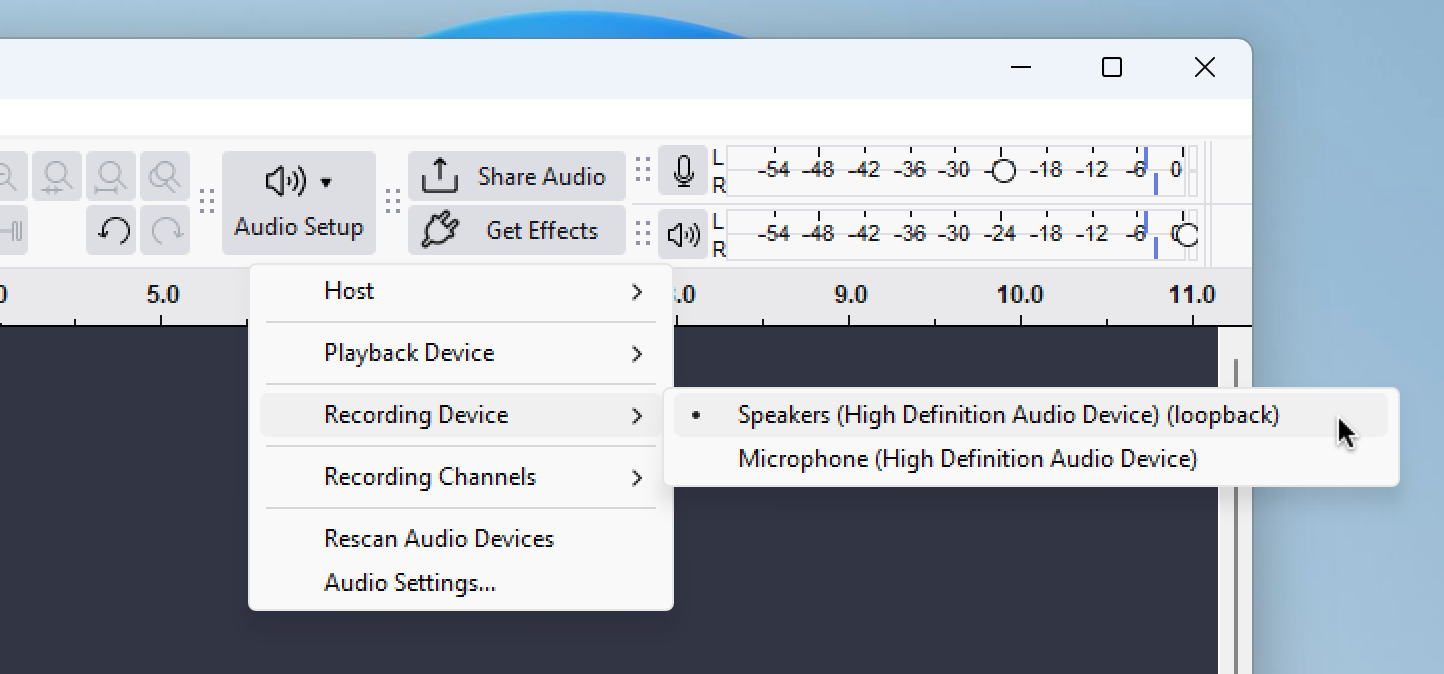
Click Audio Setup again, and under Recording Device, make sure that Speakers (loopback) is selected.
That's it—you're now ready to record system audio alongside your microphone input. You can test your configuration by making a recording of a YouTube video playing in the background and speaking over it. Use the big red Record button in Audacity to start recording.
When you're happy, you can record your call and then use File > Export Audio to export your audio file.


How to record a call on a landline
First of all, congratulations on still having a landline. It's a smart move, honestly—one that most of us don't make.
Recording a call on a landline isn't as easy as doing it on a mobile phone, but you have a few options:
Your best bet is the speakerphone method: put the landline on speakerphone and then use an external recorder like a smartphone or computer to record your conversation.
Some phones have a headphone jack that should pass audio through to an input on a recorder or a computer.
Use a service like Twilio to record a call for you. This is a premium service that allows you to purchase a number, instruct that number to call a contact of your choice when you dial in (using your landline), and then automatically record the call to your Twilio account. You'll need to change your configuration for each number you want to call. To get a better idea of how this works (and why it might be more effort than it's worth), check out Twilio's official call recording help document.
How to record a video call
If the call you're recording is happening on your computer and includes video, you have a few options.
Record a call with a video conferencing app
This is your easiest option because any video conferencing app worth its salt includes the ability to record and transcribe the call. (Just keep in mind that some require a premium subscription, either for recording or transcribing or both.)
How you record a meeting will depend on the app you use. On Google Meet, you'll go to Meeting tools and select Recording from the menu that appears. For this to work, you'll need to satisfy Google's requirements, which include being the meeting's host or co-host, having the feature enabled on your workspace, and being subscribed to an appropriate Google One, Business, or Enterprise-level workspace plan.

On Zoom, you'll need to enable recording on your account by logging in to the Zoom web portal and setting preferences under Account Management > Account Settings > Recording & Transcript. You'll then get access to a Record button that you can use during your calls.
The best thing about using these tools is that you should get a relatively clean recording. In a lot of apps, the recording will focus on the person currently speaking and automatically switch to their camera (even if you're using a different view layout). And the recordings will show up in a central spot for you to access later.
For more details, here's how to record calls on a few of the most popular video conferencing apps:
You can also take a look at these AI meeting assistants, which can record and transcribe calls on multiple platforms, if you tend to switch between apps for calls.
Record a call with screen recording software
If you don't want to have to worry about the app you're recording from, you can use screen recording software to record a call, regardless of its source. It just takes a bit of experimenting to set it up, and you'll likely have to pay for a reliable subscription.
There's a lot of solid screen recording software options out there, and they can record calls by capturing the application window or browser tab alongside the audio. What you see and hear is what you record.
Camtasia (from around $179 per year) is a leader in the space. It's available on both Mac and Windows, comes with a decent free trial, and is packed with screen recording features you might want to use for other reasons, too.
The key to a successful recording is to set up your software appropriately. Below, you can see how Camtasia has been set up to record both a MacBook Pro's internal microphone and the system audio. Enabling the Built in Retina Display option would also capture the screen, perfect for video calls.

And here's a similar setup on a Mac screen recording app called CleanShot X ($29). In this example, the microphone and system audio options are both checked. The app will record a video of this section of the screen alongside the audio, so you can either extract the audio for use later or capture a video call by arranging the capture zone accordingly.

If you don't have screen recording software or would rather not pay for an app, you still have options: you can capture system audio and your microphone with a free app like QuickTime or Audacity instead.
How to transcribe a phone call
Most of the options I described above will automatically transcribe your call. But if you have a recording of a phone call that's not transcribed, you have a couple options:
You can use any transcription service to get the job done. A lot of them offer free trials, or if you need it a lot, you can pay a low monthly subscription fee. These services come with a few extra bells and whistles, like collaboration options or chatting with AI about your transcript.
You can use a note-taking app like Apple Notes or Microsoft OneNote. They're free, and if you have a Mac or Windows PC, then there's a good chance they're already installed.
For example, to transcribe a phone call in Apple Notes, simply create a new note, and drag your audio recording into the note. Hit Play, and Notes will start to transcribe the recording. You can click on the quotation icon that appears in the playback window to see the full transcription, after which you can copy and paste it. If you have a Mac that supports Apple Intelligence, you can even summarize the recording.

OneNote works similarly. Create a new note, and then on the Home tab, click the More Options icon (which looks like an ellipsis), and then choose Transcribe. In the window that appears, use the Upload audio button to select your audio file. Once your note has been transcribed, it will appear in the note.
Recording phone calls is easier than ever
It hasn't always been this easy to record and transcribe phone calls—both Android and iOS once required some serious workarounds. Now that there's built-in recording capabilities on your phone, you should start with that when you need to record. Otherwise, try one of the other workarounds I mentioned or use the tools baked into the apps you already have.
Related reading:
This article was originally published in May 2018 by Matthew Guay. The most recent update was in May 2025.


