
Unlike the usual ads folks scroll past on Facebook or Instagram, Facebook lead ads come with a built-in form that's already filled with the user's data from Meta. In this guide, I'll walk you through setting up your first Facebook lead ads campaign and share some tips for how to quickly make the most efficient use of your new Facebook leads.
Table of contents:
What is Facebook advertising?
Facebook advertising is just that: paid advertising on the Facebook platform, including traditional social media ads as well as lead generation campaigns and other engagement tactics.
Facebook ads are a powerful way to reach your target audience, assuming your target audience is on Facebook. And with so much user data to account for, you can get very specific with your targeting—basing it on things like age, location, interests, professions, and favorite Ariana Grande song.
As a proud Facebook account owner (please don't hack me), I remember a time when the platform's ads all looked similar and followed the same format, style, and approach. These days, ad types can vary by appearance, purpose, and setup. They can range from simple image and video ads to more complicated poll ads, lead ads, and engagement ads—different types with different goals and budgets.
What is a Facebook lead ad?
Facebook lead ads have users submit a form to access content, receive a discount, or sign up for a newsletter. The form is part of the ad and is pre-populated with the user's data, so they never have to leave Facebook to engage with your ad. That's good for users (they don't have to click away) and good for you (you don't need a landing page). Lead ads can prompt users to take a whole slew of actions:
Apply for memberships or exclusive offers
Download content
Get a quote
Request more information
Sign up for a promotion or course
Subscribe to a newsletter
To give you a better idea, here's what it looks like in action.

How do lead ads work?
When a user encounters a lead ad in their feed, it looks like any other ad but with a twist: a direct call to action, such as "Sign up" or "Get a quote." When they click this button, a form pops up, pre-filled with their Meta profile information. They can review, make any necessary edits, and submit—without ever leaving their feed.
On the advertiser's end, there's a world of customization options. You can handpick your target audience based on demographics, interests, or behaviors, ensuring the ad reaches those most likely to engage. The form itself is also adaptable. You can decide which fields to include, tailoring it to capture the information most pertinent to the campaign.
Once that's done, you can download the leads from Facebook or, even better, automate the process to send these fresh leads directly into your CRM or email marketing tool.
How to create a Facebook lead ad
Facebook lead ads may seem more daunting to set up than a traditional image or link-based Facebook ad, but they're actually pretty simple once you know how they work.
Here's the brief step-by-step. Follow along, or click on any step to jump to that spot.
1. Start at Meta's Ads Manager
Go to the Ads Manager, navigate to the Campaigns tab, and click Create. This is where your ad's story begins. Opt for Leads as your objective, and click Continue.

2. Name and detail your campaign

You'll add some details on the next page. Give your campaign a descriptive name, then add nuances like special ad categories, budget details, A/B testing options, or the Advantage campaign budget.
When setting your ad budget on Meta, you're essentially deciding how much you're willing to invest in reaching your audience. When it comes to the duration of your budget, you've got two main choices:
Daily budget: This is the average amount you're willing to spend each day. While you set a daily cap, Meta might adjust the actual spend based on opportunities. That means if your daily budget is $10, you'll have some days where it might be $12 and others where it could be $8. But it won't exceed $70 over the course of the week. This ensures your ads capitalize on prime opportunities in the dynamic ad auction marketplace.
Lifetime budget: This is your overall investment for the ad's entire duration. It's a fixed amount, ensuring you never overspend. If you're running an ad for less than a day, you'll need to opt for a lifetime budget.
If you're keen on fine-tuning your ad schedules even further, delve into your Page Insights. (To access Page Insights, go to your Meta Business Suite and select Insights.) This tool provides data on when your audience is most active, allowing you to align your ad schedule for maximum impact. By understanding peak engagement times, you can ensure your ads are front and center when they're most likely to resonate.
When you're ready, hit Next.
3. Choose your conversion location

On the Conversion page, you'll want to select Instant forms. This option keeps users on Facebook or Instagram, letting them interact with your ad without the distraction of an external site. While there are other conversion choices, Instant forms epitomize the lead ad experience, offering a seamless and efficient lead capture.
Once you've selected Instant forms, continue down to Budget & schedule.
4. Schedule your ad
Further down on the same page, under Budget & schedule, you'll find the following section that allows you to tweak your campaign duration, daily spending limits, and scheduling.

If you ever want to hit the brakes on your ad, just pause it in Meta Ads Manager. You might still get a bill for charges accrued before pausing, but it doesn't mean your ad is back in action.
After setting your schedule, continue on to pick your audience.
5. Select your audience

With Meta boasting nearly half the world's population, the possibilities are endless—that's why precision is key when selecting your audience. Here's the breakdown:
Custom audience: Use data sources like existing customer files, website traffic, or engagement on Facebook. This option will let you reach out to folks who already know you.
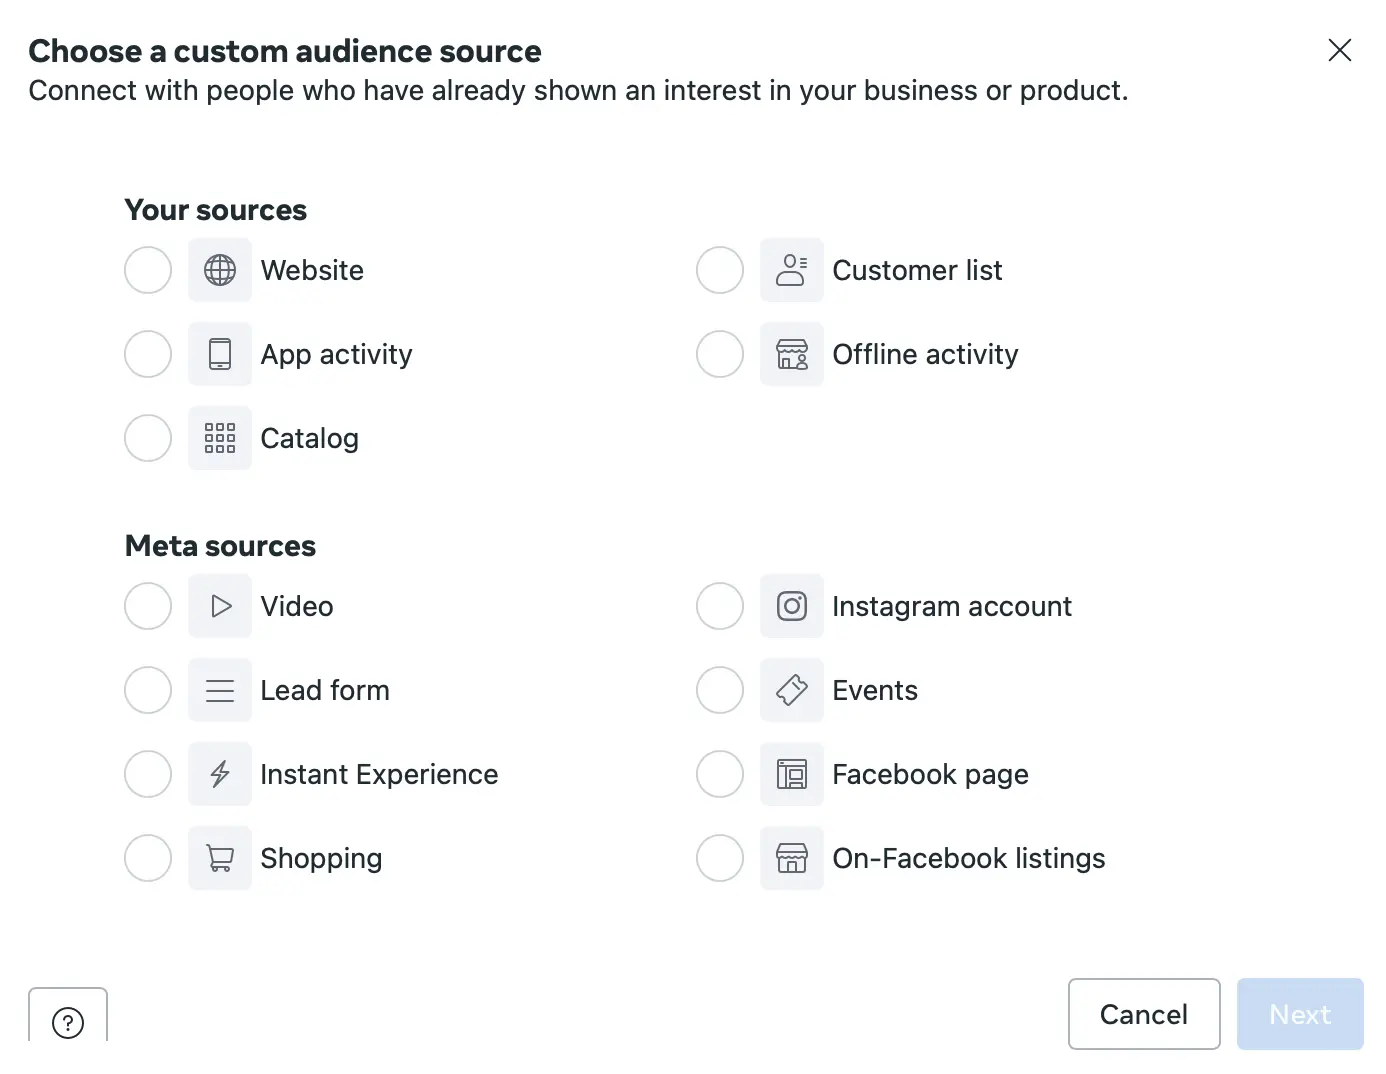
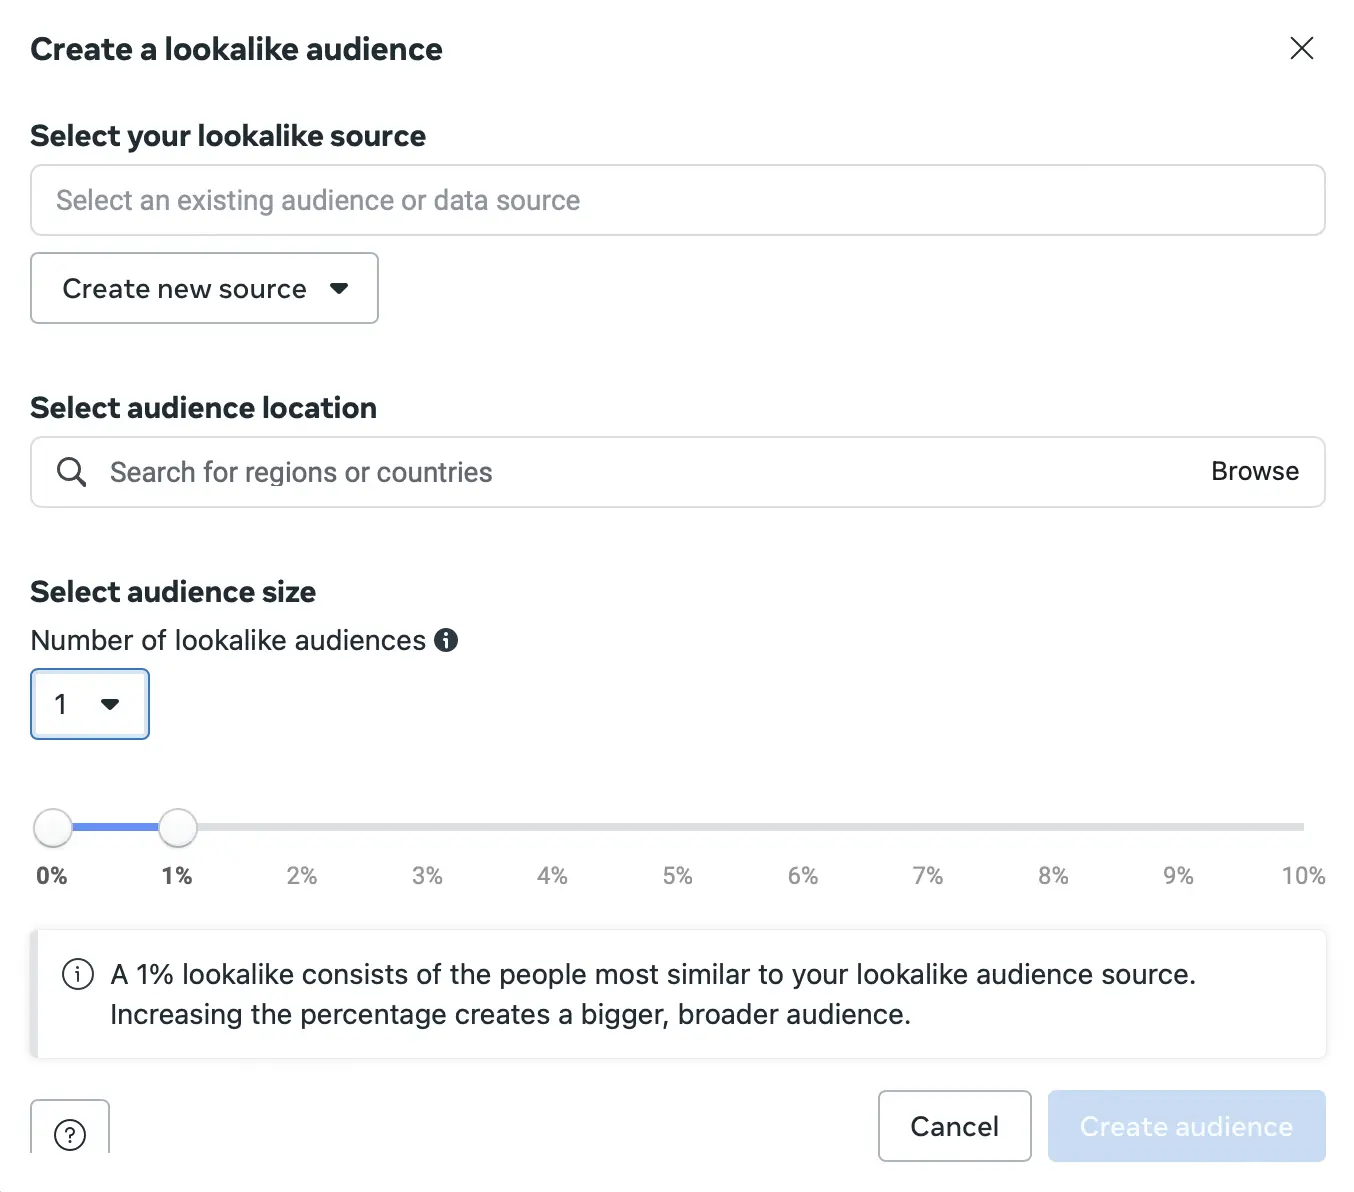
Lookalike audience: This is your tool to find new users who share traits with your best customers. You'll give Meta the lookalike "source," and it will advertise to a new audience similar to that one.
Saved audience: Whether you're narrowing down by age, gender, location, or other demographics, once you've found a mix that resonates, you can save it. If you want to advertise to that group again, you'd choose this option.
Detailed targeting: If you know exactly who you want to target based on demographics, interests, or behaviors, you can do your own detailed targeting here. From life events to specific behaviors, the level of detail here is unparalleled and a tad creepy.

Connections: If you want to engage with people already connected to your page, event, or app, you can do that here. Or you can choose to exclude them if you're looking for fresh blood.


After you've selected your audience, continue to Placements.
6. Decide on ad placement

Here, you can decide between two options:
Advantage+ placement: This is the "set it and forget it" option. By choosing Advantage+ placements, you're allowing Meta's algorithms to do the heavy lifting. They'll distribute your ad across various placements, ensuring it appears where it's likely to perform best. If you're unsure where your audience hangs out or if you're just starting out, this is a good option. It maximizes your budget and potentially broadens your reach.
Manual placement: Manual placements let you handpick where your ads will appear. It's a bit more hands-on and requires a better understanding of where your audience is most active. Here are your options at a glance:
Platforms: Facebook, Instagram, Audience Network
Feeds: Facebook feed, Instagram feed, Marketplace, Video feeds, etc.
Stories & Reels: Instagram Stories, Facebook Stories, and Reels on both platforms
In-Stream: Facebook in-stream videos
Search Results: Facebook and Instagram search results
When you've set up your placements, click Next in the bottom-right corner of your browser.
7. Select your ad's home base

When you create an ad, it doesn't just float around aimlessly in the digital ether. It can appear on lots of channels, but it's tethered to a specific Facebook or Instagram page, serving as its Identity—the account or page name users see when they encounter your ad in their feeds. So, choose the Facebook and/or Instagram page that best represents the message or brand of your ad. If you have a new page you'd like to use, hit Connect account.
8. Design your ad

Your format should resonate with your message.
A single image or video is good for quick impact. It's straightforward and doesn't beat around the bush.
A carousel lets you tell a story or showcase a lead magnet, giving viewers a bit more to swipe through.
Multi-advertiser ads let two brands share the stage.
Once you select your format, you'll move on to the ad creative. Remember, you're just designing the ad here, not the form quite yet.
Here's where you input your copy.

As you go, it'll show you how it will look to the user.

Your media should be the star of the show here. High-res images or videos that grab eyeballs are key. Pair that with some actionable copy, and you're well on your way. But don't forget about your call to action (CTA), where you tell your audience what to do next. Whether it's "Get a quote," "Learn more," or "Sign up," it should be clear and consistent with the ad's copy. When they click the button, that's when they'll be brought to your lead form.
After you've set up your ad creatives, proceed down to Destination to create your lead form.
9. Create your lead form
Nestled under the Destination section, the Lead form is where the magic happens. It's where you'll create the form users will interact with once they click the ad CTA.
Under Destination, select Create form.
Choose your campaign's goal: More volume, Higher intent, or Rich creative.
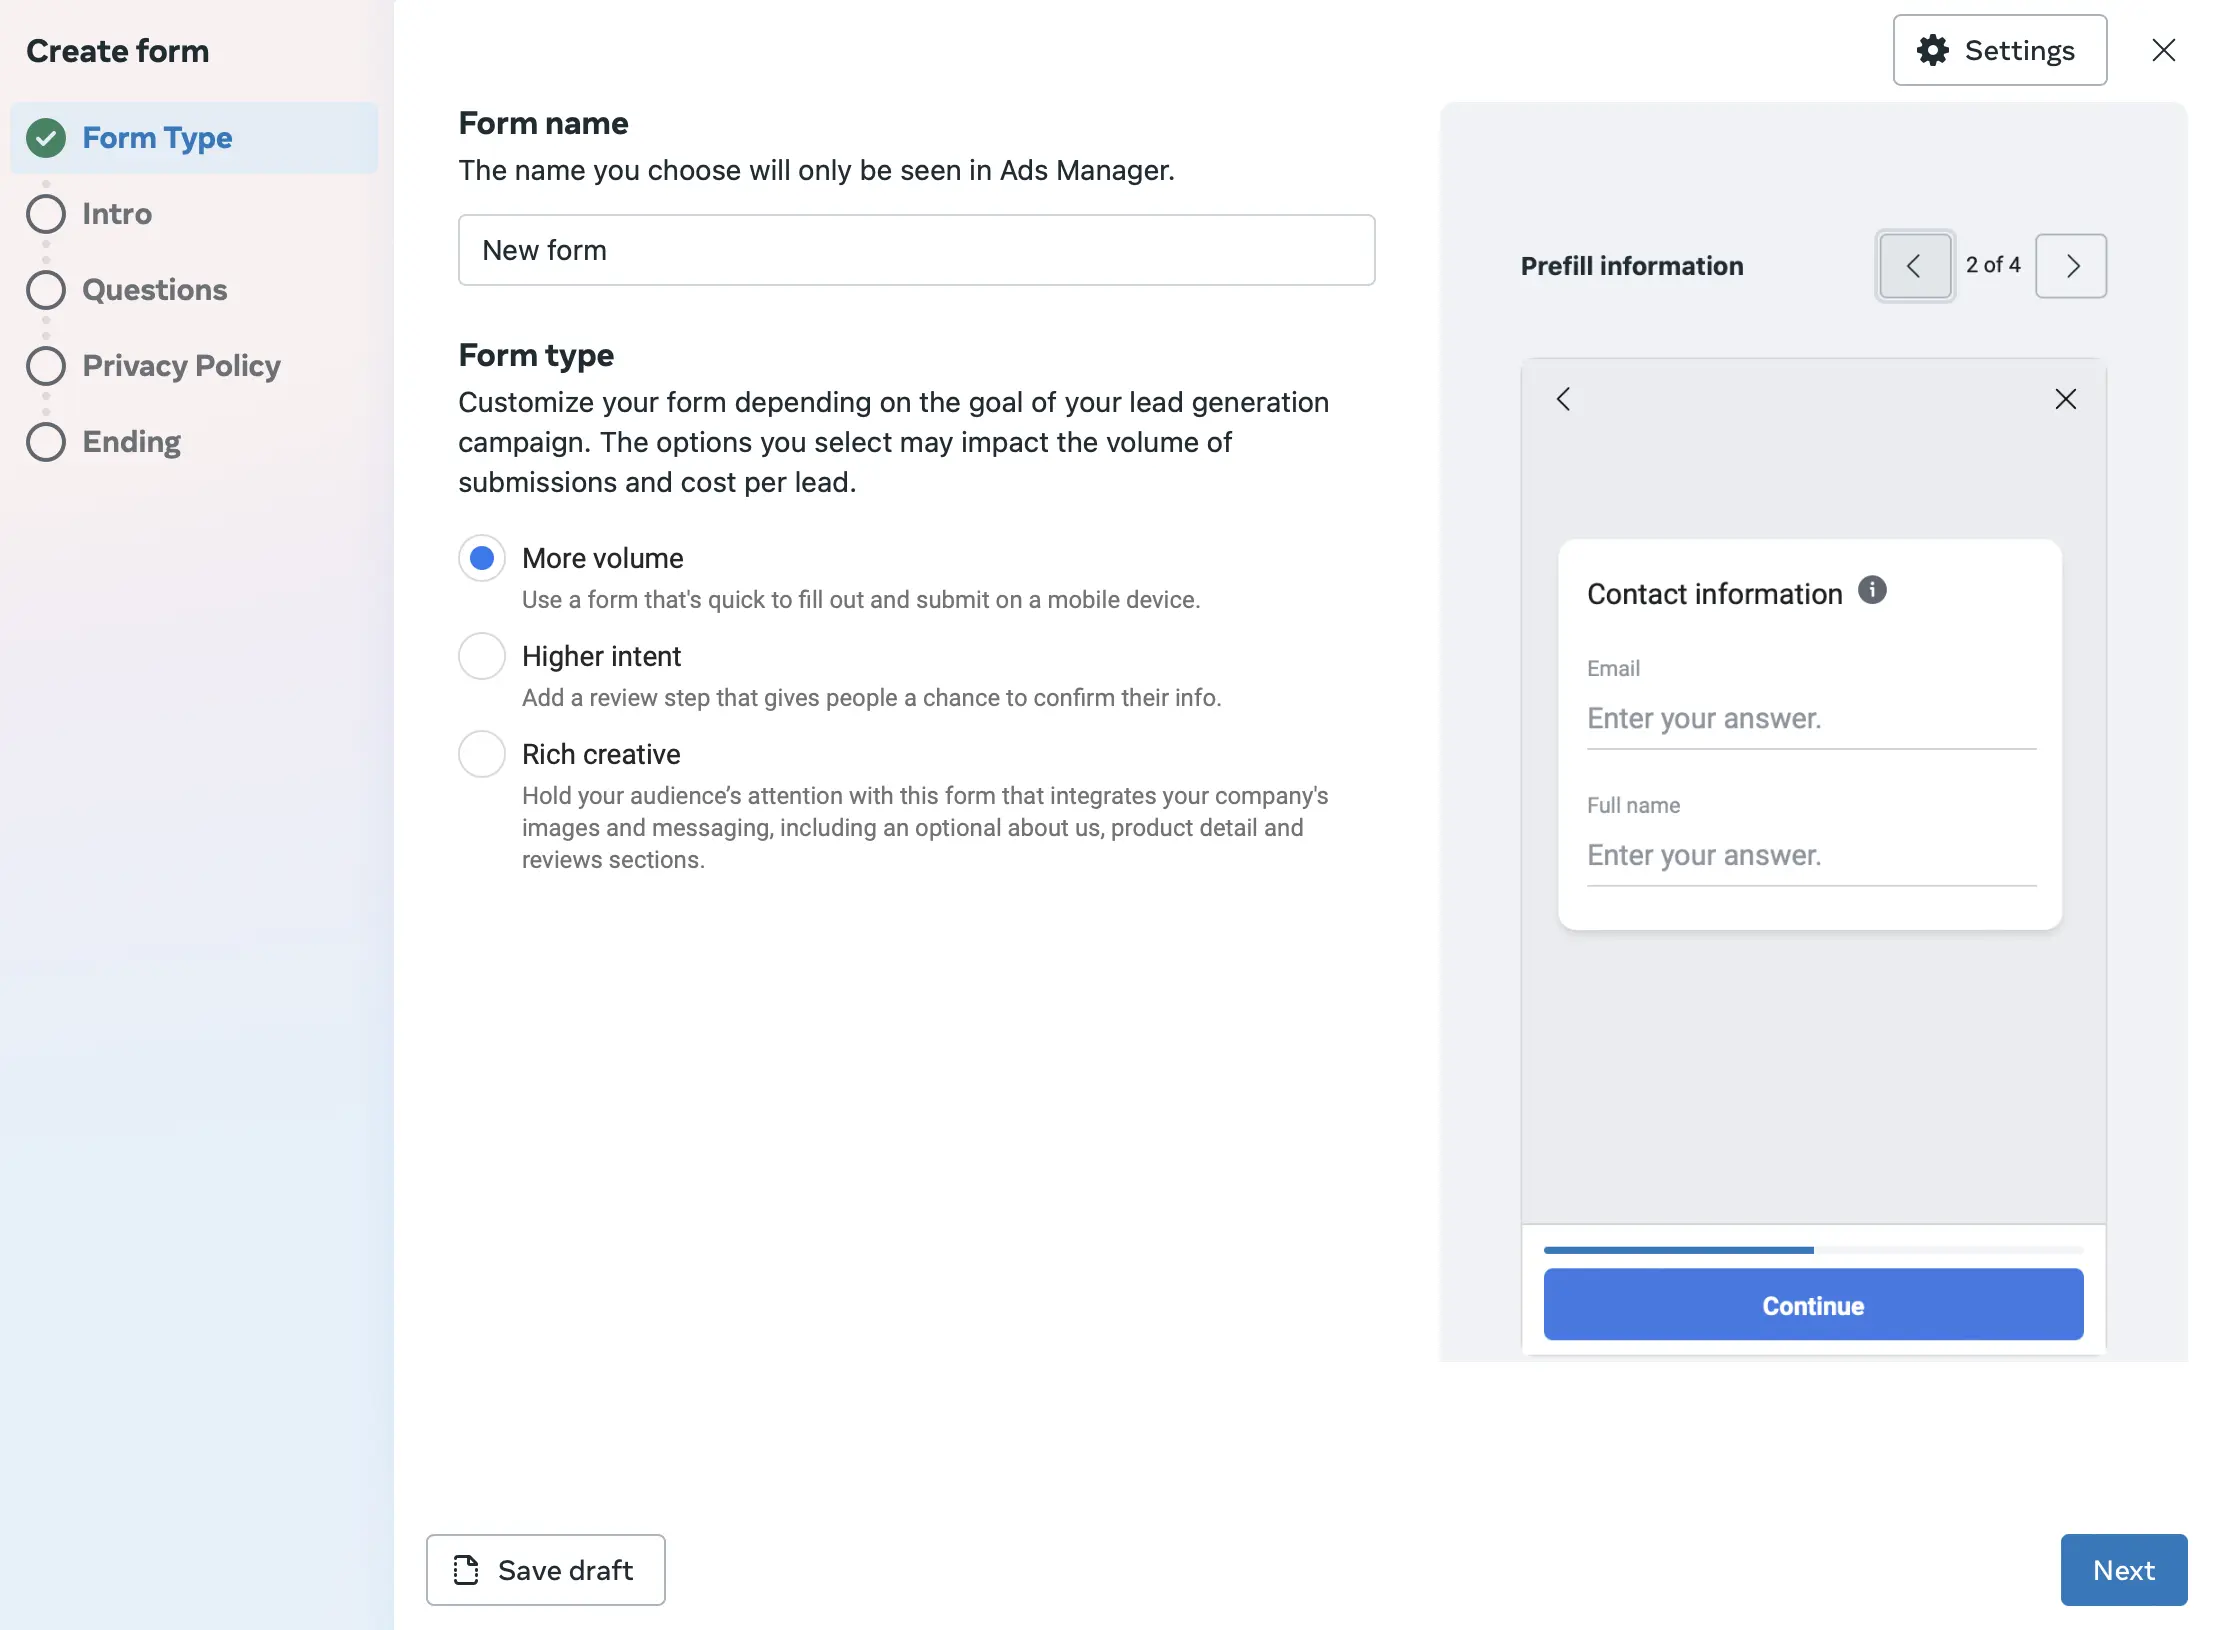
Opt for More volume if your primary goal is to gather as many leads as possible. This form type is designed for simplicity and speed, ensuring users can quickly provide their information without too many steps or questions.
Higher intent includes an extra step where users can review and confirm their information. While it might result in fewer leads compared to the More volume option, the leads you do get are likely to be of higher quality and more engaged.
If you want to provide more context or information about your offering, Rich Creative is the option to choose. It's ideal for campaigns where you want to give users a deeper understanding of your product or service before they sign up.
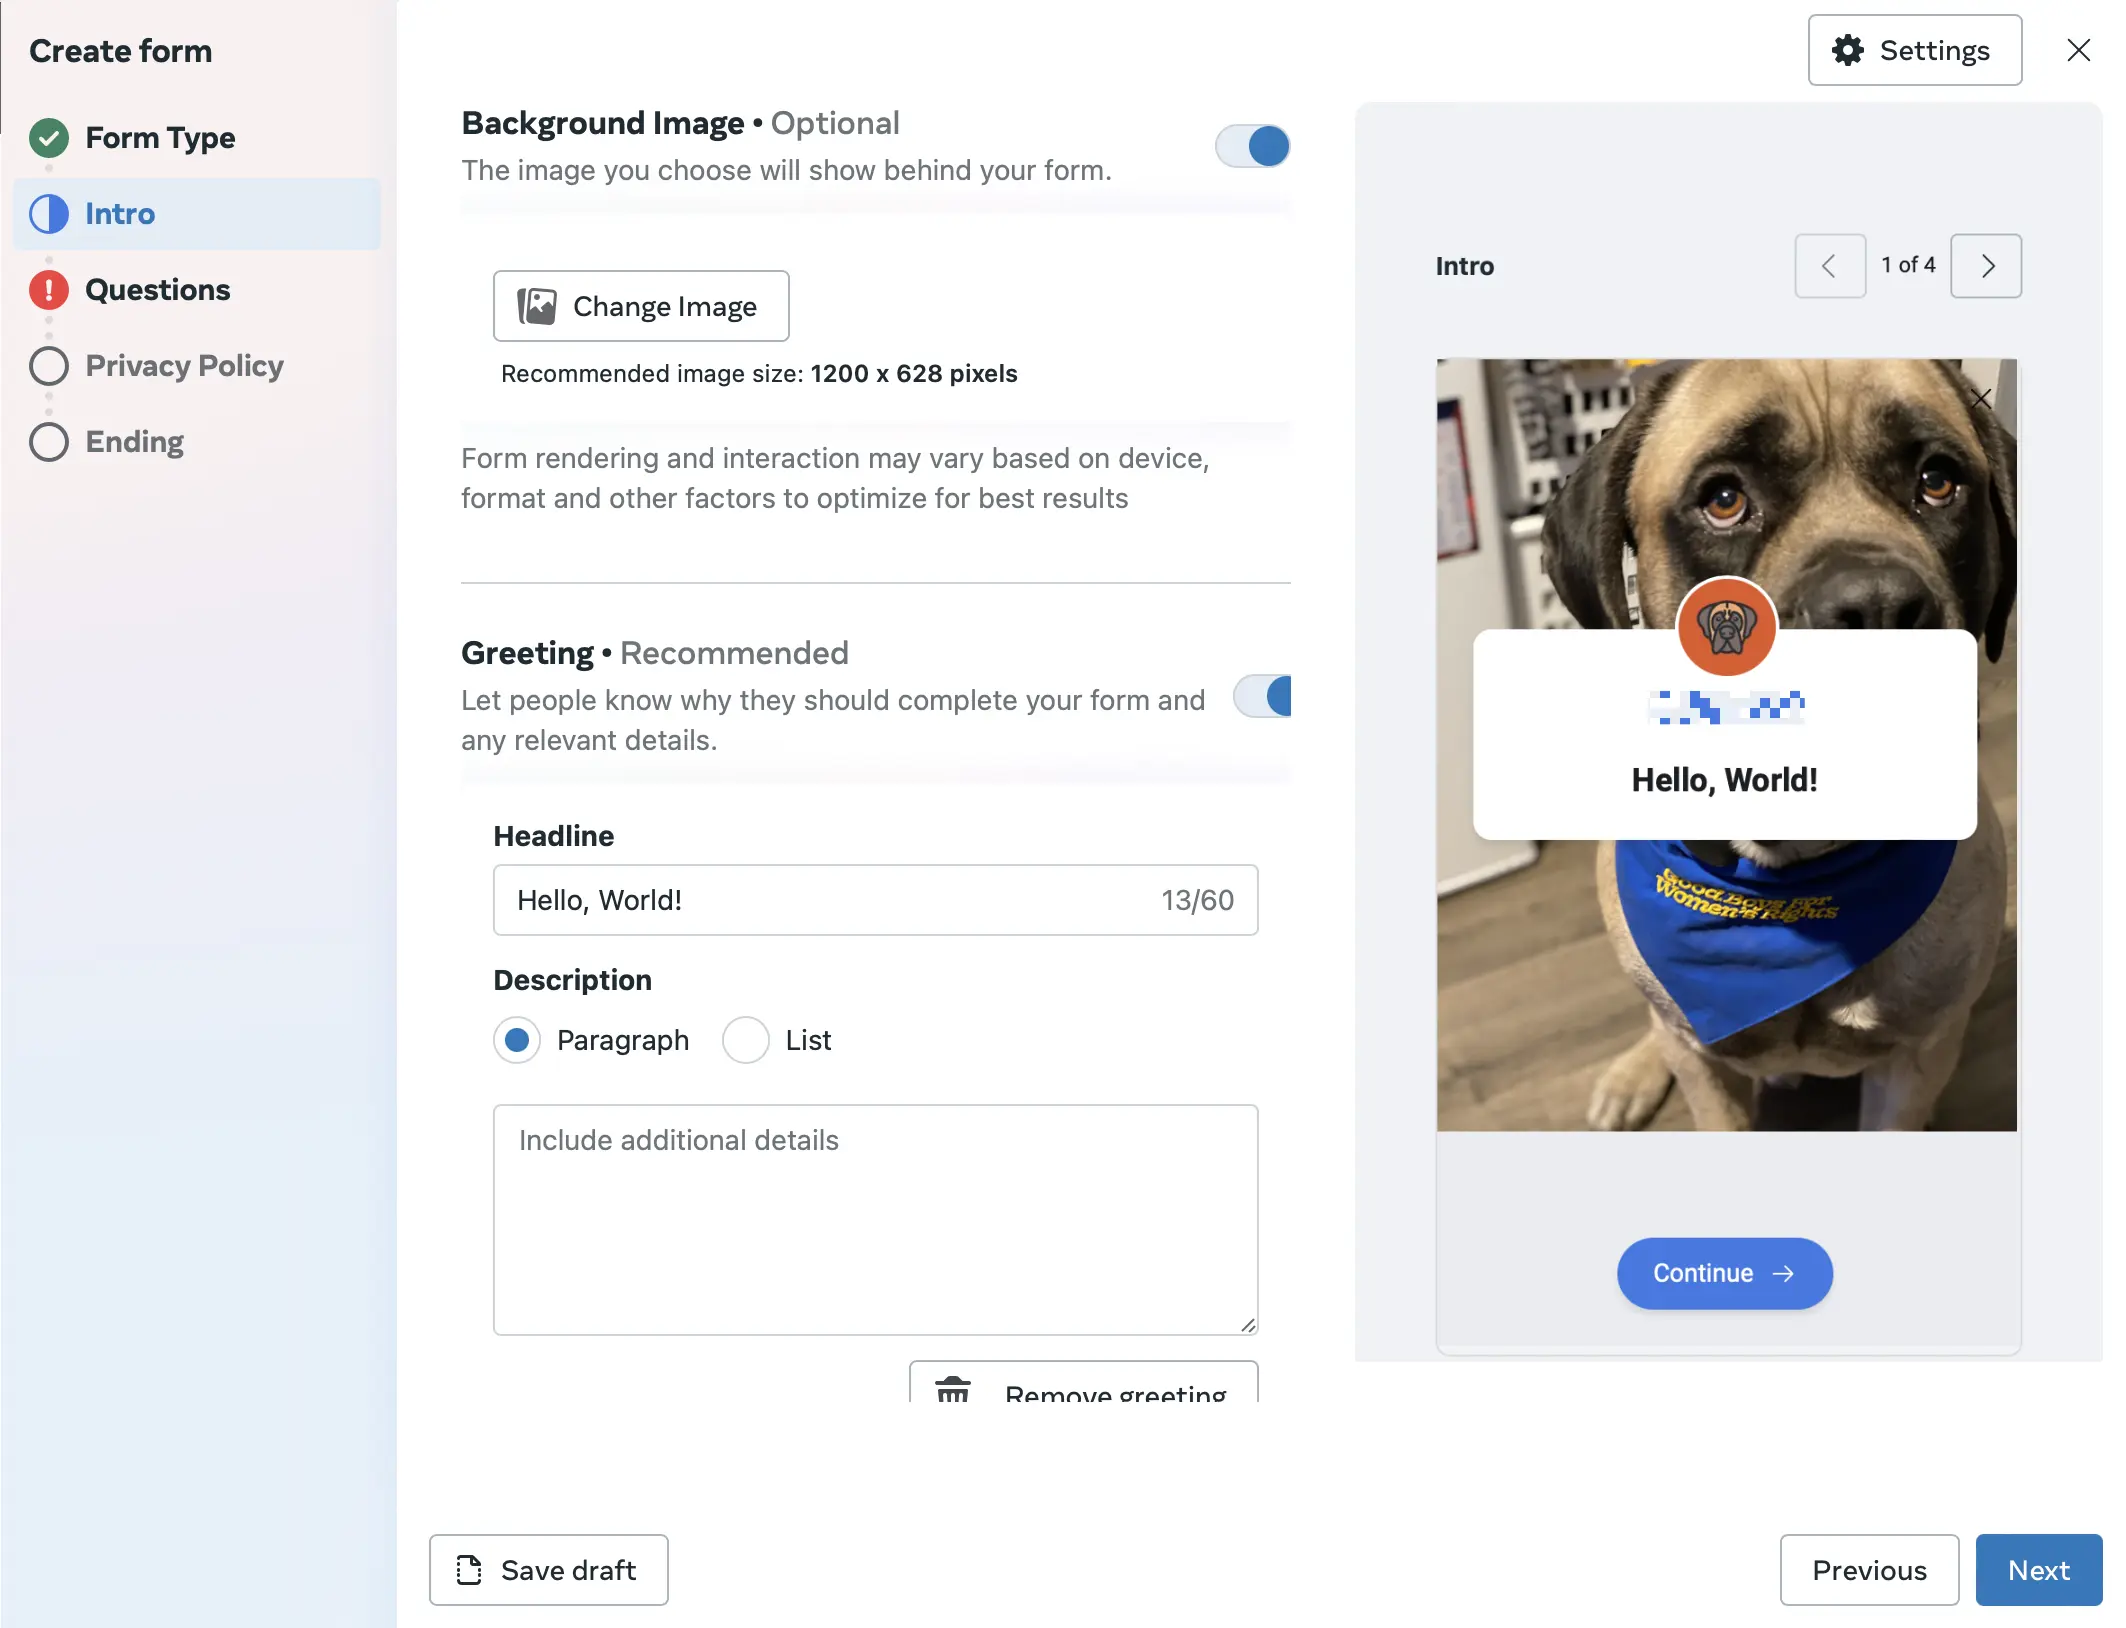
Under Intro, add a Background image, Headline, and Description to explain the form's benefits. You'll be able to see a preview to the right as you do this.
In Questions, add up to 15 custom questions by selecting Custom questions > Add question. This is for any additional data you want to capture beyond the standard pre-filled information like name and email address. If you're only interested in the basics, you don't need to add any custom questions. If you do decide to gather more details, remember that brevity is your friend. A shorter form often results in fewer drop-offs, so only ask what's absolutely necessary.
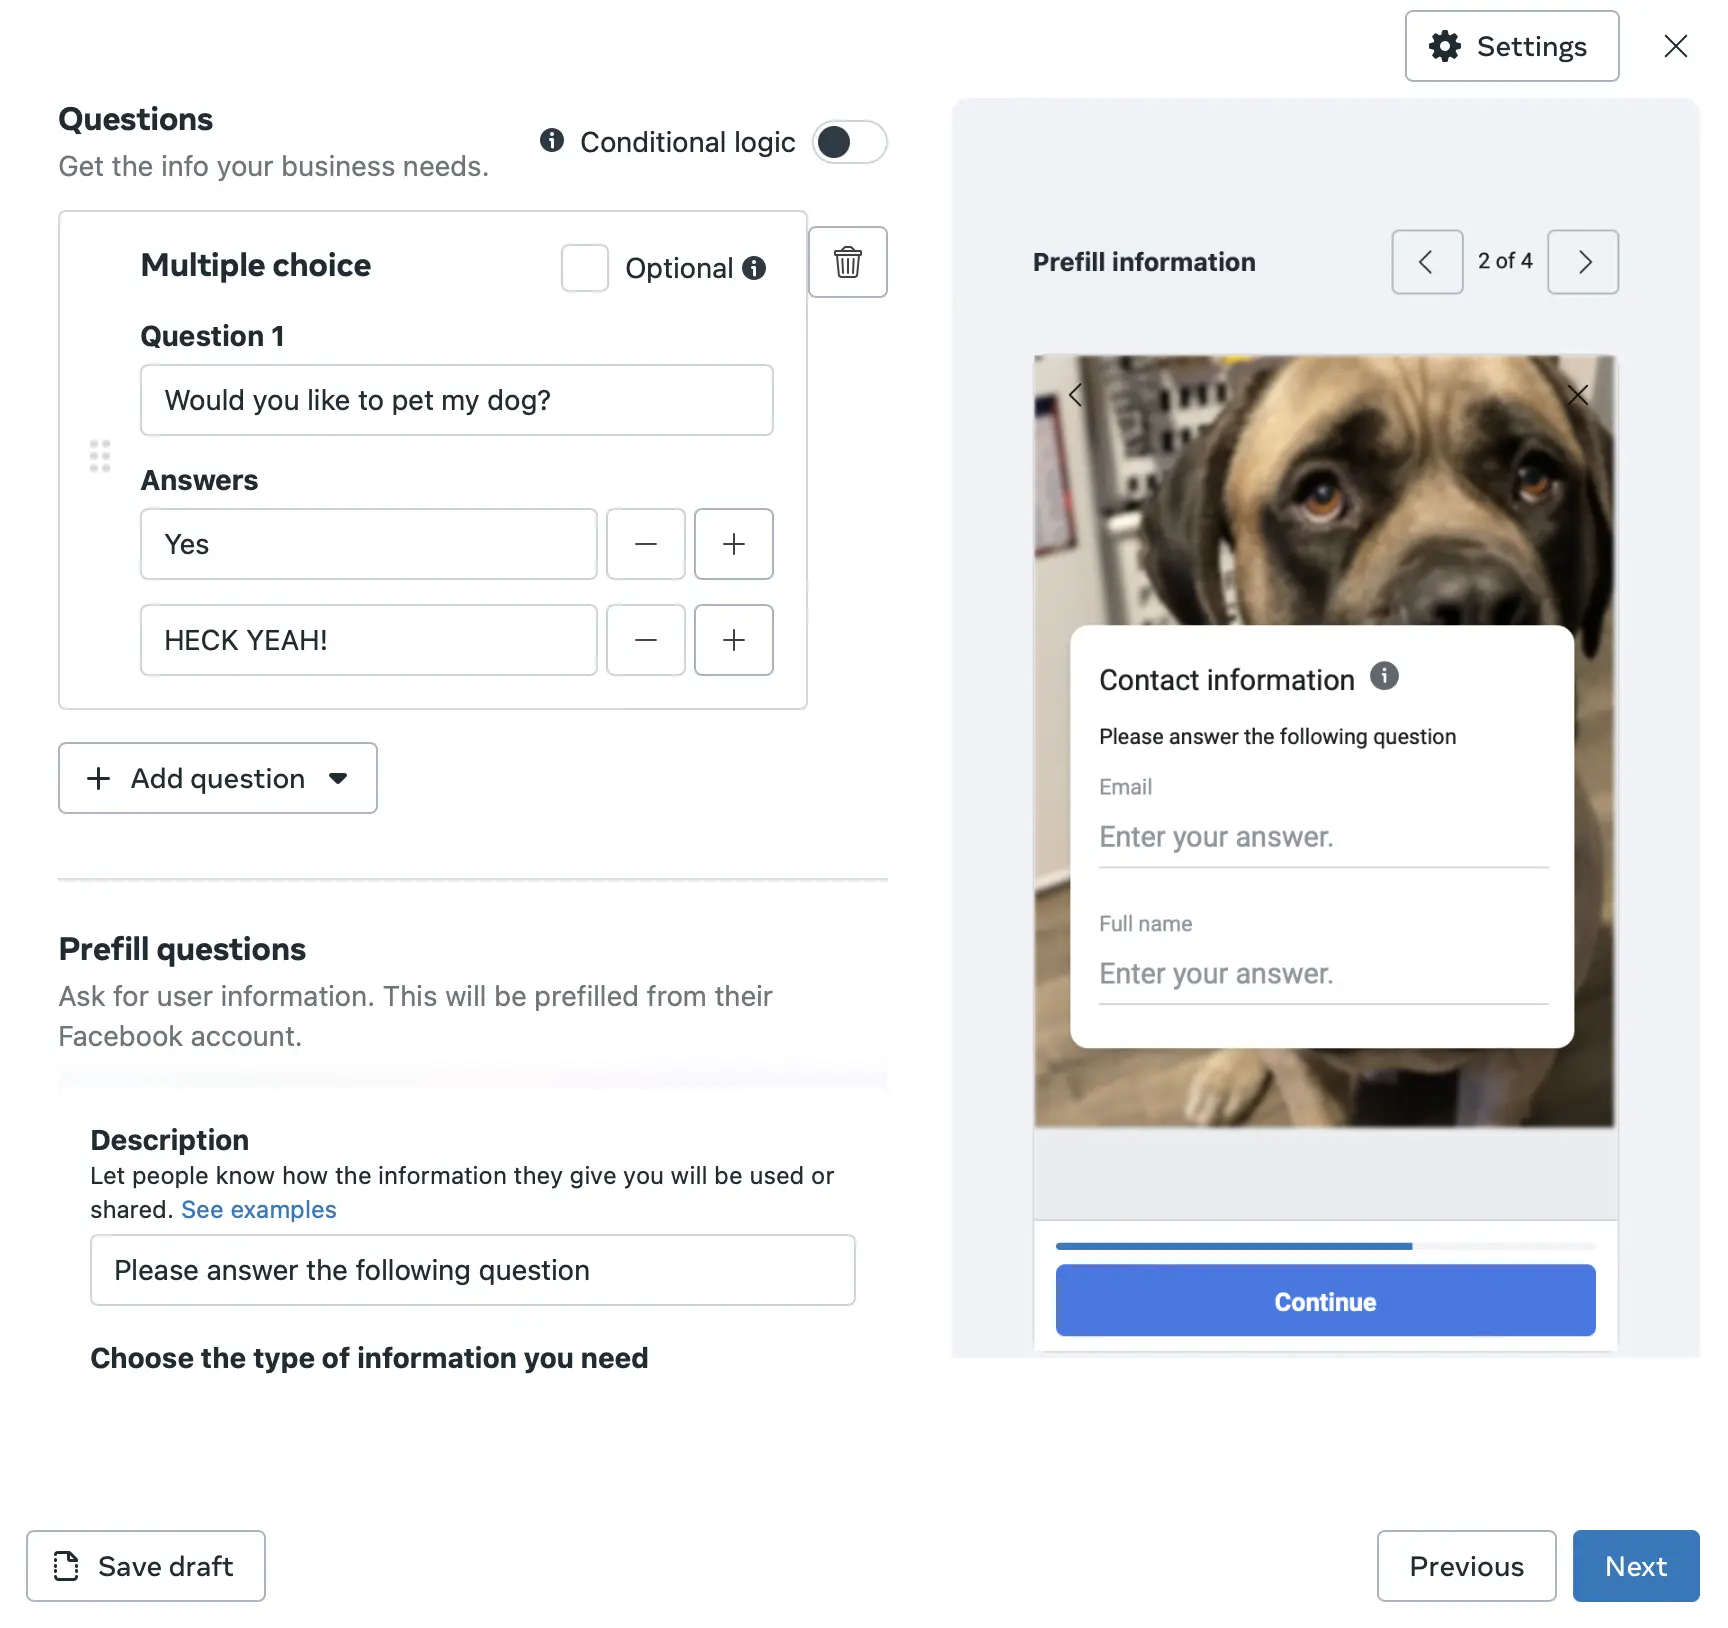
Under Prefill questions, whether you're collecting email addresses for an email marketing campaign or you're planning on sending out a newsletter, describe how collected data will be used.
Make it abundantly clear how you'll use the data you collect. Not only does this build trust, but it also ensures you're on the right side of data protection regulations.
Then, choose which data should be auto-filled from users' accounts.
You can choose things like name, email address, phone number, address, or even demographic information. If the user has previously shared that information with Meta, it will be auto-filled.
Add your privacy policy URL and link text. Optionally, include a custom disclaimer for additional notices or opt-ins.
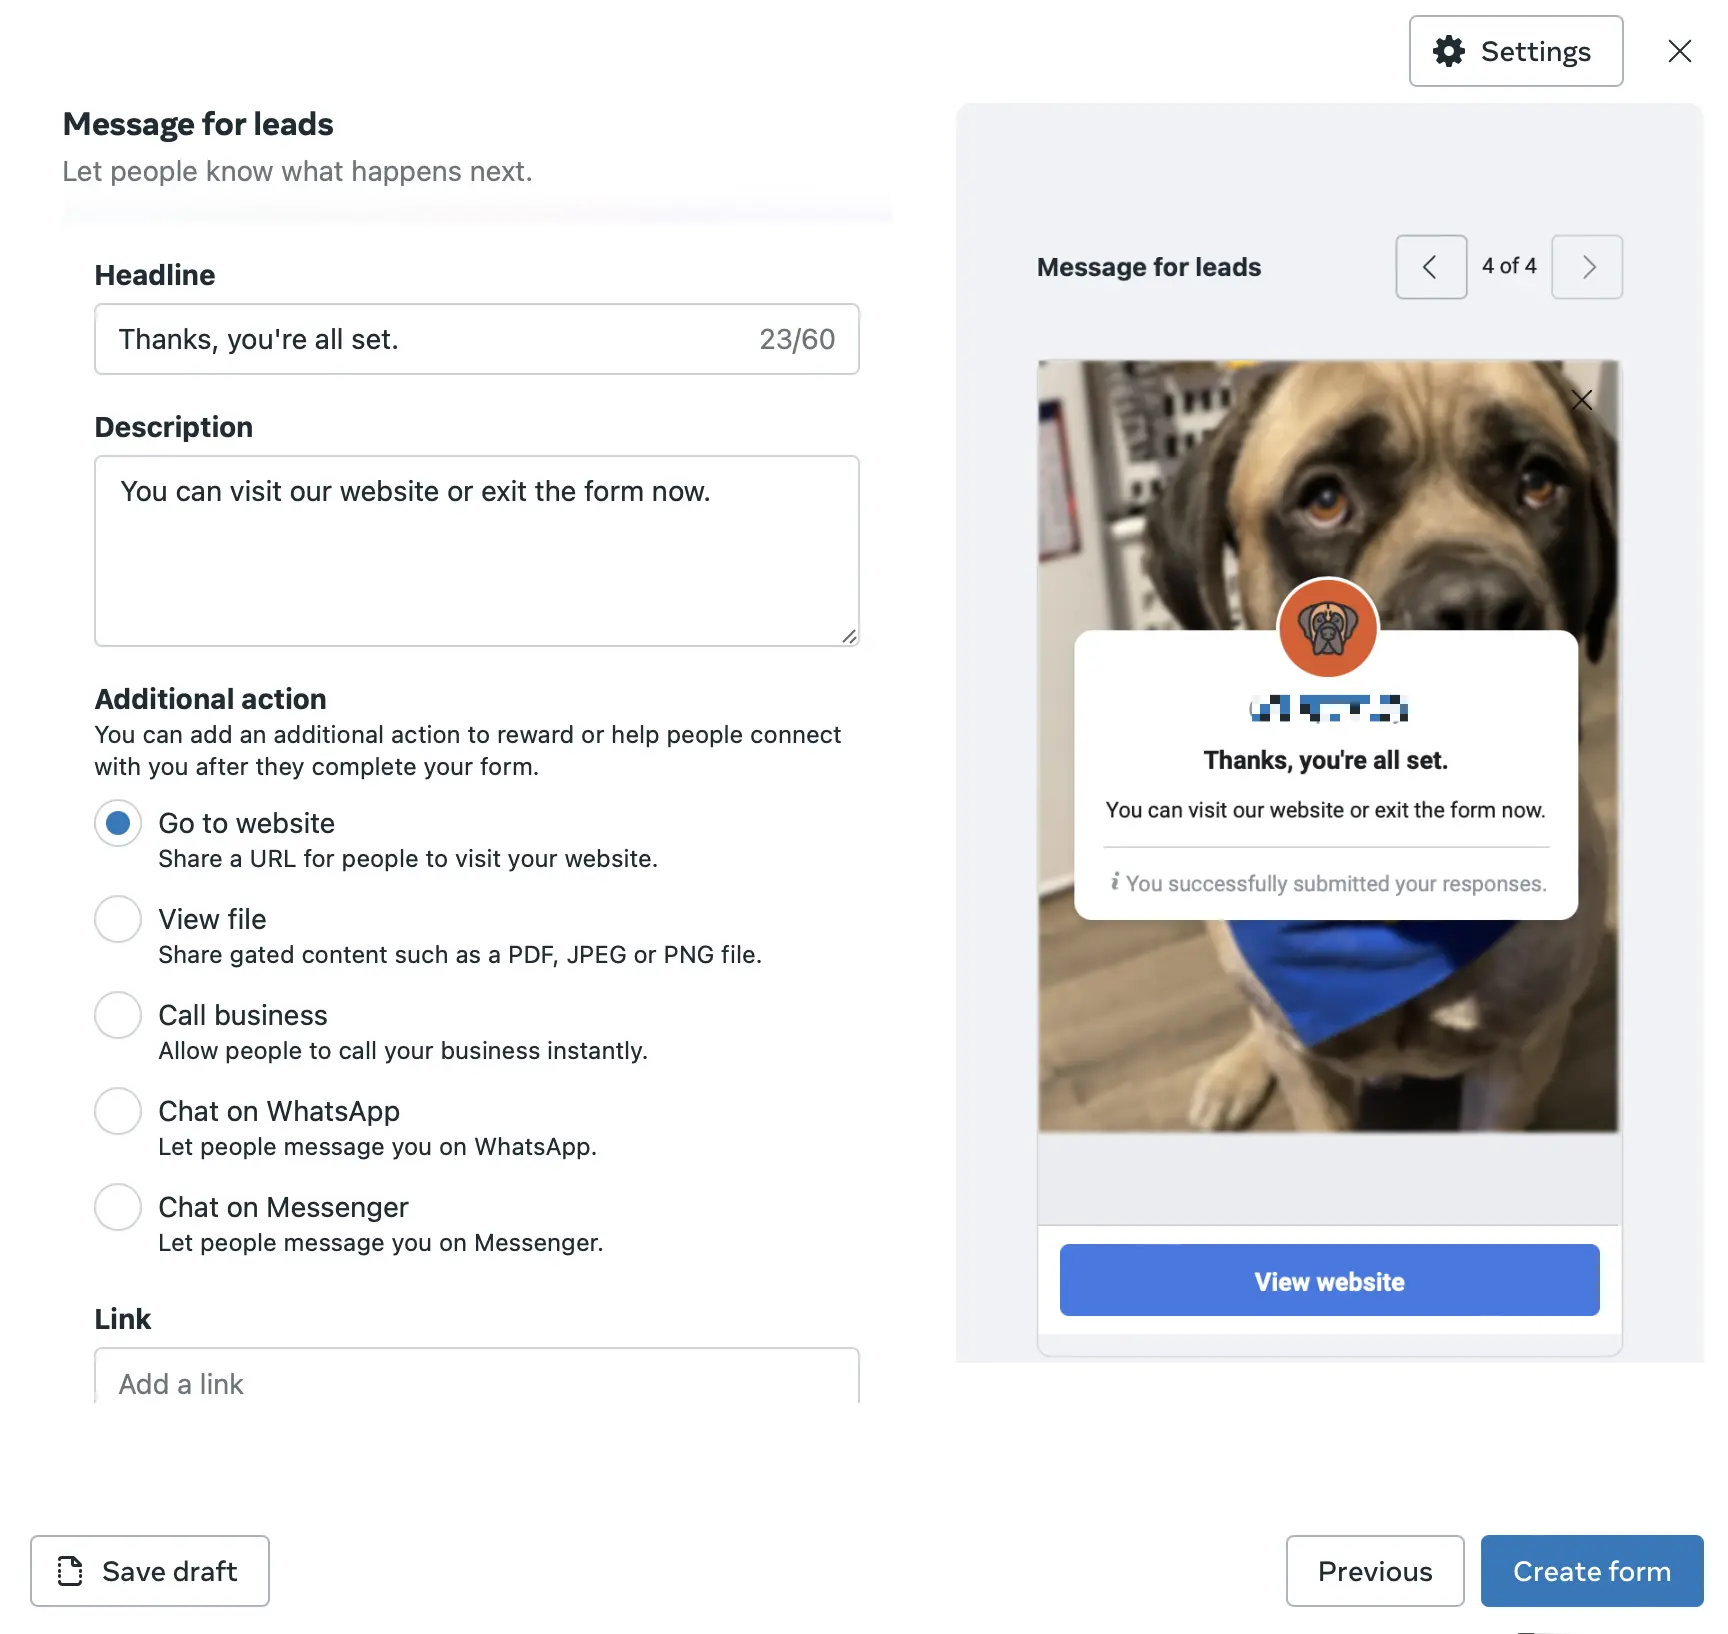
In Message for leads, detail what happens post-submission with a headline, description, and call to action (with a link). Again, you'll be able to see what this will look like in the preview.
Finalize by selecting either Save draft (to revisit later) or Publish.


10. Set up tracking
When users fill out the forms in your lead ads, where does that data go? By integrating your CRM with Meta's Ads Manager, you can automatically import your new leads to your CRM, allowing for timely follow-ups and better lead nurturing. But what if you want a little more information?
Using the Meta Pixel, you can track Website events like:
View content: visits to specific pages or product views
Add to cart: products added to the shopping cart
Purchase: completed purchases
Lead: other sign-ups or interest indications outside the lead ad
These insights help you understand user behavior post-lead capture, allowing for retargeting and ad optimization based on their website interactions.
If you're promoting an app through your lead ads, you'll want to know how users interact with it after they've filled out your form. App events can track things like:
App install: Post lead capture, did they install your app?
Completed registration: Did they register within the app after showing interest through the lead ad?
Achieved level: For gaming apps, did they reach a specific level after engaging with your ad?
Even with Instant forms, you might have CTAs or links within the form that direct users elsewhere. URL parameters help track these specific interactions. They provide granular insights like which campaign, ad set, or specific ad drove that click or subsequent action.
Here is also where you can connect with Zapier to send your leads wherever you want to store them. If you want a head start, check out this Facebook lead tracker, a no-code Zapier Tables template designed to help you simplify lead management and keep your lead data organized.
11. Manage your leads
You've meticulously crafted your campaign, designed an engaging ad, and you're all set for the leads to roll in. But before you kick back and relax, there's a crucial question to address: what exactly do you do with these leads?
Put them into your marketing funnel.
From the Meta Ad Manager, you can set up automations using Zapier to channel those fresh leads straight to a variety of other apps, from CRMs like Salesforce or HubSpot to email marketing services like Mailchimp.
During the Tracking setup, click on Set Up next to CRM. This will direct you to the Events Manager.
From there, navigate to Partner Integrations, and select Zapier.
You'll be prompted to log in to your Zapier account or create a new one if you don't have one yet.
With your Zapier account connected, you can automatically send your leads to whatever platform you want or use them to trigger actions like autoresponders, welcome sequences, coupon or download delivery, or registrations. No code required.
Learn more about how to automate Facebook lead ads, or get started with one of these pre-made workflows.
Add new Facebook Lead Ads leads to rows on Google Sheets
Send emails in Gmail for new leads in Facebook Lead Ads
Subscribe new Facebook Lead Ad leads to a Mailchimp list
Want to see how other people are automating their Facebook leads? Learn how to connect Facebook lead ads to Google Sheets, automatically track and respond to leads from Facebook lead ads, send Facebook leads to Salesforce or ActiveCampaign, or set up email alerts or custom notifications for new leads.
12. Publish
With everything set, hit Publish. Your lead ad is now live, ready to engage and convert.
Facebook lead ads best practices
If you want your lead campaign to generate actual results rather than just be another automatic charge on your company credit card, here's what you can do:
Define objectives early: Clearly outline your campaign goals to ensure your lead ads align with your overall marketing strategy. Are you aiming to increase brand awareness, generate leads, or drive sales?
Choose your audience wisely: Facebook's borderline creepy targeting allows you to get very specific with your options to reach the most relevant and qualified audience for your offer. Consider demographics, interests, behaviors, and custom audiences for the best results.
Be creative: Use high-quality images or videos and engaging copy to capture attention and communicate value quickly. Your ad creative should be visually appealing and relevant to your target audience.
Make forms simple: Nobody—I cannot stress this enough—likes to fill out long-winded forms that could have been avoided entirely. Minimize the number of form fields to reduce friction and increase completion rates.
Optimize regularly: Regularly analyze performance metrics and use A/B testing to continuously refine and improve your ads. Track key metrics like click-through rate, conversion rate, and cost per lead to identify areas for optimization.
Automate what you can: Make the most of automation and AI marketing tools to streamline your Facebook lead generation process. This can include automatically sending leads to your CRM, triggering email marketing campaigns, or delivering coupons and downloads.
IRL examples of Facebook lead ads
There's nothing I love more than a clear and concise message in an ad. If something's going to interrupt my scrolling, it might as well be a well-written and engaging ad. Here are a few examples I've enjoyed recently.
Gym lead ad campaign

The kids' fitness niche is a peculiar beast. On one hand, you're selling health, discipline, and confidence. On the other, you're essentially advertising a place where children voluntarily get punched.
This example actually walks that tightrope quite well by positioning the boxing program as a positive outlet for energy, focus, and personal growth. The value proposition is clear (one week free, beginner-friendly classes), and the creative choice (smiling kids, an upbeat coach, no visible crying) signals a fun, structured environment and social proof in a single frame.
Form fields:
Which deal are you interested in?
Full name
Email
City
Phone number
Steakhouse lead ad

Restaurants have the opportunity to use the lead ad format to their advantage because it combines advertising and scheduling at once.
This type of campaign is designed to draw the audience in and acquire some form of data from them through the form—data that may just as well be a dinner reservation.
Form fields:
Event date and time
Number of people
Type of event
Email
Full name
Phone number
Type foundry lead ad

This is one of my favorite ones, simply because it doesn't stuff the ad with unnecessary text, overly technical descriptions of typeface features, or busy imagery. The ad contains a creative example of how typography impacts branding and a clear CTA that links out to a lead form and helpful branding guide.
The message is clear, despite the fact that the ad doesn't aggressively shout "BUY OUR FONTS." Instead, it invites the audience to learn about elevating their branding, subtly establishing Monotype as the expert in typography and visual identity.
Form fields:
Name
Company
Country
Work email
Do you work for an agency?
What describes your function within your organization?
What is the top challenge you are looking to solve?
Facebook lead ads FAQ
If you still have questions about Facebook lead ads, I'm impressed. Here are answers to some of the most common ones.
Are Facebook lead ads good?
Well, it depends on whether or not you like leads. If you do, then yes, absolutely. Facebook lead ads are great. By allowing users to share their information without leaving the platform, the friction often associated with conversions is reduced. This often results in higher conversion rates and a more seamless user experience. Of course, like any tool, their effectiveness depends on how they're used. Proper targeting, compelling creatives, and a clear call to action are essential to make the most of lead ads.
What is the difference between leads and conversion ads on Facebook?
Lead ads are specifically designed to collect user information, like email addresses or phone numbers, directly within Facebook and Instagram. Conversion ads, on the other hand, aim to drive users to take a specific action on your website, such as making a purchase or signing up for a newsletter. While lead ads keep users within the Facebook ecosystem, conversion ads typically redirect users to an external site.
How much is a lead on Facebook ads?
The cost of acquiring a lead on Facebook varies based on several factors, including your industry, target audience, ad quality, and competition. It's essential to monitor your campaigns, adjust targeting, and optimize creatives to ensure you're getting the best value for your advertising spend. Remember, it's not just about the cost per lead, but the quality of those leads and their potential to become paying customers.
What is Meta Advantage+?
Meta Advantage+ is a suite of AI-driven tools to optimize your advertising campaigns. Rather than manually adjusting every detail, Advantage+ uses algorithms to make decisions that can enhance the performance of your ads:
Audience targeting: Advantage+ can refine your audience selection using features like detailed targeting, custom audiences, and lookalike audiences to ensure your ads reach those most likely to engage.
Optimal placements: Advantage+ can automatically determine the best spots for your ads, be it on Facebook, Instagram, or the Audience Network.
Budget utilization: The Advantage+ campaign budget feature is designed to optimize your ad spend, ensuring you get the most out of your investment without unnecessary excess.
Creative adjustments: Advantage+ tools can help automate and optimize your content, making sure it aligns well with your target audience.
While Advantage+ offers automation and optimization, aligning it with your campaign goals is essential. If you want more control over specific campaign aspects, you might opt for manual settings.
Related reading:
This article was originally published in May 2017 by Jamie Irish and has also had contributions from Hachem Ramki and Allisa Boulette. The most recent update was in January 2026.


