Google has built some of the most effective productivity tools on the planet. With Gmail, Hangouts, Chrome, Docs, Sheets, and more, odds are you use Google products for at least some of your work. There’s also a good chance, though, you’re missing out on one of Google's most powerful tool: Google Apps Script.
Apps Script lets you build powerful add-ons for Google Apps with snippets of JavaScript code. Take a few minutes to code a script, and you can mold apps like Gmail, Google Sheets, and Google Drive into custom tools for your business. A script could, for example, automatically send email thank-yous with Gmail and a Google spreadsheet, or automatically add new people from a spreadsheet to Google Contacts. (Don't worry: We’ll cover both of those examples in-depth.)
To start, let’s cover the basics of Apps Script and how you can start using it—even if you're not a developer or have only limited JavaScript experience.
If you’re new to Apps Script, be sure to check out Google's documentation in addition to this guide. Google does a terrific job of laying the groundwork, so it's a great place to start. Then come back here to build your own add-ons.
Learn more about using Google Sheets
Getting Started with Google Apps Script
There are two main types of scripts you can use with Google Apps: standalone and bound scripts.
Standalone scripts are not attached to any particular app in your Google account. Instead, think of them as macros that perform system-wide functions.
A standalone script could search your Google Drive for all items with the name ‘untitled’ (the default name Google gives to files when the name isn’t specified), for example, as a handy way to keep your Google Drive clutter-free.
You'll see standalone scripts alongside your other Google Drive files, and each file contains JavaScript for your particular function.
Bound scripts extend the functionality of a certain file in one of your Google apps. They perform specific actions directly to that particular file.
For example, you could create a script bound to a specific Google Sheet that checks for and removes duplicate rows.
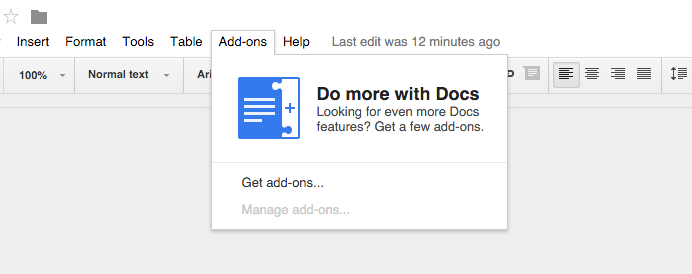
Google lets you publish both standalone and bound scripts for others to use. In fact, the "Add-ons" menu in a Google Docs document includes dozens of scripts—to translate your document, format tables, add formulas and more—that have been converted into extensions and shared by others.
This chapter's tutorials will focus on bound scripts—the most common ones in the Google Docs Add-ons menu. First, let’s get our feet wet by building a simple bound script that fills in header values in a spreadsheet automatically.
Building your First Script
To get started, visit sheets.google.com and create a new sheet. Under the "Tools" menu in your new sheet, click the option for "Script editor…"
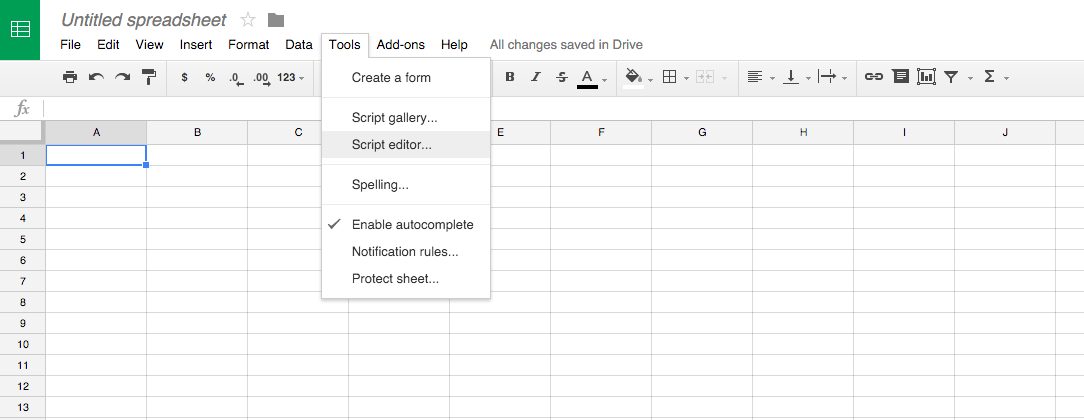
That'll open a new tab with a blank script file: the Script Editor. It's an easy way to create both standalone and bound scripts without leaving Google Apps.
In this case, since we opened a new sheet first and then opened the Script Editor, we’re creating a bound script; when we run it, the script will only affect the new file we opened. By contrast, standalone scripts are created by visiting script.google.com directly.
When we open the Script Editor from within a Google document for the first time, it automatically creates a new "Untitled project" for us. Let’s change that to something a bit more descriptive, like "Create Headers."

Now, it’s time to write a bit of code. On a basic level, Apps Scripts are a combination of JavaScript functions—blocks of code designed to perform a certain task. Often there's functions you can copy and use on your own with minimal editing, which is what we'll use here.
Google has given us a starting block that looks like this:
function myFunction() {

}
This will be the framework for our first function. Just like our project title, we want our function name to describe what the code is actually doing. Let’s change the function name from myFunction to createHeaders, since this script will be creating column headers for us.
function createHeaders() {

}
Now, we need to put some code inside those curly braces (the { } characters you'll notice after the function name) that will make this function do what we want. To get this code, let’s head over to the documentation for Google Sheets. This documentation tells you exactly how you can manipulate Google Sheets with Apps Script.
If you scroll down, you’ll notice a method called setFrozenRows that we can use. If we’re setting up column headers in the top row of the spreadsheet, it would be helpful to freeze that row so it’s always available, no matter how far we scroll down. Google provides the following example:
 var ss = SpreadsheetApp.getActiveSpreadsheet();
 var sheet = ss.getSheets()[0];

 // Freezes the first row
 sheet.setFrozenRows(1);
Let’s copy that code and use it in our function:
function createHeaders() {
  var ss = SpreadsheetApp.getActiveSpreadsheet();
  var sheet = ss.getSheets()[0];

  // Freezes the first row
  sheet.setFrozenRows(1);
}
Click the disk icon in the toolbar or press the Save keyboard shortcut (Command+S on a Mac or Ctrl+S on Windows) to save the project. Now, it’s time to run the function. In the toolbar, you should see a play icon just to the left of a menu item with the function name we set (createHeaders). For now, we only have one function to run. However, if you had multiple functions in your code project, you could individually select the function you want to run.
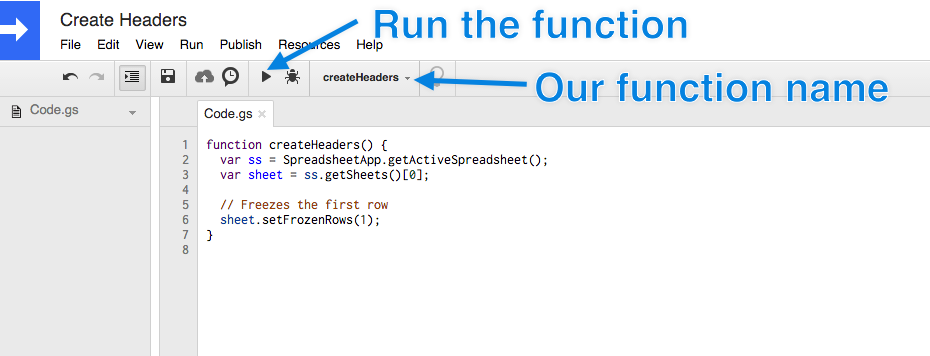
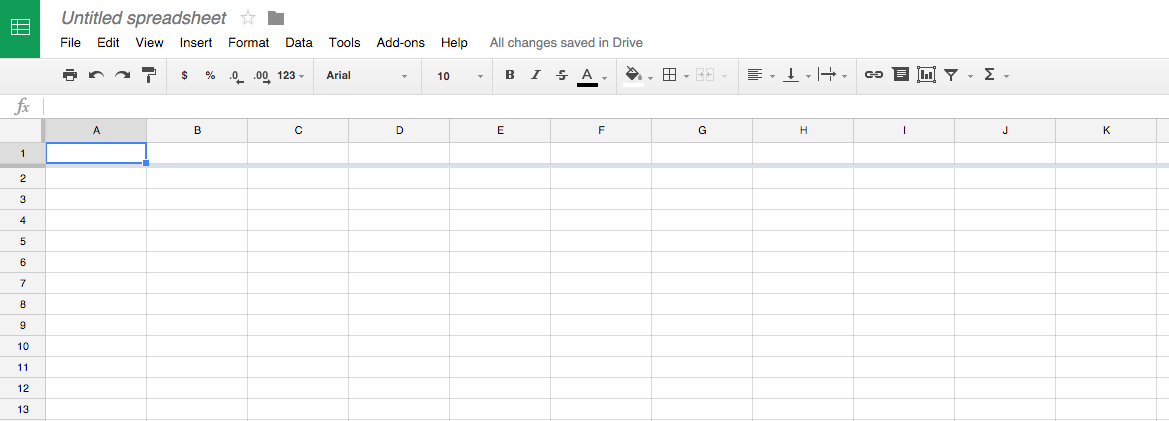
Click the play icon to run the function. You’ll be prompted with some authorization dialogue, but once you authorize the script to run, jump back to your Google Sheet. The first row should be frozen!
Now, we need to extend our function to actually set the values of the header row. To do that, let’s go back to the Google Sheets documentation to find some more code.
We need some way to set the values for a particular range of cells. On the left-hand side of the Google Sheets documentation, under "Classes", you’ll notice we have a Range class.
Clicking on that reveals a selection of methods we can use on a specific range of cells. If you scroll down a bit, you'll find setValues(values), which inserts a set of values into a range; that seems to match what we need! Here’s a portion of the example provided:
var ss = SpreadsheetApp.getActiveSpreadsheet();
 var sheet = ss.getSheets()[0];

 // The size of the two-dimensional array must match the size of the range.
 var values = [
   [ "2.000", "1,000,000", "$2.99" ]
 ];

 var range = sheet.getRange("B2:D2");
 range.setValues(values);
For a non-engineer, that's a lot of code! Here's the part we're most interested in:
 var values = [
   [ "2.000", "1,000,000", "$2.99" ]
 ];

 var range = sheet.getRange("B2:D2");
 range.setValues(values);
This might look a bit foreign if you’re not familiar with JavaScript, but in short, the code creates two variables.
Values, set byvar values =stores the values 2.000, 1,000,000, and $2.99.Range, set byvar range =stores the range of cells B2 to D2 based on the sheet we're working with.
From there, we can call the setValues method on the range variable we set and give it the values variable. This tells our function to assign our Values (2.000, 1,000,000, and $2.99) to the cells defined in Range (B2 through D2).
Instead of adding random numbers to our spreadsheet, let’s say we wanted to create a contact list. We might want the following headers:
First Name
Last Name
Email
Phone Number
Company
Notes (Where did we meet this person? Is there anything special we need to remember?)
These would be our ‘values’. Since there are six different values, our ‘range’ needs to be six cells wide (like A1:F1). We also want to use the first row of the spreadsheet.
After updating example code and changing the range and values, add it to your createHeaders() function. You should end up with something like this (the // denotes a comment, so you can make inline notes about what your code is supposed to do):
function createHeaders() {
  var ss = SpreadsheetApp.getActiveSpreadsheet();
  var sheet = ss.getSheets()[0];

  // Freezes the first row
  sheet.setFrozenRows(1);

  // Set the values we want for headers
  var values = [
    ["First Name", "Last Name", "Email", "Phone Number", "Company", "Notes"]
  ];

  // Set the range of cells
  var range = sheet.getRange("A1:F1");

  // Call the setValues method on range and pass in our values
  range.setValues(values);
}
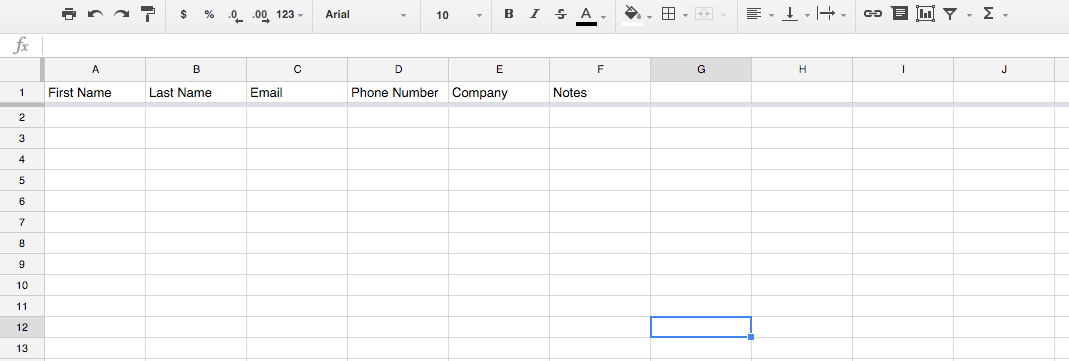
If we run the function again and flip back over to our spreadsheet, we should see the values set in the header row!
Exploring the Power of Google Apps
Typing in the header values for a Google Sheet isn’t that much work, so that script isn't the most valuable unless you setup a lot of new spreadsheets. But, Google Apps Script can do so much more. Here are two additional examples to play around with.
Example 1: Automatically Add Contacts From a Google Sheet
Let’s say we had a contacts spreadsheet set up like the example above, with columns for first name, last name, and more, as an easy way to keep track of everyone we met at networking events and conferences. We can actually use Apps Script to automatically turn these rows into Google Contacts so we can connect with them again later.
Here’s the basic spreadsheet setup:

Now, we could use a function like this to add the contacts to Google Contacts:
function createContact() {
  var alreadyAdded = "Already added";
  var sheet = SpreadsheetApp.getActiveSheet();
  var startRow = 2;  // First row of data to process
  var numRows = 2;   // Number of rows to process

  // Fetch the range of cells A2:G3
  var dataRange = sheet.getRange(startRow, 1, numRows, 8)

  // Fetch values for each row in the Range.
  var data = dataRange.getValues();
    for (var i = 0; i < data.length; ++i) {
    var row = data[i];
    var firstName = row[0]
    var lastName = row[1]
    var emailAddress = row[2]
    var phone = row[3]
    var company = row[4]
    var notes = row[5]
    var addedAlready = row[6];

      if (addedAlready != alreadyAdded) {
      // Create contact in Google Contacts
      var contact = ContactsApp.createContact(firstName, lastName, emailAddress);

      // Add values to new contact
      contact.addCompany(company, "");
      contact.addPhone(ContactsApp.Field.WORK_PHONE, phone);
      contact.setNotes(notes);
      sheet.getRange(startRow + i, 7).setValue(alreadyAdded);
      };
    };
};
While the code above looks much more complex, we’re actually doing many of the same things we did in the original example.
First, we define a range of cells using dataRange. Then, we look at each one of those cells and grab the associated value for each property (first name, last name, etc).
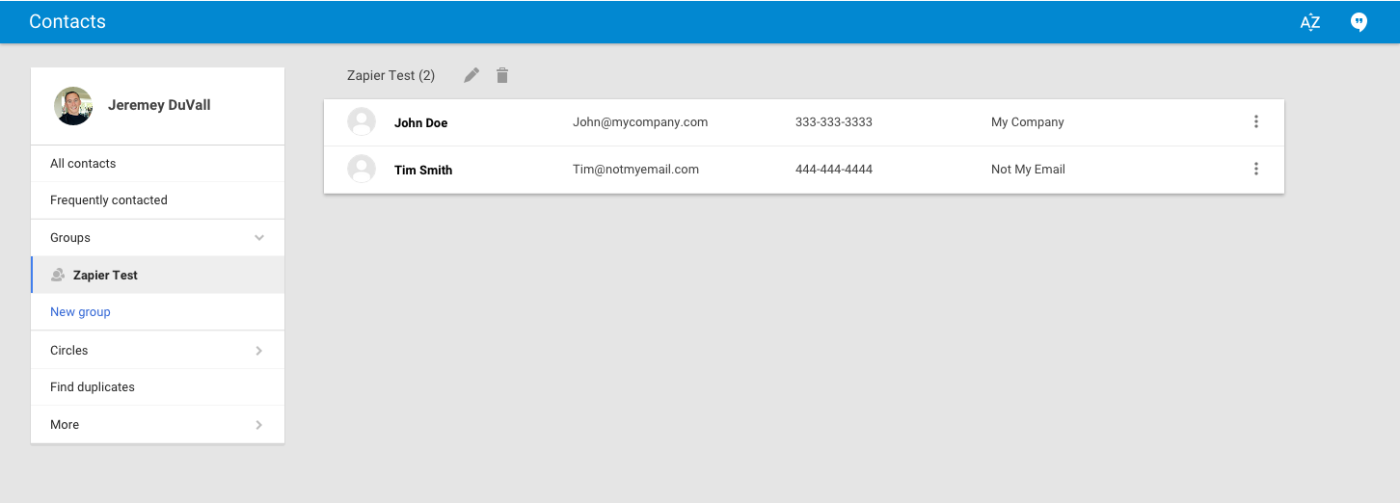
Now, we can use some methods provided by the Google Contacts documentation to create a contact and give it the right values. In this example, we also have a check in place to make sure a contact isn’t added twice; for that, we use alreadyAdded. When you run this code, you should get some contacts added automatically from your spreadsheet!
Add Contacts from Google Sheets to a CRM using Zapier Instead
Google Apps Script helps you automate processes within a specific tool and create connections between your Google apps. But if you want to avoid JavaScript troubleshooting, or send data from Google Sheets to a non-Google app, try Zapier. It can automatically pick up new information in a spreadsheet and transfer it to any of 500 apps—no code required.
For example, you can build the same automation that we covered above, hooking Google Sheets up to Google Contacts, or connect it to your favorite CRM app instead.
Create Google Contacts from new Google Sheets rows
Add leads to Salesforce from new rows on Google Sheets
Create or update HubSpot contacts from new Google Sheets rows
Explore more ways to use Google Sheets with Zapier, or jump back to chapter 3 to how to turn Google Sheets into a customized CRM.
Example 2: Automating Email Outreach
Let’s say you put on a massive event that was a huge success. You want to thank everyone individually, but with over 200 guests you don’t have the time to email each of them. With Google Apps Script, Google Sheets, and Gmail, though, you can automatically send out emails with custom messages for each person!
To set this up, we’ll want a spreadsheet with each contact’s first name and email address like this:

Then, we can use a function like this to make the emails:
function sendEmails() {
  var sheet = SpreadsheetApp.getActiveSheet();
  var startRow = 2;  // First row of data to process
  var numRows = 4;   // Number of rows to process

  // Fetch the range of cells A2:D5
  var dataRange = sheet.getRange(startRow, 1, numRows, 4)

  // Fetch values for each row in the Range.
  var data = dataRange.getValues();
  var emailSent = "Email Sent";
  for (var i = 0; i < data.length; i++) {
    var row = data[i];
    var firstName = row[0];
    var emailAddress = row[1];
    var isEmailSent = row[3];
    if (isEmailSent != emailSent) {
      var message = "Hi " + firstName + "! Great seeing you last night. Looking forward to connecting soon!";
      var subject = "Great seeing you last night!";
      MailApp.sendEmail(emailAddress, subject, message);
      sheet.getRange(startRow + i, 3).setValue(message);
      sheet.getRange(startRow + i, 4).setValue(emailSent);
    };
  };
};
This function starts off similar to the others by grabbing a range of cells in the dataRange variable. For each row, it grabs the first name from the first column (the firstName variable) and the email address from the second column (the emailAddress variable). Then, it builds a customized message in the message variable.
Once your script has a recipient, subject line, and message to work with, it taps into Gmail to send your message. In the Apps Script documentation for Gmail, you'll find the sendEmail class, which accepts the variables emailAddress (your recipient's email address), subject (the email's subject line), and message (your custom message).
The sendEmail class builds your email, and sends it to the appropriate address. Finally, this script adds the customized message to your spreadsheet, and sets the value of the fourth column to "Email Sent," to ensure we don’t send duplicate emails.

In the example above, I changed the test emails in the spreadsheet to my actual email, which is why all of the emails arrived in the same inbox. When you run this script on your own spreadsheet, though, it'll send emails to each of the contacts you've added to the spreadsheet.
Use Zapier to Send Emails via Google Sheets
If you use a different email service provider, or you just don't want to build new JavaScript blocks for each batch of follow-ups, try using these Zaps to connect Google Sheets to the email app of your choice.
Send Gmail emails for new Google Sheet spreadsheet rows
Send Microsoft Outlook emails from new rows in Google Sheets
Send Mailchimp Transactional emails when new rows are added to Google Sheets
What else can you do with Google Apps Script?
Your imagination is the only limit on what you can achieve with Google Apps Script. Here are some of my favorite examples:
Jame Todd Rubin created a writing tracker script you can copy from GitHub.
Google has an example script that generates a monthly report of your Gmail activity (daily usage, emails received, etc).
Gmail Snooze allows you to move emails out of your inbox for a specified period of time thanks to an Apps. Then, they’ll reappear in your inbox so you can deal with them when appropriate.
Amit Agarwal made a website monitor with Google Docs so you'll immediately receive alerts if your site goes offline.
There's hundreds of other things you can do with Google Apps Scripts—your imagination's the limit. The best way to get started is to review the documentation and start tinkering away. As you get more familiar with the methods and attributes available to you, you’ll start to realize just how much is possible—often without writing any extra code.
Or, if you don't want to mess with JavaScript, let Zapier do the heavy lifting for you. With dozens of Google Sheets automations that pass data between your apps, Zapier transforms the examples we covered above into a few simple clicks, making each integration painless.
You've done it: if you've followed along with this entire book, you've learned spreadsheet basics, built a CRM and business dashboard, learned about Google Sheets' hidden text tools and best add-ons, and now have learned to code your own add-ons with Google Apps Script.
Where can you go from here? In the closing chapter, we'll take a quick look at some of Zapier's best resources to help you organize your files, gather data, and more—along with the best Google Sheets resources to find the spreadsheet tools you need in seconds.

