
Many of our daily tasks, such as creating project outlines and drafting client emails, are variations of things we've done hundreds of times before. Not only are they time-consuming, but they can be a real snooze.
There's no need to reinvent the wheel every time you start something new. Instead, use templates—standardized files complete with fill-in-the-blank fields and preset formatting—to kick things off.
Templates work everywhere you do, like in word processors, spreadsheets, and email. Here, I'll show you how to create templates in your favorite apps, so you can get your most routine tasks done faster.
Why use templates?
Yes, templates take up-front time to build—but they're worth the investment. Here are three key reasons why you should consider using templates:
Efficiency. It's much faster to edit a template and fill in the blanks than it is to repeatedly build the same thing from scratch.
Maintain key information. Using a template means you're less likely to leave out key information. For example, if you work with freelance writers, modifying a standard contributor agreement ensures you include that crucial clause about owning the content once you've paid for it.
Consistency. Perhaps you send regular project updates to clients or investors. With a template, it's easy for everyone to follow along and quickly find the information they need because each update uses the same structure, formatting, and design.
How to create effective templates
Some daily workflows don't need a template, but when they do, here are a few simple guidelines to keep in mind.
Create comprehensive templates. It's easier to delete information than it is to add it in, so err on the side of adding too much versus too little. For example, imagine you're creating a template for your resume. By including in-depth details about your experiences and achievements, you can easily delete anything that's irrelevant to future jobs you apply for. But if they're not in your template, you might find yourself scrambling to recall what you did at your job from six years back.
Make customization areas clear. Include descriptive text or visual clues like "Hi
[INSERT NAME]," or "You'll be paid[INSERT $0.00 AMOUNT]every 15 days" to make it clear that these fields need to be updated. UsingINSERTas part of your clue is also a great way to make these fields easily searchable. Some apps even enable you to automate the process with variables.Use a standardized naming system. To make your templates easier to find, add
Templateto your file name. For example,Template_BlogorTemplate_Freelance_Contract. Whether you add it to the beginning, middle, or end of your file name, just pick one way to identify your templates, and stick to it.
Learn how to organize your files and folders, so you can find templates and important files faster.
Now that we've covered those ground rules, let's dive into how to create templates for common file types like text documents, presentations, and emails. I'll demonstrate this using the most popular apps for each category. If you use a different app, no worries—these strategies work on most platforms.
And if you want to make a template in a different type of app—perhaps to make notes in a CRM or to log data in a database builder app—the general tips still work there, too.
How to create document templates
Document templates are suitable for almost anything, including legal agreements, resumes, and meeting notes. You name it, you can create it. Here's how to build your own document template in popular word processing apps.
How to create a template in Google Docs
If you're short on time to create a nicely-formatted template, check out the Google Docs template gallery. It contains over 50 professionally-designed templates for things like project proposals, meeting notes, and cover letters, which you can use as is or modify to your needs.
But if you want to create a truly powerful template, here's how to build one from scratch.
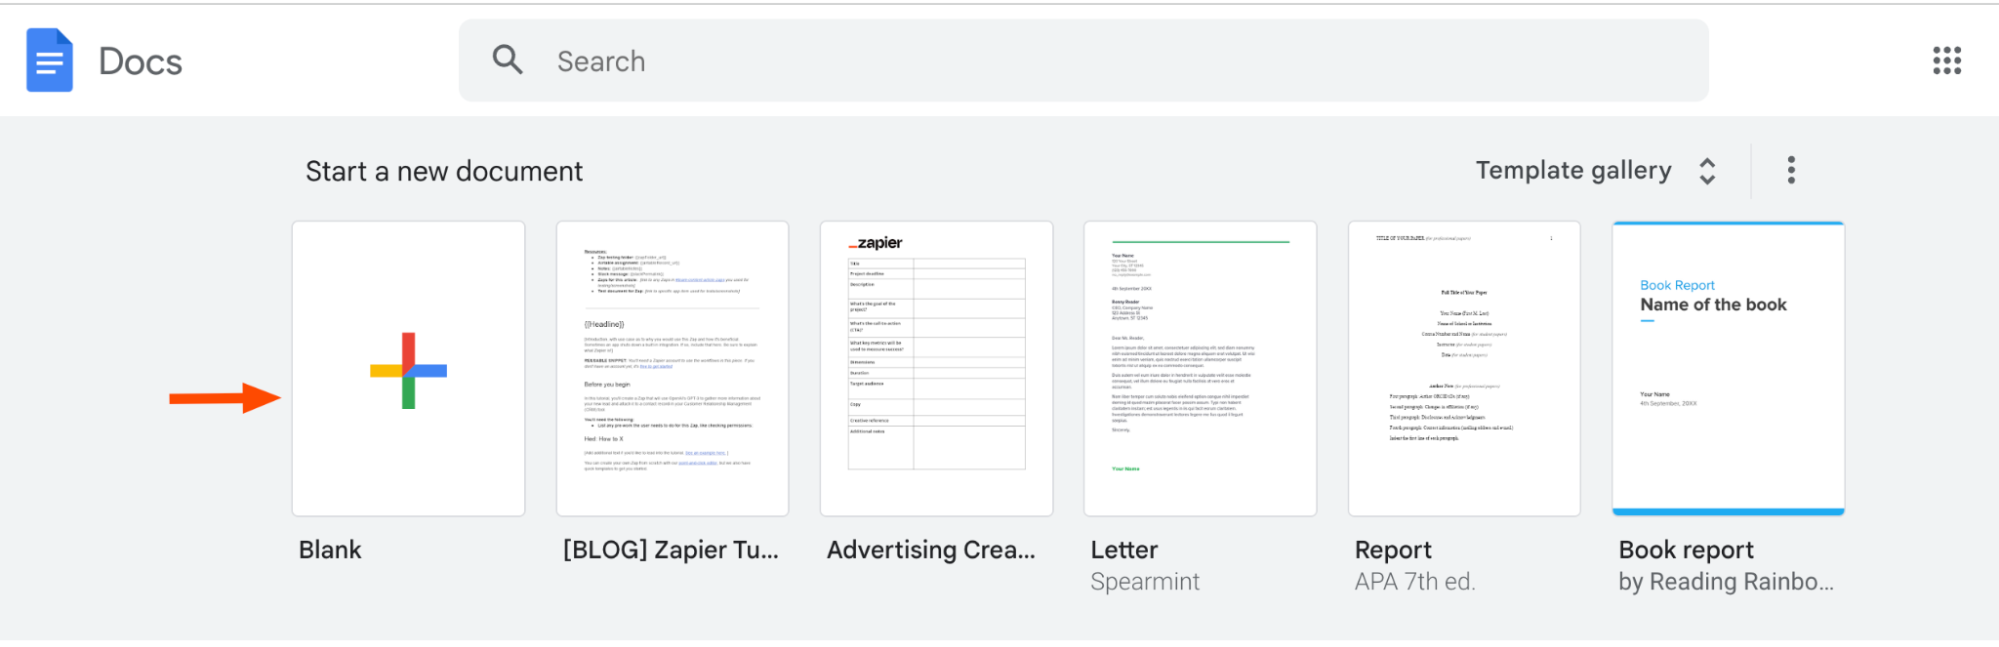
Go to https://docs.google.com/.
In the Start a new document section, click Blank.
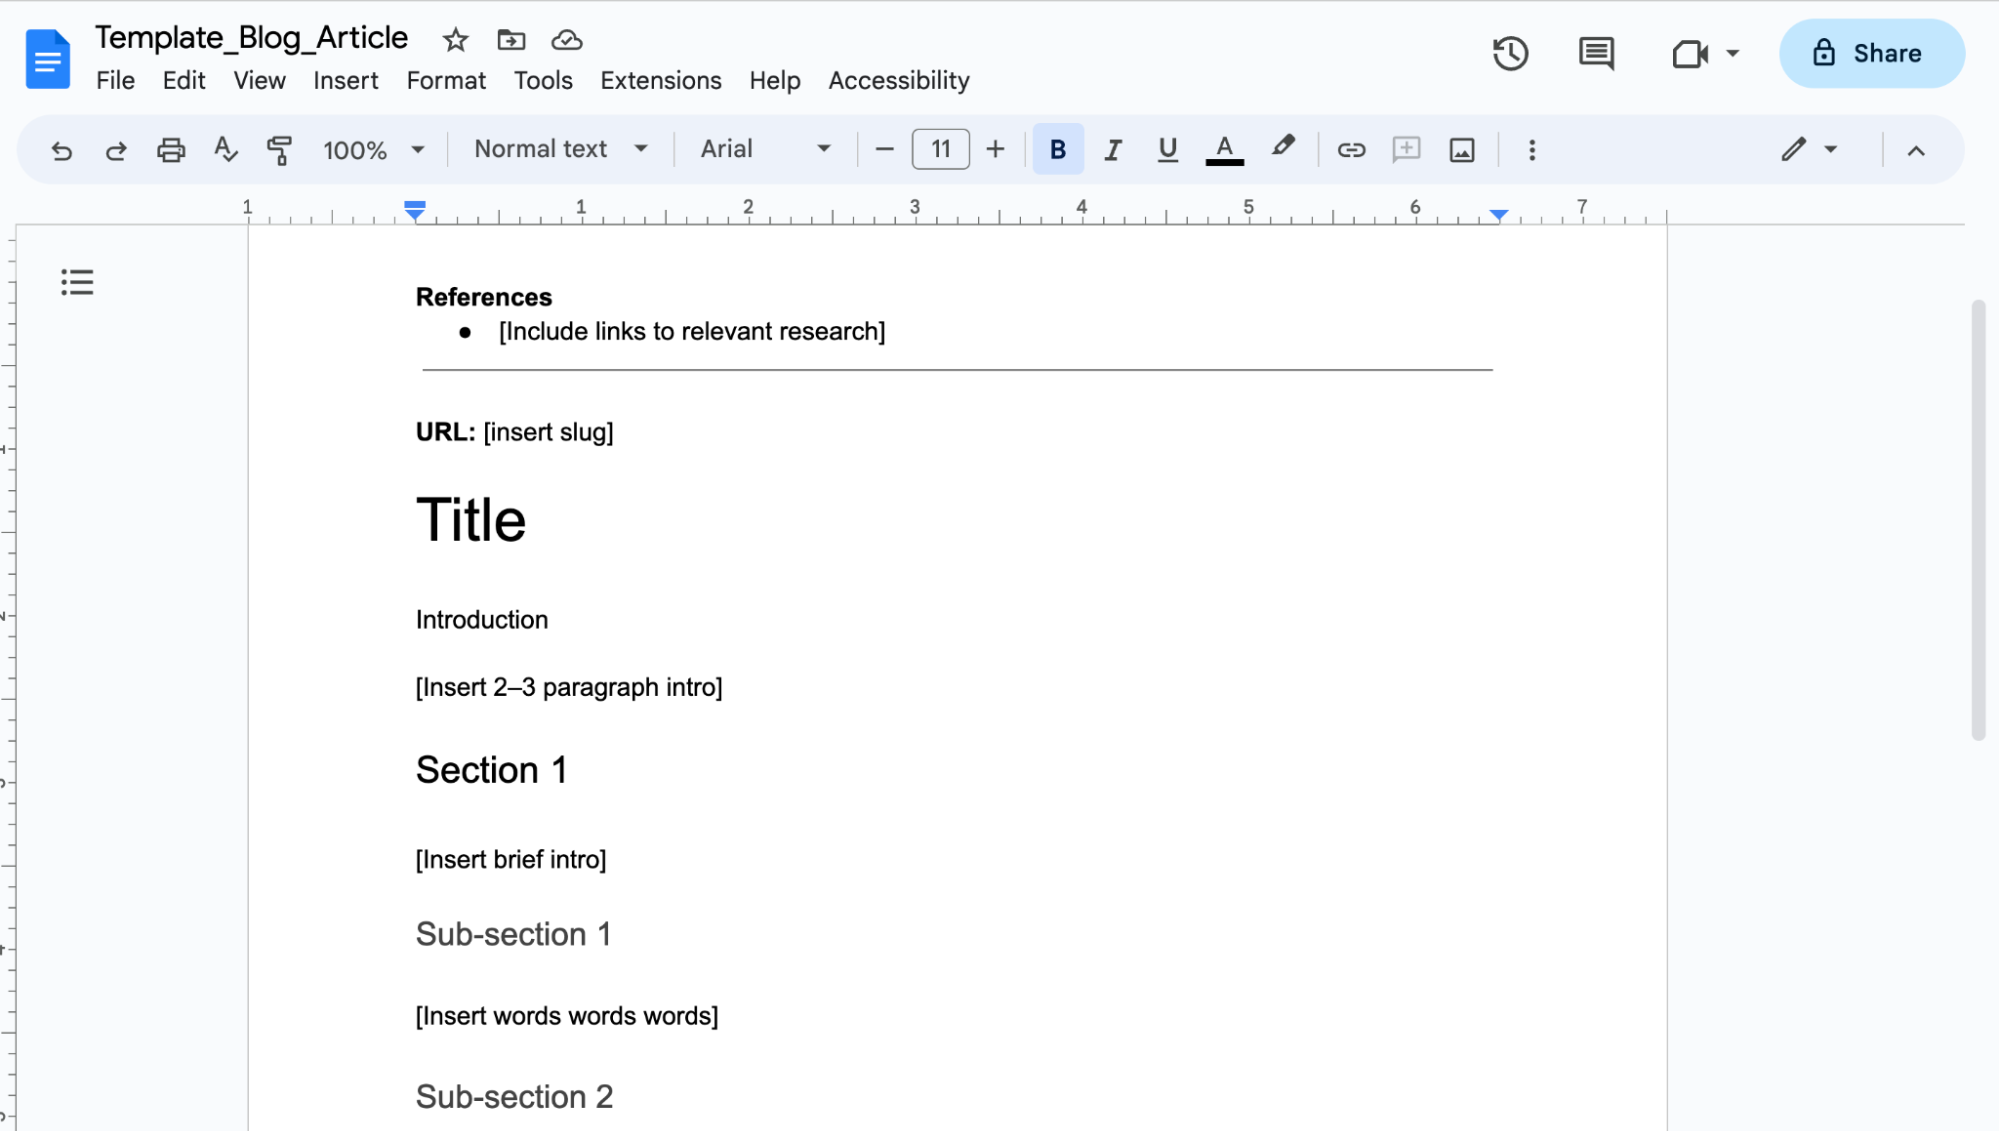
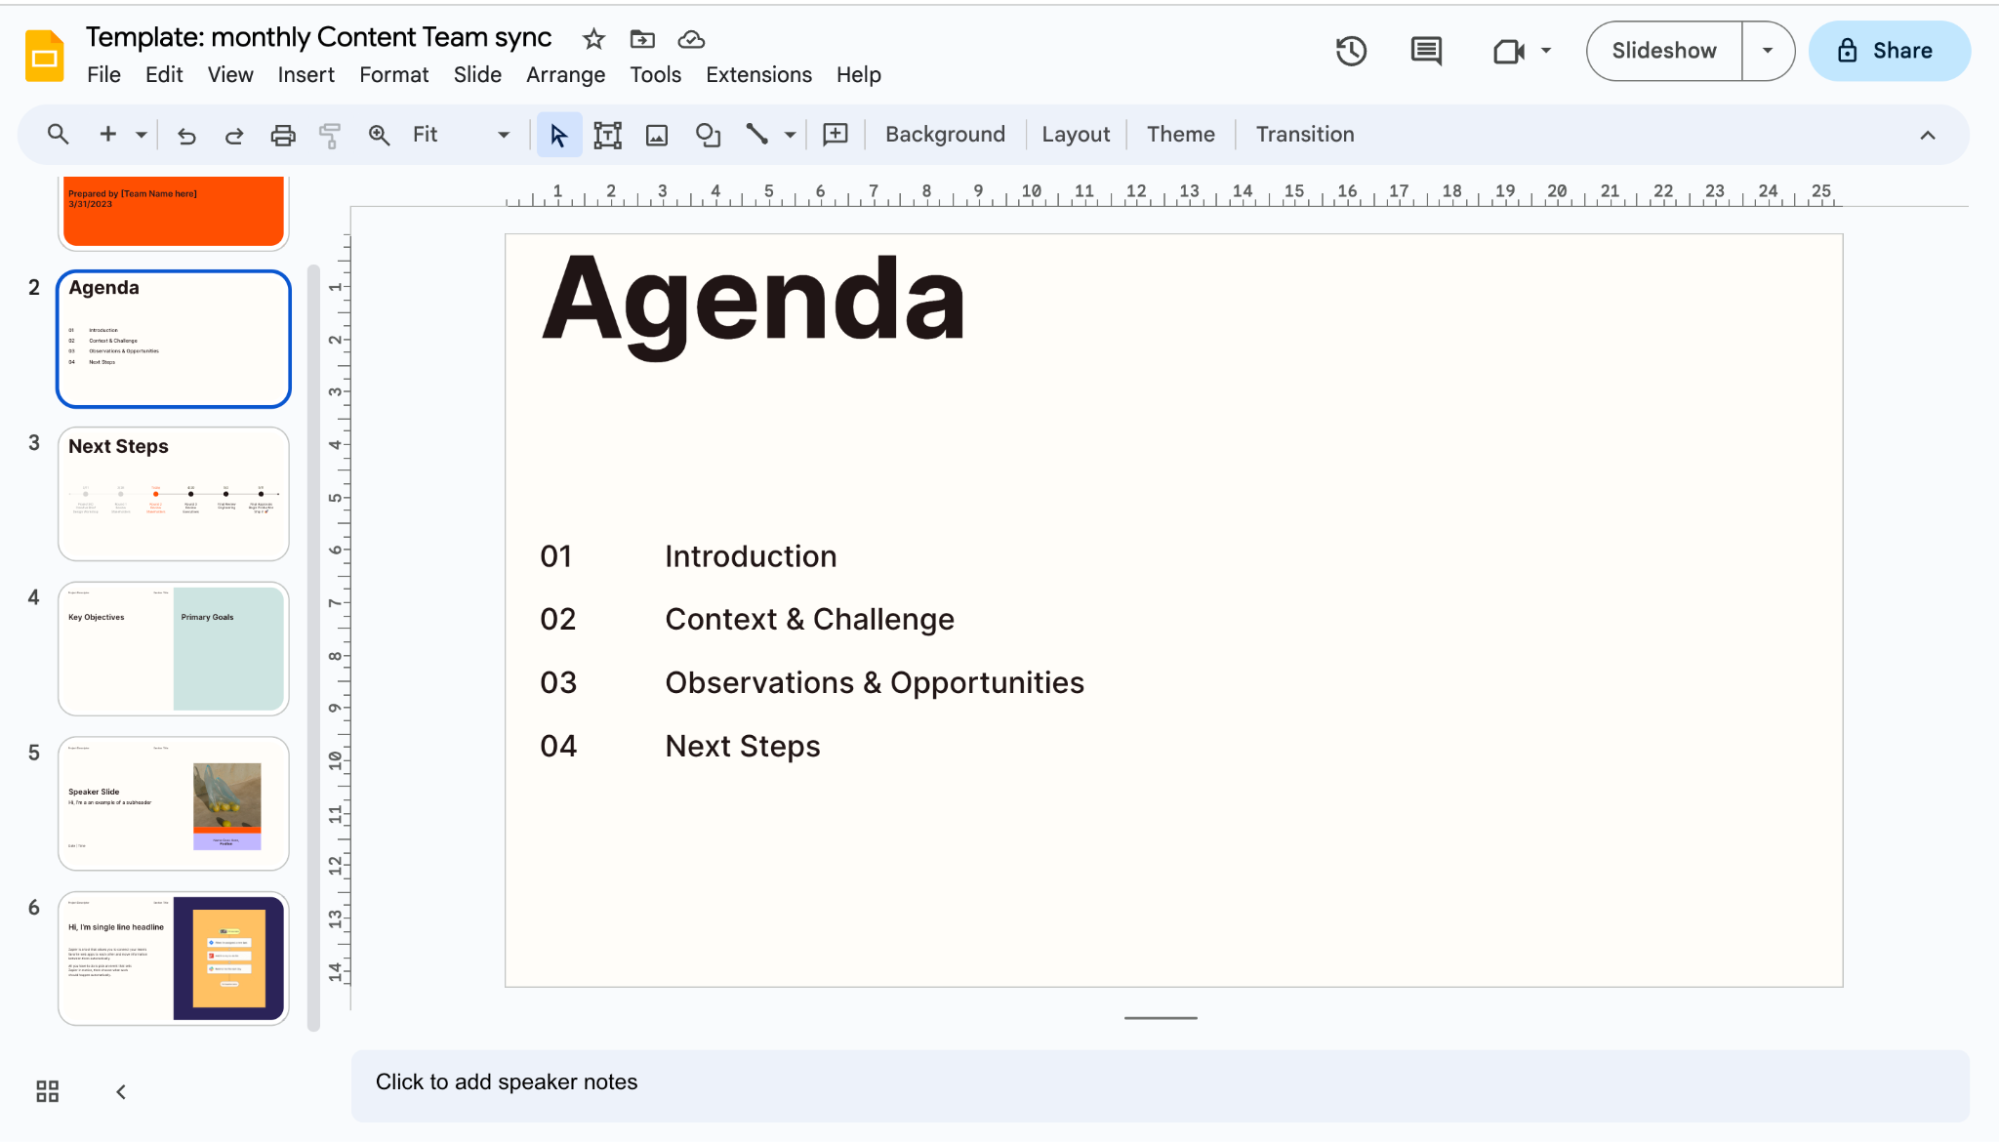
Create the framework for your document, including fill-in-the-blank fields, formatting, and your logo. Here's an example of a blog article template.
Google Docs automatically saves new documents, so all you have to do is give your template a clear name.
Then, the next time you need to make a document with this style, simply find the file in Google Drive, right-click it, and click Make a copy.


Save yourself a few extra steps. Learn how to automatically create and autopopulate a Google Docs template.
If you have a Google Workspace account, and you want to share your template with the rest of your team, here's how to add it to your organization's template gallery.
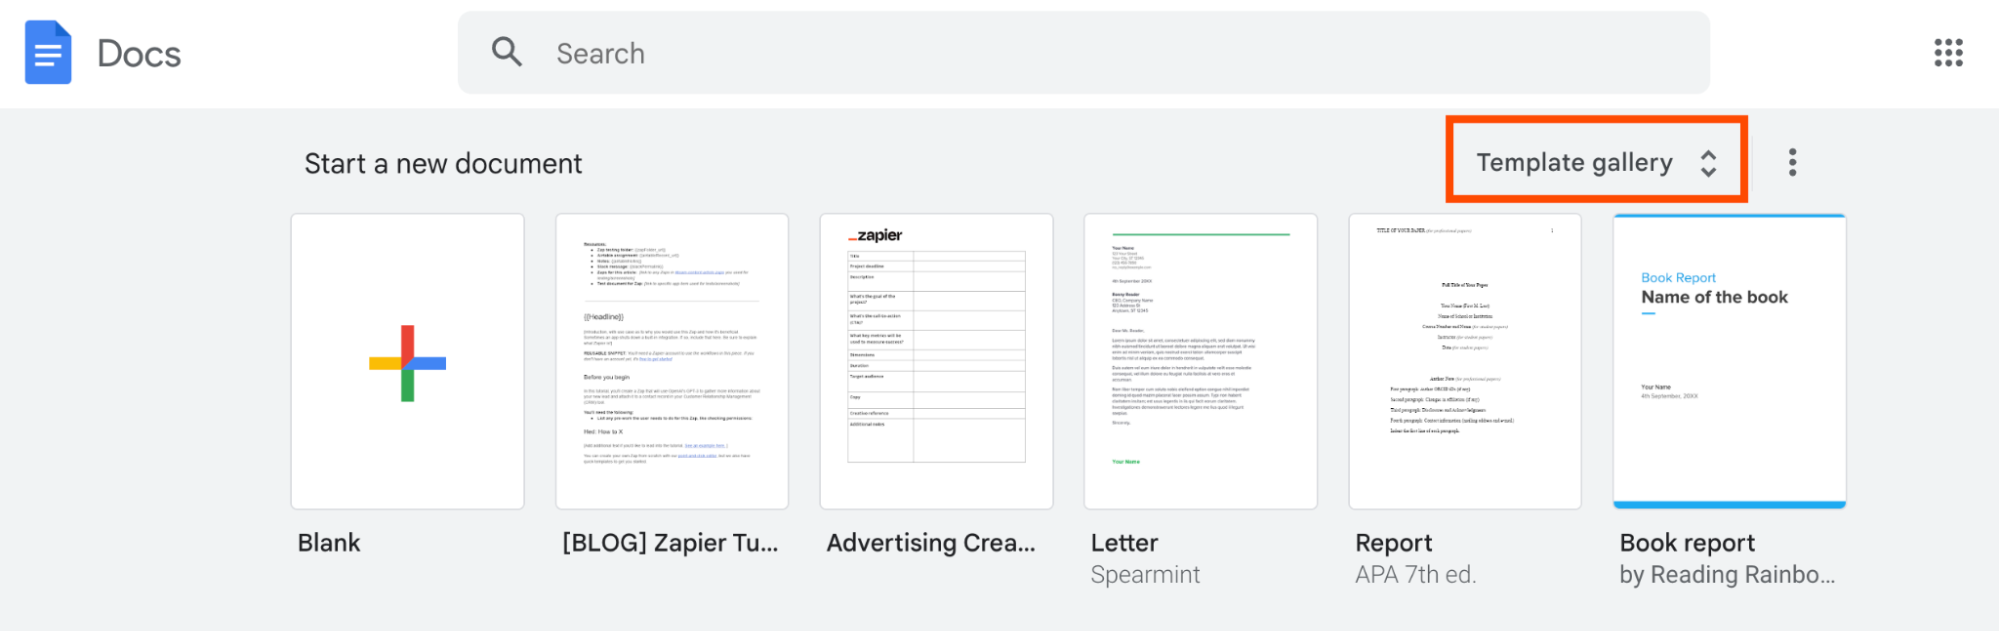
Go to https://docs.google.com/.
Click Template gallery.
By default, the Template gallery will display your organization's templates. (If not, click your organization name.) Click Submit template.

In the Submit a template window that appears, click Select a document.
Select your file, and click Open.
Choose the appropriate category for the template.
Click Submit.


Now your template is available company-wide.
How to create a template in Word
Like Google Docs, Microsoft Word is loaded with pre-made templates—from meeting agendas to cover letters to business trip checklists. To access them using the web version of Word, click See more templates in the Create new section. If you're using the desktop app, click More templates in the Home tab.

For whatever reason, Word only displays a small sampling of its templates. To find more templates, or search for specific ones, check out the template library.
If you want to create your own template, here's how.
Click Blank document.
Create your template as you normally would.
Once you've created your template, click File > Save as, and then click Save as once more.
In the Save As window that appears, give your template a recognizable file name, and click Save.
If you're using the desktop app, click File, and then click Save as template. The File Format will automatically save as
.dotx(Microsoft Word template).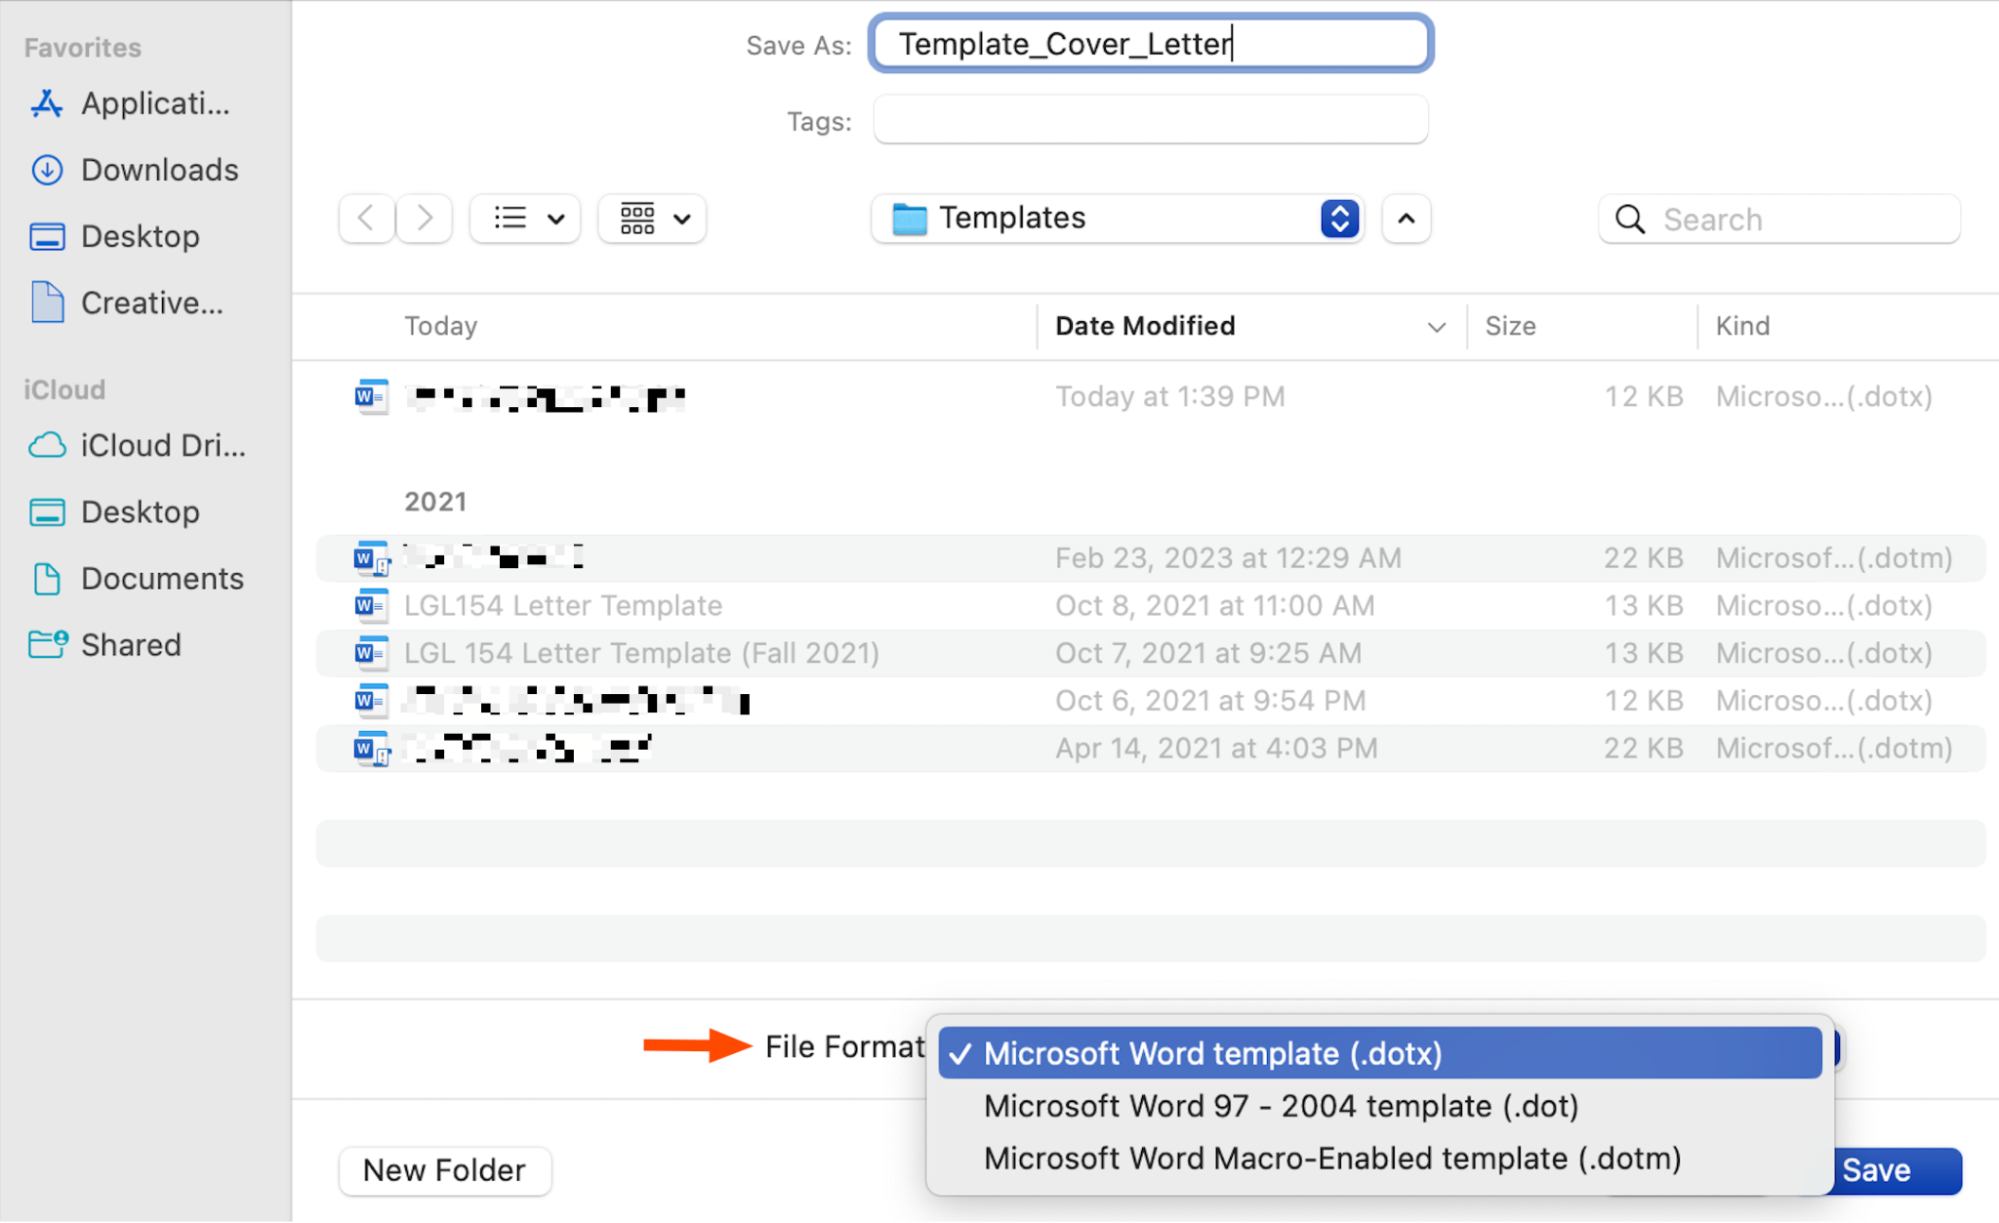
When you want to create a new document using that template, open the Word app, click New, and then choose your template. The convenient thing about
.dotxfiles is that they open as brand new documents, so there's no risk of writing over your original template.

If you're using the web version, you can't save the file as a Word template. Instead, whenever you need to use it, you'll have to make a copy and edit as needed.
How to create presentation templates
The general approach to creating document templates also applies to creating presentation templates: create a base presentation with your desired structure and formatting, then duplicate and modify it each time you need to present something.
If you want to reuse specific slides across different presentations—perhaps a slide with your business plan, company statement, or goals—most apps offer ways to copy individual slides from one presentation to another without sacrificing design.
Here's how to do it in Google Slides, but you can apply similar steps in Apple Keynote and Microsoft PowerPoint.
How to create a template in Google Slides
Google Slides is a good go-to for presentations because it's cloud-based. This means you can access your templates from anywhere, so long as you have internet access.
Similar to Google Docs, you can use pre-built Google Slides templates. Or you can create your own.
Create your presentation framework.
As with most other Google apps, your presentation will save automatically. Just remember to give it a search-friendly name.
Next time you need to present something using this framework, find the file in your Google Drive, right-click it, and click Make a copy.

If you want to copy individual slides from one presentation to another, without losing the formatting, here's how.
Right-click the slide you want to copy, and use your keyboard shortcut to copy:
command+Con a Mac orCtrl+Con Windows.In your new Google Slides presentation, right-click anywhere in the filmstrip, and use your keyboard shortcut to paste:
command+Von a Mac orCtrl+Von Windows.In the Import Slides window that appears, click Keep original styles. This will maintain any formatting applied to the original slide.
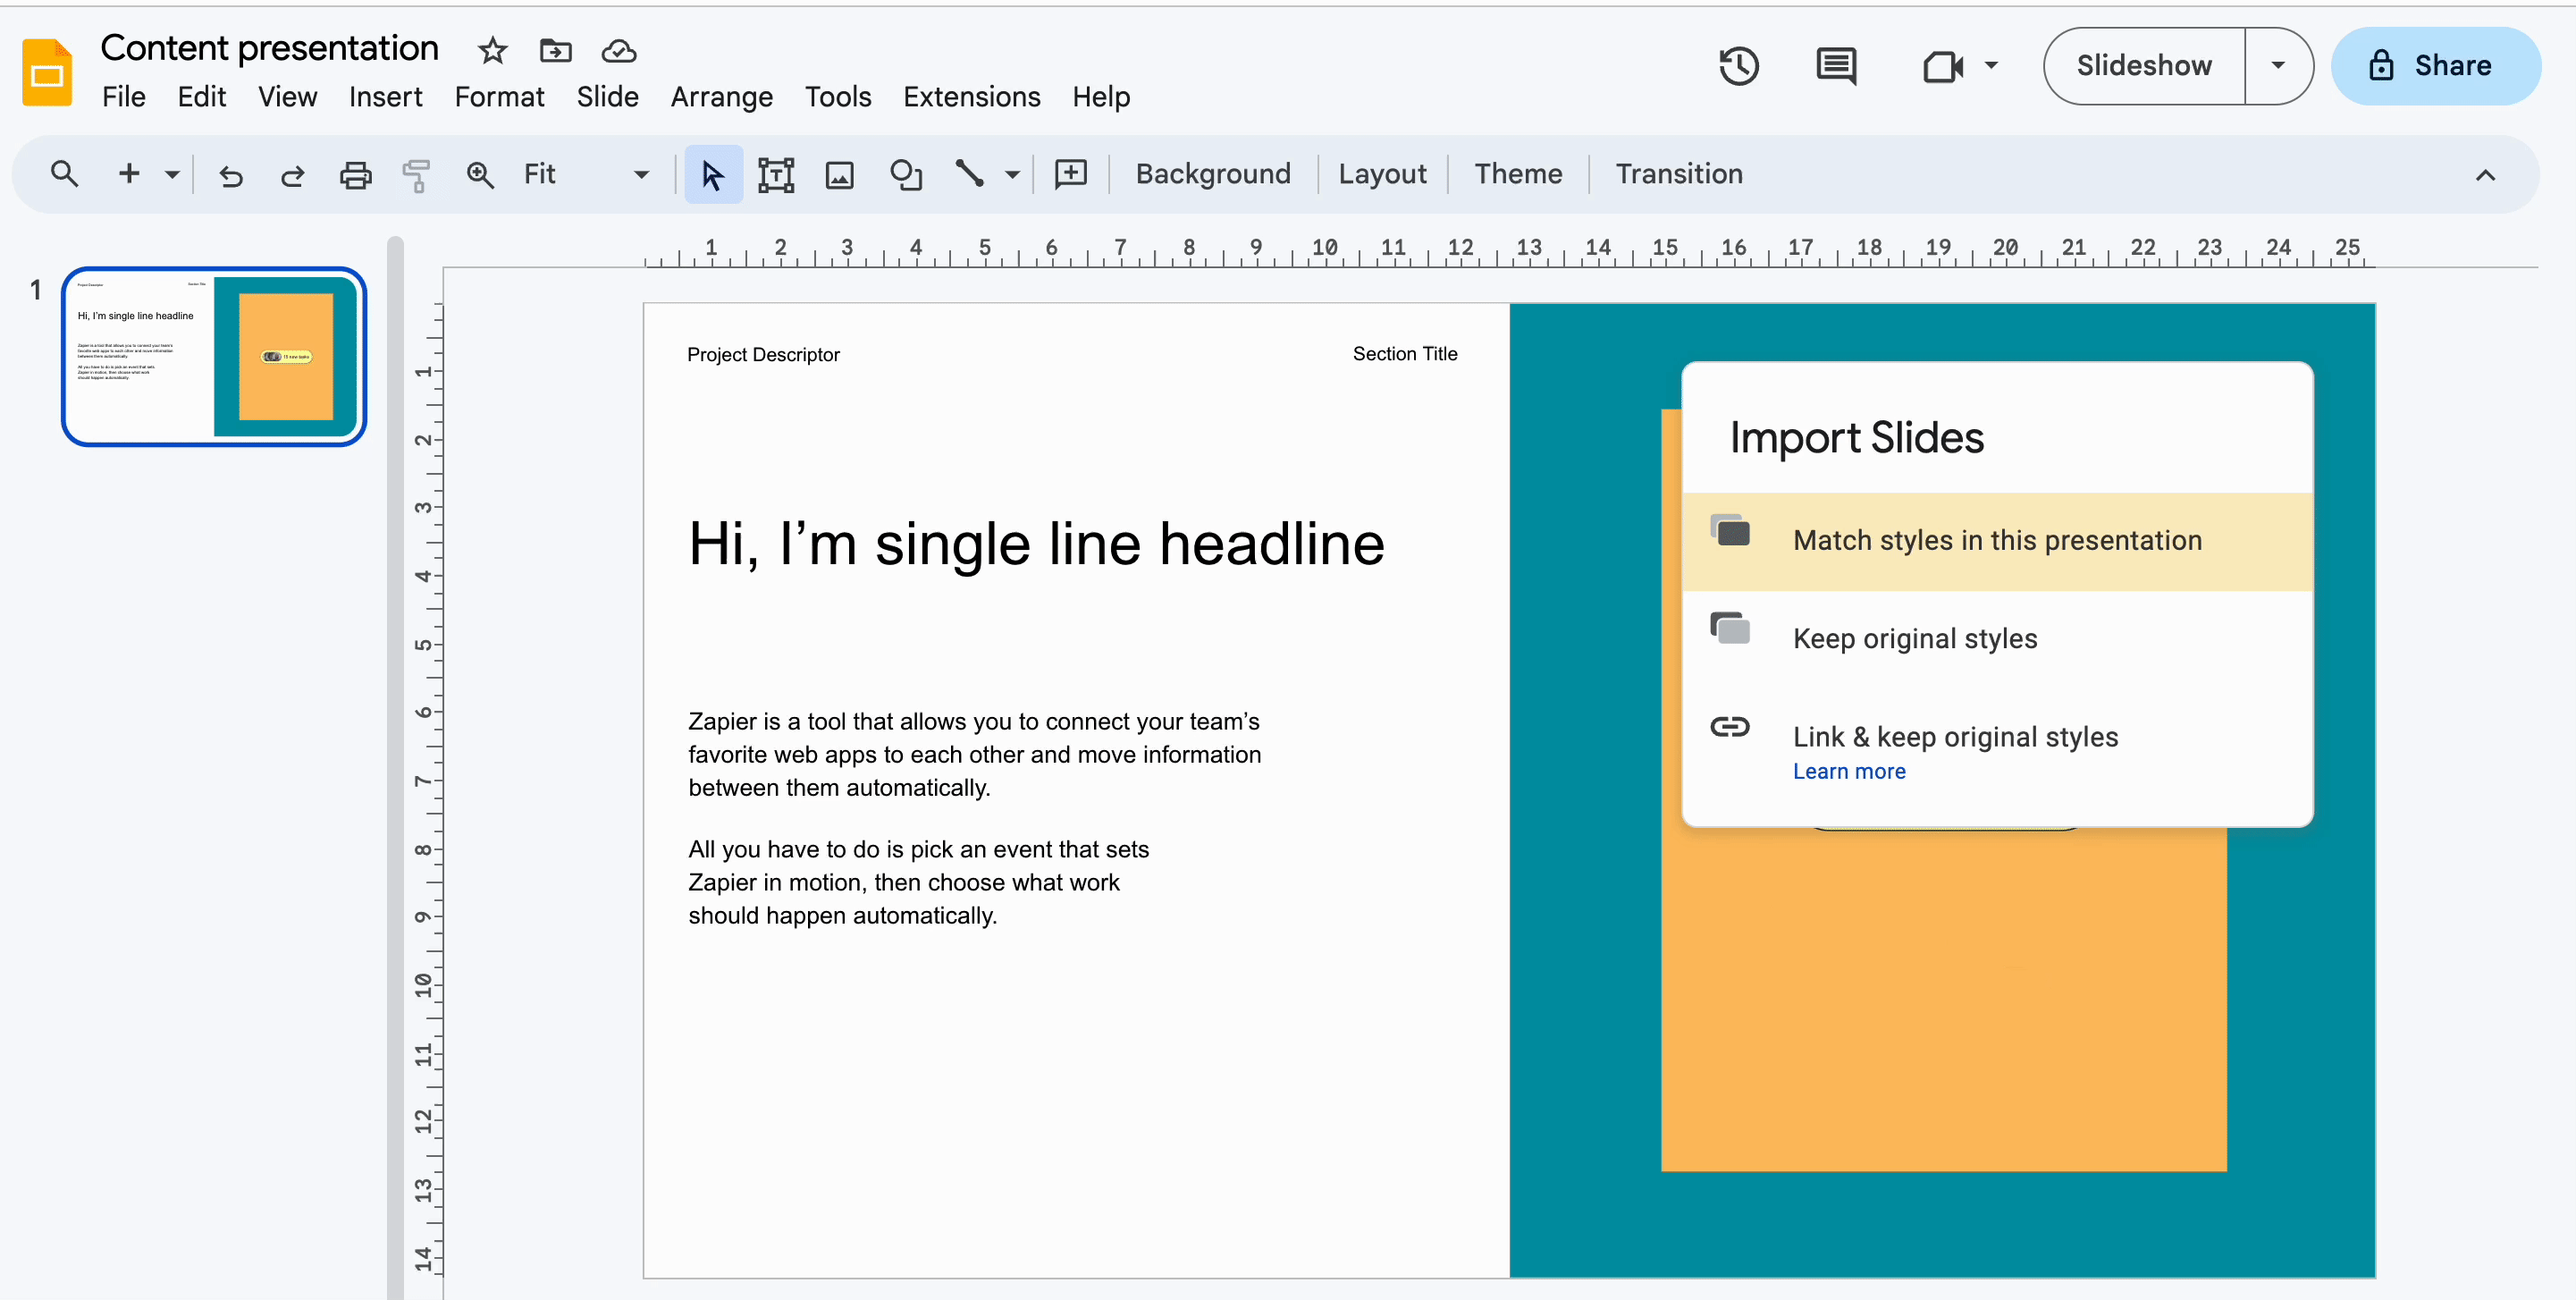

In the GIF above, notice how the text font and presentation colors change after I click Keep original styles. That's what you want. If you click Match styles in this presentation, you'll lose the desired formatting.
Want to create a presentation using something other than Google Slides or Microsoft PowerPoint? Check out our roundup of the best online presentation tools.
How to create spreadsheet templates
If you're not making spreadsheets for fun, you're probably using them for something arguably more practical: budgets, timesheets, project management, reporting—you get the idea.
Instead of manually entering complex formulas every time you need to crunch large amounts of data, use a spreadsheet template.
How to create a template in Google Sheets
Need to quickly whip up an invoice? Or maybe a project timeline that includes progress bars? These are just a few of the templates you can find in Google Sheets' template gallery. The best part is that a lot of them come fully loaded with the formulas you'd likely need, so you don't have to plug them in yourself.

To create your own template, and to share it with others in your Google Workspace, the steps are nearly identical to what you'd do for Google Docs.
How to create a template in Excel
If you're crunching large amounts of data, you're probably doing it in Microsoft Excel—it's one of the most powerful and popular spreadsheet tools for good reason.
There's an Excel template for almost every purpose imaginable. Just do a quick search in your browser for Excel template [use case], or check out Excel's template library, and you'll get what I mean. There are lots of free options out there, so please don't feel compelled to purchase a template.
And if none of those fit the bill, you can create your own.
Open the workbook you want to convert into a template.
Click File, and then click Save as template.
By default, the file will save as a
.xltxformat, but if your file contains macros (automated action in the spreadsheet), change the file format to.xltm(Excel Macro-Enabled Template).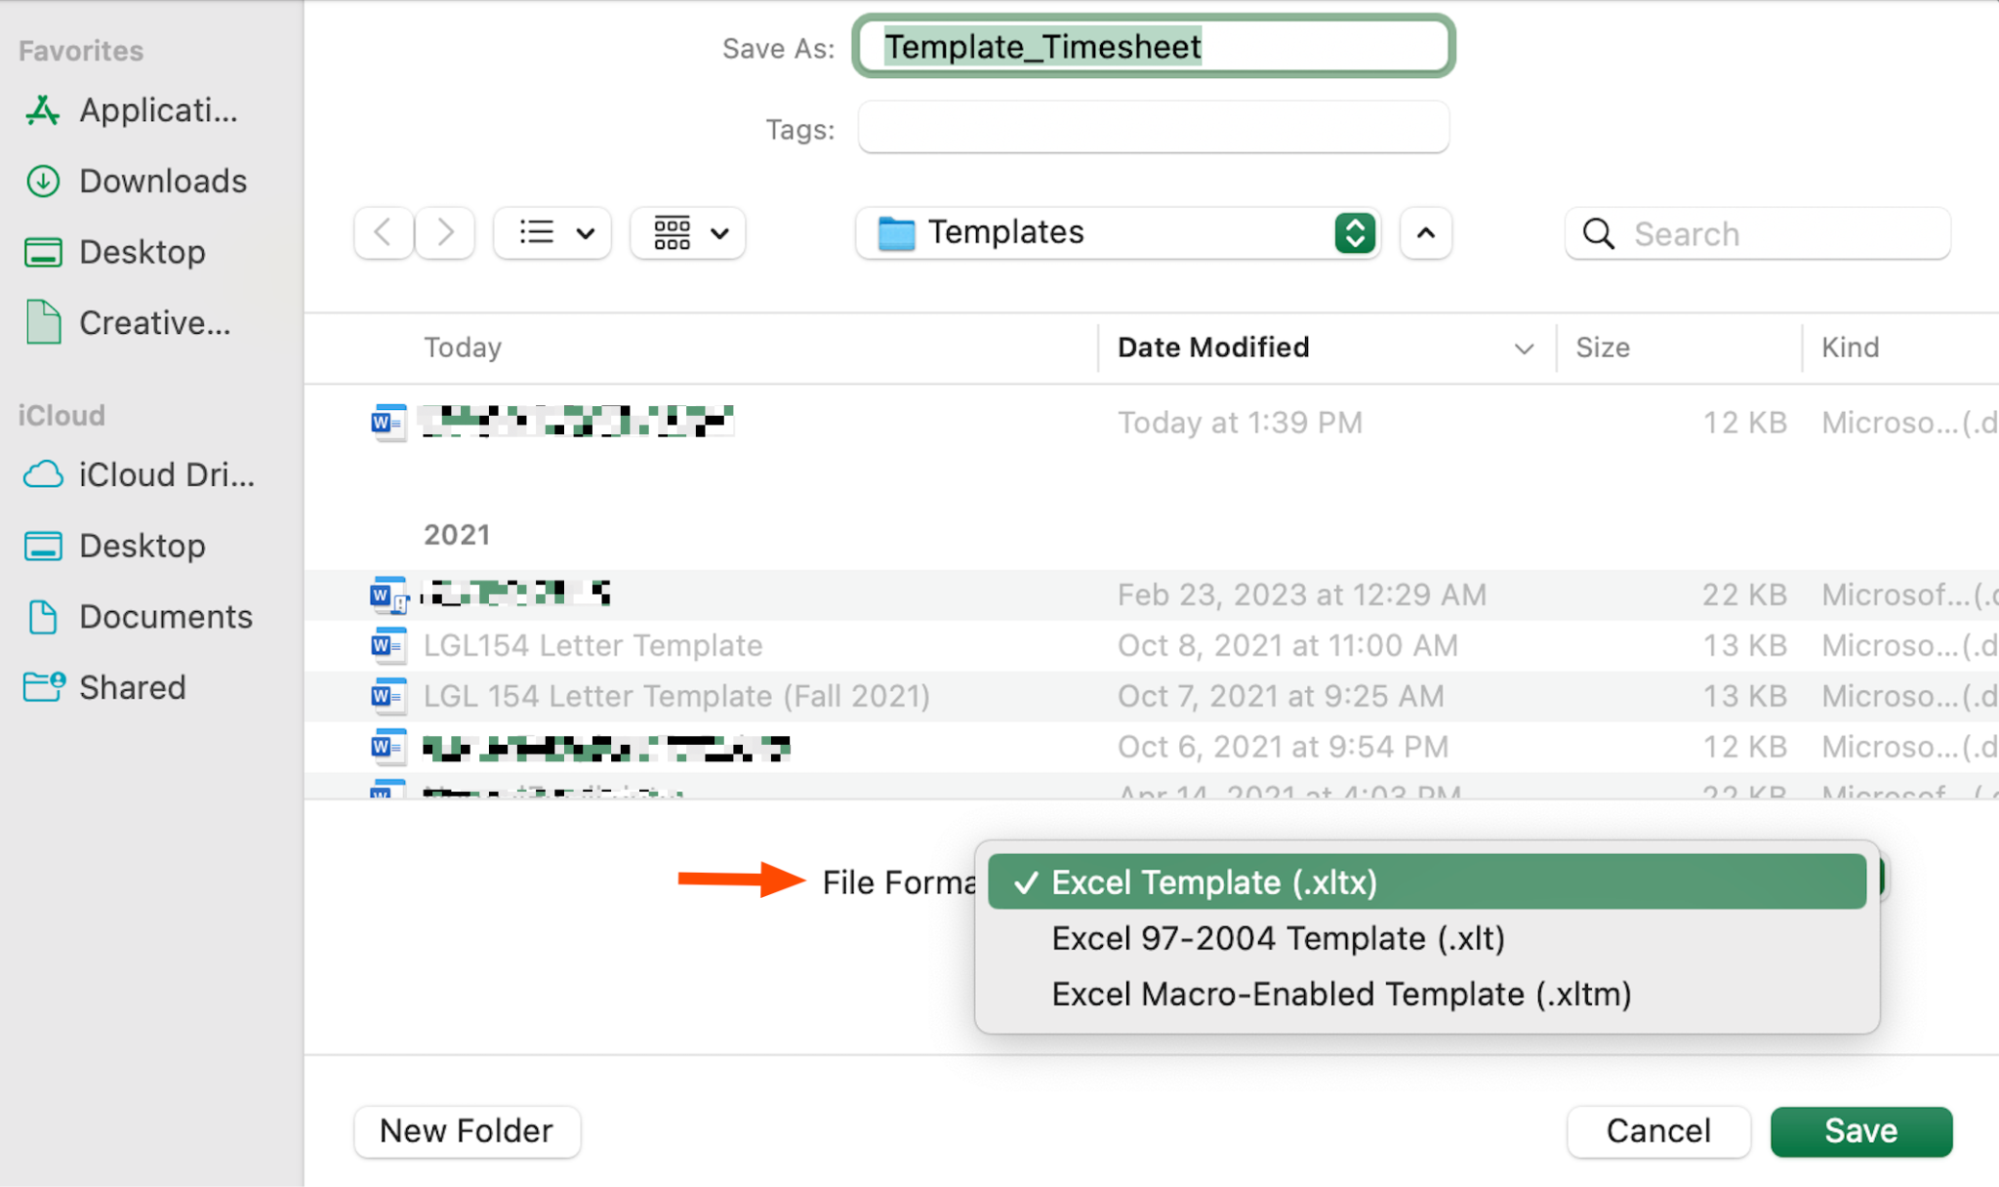
When you need to create a new spreadsheet using that template, open the Excel app, click New, and then choose your template.

Note: If you're using the web version of Excel, you can't save your file as .xltx (Excel template). Instead, you'll have to save your file as the default .xlsx, and then make a copy of it every time you want to use it.
Learn how to automate Microsoft Excel, so you can do tasks like log form submissions, send team updates, and sync databases—without lifting a finger.
How to create project management templates
Using project management templates doesn't just cut down on setting up workflows—it also helps you leverage processes that have worked in the past. Here's how to set up a template in popular project management apps.
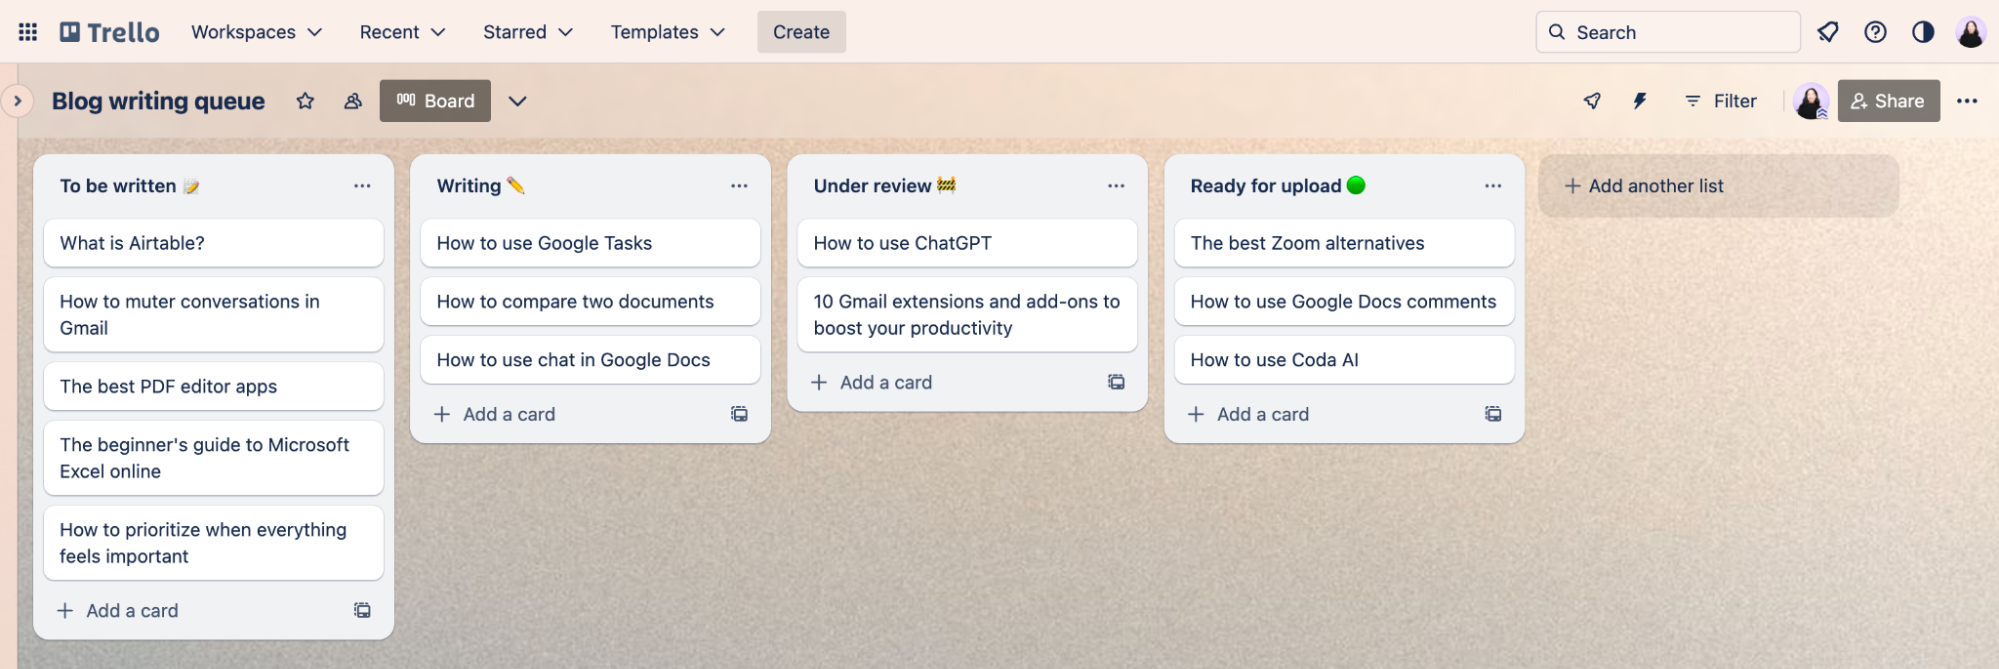
How to create a project management template in Trello
Trello is a terrific tool for managing all sorts of projects: weddings, vacations, reading lists, and, you know, work stuff.
In Trello, projects are organized into separate groups called boards. Within each board, you can create an unlimited number of lists that you can fill with cards for specific tasks. Here's how to create a project management template.
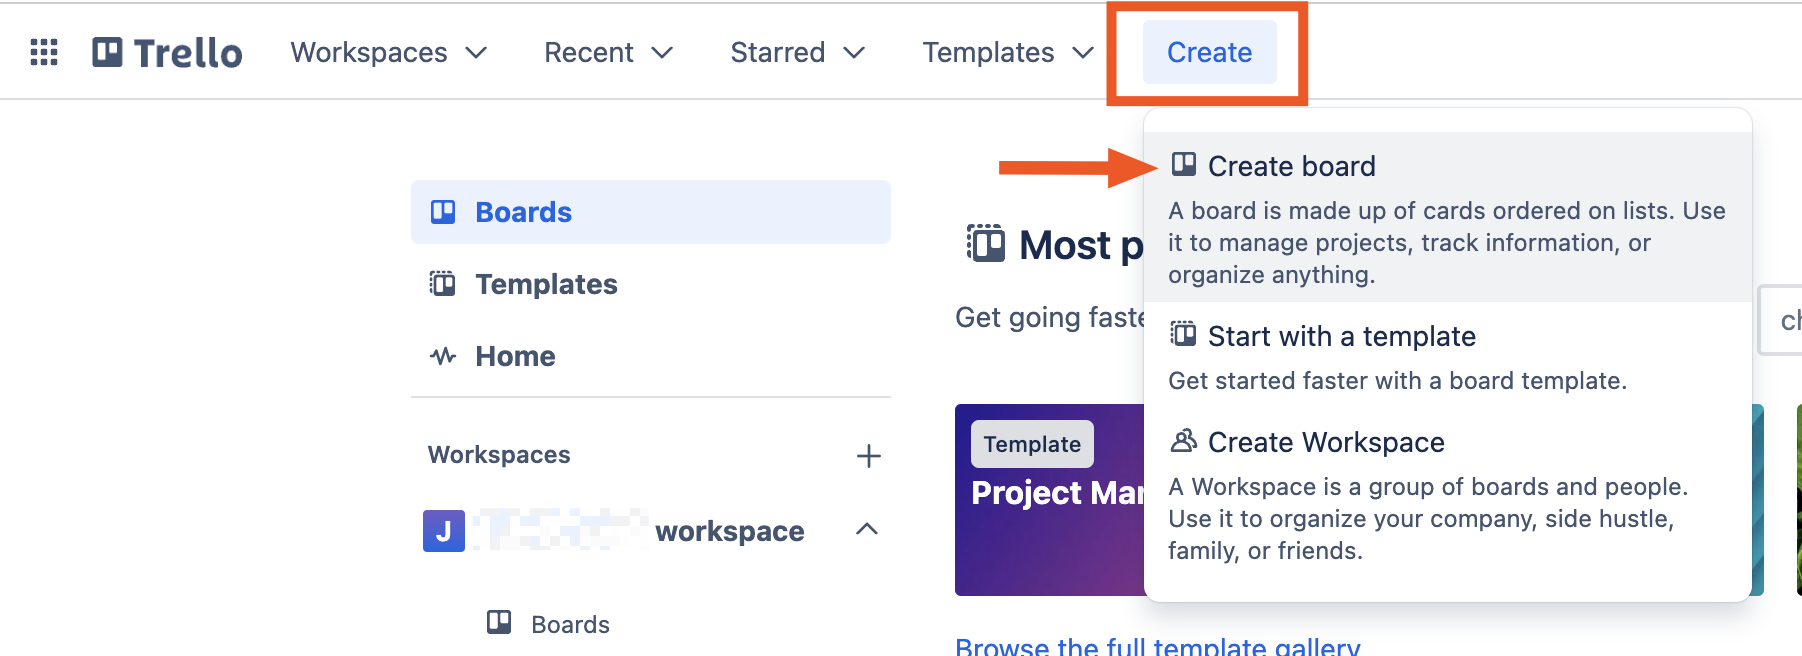
In the Trello menu bar, click Create, and then click Create board.
Give your board a title, and then click Create. You can also change the board background and visibility (Private, Workspace, and Public).
Add the appropriate lists, and then flesh them out with the relevant cards, attachments, project members, and descriptions.
When you want to reuse this template, click the Menu icon, which looks like an ellipsis (
...), and then click More.
Click Copy board. Give your board a title, and then click Create.


If you don't want to create a board from scratch, you can copy one from Trello's rich library of templates. Before you copy the board, you can deselect Keep cards to reuse only the old project's list structure—not its existing cards.

And if you don't want to template an entire board, you can also create card templates. This way, you can quickly create tasks, including notes, attachments, and assignees, faster.
How to create a project management template in Asana
Asana recommends creating project templates for processes with five or more steps. (For processes with fewer than five steps, you're better off creating task templates.) To build a project template, you can use Asana's pre-built templates, or you can create your own.
To do the latter, you need to first create a project. Here's how.
From the Asana home page, click Create, and then click Project.
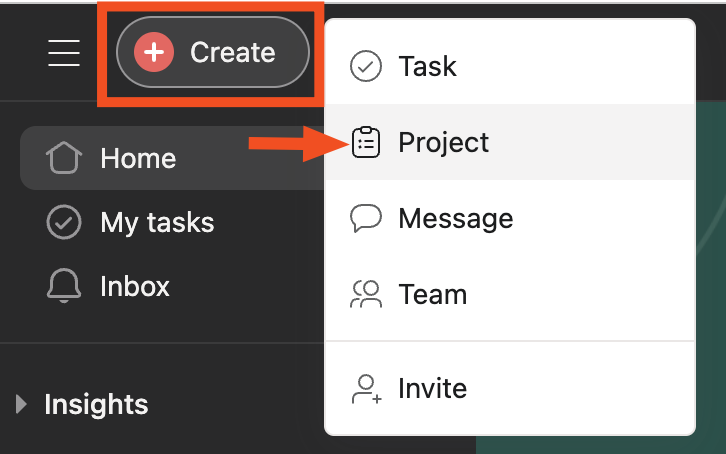
In the Create a new project section, click Blank project.

Give your project a name. You can also modify the privacy settings (Public to team or Private to project members) and view (List, Board, Timeline, or Calendar).

In the What do you want to do first? section, click Start adding tasks, and then click Go to project.
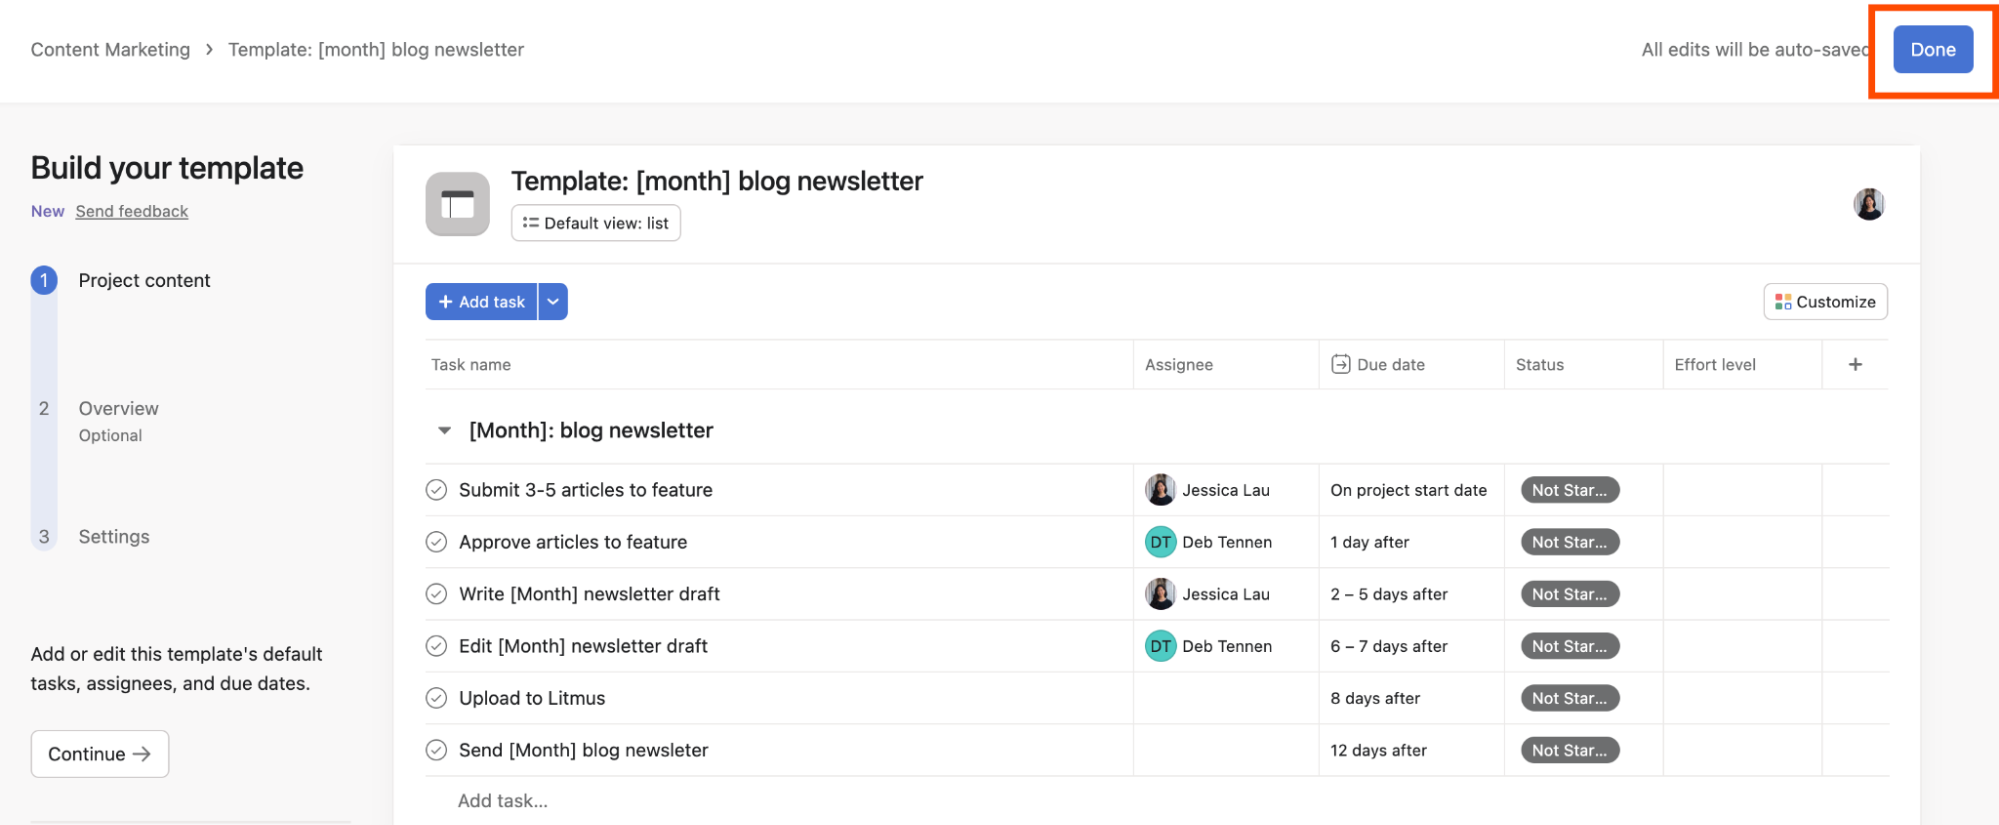
Fill in your project template with the relevant sections and tasks. You can also pre-assign tasks with due dates and attachments. The due dates will automatically adjust based on the start and finish dates used when the template is copied.
Click the Project Actions icon, which looks like a down caret (
⋁), and then click Save as template.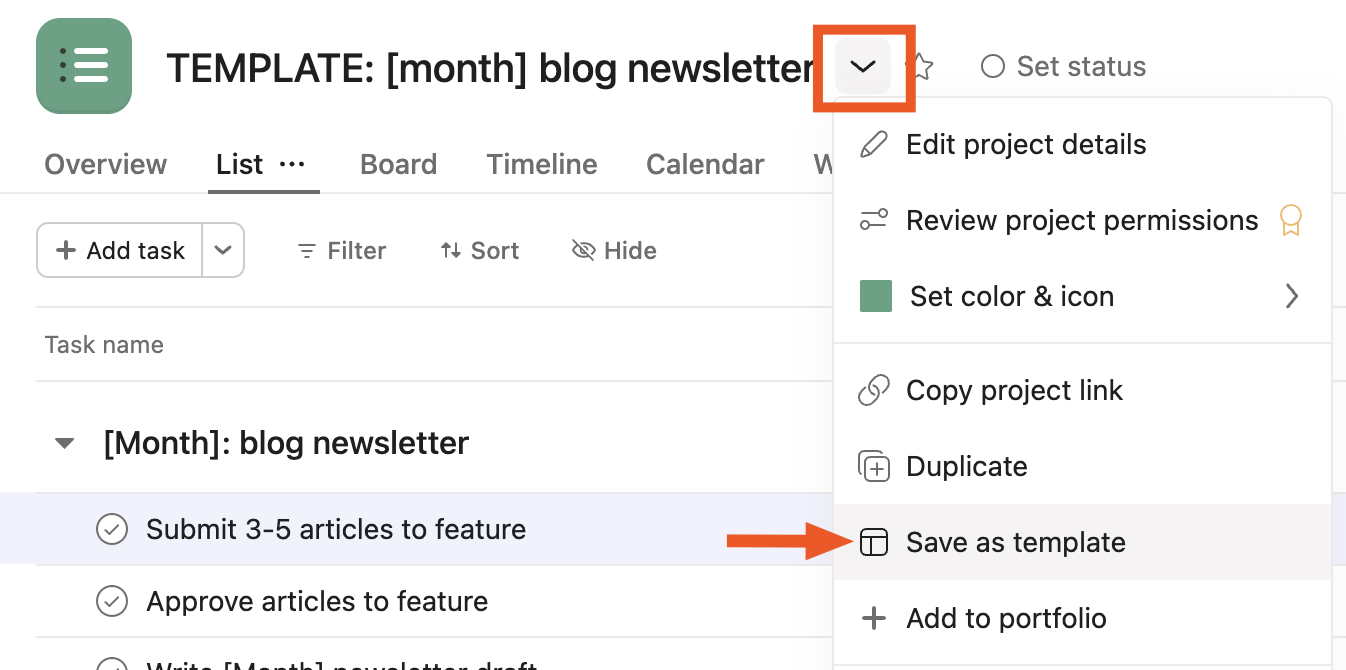
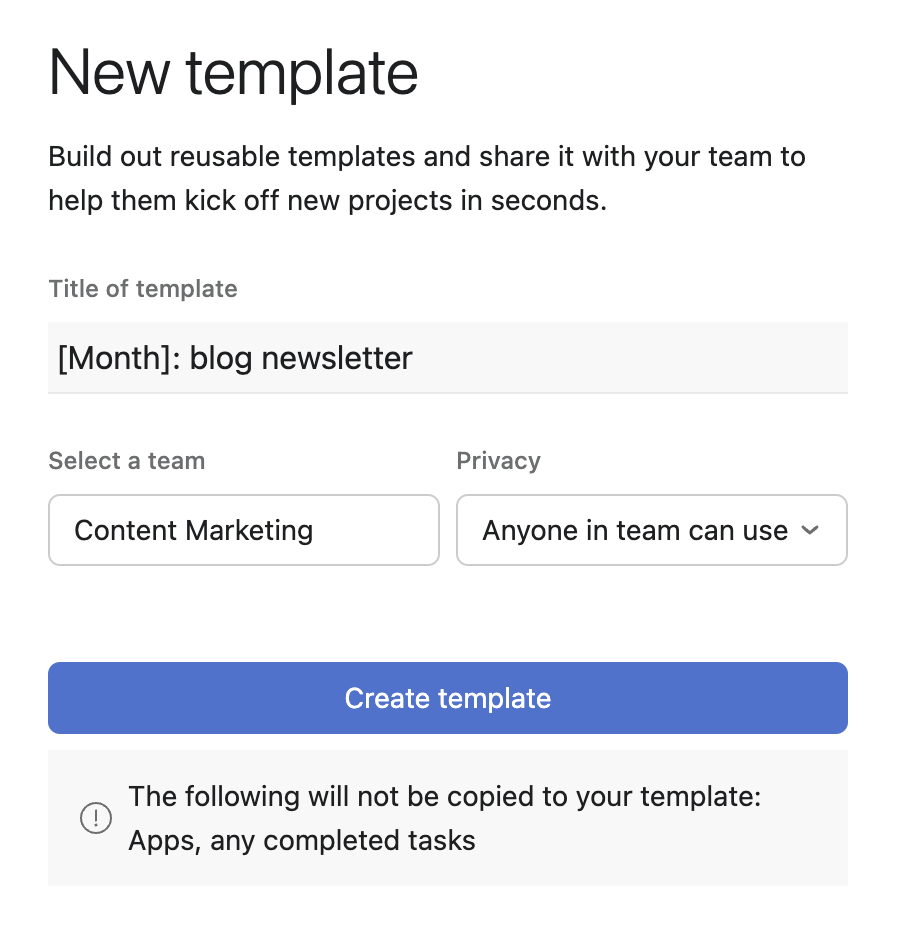
In the New template window, give your template a title, and change the privacy to Anyone in team can use. Then click Create template.
Review your template, and then click Done.
When you want to use the template, start a new project as you normally would, but click Use a template.
In the templates panel, scroll through the existing templates to find the one you want to use. Or, if your organization has a lot of public templates, click the Types dropdown (by default, this is set to All types), click Custom, and then filter by Teams and Layout.
Click the template you want to use, and then, in the template preview area, click Use template.

Give your new project a name, choose a project start date, and then click Create project.


Debating between Trello and Asana? Find out how these two project management apps stack up in our showdown: Trello vs. Asana.
How to create form and survey templates
Form and survey design is a mix of art and science: you have to find the just-right combo of questions, wording, design, and formatting. But once you've found the winner, create a template in your go-to survey or form builder, so you can repeat your success again and again.
SurveyMonkey
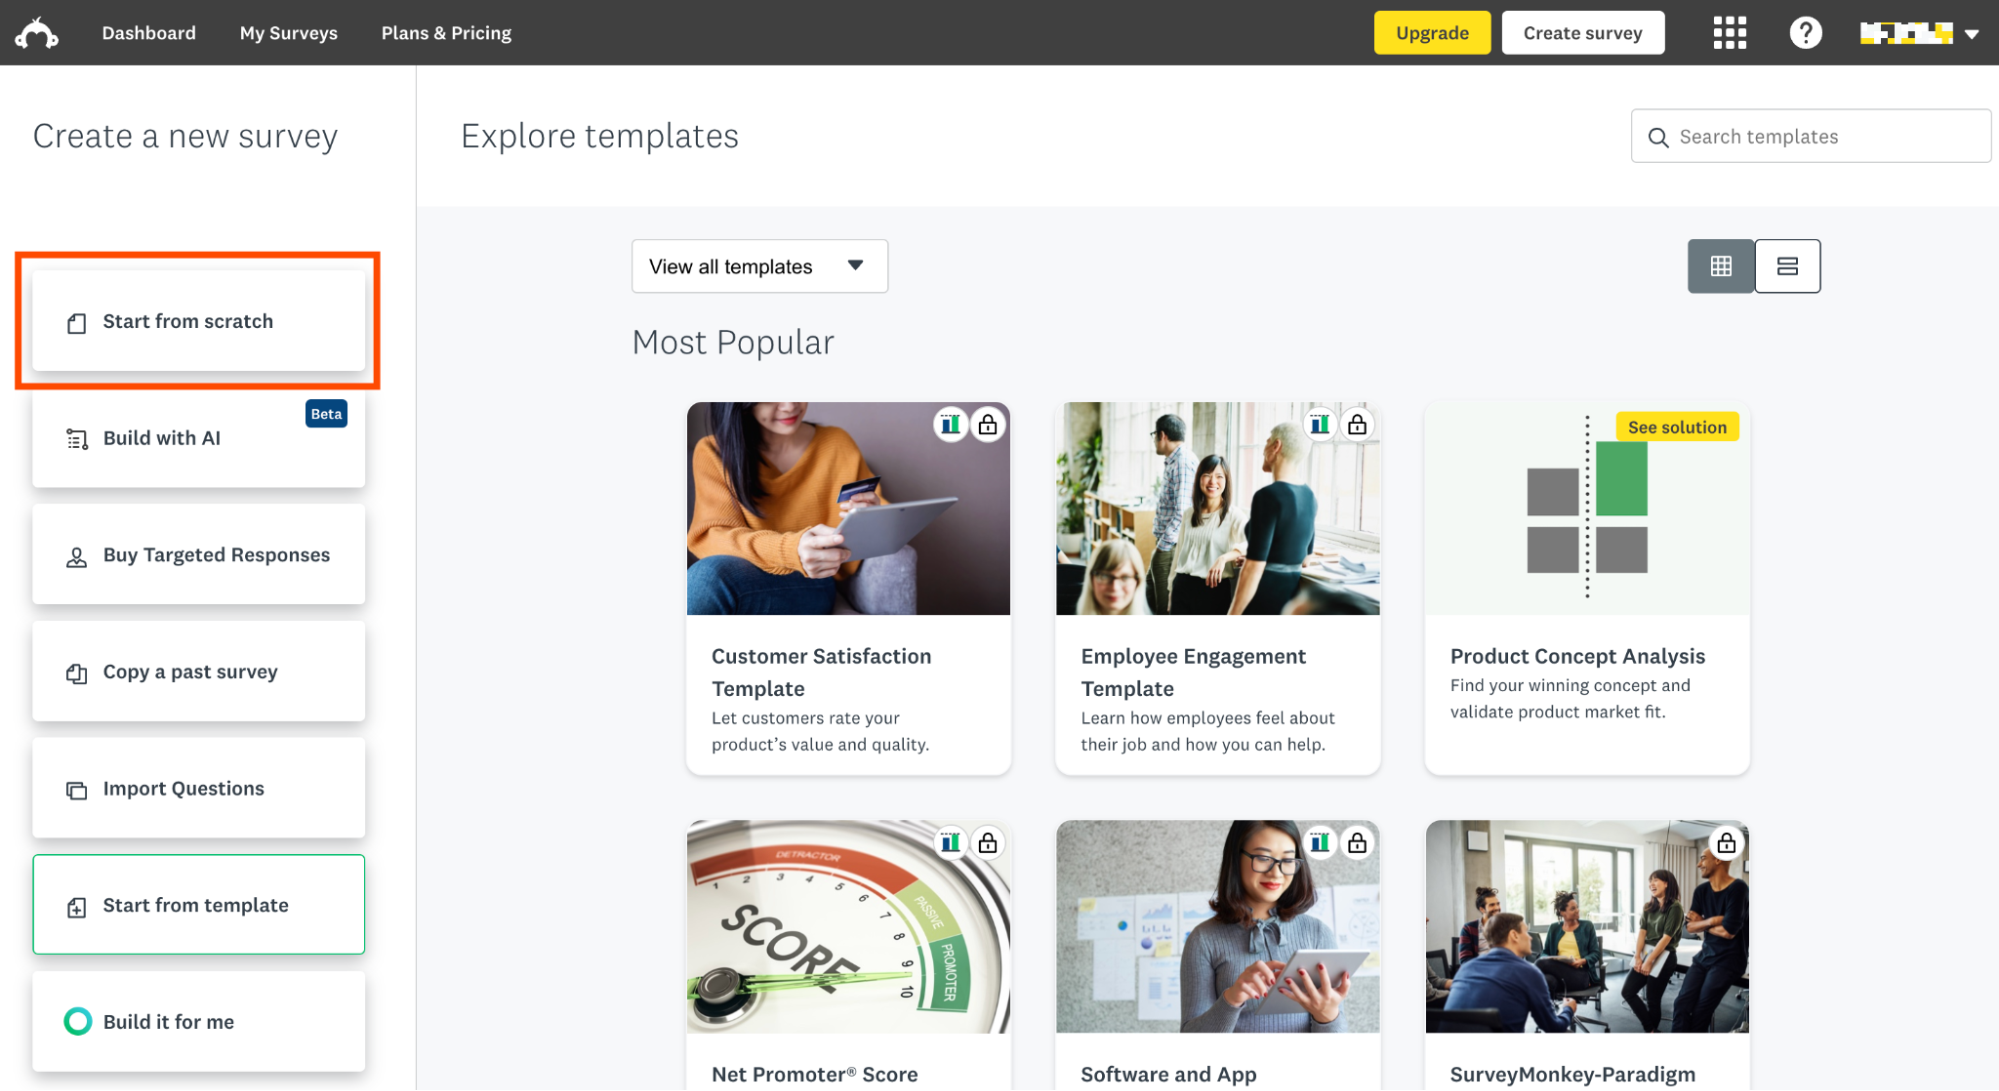
There are three ways to create a survey template using SurveyMonkey: create your own, build with AI (in beta as of this writing), or use one of their over 150 ready-to-use templates. Here's how to create a survey template from scratch.
In the Create a new survey panel, click Start from scratch.
In the New survey window that appears, give your survey a title. Then click Create survey.

Create your survey as you normally would.
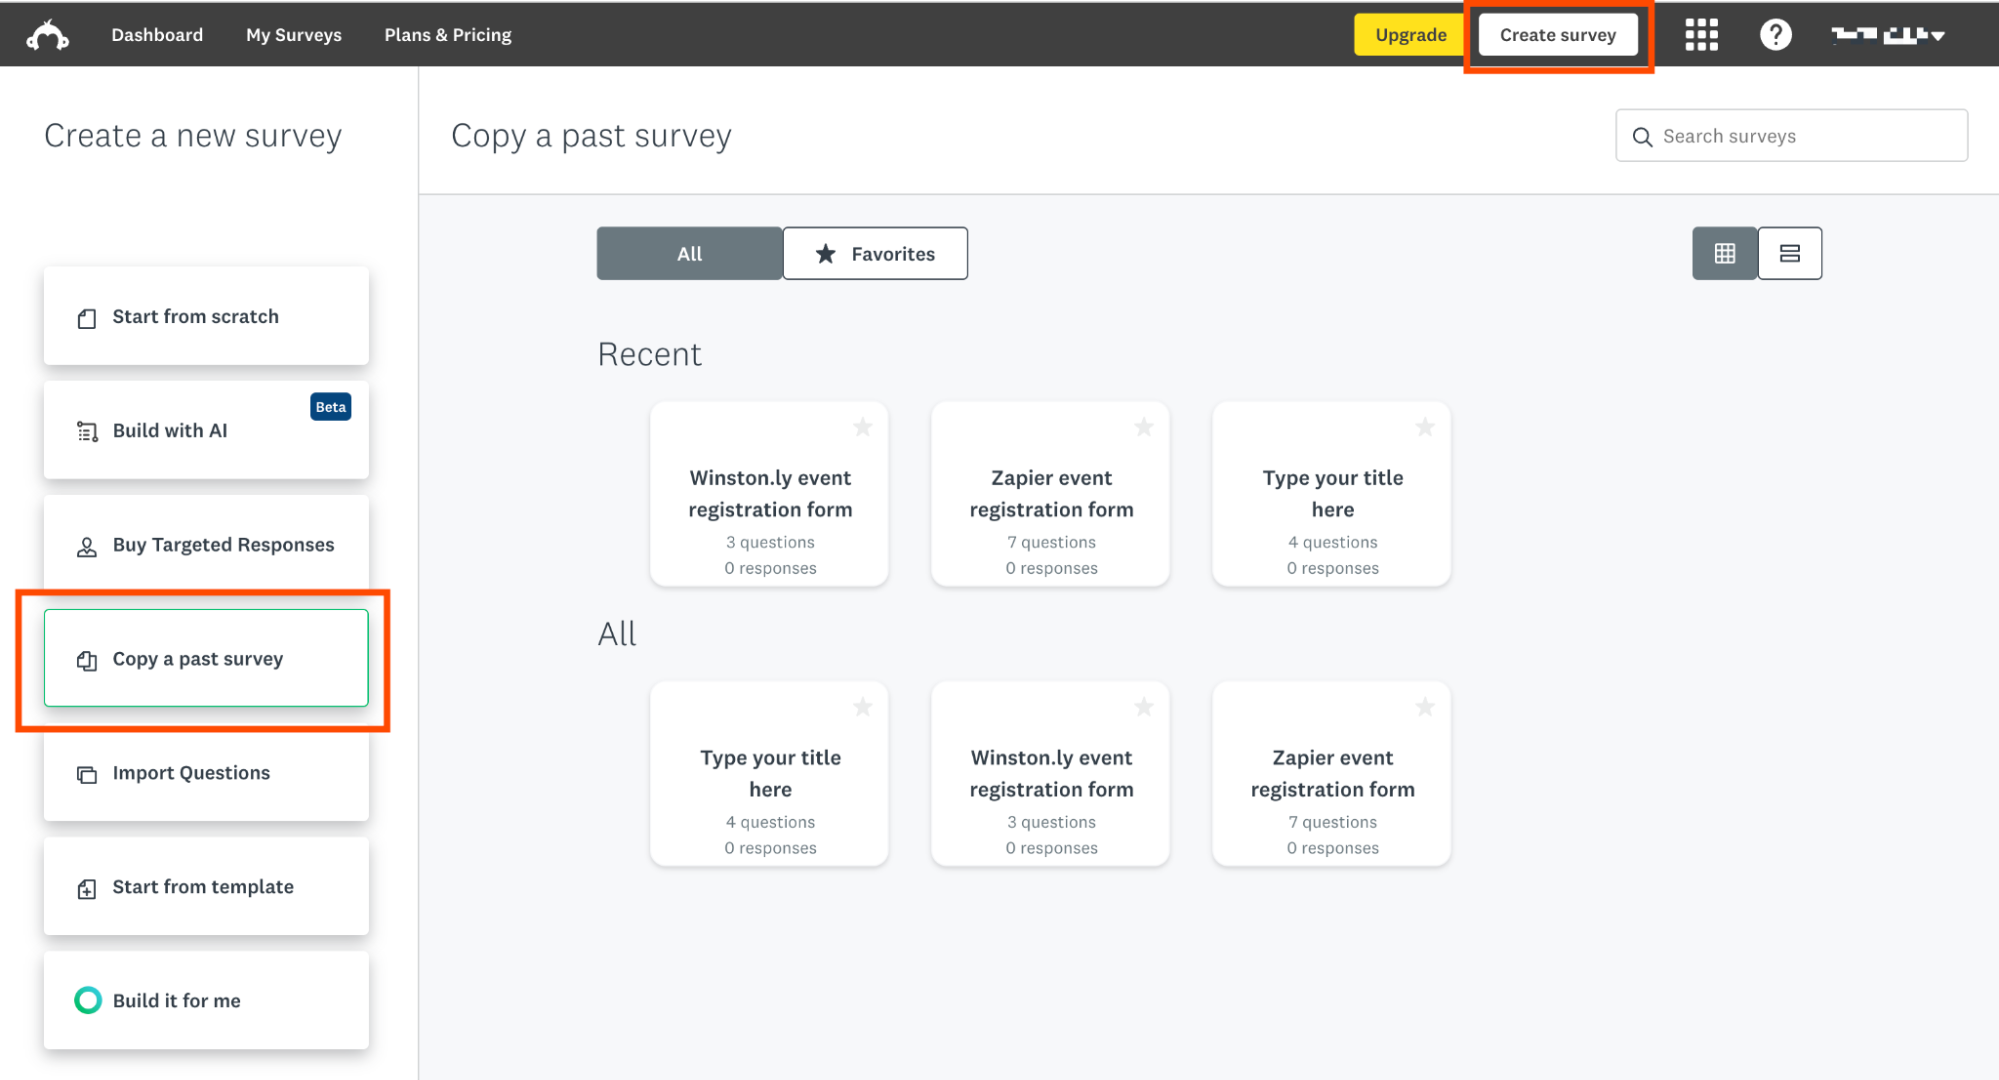
Whenever you want to clone your survey, click Create Survey in the menu bar. Then click Copy a paste survey, and click the survey you want to copy.
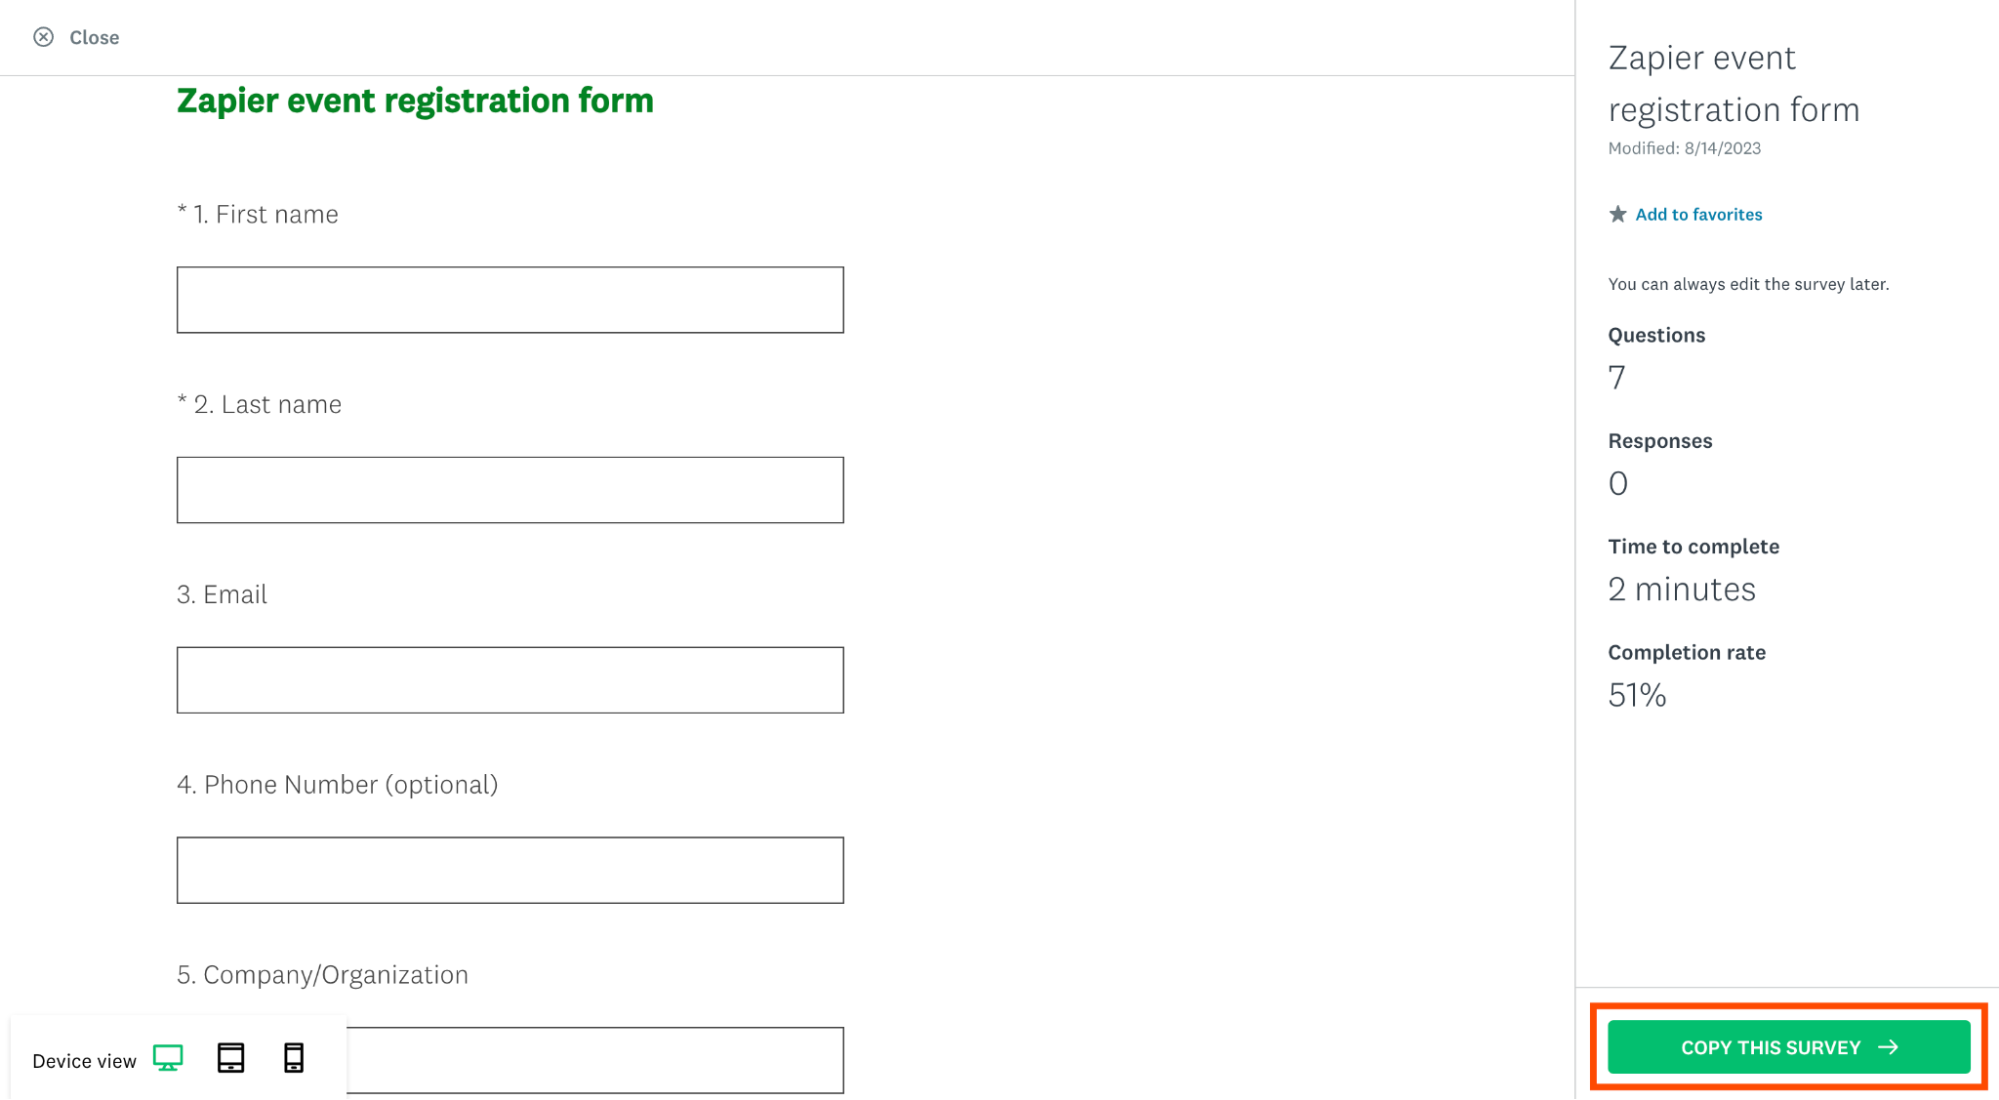
In the side panel of the form preview, click Copy this survey.


Want to try a different survey builder? Check out our roundup of the best survey apps—many of which let you copy surveys to use as templates just like SurveyMonkey.
How to create a form template in Typeform
Creating a form template in Typeform is similar to what you'd do in SurveyMonkey.
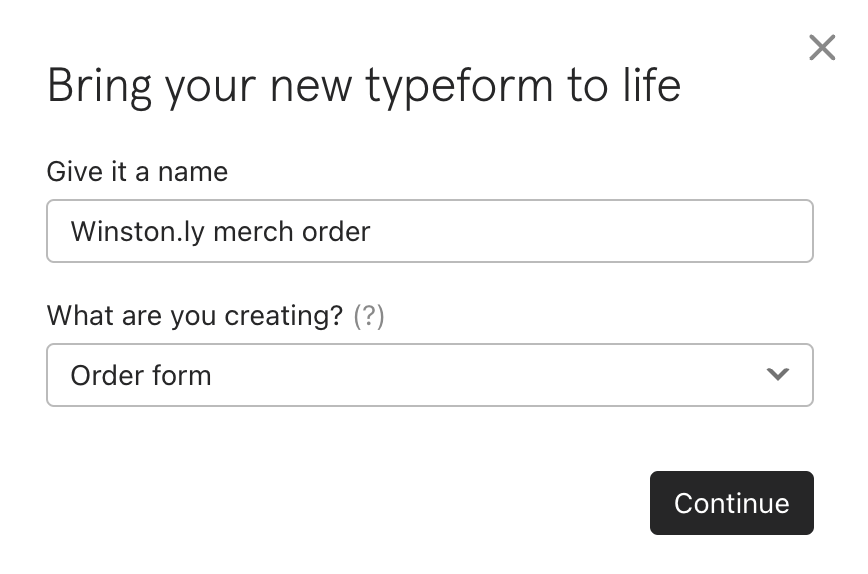
In your Typeform workspace (similar to a dashboard), click Create typeform.
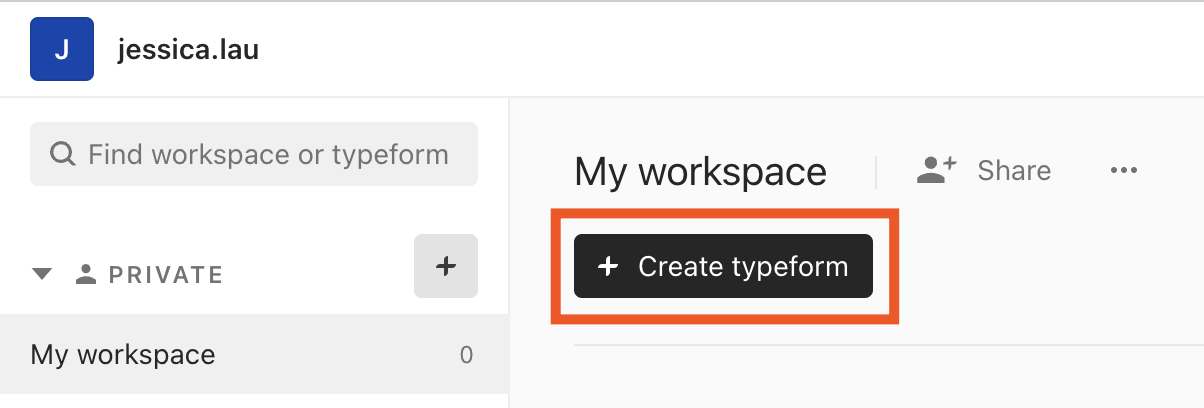
In the Create a new typeform window that appears, click Start from scratch. (You can also build forms faster using Typeform's AI form builder or one of Typeform's templates.)

Give your form a name, and then click Continue.
Create your form as you normally would.
When you want to copy your form, go to your Typeform workspace. Click the More options icon, which looks like an ellipsis (
...) beside the form you want to copy, and then click Duplicate.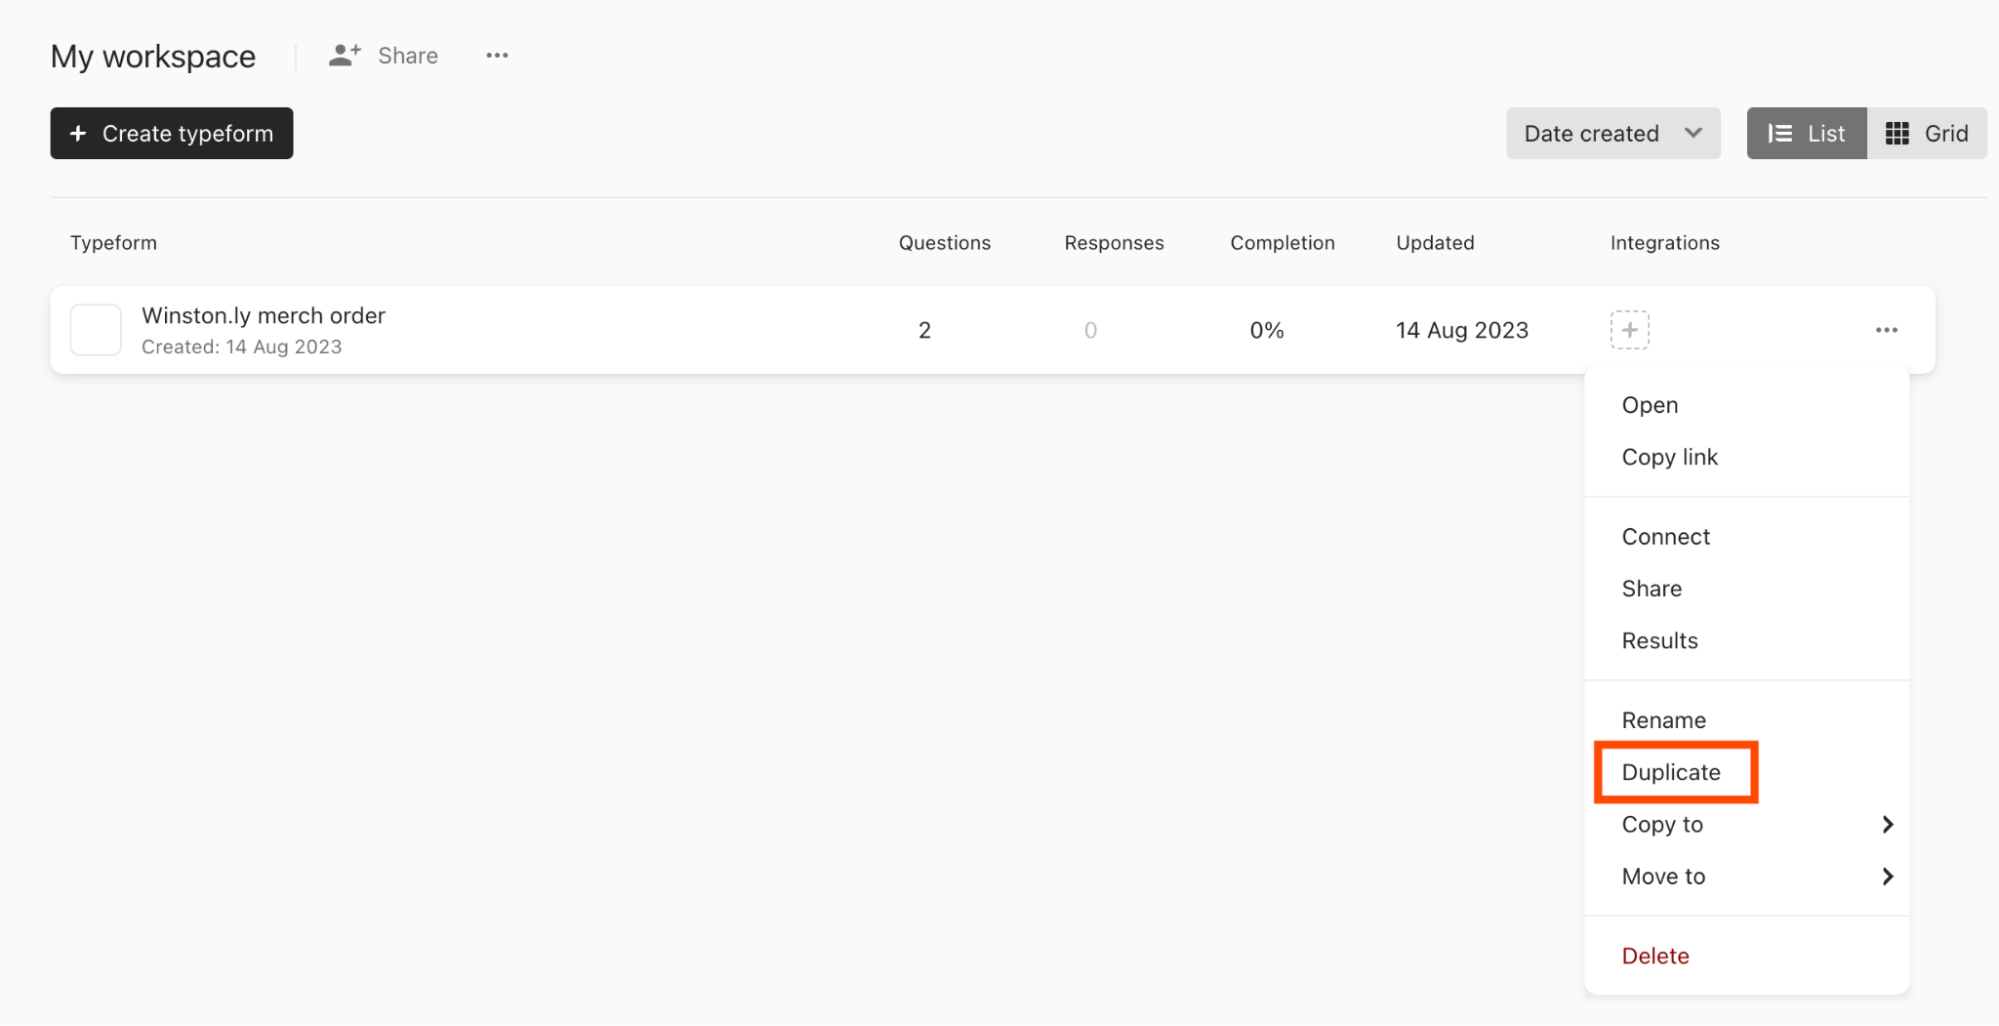
A copy of the form will immediately appear in your workspace, which you can then click to edit.


Learn how to connect Typeform with the apps you already use, so you can streamline your workflows and eliminate errors that come with manual data entry.
How to create email templates
If you, like me, dread typing routine emails, email templates are a game changer. You can create one for almost anything, including welcome emails, customer feedback requests, and post-purchase messages.
Here's how to create an email template in the most popular email apps.
How to create a template in Gmail
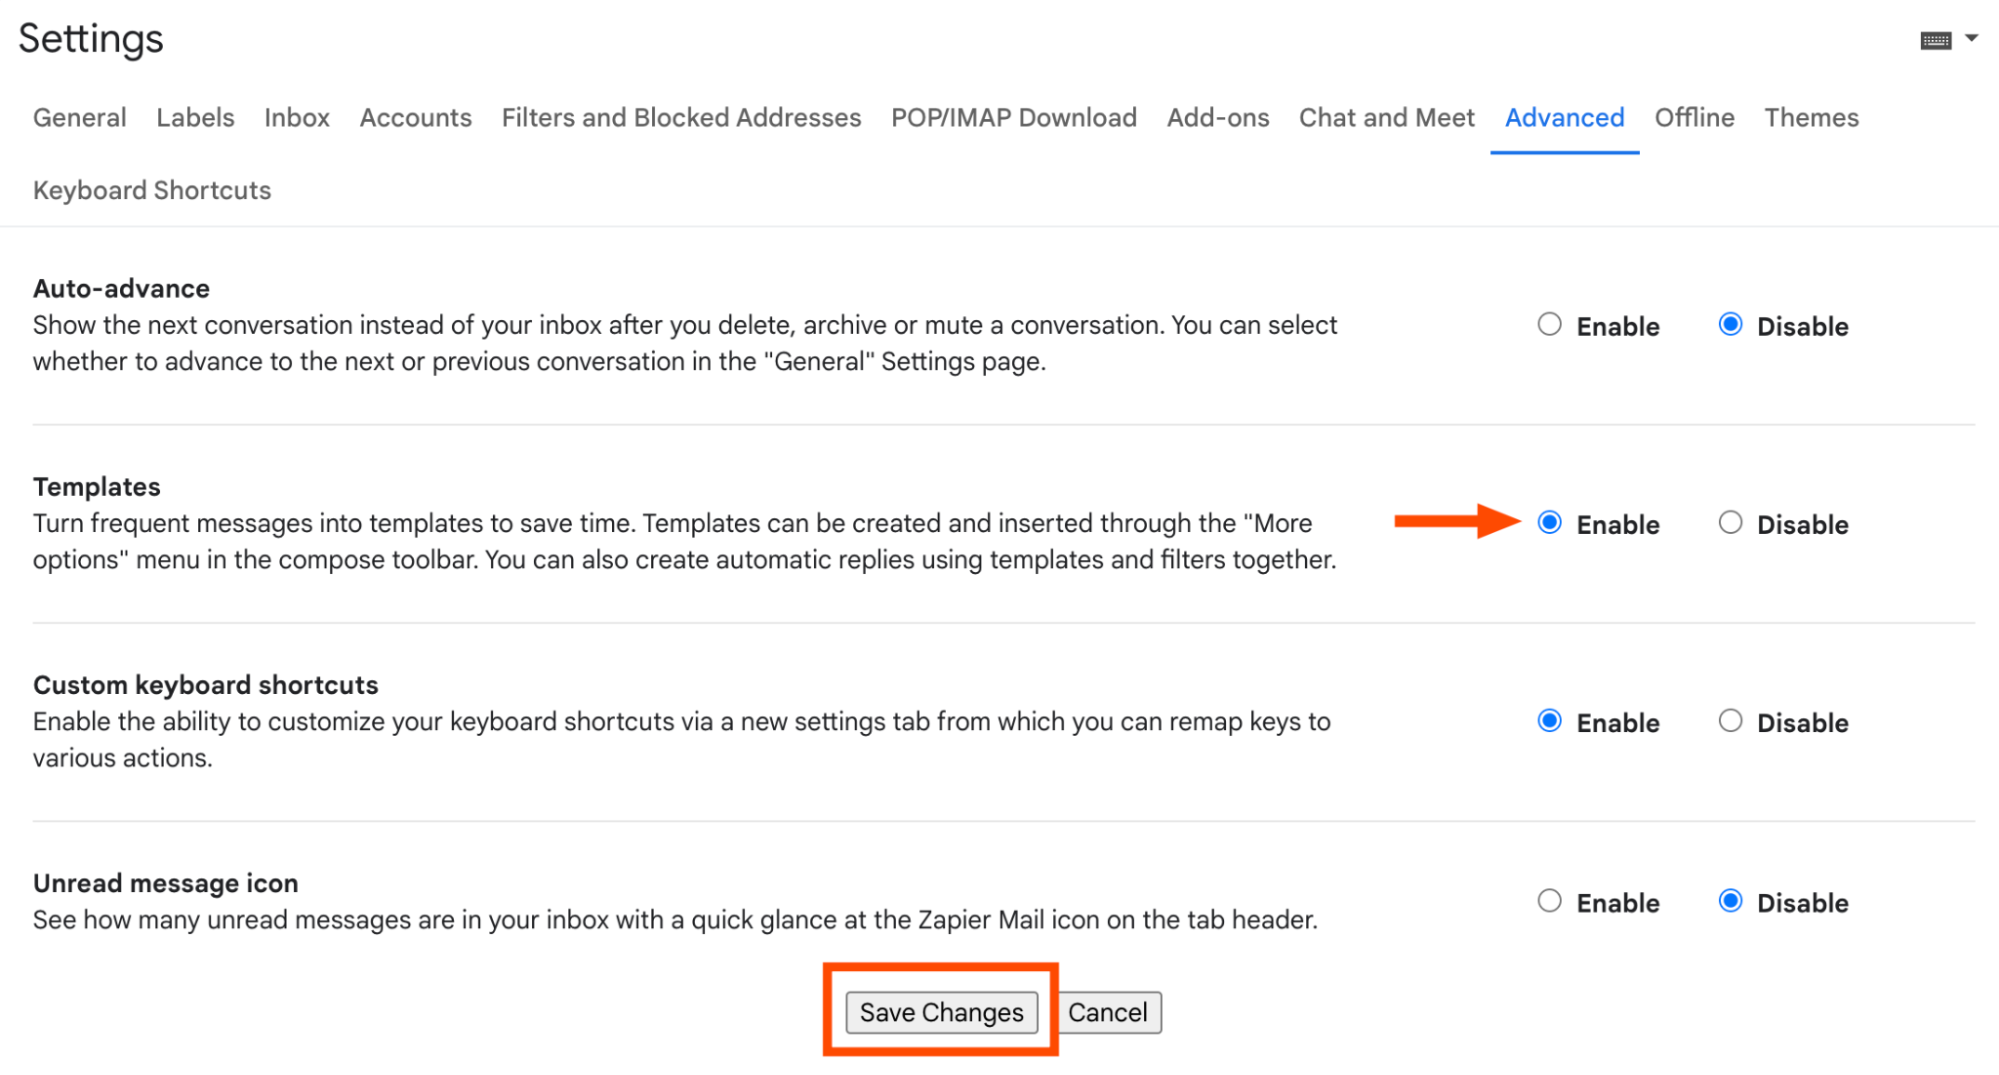
Before you can create a template in Gmail, make sure you have the template feature enabled.
Click the Settings icon, which looks like a gear, and then click See all settings.
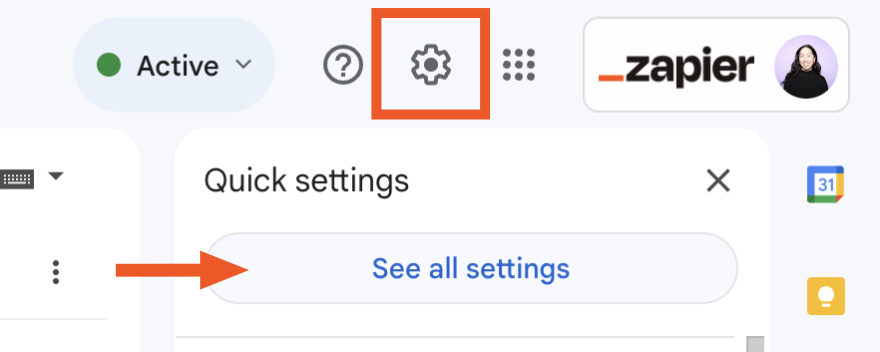
In the Settings window, click Advanced.
In the Templates section, click Enable, and then click Save Changes.


Now you can set up your first template.
Click Compose in Gmail.
In the New Message box, type your email template.
After you've drafted your template, click the More options icon, which looks like an ellipsis (
...) within the message box. Then click Templates > Save draft as template > Save as new template.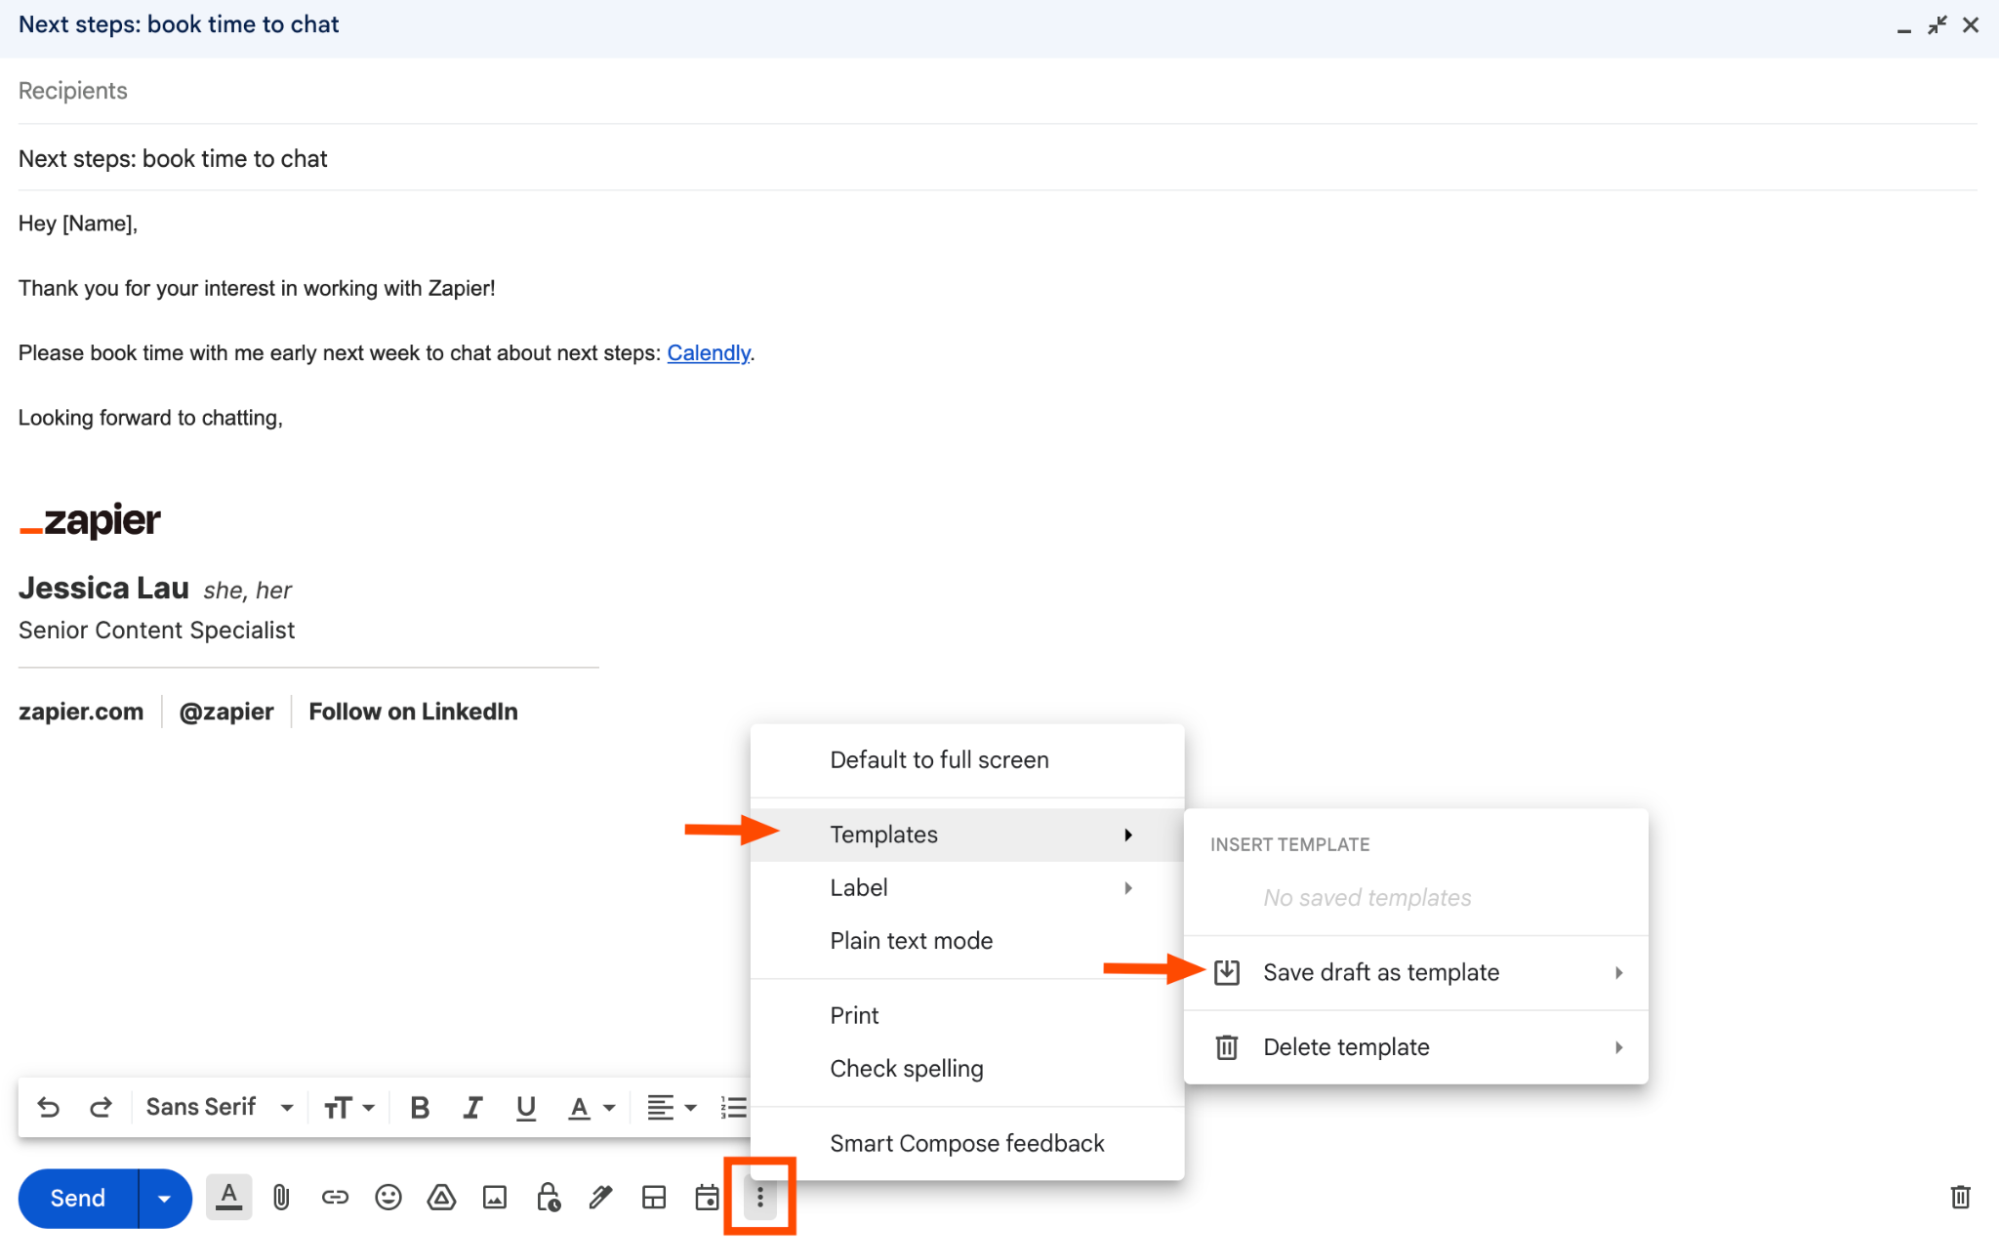
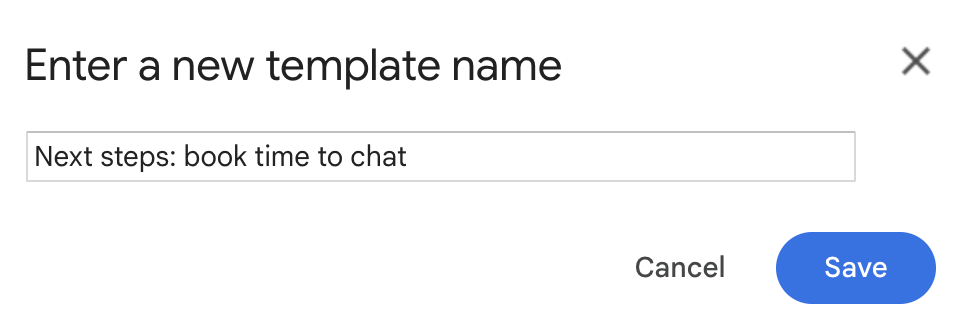
Give your template a name, and then click Save.
Any time you want to use it, click the More options icon (
...) in the message box. Click Templates, and then click the message template you want to insert.


The email signatures below live in a Google Doc. Click Get the templates to make a copy of the Google Doc, and then scroll to the bottom of the article for instructions on how to install them.
How to create an email template in Outlook
Setting up message templates in Outlook is just as easy as it is in Gmail.
In the Home tab, click New email.
Click Message in the email ribbon.
From the Message toolbar, click the More options icon, which looks like an ellipsis (
...), and then click My Templates.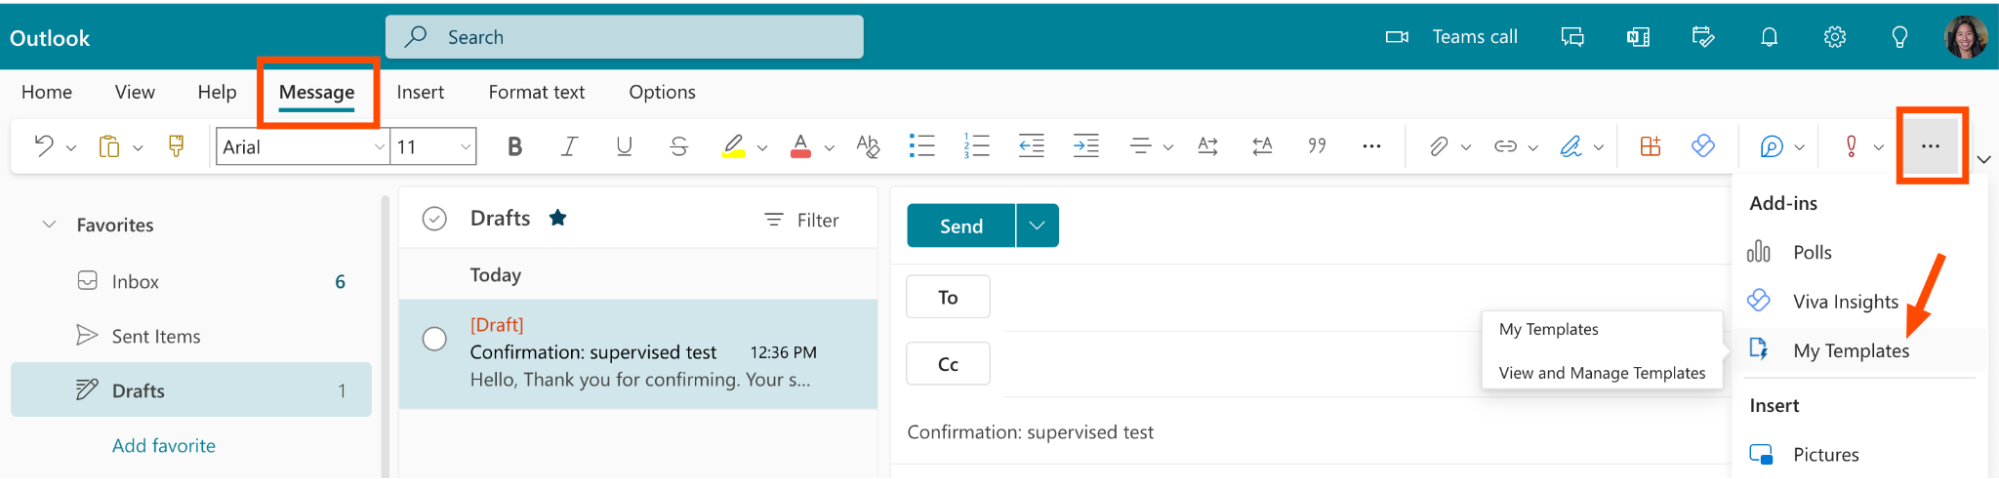
In the My Templates pane, click + Template.
Give your templated response a title, and then draft the message in the composition box. (I find it's easier to draft the message in the body of your email, format it the way you want, and then copy and paste your message into the composition box.)

Click Save.
Whenever you need to use a message template, go back to My Templates, and then click your desired template to populate the message in the body of your email. From there, you can edit and customize as needed.


Create templates for any app with automation
Using templates is just one way to save time in your daily workflows. If you want to reclaim even more hours in your day, connect your apps with Zapier. This way, you can automate your templates, based either on actions taken in other apps or on a schedule. Here are some examples to get you started.
To get started with a Zap template—what we call our pre-made workflows—just click on the button. It only takes a few minutes to set up. You can read more about setting up Zaps here.
Create Google Docs documents from new Slack channel messages
Create Google Slides presentations from templates for new Google Sheet rows
Tread lightly with your templates
Once you discover the power of templates, the temptation to create templates for everything is real. But this can leave you with a new problem: template overload.
To avoid creating templates unnecessarily, take stock of patterns in your work. What projects do you regularly create outlines for? Which emails do you dread sending on a daily basis? Once you find repeat offenders, template it.
By following this approach, you'll end up with just the right number of templates.
Related reading:
This article was originally published in May 2016 by Aja Frost and has also had contributions from Elena Alston. The most recent update was in August 2023.


