Evernote is a feature-rich collaboration and document organization tool used by over 150 million people. It excels at organizing large amount of notes, articles, and files of all types, allowing you to access them from multiple devices and share with team members.
However, few understand how truly deep and feature-rich Evernote can be. With a proper setup and integrations with Evernote, you can make Evernote your one-stop-shop for productivity and task management. In this guide, we will highlight five "hidden features" of Evernote that you might not be aware of, which you can plug directly into your workflow and get more stuff done, every day.
If you are brand new to Evernote, Head on over to our basics guide and learn the ropes first, then head back over here once you’re comfortable with Evernote.
What’s in this guide
Merge Notes in Evernote
As you become increasingly familiar with Evernote, you may find yourself with too many notes within your notebooks. A cluttered Evernote is an unproductive one, so it’s important to take advantage of features that allow you to clean-up your Evernote desktop, such as archiving and stacking notebooks. We have previously covered how to start over in Evernote but if declaring Evernote bankruptcy sounds too dire for your tastes, you can take advantage of the merging feature to condense what could be dozens of similar notes into one, saving you lots of clutter headaches. Just in time for spring cleaning!
Merging files is important for consolidating similar items that belong together. Let’s walk through the merging functionality in Evernote and how you can take advantage of it in various ways.
First, navigate to the notebook with the similar types of notes you want to condense. In this example, we are locating the Read Later notebook, where articles were clipped from the web with the Evernote Web Clipper tool and stored as individual notes in that notebook. We want to free up space in the folder, without archiving the notes. Enter the merge feature.
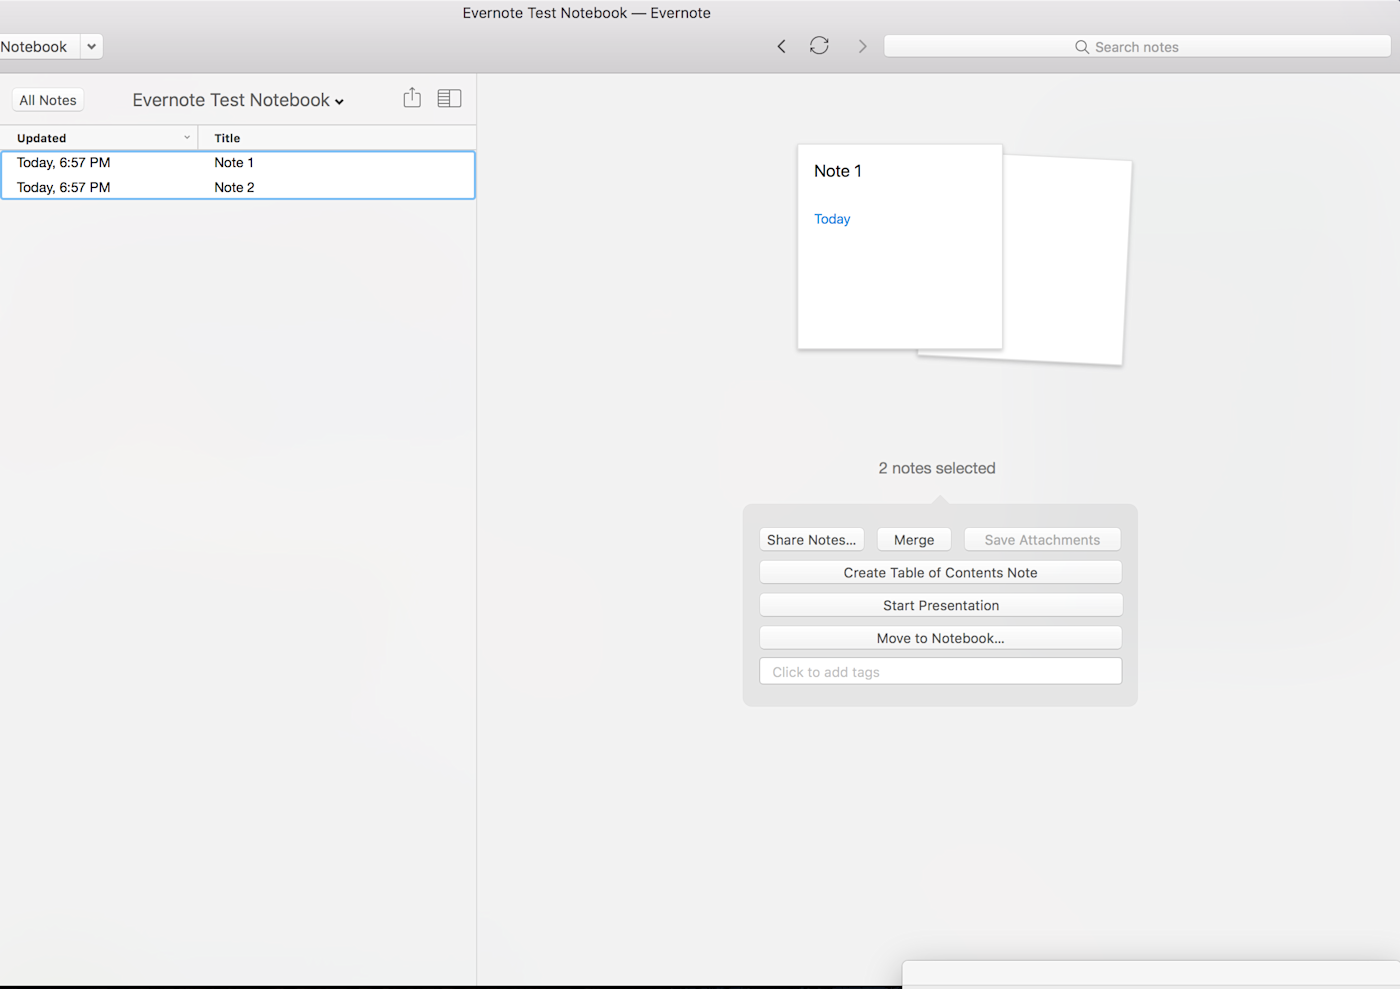
Select all of the files you’d like to combine by clicking on them and holding Shift, and then you can right-click, then select Merge Notes. Voila! You have now combined all your web-search into one handy note. You can select a new name for the merged note, if you want, to help describe its content, which can be useful for organization.
When you add a file to Evernote, such as a PDF or an image, Evernote defaults to creating a new note. The merge really shines in these cases, combining multiple files for maximum organization. For example, if you are taking an audio note (via File -> New Audio Note), you can then take a photo of the whiteboard after the meeting or class, and merge them together to create one "super meeting" note. This way, you will only need to share a single note with your team rather than several notes.
What other use cases are there for merging notes?
Receipt Organization: Through taking photos of receipts, scanning them, or through an app like Expensify, you can combine them into one Evernote note, such as "Expenses for the San Francisco Trip." Don’t forget about Evernote’s digital image recognition feature as well, which recognizes text and helps you search through scanned receipts.
Resume Draft Revisions: If you are hunting for a new job, you can combine various resume versions as you improve them by merging the PDFs together, and add text change notes between them to help you remember what you changed.
Podcasts: If you have a premium Evernote account, you may have a large enough upload limit to upload your favorite podcasts into separate notes and merge them together to create a unified "podcast" note.
Merging notes is one of the best ways to minimize your Evernote footprint without having to resort to deleting or archiving. If you are the type of person starting new projects regularly, you will find great use in merging notes together to keep your progress on track and in one place.
Customize Evernote's Toolbar and Sidebar
While toolbar and sidebar optimization might seem like a trivial thing to fret over, if the perfect setup saves you seconds every time you need to access your most useful notes, these seconds add up over time. Just like your desk in real life, you’ll want to have everything in their correct place. A cluttered Evernote is a cluttered mind!
Whether you are looking at an Evernote blank slate after freshly installing it or have been using it for years, it always helps to reconfigure your menu layouts for speed of use. Located in Evernote’s menu bar, under View , are the menu options Customize Toolbar and Sidebar Options. Here is where you are able to change the look and layout of the top toolbar options (such as where the search bar is) as well as show and hide various notes and notebooks that appear on the left side of the screen.
Customize the toolbar
The key to optimizing the top toolbar is to ensure that your most used options are present on the screen and to hide features that you may never use. It helps to think like a user-experience designer when making these choices; Where does your eye naturally go when tabbing over to the Evernote app? What is your main motivation when you are doing so? Considerations include whether you primarily use Evernote in teams or as an individual, which buttons make sense to group together, and whether you prefer having more shortcuts or fewer when typing. Also worth noting: You can turn off the toolbar completely if you prefer to have more screen real estate for writing.


My current setup removes many of the default options Evernote includes and instead simply has New Note option on the top right, since that is my most used option, with the search bar on the far right. I also include the Back and Forward options to the immediate left of the search bar, since when I am searching my notes I will often need to skip quickly around the documents. A good idea is to play around with various setups and see which ones make sense for your Evernote uses.
Customize the sidebar
Sick of the Atlas feature cluttering up your Evernote sidebar? Also found under the View menu is the Sidebar Option submenu, which gives you the ability to customize the sidebar options. Here you can deselect the Atlas option, as well turn on and off as many items as you like.
Make sure that the Shortcuts option is selected so you can move your most used Notebooks and Notes that you will need to access quickly. I personally keep my Read Later and To Do List notebooks here, as well as my Accounts note, where I keep track of frequent flyer numbers and other easily forgotten membership numbers (but make sure to encrypt anything important! More on that in a bit.)
Another useful Notebook to keep in the Shortcuts section is any starred or labeled items from Gmail, so that you can have all of your action items conveniently under one Evernote roof. You can create an automated workflow with Zapier to achieve this by connecting your Gmail account to your Evernote.
Lastly, also located under the Sidebar Options menu is the ability to turn the sidebar color either light or dark, depending on your preference or amount of available light.
Password-Protect Text Within a Note
Have you ever wanted to make sure that something you write in Evernote can’t be read by just anyone? Well, you’d be pleased to know that Evernote lets you password-protect any text, image, or other type of file within a note.
To access this feature, highlight the text that you wish to encrypt, right-click, and select the Encrypt Selected Text option. You can also choose whether you want Evernote to remember the password until you quit the application, so you won't be prompted again for the password.
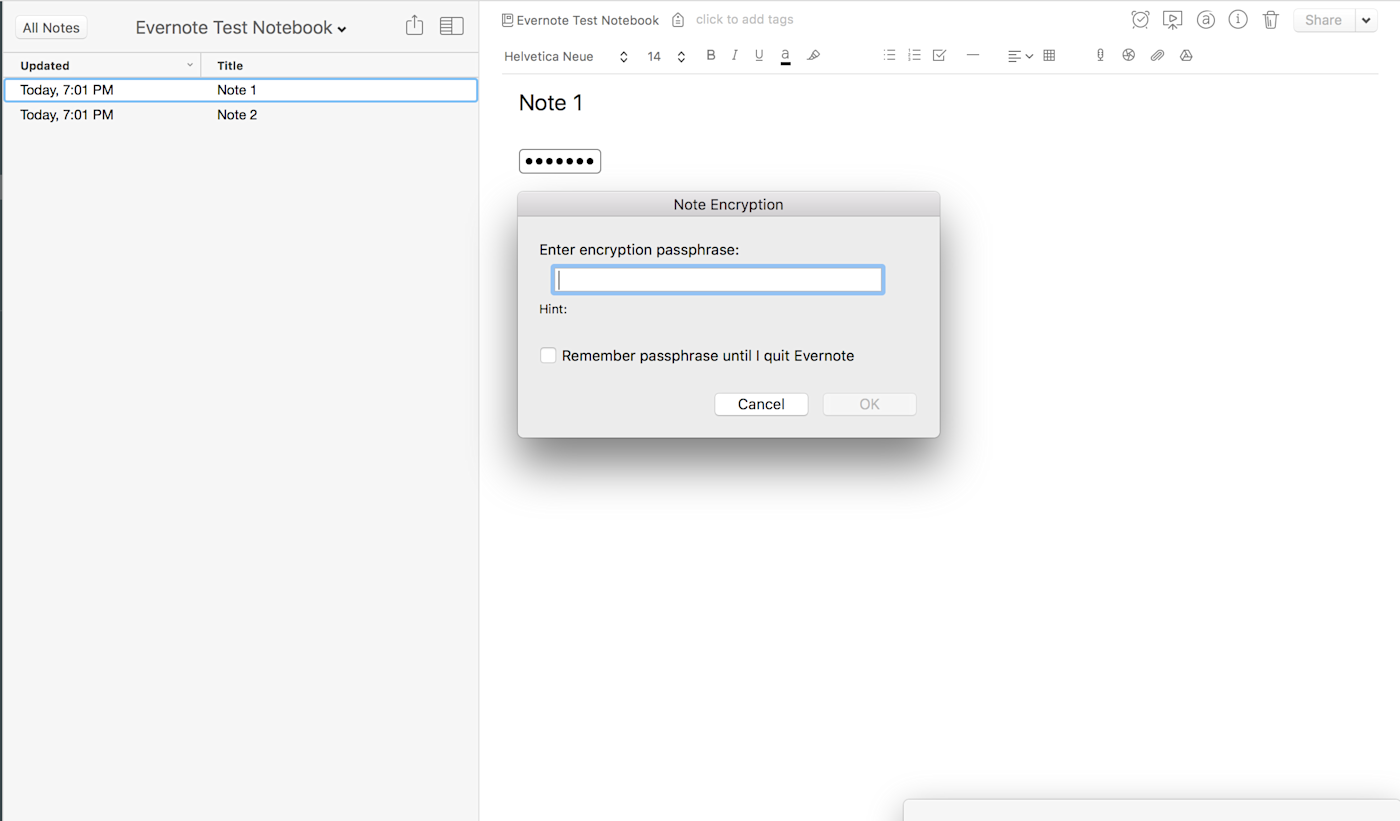
You can also encrypt any file type that is within your chosen note as well—for example, an image file or PDF document in the notebook, a sound-clip, or a movie file.
What are some good uses cases for password protection within Evernote?
"Accounts" Notebook: When working with a team to manage shared logins—for social media accounts, Mailchimp, or Gmail accounts—keeping track of the usernames and passwords can be tricky. A solution would be to create a shared Evernote note with the credentials, while encrypting the text to make sure only those with permission can access them. Note: the owner of the shared note is the one who decides the password.
Securing Important Paperwork: If you are organizing your tax documents, you can add all your important files to an Evernote notebook, merge them into one, and encrypt the files so only you (and your accountant) can access them.
Frequent Flyer Numbers: Always fumbling around to enter your rewards number or frequent flyer information? Keep them in an Evernote note and password protect it for piece of mind.
Evernote’s security uses a 2048 bit RSA SSL encryption, which Evernote describes as industry standard for security, but the app only encrypts information that you password protect through the feature we described above. So that means if you have any important or sensitive files such as client documents or personal financial information, it’s a good idea to secure them with password encryption to be safe.
Two other pieces of Evernote security advice: Make sure to set the 4-digit passcode in the Evernote mobile app so that prying eyes don’t wander around your work notes. Secondly, ensure that you have two factor authentication set up.
Set Up Reminder Subscriptions
Each note you create in Evernote can be assigned a "reminder" date and time. This can be useful when you have a notebook that acts as a To Do List or Inbox, which allows you to schedule and prioritize your personal and professional due dates.
However, did you know that Evernote can also send you an email summary about that day’s reminders that are due? You can locate this feature by navigating to the notebook your note is in, clicking the Settings button (which looks like a gear), and then selecting subscription settings. Here you can manage your reminder emails that Evernote will send you. The email reminders are beneficial to those who are first starting out with Evernote to use the service daily and get maximum usage out of it. But it's also handy for power users who rely on Evernote as their productivity hub.
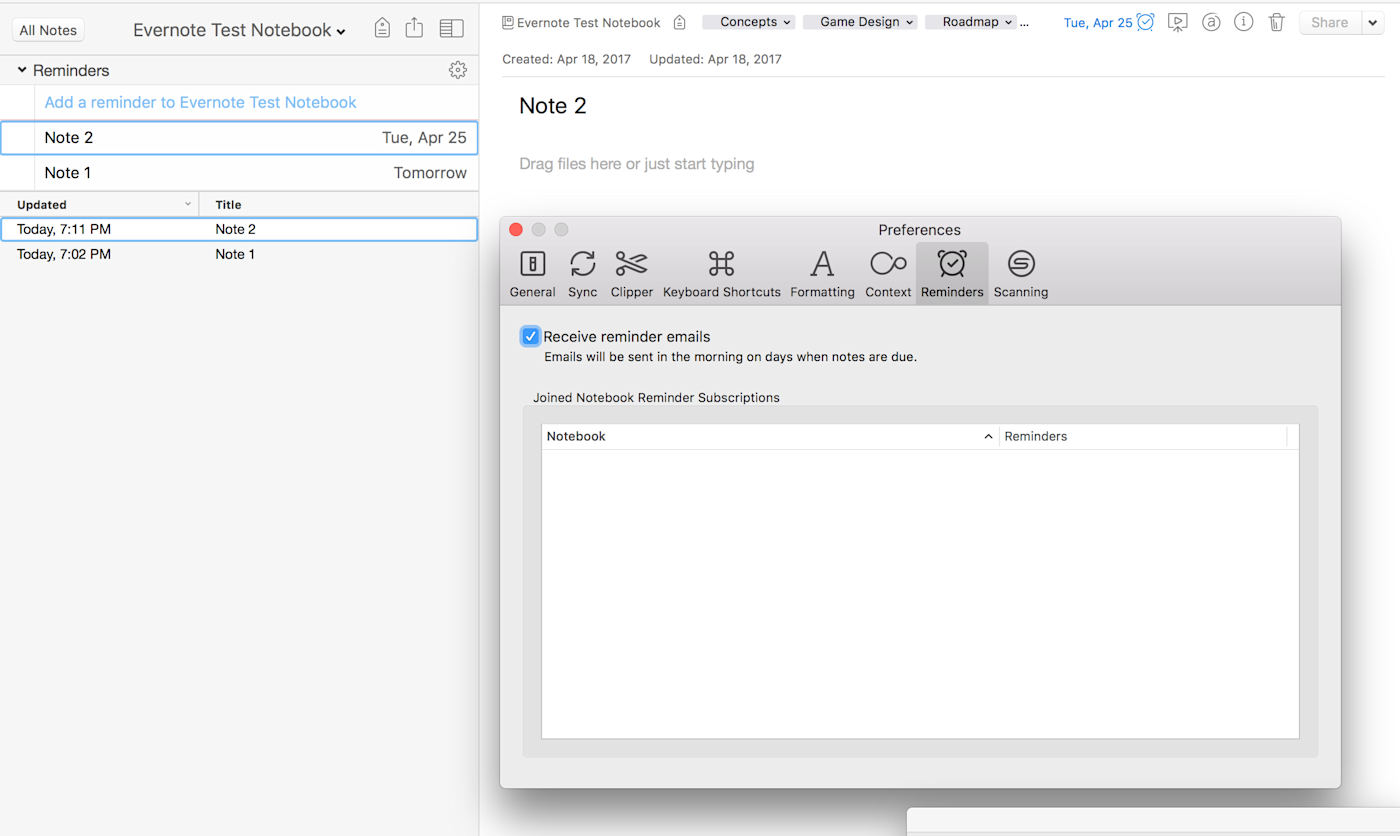
If reminders aren’t enough scheduling power for you, you can connect Evernote to Google Calendar and automatically create new calendar events when you create an Evernote reminder. You’ve now created the trifecta of calendar synergy and can’t possibly miss a deadline again.
Create Google Calendar events from Evernote reminders
Create Google Calendar events from new Evernote reminders
Nest Tags and Notebooks
Evernote power users are often torn on the use of tags: some believe they are worth the effort to add, while others believe that the search algorithm has gotten so powerful that they deem them superfluous. In either case, there are certain times where they are very useful—such organizing large amount of notes, as well as categorizing notes in two separate notebooks under one tag.
When organizing notebooks, for example, users can combine two or more notebooks together into "stacks." This provides some level of hierarchy between notebooks but not a deep one. A hidden feature about tags, however, is the ability to to give multiple layers of hierarchy. Using tags as well as notebooks, you can browse an enormous amount of documents easily.
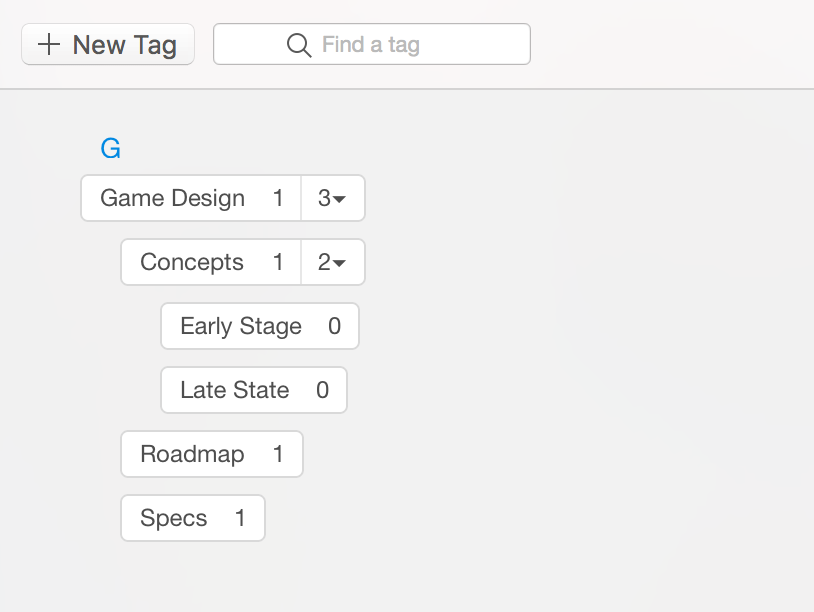
For tags, one parent tag can have up to 10 child tags. As an example, you may have a "receipts" tag, and nested under that you can have "food," "lodging," or "bills." One level further, "gas" and "electricity" tags can be nested under the "bills" tag.
Some practical examples of nested tag uses:
"Photography" parent tag, with "landscape" and "portrait" child tags "Recipe" parent tag, with "baked goods" or "slow cooker" child tags "Workout" parent tag, with "cardio" or "free weights" child tags
Whether you are a notebook stacks fan or a nested tags person, understanding the different ways that Evernote can organize your data is key to becoming an Evernote pro. As we have mentioned a few times already, a well-organized Evernote is the key to success.
More Hidden Features of Evernote
Evernote Templates: To make an Evernote "template," create a note that you wish to use multiple times, then navigate to File -> Export Note. You can then re-open that ".enex" file as needed when creating new notes as copies of the exported note.
Screenshot Clipper Tool: In addition to the web clipper Chrome extension, Evernote also allows you to customize a hotkey from within the app's settings, which will bring up a selector to save an image of your current screen selection as an Evernote note.
Note Information: You can find the number of words in an note, as well as edit the existing metadata of a note (such as tags, author, last modified date) by selecting the Information button at the top of a note’s header menu (it looks like a lowercase letter "i").
Evernote is an extremely powerful tool and one that can replace many of your existing apps—such as screenshot clipper, to-do list app, and cloud-file manager. The best way for new users to feel the full potential of Evernote is to invest time in adding all of their work, projects, and documents to Evernote to see how the app can improve their workflow. However, even after months or years of use, Evernote can still surprise users with features that are not as immediately obvious. From merging PDF files with images to creating a useful nested-tag organization structure, Evernote’s feature depth can expand to fit any productivity junkie’s needs.
Keep Reading:

