
On the face of it, uninstalling a WordPress plugin is straightforward. Click a few buttons, and hey presto, the plugin vanishes. But, alas, that's not the whole picture.
While everything might appear ok on the surface, you'll find a trail of leftover tables, files, and code snippets underneath. Most of the time, these leftovers don't cause a problem. But there's always a chance they might lead to trouble down the line.
So how do you get rid of these unwanted leftovers? Stay tuned as I show you how to uninstall a WordPress plugin completely.
Why uninstall a WordPress plugin
WordPress plugins are small software apps that add new features or extend the base functionality on your site. Thousands of free and premium WordPress plugins are available to download and install—but why would you want to uninstall one? Well, there are several reasons:
1. You've outgrown it
As your site grows, your needs change, so a plugin you required several months ago may now be redundant. When you no longer need it, you should uninstall it.
2. You don't like it
When you're looking to add some new functionality, you'll likely download a few similar plugins to test which one you like best. That's perfectly fine, but you need to uninstall the ones you don't like and aren't going to use.
3. It's causing problems
It might be that a plugin you installed is causing a problem on your site. While plugin developers try to follow agreed standards, sometimes problems occur, and you get conflicts between plugins or a plugin and a theme. When this happens, you'll need to uninstall the rogue plugin.
4. It's no longer supported
Developers have to regularly update plugins to keep them compliant with the latest version of WordPress. Sometimes plugins get abandoned by developers, and they become incompatible.
Pro tip: Check the WordPress repository for compatibility. For example, here you can see Yoast SEO was recently updated and works on WordPress version 6.5 or higher.

5. It contains malicious code
It's not unknown for hackers and unscrupulous developers to create plugins containing malware and viruses. It's unlikely you'll download such a plugin from the official repository, but you may inadvertently download one from a third-party site. If that happens, you definitely need to uninstall the plugin ASAP. And, if it's infected your site, you'll need to call in some malware removal experts.
Bottom line: whatever the reason, leaving an unwanted WordPress plugin on your site is never a good idea.
The difference between deactivating and deleting a WordPress plugin
When you no longer need a WordPress plugin, you have the option of deactivating or deleting it. So what's the difference?
Deactivating a plugin is like switching a light off. You still have all the electrical wiring in place, but you've temporarily stopped the electricity flowing through to the light bulb. In the case of a plugin, that means all the files remain on your site, but WordPress prevents them from running until you activate the plugin again.
Deleting a plugin removes the plugin from your plugin list and uninstalls all the files from your site.
Deactivating a plugin is helpful when troubleshooting a problem on your site: you can temporarily deactivate one plugin at a time to isolate potential conflicts. But if you find a rogue plugin, it's best to delete it completely.
How to uninstall a WordPress plugin
WordPress makes it super easy to uninstall unwanted plugins from your admin dashboard. But before you start, make sure you have a current backup that you can use to restore your site if anything goes awry.
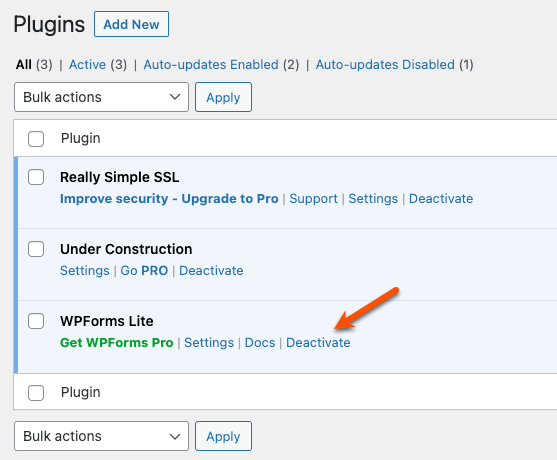
Log in and head to Plugins > Installed plugins to see all the installed plugins on your site.
Scroll down to the plugin you want to remove. Click Deactivate.
Click Delete to uninstall the plugin.
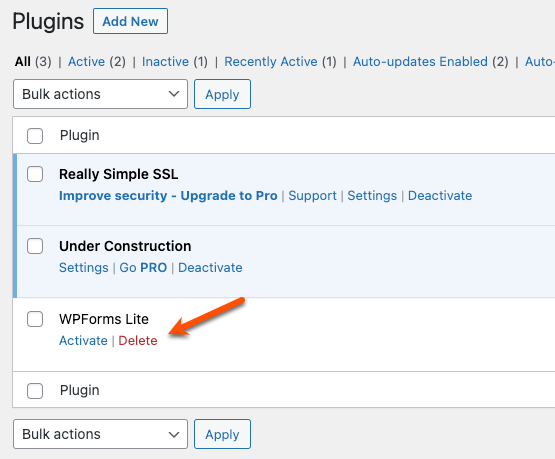


Most of the time, all the plugin files get removed immediately. However, some bits of data can get left behind. So, you need to go behind the scenes and remove any "leftovers" manually to fully delete plugin data in WordPress.
Removing the "leftovers" after uninstalling a WordPress plugin
Deleting a WordPress plugin from your admin dashboard will usually uninstall any files and folders created in the /wp-content/plugins/ directory. But sometimes, a plugin creates files, tables, and shortcodes in other folders that may not get deleted. When this happens, you need to take manual action.
Once again, before you start, make sure you have a current backup that you can use to restore your site if anything goes awry.
How to remove leftover files and folders
You can remove any unwanted files via FTP or SFTP with a program like FileZilla or Cyberduck. Alternatively, some WordPress hosts, like WPX, include a file manager so you can bypass the FTP process. Either way, you gain access to the files and folders on your WordPress server.

When you install WordPress, it creates two subfolders in the "wp-content" folder:
plugins
themes
Over time, other subfolders get added, such as:
cache
upgrade
uploads
And some plugins create their own folders, too. For example, W3 Total Cache creates a "w3tc-config" subfolder:

Even if I delete the W3 Total Cache plugin successfully:

The "w3tc-config" subfolder remains:

To delete the unwanted folder and files, right-click on the folder, and select Delete.

You'll see a confirmation message. Select Delete to confirm, and the "w3tc-config" folder gets removed.

How to remove leftover database tables
You can remove any unwanted database tables using phpMyAdmin. Most WordPress hosts provide it in your hosting admin dashboard.

When you install WordPress, it creates 12 database tables as standard:
wp_commentmeta
wp_comments
wp_links
wp_options
wp_postmeta
wp_posts
wp_termmeta
wp_terms
wp_term_relationships
wp_term_taxonomy
wp_usermeta
wp_users

Individual plugins create any other tables you see. For example, here you can see a total of 22 tables, including entries from Yoast SEO and Thrive Architect.

When you delete a plugin, some developers intentionally retain settings in case you reinstall it, but others simply don't tidy up. Either way, you can remove any leftovers.
For example, say you want to remove the leftover "wp_socialsnap_stats" table from the Social Snap plugin. Select the Drop option next to it.

You'll get a message confirming you want to delete the table. Press OK to confirm your choice, and the table gets deleted.

How to remove leftover shortcodes
Many plugins use shortcodes to add functionality to WordPress. For example, WPForms creates a shortcode that you can insert on your contact page.

So you have a contact form that looks like this.

But when you deactivate and delete a plugin that uses shortcodes, you can end up with the actual shortcode tag displaying.

When you know you only have the shortcode on one or two pages, it's easy to edit them and remove the code. But other plugins (especially visual page builders like Divi) create hundreds of shortcodes throughout your site. In this scenario, there's a quicker way to find and remove the leftover shortcodes.
First, you'll need to install a plugin called Shortcodes Finder.
Then, head to Tools > Shortcodes Finder, and select Settings. Check the box next to Disable unused/orphan shortcodes to find and remove unwanted tags, and then save your settings.

Next, select the Find unused shortcodes tab and search the Posts and Pages to find the shortcodes. In this example, it finds and removes the unused shortcodes from my Contact Page and Sample Page.

Now, you can see the Contact Page no longer displays the shortcode.

Note: In this example, you'd still need to edit the text on your page, as it's meaningless without a form to display.
Remember to uninstall your WordPress plugins completely
WordPress lets you install and delete plugins quickly from your admin dashboard. But sometimes, when you delete a plugin, it doesn't uninstall all the files, folders, database tables, and shortcodes. If you want to remove all the leftovers, follow the steps above to uninstall any unwanted WordPress plugins completely.
Related reading:


