
Facebook's billions of daily users definitely make it an attractive place to advertise. One drawback to Facebook's scale, though? Its wide range of platforms and products—from personal Facebook profiles to Instagram ad accounts for business—can make it chaotic to navigate. Facebook's solution to the clutter is Facebook Business Manager, which helps you manage and collaborate on Facebook pages, Instagram profiles, and ad accounts.
Facebook's parent company, Meta, rebranded the tool to Meta Business Manager in 2022 (creating some confusion). And now, it's being phased out in favor of Meta Business Suite, a similar platform (creating even more confusion).
I've used Facebook Business Manager (and now Meta Business Suite) for the better part of a decade to juggle multiple clients, business Pages, and ad accounts. In this article, I'll explain who it's for, how to set it up, and how to use it (along with Ads Manager) to create your first ad campaign.
Table of contents:
What is Facebook Business Manager?
Facebook Business manager, now known as Meta Business Manager, is a free platform that you can use to manage multiple Facebook Pages, ad accounts, and business assets, along with additional resources like your Instagram account and product catalogs—all in one place. You can also grant full or partial access to team members to help manage your Facebook Pages, making it easier to securely delegate tasks.
Meta Business Manager vs. Meta Business Suite
Before we go further, a quick definition of terms is in order:
Facebook Business Manager: Launched in 2014 to help businesses and agencies manage Facebook (and Instagram) pages and ad campaigns.
Facebook Business Suite: Launched in 2020 as a more accessible version of Business Manager, aimed initially at small businesses. In recent years, most of its features have converged with Business Manager's features.
Meta Business Manager and Meta Business Suite: After Facebook's rebrand to Meta in 2022, both products were renamed. Most people still refer to them with the F word, though.
Here's where this gets more confusing: according to Meta, "Business Manager works alongside Meta Business Suite and Meta Ads Manager." Given how similar the tools are, the long-term goal is clearly for Meta Business Suite—which has a spiffier user interface, along with a mobile app—to replace Business Manager.
For now (as of September 2024), both products continue to coexist—but new users are directed straight to Business Suite. If you want to switch back to the legacy Business Manager, you can: click Help in the bottom-left corner of your Business Suite menu, then Go to Business Manager. This option may be going away soon, though: on my legacy account, it showed up sporadically during my testing.

So, is there still a difference between Business Manager and Business Suite? Not really, beyond superficial visual differences.
When I explored each platform for earlier versions of this article, Business Manager was still necessary for certain tasks; for example, in January 2024, you still had to jump from Business Suite to Business Manager to change your business's settings. Now, as of September 2024, all settings have been ported over to Business Suite; and according to a notice from Meta, "the legacy Business Settings will be discontinued soon."

The writing is on the wall: even if you're a die-hard fan of Business Manager, the switch to Meta Business Suite is underway. As I walk you through the setup process below, I'll do so using Meta's latest Business Suite interface.
How to set up Facebook Business Manager and Business Suite
The process for setting up a Business Manager account used to be more complicated, but these days, the only prerequisite is having at least one Meta asset linked to your personal Facebook account (for example, a Facebook business Page).
Keep in mind that, like all mega companies, Facebook changes its interface frequently. The following instructions are updated as of September 2024 and reflect the increasing convergence between Business Suite and Business Manager.
Here's the short version of how to set up Facebook Business Manager:
Create a Facebook business Page, if you don't already have one.
Go to business.facebook.com. (You may have to first log in to your personal Facebook account.)
Click your business page name, and then click Create a Business Portfolio. Enter all the details of your business portfolio, including business name and email.
Add existing Facebook Pages to your Business Manager.
Add a Facebook ad account.
Invite users to collaborate on your account.
Go to Settings to fine-tune your advanced settings, including security protocols.
Add partners to Facebook Business Manager.
Connect Instagram and other social media platforms to Facebook Business Manager.
Set up Meta Pixel and Conversion API.
Now let's get into more details.
1. Make sure you have a Facebook business Page
Before you get started, make sure you have at least one Meta asset linked to your personal Facebook account, like a Facebook business Page. If you also have a Meta Ads Manager account, you'll be able to pull that in as well.
To see the latest setup steps, I created a new personal Facebook profile along with a business page called "Green Landscaping," which you'll see in the images below.
2. Access Meta Business Suite
Make sure you're logged in to your personal Facebook account. Then, go to business.facebook.com. You'll be taken directly to Meta Business Suite.

Even without doing any additional steps, Business Suite is pretty useful—especially for entry-level users. You'll get access to features like a unified social media inbox for your Facebook and Instagram accounts, as well as consolidated analytics.
But to get the most out of the tool—especially if you're planning to collaborate with others—you'll want to create a business portfolio.
3. Create a business portfolio account to organize your assets
To create a business portfolio, follow these steps:
Click Create a business portfolio. This will let you group assets that belong to the same business.

Add a business portfolio name (which should match the name of your business), and input your name and email. Click Create.
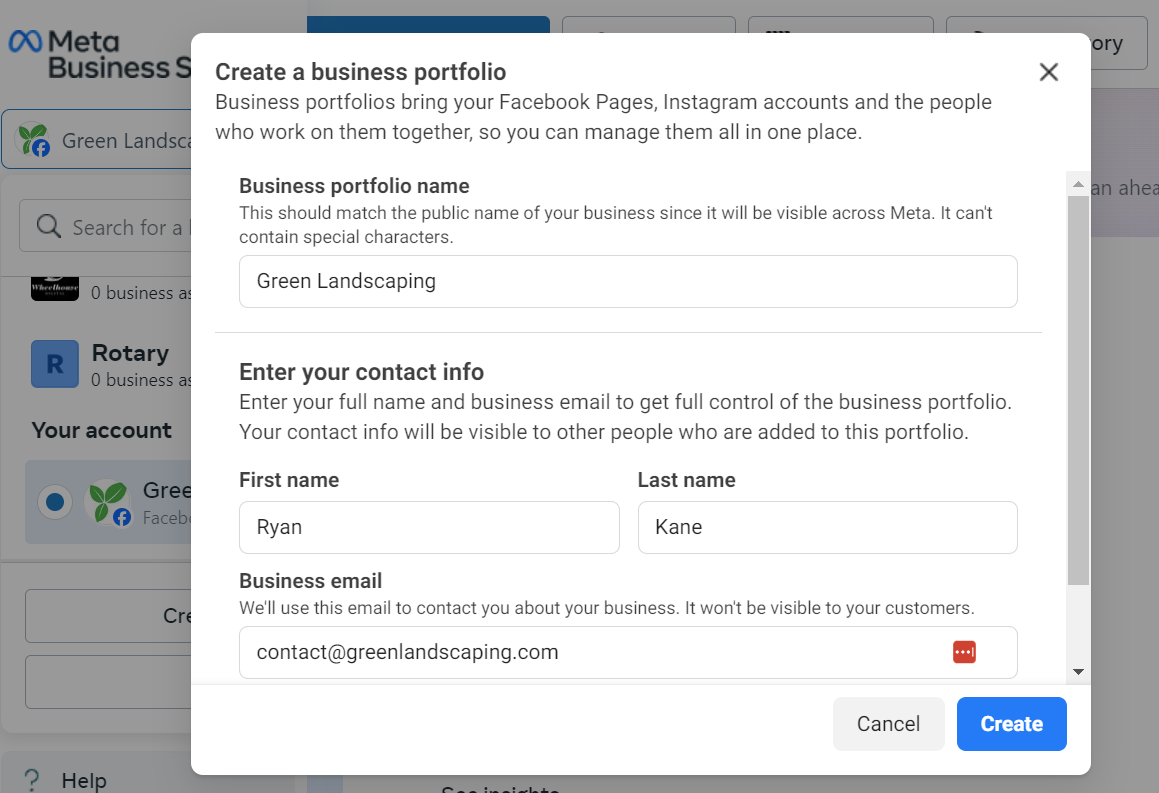
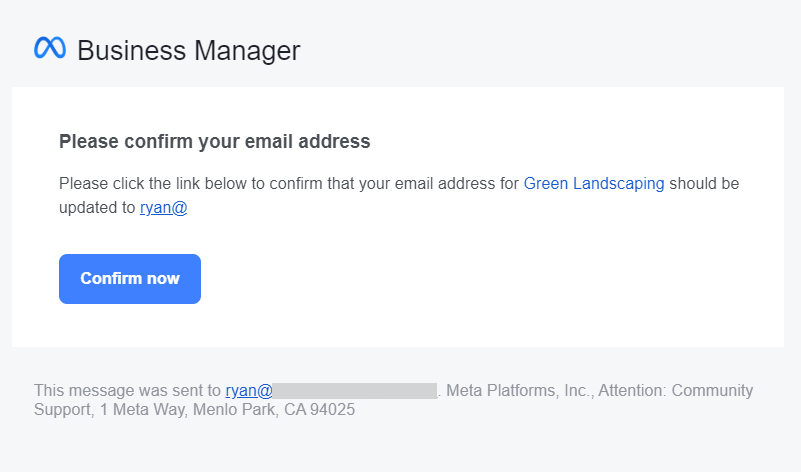
Go to your email and find the email with the subject line Confirm your business email.
Open and click Confirm now to verify your email.
Once confirmed, you can add your other business details like the business's legal name, address, phone number, and website.
After confirming, head back into the setup process.


(Note: Meta renamed Business Account to Business Portfolio in 2024, so you might see support documentation referencing the old name. They're the same, though.)
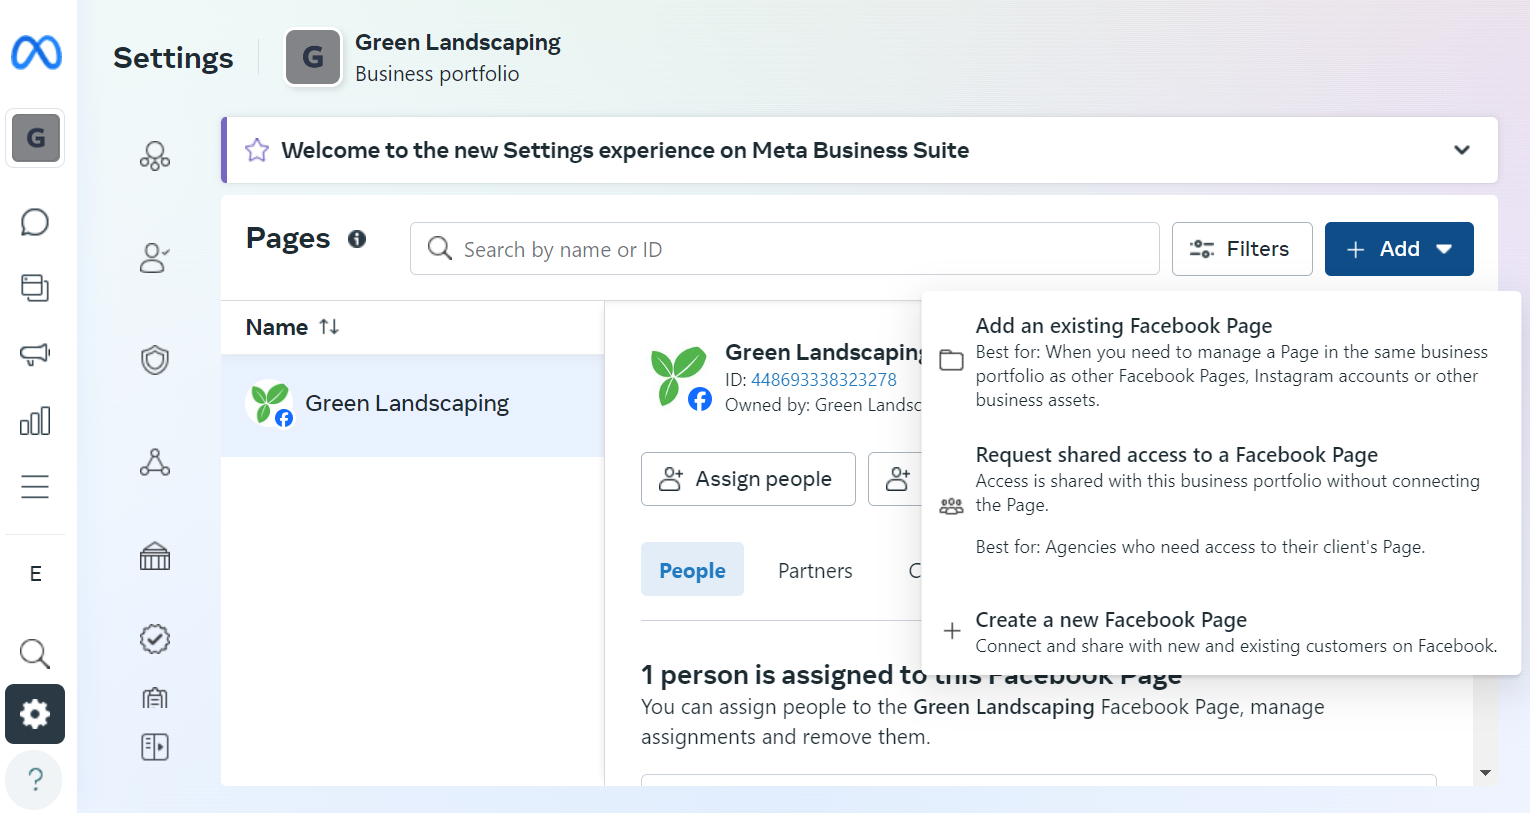
4. Add a Facebook Page to Facebook Business Manager
Now that you have a business portfolio, you'll want to pull relevant assets into it, like Facebook Pages, Instagram profiles, and ad accounts. Fortunately, the setup process makes this easy.
As you get started, you'll see a list of all the assets you have access to. Select the ones that are relevant for your business, and click Next.

Here's how to add more Pages to your Facebook Business Manager:
Navigate to Settings, then click Account.
Go to Pages.
Click Add.
Choose from the following options:
If you already have a Facebook Page, select Add an existing Facebook Page.
If you're requesting access to another Page, click Request shared access to a Facebook Page.
If you don't have a Facebook Page yet, select Create a new Facebook Page.

5. Add a Facebook ad account to Facebook Business Manager
If you already have a Facebook ad account, you can connect it to Facebook Business Manager by selecting it during the business portfolio setup process.
Or, add an ad account at any time by following these instructions:
In Settings, click Accounts and then Ad Accounts.
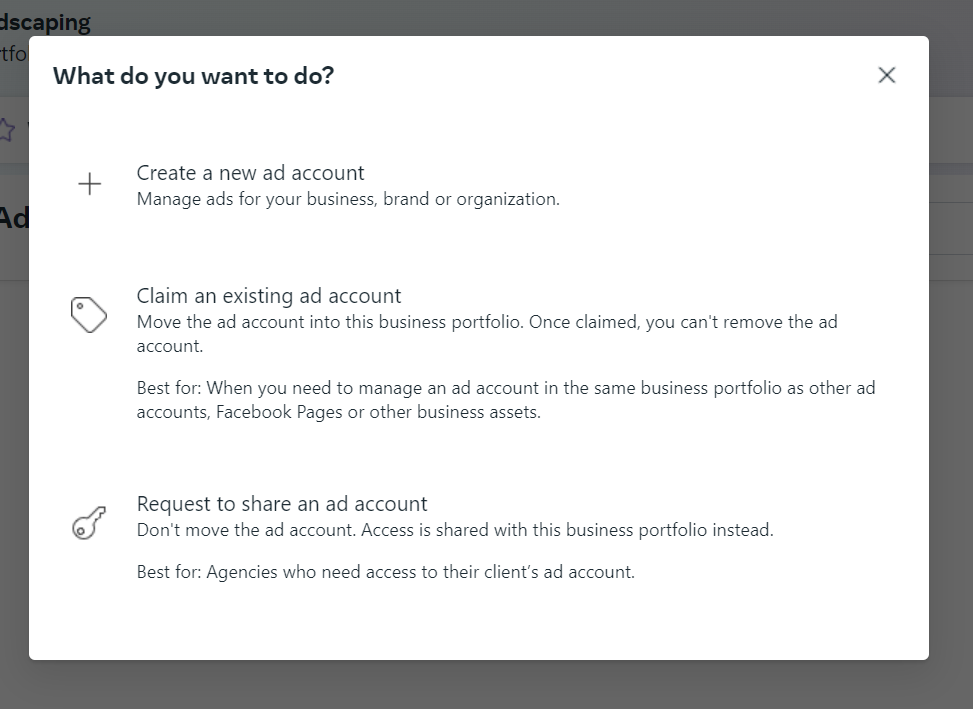
Click Add.
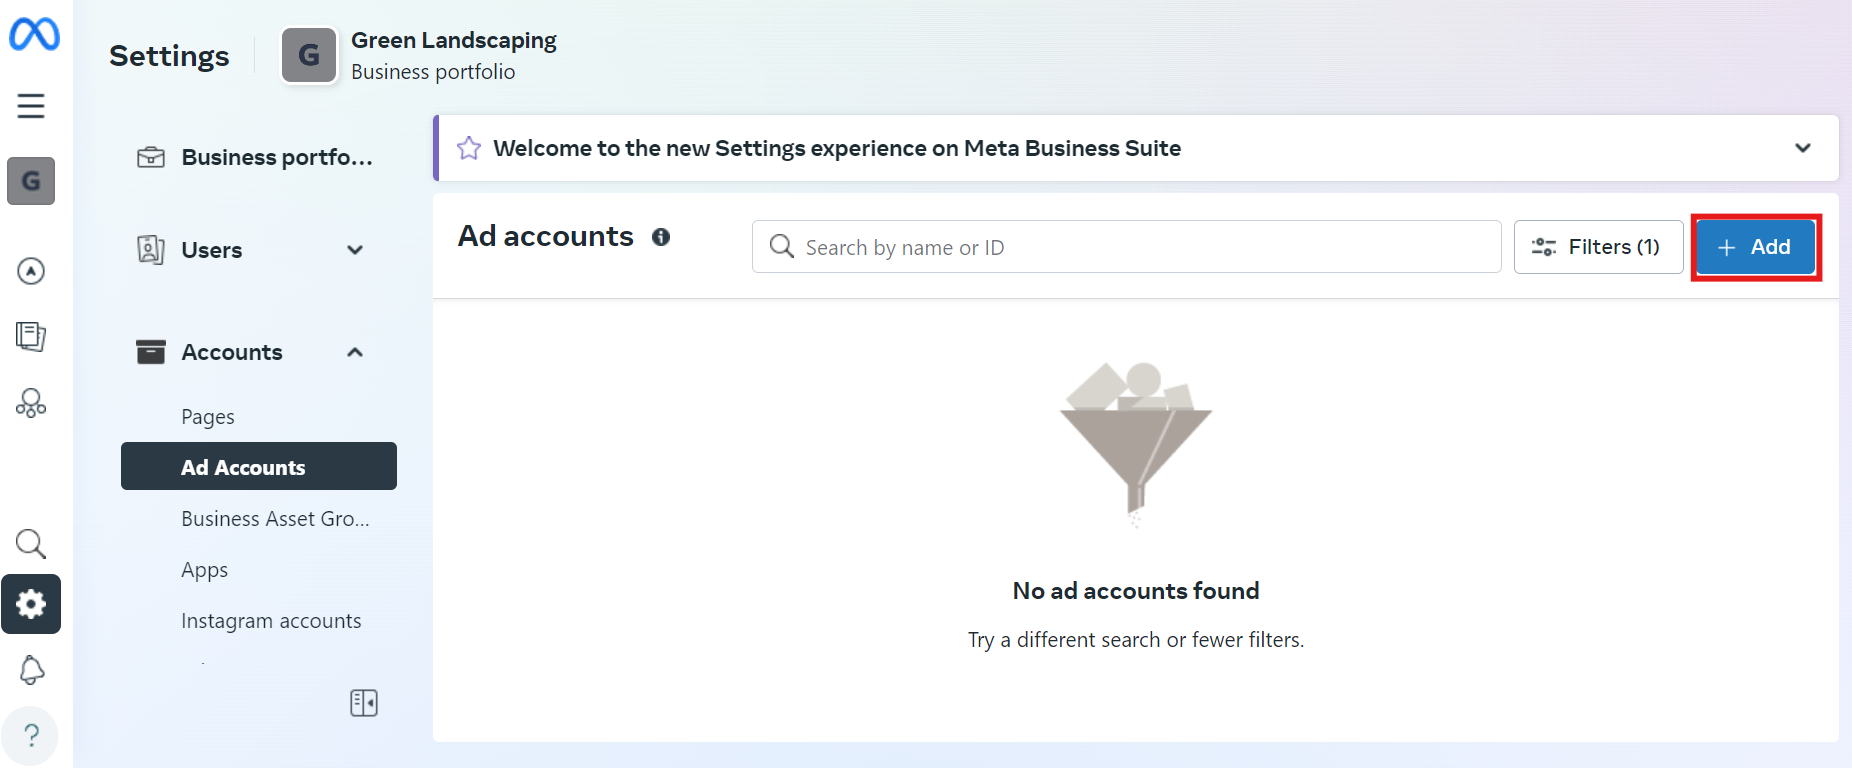
From there, you can decide whether to create a new ad account, claim an existing ad account, or request to share a client's or partner's ad account. (Note: you'll need the Ad Account ID of any ad account you want to integrate.)
If you don't have an ad account yet, click Create a new ad account.
If you already have an ad account, click Claim an existing ad account.
If you need access to a client's ad account, click Request to share an ad account.


6. Add users to Facebook Business Manager
You can add collaborators during the setup process to help you manage your Meta business portfolio. Just add each collaborator's email address and the level of access you want to provide. Once your account is set up, you can get into more advanced details.
There are three levels of access to consider:
Basic: Formerly the employee role, basic access is the most restricted and only allows users to work on assets you specifically assign to them.
Apps and integrations: Formerly the developer role, this is the access level you want to give for anyone who's working with APIs, monitoring events, editing applications, or creating access tokens.
Everything: Formerly the business admin role, this one is only for trusted partners because it lets users see and manage everything, including settings, people, tools, and assets. (They can also delete the business portfolio. Careful!)

Invite as many users and partners as you like during the setup process, but don't stress about getting it perfect. Later, you'll be able to add new users, customize each team member's permissions, and give access to marketing agency partners.
Here's how to add more users to Facebook Business Manager after your account is set up:
Navigate to your Settings
Click People and then Invite People.
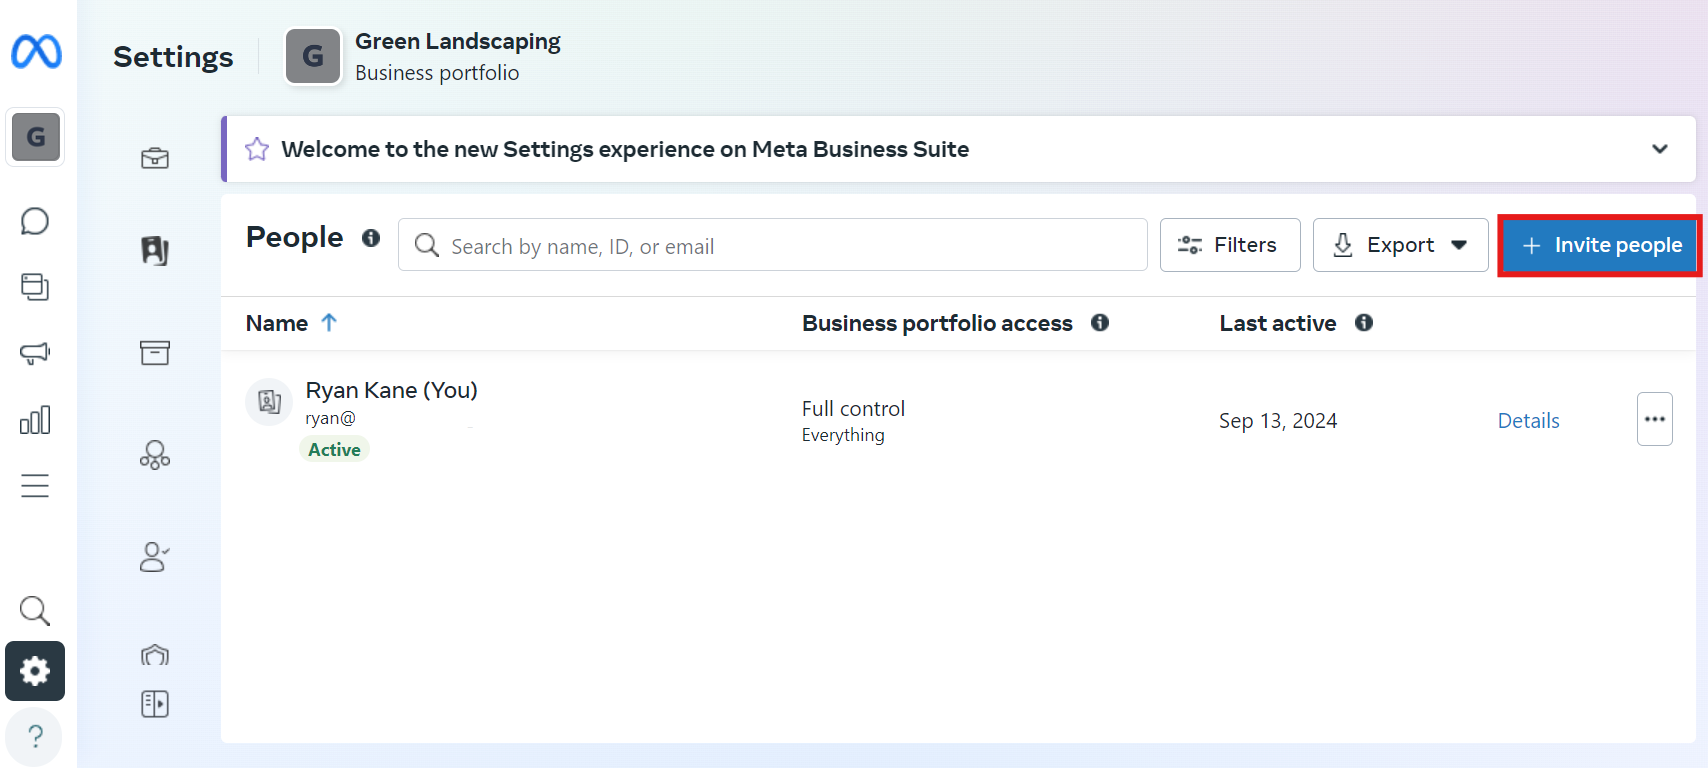
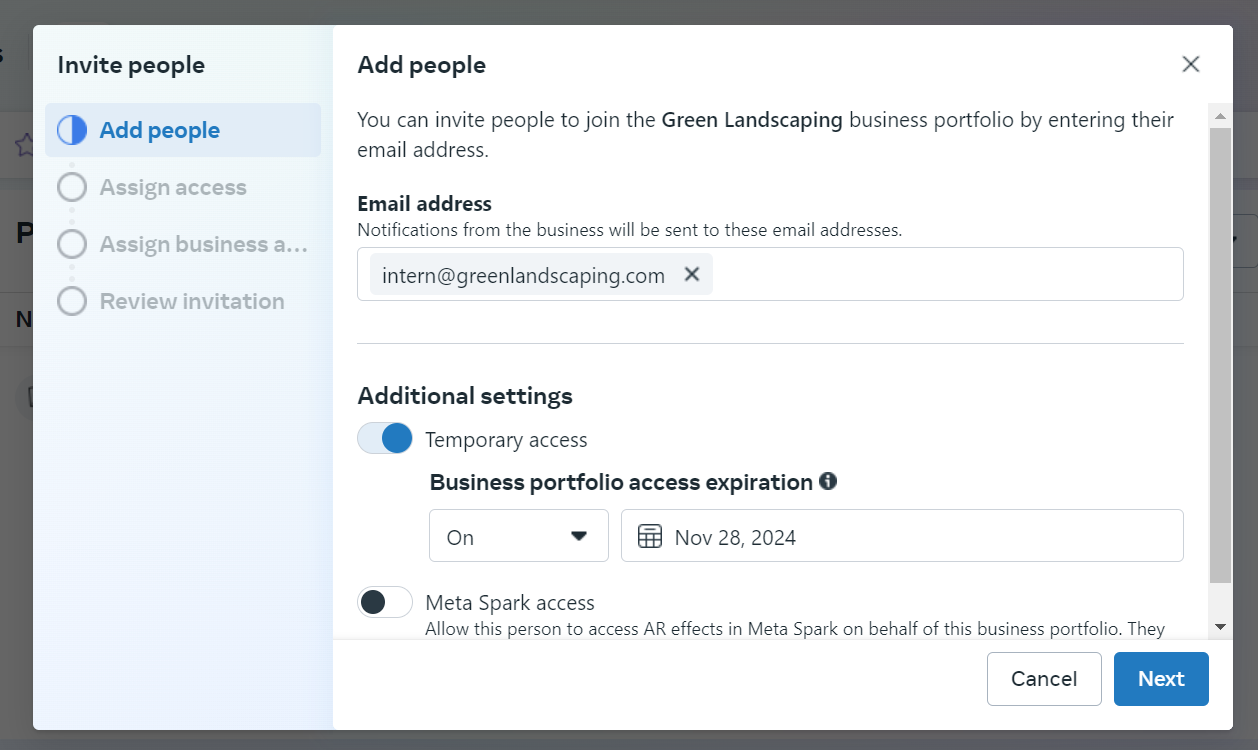
Add one or more email addresses.
Decide if access is temporary or permanent.
Set permissions and assign assets.
Send the invitation to collaborate.


For each person or group of people you invite, you'll be able to assign temporary access, adjust permissions, and select the specific business assets you want to give them access to.
7. Adjust business settings
Once you've finished the business portfolio setup process, you'll be sent to Settings.

The left-hand menus serve as a gateway into everything Meta offers, allowing you to run ads, create pixels, and review performance insights.
To start with, though, you can focus on adding an address, legal business name, and a business phone number, along with a description of your business.
This is also a good time to secure your account. To block unauthorized users, set up two-factor authentication and require it for any users who have access to your account.

8. Add partners to Facebook Business Manager
Now that your business portfolio account is set up, you can invite partners to collaborate with you and give them access to your assets. Go to Settings, then click Partners.
Here, you have two options:
Share assets with a partner: If you're working with an agency, select this option to specify which assets they can have access to.
Request assets from a partner: If you're part of an agency or collaborating with another organization, use this feature to request the assets you need.

If you're sharing access with a partner, click Add under Partner to share assets with. You'll need their business ID (that's the same as their Business portfolio ID).

From there, you can choose the assets and level of access you want to provide.

To request assets, you'll follow a similar process. Under Partner to request assets from, click Add, then provide your partner's Business ID, name, and email.

9. Connect Instagram and other social media platforms to Facebook Business Manager
If you didn't already connect all your relevant social media accounts during the business portfolio creation phase, now's the time to do so. You can amplify the power of Business Manager by linking your Instagram and WhatsApp accounts.
To connect Instagram to Facebook Business Manager:
Go to Settings.
Click Accounts.
Select Instagram accounts.
Click Add.
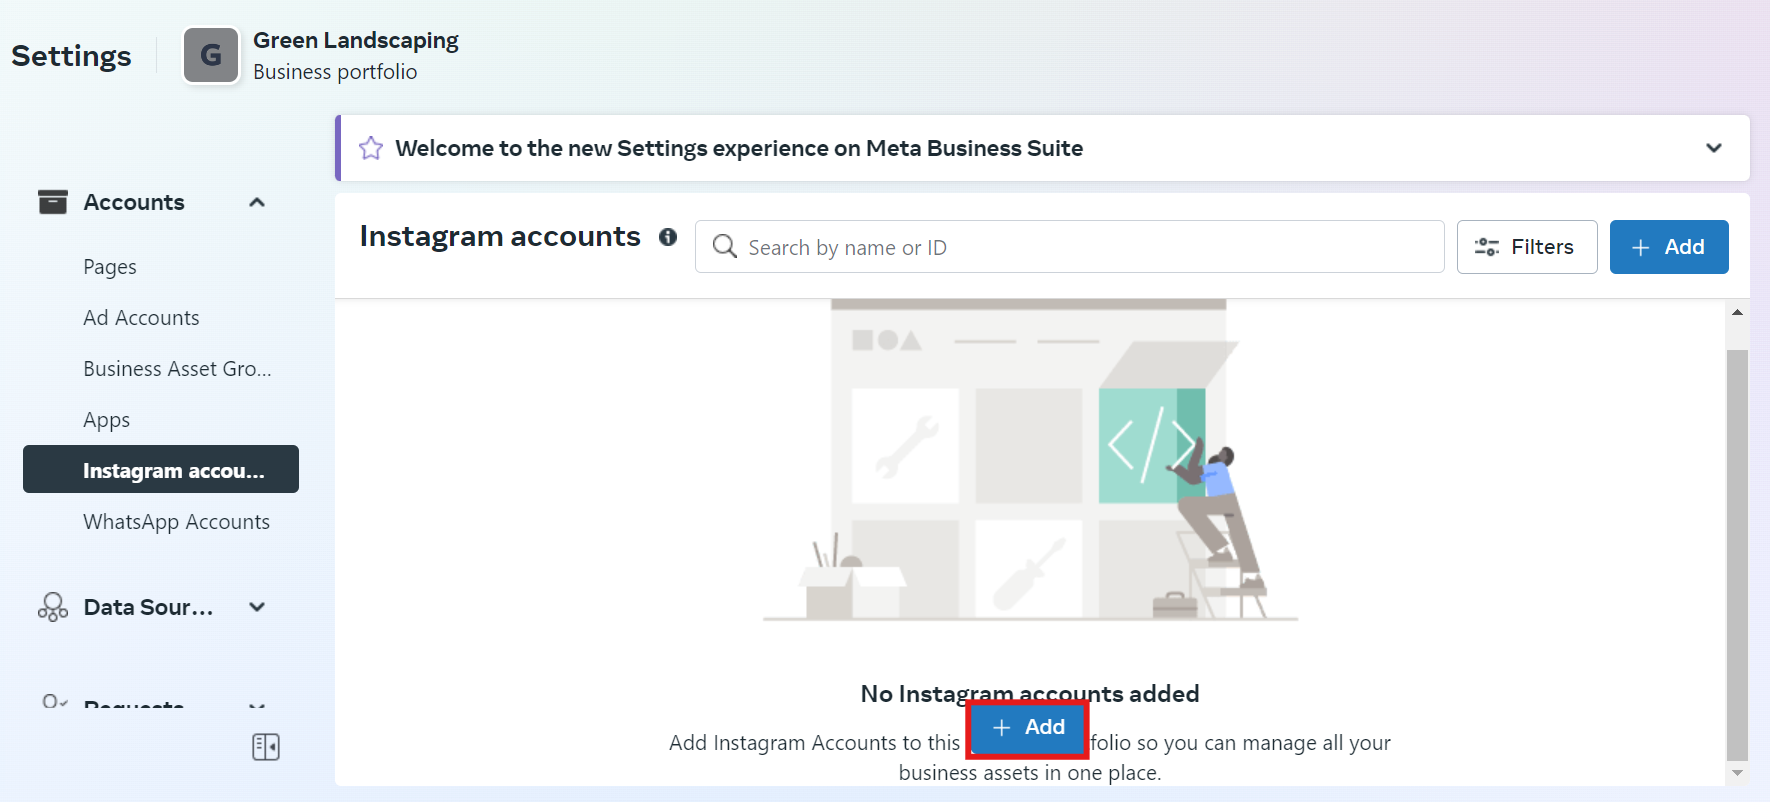
Log in to Instagram to claim the account you want to link.

Keep in mind that to add an Instagram account, it needs to be a professional account. (If it's a personal account, it'll be converted to a professional account when you connect it.)
To add a WhatsApp account to Facebook Business Manager:
Go to Settings.
Click Accounts.
Select WhatsApp accounts.
Click Add.
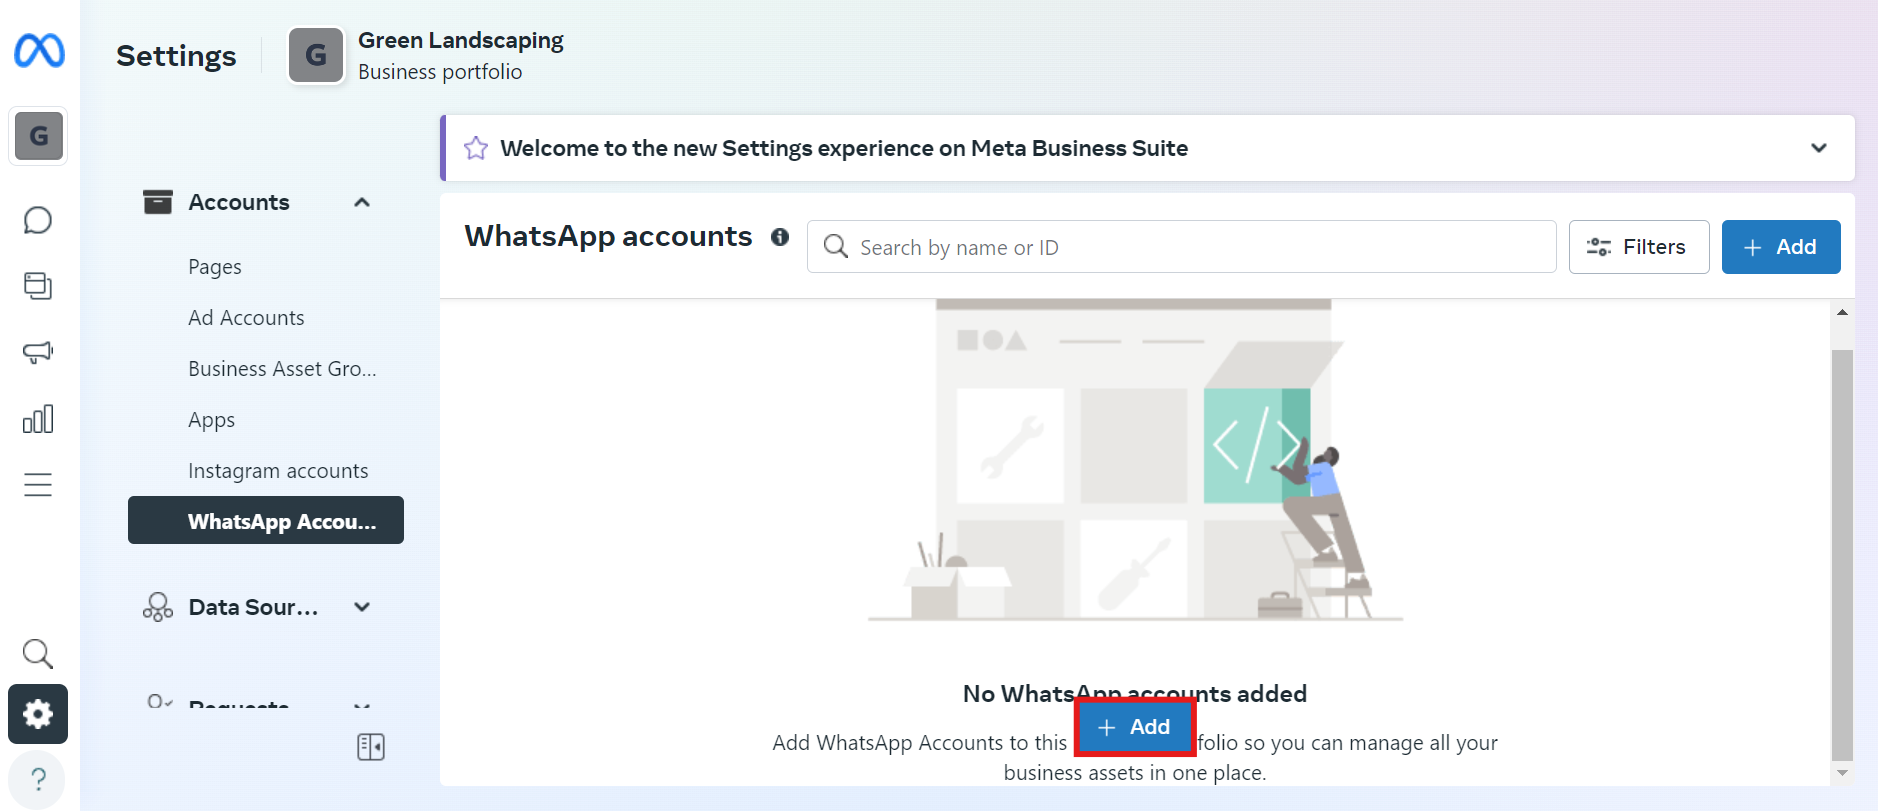
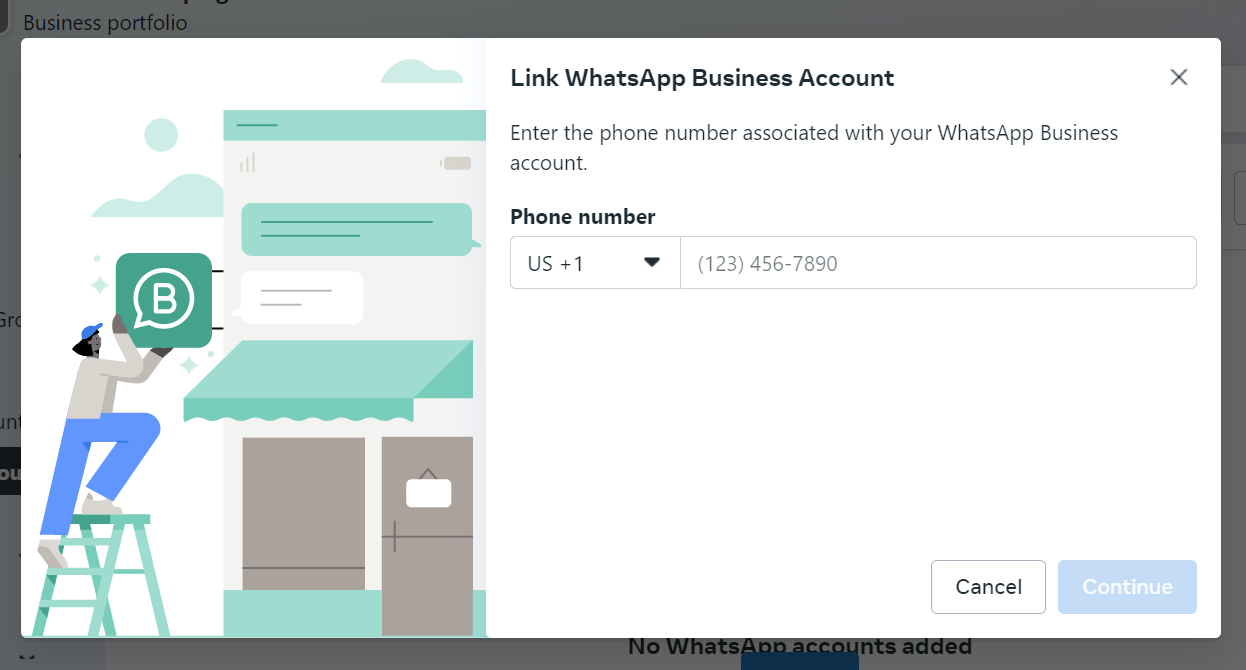
To proceed, you'll need to already have a WhatsApp Business account. Enter the number, and click continue to link your account.


10. Set up a Meta Pixel in Facebook Business Manager
The Meta Pixel (formerly known as the Facebook Pixel) helps track conversions and user activity. Due to changing privacy regulations, Meta is increasingly shifting users toward another solution called Conversion API. For now, you can still set up both.
If you're creating a pixel to track activity on a website, follow these steps:
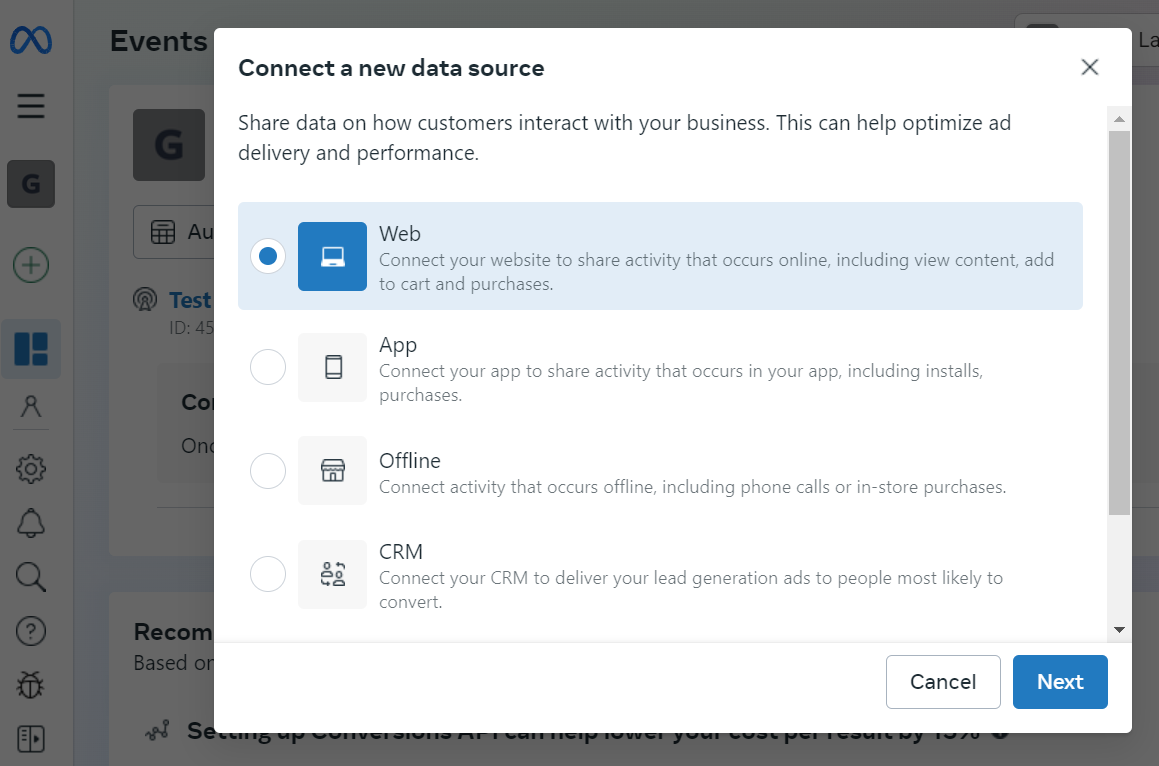
Go to Settings and select Events Manager.
Click the green + button to connect a new data source.
Select Web as the data source type.
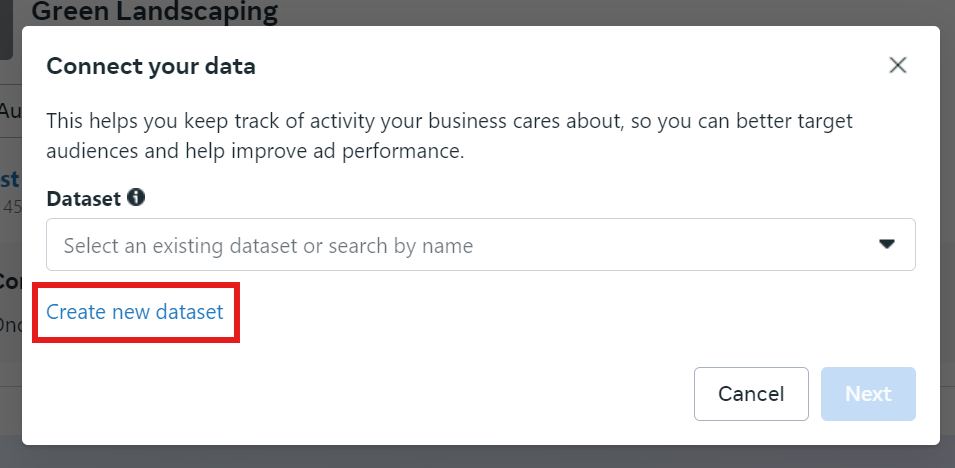
Click Create new dataset, click Next, and then give it a name.
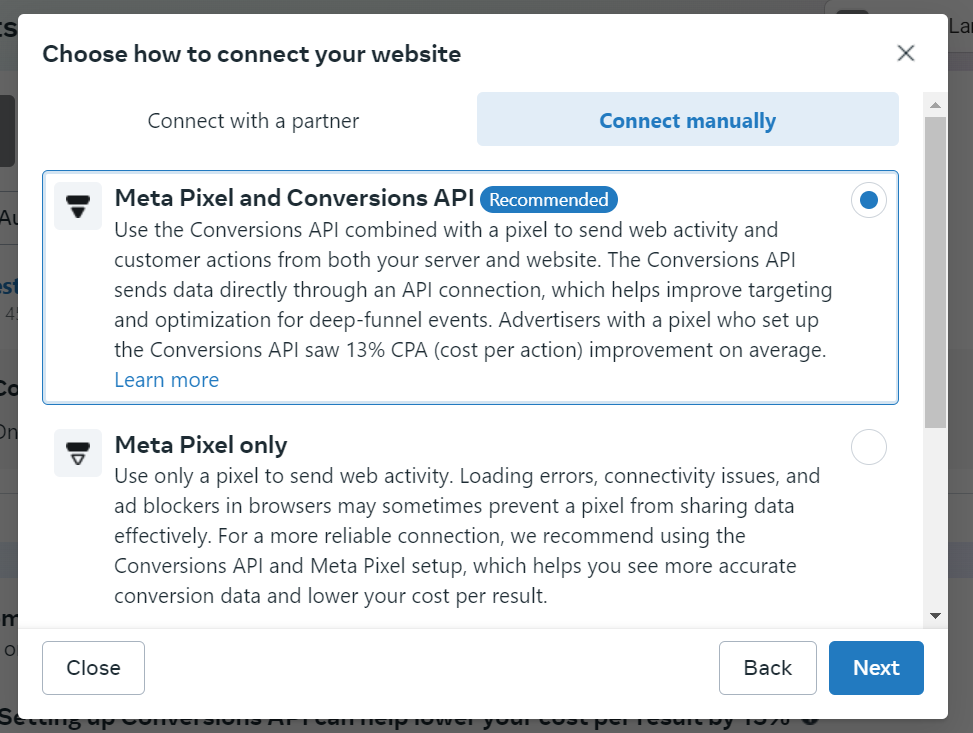
If you use a popular platform like Shopify or WordPress, click Connect with a partner to see your options. Otherwise, click Connect manually, and choose Meta Pixel and Conversions API (since privacy changes in browsers are making it harder for Meta's pixel to to accurately collect data). Click Next.
Follow the instructions to install Meta Pixel and Conversions API on your website.


How to create a campaign in Facebook Business Manager
Business Manager allows you to manage ad accounts, but to create a campaign, you'll need to navigate to Ads Manager.
1. Open Ads Manager
To get started with this process in Business Manager, go to Settings and click Ads Manager on the left-hand menu.

Once you're in Ads Manager, click Create Ad.

2. Set your campaign parameters
What's your campaign objective—website traffic, likes, leads, sales, impressions—and how much budget are you willing to put behind it? By choosing an objective for your campaign, you'll inform the rest of the process.

For a deep dive into Facebook strategy, check out Zapier's guide to creating a Facebook ad strategy.
Once you've chosen an objective, Facebook will give you the choice to set up your campaign manually, or go with its recommended settings. Then, you'll need to give your campaign a name and choose your budget and timeframe.

3. Identify your audience
With a potential audience of billions of people, narrowing down your audience is key. Facebook's Advantage+ tool helps you identify relevant audiences based on behavior, interests, geography, and demographics. If you're an advanced user, consider drilling down further by creating a lookalike audience or custom audience.

4. Select your ad placements
Meta's platforms host a wide range of content, so you'll need to decide where you're comfortable having your ads show up. Using the brand safety options, choose the ad inventory you prefer. You also have access to a growing set of placements, from Instagram posts to the Facebook feed to the billion stories posted daily across Meta's apps.
If you're not sure what placements to select, you can use automatic placements determined Meta's algorithms.

5. Create your ad
Facebook and Instagram are noisy places, so to stand out, you'll need an ad with eye-catching visuals and unbeatable ad copy. Create ads that are hyper-relevant to your audience, then select a call-to-action (CTA) that makes sense for your audience and campaign objectives.

To figure out which Facebook advertising strategies work for you, check out these examples of successful Facebook ads. There are many ways to create an ad that resonates, but all of them share something in common: experimentation and A/B testing. Make sure to run multiple ad creatives to see what your audience responds to.
Once your ad is ready, click Create Your Ad to launch it.
Connect Facebook to other apps
With Zapier's Facebook integrations, you can make Facebook more useful by connecting it to thousands of other apps. Automatically send leads to your CRM, add contacts to a custom audience, and anything in between. Learn more about how to automate all your Facebook business workflows, or get started with one of these pre-made workflows.
Subscribe new Facebook Lead Ad leads to a Mailchimp list
Add new Salesforce contacts to a Facebook custom audience
Send new paid orders in Shopify to Facebook conversions as purchase events
You can use also use Zapier Tables to store, track, and follow up on your leads—all automatically, and all from one place.
Zapier is the most connected AI orchestration platform—integrating with thousands of apps from partners like Google, Salesforce, and Microsoft. Use forms, data tables, and logic to build secure, automated, AI-powered systems for your business-critical workflows across your organization's technology stack. Learn more.
Related reading:
This article was originally published in January 2024. The most recent update was in September 2024.


