Content teams produce all sorts of content. For the last seven years, I worked on a content team at Slack that grew from two members to more than a dozen, and we increased our publishing frequency to match. In the early days we posted a couple of product announcements a month. But by the time I left, my team was pushing out multiple pieces each day across a variety of content channels. Here's how we automated our transcript process to help speed up our content production.
This workflow requires a paid Zapier plan.
Dealing with interview transcripts
No matter what kind of content my team produced, almost every project included interviews with customers, partners, and engineers for gathering background research and nabbing choice quotes before we'd begin writing stories. Typically, we'd conduct an interview over Zoom, save a video file locally, then upload it to Rev, a service that creates detailed transcripts.
In the old days, what followed was time-consuming and created a bottleneck.
Someone would have to look for emails from Rev when the transcript was ready—which was anywhere from hours to days after uploading. Then they'd log in to Rev and download a Word .docx file, upload it to Google Drive (our team doesn't use Office), convert it to a Google Doc, then change share settings so anyone in the company could view and edit the file.
Lastly, the person doing all these tedious steps would have to share a link to the Google Doc with the writer/interviewer so they could start grabbing pull quotes and crafting their story.
How to automatically create transcripts
My favorite Zapier usage to date was automating everything that happened after we upload our Zoom video to Rev. It's a three-step Zap that saved real time for my team. Follow along as I walk through the steps.
Step 1: Get transcripts from Rev
First we need to create a link between Rev and Google Docs that kicks in whenever a new transcript is created. This step will automatically upload any new transcript files to Google Docs where they will be auto-converted for use by your team.
To get started, head to your Zapier dashboard and click the Create Zap button in the upper-left corner. Search for and select Rev for your trigger app, then choose New Automated Transcript for your trigger event—this is what will kick off your Zap. Then, click Continue.
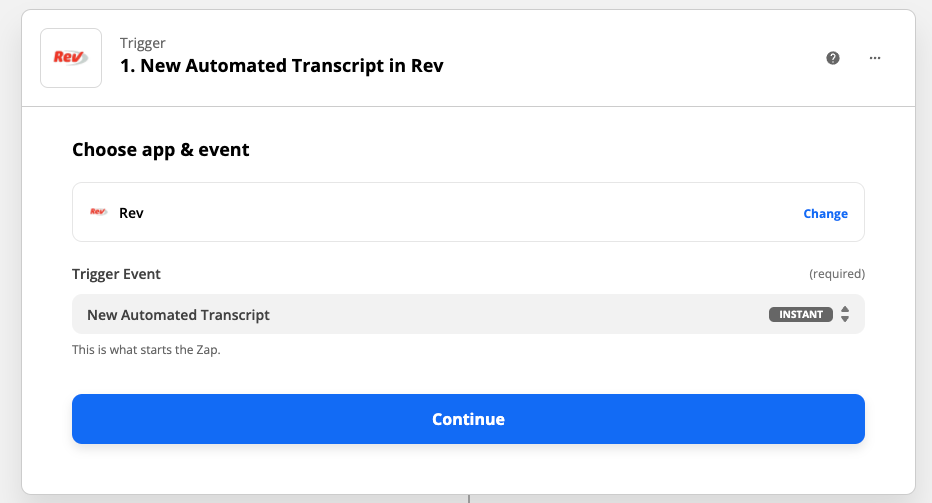
You'll want to have at least one automated transcript in your account for Zapier to look for when you test your trigger step. If you don't already have one, go ahead and add one now.
Step 2: Convert transcript to Google Docs
Now you'll set up your first action step.
Search for and select Google Docs for your action app and then Upload Document for your action event and click Continue. Connect your Google account, or choose it from the list of available accounts if you've already connected it to Zapier.
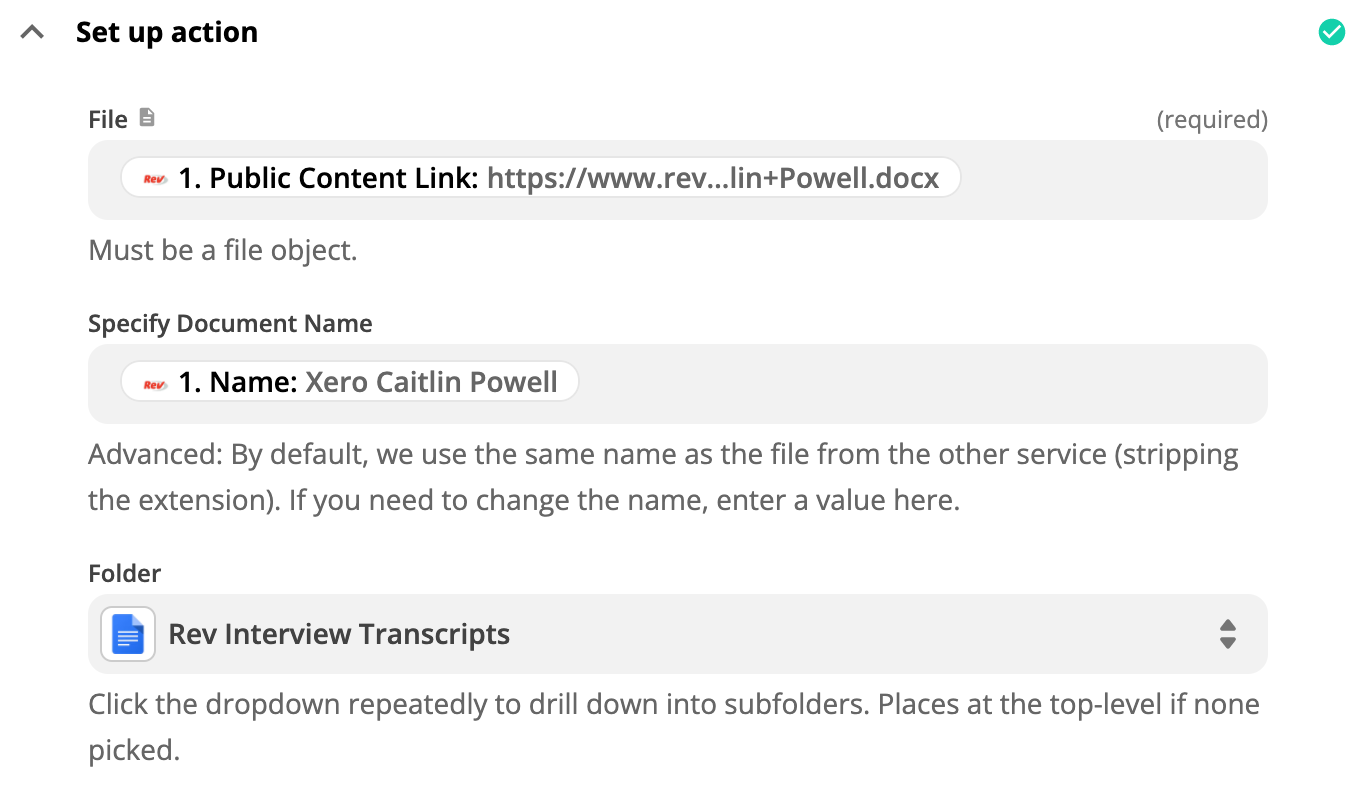
Now set up your action step. Click in the File field to select the correct file from your Rev account. Then give it a name that corresponds to the subject matter in the Specify Document Name field.
In the Folder field, make sure to select a folder in Google Drive you've already shared with everyone in your organization who needs to access these transcripts—this is where the new transcripts will go. Any new Google Docs created in that folder will automatically inherit those settings, letting anyone view and work with the file.
Test this step, and, when everything looks right, click Continue.
Step 3: Send transcripts to Slack
The third and final step is to send a new message in Slack announcing the transcript is ready. Our team created a public channel called #content-transcripts where anyone in the company that uses our Rev account (like our Internal Comms and User Research groups) can find copies of their interviews. The message mentions the title of the document and includes a link that you can click to start working with it instantly.
Click the plus icon (+) to add a third step to your Zap. Search for and select Slack as the action app, and choose Send channel message as the action event. Continue, connect your account if needed, then set up your action.
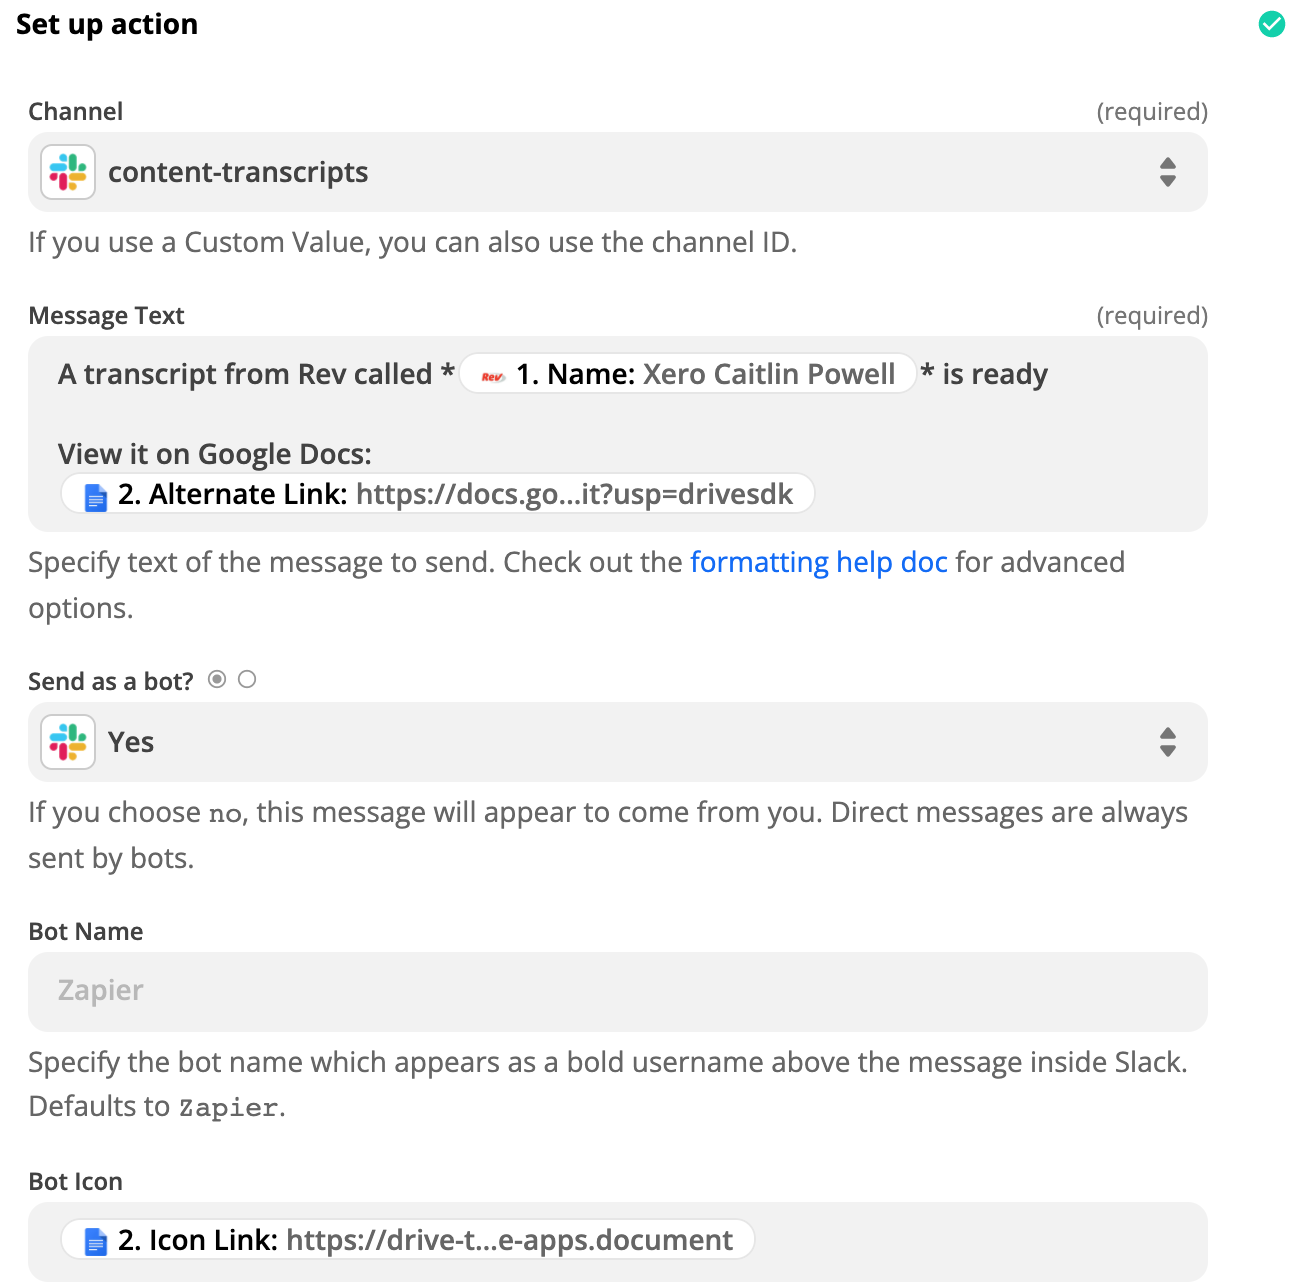
Anything you want to appear in every message should be typed in the Message Text field.
Information that changes based on what's happened in the prior steps should be mapped (these are the elements that have the logos for Google Docs and Rev along with text in the lighter colored ovals in the screenshot below). You can add in information from prior steps by clicking in the Message Text field and selecting items from the dropdown.
Here's what that looks like in Slack:

You'll notice that the file name is bolded in the message. When setting up your Zap, you can use Slack's text-based formatting to make text appear in italics, bold, and more within the message Zapier sends. In this case, I've marked it bold by adding asterisks on either side of the Rev file name.
Learn more about formatting Slack messages in Zaps.
Final tips
If your content team recreates this Zap, don't forget to create a folder in Google Drive to house all the transcripts and make sure it automatically shares any files within it across the whole organization. I set mine to give full edit control to anyone in the company, and it hasn't been a problem to date.
You can also streamline alerts when a transcript is ready by editing the filename of your Zoom video before uploading to Rev to include a mention of your screen name in Slack. If you use that name as a notification keyword in your Slack preferences, you'll get pinged the moment it's ready.
Save time, save frustration
These days, the Slack team frequently conducts a couple of interviews each day. The 10 minutes or so it used to take for someone to open an email, log in to a service, download a doc, upload it to another service, wait for conversion, then change share settings before sending out a message in Slack was tedious. But it wasn't until production staff went on vacation that we realized relying on one person looking for emails from Rev was a real blocker on everyone's projects.
I often say the best way to improve your working life is to figure out what the most annoying aspect of your job is, then look to see if there's a way to automate it so you never have to do it again.
Given my team's use of Rev for our transcripts, we save hours of time when no one has to do all these steps by hand. Today, whenever I finish a Zoom interview and upload it to Rev, I wait for a ping on the transcripts Slack channel later that day or early the next morning. When I see my new transcript appear, I can immediately dive in and work with no muss and no fuss.
Automated workflows like this can be created in minutes and save teams hours each year. It took about 20 minutes of testing and tinkering to set this Zap up, and I haven't had to change it in over two years. It's worked in the background the whole time, helping everyone get their transcripts in Slack quickly and freeing all of us from having to do it manually.
