
I teach classes online via Zoom, and for a host of reasons, many of my students don't attend these sessions live. It's a good thing, then, that Zoom makes it easy to record and share these classes with those who may have missed it or need to review what was said.
No matter what you're recording—class lectures, company meetings, or webinars—here's how to record a Zoom meeting from your desktop or phone.
(Note: To record a Zoom meeting, you need Zoom on macOS, Windows, or Linux.)
Table of contents:
Local vs. cloud storage
Before we dive into Zoom recordings, it's important to know where you're storing those recordings. When you record in Zoom, you have to choose whether to use the local or cloud option. Here's the difference:
Local means you store the video file yourself, whether locally on your computer or in another storage space that you provide.
Cloud means Zoom stores the video for you in its cloud storage. One major convenience of the cloud option is that people can stream the video in a web browser once it's ready. This option is available for paying users only, and the amount of available cloud storage will vary depending on your account type.
It's also worth mentioning that you have to use cloud recordings to get the following features:
Record Active Speaker, Gallery View, and shared screen separately (local recordings will always show a thumbnail gallery view with the shared screen)
Audio transcription (but you can save closed captions as a separate file)
If you want to use any of these features and you're on a paid account, be sure to record to the cloud.
How to enable local or cloud storage
Here's how to enable or disable local or cloud storage in Zoom.
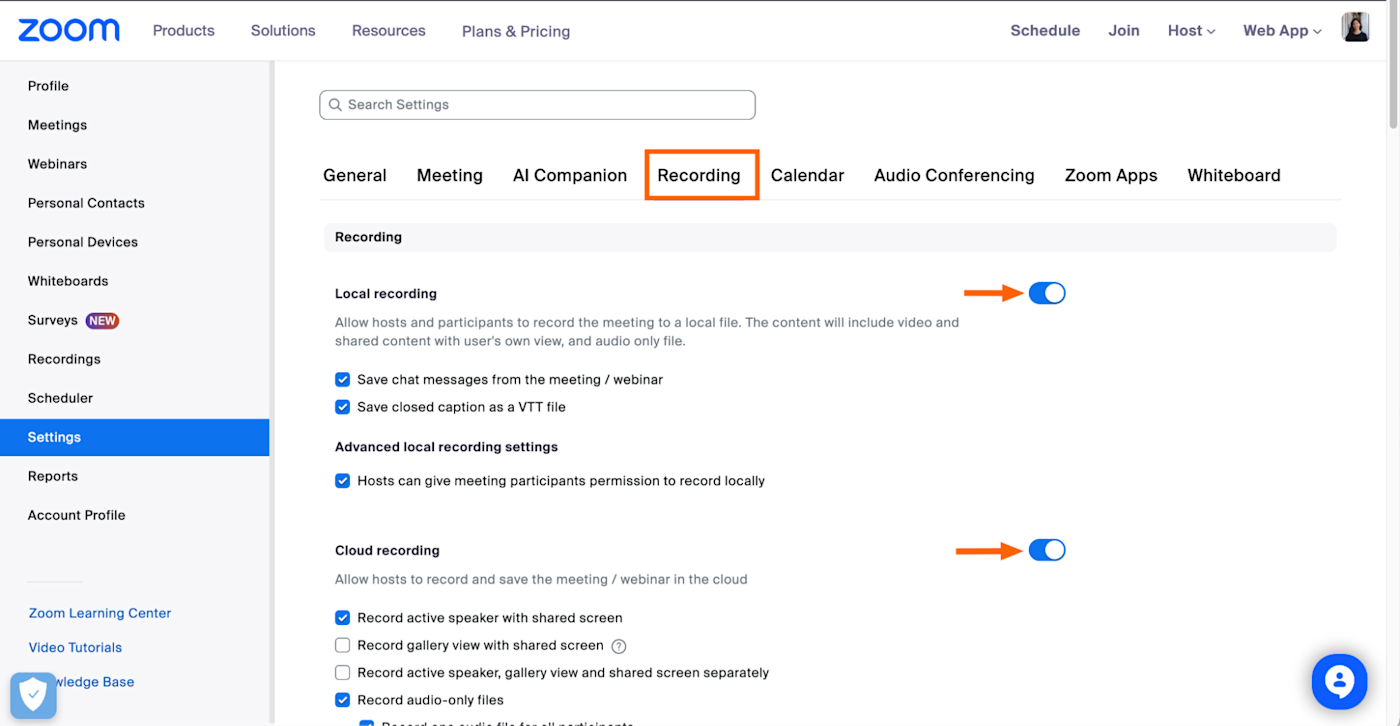
Log in to your Zoom web portal (e.g., CompanyName.zoom.us).
Click Settings.
On the Settings page, click Recording.
Click the toggle next to Local recording and Cloud recording to enable or disable the setting.

Note: Your account administrator may limit you from editing recording settings, so if you don't have the option to, that's probably why.
If you plan to store your recordings locally, I recommend choosing where to store those recordings prior to starting a meeting.
Log in to your Zoom desktop client (the desktop app).
Click the Settings icon, which looks like a gear.
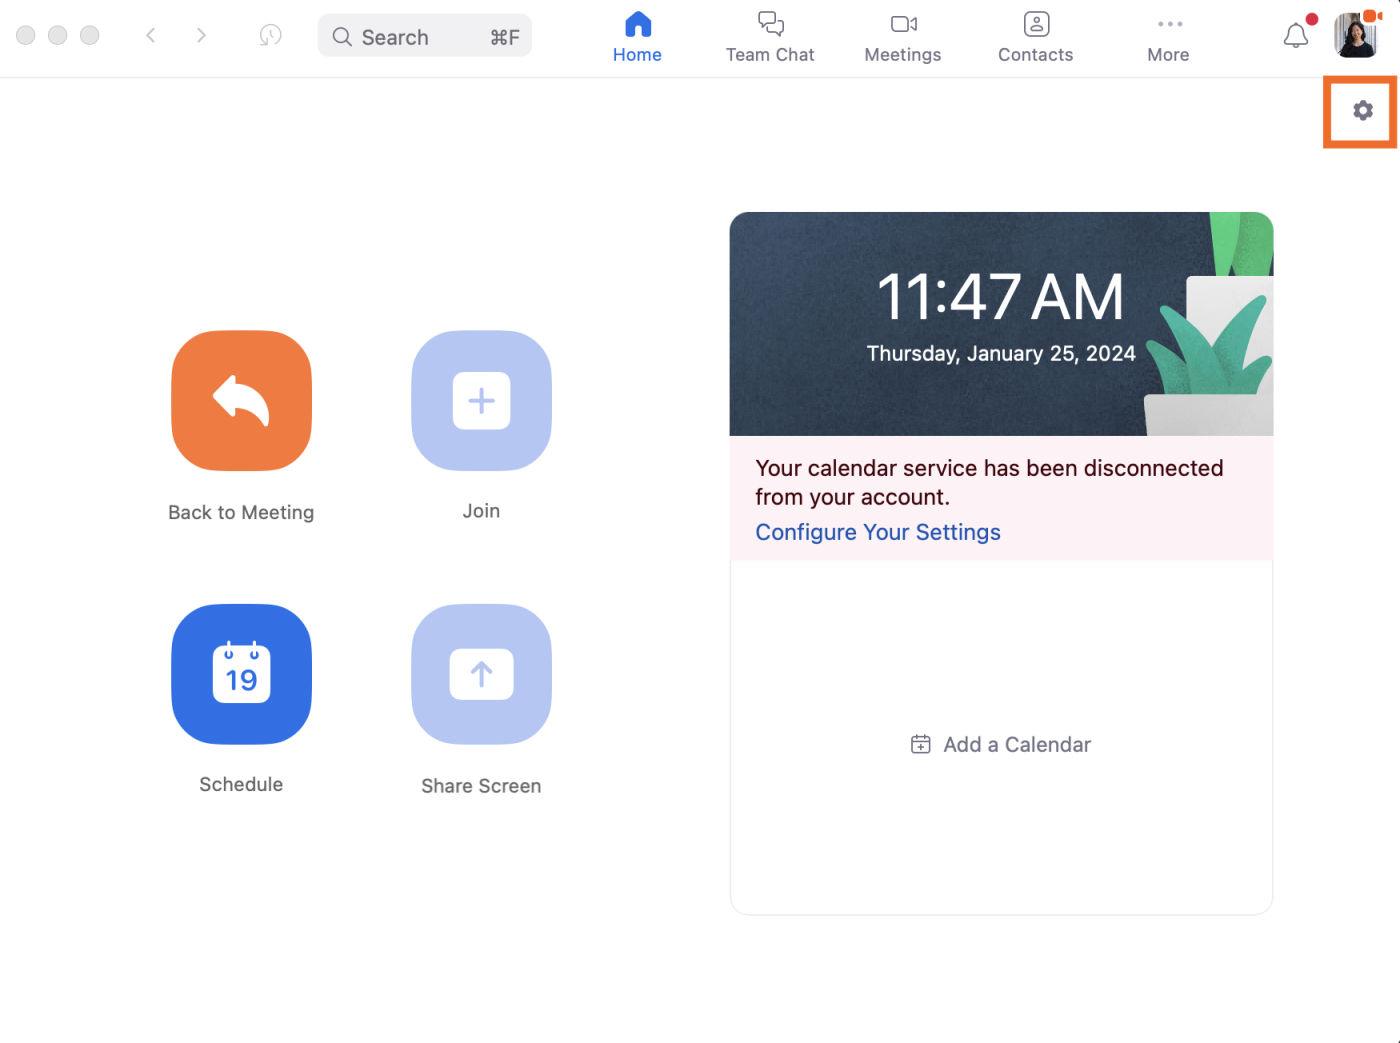
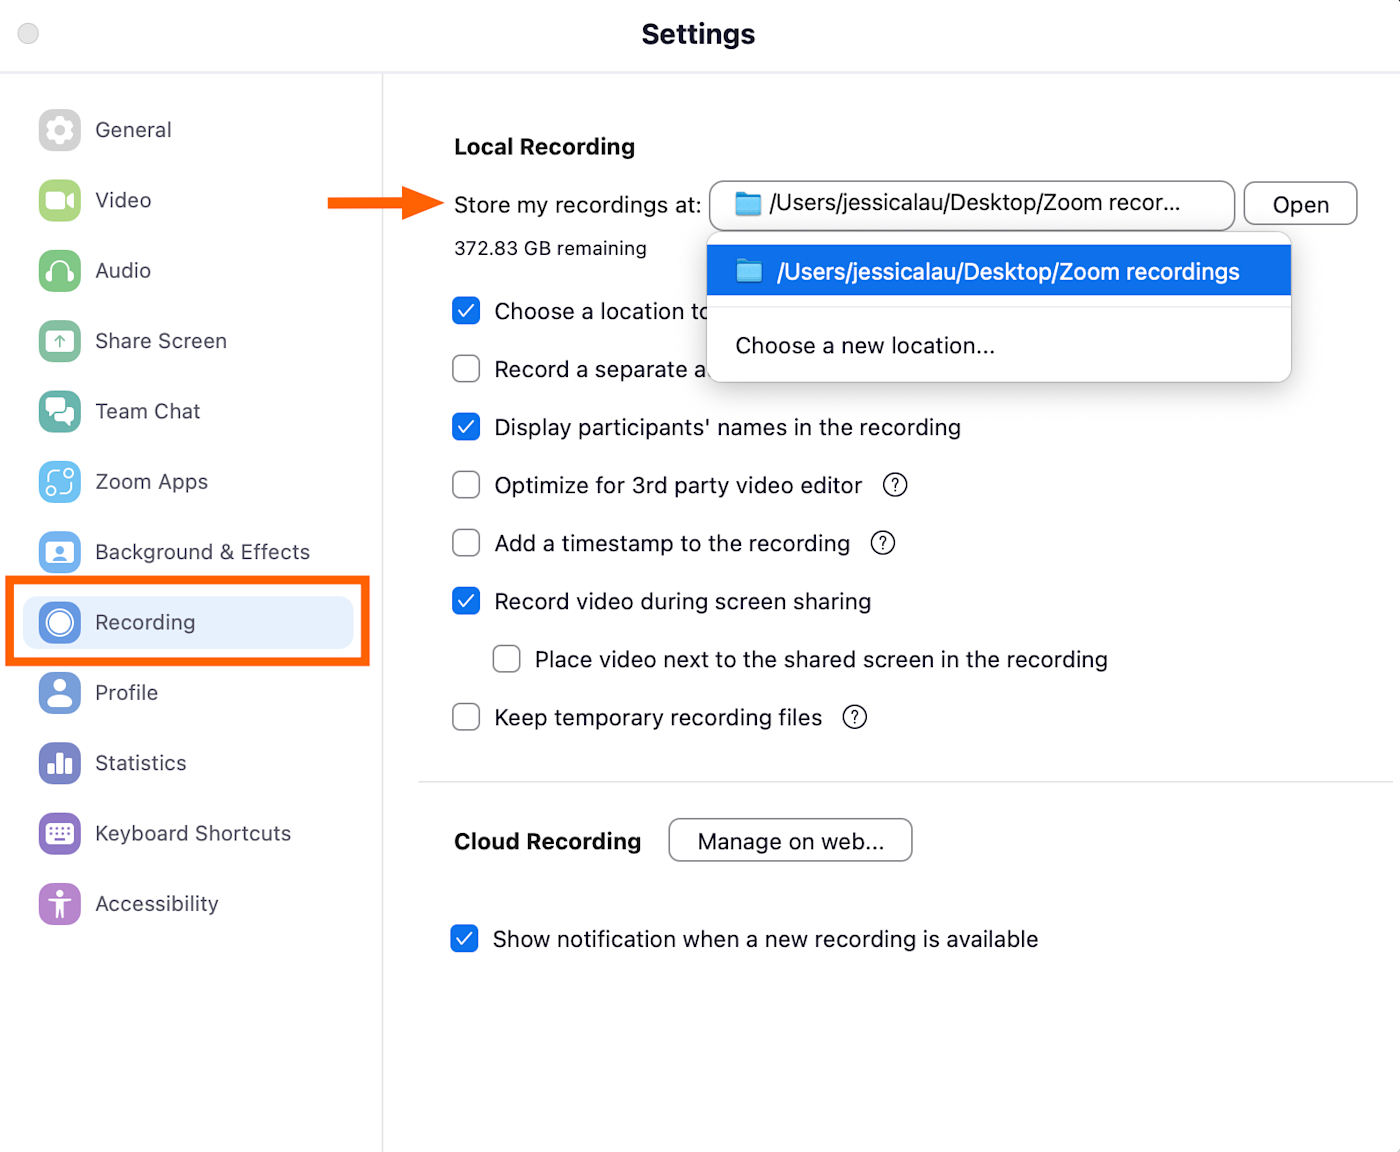
Click Recording.
Next to Store my recordings at, choose where you want to store your recordings.


One other thing: When creating a video from a conference call, it makes a big difference in the final quality if you optimize a few settings in advance. For example, some calls might be broadcast-style, where only the host appears on screen. In that case, set Zoom to record only the audio and video of the host (deselect Record gallery view with shared screen and Record active speaker, gallery view and shared screen separately).

Other calls might be in the style of a collaborative meeting, in which case you want to record everyone.
Once you've updated your recording settings, everything from here on out is a breeze.
How to record a Zoom meeting from your desktop
If you're the host or co-host of a meeting, here's how to record a Zoom meeting from your desktop.
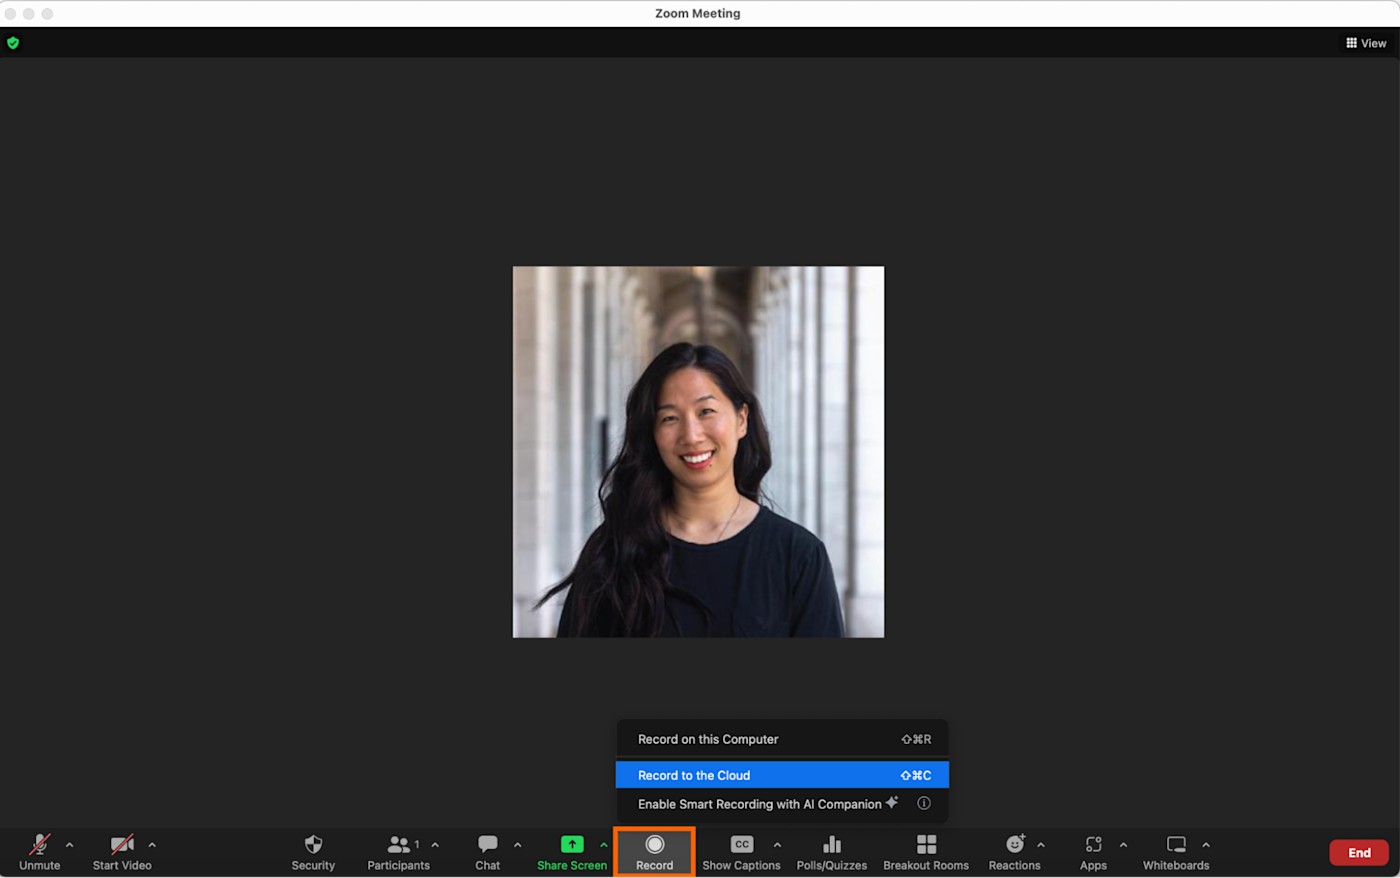
During a Zoom meeting, click Record in the control bar.
Select Record on this Computer or Record to the Cloud. (Zoom offers keyboard shortcuts for this, too, but using them only highlights the option you want—it doesn't actually initiate recording to your desired location.)
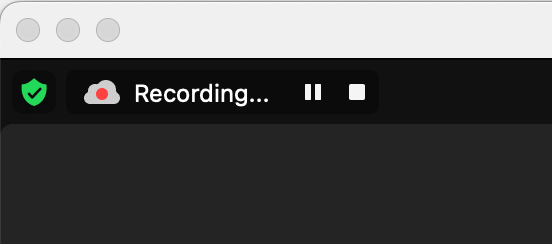
Zoom will display a subtle Recording… message and icon in the top-left corner of your screen to let you know you're recording. And if there are participants in your meeting, Zoom will notify everyone that the meeting is being recorded.
Need to pause the recording? Click the Pause recording icon in the control bar or next to the Recording message in the top-left corner of your window. When you're ready to start up again, click the same button (it'll read Resume recording instead).
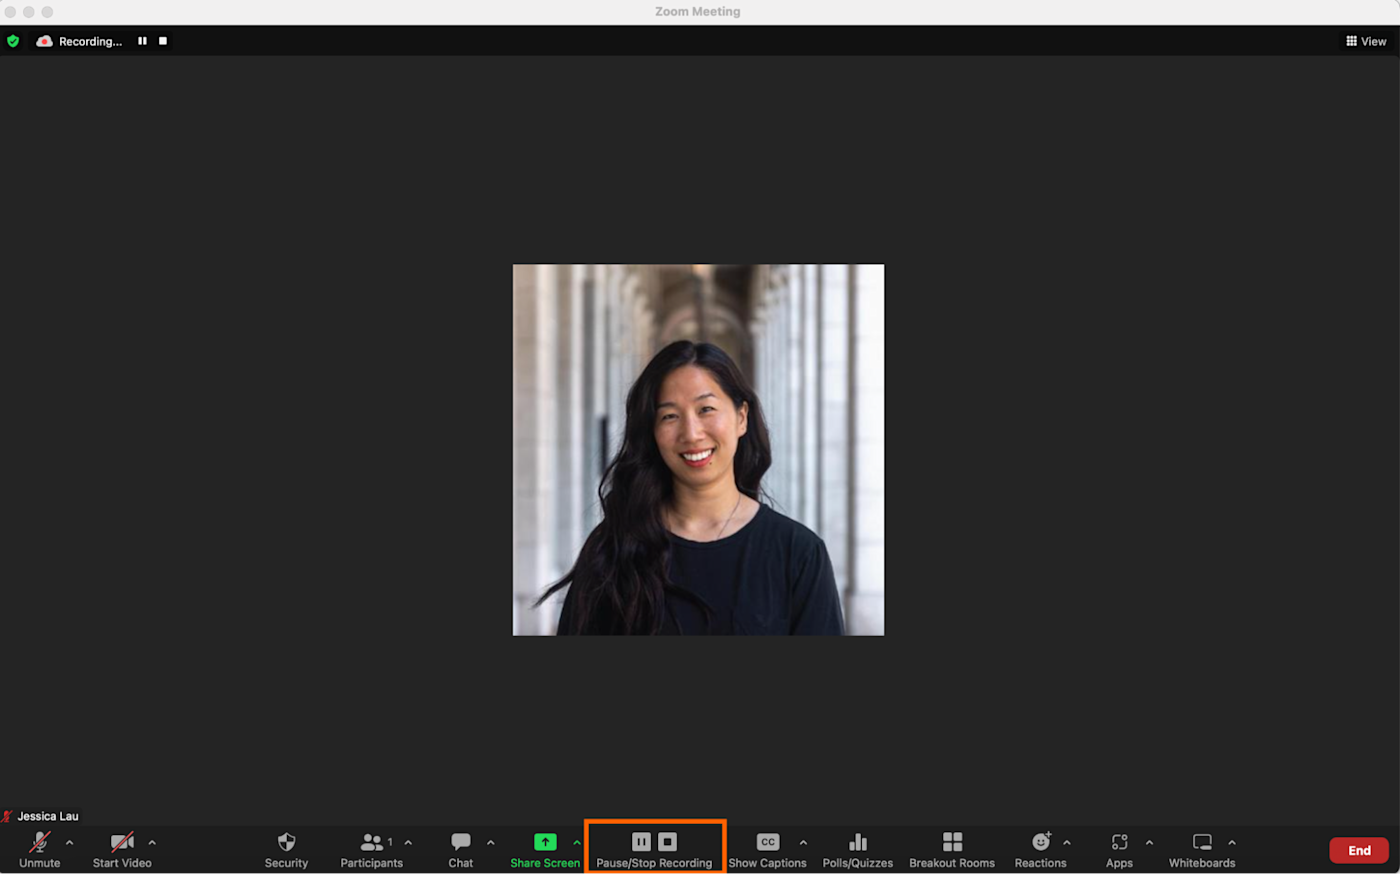
Once you're done, click the Stop recording icon in the control bar or next to Recording… in the top-left corner of your window.


Let's say you want to record multiple videos. Start and stop your recording as you normally would—you don't need to create a new meeting. Once you're done recording everything, click End to end the meeting. Zoom will create separate files for each recording, but will group them together under the same meeting topic.
How to record a Zoom meeting from your phone
Joined a Zoom meeting from the mobile app? If you have a paid account, here's how to record a Zoom meeting from your phone. By default, these Zoom recordings are stored in the cloud.
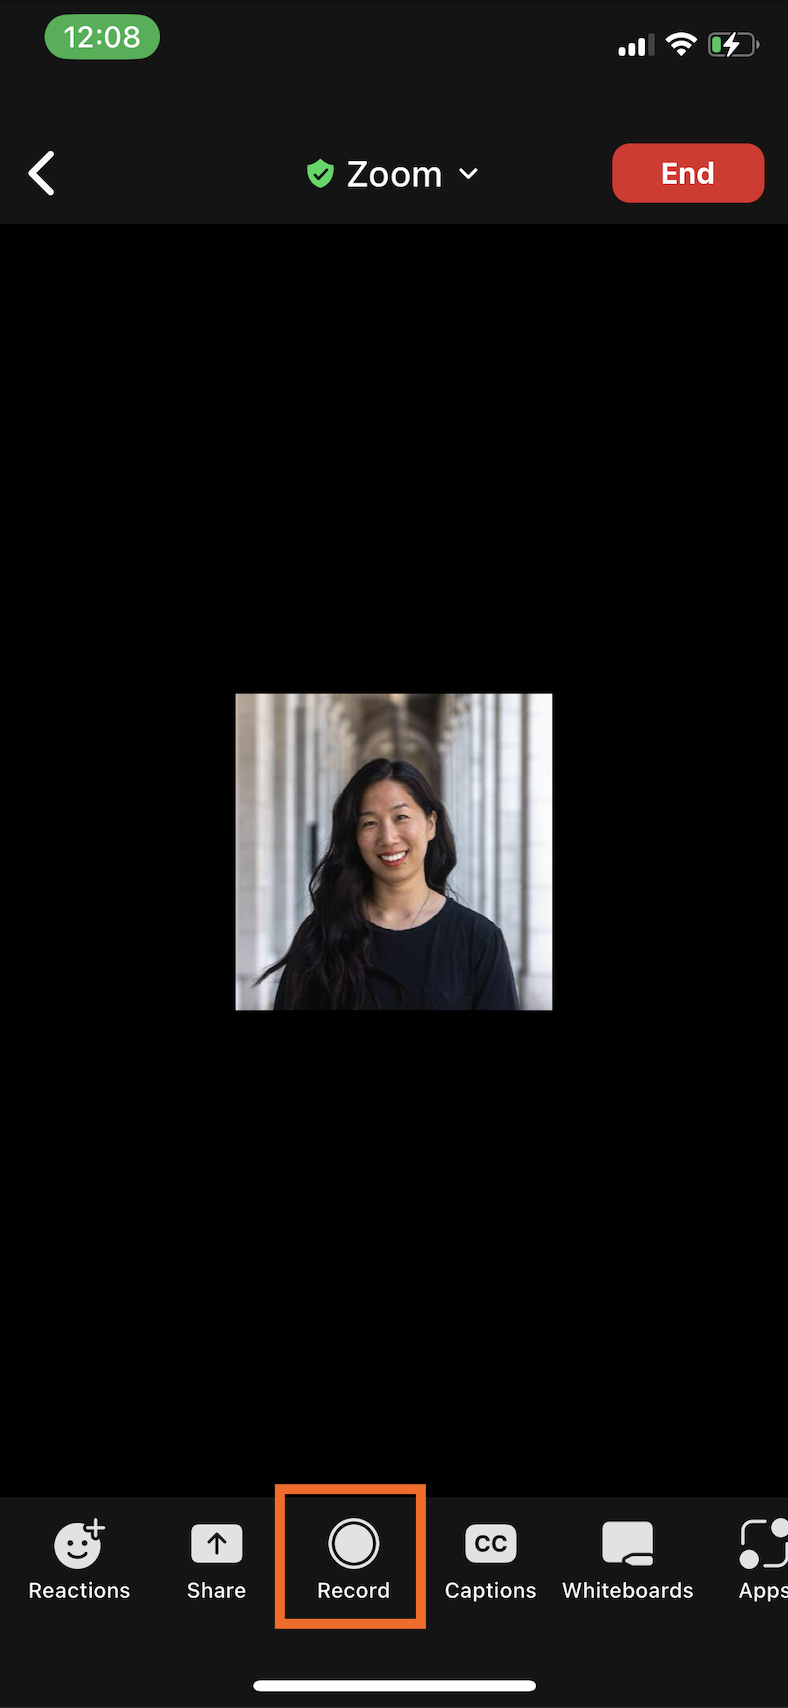
During a Zoom meeting, scroll across the control bar and tap Record.
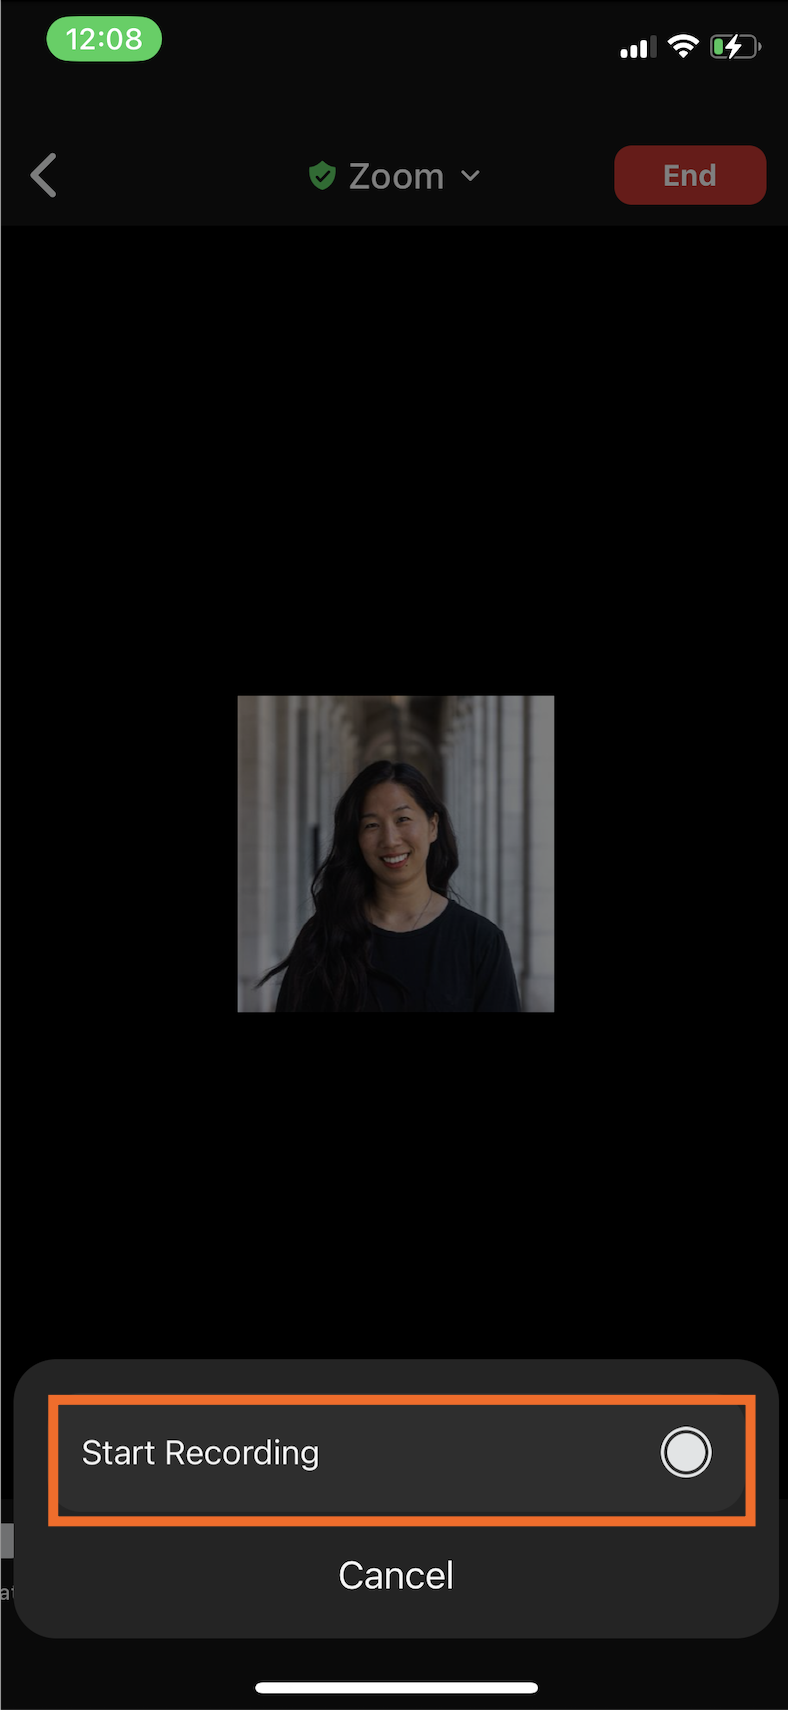
Click Start Recording.
A subtle recording icon will appear in the top-left corner of your screen to let you know you're recording.

If you need to pause the recording, tap the Pause recording in the control bar.
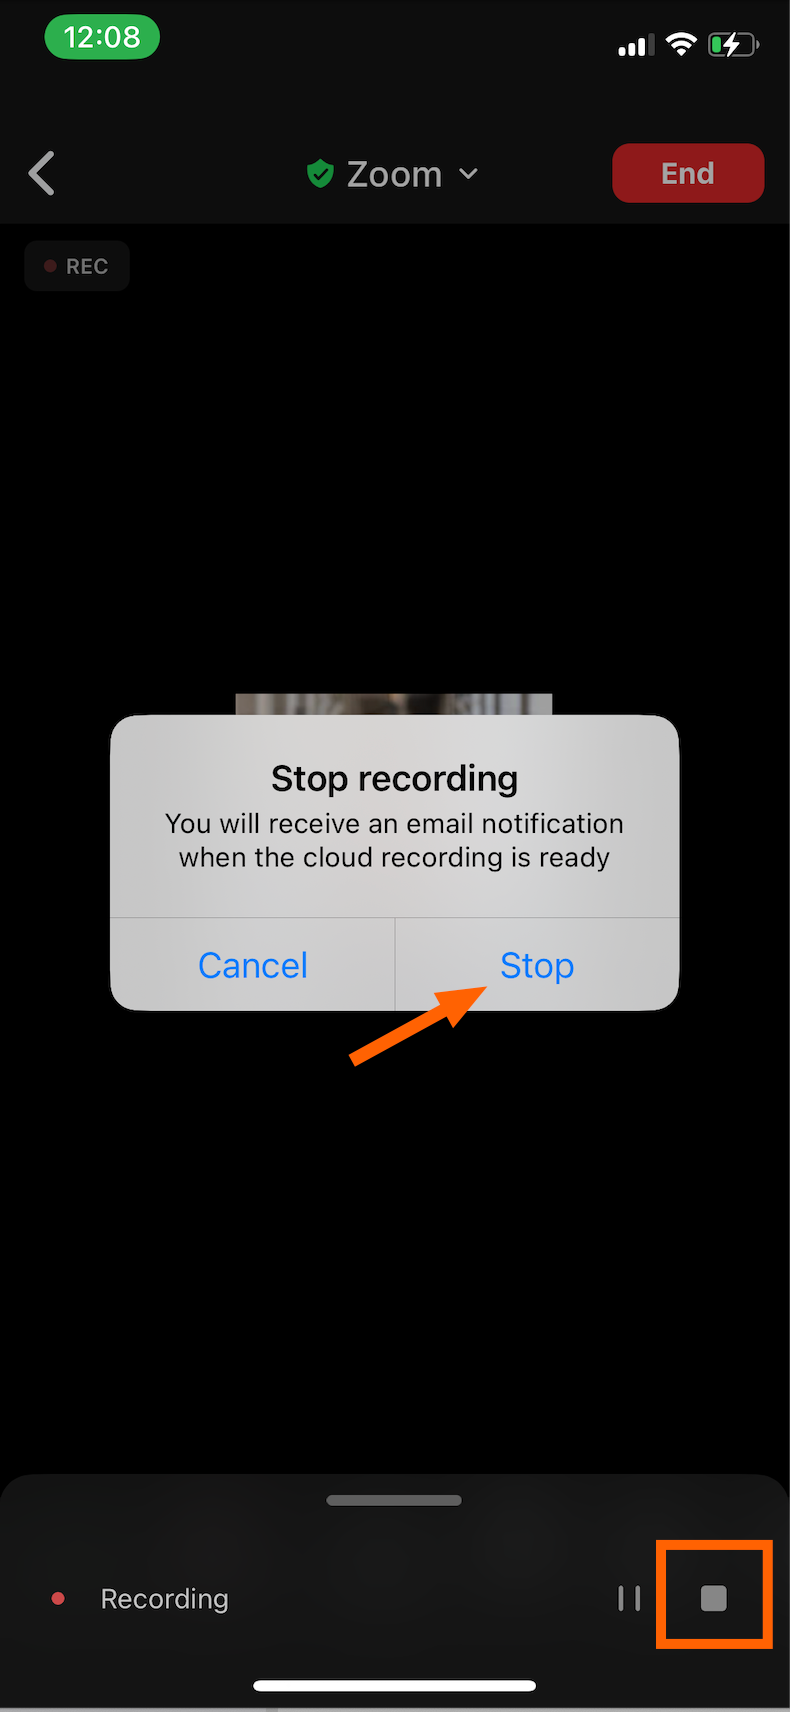
Once you're done, tap the Stop recording icon in the control bar.
Tap Stop again to confirm.


How to find Zoom recordings
How to find Zoom recordings stored locally
The easiest way to find Zoom recordings stored locally is to open Finder (on Mac) or File Explorer (on Windows), and go to the folder you saved the recording to.

If you can't find the recording or you don't remember which folder you saved it to, you can also access it via the Zoom web portal.
Note: You can only access Zoom recordings saved locally on the computer you originally recorded the meeting from.
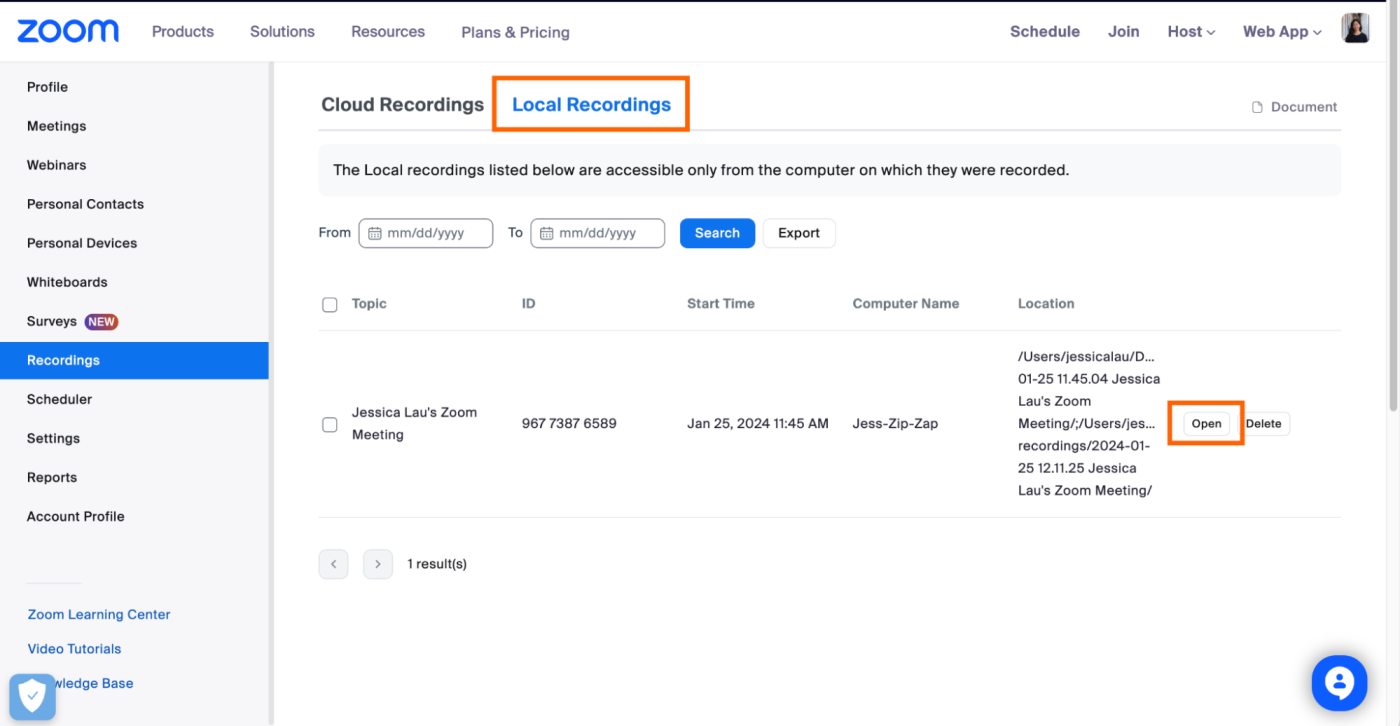
Log in to your Zoom web portal.
Click Recordings.
Click Local Recordings.
Hover over the meeting you want to access, and click Open to view it in your browser.

To export a list of local recordings as a .csv file, click the checkbox next to the recording topic, and then click Export.

To delete a local recording in the Zoom web portal, hover over it, and click Delete. To delete multiple recordings at once, click the checkbox next to all the recordings you want to delete, and then click Delete Selected.
How to find Zoom recordings stored in the cloud
Log in to your Zoom web portal.
Click Recordings.
Click Cloud Recordings.
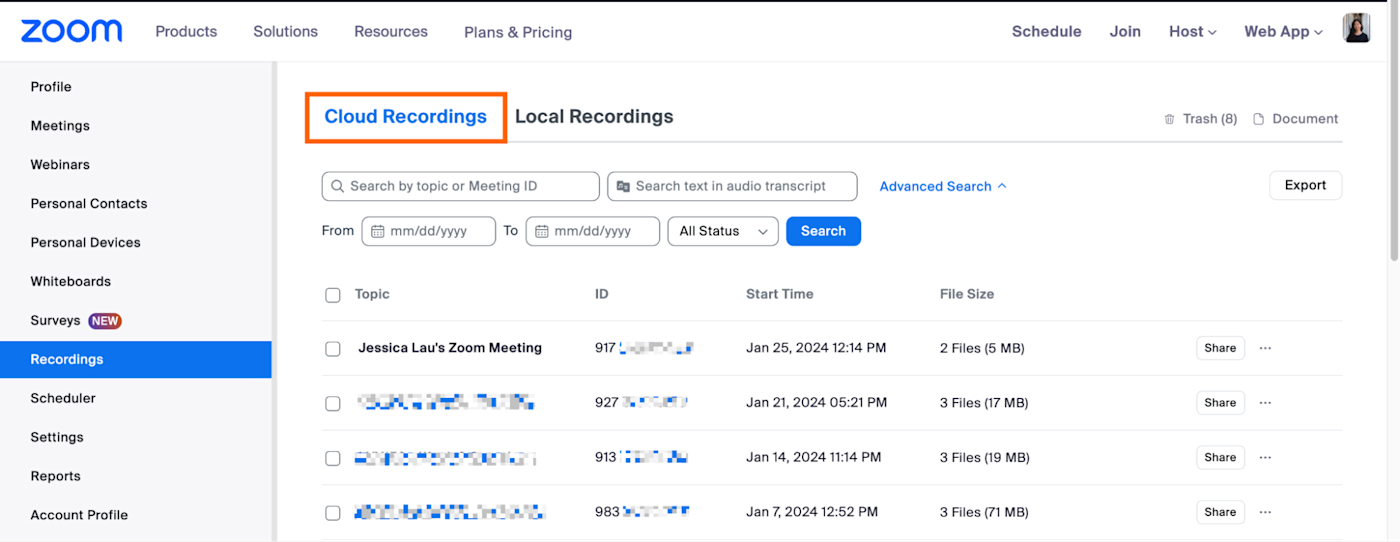

If you have a lot of recordings, Zoom offers advanced search options to narrow down the results. You can search by the meeting topic, meeting ID, text from the audio transcript, recording date, and recording status (Shared, On Demand, or Uploaded).

Once you find your recording, you have a number of options:
Share. This generates a shareable link to your recording. Zoom offers a lot of customization options when it comes to sharing your recording. For example, you can enable a password, enable or disable viewers from downloading the video, and setting an expiration date.
Download. Click the ellipsis (
...) next to your recording to download every recording within that meeting.Delete. Click the ellipsis (
...) next to your recording to delete every recording within that meeting.
As with local recordings, you can also export a list of all your Zoom recordings stored in the cloud as a .csv file.
How to record a Zoom meeting: FAQs
If you still have questions about pushing the record button—namely, who can do it and who has to know about it—we've got you covered.
Can I record a Zoom meeting without participants knowing?
If you record meeting attendees' video or audio, it's common courtesy—and in some places, a requirement—to inform them before you do. Once you begin recording, Zoom will also notify all participants that the meeting is being recorded.
Can I record a Zoom meeting as a participant?
In order to record a Zoom meeting as a participant, the meeting host must first give you permission.
Note: If granted permission, meeting participants can only record meetings locally—not to their or the host's cloud storage.
During a Zoom meeting, click Participants in the control bar.
Hover over the participant you want to give recording privileges to. Click More, and then click Allow to Record Local Files. Click it again to remove recording permissions.
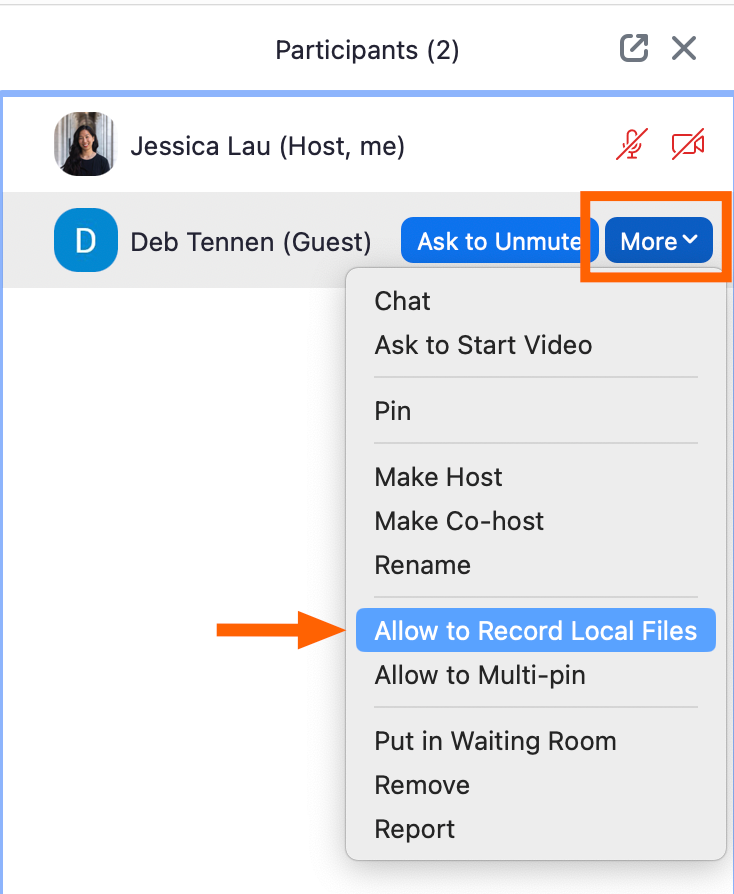

The participant won't receive a notification about being granted recording privileges—the host has to manually notify them. But when a participant begins recording, a recording icon will appear in the top-left corner of the meeting window and next to their name in the Participants window.

Automate Zoom recordings
Once you have the correct settings enabled, recording a Zoom meeting is easy to do. What's not as easy? Remembering to share the recording later. This may not be a big deal if it's a low-stakes meeting, but when it's a class lecture or event you promoted, that's another story.
Use Zapier to connect Zoom with your other apps, so you can automatically send new Zoom recordings to a cloud storage app or video hosting service, or even send a Slack message with a recording link. Learn more about how to automate Zoom, or get started with one of these workflows.
Send Slack channel messages for new Zoom recordings
To get started with a Zap template—what we call our pre-made workflows—just click on the button. It only takes a few minutes to set up. You can read more about setting up Zaps here.
Related reading:


