Our upcoming Backbone.js frontend is quite complex. When you consider the fact that we are relatively inexperienced with Backbone, it made sense to start off with an easier, smaller project. This allowed us to focus more on getting the models and collections correct before worrying about views (which, arguably, are the most difficult part of implementing Backbone apps).
So we decided to build a simple Chrome Extension to test the waters and learn a little about Backbone. To our knowledge, this is the first published case of using Backbone inside a Chrome Extension. Jeffrey Iacono has a published Github repo featuring a Chrome Extension and Backbone from about a month ago.

Design.
Part of our design philosophy is that the entire backend be accessible via APIs. This allows us to build different and device-varying frontends which all leverage the same data source. We have a lot going on behind the scenes with Zapier and creating an exposed backend API creates a very clean separation of concerns. We can easily create a desktop application, Android app, iOS app, or even, a Chrome Extension from this API.
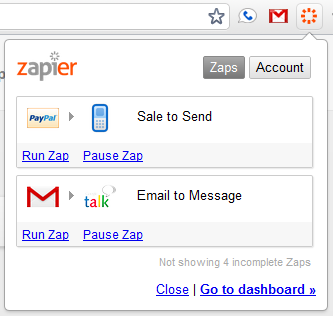
As mentioned above, views tend to be the most difficult concept when getting acquainted with Backbone. They are "more convention than code" and as such, you the developer are left to fill in the details. For our Chrome Extension, we have a simple Viewport view which controls the loading and unloading of content views. You can see an example of the first content view loaded in the screenshot. Also note we are writing our Backbone code using Coffeescript, RequireJS, and the Use Requirejs Plugin.
A single corresponding content view might look something like this. Note the element which the content view renders into is passed in from the Viewport view.
There were few surprises developing the Chrome Extension. We only wanted to generate a popup and Chrome can handle this automatically with a browser_action definition inside your manifest.json file.
You simply define an HTML file as the default to load into the popup when your extension icon is clicked. Chrome automatically draws the white bubble background.
Storing locally.
One gotcha (especially with regards to Backbone) is that each time you close and re-open the popup, the code is entirely unloaded and then re-loaded. This means if you are using a lazy loading method for your models and collections, they will be pulled from the server fresh each time you click the extension icon.
In a typical Backbone application, you would preload your model and collection data (to be transmitted to the client with the initial website load). This is not applicable to extension popups, though, because all the HTML is stored locally inside the extension. To get around this, I recommend taking advantage of Chrome's LocalStorage API to cache your model and collection data to persist between extension loads.
Another alternative is to persist data into your extension's background page. More details on background pages can be found here. It might even make sense to load the entire Backbone app into the background page when the browser starts and re-render the Viewport view into the popup each time the popup is loaded.
Packaging it up.
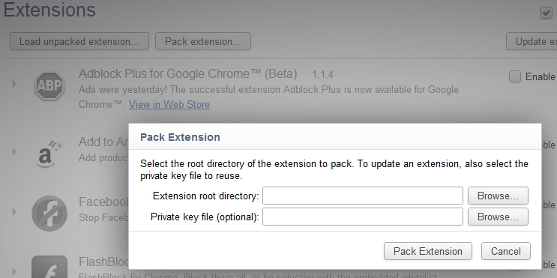
Once you've got your Backbone project completed and rendering via a single HTML file, you can simply package up your Chrome Extension using the built-in extension packager. The extension root directory is the folder which contains all your code and you do not need to define a Private Key. See the Chrome Extension help guide for more information.

Overall, the quick aside to building the Chrome Extension was easy and painless and demonstrates the power of a separated backend API and the general applicability of Backbone to many different frontend views.
UPDATE: There is further discussion over on Hacker News, here


