
Picture this: you're eagerly waiting to hear back about a job you interviewed for. You keep refreshing your email for any signs of a job offer. Instead, when you refresh, you get a fresh batch of "last chance" offers from your air miles provider, bank, and cookie delivery subscription that you swore you unsubscribed from.
Save yourself from the emotional rollercoaster. Use a Gmail filter to automatically delete, archive, or move incoming marketing emails (or any kind of email) to another folder, so you can come back to a cleaner inbox full of the emails you want to read.
Here's everything you need to know about Gmail filters—and the most helpful filters to set up now.
Filter 1: Automatically delete all newsletters and marketing emails
Filter 2: Automatically archive all newsletters and marketing emails
Filter 3: Automatically move all newsletters and marketing emails to a specific folder
Filter 4: Automatically delete, archive, or move emails from specific senders
Filter 5: Create separate inboxes to manage multiple Gmail accounts
How to create filters in Gmail
There are a handful of ways to start creating filters in Gmail:
Directly from an email: With an email that you want to filter opened, select more (
⋮) > Filter messages like these.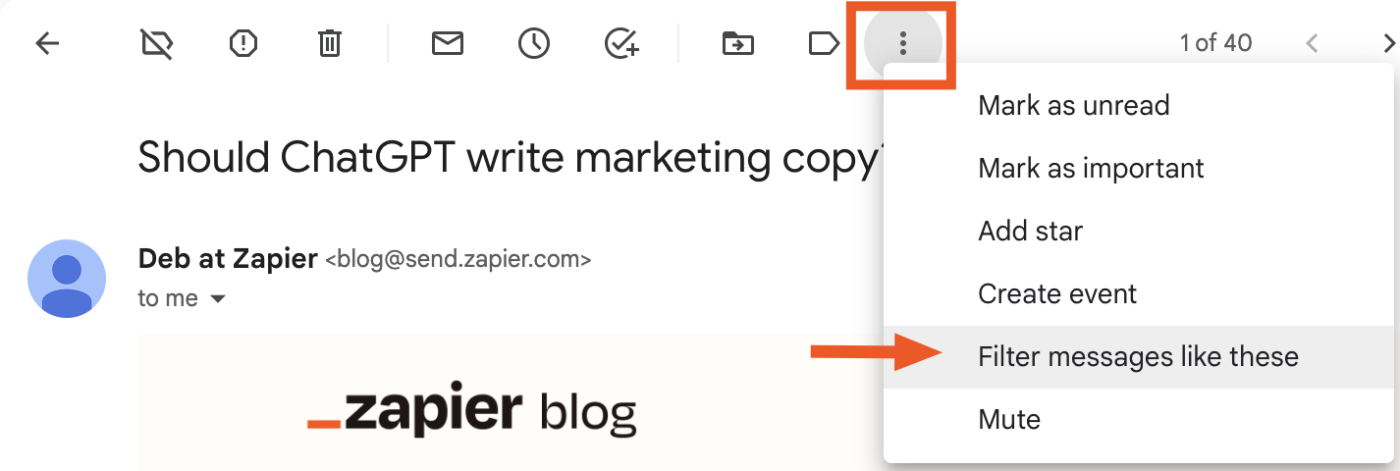
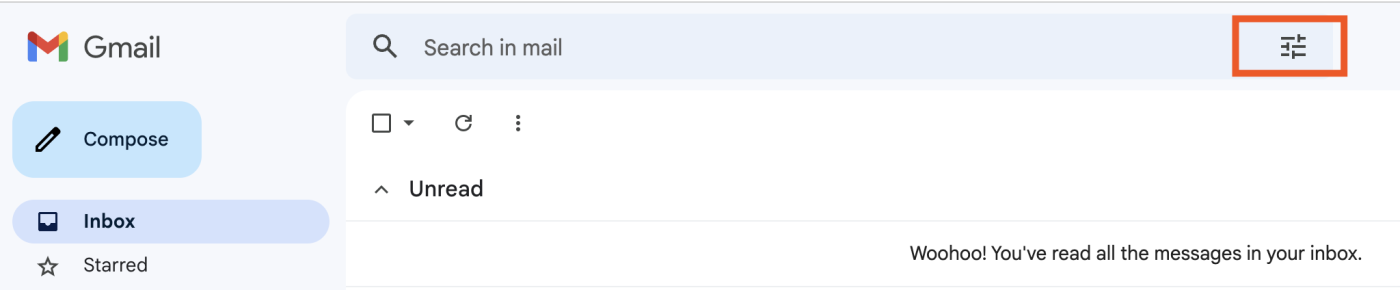
From Gmail's search options: Click the show search options icon, which looks like three horizontal lines stacked on top of each other, in Gmail's search bar.
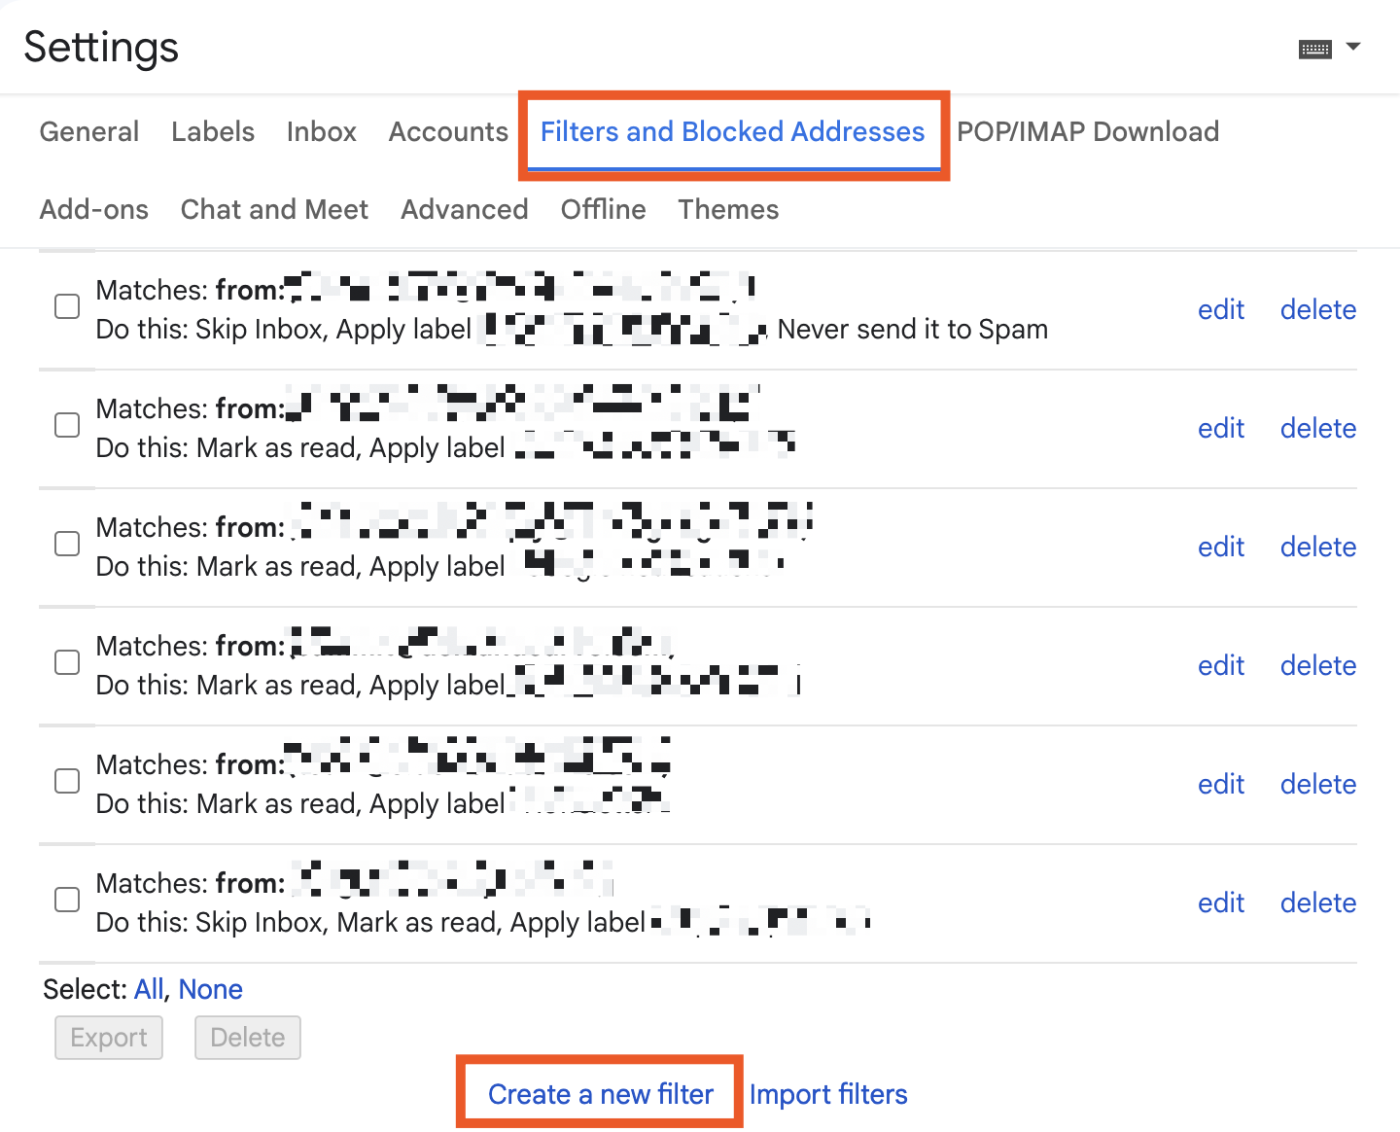
From your Gmail settings: Select the settings cog icon > See all settings > Filters and Blocked Addresses. If you already have email filters, scroll down to the bottom of your list of filters and click Create a new filter.


No matter how you get there, your filter creation form will look the same. Now, let's break down the available search criteria in the form:
From: Filter emails sent from a specific email address. (If you create a filter directly from an email, Gmail automatically fills in the From field for you.)
To: Filter emails sent to a specific email address.
Subject: Filter emails that use a specific subject line.
Has the words: Filter emails that contain specific keywords.
Doesn't have: Filter emails that don't contain specific keywords.
Size: Filter emails larger or smaller than a specific size.
Has attachment: Filter emails that include an attachment.
After adding the criteria for your filter, click Create filter to specify what Gmail should automatically do with emails that match this filter. (You can select more than one action.) Here are your options:
Skip the Inbox (Archive it): Archive the email, so it doesn't appear in your inbox.
Mark as read: Have the email appear in your inbox as an already-read item.
Star it: Star the email.
Apply the label: Add a specific label to the email.
Delete it: Send the email to the trash.
Never send it to Spam: Prevent Gmail from tagging the email as spam.
Always mark it as important: Label the email as important.
Never mark it as important: Tell Gmail not to label the email as important.
Categorize as: Add the email to an existing category.
Also apply filter to # matching conversations: Apply the selected filter conditions to every email in your account (new, archived, and deleted) that matches the selected filter criteria. Gmail will automatically update the number of emails that match your filter criteria accordingly.
Once you're ready, click Create filter.
How to edit filters in Gmail (or delete them altogether)
In my more ambitious years, I created filters to star all the newsletters I would for sure read "later" and then unstar them once they were read. Later came and went, and you know what remained? Those stars—and an increasingly daunting number of unread emails.
So I modified my filter to corral all my newsletters into a separate folder (i.e., tag them with a different label) and automatically mark them as read. If your filters could also use a modification, here's how to edit or delete them.
Select the settings cog icon > See all settings.
Click the Filters and Blocked Addresses tab.
Click edit or delete beside the filter you want to update or remove.

7 of the best Gmail filters to organize your email
Before I dive into the most practical Gmail filters, let's review the different types of operators that Google recognizes. (If you're a pro user of search operators, keep scrolling for the list of Gmail filters.)
What are Gmail search operators?
Search operators are words or symbols you can use to more accurately filter your email search results. When it comes to creating a powerful and precise Gmail filter, search operators are key.
Here are the most common ones:
Operator | Function | Example | Use |
|---|---|---|---|
OR | The 'OR' operator tells Gmail to find emails that match any of the specified keywords. | Unsubscribe OR browser | Filter emails with either the word unsubscribe or the word browser. |
- | The minus sign ( | -contact@zapier.com | Don't filter any emails that come from the address contact@zapier.com. |
" " | Surrounding keywords in quotation marks tells Gmail to filter emails that contain an exact match of the specified text. | "View in browser" | Filter emails that contain the exact phrase view in browser. |
( ) | Surrounding multiple keywords within parenthesis tells Gmail to group those terms together. | -(contact@zapier.com OR support@zapier.com) | Don't filter any emails that come from either contact@zapier.com or support@zapier.com. |
* | The asterisk operator is a wildcard symbol that tells Gmail it doesn't matter what text appears here. | *@zapier.com | Filter emails that come from any address on the Zapier domain (i.e., any address that ends with @zapier.com). |
You can use any of these operators when creating Gmail filters to manage all kinds of recurring emails you might get, such as Amazon receipts and bills from your utility company. You can even use them for those "Fwd:" chain letters that are, unfortunately, making a comeback.
Note: Most of the examples below are based on newsletters and marketing emails. To make these filters work for you, simply modify the example words or phrases.
1. Automatically delete all newsletters and marketing emails in Gmail
If a retailer offers any one-time discount in exchange for my email, you better believe I'm handing it over. In theory, Gmail should automatically keep future marketing emails and promotional content out of sight and out of mind by moving them to the Promotions tab of my inbox, but sometimes, Gmail's built-in filters don't catch everything. Instead of manually unsubscribing from every newsletter, use a Gmail filter to do it for you. Here's how.
Click the show search options icon in Gmail's search bar.
Beside Has the words, type
unsubscribe, then click Create filter.Check Delete it, then click Create filter.
This filter tells Gmail to send any emails that contain the word unsubscribe—which will apply to the majority of newsletters and marketing emails you'll receive—directly to the trash.
Gmail filter not catching every piece of promotional content? Add an OR operator to your filter to include other keywords commonly found in newsletters or marketing emails. To make it even easier, you can copy and paste the following search terms beside Has the words in your filter:
unsubscribe OR "view in browser" OR "view as a web page" OR "privacy policy" OR "click here" OR "view online" OR "update your preferences" OR "opt out" OR "manage your account"
If other marketing emails make it past your expanded filter, open those emails and look for unique keywords that they specifically use (i.e., keywords that are rarely used in the emails you want to land in your Primary inbox).
Tip: You only have 30 days to recover deleted items from your Trash folder before they're permanently deleted. If you think the filter might catch an important email, automatically send yourself a reminder to skim through your deleted items at least once a month. Or, consider using the archiving method described in the next example instead.
2. Automatically archive all newsletters and marketing emails in Gmail
Auto-archiving newsletters and marketing emails works well if you're concerned that Gmail will unintentionally delete something important, but my go-to use case for this filter is for companies that occasionally send promo codes.
Here's an example: I don't need a notification in my inbox every time my local bookstore has a sale. But when I am ready for some retail therapy, I can quickly scan through my archives to see if they recently sent me a coupon code.
Note: In Gmail, there isn't actually an archive folder. Instead, Gmail stores your archived emails under All Mail.
Here's how you can create a filter that automatically archives newsletters and marketing emails:
Click the show search options icon in Gmail's search bar.
Beside Has the words, type
unsubscribe(you can also use theORoperator to include additional keywords), then click Create filter.Check Skip the Inbox (Archive it), then click Create filter.
This filter automatically sends all emails that include the word unsubscribe (or any of your additional keywords) to your All Mail folder. While you won't see the emails in your inbox, you'll always have access to them in your archive.
3. Automatically move all newsletters and marketing emails to a specific folder in Gmail
I'm a big fan of time blocking my tasks, which includes catching up on my newsletters once a week. To minimize getting distracted by other emails while I'm reading, I use a filter to automatically store them in a dedicated folder. This way, I can scan through them without feeling overwhelmed by all the other emails I have yet to address.
In order to do this, you first need to create a new label (a.k.a. folder).
In the main menu of your Gmail, click More to expand the menu.
Click Create new label.
Enter a label name, and click Create.

Now you can create a Gmail filter to automatically move all marketing emails to your new folder.
Click the show search options icon in Gmail's search bar.
Beside Has the words, type
unsubscribe(you can also use theORoperator to include additional keywords), then click Create filter.Check Skip the Inbox (Archive it).
Check Apply the label, and use its accompanying dropdown menu to select the desired label. In this example, the label is "Newsletters."
Click Create filter.

With this filter, Gmail will automatically move all emails that contain the word unsubscribe to the Newsletters folder.
4. Automatically delete, archive, or move emails from specific senders in Gmail
The three filters above allow you to use filters to batch delete, archive, or move (a.k.a. label) emails, but what if you just want to apply those filters to specific types of emails or to emails from specific senders? There are a few ways to create more precise filters in Gmail.
Filter by email address: If you want to automatically delete, archive, or label emails from a specific sender, enter that sender's email address in the From field of the filter form. Then check the appropriate actions for the filter (delete, archive, or label).

Filter by email domain: If you want to automatically delete, archive, or label emails from all senders from a specific domain/company, use the wildcard operator. To do this, type an asterisk (
*) before the@symbol (e.g.,*@zapier.com) in the From field of the filter form.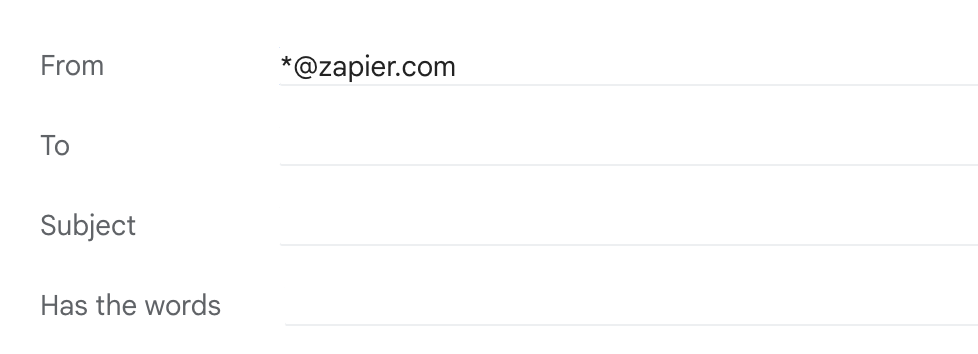
Exclude certain senders from mass filters: If you want to automatically delete most marketing emails, but still want to receive them from a specific domain/company, use the exclude operator. To do this, type
-(*@domain.com)in the From field of the filter form. You can use this filter even if you're also filtering for other keywords, subjects, or any other criteria.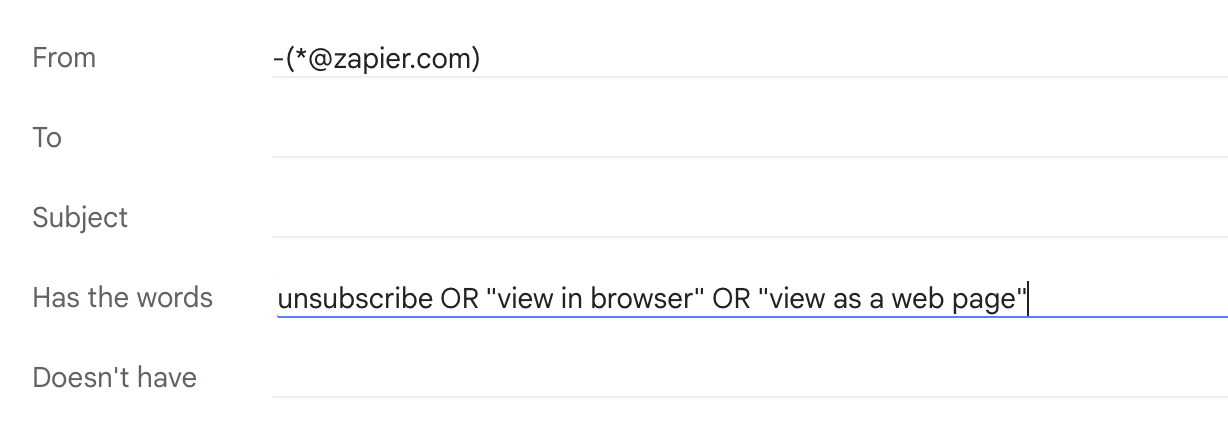


5. Create separate inboxes to manage multiple Gmail accounts
Do you manage multiple Gmail accounts? Or maybe you have two Gmail accounts: one for work and another for personal? Instead of toggling between accounts, use a Gmail filter to organize your emails into separate inboxes within one central account. Here's how.
Create a label for each account (e.g., Work receipts and Personal receipts).
Click the show search options icon in Gmail's search bar to open the filter form.
Enter the email address for your first account into the To field, then click Create filter.
Check Skip the Inbox (Archive it).
Check Apply the label, and use its accompanying dropdown menu to select the appropriate label.
Click Create filter.
Repeat the above steps for each additional account.
This moves emails from your Primary inbox into individual queues that mimic account-specific inboxes.
This filter is also helpful if you're trying to retire an old email address. It'll allow you to quickly understand where you still need to update your email address.
Tip: Check out our in-depth guide on how to merge multiple Gmail accounts, so you can manage multiple all of your email, calendar events, and contacts in one place.
6. Automatically empty your Spam folder
There's only one kind of Spam I want in my life, and it's the deliciously processed kind that comes in a tin that screams nostalgia. For all other spam that Gmail automatically funnels into my Spam folder, I use a filter to instantly—and permanently—delete it as soon as it arrives in my account. Here's how.
Click the show search options icon in Gmail's search bar to open the filter form.
Beside Has the words, type
in: spam, then click Create filter. Theinsearch operator tells Gmail to filter messages by the folder they're in.Check Delete it.
Click Create filter.
Note: Google doesn't recommend filter searches containing "in:" because they'll never match incoming mail. So, in theory, this filter shouldn't work. But after running the filter for about four days, my Spam folder was empty—and remained empty at the time of publishing this article—which was never the case prior to setting this filter.

Caution: On rare occasions, Google might misidentify a legitimate email as spam. By setting this filter, you'll have no way to sort through your Spam folder to make sure nothing important landed there.
7. Automatically build a to-do list in Gmail
You could use an app that was specifically designed to create to-do lists. Or, you can use your Gmail inbox, which also gets the job done.
Because I only ever email myself reminders of things I need to do—or send myself links to articles I want to read—I use a filter to automatically tag emails that I send myself with my to-do label. Here's how to set it up.
Create a To-do label, if you don't have one already.
Click the show search options icon in Gmail's search bar to open the filter form.
Beside From, enter your email address.
Check Skip the Inbox (Archive it).
Check Apply the label and use its accompanying dropdown menu to select the appropriate label.
Click Create filter.

You can also use this filter for emails from other people—your boss, a client, an editor, etc.—that always include tasks you need to complete. Simply substitute their email for yours in the From field of the filter form, or use the OR operator to have Gmail automatically label incoming emails from specific addresses (for example, myemail@gmail.com OR boss@gmail.com).
Prefer to use a to-do list app to manage your tasks? Combine this filter with one of the following workflows from Zapier to have your labeled Gmail emails automatically convert to tasks in your preferred productivity tool.
Create Asana tasks for labeled Gmail emails [Business Gmail Accounts Only]
Add new labeled emails to Todoist as tasks [Business Gmail Accounts Only]
Add tasks on OmniFocus for new labeled emails on Gmail
Create tasks in Wrike from new labeled messages in Gmail [Business Gmail Accounts Only]
Zapier is the leader in workflow automation—integrating with 6,000+ apps from partners like Google, Salesforce, and Microsoft. Use interfaces, data tables, and logic to build secure, automated systems for your business-critical workflows across your organization's technology stack. Learn more.
How to export and import a Gmail filter
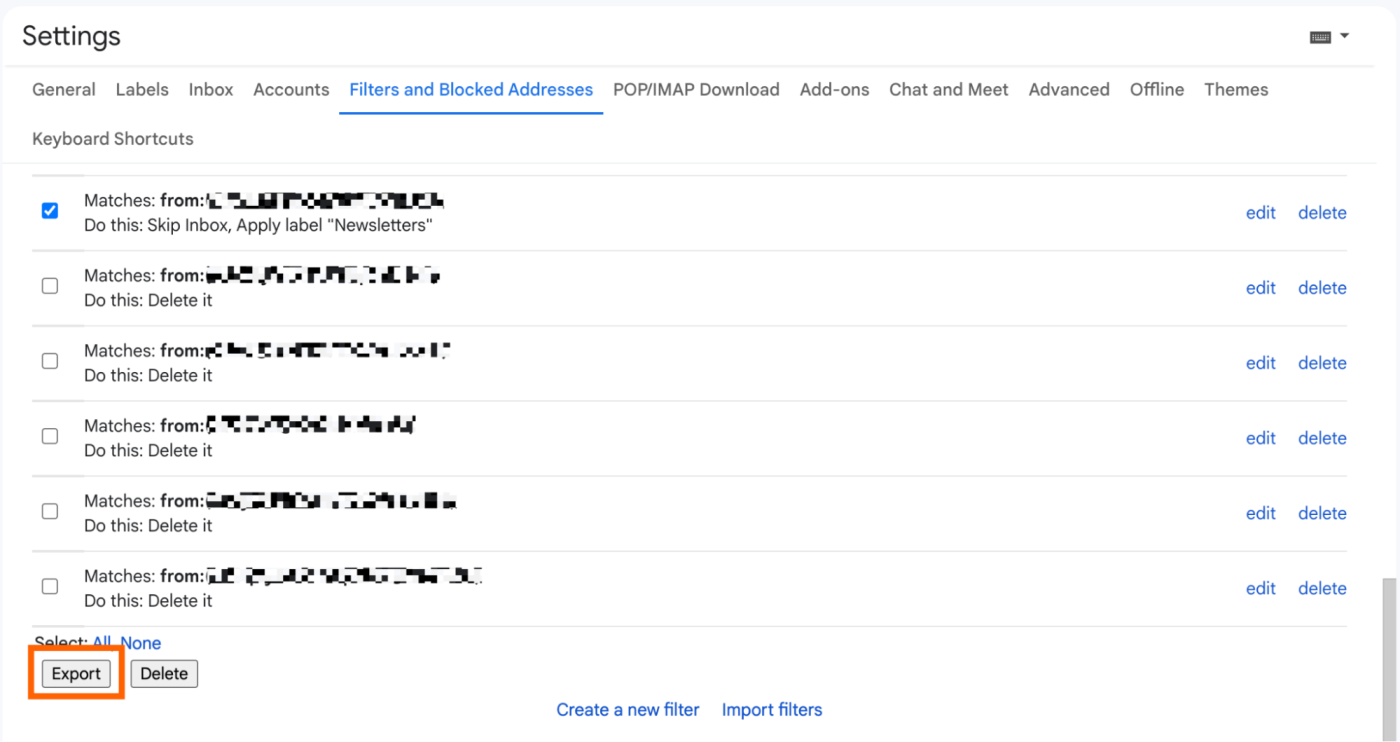
If you manage multiple Gmail accounts and want to use the same Gmail filters across all your inboxes, you can do this with a quick export and import.
Go to the Settings page of the Gmail account that has the filters you want to copy.
Click Filters and Blocked Addresses.
Click the checkbox next to all the filters you want to export.
Scroll to the bottom of your list of filters and click Export. A zip file of your filters will automatically download to your computer's hard drive.
Go to the Settings page of the Gmail account that you want to import your copied filters into.
Click Import filters.
Click Choose file, and upload the file containing your Gmail filters.
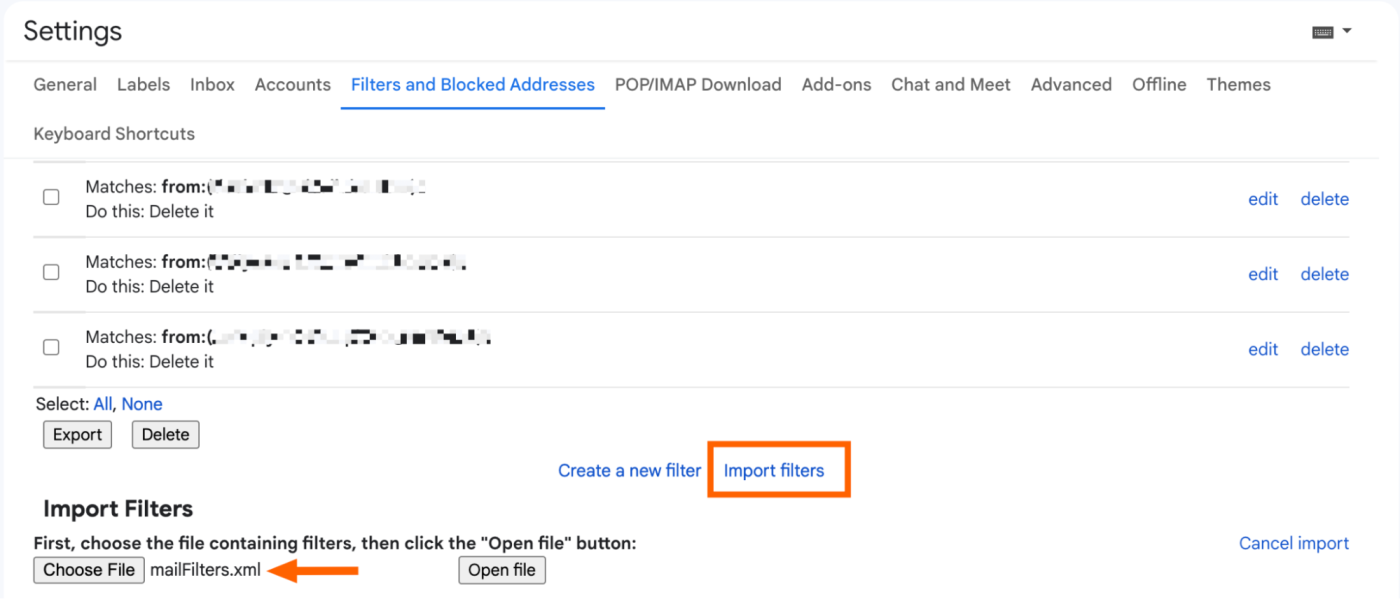
Click Open file.
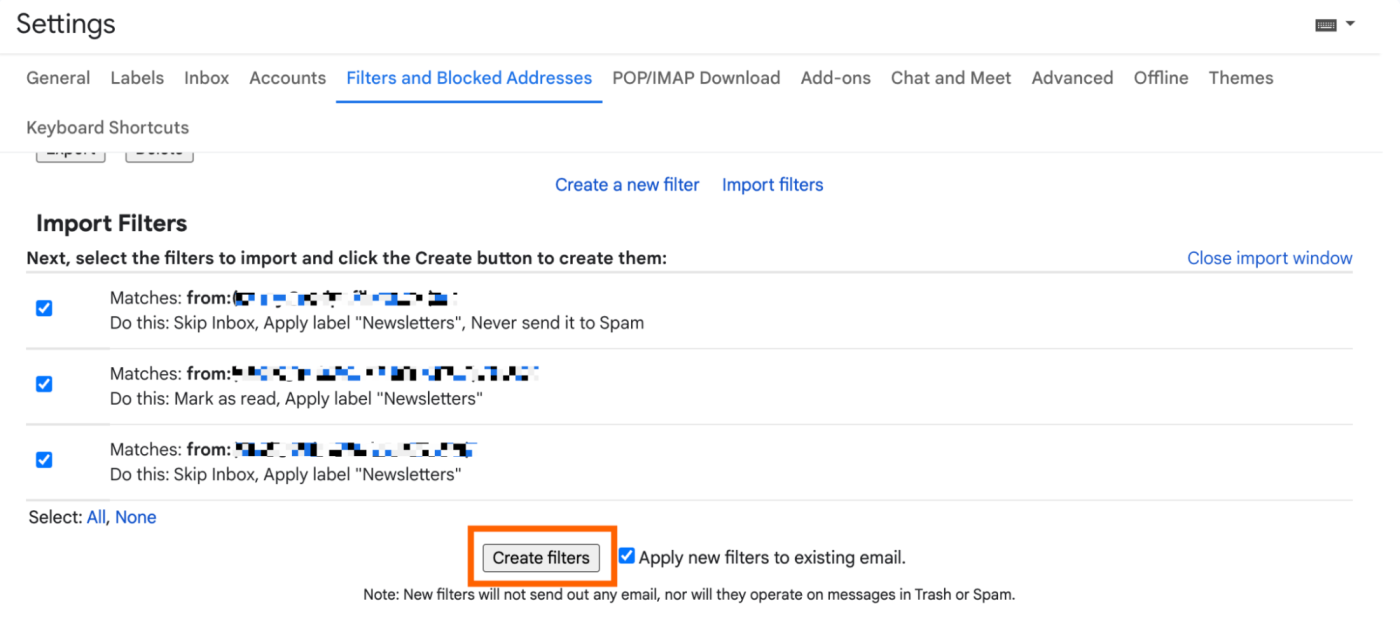
In the list of imported filters that appear, select the ones you want to import to your Gmail account, and then click Create filters. You can also apply the imported filters to existing emails in your inbox (but not ones in Trash or Spam). To do this, select the checkbox next to Apply new filters to existing email.


Bonus: How to free up space using a Gmail filter
If you're running out of space in your inbox, the best way to reclaim some of it is by batch deleting emails you no longer need. Let's say you've been automatically archiving newsletters and promotional emails, but now you want to delete all of them to free up space in your Google account. Here's what to do.
Select the settings cog icon, then click See all settings > Filters and Blocked Addresses.
Click edit next to your newsletter filter. This will open your filter form with the newsletter filters already filled in.
Click Continue without changing any of the filter criteria.
Uncheck Skip the Inbox (Archive it).
Check Delete it and Also apply filter to # matching conversations. Gmail will automatically update the number of emails that match your filter criteria accordingly.
This automatically deletes all of your archived emails that were previously caught by your newsletter filter, which should free up a lot of space.
Once Gmail finishes the deleting process, be sure to edit your filter again to set it back to only archiving the emails. Repeat the process any time you need to free up space in your account.
Make your Gmail inbox work for you
Whether you're aiming for inbox zero or wanting to minimize the feeling of inbox-induced dread, filters can help you achieve all of the above. And if you're looking for more ways to make your inbox even more productive, check out these helpful guides:
This article was originally published in April 2018 by Jessica Greene. The most recent update was in February 2024.


