You've probably heard this term a lot, but what exactly is a line item?
If you’ve ever received a receipt for a purchase, or filled out an invoice, you’ve already seen them: A line that includes each product’s name, price, or quantity, repeated for every product.
In Zapier, the definition of "line items" is extended to mean "a group of similar things, with information about each of them". If you're a developer, calling line items an "array of objects" wouldn't be far off.
This could look like various expenses on an invoice from Xero or QuickBooks Online, all the items purchased through an eCommerce platform like WooCommerce, or rows in an Excel spreadsheet, or even a list of the dogs you see outside. In each case, the items all have similarities with each other, but slightly different values between them. When a Zap receives those values, it groups them together into line items for easy use later on.
To see if you're working with line items in a Zap, take a look at the sample data provided by an action or trigger. In this example, we have an app that gives us information about dogs:
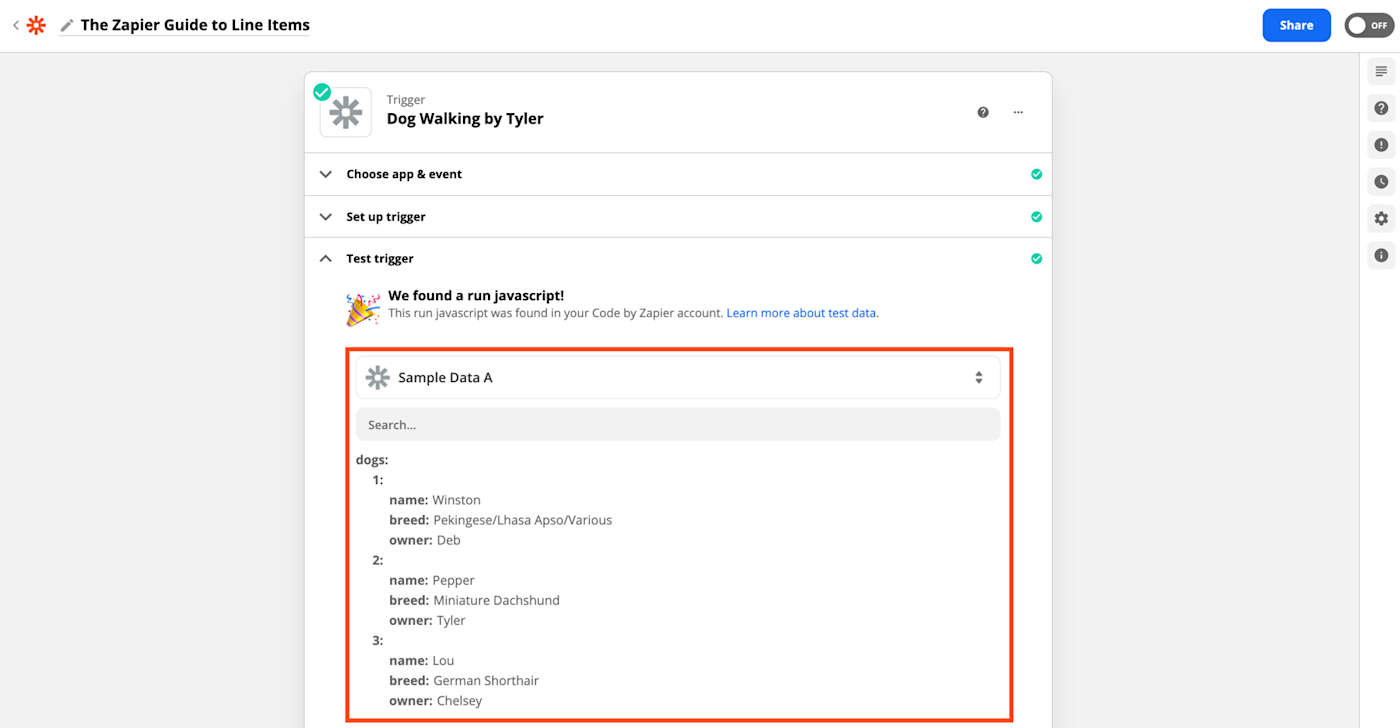
Notice how the information is grouped by number, and each number lists the same values ("name", "breed", "owner") but with different data in each?
That means "dogs" is a group of line items, and we can reference any of the values later on. If we want the "name" value for each dog, Zapier automatically groups them together in a value called "Dogs Name".

What do line items do?
For actions that support line items, providing them tells the action to act as a "for each" loop, prompting the app to do something once for each item in the list.
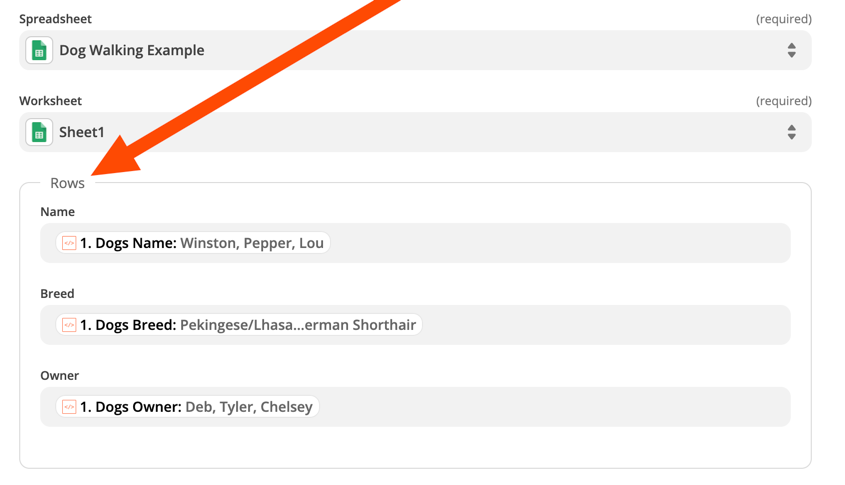
Using the example above, when we send our dog-walking information to Google Sheets with the Create Spreadsheet Row(s) action, the Zap automatically creates a new row for each item in "dogs," with the corresponding information attached.

As an added bonus, no matter how many line items we provide, the action still uses one task, allowing you to do more with less.
Different fields support line items in different ways. To find out if your action supports line items like the example above, look for a field or group of fields with a plural name, like "Rows."
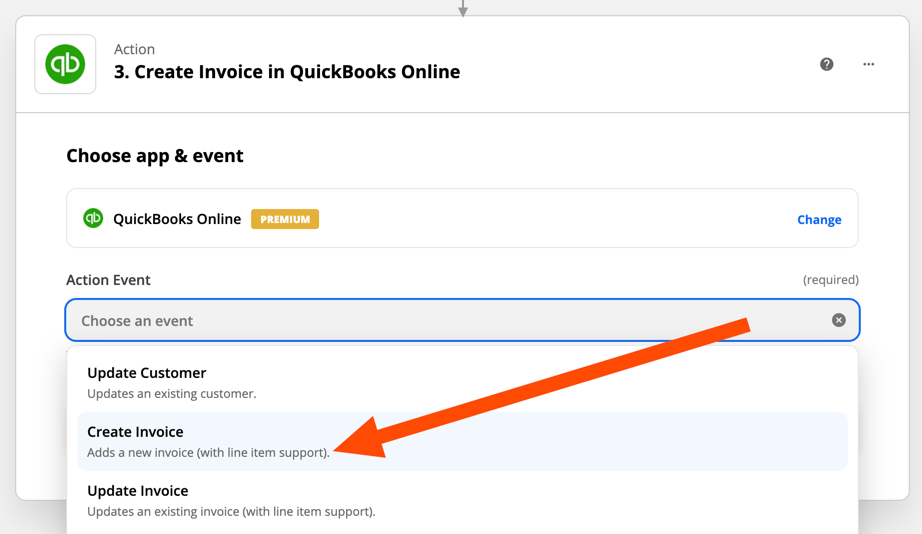
Lots of actions also call out their support of line items in their descriptions, making them easy to spot while creating your new Zap.
What can I use line items for?
Just like the term "line item" can be used to mean a lot of different kinds of data, line items can be used in a lot of different ways.
Invoices, orders, and receipts
The original definition for "line items" comes from invoices, and that's one of the most common places we see them in use. When creating a new invoice or receipt with apps like QuickBooks Online, Xero, or making orders in apps like WooCommerce, line items help you make sure that a new line is created for each line item, instead of adding them all in a big lump.
Here's an example using QuickBooks Online, where we're creating a new invoice for services performed by my fictional dog walking/grooming business.
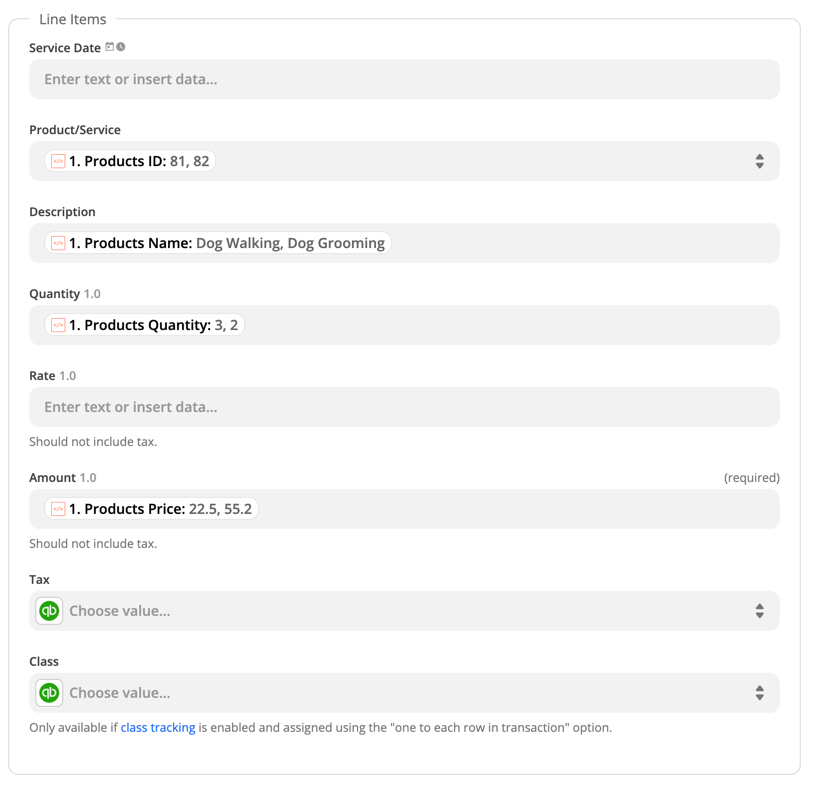
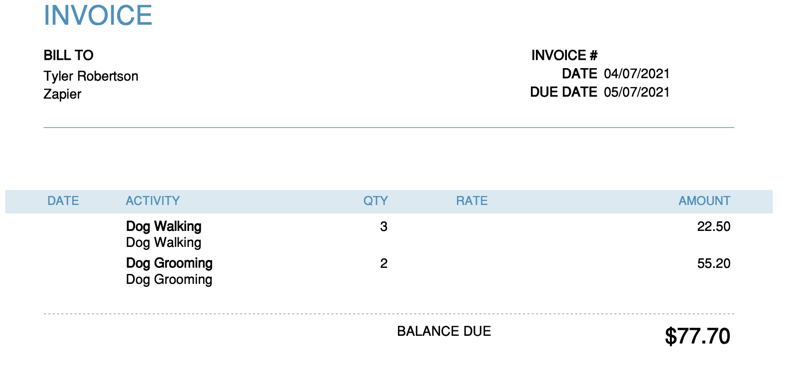
When the information is sent to QuickBooks Online, values that I've mapped in the "Line Items" section are split into separate lines on the final invoice, so that information about each product can be read easily. This also helps QuickBooks Online easily perform other math, like figuring out the balance due.
Making complex processes easier
Many Formatter by Zapier actions support line items, and can be used to help adjust information before sending it to other apps, taking the tedium out of tasks we'd otherwise have to do by hand.
Working off the invoice example above, did you notice that the "Amount" didn't account for each item's quantity? In that case, we wanted to calculate the total amount spent on each product, before creating the invoice.
Depending on how many items were sold, you may be tempted to do that process manually, but the minutes spent manually tallying line items can add up fast. Instead, we can use a Spreadsheet-Style Formula action, and multiply the price and quantity together with the PRODUCT formula.
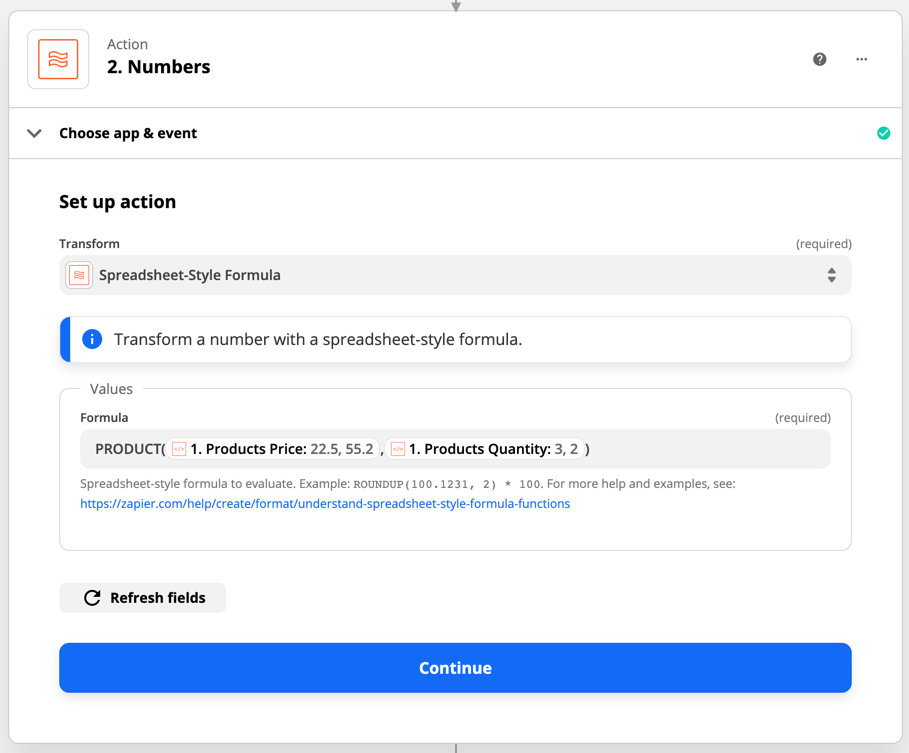
The Spreadsheet-Style Formula option in Formatter supports many types of formulas, allowing your Zap to process data similar to how you would in Excel or Google Sheets. Check out all of the formulas Formatter supports.
When the action receives line items, it will process the first items in each list first, and give us the result as a new line item. Then it processes the second items from each list and gives us that, then the third item, and so on. The result is a brand new set of line items, each of which is a result of our formula:

Now we have our totals for each product, in the same order as our original line items. That value can then be sent to QuickBooks Online to help correct the earlier calculations.
Just like other actions that support line items, Formatter actions will automatically stretch to process any number of line items that you give it. That means that once you've set it up the first time, you won't need to make any adjustments for invoices with more or fewer products.
Getting more out of your Zaps
Moving on to the next phase of my dog walking/grooming business, let's say that after the dogs have all been walked/groomed, I want to email each of their owners separately, to let them know that their dog is ready to be picked up.
Thanks to my trigger, I have each of their names and emails as line items, but if I add them directly to a "Send Email" action, it's going to send one email to all of them at the same time. Instead, I'd like each customer to receive a unique email, so I add the Looping by Zapier integration to my Zap to make that happen.
With Looping by Zapier's Create Loop from Line Items action, I can provide my line items, and have later actions run once for each item.
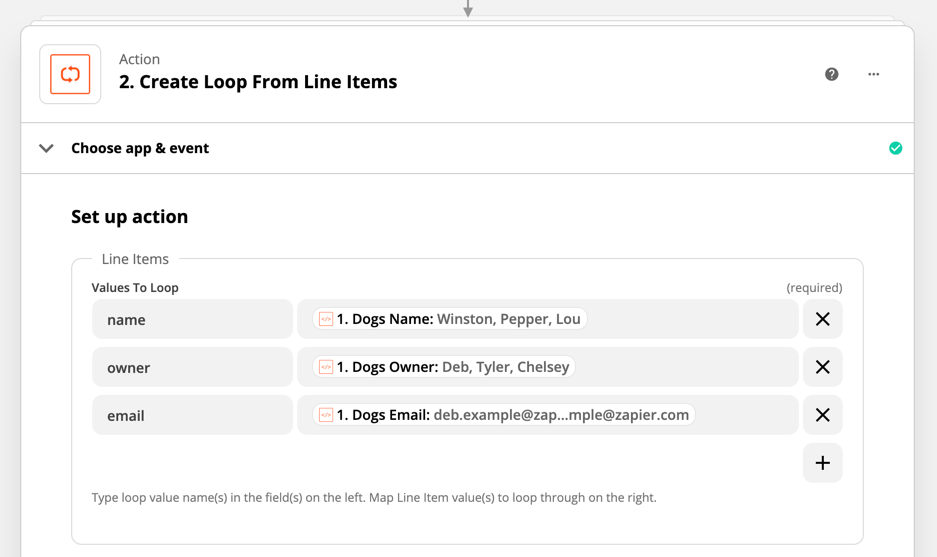
The Looping by Zapier action is still in beta. Learn more about what it can do and its limitations.
Just like with the Formatter action from earlier, Looping will prompt later actions to use the first set of values first, then the second, and so on, no matter how many items are provided by the Zap's trigger.
When we set up those later actions, we'll see they're nested inside the loop, and we'll see just one value from our line items appear at a time. That helps us get a better idea of what each action will use when it runs.
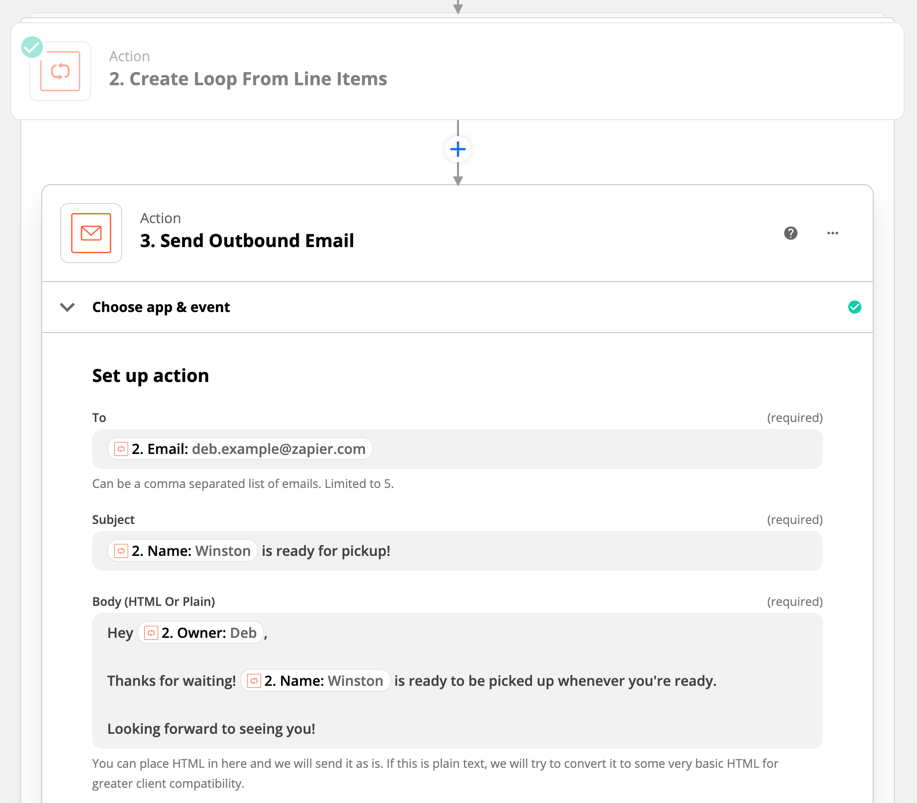
When this Zap runs, one email will be sent to each dog's owner, including their name and their dog's name, all without me having to do any additional work, or other complex actions.
What can I do if an action doesn't support line items?
If an action or field doesn't support line items, you can still add them, but they'll be treated as a comma-separated list instead. Here's our dog walking example again, but using an action that didn't support line items:

If you'd prefer to use something other than commas, such as having each item on its own line of text, you can use a Formatter "Line-item to Text" utility.
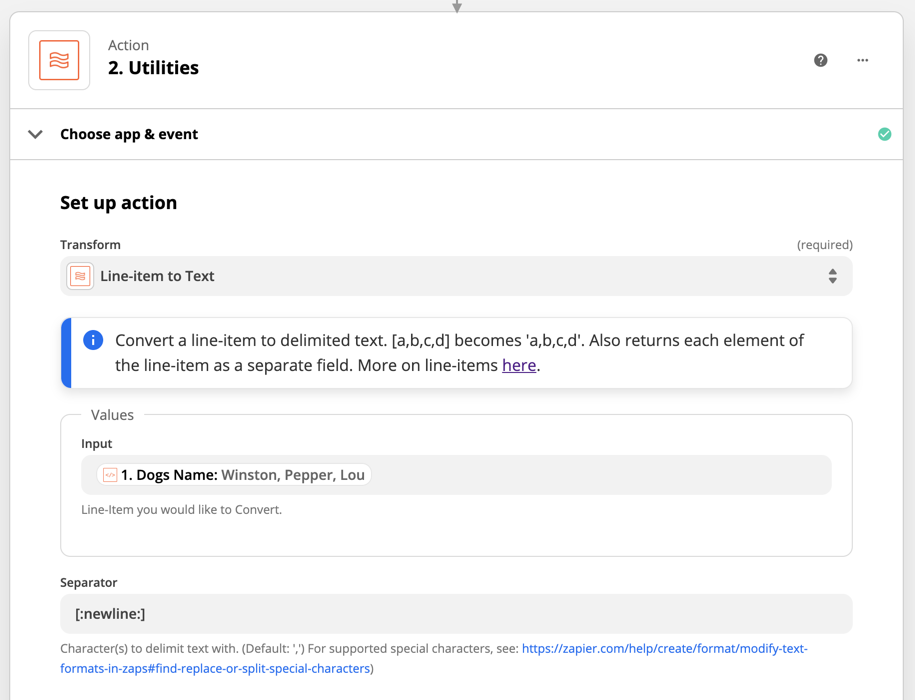
In the action, you can input your line items, and tell the Zap how you'd like to separate each item, instead of using a comma. This action supports several special characters (which you can read about here), such as [:newline:] to create a new line between each line item.
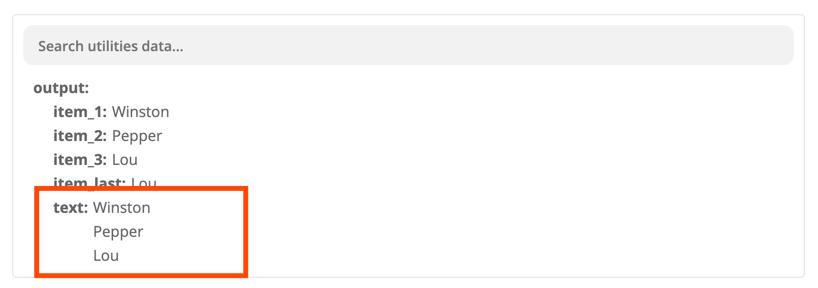
When the Zap runs, the Output Text value will be your new string of text, with each item separated by your custom separator.
The action even lets you put multiple line items into the Input field. For example, if you wanted to show who each dog belongs to:
![Input field: [Dogs name] belongs to [Dogs owner]](https://images.ctfassets.net/lzny33ho1g45/2befoLsWnuG3WQOycPRhpm/507f57b569ba30eaa6a659990c3babc9/4bb49754fc0d3e940b4b45983d95a807.png?w=1400)
Anything that isn't a line item, such as text you type in manually, will be applied to each line, while the line items will be separated like we saw before.
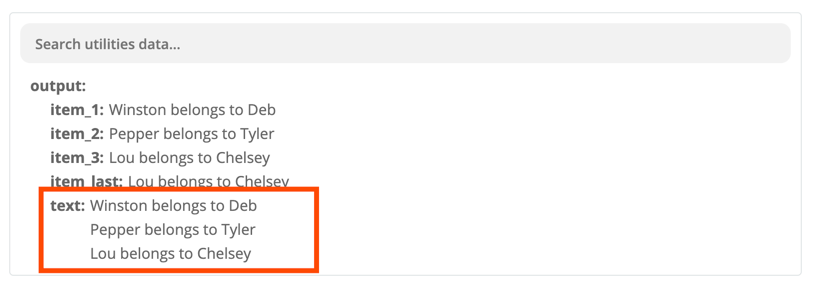
That output can then be sent to an action that doesn't support line items, so that each line can be displayed on its own line of text. This is great for sending emails about purchases, summaries of data, or creating handy lists of information.
As you've probably noticed, the Line-item to Text action gives us lots of useful values in its output. Check out more of what it can do.
Get started with line item automation
Now that you know what a line item is and what it can do for you, it's time to get started! Here are some of the most popular apps with triggers or actions that support line items:
Accounting: Xero, QuickBooks Online, FreshBooks
Invoice: Zoho Invoice, Harvest, ProWorkflow, Wave
eCommerce: WooCommerce, Shopify, Magento 2.X, Ecwid, BigCommerce, ShipStation, LemonStand
CRM: Infusionsoft, Close, Keap
Other: Google Sheets, Livestorm, BookingSync, Mailchimp
You can create a new Zap yourself by logging into Zapier and selecting Make a Zap, or click the button on one of the templates below for a guided experience that helps you get set up quickly.
Create invoices for QuickBooks Online customers from new Shopify orders
Create invoices in Zoho Books from new WooCommerce orders
Add or update Mailchimp subscribers with new Notion database items
What if I don't have line items, but I'd like to?
In some cases, you might want to send information to an app that supports line items, but the data you've received from the Zap's trigger or an earlier action don't provide them! Check out the sample data from this alternate version of my dog-walking app, which uses the same information, but lacks line items:

All of the right data is there, but because it's not provided as line items, apps like Xero or QuickBooks Online won't be able to use it as easily.
Luckily, we have two different Formatter by Zapier actions that can help us out, depending on how many values we need to make into line items.
Creating one set of line items
If we only need to create one set of line items, such as the "dogs" value from above, we can use the Formatter Text to Line-item action. This is the reverse of the Line-item to Text utility we covered previously, as it takes a string of text, and breaks it up into separate line items.
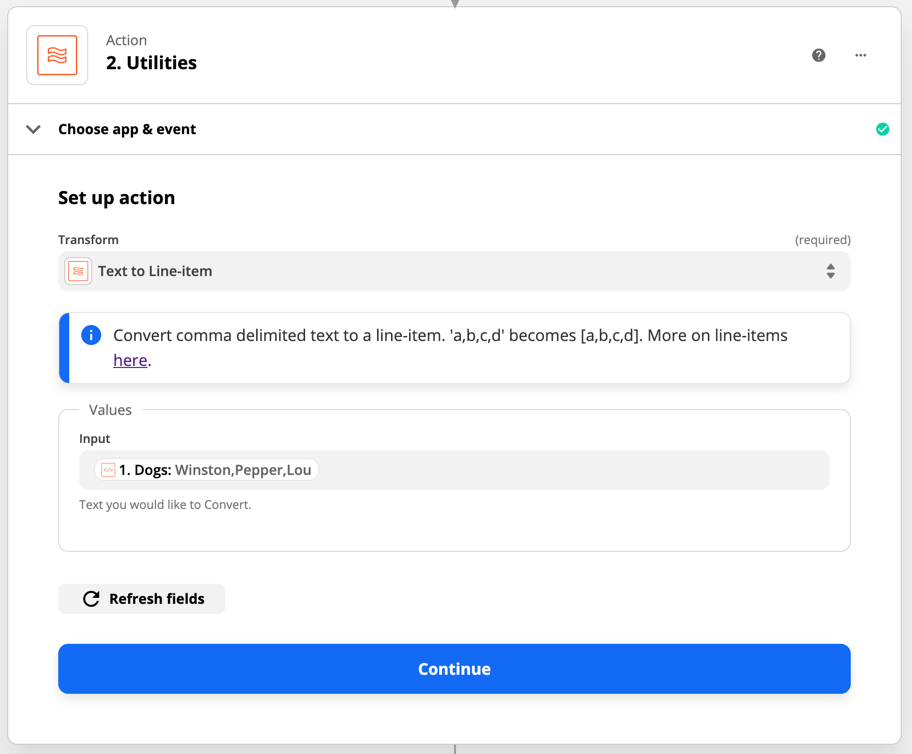
The action breaks the text at each comma, and turns each value into a line item so that actions later on can use them separately.

If your values aren't separated by commas, don't worry! The Formatter "Split Text" can be used to split values with any delimiter.
Creating multiple line items
If you'd like to turn several (maybe even all) of the values from your trigger into line-items, you can take advantage of my personal nomination for "Best Utility Name of All Time" — the Line Itemizer.
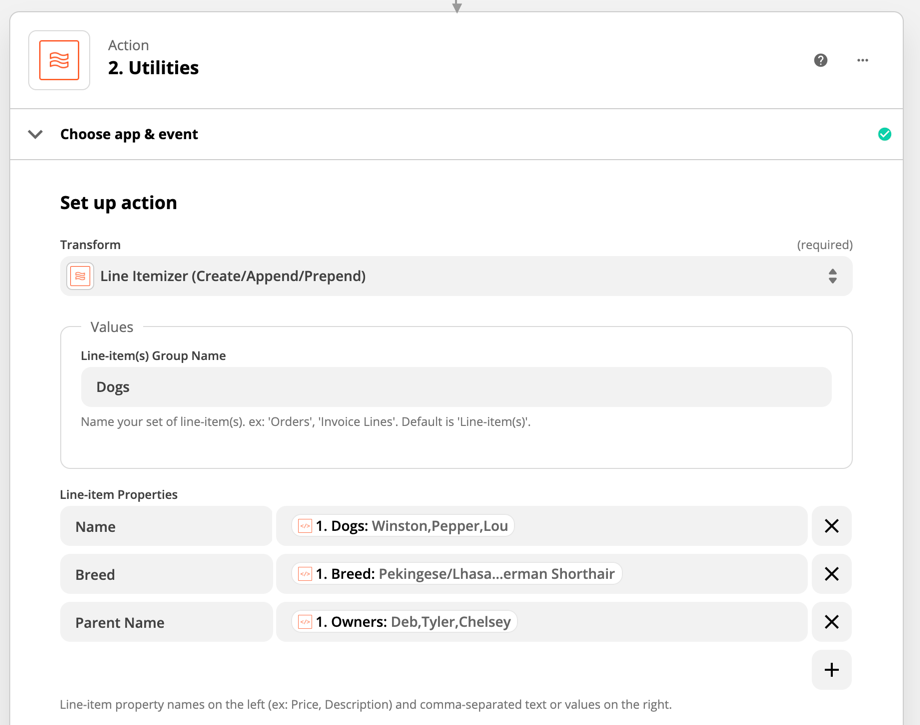
With the Line Itemizer utility, we can take all of our comma-separated values, and turn them into a brand new group of line items. It also lets you specify the name of each group of items, allowing you to rename values so they make more sense, like changing "Dogs" back to "Name", or "Owner" to "Parent Name".
When the Zap runs, it will take the first item from each list, and add it to the first line item using the names you specify. Then it creates the second line item with the second values, then the third, and so one, depending on how many values you provide. You can also use the + button to add new rows, depending on how many values you need.
The output will give us nice and neat line items, ready for use in other apps.
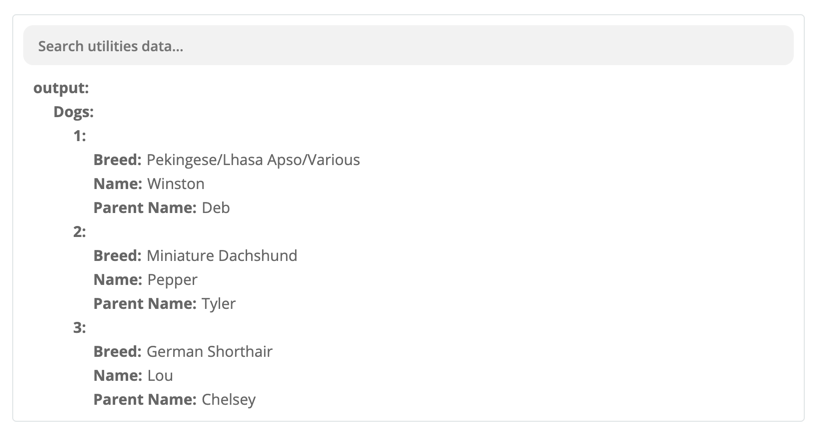
The Line Itemizer also lets you combine line items and comma-separated lists when you map them to the same field, helping you bring together data from different apps!
Lining it all up
Now that you're a master of all things line item, you're ready to create your own, ultra-powerful Zaps!
Check out our Automation Inspiration page for some ideas to get you started, and consider dropping a line in the Zapier Community, to connect with Zapier power-users just like you.
This piece was originally written by Matthew Guay in December 2017. It was updated in June 2021.
Do more with Formatter by Zapier
Want to automate more of your work with text? Check out the other tutorials in this series for more ways to use Formatter.

