Buffer is my favorite social media tool because it's approachable yet powerful. It has reasonable and scalable pricing plans and a straightforward interface, while offering scheduling, analytics, and engagement features in one package. It gets its name from "buffering" your posts in a schedule, but it covers most of the typical social media workflow.
In this guide, I'll show you how to use all of Buffer's features. Jump ahead to the section you need, or keep reading to learn the whole process.
Buffer pricing: Buffer's free plan offers planning and publishing features for up to three social media accounts and 10 scheduled posts at a time per account. Paid plans start at $6 per social media account per month for features like analytics, engagement, and team management.
How to set up your Buffer account
If this is your first time using Buffer, you'll need to create an account to get started. After you enter your email and password, Buffer will prompt you to connect channels (social media accounts), build a Start page landing page, or sign up for analytics.
Click Connect Channels to connect your social media accounts.

You'll then see a list of platforms to connect to. Buffer currently supports these channels for publishing:
YouTube channels
Mastodon profiles
Facebook Pages and Groups
Instagram business or creator accounts
X (Twitter) profiles
LinkedIn pages or profiles
TikTok business accounts
Google Business profiles
Pinterest profiles
Buffer Start Pages (landing pages you can create in Buffer)
You can also add Shopify as a Buffer channel, but only for analytics, which makes it exclusive to paid plans.

Once you select the account type, you'll be asked to authorize the app via the OAuth 2.0 protocol. If you're currently logged in to that social media account, you might get a Continue as [user] message. Otherwise, you'll be asked to sign in to the account. After you sign in, you might also be prompted to choose the specific pages or groups you'd like to add.
How to set up your publishing schedule
Before you schedule your first posts on Buffer, make your life easier by setting up queues for your social media accounts. These queues consist of time slots for you to schedule posts based on your posting schedule. Buffer will start you off with some suggested posting times, but you can change them whenever you want.
If you want to change the times that you post to each account, click the Settings tab.

Once selected, you'll be in the General sub-tab. (Here, you can remove the link shortening function, add a Google Analytics campaign tracking code, or even shuffle up to your first 200 posts in your queue.) For our purposes, you'll want to click on the Posting Schedule sub-tab.

There are three sections to make note of:
Timezone. This is where you'll select the timezone you want to target.
Add a new posting time. This is where you can add a default posting time for your queue.
Posting times. This is where you can edit the default posting times that already exist.
Using these settings, you can completely customize the timing of your posts to match your specific requirements. Only do this if you know for sure that your selections are better for your audience—otherwise, stick with Buffer's suggestions.
You can also create a post directly from the queue. Pick the next available slot on the queue, and you'll be able to create the post from there.
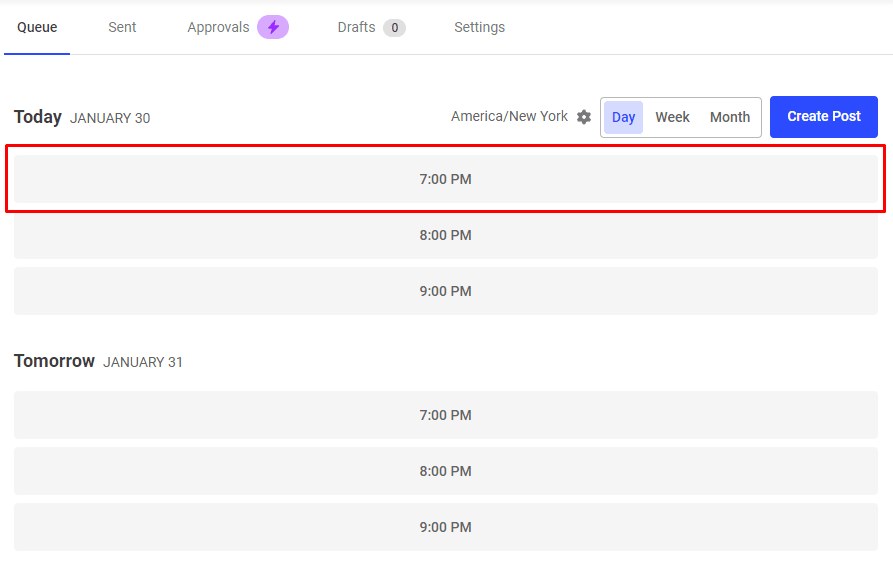
Note: Depending on your settings, posts added by non-account owners may have their posts placed in Draft until they're ready for approval. If you're an account owner, you can find and approve those posts in the Awaiting Approval tab.
How to publish posts in Buffer
In the left sidebar of the Publishing tab, you'll find a list of all your connected accounts. Each account will be wearing its respective logo, allowing you to distinguish between the social media platforms you've connected, even if they all have the same username.
Select the account you want to post to. Once selected, click the Create Post button.

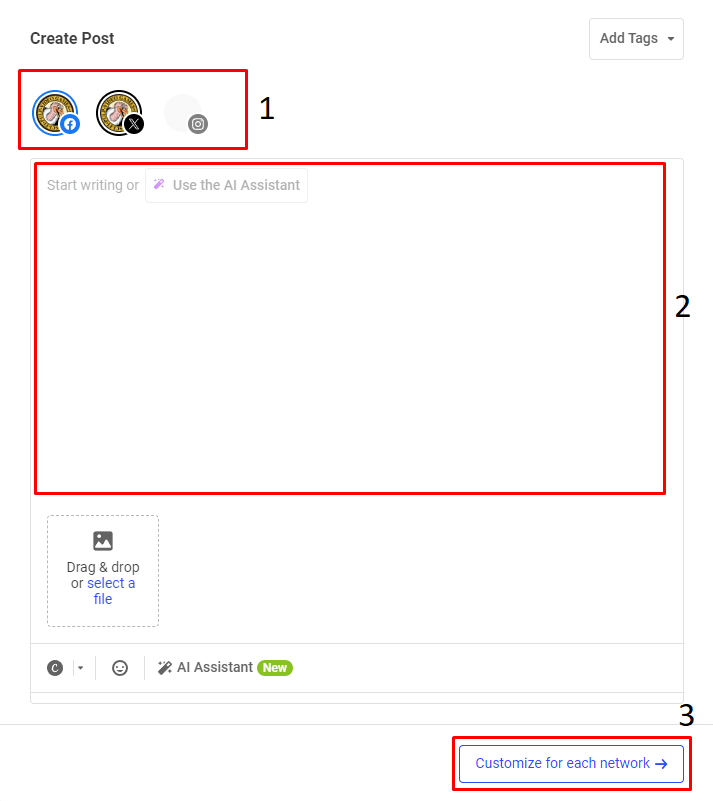
In the new window that appears, you can do a few things:
You'll have the option to select (or deselect) additional accounts where you'd like to share the post. You can select as many accounts as you like, and the accounts that aren't selected will be grayed out.
This is also where you'll create the post itself. In the status box, you can add images, text, links, or any combination of the three. When you add a link, it will automatically be shortened per your link shortening settings. This is particularly useful for social accounts like Twitter that have character limits. If you don't want to use the shortened link, hover your cursor over the link and select Unshorten.
Click Customize for each network at the bottom-right, and you'll be able to customize the post to be different for each social media account.
At this point, you should be at a window that shows a short preview of the post, any links, an image thumbnail, and each account it will be shared to. Additionally, if there are any issues with your post, you'll see an exclamation point at the beginning of the status, signaling that something is awry.
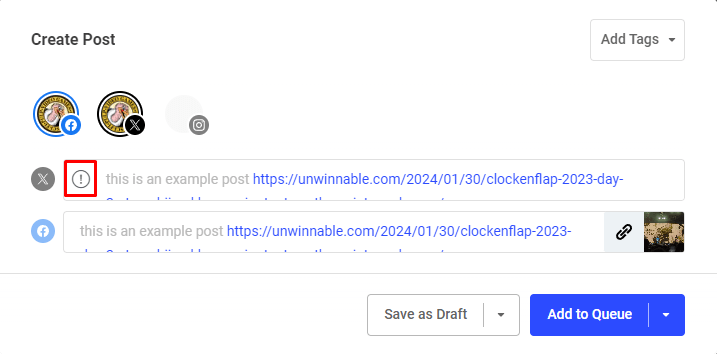
Select the box next to the logo of the account you'd like to customize. Once selected, the editor will expand, showing a complete preview of the post. Now you can completely customize the post for this specific account. For example, you might add extra media or shorten the post if it exceeds the character count.

If you've included a link, you'll also notice a Suggested media box below your text and image. By default, the post will use the linked article's featured image in the preview. If you'd rather use a different image, select the box to the left of the Suggested media section, then select the image file you'd like to use.
After you've finished customizing the post, you're ready to publish it. If you want to publish it immediately, select the arrow next to Add to Queue to bring down a menu, then select Share Now. You can also click Save as Draft to hold onto it for review.
Scheduling posts in your queue
You probably chose Buffer to take advantage of its scheduling features, so let's dive into those.
Back at the dropdown menu next to the Share Now button in the composer, you'll see two other options.
Selecting Share Next will add the post to your queue, putting it next in line for publication.
Selecting Schedule Post, which gives you complete control of the publication time and date, brings up a calendar.
Once you've set your time and date, click Schedule.

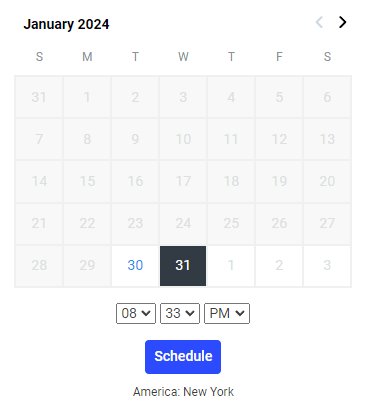
Alternatively, you can simply click the Add to Queue option, which will put the post in the next available slot in the post queue.
Once you've scheduled your post, you'll be brought back to your Publishing tab. There, you'll see all of your scheduled posts in the Queue sub-tab.
How to manage your Buffer content and schedule
Buffer's Publishing tab has three additional features that help you manage and schedule your content:
Create: Click Create at the top of the Publishing tab's left-hand menu to access a library of content ideas. Here, you can post ideas for content that you can convert to posts in just a click.
Calendar: Underneath the Create button, you'll see a Calendar button to see all of your posted and scheduled posts in a calendar grid. Choose between weekly and monthly views at the far-right of the screen, right next to the Create Post button. Speaking of creating posts, you can click any slot on your calendar to schedule a post for that day and time.
Tags: The second option from the bottom of your left-hand menu is the Manage Tags menu, which lets you create and manage tags for organizing your ideas and posts. You can tag an idea, turn it into a post with that same tag, then analyze the performance of posts with that tag.
How to view your social media analytics
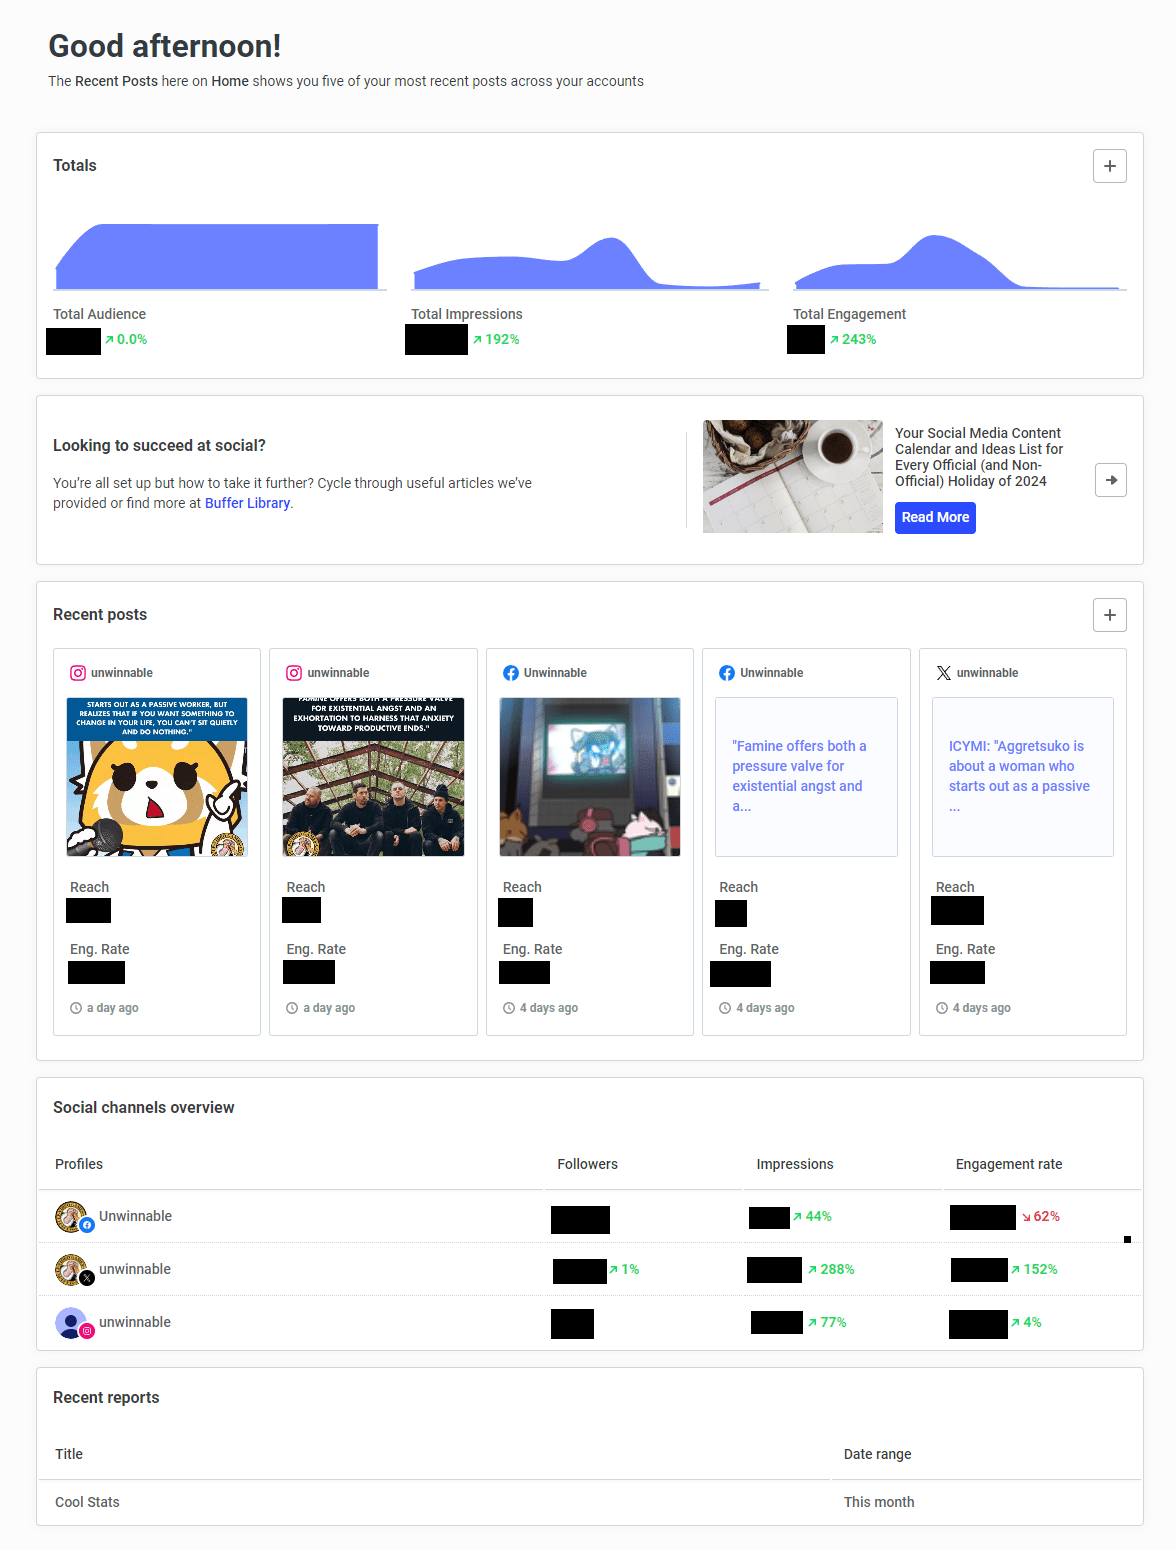
Onto the next major tab in Buffer: Analytics. Here, you can get a big picture of your social media performance and explore each of your channel's analytics individually.
The Analytics tab's home shows the following analytics covering all of your channels:
Totals: Your total audience members, impressions, and engagement numbers for the past seven days and graphs representing their daily breakdowns.
Recent posts: Your five most recent posts across platforms, plus their reach and engagement rates.
Social channels overview: Your followers, impressions, and engagement rate for the past seven days by channel.
Recent reports: Links to your most recent reports (more on those soon).
On the left side of your screen, you'll see a menu with the names of the major channels Buffer connects with. Click on the channel you want to analyze performance for. Now, you'll have a full range of sub-tabs to choose from full of analytics. Filter this data by date range by clicking the dropdown at the top-right of the interface, and export it using the dropdown right next to it.

The exact sub-tabs you'll see will vary by platform, but these are the options you'll usually have:
Overview: A list of all of your most important performance metrics and graphs showing their progression throughout your specified period.
Posts/Stories: Performance metrics for the posts or stories you posted within the specified period, including engagement metrics, hashtag performance, and individual performance.
Audience: An overview of your audience demographics, such as gender, age, and location.
Answers: Insights into your highest-performing post times, days, types, and frequency based on your previous performance.
Note: The performance overviews in the Overview and Posts/Stories tabs have the same metric types, but not the same numbers. This is because the metrics in Overview relate to all of the posts you've ever made, while the metrics in Posts/Stories relate to the posts you made during your specified period.
In each of the sections you've learned about so far, you'll see a + in the upper right corner. Click on it to add that section to a report. Then, you can go to the Reports option at the bottom of the left-hand menu to see all of those sections together in a custom report.
How to reply to comments on Facebook and Instagram
The next tab in Buffer, Engagement, checks your Instagram and Facebook posts for unanswered comments and lets you respond to them in Buffer.
On the left side of the screen, you'll see a grid of your most recent posts on your chosen channel. Above, there are dropdown menus to switch to a different channel and check Buffer's perceived comment sentiment. Buffer will highlight posts on the grid with unanswered comments.

After you click on any of the posts in the grid, you'll see any comments on a post and an option to reply.

How to create a Buffer Start Page
The final tab at the top of your Buffer interface, Start Page, takes you to the builder for your Start Page landing page. If you publish and use this page, it will count as one of your channels. This means it will take up one of your three channels on a free plan or add to your monthly fee on a paid plan.
When you click the Start Page tab, from left to right, you'll see a preview of your landing page, editable blocks representing each section of the page, and a menu. The right-hand menu includes these options:
Appearance: Choose a color scheme and font pack for your page
Layout: Drag and drop blocks (sections) to set up your Start Page layout—the default option that opens when you go to the Start Page tab
Add Block: Add a block to your Start Page
Statistics: Metrics related to your page views and clicks to your page link
Settings: Add a custom domain to your page, name your page, or unpublish your page

The types of content you can add to your Start Page include:
Button links
Links to your social media pages
Image links
Subheadings
Text
YouTube videos
Spotify songs and playlists
Image grids with links
Update posts that you can schedule with Buffer
Email signup forms
This wide range of options lends Start Pages well to just about any micro-site you want to make. It seems to be geared toward link in bio pages, but you could use it as a personal site, portfolio, or whatever simple page you have in your head.
Go one step further with automation
Now that you know how to use Buffer, try automating it with your other favorite apps. You could queue up content you find on the internet, make a log of your posts, or connect Buffer to your favorite project management tool. With thousands of apps to choose from, chances are you'll find a way to connect your favorites to Buffer.
Learn more about how to automate Buffer, or get started with one of these pre-made workflows.
Create Buffer ideas from new Trello labels added to cards
Zapier is a no-code automation tool that lets you connect your apps into automated workflows, so that every person and every business can move forward at growth speed. Learn more about how it works.
Related reading:
This article was originally published in June 2019 by Marshall Gunnell. The most recent update was in February 2024.
