When your product team receives dozens—or hundreds—of feature requests, manually reviewing and prioritizing each one can become a massive time sink. Even worse, it leaves room for delays in responding to customer needs.
That's where automation comes in. With Zapier, you can build a feature request system that captures and prioritizes feature requests with AI based on customer demand and your product strategy.
New to Zapier? It's workflow automation software that lets you focus on what matters. Combine user interfaces, data tables, and logic with thousands of apps to build and automate anything you can imagine. Sign up for free.
How it works
You start by mapping that system out in Zapier Canvas—which will then automatically create the connected form in Zapier Interfaces (for feature requests) and a table in Zapier Tables (where those feature requests will be stored). An AI-powered agent will then look at that table and use several data sources to properly assign each feature request the right priority level (high, medium, or low), along with a justification for that decision.
Watch the demo below to see how it works, or keep reading for step-by-step instructions.
Note: This demo and walkthrough uses an older version of Zapier Agents. We've since updated the experience, so the visuals and UX may look a little different. For more information, check out our step-by-step feature guide.
Skip ahead
Building with ChatGPT, Claude, Cursor, or other AI platforms? Try Zapier MCP! It's the fastest way to connect your AI to nearly 8,000 apps and 30,000+ actions without complex integrations.
Step 1: Map out your system with Canvas
Whenever you're mapping out a new system, it's best to visualize each step involved, so your team knows exactly what's happening when, and why. But what if you could map out a system—and have it also build parts of it for you—automatically?
Enter: Zapier Canvas. It's an AI-powered diagramming tool that helps you visualize, plan, and automate business-critical systems.
By describing the system you want to build, Canvas will automatically chart that system for you—and even build any necessary additions to that system, like a form in Zapier Interfaces to collect feature requests or a table in Zapier Tables to store and sort them.
To get started, head over to your Canvas dashboard and click + Create canvas.
You can use the AI tool to automatically draft your system for you. Just describe the sort of system you're looking to build under Get a system recommendation. It can be as simple as "Create a feature request system," but feel free to add as much detail as you'd like.

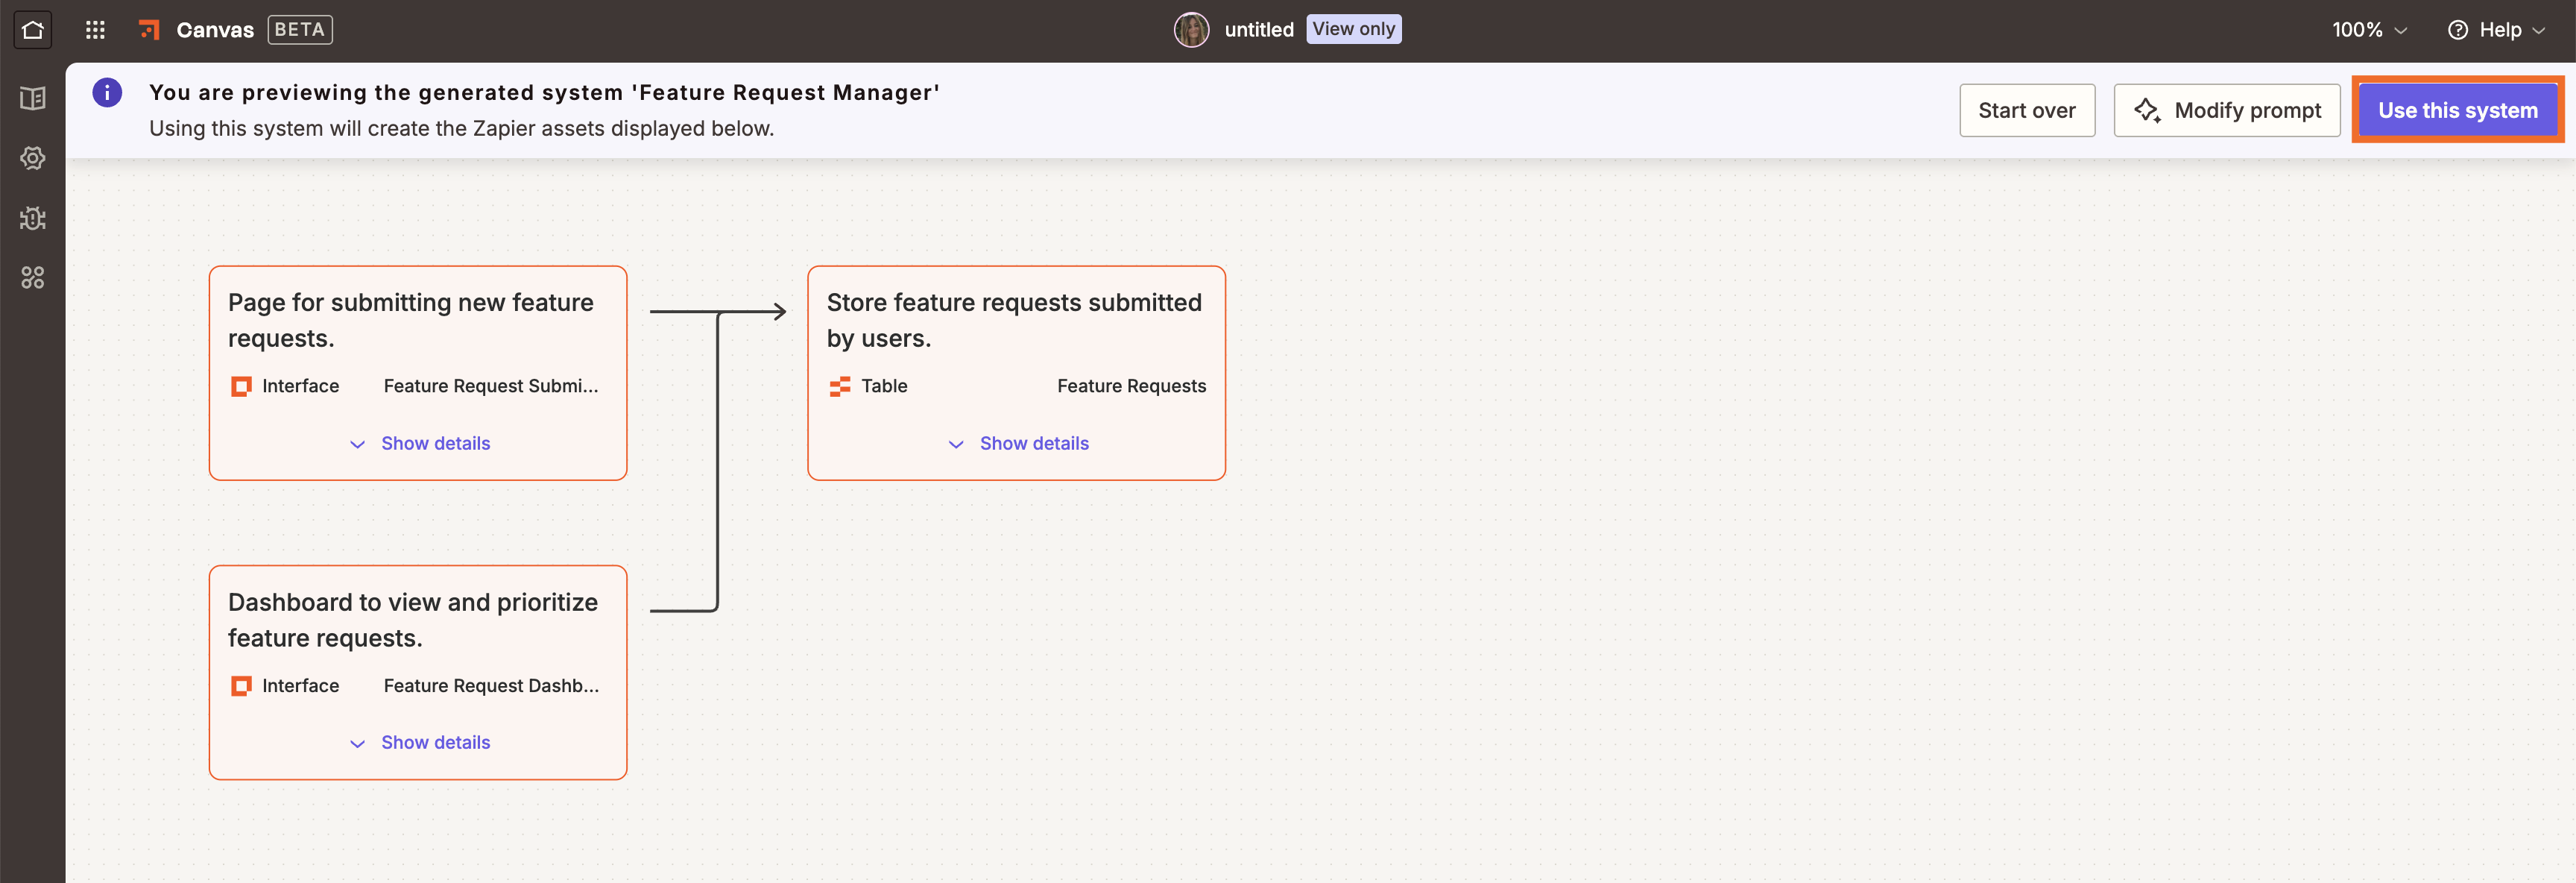
When you click Generate, Zapier Canvas will offer you a preview, which you can accept or modify.
Your canvas will now include a feature request form (automatically built in Zapier Interfaces) and a table (automatically built in Zapier Tables).
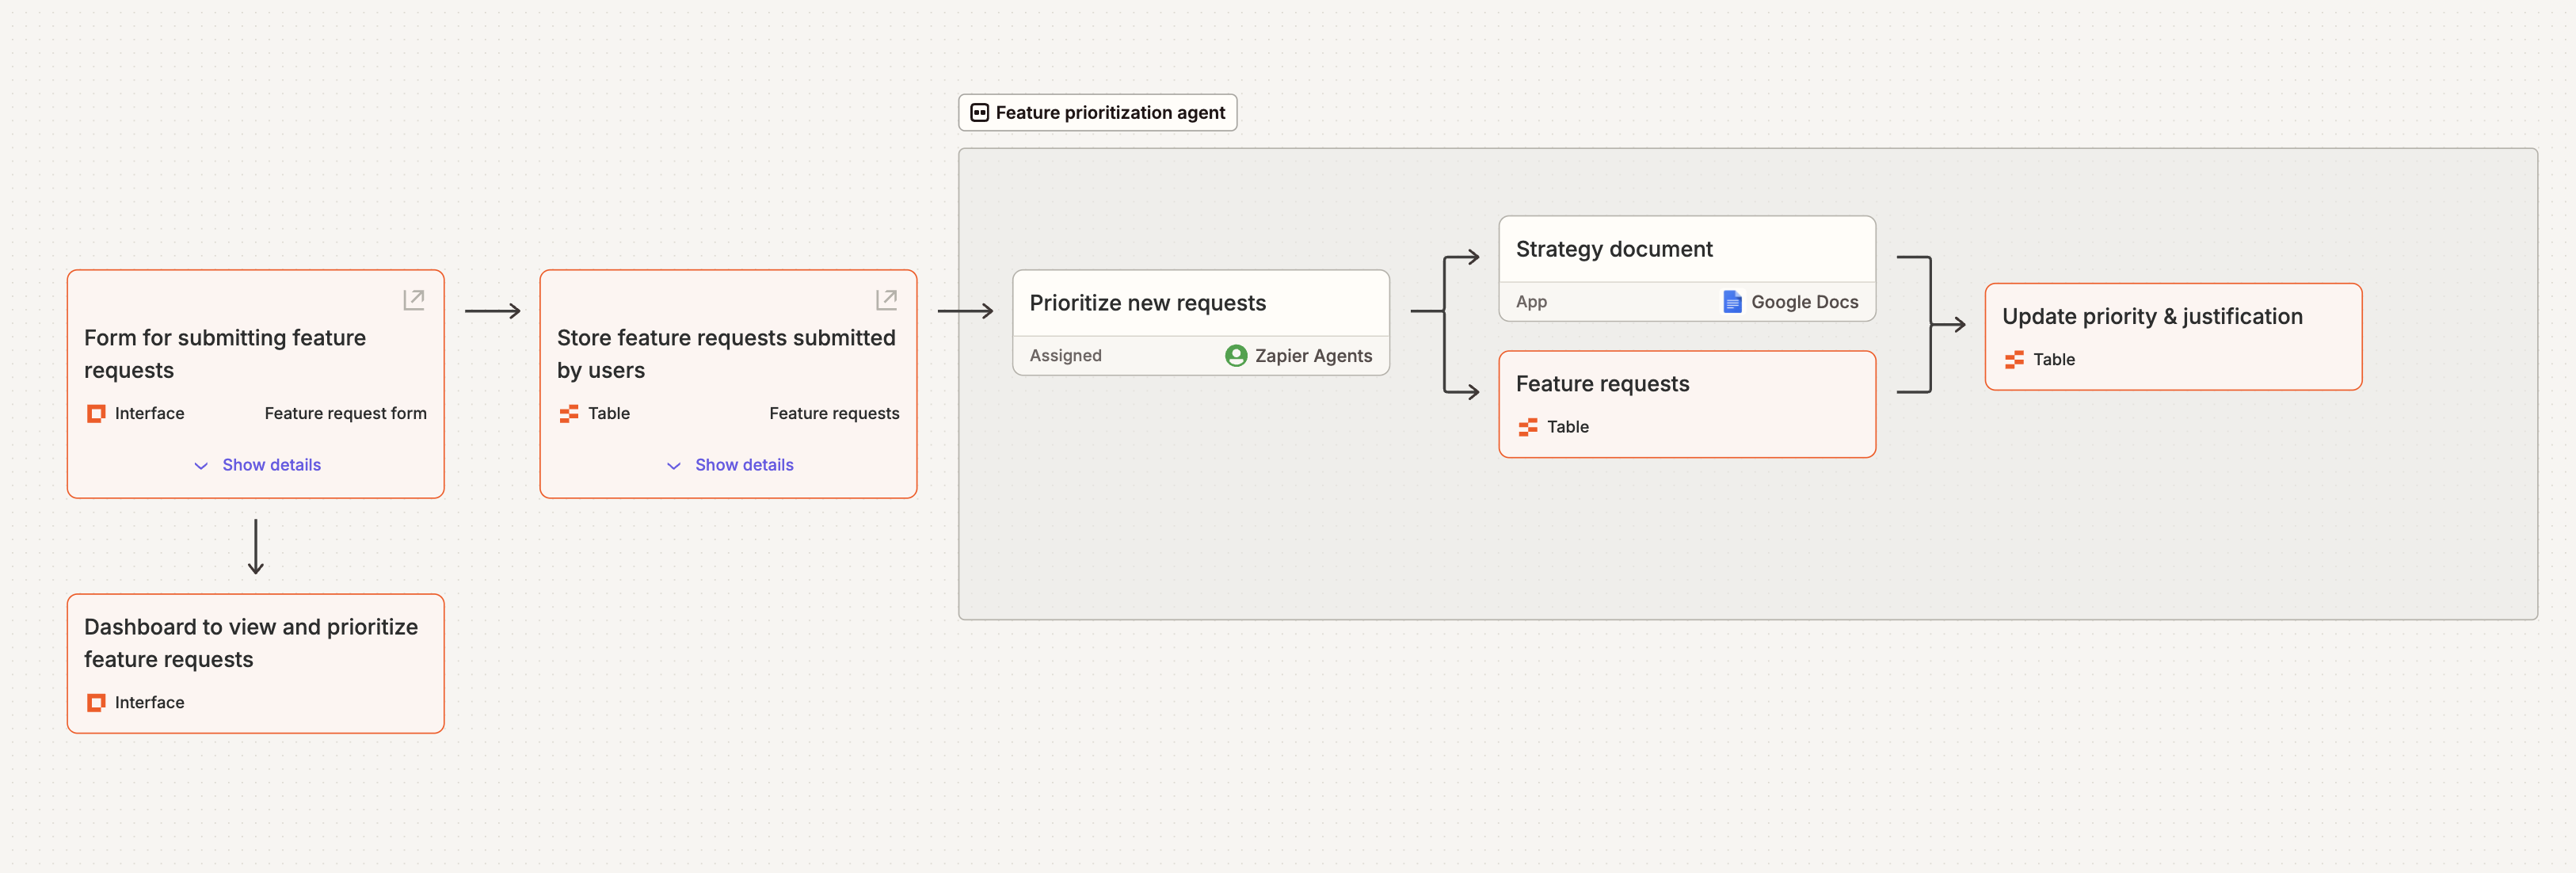
From there, you can add more steps, assign tasks, and connect apps—so your canvas clearly shows how feature requests are received, prioritized, and implemented:
In our case, we've added a step for the agent to analyze each new feature request based on its data sources—and a step to update the table itself. This is so the rest of our team can see how this system works end-to-end.
Step 2: Edit your form and connected table
Now let's check out your feature request form. To access your form, just click on the arrow icon on your interface step in your Canvas layout.

You'll be taken directly to your interface page, where you can edit your form in the backend:

To edit the fields, just click Edit next to the form's questions. Within the right-hand side panel, you can edit existing fields, add new ones, adjust the form's alignment, and more.

Once you've finished setting up your form, you can access the public link in the top-left corner of your page.

Tip: We recommend filling out a test submission so your agent can test that data later on.
Edit your connected table
Once you're happy with your form, head back into your canvas. Now we want to open the table your form is automatically connected to. Once again, click the arrow icon on your table step in your canvas. You'll be taken directly to your connected table, where your form submissions will be saved each time someone submits a feature request.
To edit your existing fields, click any field and select Edit field from the list of options.

In the right-hand panel, you can give that field a new name, define the field type, adjust the alignment, and add an icon to personalize your table. Just remember to click Save once you're done.

Note: If you already have existing feature requests that you'd like to add to your empty table, you can import existing records from a file or transfer existing data through a Zap.
Add unique fields to your table
Next, we'll want to add a couple of new fields to your table so your agent can prioritize each request. With Zapier Tables, you can add different types of fields to your table to help generate information or sort data based on conditions. For example, you can add:
Dropdown fields that standardize data entry by offering a set list of pre-defined options.
Formulas that perform calculations, add up values, and extract key insights from existing records in your table.
AI fields that let you automatically populate records, reference record data, and generate different responses.
In this case, let's start by adding a dropdown field to your table. This will help your agent assign a priority level to each feature request by selecting from a predefined list of options.
To set up a dropdown field, click the + Add field icon in the top-right corner of your table and select Dropdown from the menu of options.

Give your field a descriptive name (like "Priority"), then select Provide Static List under Selection Source. You can then add an itemized list of values—which refers to the different levels of priority. In our case, we'll add high, medium, and low priority which we'll better define for the agent later on.

Click Create to save your field.
Tip: If you'd like your agent to add a reasoning for each selection it makes, you can add a simple Long Text field and name it something self-descriptive, like "Justification." We'll instruct the agent to update this field later on.
Step 3: Set up your agent
Now for the fun part: setting up your AI agent to interact with your table. To set up your agent from scratch, follow these steps:
Head over to agents.zapier.com and sign up.
If you haven't created an agent before, click Create my first agent. If you already have agents, hover over the + icon on the left sidebar and click + New agent.
Next, give your agent a new name and then select Start from scratch.

A chat panel will open, which is where you can chat with your agent (like you would a coworker in Slack) using the message field at the bottom of the chat screen.
It can give you an overview of its capabilities and help you set up the kind of agent you want. The icons at the bottom of the chat panel also allow you to upload data sources, connect apps and add actions, define behaviors, and more.

Set up your agent's behavior
Next, let's set up your agent's behavior. Your agent's behavior refers to the rules for when it should step in and perform actions in other apps independently or on demand. A behavior will usually consist of some or all of the following parts:
Instructions: What you want the agent to do.
Trigger: An event that starts the behavior. You can trigger events on a schedule, on demand, or when something happens in another app.
Actions: Apps the agent will use to perform tasks.
Data sources: Documents the agent uses to answer questions and complete tasks.
To set up your agent's behavior, follow these steps:
Click the Configure tab at the top of your Settings panel, then Create behavior.

This will lead you to the configuration page, where you can finish customizing your agent's instructions. In the left-hand panel you can set up or change the behavior's trigger, personalize the instructions, and configure any apps that perform actions. The right-hand panel is where you can test your agent's behavior once you've set it up.

First up, let's set the trigger for your agent's behavior. Click the Trigger step and select Zapier Tables from the list of options. Select New Record as your trigger step, then select the right table ID from your list of options.

That means that anytime someone submits a feature request (and it's added to your table), the agent will be set to work on prioritizing it.
Next, let's add the first part of your instructions. In the Instructions field, type out exactly what it is you want your agent to do with the data from your table. For example, you'll want to include:
The agent's process: Tell the agent what to do with the new feature requests (e.g., check how many times a feature has been requested or make sure the feature aligns with company goals).
The agent's task: Make sure to instruct the agent to update the record in Zapier Tables with the right score.
Context or decision framework: Include a definition of each priority level so the agent knows to assign the right score.
Here's our example for reference:

Next, let's connect your agent to several data sources so it can reference them. We'll add our feature request table and a company strategy document so your agent can better understand company priorities.
In the Instructions field beneath your text, click the Insert data tab at the top of the Instructions panel.

Select Zapier Tables from the list of options, then search for and select the right table from the list of generated options. Click Add data source and wait for it to sync. We'll do the same thing for our company doc, which is a Google Doc. Both data sources will appear in your Instructions field, like so:

Finally, it's time to add an action—what you want the agent to do with its priority ranking. In our example, we'll be updating the records in your table.
To add an action, click the Insert action tab, then search for and select Tables. Follow the instructions to finish connecting your table and setting up the relevant fields (like which field ID it should update).

Once you've saved your action, select Test behavior. If everything looks good, remember to switch it on with the toggle in the top-right corner of your screen.

Power your product team with AI and Zapier
By combining Zapier Canvas, Interfaces, Tables, and Agents, you can build an end-to-end feature request system that's not just automated—but intelligent. Instead of manually sorting through submissions, your team gets a clear, prioritized list backed by data and AI-generated reasoning. That way, they can focus on what really matters—building great products.
Ready to streamline your feature request workflows? Start mapping it out in Zapier Canvas and let automation do the heavy lifting.
