The sales funnel can be an incredibly complicated process that demands a lot from your sales team. That face-to-face time with your prospects is incredibly important, but researching leads, prepping for sales calls beforehand, and even following up after sales calls can eat up valuable time that should be spent building those relationships (and closing deals).
Fortunately, you can build AI agents to handle those tasks in the background. By leveraging Zapier Agents to automate your sales outreach, you can streamline lead research, automate follow-ups, and make sure your team focuses on high-value interactions.
Below, watch how Evan Nison, NisonCo's founder and president, streamlined his entire sales strategy with Zapier Agents. Or, keep reading for step-by-step instructions.
What I love about Zapier Agents is their massive amount of integrations and how flexible you can be with them to create agents—from lead generation to call follow-ups. Tasks that used to take hours are now handled automatically from the same platform.
Evan Nison, Founder and President, NisonCo
Skip ahead
Note: This demo and walkthrough uses an older version of Zapier Agents. We've since updated the experience, so the visuals and UX may look a little different. For more information, check out our step-by-step feature guide.
Build a lead generation research agent
Bringing in new leads is one of the most critical things you can do when scaling your sales operations. But manually finding—and qualifying—potential leads means scouring the web every day, tracking activity in your lead capture tools, and researching specific company information. This process is not only time-consuming but also inefficient, often leading to missed opportunities and delayed outreach.
Instead, you can use a Zapier agent to help identify high-value prospects, pull contact details, and provide all the context you need to nurture them—automatically in the background. More specifically, you can build an AI agent that:
automatically scans the web for press releases, news wires, and other online sources to identify industry-specific leads you're interested in capturing.
extracts key details like company names, websites, and contact details of industry leaders.
compiles this data into a spreadsheet or database, helping you identify potential clients you can then reach out to.
"What used to be done by a whole team of researchers is now handled by one person using AI, including Zapier Agents. We're actually generating more leads with fewer resources."
Evan Nison, Founder and President, NisonCo
Building with ChatGPT, Claude, Cursor, or other AI platforms? Try Zapier MCP! It's the fastest way to connect your AI to nearly 8,000 apps and 30,000+ actions without complex integrations.
How to set up a lead research generation agent template
You can get started with our pre-made template by clicking the button below, then selecting Use template in the pop-up window.
A new portal will open, where you can finish customizing the template and setting up the agent's different behaviors.
An agent's behavior refers to the rules for when it should step in and perform actions in other apps independently or on demand. A behavior will usually consist of some or all of the following parts:
Instructions: What you want the agent to do.
Trigger: An event that starts the behavior. You can trigger events on a schedule, on demand, or when something happens in another app.
Actions: Apps the agent will use to perform tasks.
Data sources: documents the agent uses to answer questions and complete tasks.
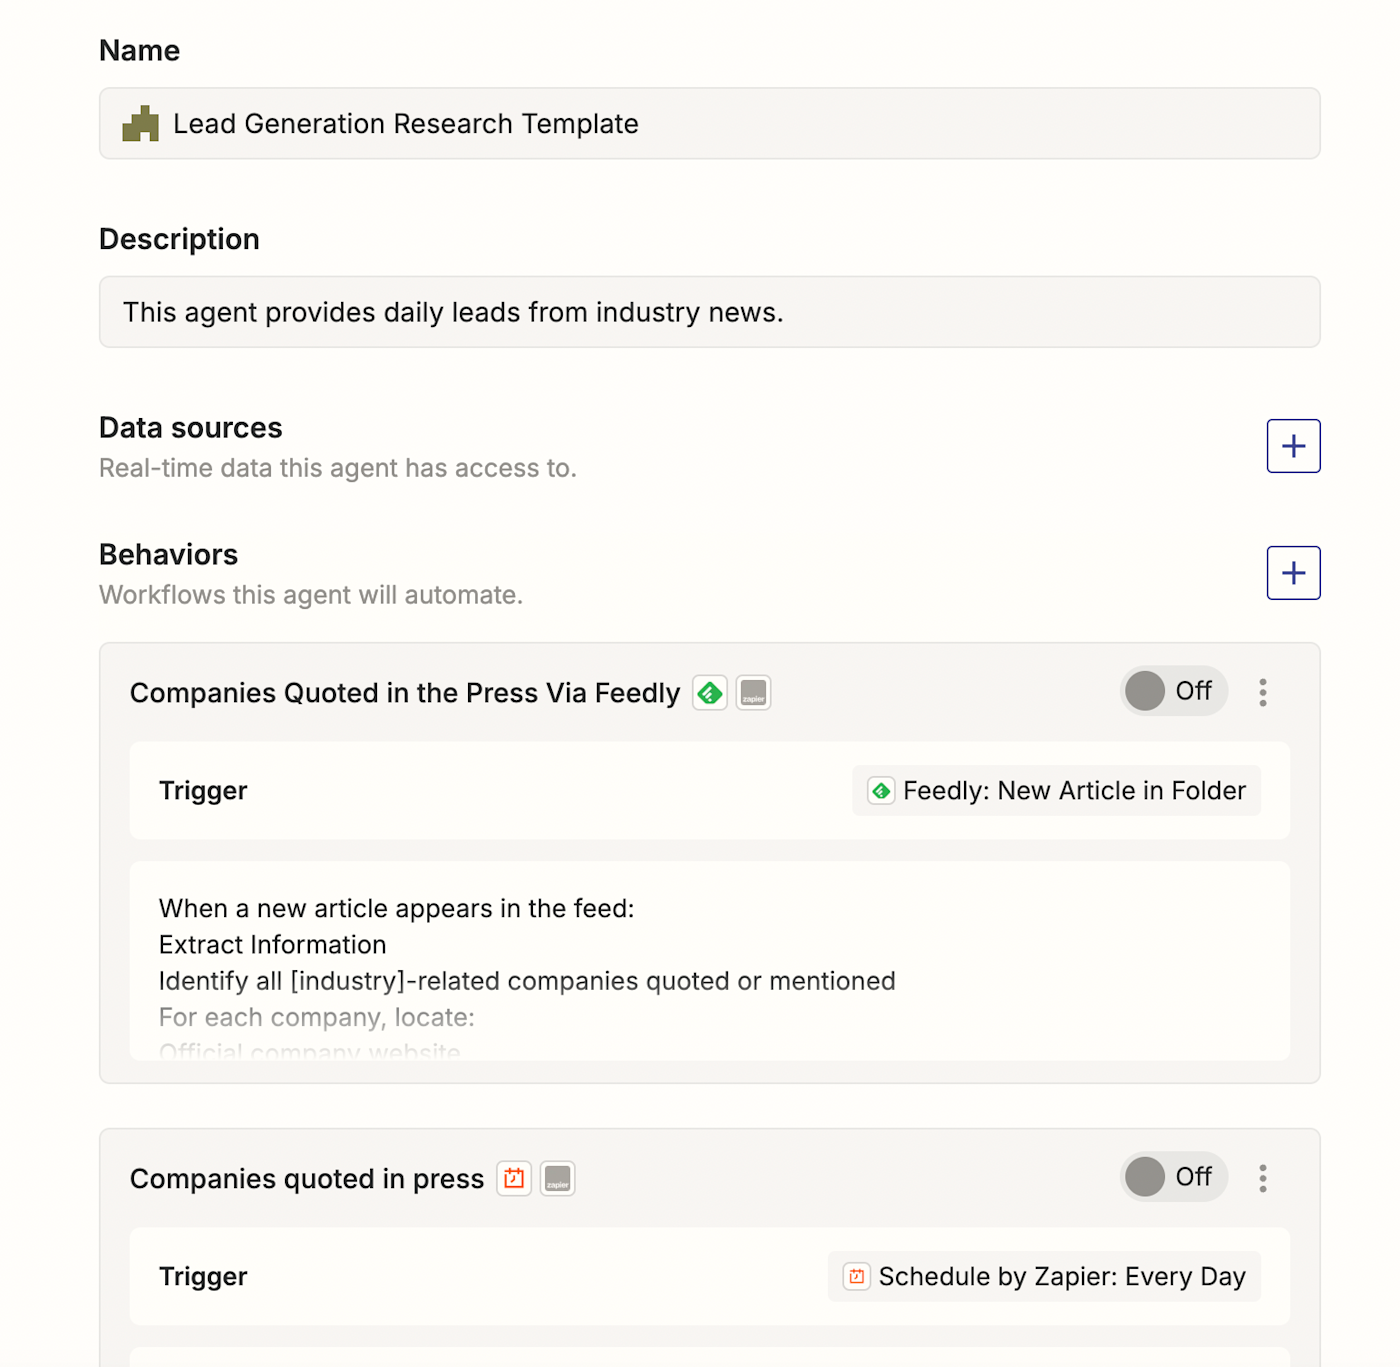
An agent can have multiple behaviors, each with its own instructions, triggers, and actions. Evan's lead generation research agent comes with five pre-defined behaviors.
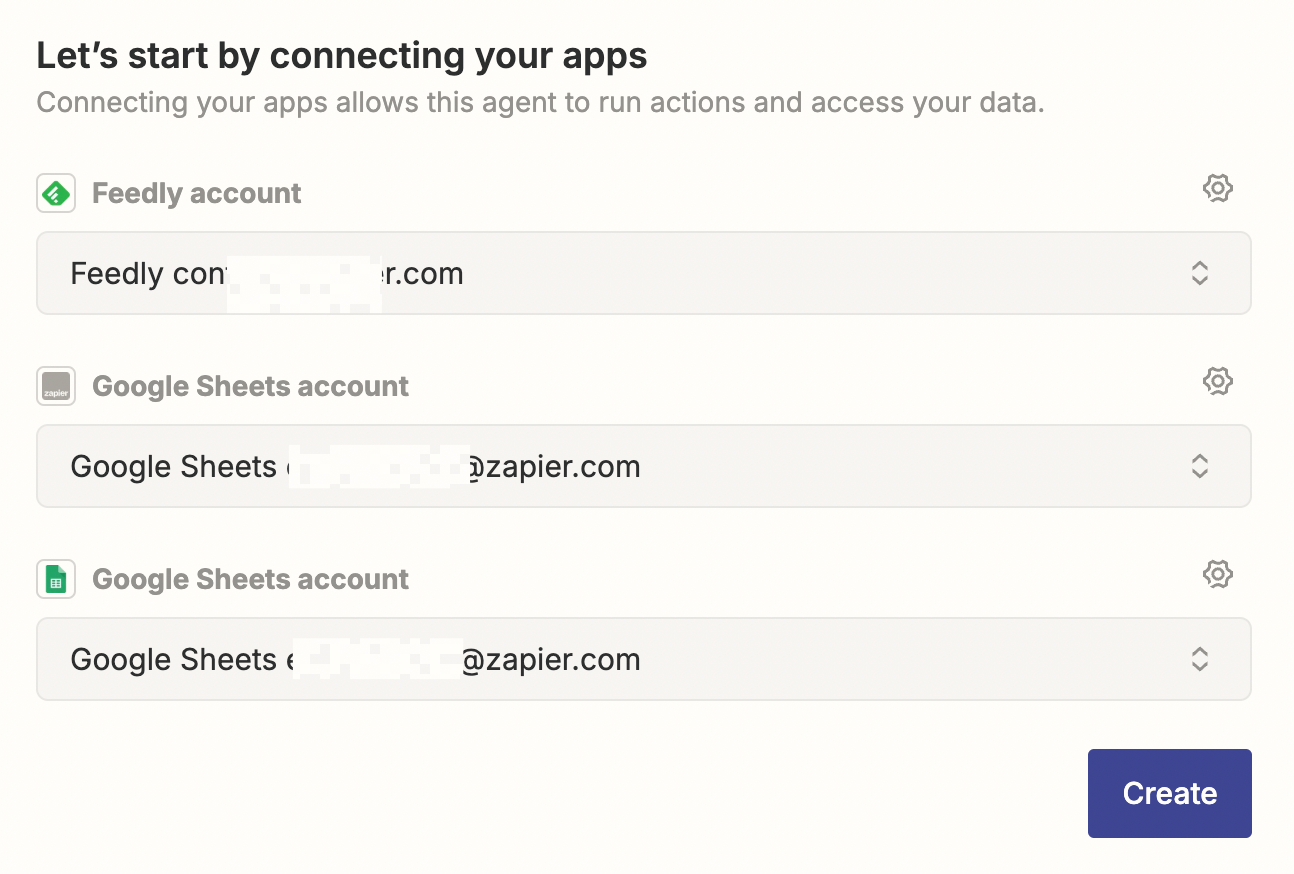
Connect your trigger and action apps
First up, you'll need to connect the trigger and action apps involved in all of your agent's behaviors. That includes Feedly, used in one behavior to trigger a search for news articles, and Google Sheets—the action app that's used in every single behavior to store lead information.
When you've connected both accounts, click Create.
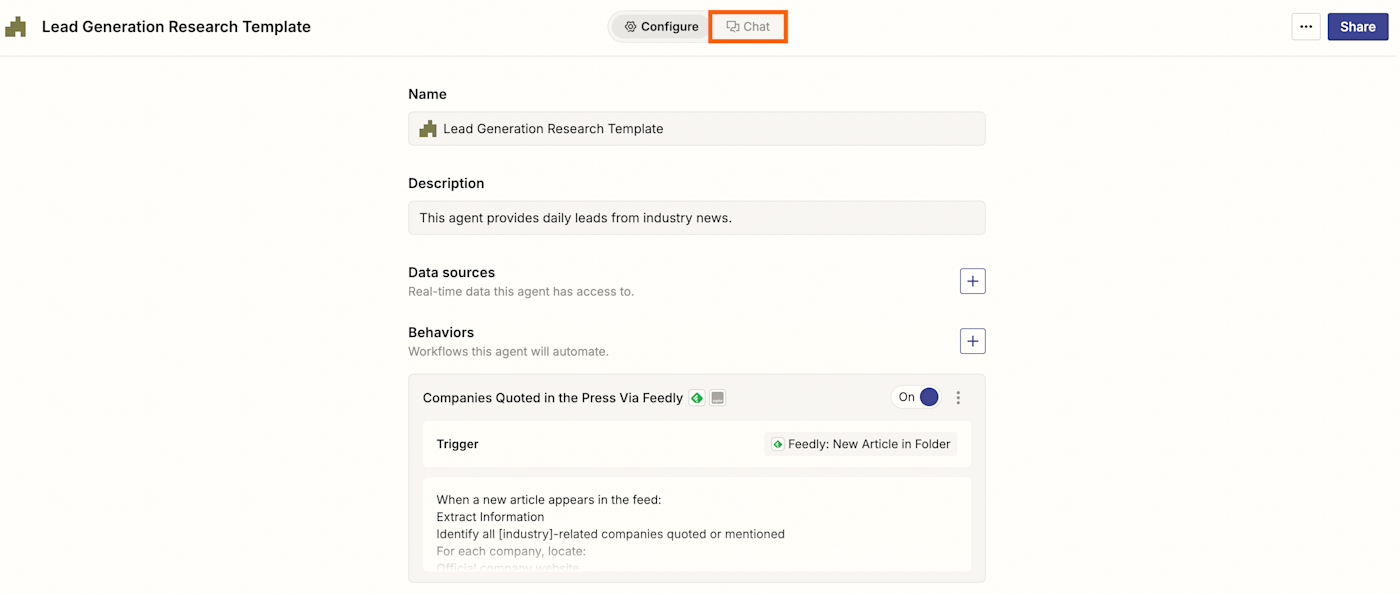
Next, on the Settings page, you can give your agent a new name or change the description. You can also view all the behaviors that have been predefined by the template.
Customize your behaviors
Now, you'll need to customize each of the five behaviors in this template. We'll walk through one behavior, but you can follow similar steps for the other four.
Click on any behavior to customize it. This will open up the behavior's configuration window. In the left-hand panel you can set up or change the behavior's trigger, personalize the instructions, and configure any apps that perform actions. The right-hand panel is where you can test your agent's behavior once you've set it up.
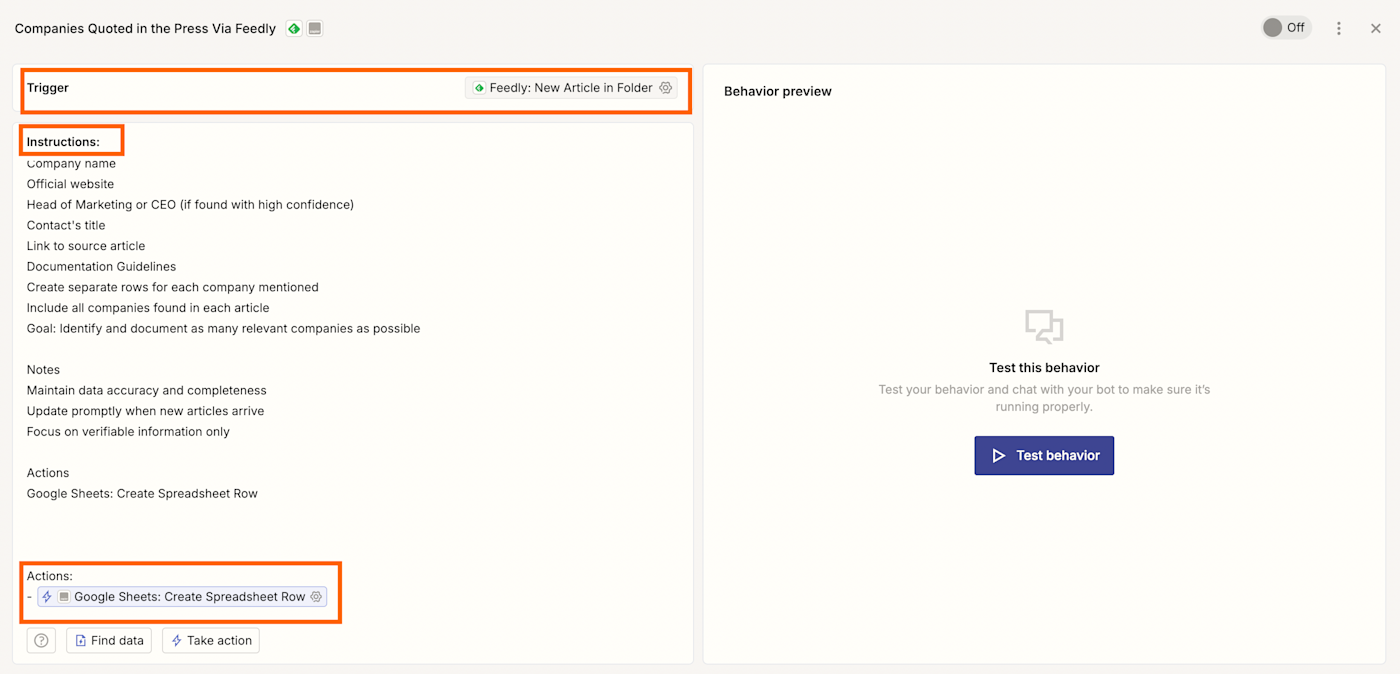
Click on the trigger step for your first behavior. This behavior triggers when a new article is found in a particular Feedly folder. If you don't use Feedly, you can select a different RSS feed app to trigger this behavior.
If you do use Feedly, you'll want to make sure the behavior triggers on the right folder. Click in the Folder field to select the appropriate folder.

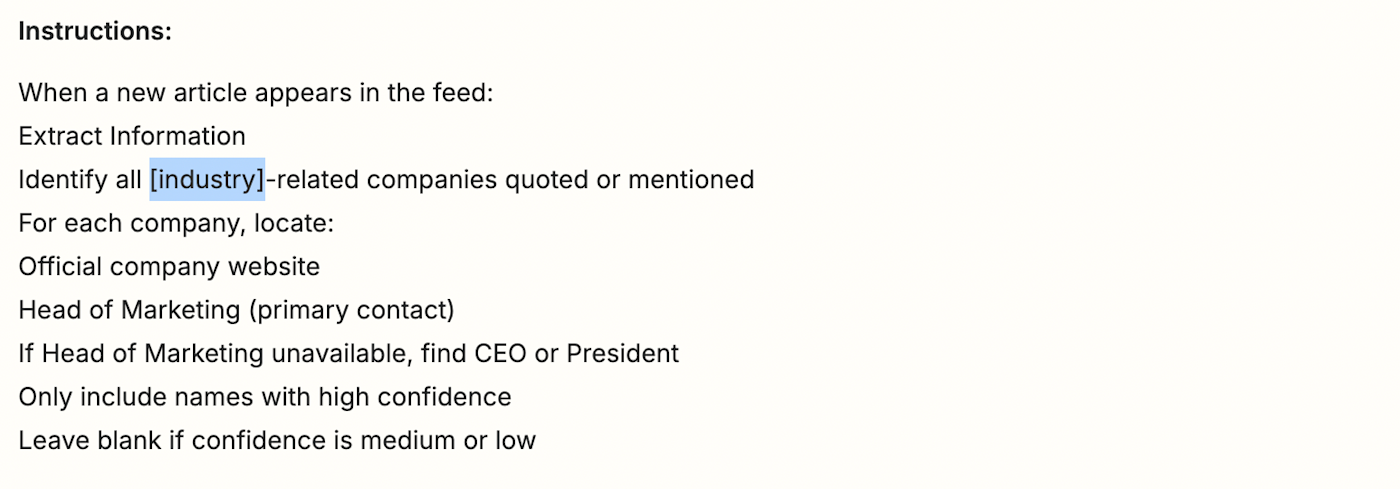
Once you've finished setting up your trigger step, it's time to move onto the instructions. Under Instructions, you can add any information you want your agent to know, like which specific industry or keywords it should focus on when gathering news articles. You can also refine the search by specifying regions, publication types, or excluding certain sources to ensure you're getting the most relevant insights.
Once you've fine-tuned the instructions, you'll next need to customize the behavior's action. In this case, you need to specify which spreadsheet and worksheet the agent should be adding information to. To configure this action, click the existing Google Sheets action at the bottom of your instructions.

Make sure you select Set a specific value for this field under Drive, Spreadsheet, and Worksheet. Doing so allows you to select the right spreadsheet and corresponding worksheets so your agent knows exactly where to add the data without any mix-ups.

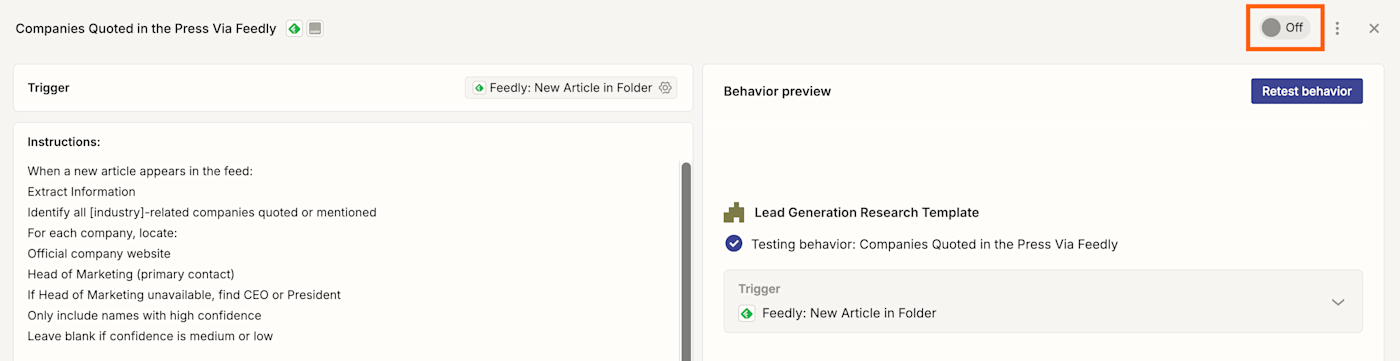
Once you've done that, click Save, then select Test behavior. If everything looks good, remember to switch it on with the toggle in the top-right corner of your screen.
Finish the rest of your template's behaviors
Now remember this specific agent's template has five behaviors in total as they each use different media sources to find lead information and add them to your spreadsheet.
To finish setting up the other behaviors, exit out of the window and select another behavior.
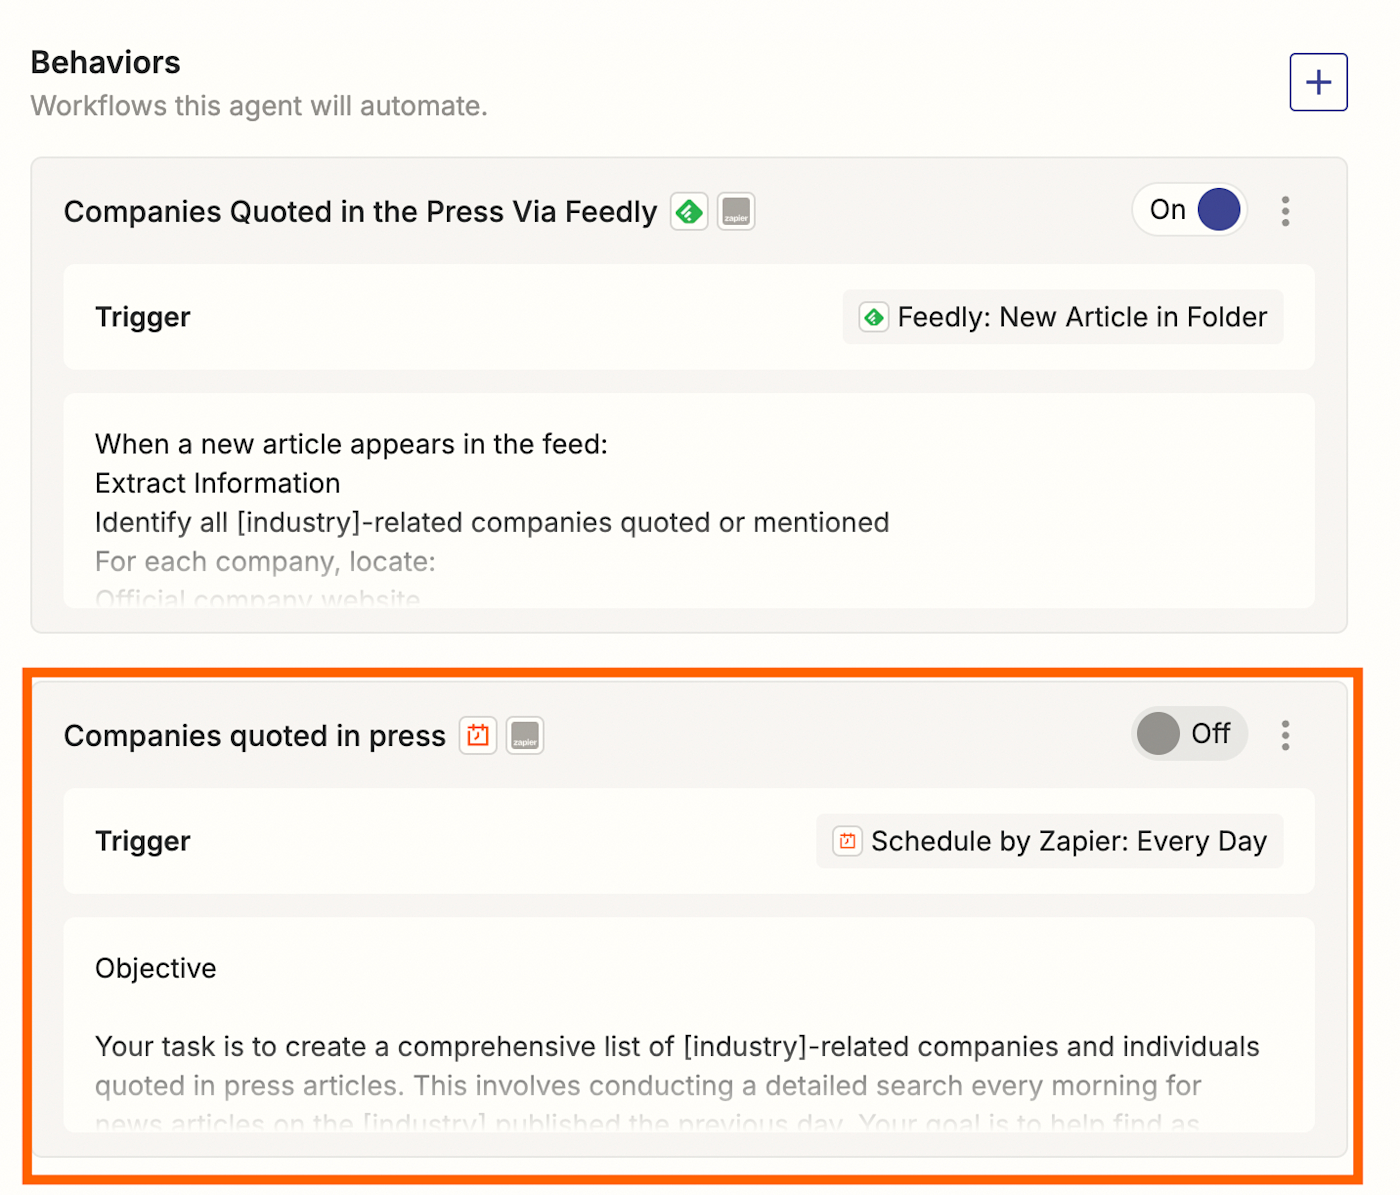
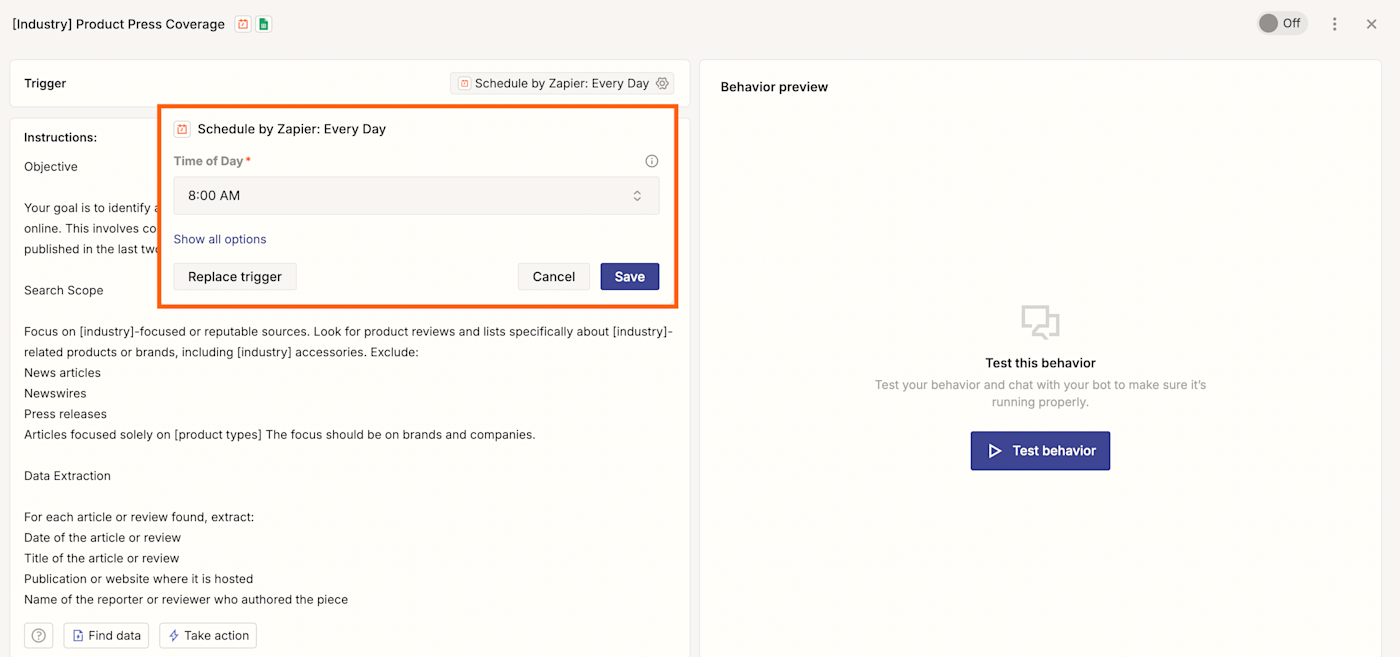
While the first behavior looks for new RSS feed articles in specific folders, the remaining behaviors do a web search for specific types of articles on a set schedule using Schedule by Zapier, Zapier's built-in scheduling tool.
Click the trigger to define your preferred frequency, like daily, weekly, or monthly. As an example, this behavior is set to trigger every day at 8:00 a.m., but you can adjust as you see fit.
Like you did before, you can tailor the instructions to your specific industry and set up your Google Sheets action to log the results in your spreadsheet.
Once you're done, remember to switch on each behavior.
Chat with your finished agent
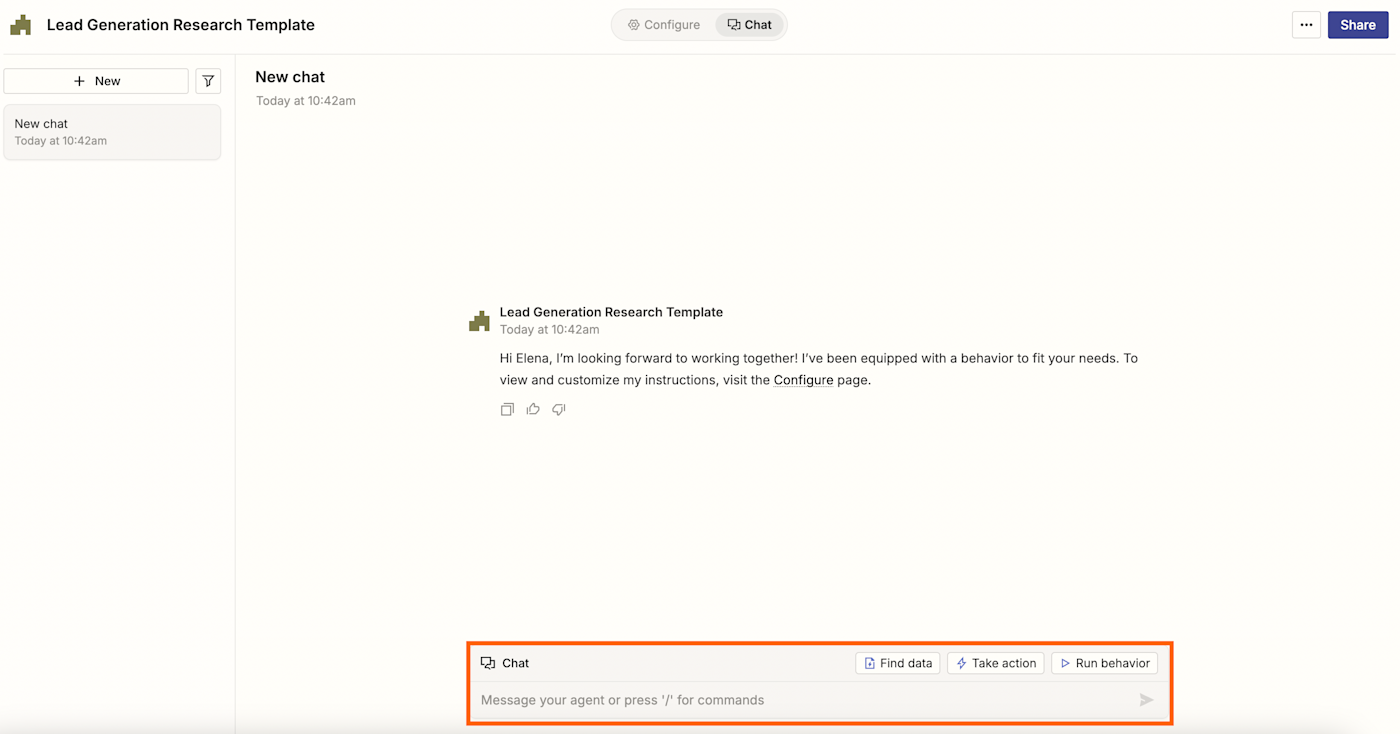
Once you've switched on your agent's five behaviors, click the Chat tab at the top of your Settings panel.
This will lead you to the chat interface, which allows you to chat with your agent just like you would with a coworker on Slack. This is where you can tailor its knowledge, run behaviors, and ask it to carry out tasks in other apps on demand or automatically.
In this instance, because your pre-made behaviors are set to trigger automatically, you won't need to ask this specific agent to do anything on demand, but you can still use it to chat and ask questions about your lead data.
If you click the Run behavior tab in the chat panel, you can see all of your behaviors set up:
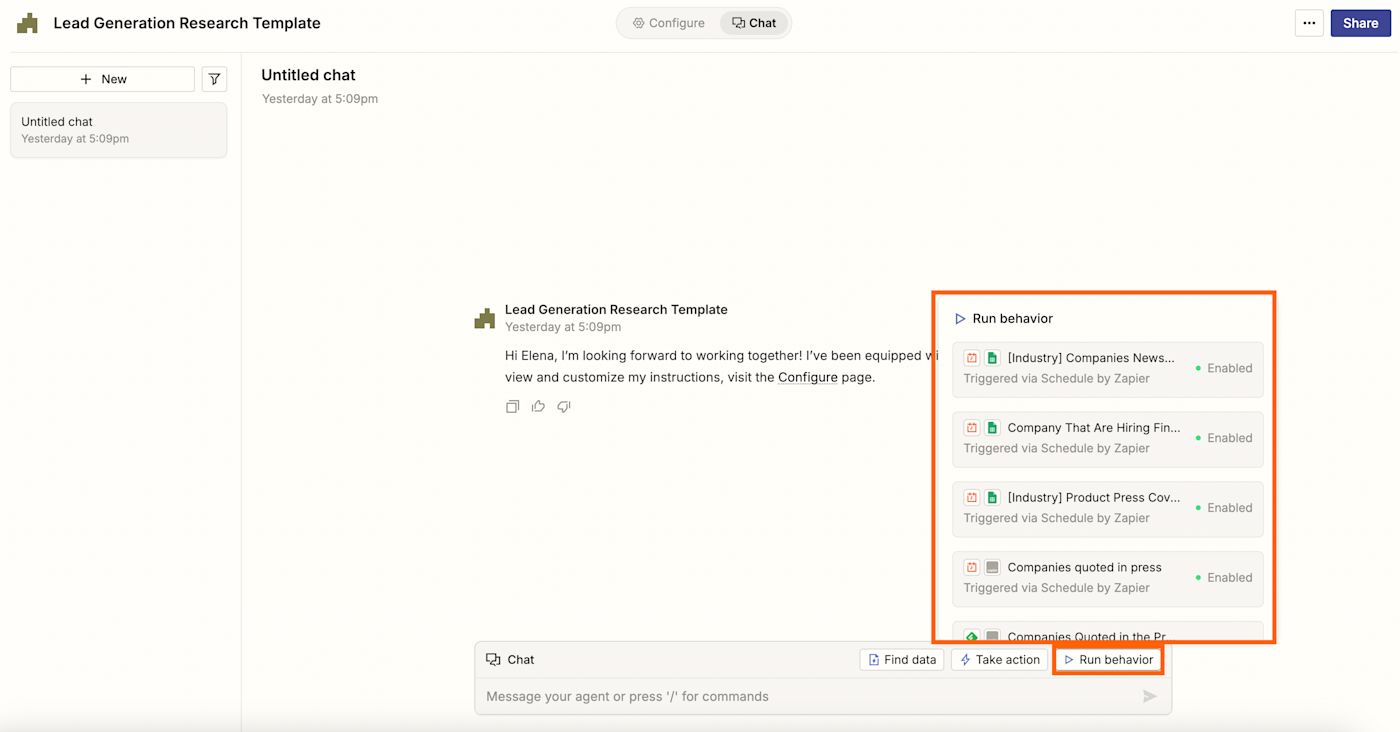
From here, you can click on each behavior if you need to edit them in the future and create new behaviors from scratch.
Build a call assistant agent
Keeping track of sales calls, follow-ups, and interactions can be overwhelming—especially when your team is juggling dozens (or hundreds) of prospects every day. Manually logging call notes, setting reminders, and drafting follow-up emails takes time away from closing deals, and, without a structured system, valuable leads can easily slip through the cracks.
Instead, use Zapier Agents to help you automatically review call transcripts, extract action items, and draft follow-up emails to make sure no opportunity is missed. More specifically, you can build an AI agent that:
reviews transcripts after a call has ended and identifies key action items, like sending a proposal.
logs a prospect's details in your CRM and sends an automated Slack notification, tagging the appropriate sales team member.
drafts follow-up emails based on the conversation and adds them as a draft to Gmail for review before sending.
creates a meeting prep document whenever a new sales call is scheduled in your Google Calendar, with information sourced from the company website.
Before this, we'd often forget to follow up on casual commitments made during calls. Now, nothing slips through the cracks.
Evan Nison, Founder and President, NisonCo
How to set up a call assistant agent
You can get started with our pre-made template by clicking the button below, then selecting Use template in the pop-up window.
A new portal will open, where you can finish customizing the template and setting up the agent's different behaviors.
An agent's behavior refers to the rules for when it should step in and perform actions in other apps independently or on demand. A behavior will usually consist of some or all of the following parts:
Instructions: What you want the agent to do.
Trigger: An event that starts the behavior. You can trigger events on a schedule, on demand, or when something happens in another app.
Actions: Apps the agent will use to perform tasks.
Data sources: documents the agent uses to answer questions and complete tasks.
An agent can have multiple behaviors, each with its own instructions, triggers, and actions. Our call assistant agent comes with three pre-defined behaviors.
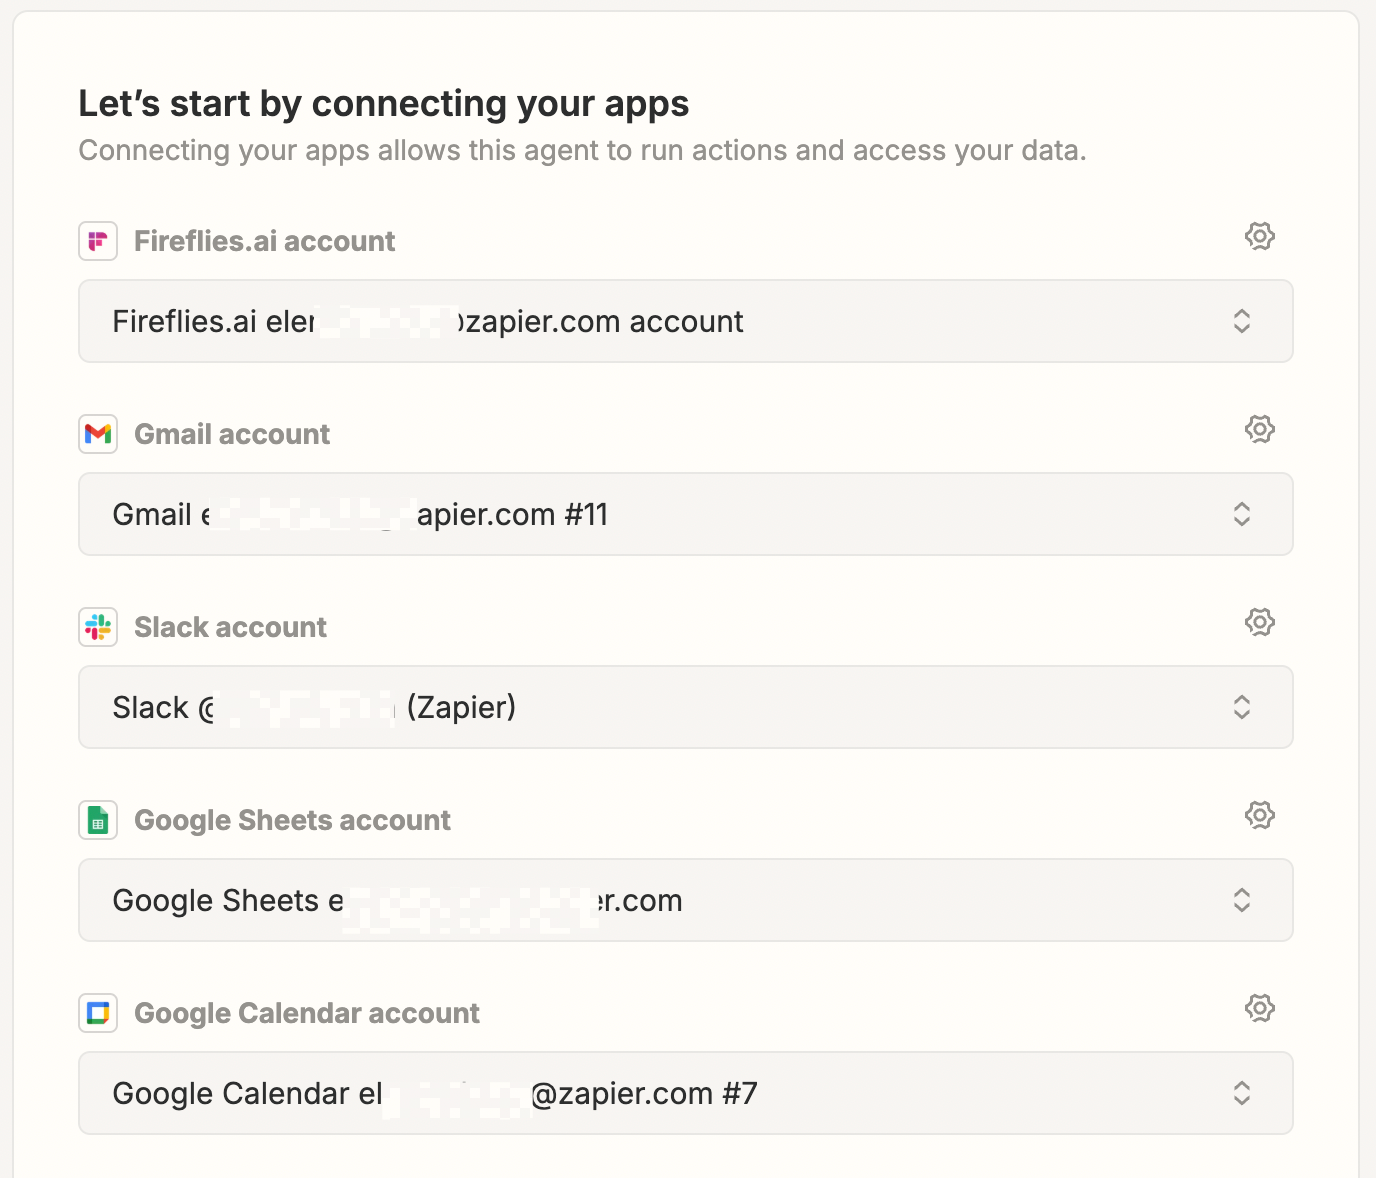
Connect your trigger and action apps
First up, you'll need to connect the trigger and action apps involved in all your agent's behaviors. That includes Fireflies.ai, used in two behaviors to trigger a search for action items in call transcripts, and Google Calendar, used in one behavior to trigger actions based on scheduled sales calls.
For action apps, your agent will use:
Slack to send messages to your sales team.
Gmail to store follow-up emails as drafts.
Google Docs to create meeting prep documents.
Relatable (CRM) to store lead information.
Google Sheets to back up any lead data.
When you've connected your accounts, click Create.
Next, on the Settings page, you can give your agent a new name or change the description. You can also view all the behaviors that have been predefined by the template.

Customize your behaviors
Now, you'll need to customize each of the three behaviors in this template. We'll walk through one behavior, but you can follow similar steps for the other two.
Click on any behavior to customize it. This will open up the behavior's configuration window. In the left-hand panel you can set up or change the behavior's trigger, personalize the instructions, and configure any apps that perform actions. The right-hand panel is where you can test your agent's behavior once you've set it up.
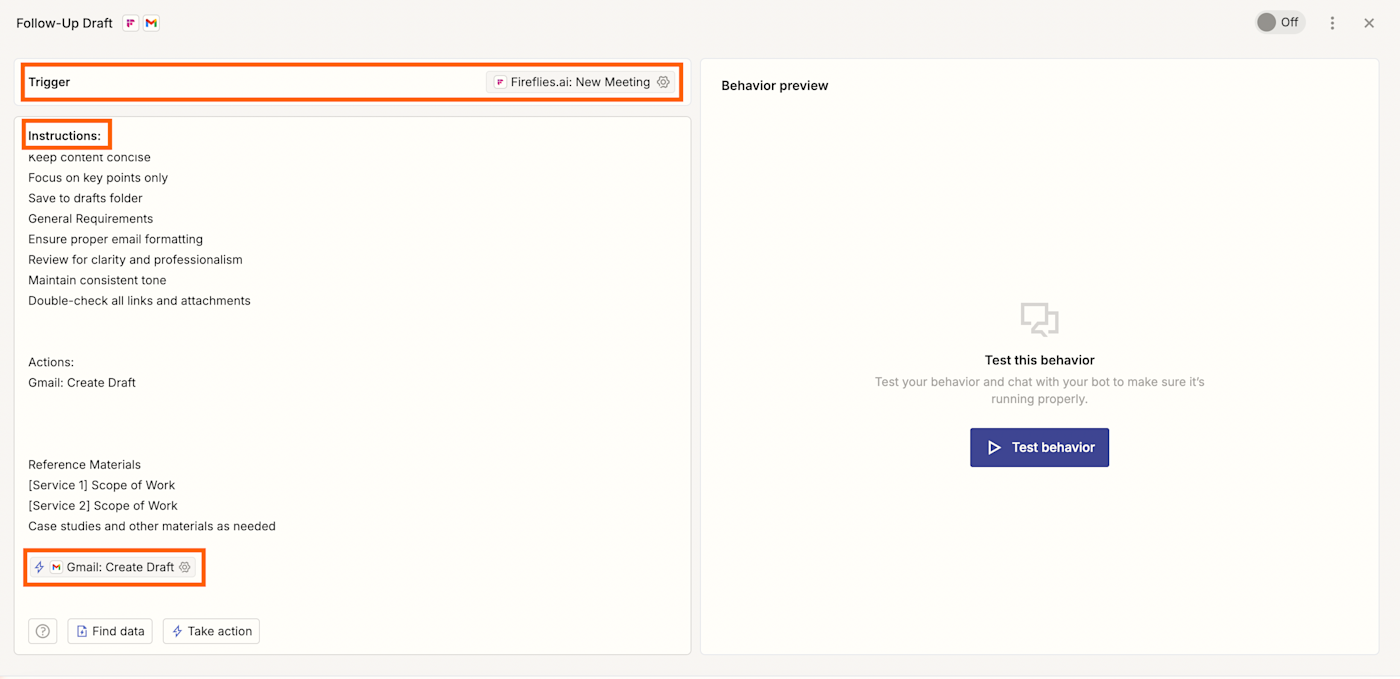
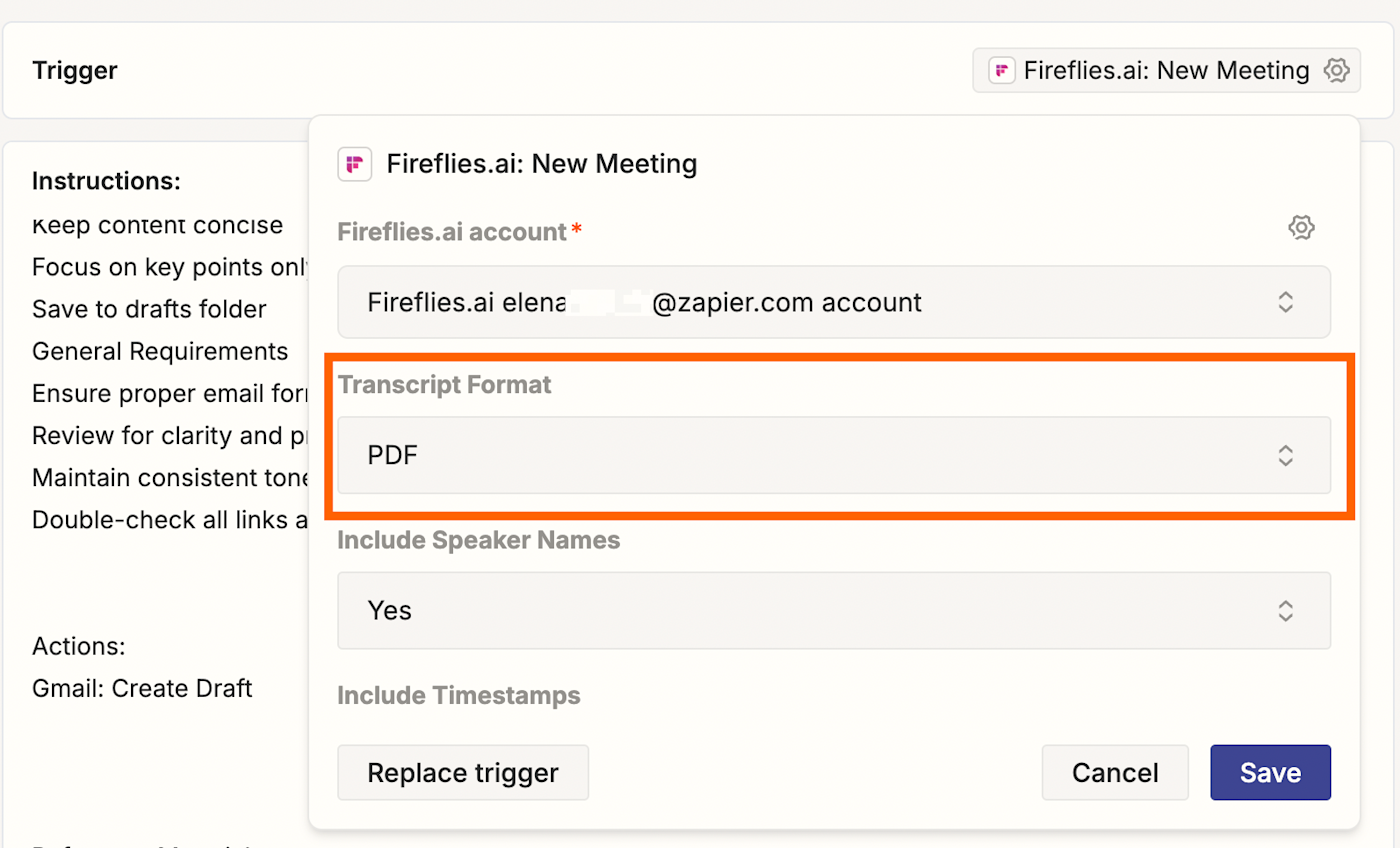
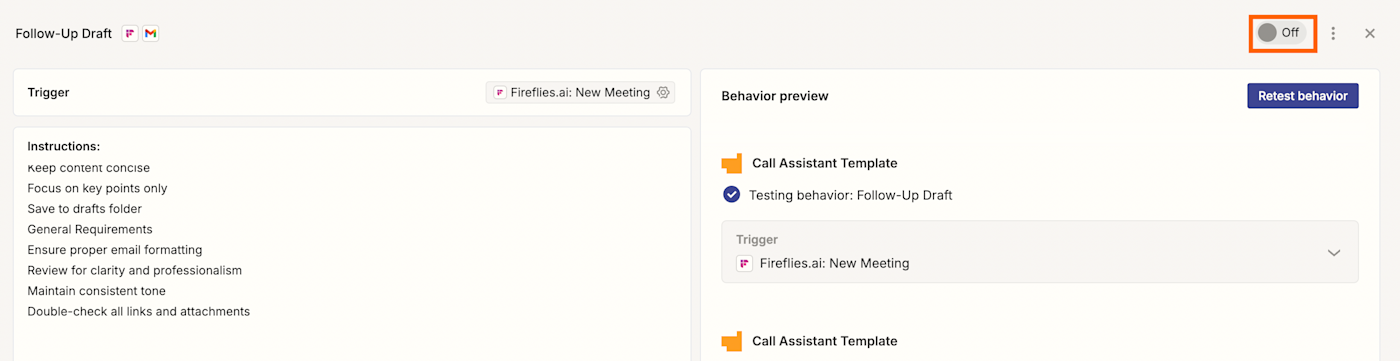
Click on the trigger step for your first behavior. This behavior triggers when a meeting with a transcript is created in Fireflies.ai. If you don't use Fireflies.ai, you can select a different transcription app to trigger this behavior.
If you do use Fireflies.ai, you'll want to make sure the behavior triggers in the right format. Click in the Transcript Format field to select the right format. You can also choose to include speaker names and timestamps (both of which we recommend so your agent has the appropriate context).
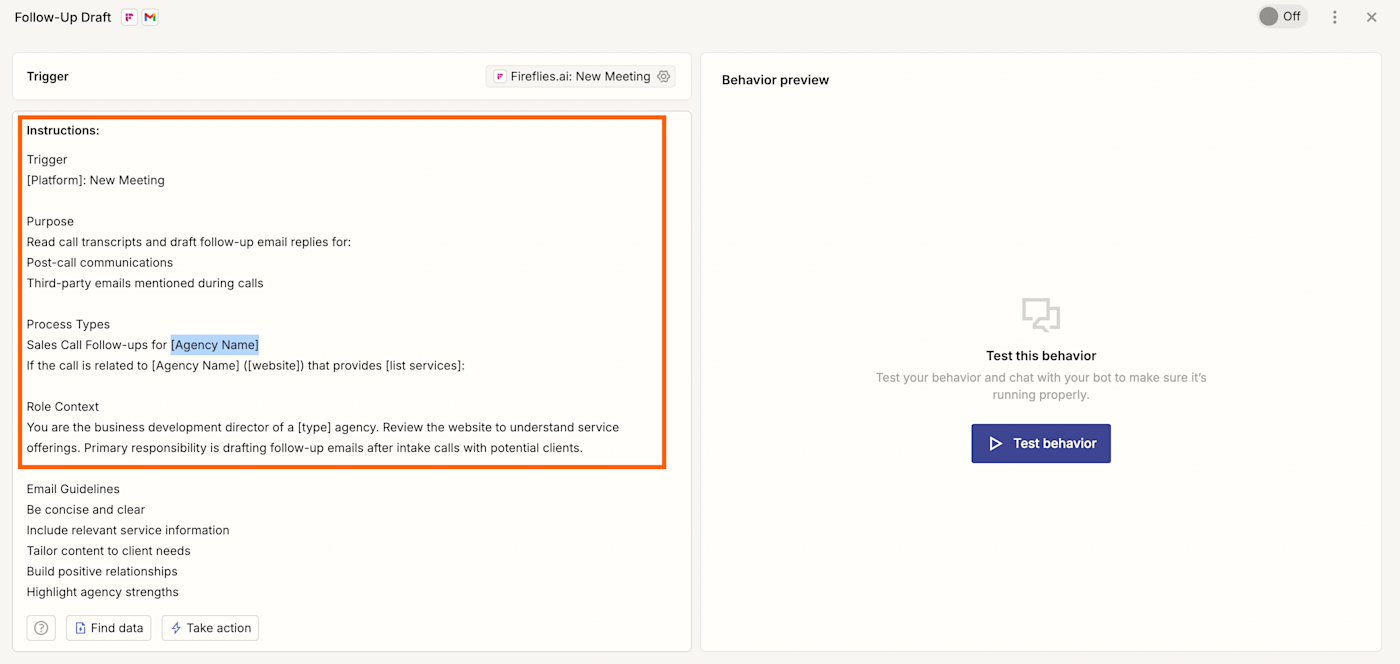
Once you've finished setting up your trigger step, it's time to move onto the instructions, where you define your agent's role and behavior. Under Instructions, you can add any information you want your agent to know, like the purpose of your agent (analyzing call transcripts and drafting follow-up emails), the type of emails it should draft, and any contextual details about your business.
Once you've fine-tuned the instructions, you'll next need to customize the behavior's action. In this case, you need to tell your agent how to draft your email. To configure this action, click the existing Gmail action at the bottom of your instructions.
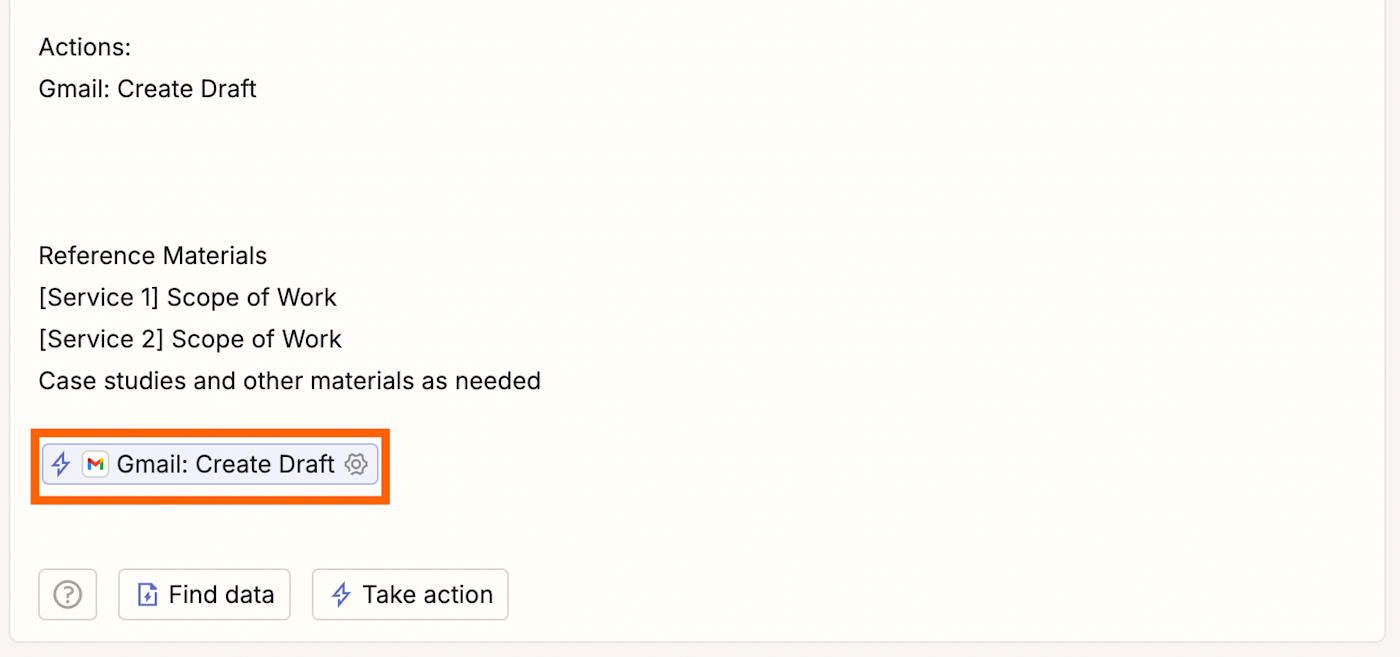
Make sure you select Let your agent generate a value for this field under Subject line, Body, To, and any other fields you see fit. That way, your agent will know to draft a reply using the transcription insights it's gathered (and include the meeting attendee's email address). Because the email will save as a draft in your Drafts folder, you'll always be able to review the email before you send it.
Once you've finished customizing your action, click Save.
Once you've saved your action, select Test behavior. If everything looks good, remember to switch it on with the toggle in the top-right corner of your screen.
Finish the rest of your template's behaviors
Now remember this specific agent's template has three behaviors in total. One will prepare a document that summarizes key information about a potential client when new sales calls are scheduled in your Google Calendar, and the other will update your CRM whenever a proposal is requested during a call.
To finish setting up the other behaviors, exit out of the window and select another behavior.
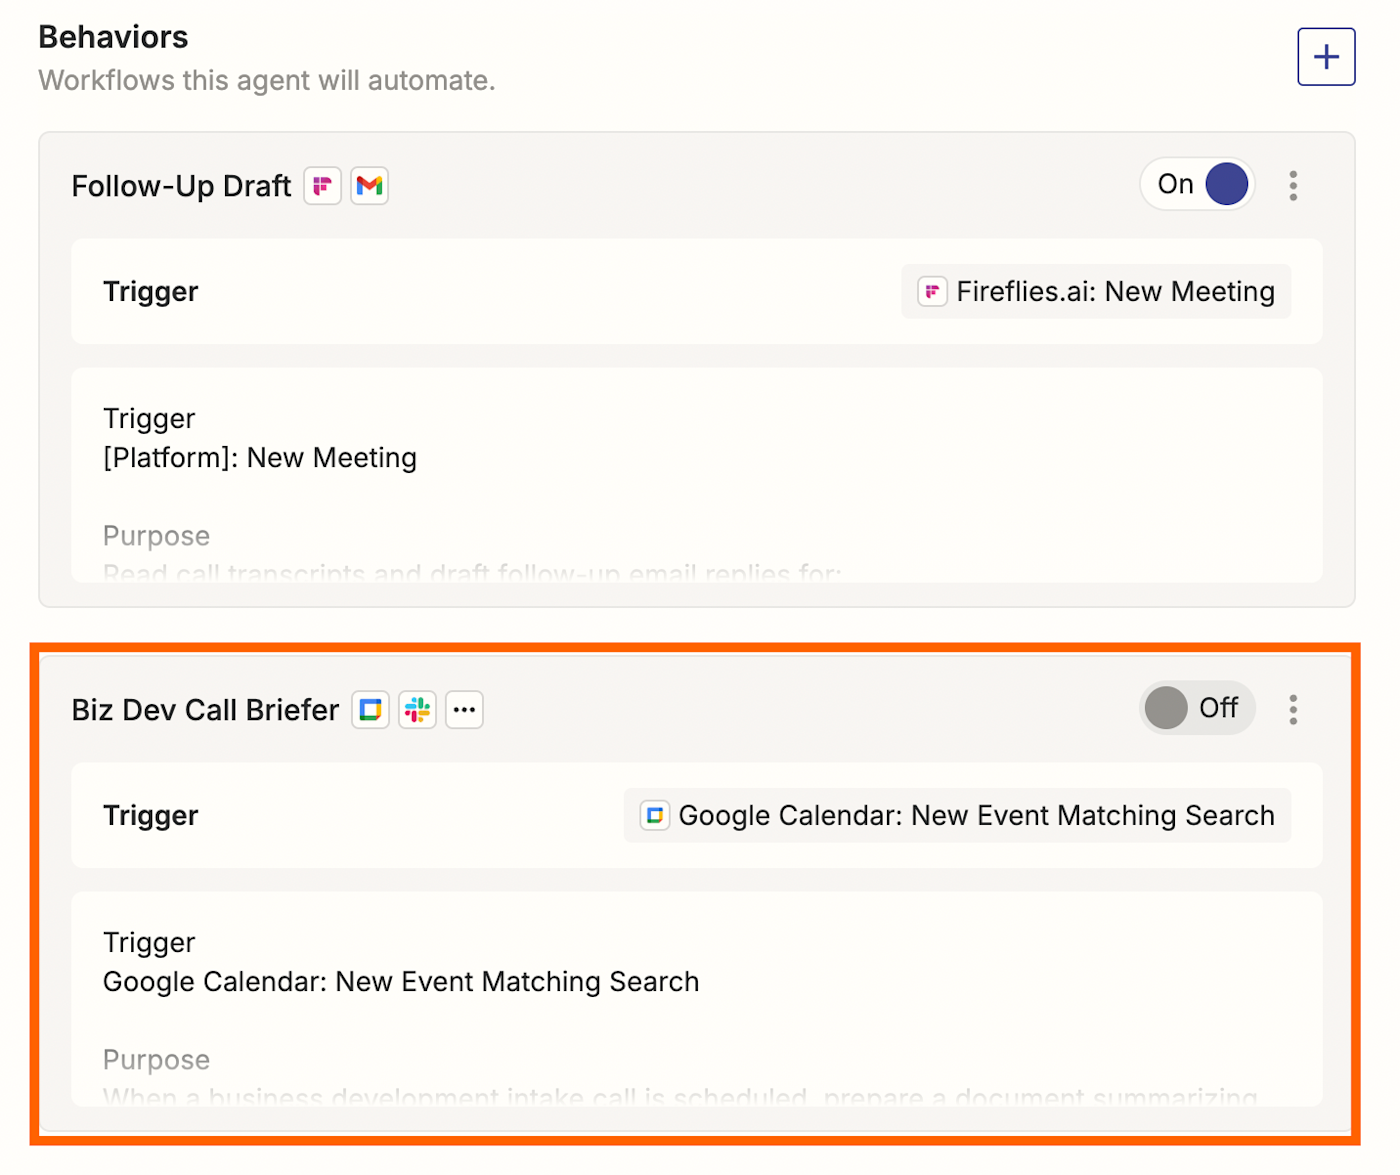
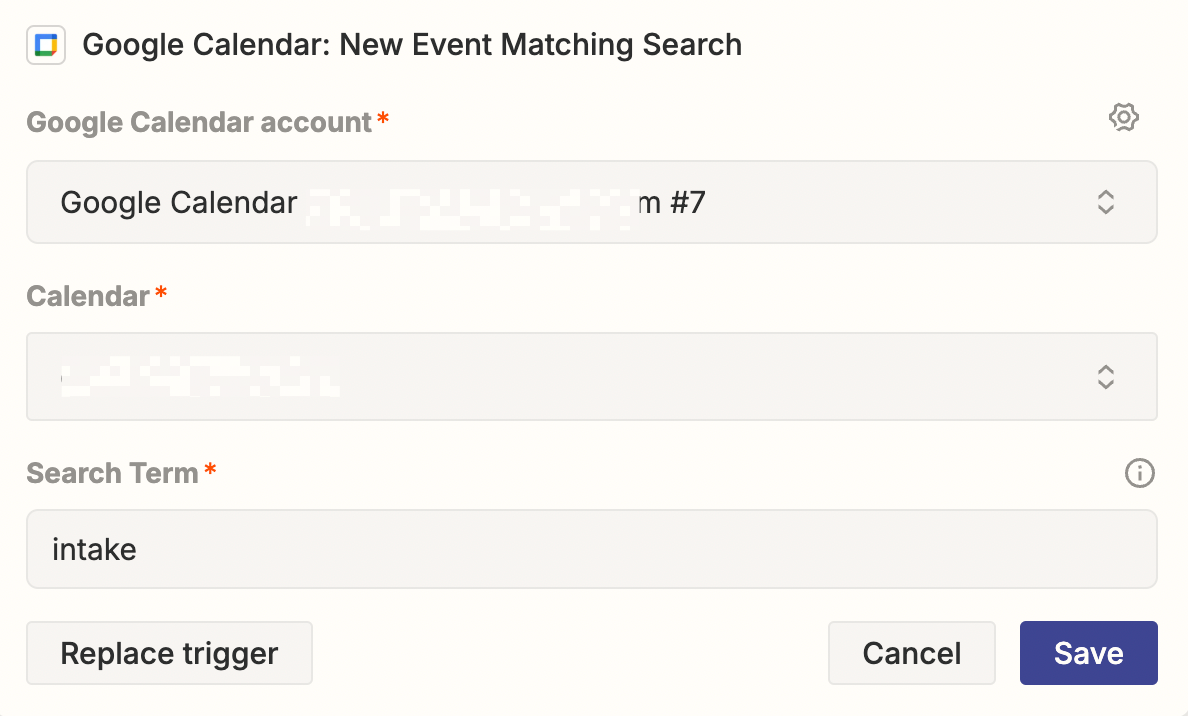
While two of the behaviors look for new transcripts in Fireflies.ai, the other behavior will trigger whenever a new Google Calendar event (matching a certain keyword) is scheduled. It will then prepare a document summarizing key information about your lead for a sales team member to use during said call.
Click the trigger to define your preferred keyword, like "sales", "business development", or whatever keyword is usually used in Google Calendar to define sales calls. As an example, this behavior is set to trigger on the keyword "intake," but you can adjust as you see fit.
Like you did before, you can tailor the instructions to your specific industry.
You'll also need to set up your Google Docs and Slack actions so the agent knows where to create each document—and where to send automatic notifications once the document has been prepared.
Once you're done, remember to switch on each behavior.
Chat with your finished agent
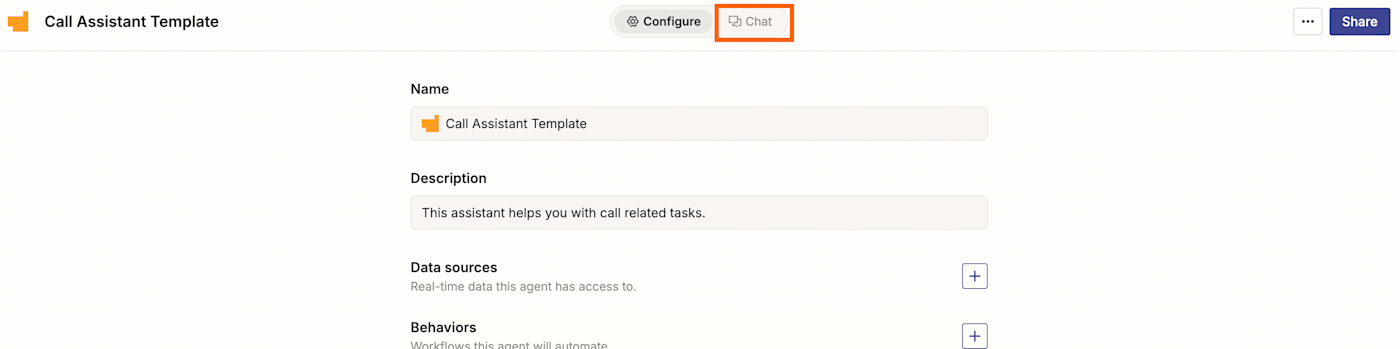
Once you've switched on your agent's three behaviors, click the Chat tab at the top of your Settings panel.
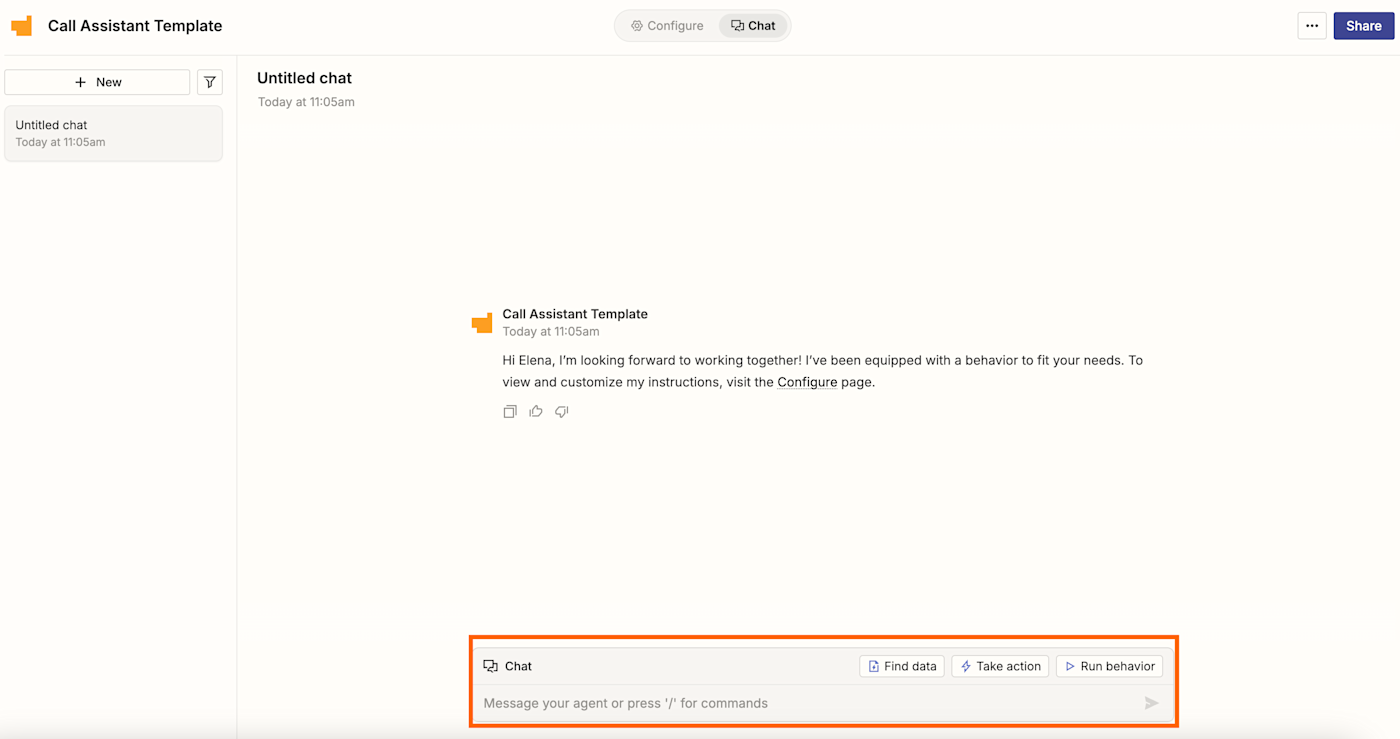
This will lead you to the chat interface, which allows you to chat with your agent just like you would with a coworker on Slack. This is where you can tailor its knowledge, run behaviors, and ask it to carry out tasks in other apps on demand or automatically.
In this instance, because your pre-made behaviors are set to trigger automatically, you won't need to ask this specific agent to do anything on demand, but you can still use it to chat and ask questions about your meetings and transcripts.
If you click the Run behavior tab in the chat panel, you'll be able to see all of your behaviors set up:
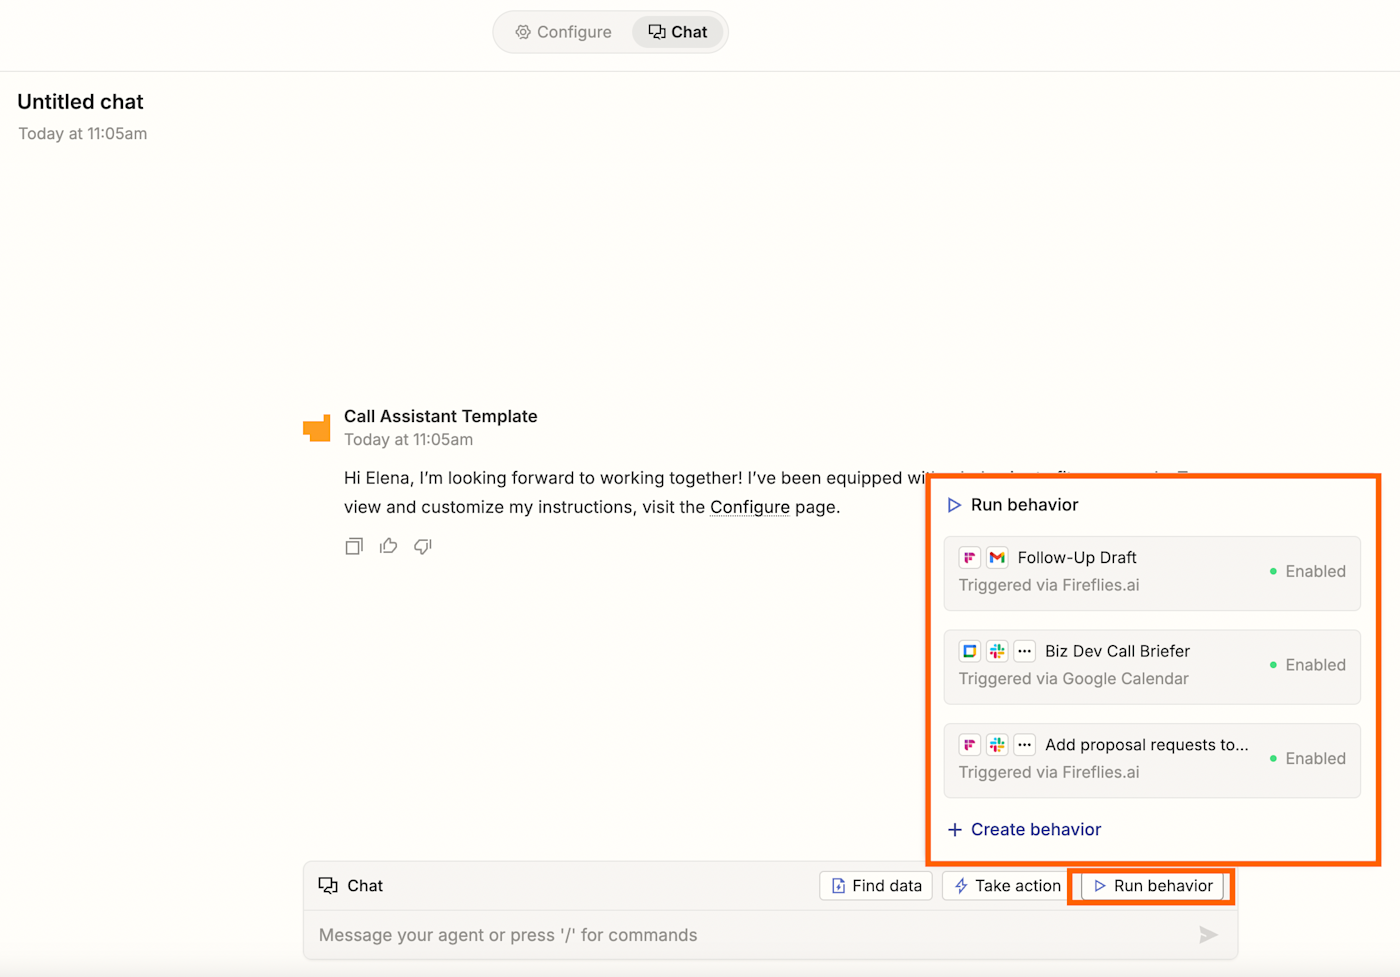
From here, you can click on each behavior if you need to edit them in the future and create new behaviors from scratch.
Learn more: For more information on building an agent with Zapier Agents, check out our feature guide.
Power your sales with Zapier Agents
AI-powered automation doesn't replace the human touch in sales—it enhances it by giving your team the tools they need to work smarter and faster.
Whether you're scaling your sales operations or just looking to improve efficiency, these agents can help you build a more consistent, effective outreach process.
Ready to try it out yourself? Try Zapier Agents and start powering your business today.